
Updated: December 9th, 2019. This recipe installs a Cookie Consent Notification provided by OneTrust (you’ll need to paste your own code there, though) and sets up triggers that respect visitor’s consent and cookie preferences.
It is highly recommended that you read this guide which explains how to create a OneTrust Cookie Banner, set it up and successfully integrate into your current Google Tag Manager stack.
This recipe is for the cookie banner, triggers, and variables only. It does not send data to Google Analytics. Also, it does not automatically adapt to your current GTM setup. After you import everything, you’ll still need to manually update your current tags and their firing conditions. Follow the instructions given on this page.
INSTRUCTIONS
- Create a free OneTrust account. It might take up to 48 hours to get it, so register as soon as possible. Here’s a form that you need to submit and after a while, you’ll get an email with the confirmation link.
- Download Container File
Download the container JSON file (right-click on the link and click “Save Link As” or “Save Target As” to save the JSON file to your computer). - Import JSON File into GTM
Log into your own Google Tag Manager container and head to the Admin section of the site. Under Container options, select Import Container. Read this blog post for more details about importing a container file. - Set up cookie consent notification, publish changes.
Read the first half of this guide for step-by-step instructions. - Get the Production CDN code from OneTrust and copy two parts from it: script URL (src) and data-domain-script parameter.

 and paste them to the cHTML – Cookie Consent tag (by replacing {{REPLACE THIS URL}} and {{REPLACE THIS VALUE}} found in the imported tag).


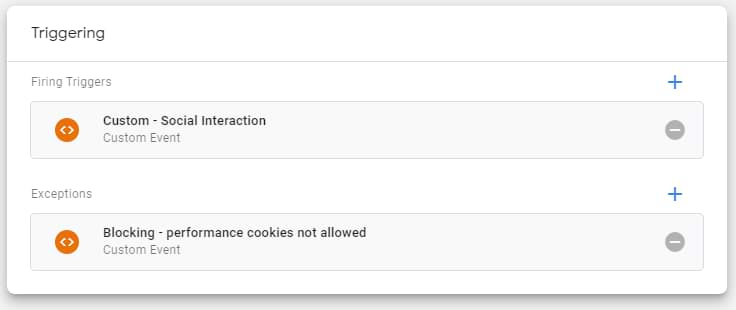
- Update all your tracking tags (which deal with personal data) in Google Tag Manager by adding one of 4 blocking triggers to them as an exception. This needs to be done with every single tracking tag (that deals with personal information), including Google Analytics Pageview, Google Ads Conversion Tag, etc. ).

 If a tag is related to analytics (e.g. Google Analytics Event tag) then assign Blocking – Analytics Tracking is Not Allowed trigger as an exception. In the case of Google Ads tag, use Blocking – Marketing Cookies are Not Allowed trigger. You get the idea, right?
Here’s how an updated tag triggering could look like of a Universal Analytics event tag:

- Additionally, update all those tags that fire upon Pageview, DOM ready, or Window Loaded Events. The important part of this new cookie consent is to hold tracking tags until a visitor gives consent to be tracked. Therefore, GA, FB pixel, and other pageview-based tags must be “on hold” as well. Consequently, standard All Pages, DOM Ready, and Window Loaded trigger becomes irrelevant here.Firstly, you need to remove all Pageview, DOM Ready, and Window Loaded triggers from your current tags as they do not respect visitor’s consent. Instead, you need to add the Custom – OneTrustLoaded. This means that your pageview-based tags will usually fire between the DOM Ready and Window Loaded.If you had a certain tag that fired on Pageview (but on a specific page), you will need to create a new Custom – OneTrustLoaded trigger with an additional condition, for example:


The expected result: Universal Analytics pageview, Facebook Pixel main code, and others which fire upon page load must not fire until a visitor gives the consent
- Need more information?
Read this extensive guide on how to install and configure OneTrust’s Cookie Consent Notification.
View all 30+ Google Tag Manager Recipes