
October 21, 2025
LinkedIn Conversions API with Google Tag Manager. The Guide.
Setting up the LinkedIn Conversions API with server-side Google Tag Manager isn’t as complicated as it might sound, especially if you’ve worked with the Facebook Conversions API before. The two processes are quite similar. If you’re not familiar, don’t worry, in this guide, I’ll walk you through everything you need to know to get the LinkedIn Conversions API up and running using server-side GTM.

Table of Contents
Here’s what you will learn in this article
- Two options
- Option 1
- Check the data that is sent to the server-side container
- Create LinkedIn tag
- Create conversion tags for key actions in the server-side container
- Configure conversion tag for page_view event
- Configure the conversion tag for the purchase event
- LinkedIn API access token
- Conversion Rule ID
- Create a trigger for the purchase event
- Test the conversion tag for the purchase event
- Add an ad click parameter
- Test purchase event
- Send user information
- Option 2
- Add the LinkedIn Insight tag to the web container
- Get your LinkedIn Partner ID
- Create a LinkedIn Insight tag for the page_view event
- Create a LinkedIn Insight tag for the purchase event
- Create a new conversion
- Add the Event ID
- Add trigger
- Update GA4 purchase event tag
- Test
- Add event ID to the server-side LinkedIn tag
- Final Words
Video tutorial
If you prefer video content, here’s a tutorial from our Youtube channel.
Two options
There are two main ways to set up the LinkedIn Conversions API with server-side Google Tag Manager, and we’ll cover both in this article.
Option 1: You install GTM on your website, include your GA4 tags in the container, and those tags send event data to your server. From there, your server sends that data to LinkedIn. This avoids adding extra tracking scripts to your site. Technically, GA4 is not even necessary here, you could achieve similar results with Stape’s Data Tag. But this guide is already quite lengthy, that’s why I’ll stick just with GA4.
Option 2: This setup is similar to the first, but with one key difference, which is that you also include the LinkedIn Insight Tag in your GTM container. This means the same event is sent to LinkedIn twice: once directly via the Insight Tag, and once via the server. This isn’t an issue since LinkedIn will deduplicate the events automatically so that you won’t get duplicates in your reporting.
If you’re concerned about page speed and don’t want to install another tracking code in the website GTM container, Option 1 is the way to go. But if your priority is the higher tracking accuracy, go with Option 2.
Option 1
Let’s start with a simple GTM client-side (also known as a web) container. In this container, you will need to have a Google tag that is updated to send data to the server container and a GA4 event (which also includes the server container as a parameter). In this case, we will be working with a purchase event, but the same steps apply to other events.
These tags will send data to the server-side GTM container, which just contains the GA4 tag and GA4 client. If you want to learn more about how to get started with server-side tagging and GA4, check out this video on my YouTube channel.
Check the data that is sent to the server-side container
Before setting up the LinkedIn tag, it’s a good idea to see exactly what data your web container is passing to the server-side container.
Open Preview mode for both your web container and your server GTM container.
In the web container preview, enter the URL of the page where the key event you’re tracking takes place, like a purchase, and trigger the event.
In the web container preview:
- You should see the GA4 tag fire on the Initialization event.
- You should also see a purchase event when the purchase action occurs.
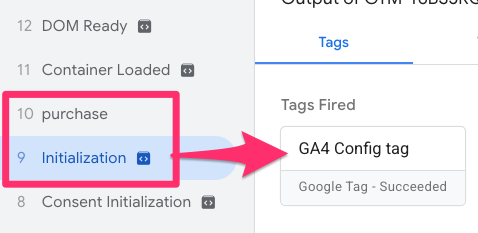
Now switch over to the server container preview:
- You’ll see incoming events such as page_view and purchase. These are the events that can be forwarded to LinkedIn via the Conversions API.
Create LinkedIn tag
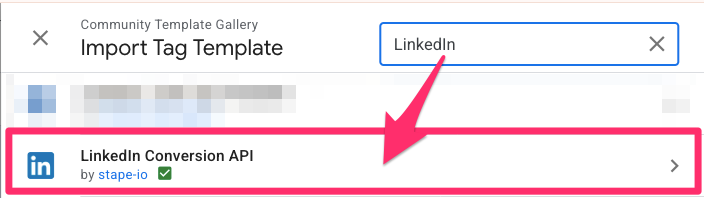
To start sending events to the LinkedIn Conversions API, you’ll first need to add a LinkedIn tag template to your server-side GTM container.
Navigate to Templates > Tag Templates, then click “Search Gallery” to find a tag template.
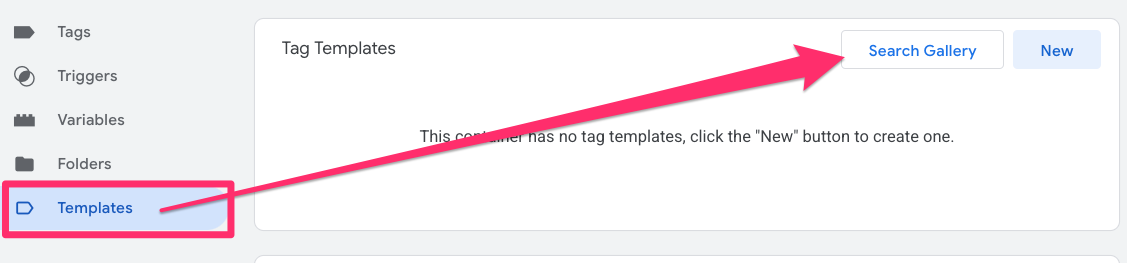
Search for “LinkedIn”, select the LinkedIn Conversion API template, and click “Add to workspace”.
Create conversion tags for key actions in the server-side container
Now that we’ve verified which events the web container is sending to the server container, it’s time to create the tags that will forward those events to LinkedIn via the Conversions API.
In this section, we’ll walk through how to set up tags for two key events: a page_view event and a purchase event.

Configure conversion tag for page_view event
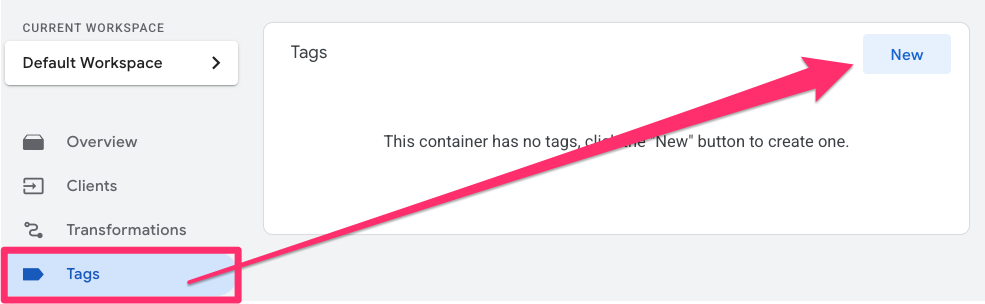
To send a basic page_view event to LinkedIn via the Conversions API, you’ll need to go to Tags and create a new tag.
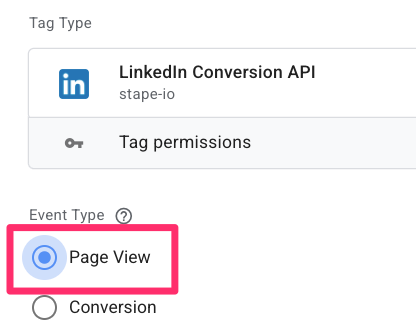
For the Tag Configuration, select the LinkedIn Conversions API tag template.

Set the Event Type to “Page View”.
Optional: If your site uses Google Consent Mode, you can configure the Consent Settings in this tag to ensure it only fires when the user has granted consent for marketing.
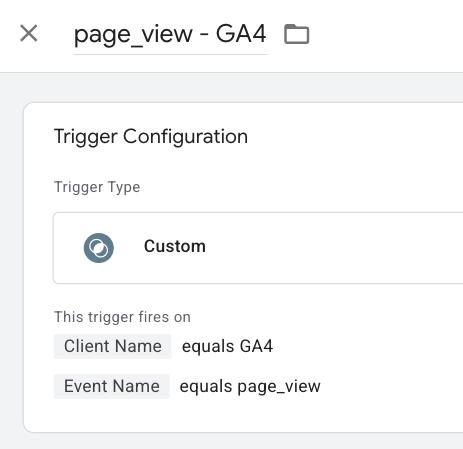
Next, we need to create a trigger to tell the tag when to fire. Click the Triggering section. When the list of triggers opens, click the “+” button to add a new trigger.

For the Trigger Configuration, choose Custom Event.
Select “Some Events”, and add the following filter conditions:
- {{Client Name}} equals “GA4”
- {{Event Name}} equals “page_view”

Name the trigger “page_view – GA4”, then click Save.
To finish it all off, name your tag “LinkedIn CAPI – page_view” and save it.
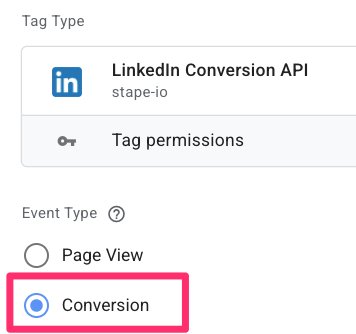
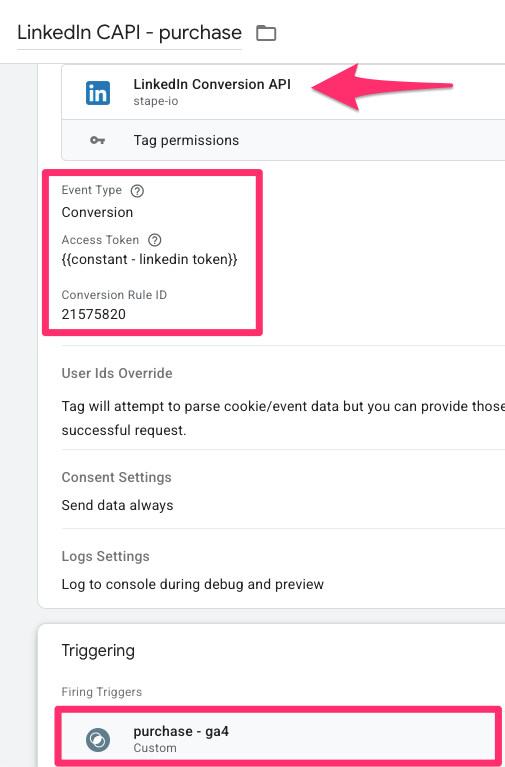
Configure the conversion tag for the purchase event
Now, we’re going to follow very similar steps to create a conversion tag for the purchase event, which is the key action we want to track for conversions.
Go to Tags > New, then click Tag Configuration and select the LinkedIn Conversions API tag template. Set the Event Type to “Conversion”.
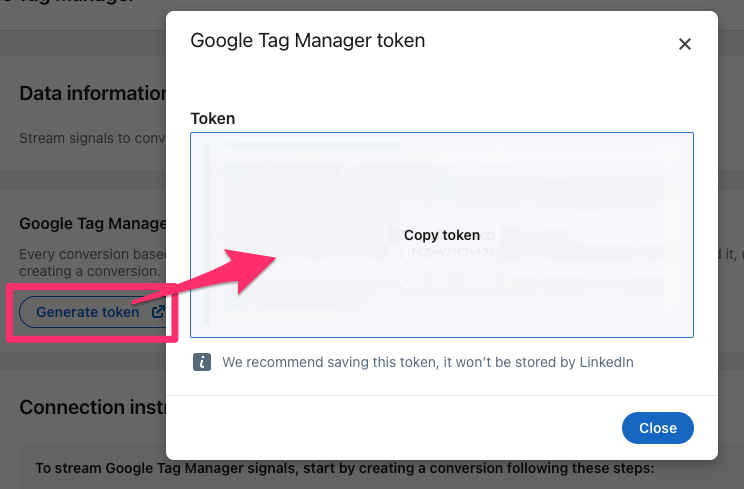
LinkedIn API access token
Next, you’ll need to provide a LinkedIn API access token for authentication. To make things easier, we’ll create a constant variable to store the token.
To get the token, go to LinkedIn Campaign Manager > Measurement > Insights > Manage Sources > Google Tag Manager. Click “Generate token” and copy the token that appears.
Back in GTM in the tag creation, click the block icon next to the Access Token field, and on the new screen, click the “+” to create a new variable.
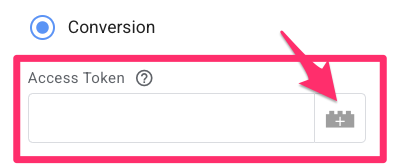
For the Variable Configuration, select Constant.
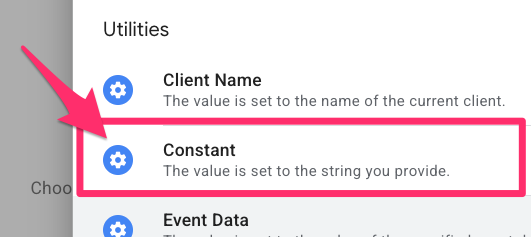
Paste in the token you generated in LinkedIn Campaign Manager and name this variable something like “constant – LinkedIn token”. Click Save and it will be automatically inserted in the tag.
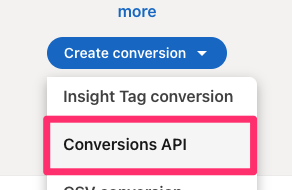
Conversion Rule ID
Next, we want to enter the conversion rule ID. To get the rule ID is a bit convoluted, so stick with me through this one. We’ll want to go back to the LinkedIn Campaign Manager > Measurement > Conversion tracking. From the drop-down, create a conversion for the Conversion API.
When the form opens on a new page, enter “Purchase” as the name of the conversion, choose the “Purchase” category and set the default value (whatever amount makes sense to you). Click “Next Step”.
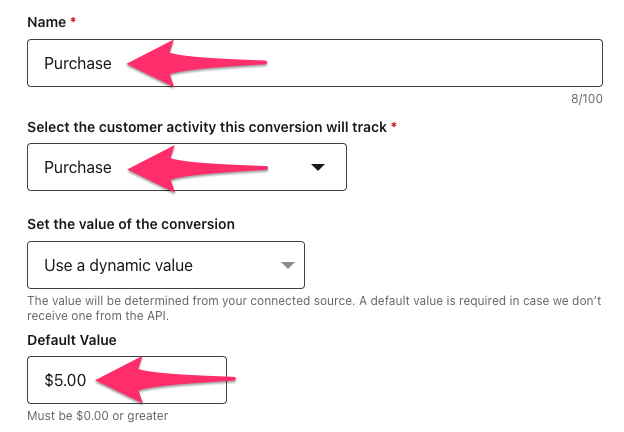
Contrary to what you may think, for the data source, we will select the Direct API to have more control (compared to choosing GTM). Then, finish the form by selecting “Next step” and then “Create”.
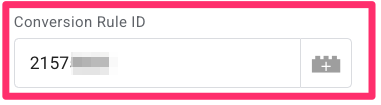
To get the conversion ID, click the Purchase conversion you just made (from the Conversion tracking list, which will be the page that opens when you complete the above form) and find the ID located in the URL after /conversion/.
![]()
![]()
Enter this conversion ID (from the URL) in the Conversion Rule ID section.
Note: If you’re using GA4’s e-commerce tracking, your data layer after a purchase should include currency, value, and other order info. When GA4 sends this to your server container, Stape’s LinkedIn tag template will automatically pick up those values, so you don’t need to set them in the tag manually.
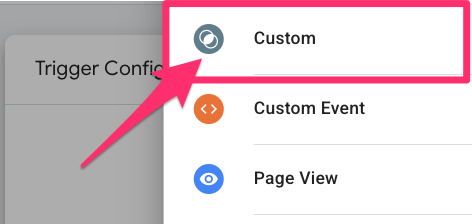
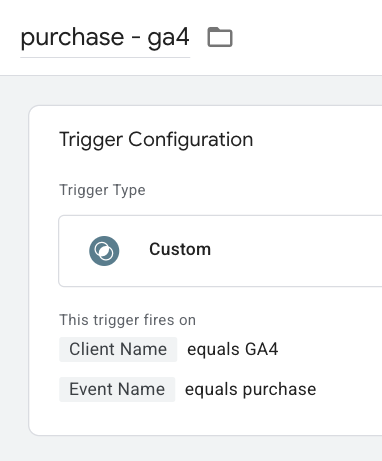
Create a trigger for the purchase event
As always, we need to make sure we tell the tag when to trigger, so we’ll create a new trigger by clicking the Triggering section and then the “+” button in the top-right corner. For the Trigger Configuration, choose “Custom”.
Select “Some Events” and set the conditions to be:
- {{Client Name}} equals “GA4”
- {{Event Name}} equals “purchase”
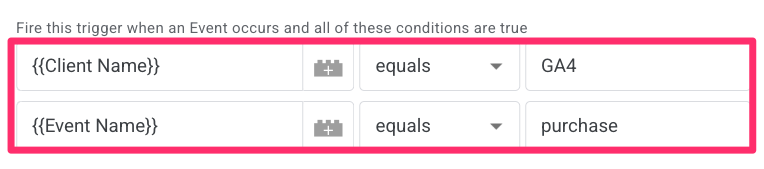
Name the trigger “purchase – GA4” and save.
The tag now has all the necessary elements, so you can name the tag “LinkedIn CAPI – purchase” and save.
Test the conversion tag for the purchase event
If you still have the preview modes open for either or both GTM containers (client-side and server-side), close them and any tabs open with your website.
Add an ad click parameter
Open a new preview mode in the web container. When prompted to enter the URL for your site, you’ll need to add an ad click parameter to your website URL to simulate what happens when a user clicks on a real LinkedIn ad. Then, open preview mode in your server container, as well.
LinkedIn uses a parameter called li_fat_id in the URL to track ad clicks. When someone lands on your site with this parameter, the LinkedIn tag in your server container sets a cookie with that ID. LinkedIn uses this cookie to attribute conversions (like purchases) back to the ad click.
This doesn’t need to be legit; you just need something in there, e.g. /?li_fat_id=1234567890 (you can enter anything after the equal sign). Once you’ve connected to your site, what happens is that we get a page_view event so that the LinkedIn conversion tag will fire, and it will create a cookie, which we’ll need later for the purchase tag.

In the Server container preview, click the most recent page_view event, go to the Request tab, and click on Incoming HTTP Request.
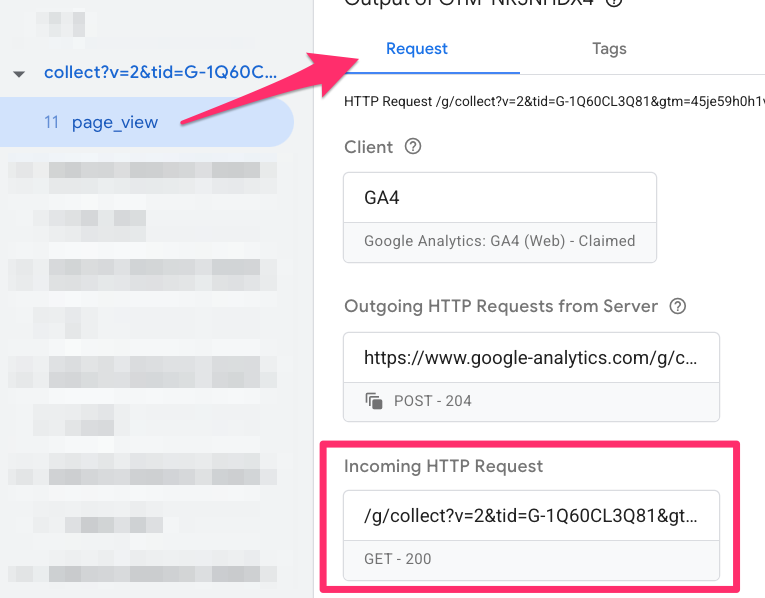
You’ll see a request is sent when the page loads with the li_fat_id in the URL. If you check the headers, you’ll notice a Set-Cookie value. This stores the LinkedIn ad click parameter (even though it’s just a placeholder in this case). LinkedIn uses this cookie to attribute conversions back to the original ad click.

Test purchase event
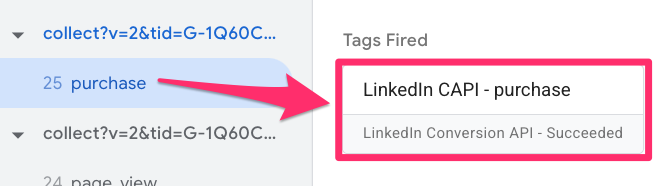
Next, go ahead and complete a test purchase on your website to verify everything is working correctly.
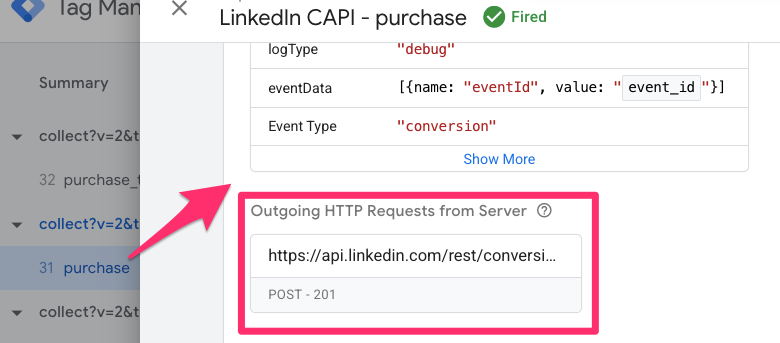
Once the purchase is complete, head back to the server container preview and check that it received the purchase event. If you’ve set everything up properly, the LinkedIn CAPI – purchase tag should fire in response to that event.
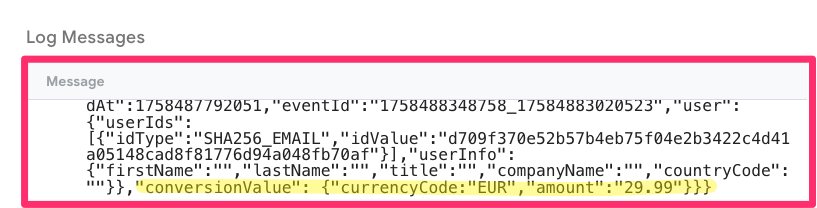
To confirm the event was successfully sent to LinkedIn, open the Console in the preview panel. Look for the ResponseStatusCode parameter. A status of 201 indicates that LinkedIn accepted the request without any issues.

You’ll also see the payload that is sent to LinkedIn. This should include details like the currency code and the total order amount, which are automatically pulled from your GA4 event data (assuming you’ve configured your e-commerce tracking correctly).
Send user information
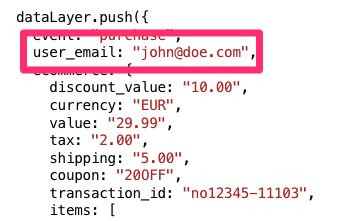
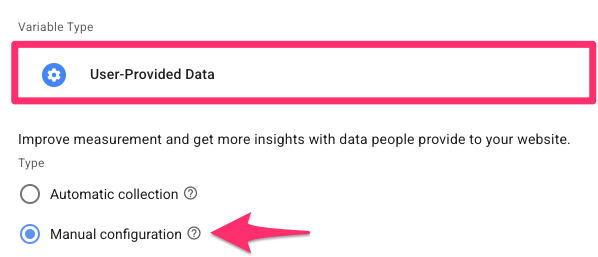
If you want to send a user’s email address along with the purchase event to LinkedIn, you’ll first need to make sure that the email data is available in the Google Tag in the web container. Typically, this information is passed through the data layer during the purchase event.
In your web container, go to Variables and click “New” to create a new variable. For the variable configuration type, choose User-Provided Data, then select “Manual Configuration”.
You’ll now need to create a new variable to pull the user’s email from the data layer:
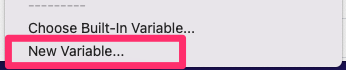
- Under the Email drop-down, scroll to the very bottom and select “New variable…”
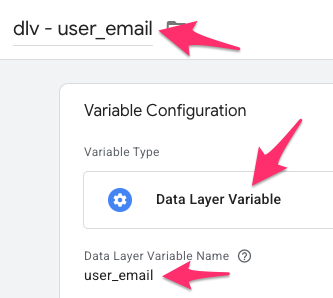
- For the Variable Configuration, select Data Layer Variable.
- Set the data layer variable name to “user_email”.
- Name the variable something like “dlv – user_email” and save it.
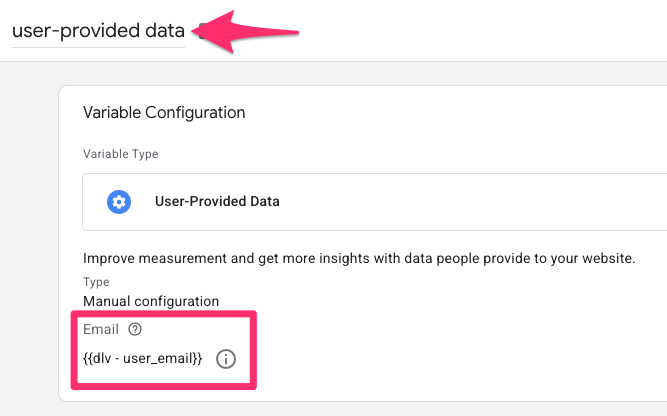
Back in the User-Provided Data configuration, use the variable you just created to map the email field. Then, name the variable “user-provided data” and save.
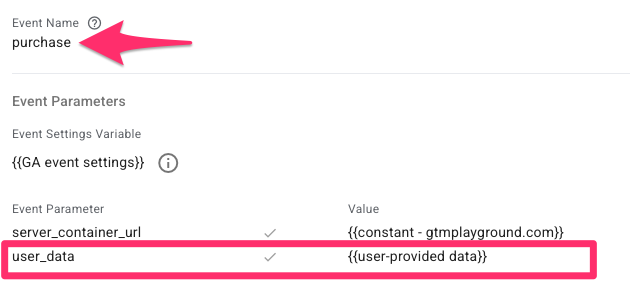
Since we want this attached to the purchase event, go to the purchase tag and add a new parameter. The event parameter name must be user_data, and the value will be the variable we just made, i.e., {{user-provided data}}. Save your changes.
To test that everything is working correctly, start by refreshing Preview Mode in your web container, then complete a test purchase on your site. Next, open the server preview mode and click on the purchase event.
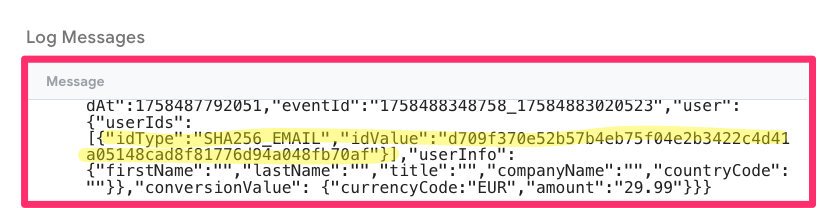
In the Console tab, check the top log message. You should see data inside the userIds variable. While the email appears hashed for privacy and won’t be readable, you’ll still see an entry where the idType contains “EMAIL”. This shows that your setup captured the email address correctly and included it in the request to LinkedIn.
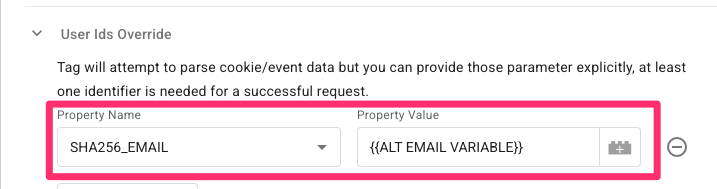
Alternatively, suppose the user’s email is stored elsewhere in your data layer and not set up through the User-Provided Data variable. In that case, you can still pass it to LinkedIn using the User Ids Override section in the tag configuration. Simply choose the appropriate idType (which should contain “EMAIL”) and select the variable that captures the user’s email address. There’s no need to hash the email yourself since the LinkedIn tag template will automatically handle the hashing before sending the data.
And, that’s it for option 1! You can stop here, but if you want to go a bit further and implement the LinkedIn Insight tag in your web container for additional accuracy, you can continue to read the next chapter, where I will cover the steps you’ll need to take.
Option 2
As a reminder, option 2 is where we will also include the LinkedIn Insight tag in the web container, so you’ll have both a server-side setup and a client-side setup.
Add the LinkedIn Insight tag to the web container
We’re going to use the LinkedIn Insight Tag template to create tags for both the page_view event and the purchase event. For the tag, you will need the Partner ID from LinkedIn, so let’s get that ready first.
Get your LinkedIn Partner ID
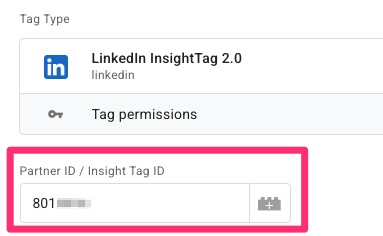
To get your LinkedIn Partner ID, go to the LinkedIn Campaign Manager, navigate to Measurement > Insights > Manage Data Sources. Under Insight Tag, choose “How to install your tag”, and select “I will use a tag manager” as your installation method. You’ll then see your Partner ID. Copy this value.

Create a LinkedIn Insight tag for the page_view event
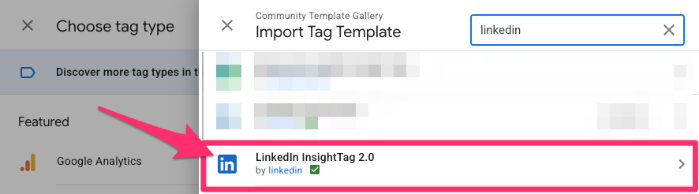
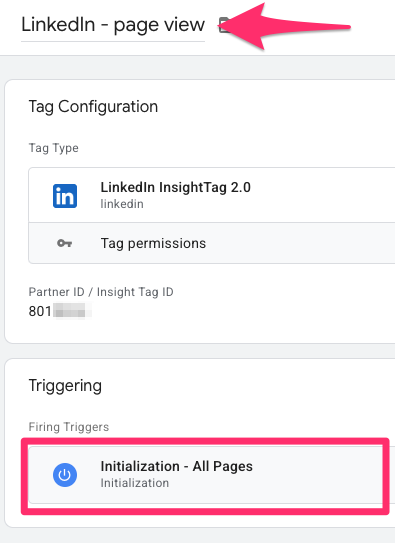
Start by creating a new page view tag in your web container. In the Tag Configuration, open the template gallery, search for “LinkedIn”, and select the “LinkedIn InsightTag 2.0” template. Add the template to your workspace.
Paste in your Partner ID, which you copied from LinkedIn Campaign Manager above.
For the trigger, use the “Initialization – All Pages” trigger so the tag fires as soon as the page loads. Finally, name the tag “LinkedIn – page view” and save it.
Create a LinkedIn Insight tag for the purchase event
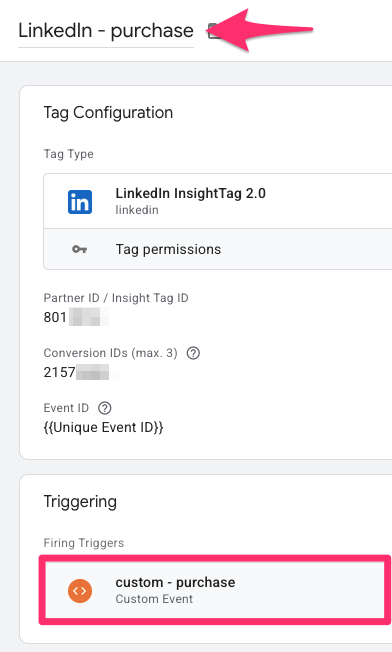
Now, we’re going to follow similar steps to those above to create a LinkedIn Insight Tag for the purchase event. Once again, create a new tag and choose the “LinkedIn InsightTag 2.0” tag from the template gallery.
In the tag settings, paste your Partner ID, which you copied earlier from LinkedIn Campaign Manager.
The next step is to enter the Conversion ID that corresponds to a conversion you set up in your LinkedIn account. If you have both the server-side setup and the client-side setup, you need separate conversions (aka you cannot use the same conversion as the one created in Option 1). Maybe in the future, LinkedIn will offer similar deduplication features (like Meta does), but right now (when I am writing this guide), you must create separate conversions.
Create a new conversion
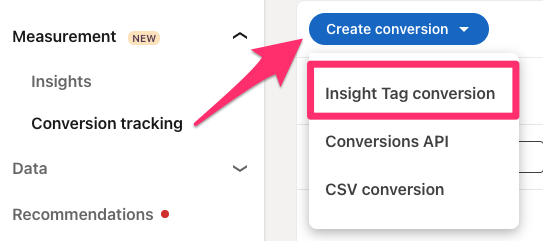
In LinkedIn Campaign Manager, go to Measurement > Conversion Tracking. Under the Create conversion drop-down, click to create a new conversion for an Insight tag conversion.
Name the conversion something like “Purchase – browser” (to differentiate it from the server one), select “Purchase” as the category, and set a default value (likely the same one as before).

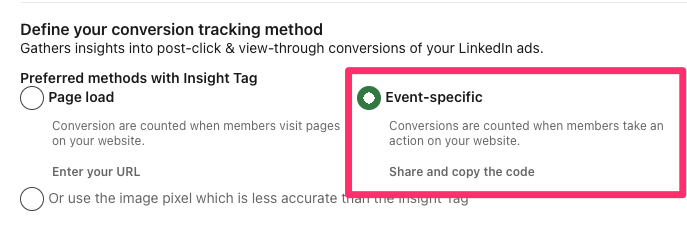
When asked how you want to track the event, choose “Tag Manager”, then select Event-specific. Then, finish the form by selecting “Next step” and then “Create”.
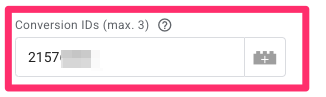
To get the conversion ID, click the conversion you just made (from the Conversion tracking list, which will be the page that opens when you complete the above form) and find the ID located in the URL after /conversion/.
![]()
![]()
Add this conversion ID to the tag.
After creating the conversion, it may appear in the LinkedIn Conversion Manager as Unverified initially. That’s normal. After you run a few tests with a LinkedIn click ID (li_fat_id) in the URL, LinkedIn will start marking the conversion as Active, confirming that it received the data correctly.

Add the Event ID
For the Event ID, this must match the ID that you’ll use in your server-side tag so that LinkedIn can deduplicate the events. Since we haven’t configured the server tag yet, we’ll come back to this part later. For now, you can insert a placeholder variable.
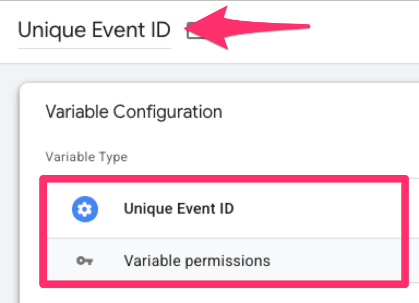
To create the Event ID variable, click the variable icon next to the Event ID field, then click the plus (+) button to add a new variable. In the configuration screen, open the template gallery again and search for “event id.” Choose the “Unique Event ID” template created by Stape, then add it to your workspace.

After adding it, for the Variable Configuration, choose the Unique Event ID and name it something like “Unique Event ID.”
Add trigger
Once you’ve configured your tag, assign the same custom event trigger used for your purchase event (this should already exist in your container for your GA4 event tag). Finally, name the tag something like “LinkedIn – purchase” and save.
Update GA4 purchase event tag
To complete the setup, you’ll need to add the same Event ID to your GA4 tag for the purchase event. Open the tag and add a new parameter with the name event_id. For the value, use the Unique Event ID variable you created earlier. Save the tag with your updates.

It’s crucial that both the GA4 event tag and the LinkedIn Insight tag fire on the exact same event. Make sure they’re both using the same custom event trigger, so the event ID matches across both and LinkedIn can properly deduplicate conversions.

Test
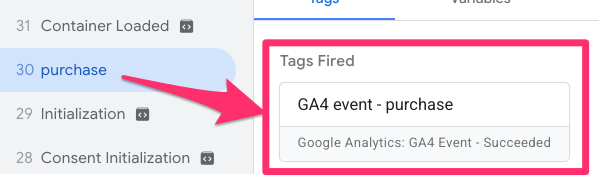
To test that everything is working correctly, open Preview Mode in both your web and server containers, then complete a test purchase on your site. In the web container preview, confirm that the GA4 event tag fired as expected.
Next, switch to the server-side preview and click on the purchase event. In the right-hand panel, go to the Event Data tab and scroll down. You should see the event_id parameter, which is available because we passed it along with the GA4 event from the web container.
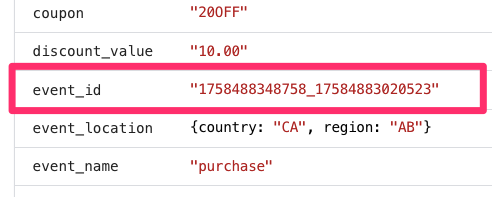
We’ll use this event_id in the server-side LinkedIn tag to ensure proper deduplication with the LinkedIn Insight Tag.
Add event ID to the server-side LinkedIn tag
Next, you’ll need to pass the event_id into your server-side LinkedIn purchase tag so that LinkedIn can properly deduplicate the event with the browser-side version.
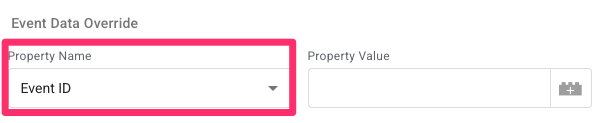
Go to your server container, find the LinkedIn CAPI – purchase tag and scroll down to the Event Data Override section. Here, add a new field with the name “Event ID”.
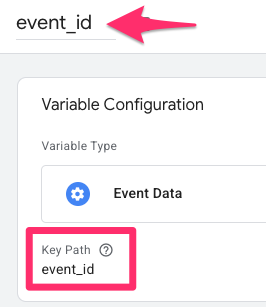
To set the value, click the variable icon and then the “+” to create a new variable. For the Variable Configuration, select the “Event Data” variable type, and set the Key Path to “event_id”. Name this variable something like “event_id”, save it, and then save the tag.
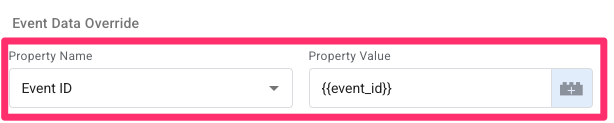
The Event Data Override section should look like this (at which point you can save the changes to the tag):
Now it’s time to test the setup.
Refresh the preview mode for both the server container and the web container. On your website, open developer tools and go to the Network tab. Complete a purchase on your site, and then search for “linkedin” in the network requests to filter the results.
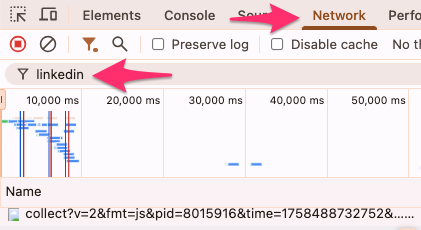
Find the request that includes “collect?”. This is the client-side request sent by the LinkedIn Insight Tag. In the Request URL, look at the value of the eventID parameter, specifically, take note of the last few digits.
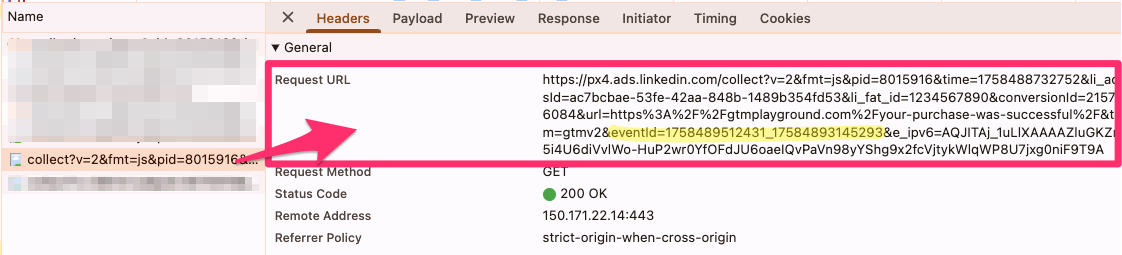
Now switch back to the server-side container preview, select the purchase event, open the LinkedIn tag, and click the outgoing request.
In the request Body, look for the eventID parameter and confirm that it contains the same value you saw in the network request from the web container.

Because both client-side and server-side events share the same event ID, LinkedIn will be able to deduplicate conversions properly. When both conversions are sent with matching IDs, LinkedIn will prioritize the client-side conversion and discard the server-side one. As a result, you should expect to see a higher count of browser (client-side) conversions compared to server-side conversions.
Once you’ve confirmed everything is working as expected, make sure to publish both your client-side and server-side containers to push the changes live.
LinkedIn Conversions API with Google Tag Manager: Final Words
And there we have it! Your LinkedIn Conversions API setup should now be up and running through server-side Google Tag Manager. This setup not only gives you more control over your tracking but also helps improve accuracy and performance. As always, keep an eye on your events and test regularly to make sure everything’s working as expected.
0 COMMENTS