November 28, 2025
How to Preserve Ad Click IDs with Server-side Tagging
Updated: November 28th, 2025
With the announcement of iOS 26, Apple announced that it will be expanding Link Tracking Protection. For those who don’t know, Link Tracking Protection is by default enabled in Safari’s Private Browsing Mode. It’s responsible for removing various tracking parameters from the page URL (e.g., gclid), which makes it difficult to preserve ad click IDs. This can seriously cripple your ability to attribute paid ad conversions.
However, with the iOS 26 announcement, Apple provided very few details. What does “expanding” mean? Will it be enabled by default in normal browsing? Are there more things that will be affected? What parameters will be removed?
Multiple people in our industry have run tests, and the results were not consistent. So, many of us were left guessing what would happen next. Now, when I am writing this blog post, iOS26 is released, and it looks like ad click parameters are not removed in normal browsing mode (yet?).
But it does not mean that this status quo will remain in the future. Our industry is constantly changing and you must keep an eye on it.
Long story short, this blog post explains how you can preserve tracking parameters in the URL in case Apple actually starts removing them more widely.
In this detailed, step-by-step guide, I’ll walk you through exactly how to preserve ad click IDs using a combination of your ad platform’s settings and a server-side Google Tag Manager container. While it seems that UTM parameters are safer than ad click parameters, I’ll also show you how this same method can be used to protect them, making your tracking setup more resilient for the future.

Table of Contents
Here’s what you will learn in this article
- Why ad click IDs matter
- The solution: a two-part strategy
- #1. Configure the Tracking Template in Google Ads
- #2. Configure Your Server-side GTM Container
- #3. Test everything
- What about UTM parameters?
- Final words
Video tutorial
If you prefer video content, here’s a tutorial from our YouTube channel.
Important: if you decided to just watch the video and skip the blog post, do this: in the Query Replacer variable, enable “Skip existing query parameters” checkbox. This is very important for proper tracking.
Before you begin: Prerequisites
To follow this guide, you will need:
- Google Tag Manager (Web Container): Installed on your site. This guide will help you install GTM step by step.
- Google Tag Manager (Server Container): Set up and receive data. Here’s a step-by-step tutorial to help you install Server-side Google Tag Manager container.
- Google Ads Account: With admin access to modify Account Settings. Check out the complete guide on how to install GA4.
- Ad Platform auto-tagging: Enabled (e.g., gclid for Google Ads).
Why ad click IDs matter
Before we dive into the “how,” let’s quickly recap the “why.” When a user clicks on one of your paid ads, the ad platform (like Google Ads, Facebook Ads, etc.) appends a unique parameter to the destination URL. This parameter is an ad click ID.
Here are a few common examples:
- Google Ads: gclid, wbraid, gbraid
- Facebook Ads: fbclid
- Microsoft Ads: msclkid
A typical URL might look something like this: https://www.yourwebsite.com/?gclid=aBcDeFg.
This ID is the key to connecting that specific user’s session and any conversions they make back to the exact ad they clicked. Without it, attribution becomes incredibly difficult, and optimizing your ad spend turns into a guessing game.
Link tracking protection features are designed to strip these kinds of parameters from the URL, effectively breaking your attribution chain. So, how do we solve this?
The solution: a two-part strategy
The core of our strategy is to “disguise” these ad click IDs so that browsers and privacy features don’t recognize and remove them. We’ll then use our server-side GTM container to “un-disguise” them before they are sent to our analytics tools.
It’s a two-part process:
- Modify URLs in the Ad Platform: We’ll use the ad platform’s tracking settings to create new, custom “decoy” parameters that hold the same value as the original click IDs. For example, instead of just gclid, the URL will contain both gclid and our custom parameter, say c_gci. However, keep in mind that right now, when I am writing this guide, not all platforms support the modification of URLs.
Why use a Decoy? Browser tracking protections work by matching URL parameters against a known ‘blocklist’ of tracking IDs (like gclid, fbclid). They might not block parameters they don’t recognize. By copying the ID into a custom parameter like c_gci, we bypass this filter because c_gci isn’t on their blocklist. - Transform Data in Server-side GTM: We’ll configure our server container to look for our custom parameters. When it finds them, it will transform them back into the standard parameters (gclid, etc.) before forwarding the data to Google Analytics, Google Ads, etc.
The browser’s privacy feature sees c_gci, doesn’t recognize it as a known tracking parameter, and leaves it alone. Our server then does the magic behind the scenes. Let’s get this set up.
#1. Configure the Tracking Template in Google Ads
First, we need to instruct Google Ads to add our custom parameters to the URLs of our ads. We can do this using the Tracking template feature.
Note: This solution relies on a feature that allows for dynamic modification of destination URLs. Google Ads supports this perfectly, but not all platforms do. At the time of writing, Facebook Ads does not have an equivalent feature, so this specific method won’t work for fbclid. Always check the capabilities of your particular ad platform.
In your Google Ads account, navigate to Admin > Account settings. Select the Tracking section from the menu.

In the Tracking template field, you’ll need to enter a specific string. This string tells Google Ads to take the final landing page URL {lpurl} and append our custom query parameters to it.
Copy and paste the following template: {lpurl}?c_gci={gclid}&c_wbr={wbraid}&c_gbr={gbraid}
Let’s break down what this does:
- {lpurl}: This is a ValueTrack parameter (dynamic placeholders like {gclid} that Google automatically replaces with actual data when an ad is clicked) that represents the ad’s final URL. The ? starts the query string.
- c_gci, c_wbr, c_gbr: These are our custom “decoy” parameter names. I just made these up. You can name them differently, but it’s best to choose something that isn’t obviously a tracker.
- {gclid}, {wbraid}, {gbraid}: These are ValueTrack parameters that Google Ads will dynamically replace with the actual click ID values for each ad click.
Also, above the “Tracking” section, make sure that you have “Auto-tagging” enabled (set to “Yes”). This feature is what enables the gclid parameter in the first place. Click Save.
Now, whenever someone clicks one of your Google Ads, the URL will contain both the original click IDs and our custom, disguised versions. Half the job is done.

#2. Configure Your Server-side GTM Container
Now we head over to our server-side Google Tag Manager container to handle the second part of the process: transforming the data back to its original state.
#2.1. Import Query Replacer variable template
Imagine a scenario. You click an ad, then you are redirected to a landing page and gclid is removed. If you completed all steps from chapter #1, the landing page URL could look like this:
c_gci is our custom parameter that contains the value of gclid. In the server GTM container, we can rename c_gci back to gclid, and your attribution will continue functioning properly.
This can be done with a Query Replacer custom variable template.
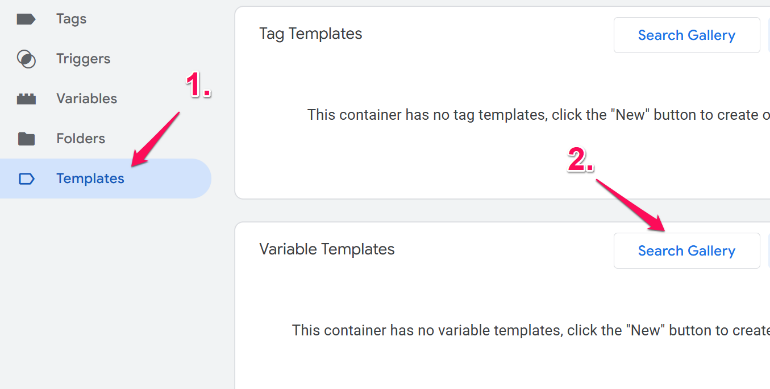
In your server GTM container, navigate to Templates. Under “Variable Templates”, click Search Gallery.
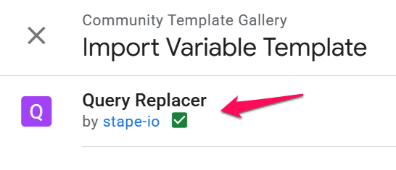
Search for Query Replacer and select the one by stape-io. Click Add to workspace and confirm any permission requests.
#2.2. Create the Query Replacer Variable
Now that we have the template, let’s create a variable that uses it. Go to Variables and under “User-Defined Variables”, click New.

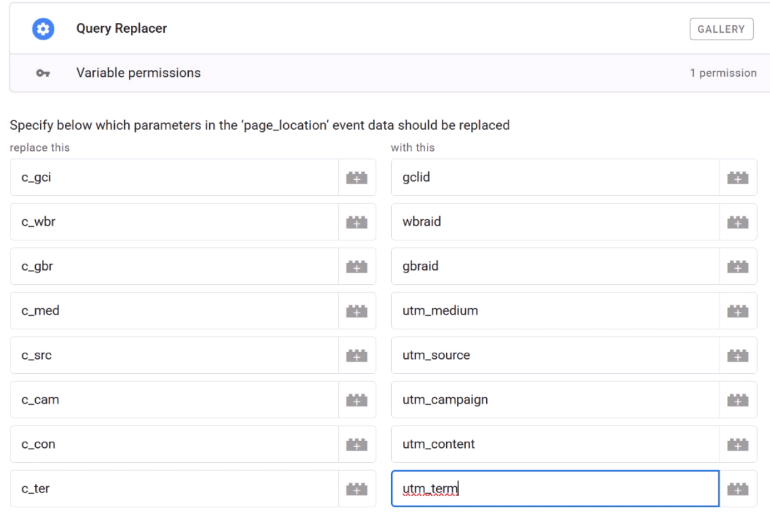
For the “Variable Configuration”, choose Query Replacer. In the main configuration section, we need to define our replacement rules. This is where we tell GTM to swap our custom parameter names back to the standard ones. Click Add Row for each rule:
- Replace c_gci with gclid
- Replace c_wbr with wbraid
- Replace c_gbr with gbraid
If you are using more custom parameters, list all of them here.
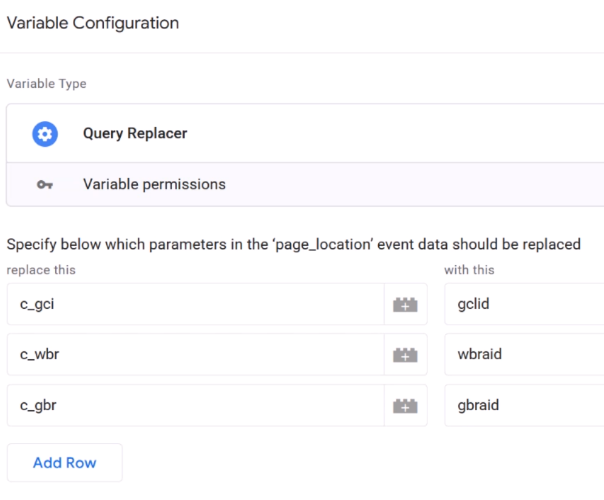
Important: enable “Skip existing query parameters” checkbox. This is an update that Stape released a bit later. What does it mean? If original query parameter is not removed, then your custom parameter is not renamed. For example, url is example.com?gclid=123&c_gci=123. If gclid is not removed (and you have the checkbox enabled), then the final output of the variable will remain example.com?gclid=123&c_gci=123. If you keep the checkbox unchecked, then the final URL would be example.com?gclid=123&gclid=123 (which might cause problems).
Anyway, after you have configured the variable, give the variable a descriptive name, like page_location with restored click ids and click save.
#2.3. Create a transformation
Transformations allow you to modify event data for multiple tags at once. In this case, we will instruct Google Tag Manager We’ll create one to apply our new variable to every incoming event. This means that all tags will start using a modified page_location (with recovered tracking parameters in case they were removed).
Go to Transformations and click New. Give the transformation a name, like “page_location with restored click ids”. For the “Transformation Type”, choose Augment Event.
- Under “Parameters to Augment”, click Add Row.
- Set the Parameter Name to page_location.
- For the Value, click the lego brick icon and select the {{page_location with restored click ids}} variable you just created.
- Leave “Matching Conditions” as Always apply and “Affected Tags” as All Tags.
- Click Save
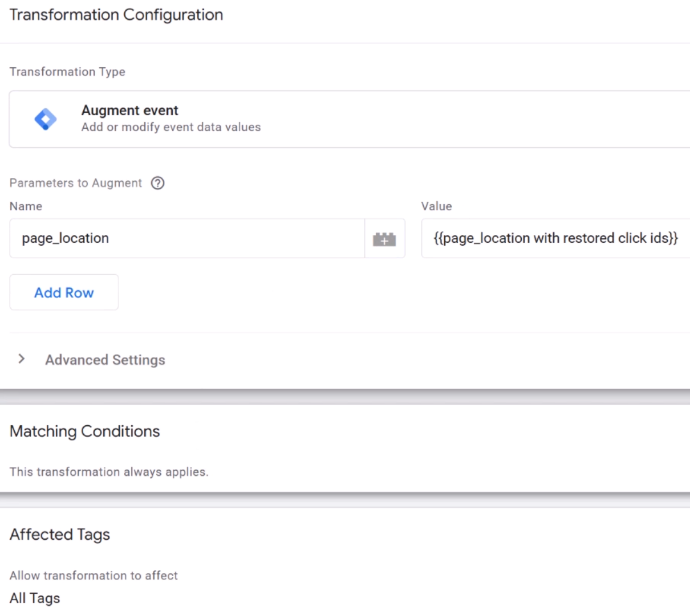
This transformation now acts as a global rule. For every single event that comes into the server container, it will take the page_location parameter, run it through our Query Replacer variable, and then use the modified (restored) version.
#3. Test everything
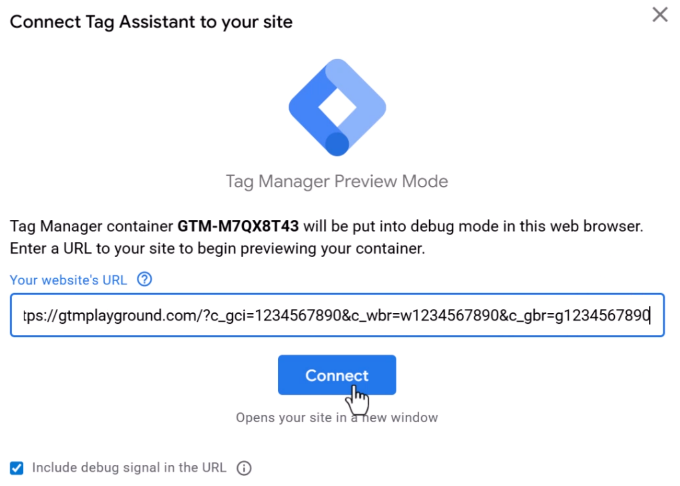
With both pieces in place, it’s time to test. Enable Preview mode in both your web and server GTM containers.
You’ll need a test URL. Take your website’s URL and manually add the custom parameters with some fake values. For example: https://yourwebsite.com/?c_gci=12345&c_wbr=w12345&c_gbr=g12345. Paste this test URL into your web GTM Preview and connect.
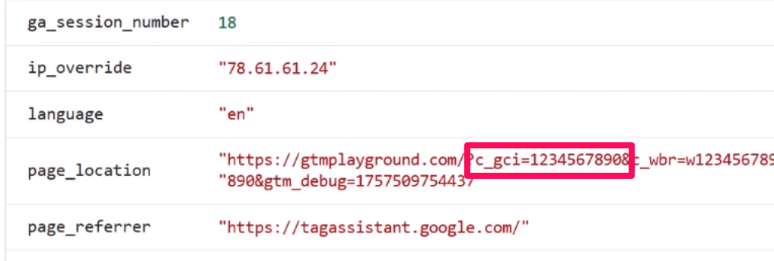
Once the page loads, go to your server GTM Preview tab. Select the page_view event on the left.

While having the page_view event selected, go to the “Event data” tab. You should see your custom parameters (c_gci, etc.) in the request URL. This is what the server received from the browser.
Now, click on the GA4 Tag that fired on page_view event. Scroll down to the Modified Event Data section.
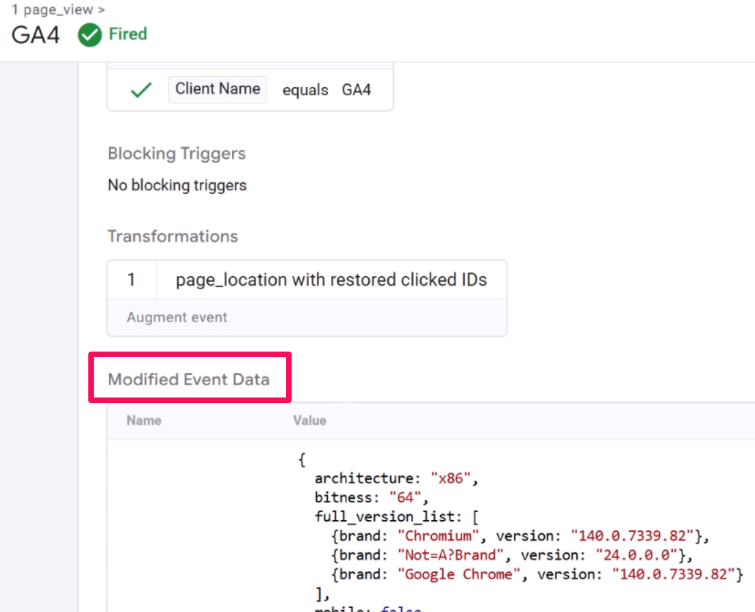
Look at the page_location parameter here. Voilà! You should see that it now contains the standard, restored parameters: gclid, wbraid, and gbraid.

Success! The browser sent the disguised parameters, and our server container successfully transformed them back before sending the data to Google Analytics. Don’t forget to publish your changes in the server-side GTM container.
You can also run one more test. This time, include both: gclid and c_gci, for example: https://yourwebsite.com/?gclid=12345&c_gci=12345.
If you have enabled “Skip existing query parameters” checkbox in the Query Replacer, the value of the page_location in the Modified Event Data should still contain both parameters https://yourwebsite.com/?gclid=12345&c_gci=12345.
Here’s a quick checklist to verify that your implementation was successful:
- Browser URL: Contains custom parameter (c_gci=…).
- Server Preview (Request): Shows custom parameter (c_gci) in ‘Event Data’.
- Server Preview (GA4 Tag): ‘Modified Event Data’ shows the restored standard parameter (gclid) and no custom parameter.
What about UTM parameters?
As I mentioned, UTM parameters don’t seem to be targeted by tracking protection yet, but it’s wise to be prepared (or at least aware of a possible solution). The beauty of this setup is its flexibility. You can easily extend it to protect your UTMs.
You would simply need to:
- Update the Google Ads Tracking Template: Add your custom UTMs, mapping them to the relevant ValueTrack parameters. For example: …&c_src=google&c_med={network}&c_cam={campaignid}
- Update the Query Replacer Variable: Add new rows to map your custom UTMs back to the standard ones (e.g., replace c_src with utm_source, c_med with utm_medium, etc.).
That’s it.
While the setup in GTM and Google Ads is simple, the real challenge here is an operational one. This is the most difficult part.
Your Google Ads account is likely not the only place you generate URLs with UTM parameters. Think about all the other sources:
- Email Marketing Platforms: Tools like Mailchimp, Klaviyo, or Omnisend often automatically append UTMs to your email links.
- Social Media Management Tools: Platforms like Hootsuite, Buffer, or Sprout Social use them to track campaign performance.
- Manual Links: Any URLs you or your team build manually for social posts, influencer campaigns, affiliate links, or even QR codes.
For this solution to be effective for UTMs, every single one of these sources must be updated to use your new custom parameters (e.g., c_src instead of utm_source). If you miss even one, and that link gets its standard UTMs stripped, the data will be lost because our server-side setup won’t have the custom parameters it needs to perform the restoration.
Therefore, before you apply this method to your UTMs, you must perform a thorough audit of every tool and process in your organization that generates tagged links. It requires a coordinated effort to ensure consistency across the board. While the technical steps are easy, coordinating this change across all your tools is a big challenge that you shouldn’t take lightly.
Preserve ad click IDs with server-side tagging: Final words
By using a combination of your ad platform’s tracking templates and the power of transformations in server-side Google Tag Manager, you can build a resilient system that preserves your critical ad click IDs.
This not only protects your attribution today but also prepares you for whatever changes may come tomorrow. Once you’re done testing, don’t forget to Submit and Publish your changes in both your web and server containers to push the solution live.

0 COMMENTS