
September 16, 2020
How To Export a Part of Google Tag Manager Container
Updated: September 16th, 2020.
What’s new in the update? In the past, the Google Tag Manager interface allowed only to export a full container. From now on, you can use the built-in features to export only a part of the container too.
In case you didn’t know, Google Tag Manager has this really useful Import/Export functionality which is a real time saver. If you need to create an identical copy of a container, you just have to export Container A and import its content (JSON file) to Container B.
Actually, the entire Google Tag Manager Recipe concept is based on that. You can learn more about importing and exporting containers here.
But what if you want to export only a part of the container? Luckily, from August 2020, that is possible with the built-in functionality in Google Tag Manager. And this is exactly what I’ll show you in this blog post.

Two options of how to partially export a container
In fact, this blog post will be split into two main parts:
- The new built-in solution in GTM to export part of the container
- The older solution that allows you to copy elements from multiple containers and then paste them to another one (without downloading a JSON file)
#1. A new (built-in) quick solution
If you want to export part of the container in Google Tag Manager, go to the Admin section of your Google Tag Manager container and click Export Container.

Then select the workspace that you want to export.
Then a new pane will slide in from the right with all the items that you can export. By default, all items are selected (in other words, this is a regular full export).

But if you need to export only certain elements of the container, you can first click this checkbox (to uncheck everything):

and then select items that you want to include in your exported JSON file.
If you are using folders in your container and you want to retain them in the exported file too, make sure to have this checkbox enabled.

At the top of the window, you will see the summary of how many items are you going to export.
Another cools thing is to exclude/include all items of the same folder. In the list of all items, you will see to which folders they belong. Click on the folder and you will automatically select/unselect all items from that container.
For example, in the screenshot below, by clicking on the “testing” folder, I’ll select/unselect two items: GA Event – File Download and Link click – pdf or docx file.
When you are ready, feel free to click the Export button at the top right corner. Additionally, you can also preview the JSON file before downloading it.
This is a welcome update in the Google Tag Manager interface. Straightforward, intuitive, and easy to use. However, if you don’t want to play with exported JSON files and you want, for example, to collect items from several containers at the same time and then directly copy them to another container, continue reading and learn more about the older solution (that I was using).
#2. An older solution that directly copy-pastes between containers
The older solution involves Simo Ahava’s GTM Tools. If you want to read the full guide about it, do it here. In this blog post, I’ll just explain the export part.
Just to clarify, by saying “export a part of a container” I mean that we’ll be able to clone a chosen set of tags, triggers, and variables from one GTM container to another. GTM Tools do not provide a direct export-to-JSON feature.
If you want to literally export a part of a container to a JSON file, pick what you need from container A (with help of GTM Tools), transfer those assets to Container B (which should be empty), and then use Google Tag Manager’s export feature. Or just use the native export feature in GTM.
Now, back to the main stuff. Here’s a whole process in a nutshell:
- Sign up with a Google Account to GTM Tools. This step needs to be done once.
- With the help of GTM Tools, we’ll choose tags, triggers, and variables that we would like to transfer to another GTM container.
- Choose a target container.
- *magic*
- Voilà! Everything is now copied and ready to be used.
Sign up
Go to gtmtools.com and press Sign-in button.

You’ll be asked to give permissions to access various stuff in Google Tag Manager.

Press Allow. If there were any additional steps (from Google Authorization), complete them as well. Long story short, follow all steps until you will log in to GTM Tools.
Inspecting the container
Get started by clicking GTM Account dropdown in the top menu bar and choose the account from which you want to copy/export something. In my case, it’s a mysterious website called Demo.
As you probably already know, each Google Tag Manager account can have multiple containers. In the screenshot above, I had only one container, therefore I clicked the black triangle icon (1) and then chose Inspect (2).

Next, you’ll see the content of a container split into three groups, tags, triggers, and variables.

Box of each group is clickable and can be expanded, and this is exactly what we’ll do. Say, that we want to check which tags are available, click Tags.
Picking up the goods
What we’re going to do next, is “shopping”. Start adding all needed tags, triggers, and variables to the cart. You can do that by clicking on a green Plus icon located next to each container element (asset).
By the way, you can go “shopping” in multiple containers (e.g. pick a tag from container A and a trigger from container B). Later, all assets (added to the cart) will be cloned to another container.

After you’re done with picking all the goods, go to the Cart (by clicking the button in the top right corner of GTM Tools).

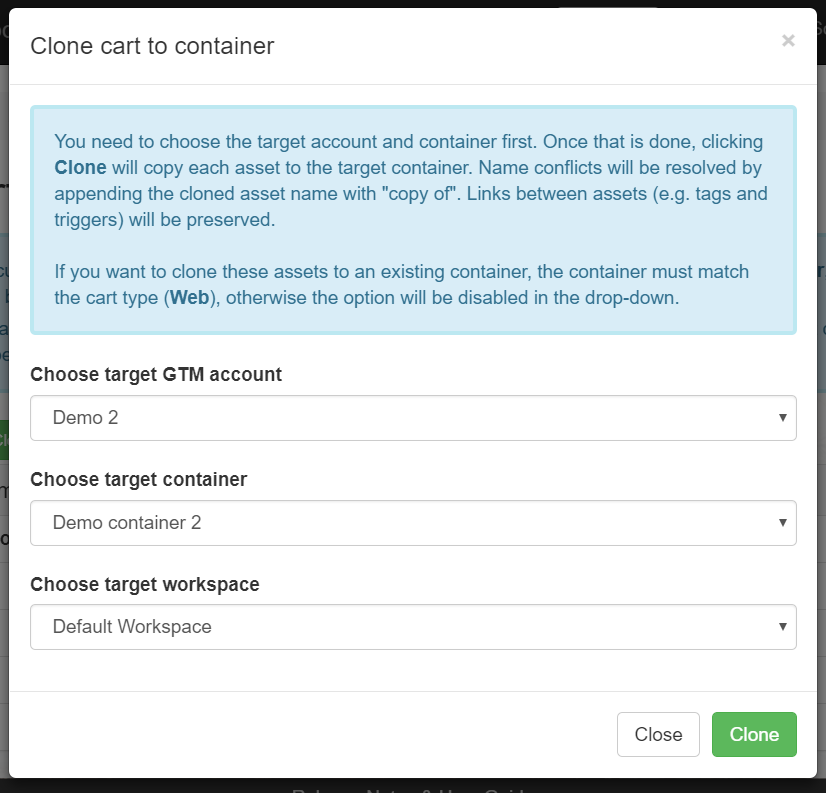
We’re getting close. Let’s clone everything from the cart to the target GTM container, click the green Clone to container button.

In the confirmation popup you’ll need to:
- Choose the target GTM account and container
- Choose the workspace within that GTM container.
Confirm the action by clicking Clone button.
Done!
Testing
Head over to Google Tag Manager and open the container that you have just recently exported all assets to. The easiest way to see all added tags/triggers/variables are by checking the Overview section of that container.

If needed, modify those newly added tags, triggers, and variables. This includes (but not limited to) changing Tracking IDs (e.g. Google Analytics or Facebook Pixel).
Last but not least, enable GTM Debug mode and test, test, test.
Final words on how to export a part of Google Tag Manager container
And that’s the end of this blog post. When it comes to partial export, you have two options: the built-in and gtmtools.com. There might be other possible solutions (like exporting the entire JSON file and then doing “surgery” directly in that file, but this is obsolete now) but the two best ones (in my opinion) are the ones that I have described in the blog post.
The built-in partial export feature in Google Tag Manager is definitely a welcome update but if you want to copy some items from container A, then several from container B and move them to container C, then consider using gtmtools.com.
1 COMMENT
Magic! Many thanks Simo Ahava for coding and Julius for spreading the word.