
June 29, 2020
Cross-domain Tracking in Unbounce Landing Pages
Recently, I had a task to work on an Unbounce landing page, and to make things a little more complicated, visitors were redirected to another domain’s Thank You page after successful form submission.
If you want to properly track such form submissions with Google Analytics, you need to implement Cross-domain tracking. However, not everything was straightforward here. After doing some research, I could not find any simple built-in solution within Unbounce that would configure cross-domain tracking for me.
Eventually, after further digging, I’ve found a solution that I wanted to share with you. In today’s blog post, I’ll show you how to implement Google Analytics cross-domain tracking in Unbounce landing pages.
IMPORTANT: Read this first
I don’t have a lot of experience with Unbounce. That’s why I think that my solution will not cover all the possible edge cases. In the next chapter of this blog post, I’ll explain the exact conditions/circumstances that were tested.
If you tried my solution and it did not work, please leave a comment and describe your situation in great detail + share a link to your landing page. That way, I’ll try to do my best to adapt my code and update the guide.
Contents
- These are the conditions that I tested against
- The Action Plan
- The Code
- Step #1: Add the code that decorates the destination URL of the form
- Step #2: Test if the code works
- Step #3: Enable Linker on a Thank You page
- Step #4: Update the Referral Exclusion List in Google Analytics
- Final test
- Final words regarding Cross-domain Tracking in Unbounce
These are the conditions that I tested against
- When the form is submitted, it was configured to redirect a visitor to the Thank you page that was hosted on another domain, for example, landingpage.com redirects to example.com/thank-you.
- If you are dealing with separate subdomains of the same domain (e.g. landingpage.com redirects to landingpage.com/thank-you), you DON’T need cross-domain tracking. Read this guide instead.
- The Unbounce account I was working on was created in early June of 2020. I’m not sure how Unbounce handles the content of landing pages that were created, say, 3 years ago. Maybe older pages use different element classes, I’m not sure about that. The solution that you will find in this blog post relies a little on element classes. That’s why once again, I’m asking you to post a comment below if you are struggling with my solution.
The Action Plan
Here are the steps that we need to complete in order to implement the Cross-domain tracking in Unbounce Landing Pages.
- Add custom code to the domain A (Unbounce landing page) that updates the opt-in form and adds a _ga cross-domain parameter to the URL of the “thank you” page. When the form is submitted successfully, the form will redirect to the Thank you page and the URL will contain all the necessary cross-domain info.
- Configure allowLinker parameter on the Thank you page
- Update the Referral Exclusion list in Google Analytics.
Keep in mind that this will work ONLY if:
- both the domain A (Unbounce) and domain B (Thank you page) use the same Google Analytics Property.
- you (or your developer) have access to the GTM (or GA code) on the Thank you page because you will need to enable the allowLinker parameter on that page.
The Code
Here’s the code that you will need to add to your Unbounce landing pages where a visitor will submit the form.
<script>
  function decorateUrl(urlString) {
    var ga = window[window['GoogleAnalyticsObject']];
    var tracker;
    if (ga && typeof ga.getAll === 'function') {
      tracker = ga.getAll()[0]; // Uses the first tracker created on the page
      urlString = (new window.gaplugins.Linker(tracker)).decorate(urlString);
    }
    return urlString;
  }

  function linkDecorator(){
    if (window.module.lp.form.data.action === 'url') {
      window.module.lp.form.data.url = decorateUrl(window.module.lp.form.data.url)}
  };

  if (document.querySelector('.lp-element.lp-pom-button')) {
    document.querySelector('.lp-element.lp-pom-button').addEventListener('click', linkDecorator);
  }
</script>
First, I’ll quickly explain separate parts of the code and then we’ll take a look at two options of how can we implement this code.
If you’re not interested in the explanation, jump to Step #1 of this guide.
The first part of the code is responsible for checking if Google Analytics is present on a page and uses the Linker functionality of the first GA tracker. When you pass a URL to this function, it will return a decorated URL, for example, https://www.example.com/ will become https://www.example.com/?_ga=123……
  function decorateUrl(urlString) {
    var ga = window[window['GoogleAnalyticsObject']];
    var tracker;
    if (ga && typeof ga.getAll === 'function') {
      tracker = ga.getAll()[0]; // Uses the first tracker created on the page
      urlString = (new window.gaplugins.Linker(tracker)).decorate(urlString);
    }
    return urlString;
  }
This code was borrowed from Simo Ahava’s upgraded cross-domain iframe tracking solution.
The second function checks if the Unbounce form is configured to redirect to a Thank You page. If it is, then this function will use the aforementioned decorateUrl function and will update the destination URL of the form. If a visitor successfully submits the form, he/she will be redirected to a Thank you page of which URL will be decorated with _ga= parameter.
  function linkDecorator(){
    if (window.module.lp.form.data.action === 'url') {
      window.module.lp.form.data.url = decorateUrl(window.module.lp.form.data.url)}
  };
Finally, the last part of the code is responsible for activating all of this:
  if (document.querySelector('.lp-element.lp-pom-button')) {
    document.querySelector('.lp-element.lp-pom-button').addEventListener('click', linkDecorator);
  }
It checks if a button with two classes exists on a page. Those classes are lp-element and lp-pom-button. Can you guess what that button is? That’s a Form Submit button of an opt-in form. If such a button exists on a page, the code attaches a click listener to it. If a visitor a button, the URL (to which the form will redirect) is updated.
Currently, Unbounce supports only one opt-in form per page (as far as I know). If they add support for multiple forms on the same page, please let me know and I’ll update the solution.
Step #1: Add the code that decorates the destination URL of the form
There are two options for how you can implement that custom JavaScript code.
If you’re using Google Tag Manager, create a Custom HTML tag that fires on DOM Ready trigger. If you wish, you can also use Window Loaded. But DO NOT USE the Pageview/Container Loaded trigger.

Save the tag.
If you are not using Google Tag Manager, you can add the script directly in the Unbounce. There are two options:
Option #1: Add only to a particular landing page. At the bottom of the page editor, you will find the JavaScripts section, click it and then choose Add New JavaScript. Click it and add the code.

Set its placement Before Body End Tag.

Option #2: Add to all landing pages in Unbounce
In Unbounce, go to Settings > Script Manager and press Add a Script > Custom Script. Paste the script, choose which domains you want to add the script, and on which pages. In my screenshot below, I’ve selected All.
Choose Before Body End Tag as a placement for that code.
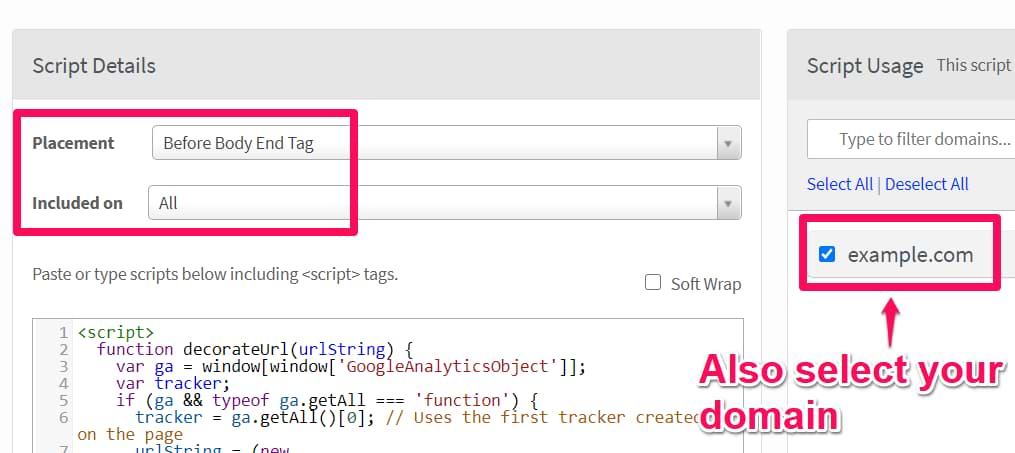
If you don’t see any custom domains that you can select in that script’s settings, read this guide first.
Step #2: Test if the code works
If you have implemented the code via GTM, save the tag, enable/refresh the Preview mode on the Unbounce landing page. If you implemented the code directly in Unbounce, save the scripts.
Then go to your Unbounce landing page, refresh it. If you are using GTM, the preview mode console should appear at the bottom of the screen. Then try submitting the form and check the URL of a Thank you page. The URL MUST contain the _ga= parameter.
This is very important. If you cannot see the parameter in the URL, check this chapter of another guide.
- If GTM preview mode does not appear, read this guide
- Also, make sure that Google Analytics is loaded on that Unbounce landing page. You can do that with Tag Assistant.
Do not proceed to the next chapter if you cannot see the _ga= parameter in the URL of a Thank you page.
Step #3: Enable Linker on a Thank You page
Once you manage to decorate the URL of the Thank you page on another domain (and _ga parameter must be visible in the URL), then you need to instruct Google Analytics (on that Thank you page) to read that parameter and update the _ga cookie accordingly.
By default, Google Analytics does not care about the _ga query parameter in the URL, therefore, if you just decorate the URL, cross-domain tracking will still not work. You need to explicitly instruct GA to fetch the _ga parameter in the URL and update the cookie accordingly.
If you’re using Google Tag Manager on the domainB.com, then this is how you should enable the allowLinker field. In GTM, go to Variables and open the GA Settings Variable. Then go to More Settings > Fields to Set and enter:
- allowLinker (case-sensitive)
- true

Hit save.
It is not necessary for the Thank you page to have Google Tag Manager implemented. It’s just important to configure the GA to read the _ga URL parameter and update the cookie accordingly.
If, for example, Thank you page uses the hardcoded gtag.js, then you will need to contact a developer and ask to include the following command: ‘linker’: {‘accept_incoming’: true}});

The screenshot was taken from here.
Step #4: Update the Referral Exclusion list in Google Analytics
In Google Analytics, open the property of your website/project and go to Admin > Tracking Info > Referral Exclusion List (in the Property column).

Add the domain of the Unbounce landing page (a.k.a. the domain A).

If you don’t do that, all of your conversions will be attributed to the Unbounce Landing page’s domain instead of the original traffic acquisition source. This phenomenon is known as self-referrals.
Important if cross-domain tracking was not set up on day 1 of your tracking implementation: due to how Google Analytics attribution works (last non-direct click), you will still continue seeing self-referrals in GA reports even after updating the Referral Exclusion List. However, the numbers of self-referrals will be falling down and will 100% disappear after 6 months.
Read more on that here.
On the other hand, if you have implemented cross-domain tracking on day 1 (when you started tracking that website), self-referrals will not be a 6-month-problem.
Final test
Open Google Analytics Real-time reports. When you submit the form on an Unbounce landing page and then are redirected to a Thank you page, you should see yourself as one user in Real-time reports. Not two.
You can also find other tips on how to test Cross-domain tracking here.
Final words regarding Cross-domain Tracking in Unbounce
And that’s how you configure Google Analytics cross-domain tracking in Unbounce landing pages. Use this method if your Unbounce opt-in form redirects a visitor to a Thank you page that is hosted on another domain. And I am mean a totally different domain.
In order to properly configure the setup, you need to:
- Activate a custom javascript code on the Unbounce landing page. That code checks if GA is present on a page and then uses one of its features to update the Unbounce form’s destination URL.
- Configure allowLinker parameter on the Thank you page
- Update the Referral exclusion list in Google Analytics
- Use the same Google Analytics property on the Unbounce landing page AND on the Thank you page.
If at least one of these list items are not completed, cross-domain tracking will not work.
If you are operating on different subdomains of the same domain (e.g. www.example.com and blog.example.com/thank-you), then you DON’T NEED cross-domain tracking. Read this guide instead.
10 COMMENTS
Hi Julius, this is great. How should I ammend this code so that it works for buttons on Unbounce?
What is the URL of the landing page and which button are you talking about?
Hi Julius - I would like this added to all buttons on my page. For example - http://unbouncepages.com/ga-test-1/
There are 2 buttons. Both buttons will link to different domains but will be set up with GA cross-domain.
Out of curiosity, why catch the form submission using a custom GTM event listener on gtm.formSubmit (which Unbounce fires when the form is submitted and a GTM integration is present)?
They note this as a reliable way to listen for submit here:
https://documentation.unbounce.com/hc/en-us/articles/203814014-How-Do-I-Integrate-Google-Tag-Manager-With-Unbounce-#content4
Doing it that way should allow you to avoid listeners completely, as the link can just be decorated on submission (and I believe this only fires on valid submissions as well, which is a plus). You'd still need to update window.module.lp.form.data.url, but at least it makes it less prone to breakage.
*why not
Hi, have you tried to apply your solution and made it work?
The reason why I'm asking is becquse the built-in form submission trigger fails in 99% of situations. I could not make it work as far as I remember.
Yes, I've tested it and it's working reliably for me.
They don't recommend using the default Form Submission auto-event trigger or you'll see duplicate events for whatever reason (as noted in the linked documentation), and I've also seen issues with that not triggering. Instead, set up a Custom Event Trigger for the event named "gtm.formSubmit" (yes, same as the internal name for normal submissions) and it works reliably on our side (keep in mind that tasks like GA tracking are unreliable here unless you're using transport:beacon, and you may still have to exclude FB Pixel form events).
Another option that would at least avoid using classes would be to add a callback to the hook queue, like this (there's also a handy afterFormSubmit for analytics cases):
window.ub.hooks.beforeFormSubmit.push(function(args) {
// your code here, use args.formElement if you need a reference to form/data
});
This is as close as you'll get to docs on that, but it's widely used (post from an Unbounce tech):
https://community.unbounce.com/t/how-to-run-custom-code-scripts-on-form-submission/5079
(Happy to discuss details via PM on #Measure if that's easier)
Interesting. I haven't seen that last link you shared. Will need to take a look in the future. Thanks.
Hi Julian.
I tried this method and it works.
But I noticed that when utm's are present on the landing page, after submitting the form, ga parameter are not attached to TY page