
November 21, 2025
Custom JavaScript variable in Google Tag Manager
Updated: November 21st, 2025
When it comes to tracking user interactions and customizing data collection, Google Tag Manager (GTM) offers incredible flexibility through its built-in variables. However, sometimes the default options just aren’t enough for the specific insights you need. That’s where the Custom JavaScript variable comes in.
With a bit of JavaScript, you can build powerful custom variables in GTM that allow you to capture unique data points and enhance your analytics setup far beyond the basics.
In this article, I will show you a bunch of Custom JavaScript examples that you can use as is or modify to your needs!

Table of Contents
Here’s what you will learn in this article
- Prerequisites
- When should you use a custom JavaScript variable?
- The basics of creating a custom JavaScript variable
- Example 1: Return the time of visit for a user
- Example 2: Extract portion of page path
- Example 3: Extract information from data layer events
- Example 4: File name
- Example 5: Screen width
- Example 6: Prevent tag from firing in iFrame
- Example 7: Extract a price from a page
- Example 8: Random number from an interval
- Important Notes
- Final Thoughts
Video tutorial
If you prefer video content, here’s a tutorial from my Youtube channel.
Prerequisites
While you don’t need to know much about JavaScript to just copy the codes in this tutorial (I will also try to explain what the code is doing), it is highly recommended to have an idea of what you’re doing so that you can adapt the code to suit different needs that you may have.
For a basic introduction to JavaScript, check out my JavaScript for Google Tag Manager: 5 Topics to Learn article.
Check out my JavaScript for Google Tag Manager course for a more advanced deep dive into JavaScript.
When Should You Use a Custom JavaScript Variable?
Before you start coding, make sure you actually need a custom solution.
| Scenario |
Solution |
| You need a standard URL part (e.g., Page Path, Query Parameter) | Use built-in variables (Faster & Easier) |
| You need to format text (e.g., lowercase) | Use a format value setting in your variable |
| You need to perform math, combine multiple variables, or extract complex data | Use custom JavaScript Variable |
| You need to push data to the Data Layer | Use a custom HTML Tag (Do NOT use a variable for this) |
The basics of creating a custom JavaScript variable
To create a custom JavaScript variable, go to Google Tag Manager, select Variables from the left-side navigation and click “New” under User-Defined Variables.

For the Variable configuration, choose “Custom JavaScript”.

You will notice the large textbox where you can enter your JavaScript code.

The Custom JavaScript variable requires you to use an anonymous function. This means it doesn’t have a name; it just needs to start with function(). This function also must return something.

Note: Unlike with custom HTML tags, you should not use the opening and closing <script> because the custom JavaScript, as the name implies, only accepts JavaScript, and the <script> only applies to HTML.
The rest of the tutorial will look at specific examples of creating custom JavaScript variables. I will go into more detail about the process in the first few examples, and then the later examples will be much shorter.
Example 1: Return the time of visit for a user
One feature lacking in Google Analytics 4 is the ability to group metrics or dimensions. This may be helpful when you want to group the times of day into categories, like morning or night.
This example shows you how to create a new variable called timeOfDay that will return a value based on the time the user visited your site. The code for this example can be found below:
function getTimeOfDay() {
   var now = new Date();
   var hour = now.getHours();
   var timeOfDay;

   if (hour >= 5 && hour < 12) {
      timeOfDay = "morning";
   } else if (hour >= 12 && hour < 17) {
      timeOfDay = "afternoon";
   } else if (hour >= 17 && hour < 22) {
      timeOfDay = "evening";
   } else {
      timeOfDay = "night";
   }

   return timeOfDay;
}
Let’s break down some elements of the code:
- var hour = now.getHour(): This variable will take the current time of the visitor and extract the hour
- var timeOfDay: Returns the time of day based on the if statement
Save your new variable as “cjs – timeOfDay”.

Let’s test to make sure the variable is collecting the correct information. Go to Preview mode, and once the website has loaded, select any event in the left-side navigation of the Preview mode. Check the Variables tab and confirm the variable’s value.

Once you’re confident that the variable is working as intended, you can publish your GTM container. Don’t forget to use proper naming conventions!
Where can you use this variable? Add it to the Google Tag and/or the event setting variable so that it’s collected alongside your events. To use this variable in Google Analytics 4, you must set it up as a custom dimension. Learn more about that here.
If you’re comfortable with JavaScript, then there are a few modifications you could apply to this code to fit your tracking needs:
- You may think the evening starts at 6 PM; you can update the time values, e.g., replace 17 with 18.
- Instead of a time of day, you can group any dimension or metric, e.g., you could make buckets for the prices of items purchased, such as “under $10” and “over $1000”.

Example 2: Extract portion of page path
For the second example, this is our scenario: In your URL, the first part of the page path always includes information on the page’s category, e.g., www.mywebsite.com/help/faq or www.mywebsite.com/womens-clothing/shop.
Information on the page category would be helpful to send as content groups so that you can segment your data. But, to do this, we need to have a variable that just collects this information from the page URL.
Our first step is to make sure the Page Path variable is enabled so that we can use it in the custom JavaScript code. In GTM, go to Variable > Built-In Variables > Configure and check the box next to “Page Path”.

In Preview mode, click on any event and find the “Page Path” variable under the Variables tab. Here, you can see what the information collected looks like. As you can see, the page path is the portion of the URL that comes after the domain name (unlike the page URL, which is the entire URL, including the domain).

For this example, we’ll go through the step-by-step process of building up the custom JavaScript to collect the text between the page path’s first and second “/”.
Back on your website, open developer tools (right-click on the page and select “Inspect”) and go to “Console”.

In the console, we will create a pagePath variable set to a static value just so that we can explore what JavaScript we need to use to get the information we need:

- var pagePath = “/help/faq”: Defines the variables that we want to explore further
- pagePath: Returns the variable value (checking to make sure it’s set)
Now, how do we split up the page path? A touch on the nose, but we will use the split() function.

- pagePath.split(“/”): The sections of the page path are separated by the “/”, so that is how we want to split the sections up.
Here, we can see that the section we are interested in is in the second position of the returned array, index 1. So, we will only extract the value in the second position.
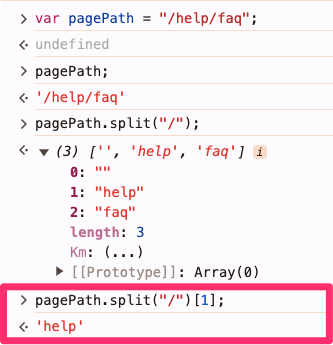
- pagePath.split(“/”)[1]: Only extracting the value in position 2, also referred to as index 1, of the split array. When splitting /help/faq by /, the first result is actually an empty space before the first slash. That is Index 0. The word help is after the first slash, making it Index 1.
If the page path has no sections, the result will be an empty string.

Hopefully, that exercise helped you understand how the following code works:
function() {
  var pagePath = {{Page Path}};
  return pagePath.split("/")[1];
}
- var pagePath = {{Page Path}}: Using the built-in variable to ensure the value dynamically changes as this is not a static value (that was only for the exercise above)
Name the variable “cjs – first part of page path” and save.

Of course, we need to test the variable to ensure it’s working properly, so open up Preview mode and select any event once the website has loaded. Check the Variables tab and confirm the variable appears.

If the information you need is available elsewhere in the URL, this code can be altered by changing the index to extract a different portion of the page path.
Example 3: Extract information from data layer events
Let’s say you have a custom solution in place for an event that fires every time a user makes a purchase, but this event doesn’t fit the mold of what Google Tag Manager expects for e-commerce data, so you cannot use the built-in “Send e-commerce data” function.
Please note that the code in this example only works with the data layer displayed in the screenshot. Slightly different situations may require different codes. If you want to learn more about how to write this type of code, my JS course will help; we focus a lot on such use cases there.
In this example, the event looks exactly like this:
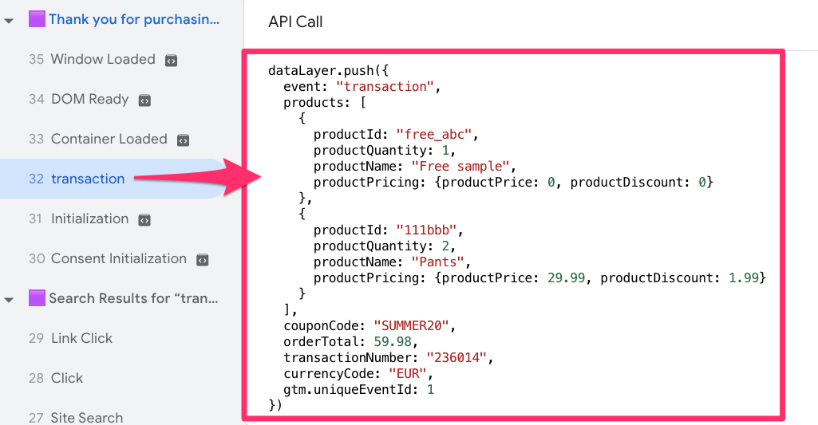
We want to extract information from the products object using a custom JavaScript variable from this data layer push event.
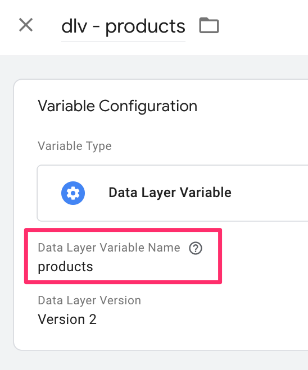
To begin, we need to create a Data Layer Variable for the products object to use as the input for the custom JavaScript variable. Go to Variables and click “New”.

When prompted, click Variable Configuration and find “Data Layer Variable”.

Enter “products” in the textbox and name the variable “dlv – products”. This will be the input we use to create the custom JavaScript variable.
It’s helpful to see what this variable looks like, so load up Preview mode and, on your website, complete the action that triggers the event. Click the event in the left-side navigation of Preview mode, go to the Variables tab, and check the value.

With this variable set up, go to Variables > New > Variable configuration and select “Custom JavaScript”. Let’s look at the JavaScript code step-by-step!
function(){
  var product = {{dlv - products}};
}
- var product = {{dlv – product}}: This variable holds the products array as a value.
function(){
  var product = {{dlv - products}};
  var items = [];
}
- var items = []: This is an empty array. We will use custom code to go through each product in the products object, and based on the data and parameter names, it will build a new structure that will be stored in this array.
This next part is where things get a bit trickier. This loop goes through each item in the products object and extracts information.
function(){
  var products = {{dlv - products}};
  var items = [];for (var i = 0; i < products.length; i++) {
    var item = {
      item_id : products[i].productId,
      item_name : products[i].productName,
      price : products[i].productPricing.productPrice,
      quantity : products[i].productQuantity
    };
    items.push(item)
  }
}
- The loop: For each product in the products array, the loop will create a new item (an object) containing the item ID, name, price, and quantity. Once the item is built, it will be added to the items array.
In the end, the code will return the items array:
function(){
  var products = {{dlv - products}};
  var items = [];for (var i = 0; i < products.length; i++) {
    var item = {
      item_id : products[i].productId,
      item_name : products[i].productName,
      price : products[i].productPricing.productPrice,
      quantity : products[i].productQuantity
    };
    items.push(item)
  }

  return items
}
Name the variable “cjs – product to items”.

To test this, go to Preview mode. Once the website has loaded, complete the event that triggers the transaction event and check the Variables tab to confirm the variable appears.

Example 4: File name
If you have a custom solution for tracking file downloads, you may want to create a variable that returns the file name rather than the entire click URL (e.g., if the Click URL is https://example.com/file.pdf, it will return file.pdf)
Note: Before you test this solution, enable the Click URL variable among built-in variables in your Google Tag Manager container.

The code for the custom JavaScript variable is:
function() {
 var filepath = {{Click URL}}.split("/");
 var filename = filepath.pop();
 var decodedFilename = decodeURI(filename);
 return decodedFilename.indexOf(".") > -1?decodedFilename:'n/a';
}
Save and name the variable “cjs – filename”. Be sure to test the variable in the same way as all the previous examples by going to Preview mode, clicking any event in the left-side navigation, and checking the Variables tab.

Example 5: Screen width
When optimizing website design, it can be helpful to know users’ screen width. Understanding the available screen real estate can help you prioritize content placement and adjust the size of texts, images, and other elements to fit properly.
While Google Analytics tracks ‘Screen Resolution’ automatically, that only tells you the monitor’s size. This custom variable gives you the browser window’s width (viewport). This is much more useful for understanding if users are viewing your ‘Desktop’ site on a small window, or triggering specific responsive design breakpoints.
Using the code below, you can capture this information:
function() {
  var width = Math.max(document.documentElement.clientWidth, window.innerWidth || 0);
  return width;
}
Name the variable “cjs – screenWidth” and save. When you test this variable in Preview mode, you can expect that the variable will look something like this:

Let’s move to the next example.
Example 6: Prevent tag from firing in iFrame
You may have come across an issue where you have the same GTM container on a parent page and in the iFrame, and you don’t want to fire certain tags inside the iFrame. This custom JavaScript variable will return a boolean depending on whether the page is in the iframe or not.
Simo Ahava originally suggested this example. You can read his full article here.
With the code below, you can capture the boolean value and use this to build a triggering exception for the tags you don’t want to fire in an iFrame.
function() {
  try {
    return window.top !== window.self;
  } catch(e) {
    return false;
  }
}
Name this variable something like “cjs – is iFrame” and save. Test this variable by going to Preview mode, loading your site, and checking the Variables tab for any of the events that appear on the left side of the preview.
![]()
![]()
It will be best to test this both on a page that is an iFrame and one that is not to confirm both cases work! If a page is an iFrame, you should get “true”.
![]()
![]()
Example 7: Extract a price from a page
Note: DOM Scraping is risky. If your website developers change the CSS class or ID of the price element, this variable will stop working. Always prioritize Data Layer variables (like in Example 3) over this method whenever possible.
This option will work if the price on your website matches one of the following examples (works with any currency code or sign):
- “some text 1200.00” (e.g., Price: 1200.00)
- “some text 1200.00 some text” (e.g., The price is 1200.00 for each pair)
- “$1200.00” (applies to other currency signs too)
- “1200.00USD” (or some other currency code).
For all these examples, the custom JavaScript variable will return the string ‘1200.00‘.
If this fits how the price that you want to extract looks on your site, then the code you need is below:
function() {
  var priceText = document.querySelector('ENTER_YOUR_SELECTOR');
  if (priceText) {
  var regex = /([0-9.,]+)/;
  if (regex.test(priceText.innerText)) {
    return priceText.innerText.match(regex)[0];
  }
  }
}
Important: You must change the ENTER_YOUR_SELECTOR part to be the actual selector of the price element. For example:
- If the price element has the class “selected-ticket-price”, the CSS Selector will be “.selected-ticket-price”.
- If the price element has the ID “order-total”, the CSS selector will be “#order-total”.
Keep in mind that any of these variables will return the proper value ONLY if the price element exists on a page:
I recommend using this variable on DOM Ready event and subsequent events. DO NOT use it on the Container Loaded (a.k.a., Pageview) because for some users, the DOM might not be fully rendered, yet.
![]()
![]()
If you want to extract the price from your site, but it looks different than the examples I shared above, you can check out the full article on how to extract the price from a page with Google Tag Manager.
Example 8: Random number from an interval
If you have ever used a built-in random number variable in GTM, you already know how it works: you have a huge interval between 0 and 2147483647, which might return a random value. But what if I want to get a random number from the interval between 1 to 3? In that case, the built-in variable becomes very limited.
The good news is that I have this little piece of JavaScript code that can be implemented as a Custom JavaScript variable.
function (){
 var min = 1; //edit the minimum possible value
 var max = 5; //edit the maximum possible value
 return Math.floor(Math.random()*(max-min+1)+min);
}
If you want the interval to be bigger or smaller, you can just update the min and max values! Name the variable “cjs – random number interval“ and save.
Testing this is simple. Just open Preview mode and load up your site. Back in the preview, click on any event in the left-side tab, select the Variables tab, and find the variable.
![]()
![]()
For more examples, check out my JavaScript for Google Tag Manager course! In that course, we focus a lot on how you can write the code snippets on your own (based on your specific needs).
Important Notes
There are a few things you should keep in mind when working with Custom JavaScript variables:
- Avoid pushing information into the data layer because the custom JavaScript might be called multiple times, and you cannot guarantee that Google Tag Manager will only push the information into the data layer once, so there is a chance you could end up getting multiple data layer pushes. This is what custom HTML tags are for, so if you want to do this, use custom HTML.
- Ensure you are using the correct case. JavaScript is case-sensitive, so keep the same formatting for your JavaScript variables to avoid confusion, e.g., camel case (when the first word in the variable is lowercase and all proceeding words are uppercase, such as timeOfDay).
- If you want to use any of these variables in GA4, you can add them as event parameters (to either the Google Tag, event setting variable, or a GA4 event tag) and create a custom dimension in GA4.
Custom JavaScript variable in Google Tag Manager: Final Thoughts
If you weren’t before, maybe now you’re convinced about the usefulness of custom JavaScript variables. Once you become more experienced with tracking, you will start to find that the out-of-the-box solutions you find online don’t always cut it.
Exploring custom JavaScript variables in GTM is a great way to explore more capabilities. Here is a quick recap of what you should remember:
- Always return a value: Every custom JS variable must be an anonymous function that ends with a return statement.
- Read, don’t write: Use these variables to extract data (like prices or page paths), but never use them to push data to the Data Layer.
- What to do next:
- Test your variables: Use GTM Preview mode to verify the output of every new variable before publishing.
- Start simple: Try the “Time of Day” or “Screen Width” examples on your own site to get comfortable with the syntax.
Do you have any cool ways that you use custom JavaScript variables? Share them below!
1 COMMENT
Thank you so much for these resources! I use them all the time for GTM.
I recently set up a custom javascript variable (code below) in GTM to pull author name ("creator") from different pages on a blog. I then set up a tag that sends a custom event to GA4 with the author's name. The trigger is a basic pageview trigger for an article page (looking at Page URL).
When I go to the debug mode, though, and click through the site, GTM sends hits for the author of every page I visit. So if I go to John Smith's page, followed by Jane Smith's page, the hits sent for Jane's Smith page are "Jane Smith" and "John Smith."
Any ideas what's going wrong here? Thank you!!!
function() {
var ldjson = document.querySelector('[type="application/ld+json"]');
var json = JSON.parse(!!ldjson ? ldjson.innerHTML : '{}');
return json.creator
}