
January 5, 2026
Complete Google Tag Manager Data Layer Tutorial
Updated: January 5th, 2026
Data Layer is one of the main Google Tag Manager concepts, which ensures maximum flexibility, portability, and ease of implementation. Without it, there would be no variables or triggers in GTM, no tags would be fired. It keeps your tag management running properly and is the key to unlocking Google Tag Manager’s potential.
But why is the Data Layer so central to effective tag management, especially compared to other methods GTM offers for capturing data? While GTM can extract information directly from the webpage’s HTML content (using DOM Element variables, a.k.a. ‘DOM scraping’) or from the URL, these approaches often introduce challenges.
Relying on the visual structure of your website (DOM scraping) makes your tracking setup more fragile. If a developer changes an element’s ID, class, etc., your GTM triggers and variables based on those selectors can break, leading to silent data loss or inaccurate tracking until you manually fix them.
The Data Layer solves this problem by creating an intermediary, structured ‘data reservoir’ independent of your website’s visual design.
I have already published several articles on this blog related to this topic, but they are scattered. That’s why I decided to collect all the important resources, tips, and knowledge (that I’ve accumulated so far) and put them in one place.
This is an extended Google Tag Manager Data Layer tutorial that explains:
- What is the Data Layer?
- Why is it useful?
- How to use it?
- Best practices when dealing with the Data Layer.

Table of Contents
– Hide table of contents –
- Additional options to learn Data Layer
- #1. What is Data Layer?
- #2. Storing data in the Data Layer (dataLayer.push)
- #3. Reading Data from the Data Layer
- #4. Send Data from the Data Layer to Other Tools
- #5. Using Data Layer Data as Triggers
- #6. Using Data Layer Events as Triggers
- Troubleshooting common data layer issues
- Data Layer best practices
- Final words
Video tutorial
If you prefer video content, here is a tutorial from my YouTube channel.
Additional options to learn Data Layer
This blog article is a compilation of all the resources you need to get started. But there’s only so much you can read and implement. If you want to get into the nitty-gritty of handling Google Tag Manager, I explain it in two of my premium GTM courses:
In the beginners’ course, we take a solid overview of what the Data Layer is in general, why it is important, and how to work with it. I also let you directly interact with the data layer and gain more experience that way.
In the Intermediate course, we take a much deeper dive into topics that are out of the scope of this blog post. Understanding the full potential (and technicalities) of the Data Layer is key to successful tracking implementations.
And if you want to learn how to manipulate data stored in the data layer and adapt it to various marketing/analytics vendors, take a look at my JavaScript course.
#1. What is Data Layer?
Technically speaking, a Data Layer is a JavaScript array that stores certain information. If that does not ring a bell, here’s a simpler explanation.
It’s an invisible/virtual website layer where you, your developers, or various tools can store data (about the user, page content, etc.). From there, Google Tag Manager reads that information, uses it in tags/triggers/variables, or sends it further to tools like Google Analytics, Google Ads, Facebook Pixel, you name it.

The Data Layer is automatically created once you place the Google Tag Manager container’s JavaScript Snippet in your website’s source code. You don’t need to add anything more unless you want to fill it with additional data.
This additional information in the Google Tag Manager Data Layer can be passed by placing an additional Data Layer snippet above the GTM snippet or using dataLayer.push method (which is the best method, in my opinion).
Continue reading this Google Tag Manager Data Layer tutorial to find out why dataLayer.push should be your only option to add the data to the Data Layer.
#2. Storing data in the Data Layer (dataLayer.push)
There are two ways to push data to the Data Layer. Actually, there is only one you should use, but for the sake of knowledge, I’ll mention both:
- By adding a Data Layer snippet above the GTM container snippet (this method is called Data Layer Declaration).
- Or by pushing data with dataLayer.push method.
What’s the difference, you ask?
|
Method |
How it works | When to use |
Why it’s risky / recommended |
| Data layer declaration | A developer places a dataLayer = [{…}] snippet above the GTM container code. | Rarely. Only for critical data that must be available at the earliest possible moment before GTM loads. | Risky: This method can overwrite the Data Layer and interfere with GTM’s initial processes. It can break tracking if not implemented perfectly. |
| dataLayer.push() | A developer uses the window.dataLayer.push({…}) method to add data to the existing Data Layer at any time. | Almost always. Use this for page information, user actions, transaction data, and custom events. | Recommended: This is the safest method. It queues messages and adds data without overwriting what’s already there, ensuring it doesn’t conflict with GTM’s operations. |
The first method is useful if you want to push custom data right when the page loads, for example, product data when the product page loads. You might want to send that product data from the Data Layer to the Meta Pixel (with View Content event).
In this case, your developers must add a Data Layer snippet above the Google Tag Manager tracking container with parameters like product ID, product title, etc. Here’s an example:
<script>
 dataLayer = [{
   'productID': '123456',
   'productTitle': 'Very awesome product',
   'productPrice': '13.00'
 }];
</script>
<!-- Google Tag Manager -->
...
<!-- End Google Tag Manager -->
Later, with the help of the Data Layer variable, you can read that information and transfer it to Meta Pixel.
The second method (the one I recommend) (dataLayer.push) lets you push additional data when certain events occur on your website. Here are a few examples:
Let’s say you have a newsletter signup form that cannot be easily tracked with a default form listener in Google Tag Manager. You should ask your website developer to fire a Data Layer event when a new subscriber has successfully filled out the form.
window.dataLayer.push({'event': 'new_subscriber'});
If you wish, you can ask your developer for additional information (e.g., form location, because you might have more than one form on the same page).
window.dataLayer = window.dataLayer || [];
window.dataLayer.push({
   'formLocation': 'footer',
   'event': 'new_subscriber'
 });
Or for example, when a visitor adds a product to his/her cart, a Data Layer event (containing the product’s information) could be fired.
If you want to learn more about dataLayer.push, read this guide.
Like this Google Tag Manager Data Layer tutorial so far? Consider subscribing! Just enter your email address in the form below. I promise to share only awesome GTM content.
#3. Reading Data from the Data Layer
Imagine there are several authors in this blog:
- Me
- John Doe
- Jack Torrance
- etc.
I want to determine which authors write the most engaging content and then segment sessions in Google Analytics. I use Tamás Geiger’s WordPress plugin that stores the post author name in the Data Layer. If you don’t have WP, ask a developer to add additional data points to the Data Layer.
The snippet looks like this:
<head>
   <script>
     window.dataLayer = window.dataLayer || [];
     window.dataLayer.push [{
    pagePostAuthor: 'Julius Fedorovicius'
  }];
   </script>
   <!-- Google Tag Manager -->
   ...
   <!-- End Google Tag Manager -->
</head>
#3.1. Data Layer Variable
Google Tag Manager, by default, does not recognize custom data in the Data Layer. I mean that you cannot use it unless you use the Data Layer Variable.
To create a variable, you’ll need to specify the Data Layer key of the value you want to retrieve. When the variable is resolved, it will return whatever was recently pushed into the key. Easy as that!

If I wanted to fetch the pagePostAuthor value, I’d need to set the pagePostAuthor key in the variable’s settings.
Say you want to send an event to Google Analytics 4 when someone leaves a comment. Let’s say you want to push the full name of the article’s author along with the event. This way, you’ll see which authors drive the highest reader engagement.
In this example, I will not go into details on how to create a tag. I will only demonstrate how to pull the data from the Data Layer and turn it into a variable (within Google Tag Manager).
In your Google Tag Manager account, go to Variables and create a Data Layer Variable with the following settings:

That’s it! Save this variable, refresh Preview and Debug (P&D) mode, and open the website you’re working on. You should then see your newly created variable in the Variables tab of the Preview & Debug window.

#3.2. Data Layer Version
Another setting available in the Data Layer Variable is Version. When you select the Version, you’re instructing Google Tag Manager to treat the values in the data model in two different ways.
#3.2.1. Version 1
Version 1 is pretty limited and does not allow you to access nested values. If you create a Data Layer variable and try to access the information stored in pagePostAuthor (in the example below), you’d fail because it’s not in the root of the object (instead, it’s a direct child of the attributes key).
<script>
window.dataLayer = window.dataLayer || [];
window.dataLayer.push({
  'attributes': {
    'pagePostAuthor': 'Julius Fedorovicius'
  }
});
</script>
So, if you want to fetch the Post Author’s name, the object in the Data Layer should look like this:
<script>
window.dataLayer = window.dataLayer || [];
window.dataLayer.push({
  'pagePostAuthor': 'Julius Fedorovicius'
});
</script>
See? There’s no attributes key, and pagePostAuthor is at the root level.
That’s not the only limitation of Version 1. When you push the data to the Data Layer, it will overwrite the entire object.
Confused? Here’s an example.
Imagine that we have two Data Layer push codes with different data. The first push contains only pagePostAuthor, the other one includes two more keys, pageCategory and pagePostType.
<script>
//The 1st Push
window.dataLayer = window.dataLayer || [];
window.dataLayer.push({
  'authorData' : {
    'pagePostAuthor': 'Julius Fedorovicius'
  }
});
//The 2nd Push
window.dataLayer = window.dataLayer || [];
window.dataLayer.push({
  'authorData' : {
    'pageCategory': 'google-tag-manager-tips',
    'pagePostType': 'post'
  }
});
</script>
As a final result, you’d have only two values in the Data Layer: pageCategory and pagePostType. Why? Because the second push to the authorData object has completely overwritten the data of the 1st push.
So what’s the point of the 1st Version? It sounds like a useless thing, you might say.
That’s not entirely true. I’ve noticed that sometimes (e.g., in GA4 e-commerce), it’s important to have a “clean” Data Layer without previous values, meaning that every time a window.dataLayer.push occurs, it completely wipes out the old data and stores the new one.
#3.2.2. Version 2
The 2nd version is much more flexible. It allows you to access nested values and arrays and merge data.
Let’s go back to the previous example of two subsequent Data Layer Pushes. The first push contains only pagePostAuthor, while the second one includes two more keys, pageCategory and pagePostType.
<script>
//The 1st Push
window.dataLayer = window.dataLayer || [];
window.dataLayer.push({
   'authorData' : {
    'pagePostAuthor': 'Julius Fedorovicius'
   }
});

//The 2nd Push
window.dataLayer = window.dataLayer || [];
window.dataLayer.push({
   'authorData' : {
   'pageCategory': 'google-tag-manager-tips',
   'pagePostType': 'post'
}
});
</script>
Contrary to Version 1, all three values would remain in the Data Layer when you use Version 2.
{
'authorData' : {
   'pagePostAuthor': 'John Doe',
   'pageCategory': 'google-tag-manager-tips',
   'pagePostType': 'post'
   }
}
Simo Ahava has posted a detailed guide about Data Layer Versions. If you still have some questions, go check it out.
#3.2.3. Default Value
The last setting in the Data Layer Variable is Default Value. If you’re trying to access the value of a particular key in the Data Layer AND that key does not exist, a default value of “undefined” will be returned.
Sometimes you might need to get a different default value (e.g., not set), empty, or whatever fits your business goal. In that case, click the checkbox and set the default value.

#3.3. But what about other data structures?
Remember that data can be stored in the Data Layer using different structures. Here’s an example where the key pagePostAuthor is in the root level:
<script>
window.dataLayer = window.dataLayer || [];
window.dataLayer.push({
   'pagePostAuthor': 'Julius Fedorovicius'
});
</script>
Or this one (pagePostAuthor key is now a descendant of the attributes key):
<script>
window.dataLayer = window.dataLayer || [];
window.dataLayer.push({
   'attributes': {
    'pagePostAuthor': 'Julius Fedorovicius'
   }
});
</script>
Or even like this (there are two arrays that are the descendants of the ecommerce.items key):
window.dataLayer = window.dataLayer || [];
window.dataLayer.push({
   event: 'purchase',
   ecommerce: {
    transaction_id: 'T_12345',
    affiliation: 'Google Merchandise Store',
    value: 25.42,
    tax: 4.90,
    shipping: 5.99,
    currency: 'USD',
    coupon: 'SUMMER_SALE',
    items: [
     {
      item_id: 'SKU_12345',
      item_name: 'Stan and Friends Tee',
      item_category: 'Apparel',
      price: 9.99,
      quantity: 1
     },
     {
      item_id: 'SKU_12346',
      item_name: 'Google Grey Women's Tee',
      item_category: 'Apparel',
      price: 20.99,
      quantity: 1
     }]
    }
   });
In the first two examples, entering the key’s name (pagePostAuthor) wouldn’t return its value. There’s something else you need to know.
#3.4. Pull Data from Child Keys
This section might sound confusing, so I’ll make this as non-technical as possible.
Keys that are descendants of other keys are called child keys (to be honest, I’ve found various terms on this one, but child key sounds the most comprehensible for non-developers).
In the example below, you can see that attributes are at the first level, and pagePostAuthor is on the 2nd.
Here, pagePostAuthor is a child key because it is nested within the attributes key.
{
 attributes: {
   pagePostAuthor: 'Julius Fedorovicius'
 }
}
To pull its value, you should slightly change one setting in a variable (within Google Tag Manager). Instead of pagePostAuthor, you should enter attributes.pagePostAuthor as the Data Layer Variable Name.

What if pagePostAuthor also had a child key? What would you do?
{
  attributes: {
    pagePostAuthor: {
      authorName: 'Julius Fedorovicius',
      authorTag: 'Google Tag Manager'
    }
  }
}

That’s right. You should define the full path to that particular key: attributes.pagePostAuthor.authorName, and so on. Every level should be separated by a dot.
Accessing child keys in Data Layer is pretty common. When someone asks me to give an example, I always tell them about the AJAX listener that tracks AJAX form submissions.
In my blog post about Google Tag Manager AJAX form tracking, I’ve explained how to use the AJAX listener which listens to all AJAX requests and pushes valuable information to the Data Layer. Here’s an example:

There are a lot of nested keys. To pull data from Data Layer, you’ll need to use dot notation in the Data Layer variable’s settings, e.g., attributes.response.

#3.5. Pull Data from Array Members
I was working with a developer on implementing Ecommerce Tracking with GA4. Following Google’s guidelines, I asked a developer to push successful order data to the Data Layer. Then, I could fetch that event via a GA4 tag within Google Tag Manager.
It’s very important that the developer follows guidelines and pushes data using the structure as instructed by Google. Here’s the official example from their knowledge base:
window.dataLayer = window.dataLayer || [];
window.dataLayer.push({
 event: 'purchase',
 ecommerce: {
   transaction_id: 'T_12345',
   affiliation: 'Google Merchandise Store',
   value: 25.42,
   tax: 4.90,
   shipping: 5.99,
   currency: 'USD',
   coupon: 'SUMMER_SALE',
   items: [
    {
     item_id: 'SKU_12345',
     item_name: 'Stan and Friends Tee',
     item_category: 'Apparel',
     price: 9.99,
     quantity: 1
    },
    {
     item_id: 'SKU_12346',
     item_name: 'Google Grey Women's Tee',
     item_category: 'Apparel',
     price: 20.99,
     quantity: 1
    }]
   }
 });
You know what? This is very useful information. Let’s say that I’d also want to push this order data to other marketing tools. It made sense for me to push data for price, name, and quantity. Here’s what I *could* do for price.

Unfortunately, this would not work. The same would happen with ecommerce.items.price, ecommerce.items.item_name, etc. All those newly created Data Layer variables always returned undefined. So what’s wrong?

Notice anything suspicious? In my GA4 Ecommerce example (taken from Google Knowledge Base), ecommerce.items has 2 item_name keys, 2 price keys, etc. So how will Google Tag Manager know which value I am interested in? The first item or the second one? And what would happen if a user purchased 5 products?
What we are dealing here with is called arrays. ecommerce.items. It is an array containing two products with the same collections of keys: item_id, item_name, item_category, price, and quantity.
In Javascript, if you want to pull the value of the first product’s price, you’d need to use ecommerce.items[0].price (the index starts from 0). Google Tag Manager does not support square brackets in this context, so you’d need to use dot notation. So the final key would look like this: ecommerce.items.0.price.

In Google Tag Manager, your Data Layer variable should look like this:

When set correctly, this will now return the value of the first item. Refer to the screenshot below.

If there were 5 products in the array and you wanted to access the price of the 5th product, the Data Layer Variable name should be ecommerce.items.4.price. Remember, the index here starts from zero, so the first product is actually not the 1st, but the 0th.
Tired? If yes, feel free to bookmark this Google Tag Manager Data Layer tutorial and return later.
#4. Send Data from the Data Layer to Other Tools
A quick checkpoint in our Google Tag Manager Data Layer Tutorial. So far, let’s see what we have achieved:
- Custom data was stored in the Data Layer (thanks to your coding skills, your developer’s coding skills, or some 3rd party plugin).
- Google Tag Manager started recognizing that custom data (thanks to the Data Layer variable).
- Now, we need to send this data to other tools, like Google Analytics 4.
#4.1. Enable Preview and Debug Mode in Google Tag Manager
Let’s head back to the example of fetching the name of the author who is most ready on my website. So, we must check if Google Tag Manager captures a value in the pagePostAuthor variable.
In your GTM panel, enter Preview and Debug mode (by clicking the Preview button)

When Debug mode is enabled, a new tab should be loaded where you will have to enter the URL of your website.

Click Start, and the URL will open in a new tab.
Click Variables in the Preview mode’s tab and look for pagePostAuthor. Check its value. If pagePostAuthor returns undefined, you should double-check whether you have entered a correct Data Layer Variable name in GTM’s admin panel (by the way, it’s case-sensitive).
In my case, the pagePostAuthor variable is defined correctly because I get the value Julius Fedorovicius.

#4.2. Send pagePostAuthor Data Layer Variable to Google Analytics
- Go back to your Google Tag Manager account.
- Go to Tags and click New.
- Click the Tag Configuration box.
- Select the Google Analytics > Google Tag. If you don’t have one, create one.
- Enter the name for the tag – GA4 config (actually, you can name it whatever you want)
- Enter your GA4 Measurement ID
- Click Shared event settings
- Enter the Parameter Name as page_post_author and {{dlv – pagePostAuthor}} Data Layer variable in the Value field. In Google Tag Manager, variables are surrounded by double curly braces {{}}.

- In the Triggering section, choose a condition that matches when your audience visits any article on the Blog page. In my case, it would be Initialization All Pages.
- This way, with every page view, you’ll send the value of a pagePostAuthor variable as an event parameter.
That’s how you can transfer additional data from the Google Tag Manager Data Layer to Google Analytics. But don’t limit yourself just to custom dimensions. You can use Data Layer variables for Meta Pixel, LinkedIn Insight Tag, etc.
#4.3. Create a custom dimension in Google Analytics 4
page_post_author is a custom parameter defined by you (or your developer). Google Analytics 4 will not display the parameter in your reports unless you add it as a custom dimension. Let’s name it Page Post Author (actually, you can call it whatever you want).
- Login to your Google Analytics 4 account.
- Open your website’s account, and click on Admin. You should see something like this:

- Click Create a custom dimension to add the desired custom parameter (in this case, page_post_author).
- Enter the Dimension name as Page Post Author (or anything else), choose Event as a scope, add page_post_author as the Event Parameter, and click Create.

#5. Using Data Layer Data as Triggers
Data Layer can also be used for more advanced tag-firing rules. For example, you can fire a Google Ads remarketing tag only when a user is on a Free plan. Let’s take a closer look at this example.
- Open the Google Tag Manager admin panel.
- Go to Tags and click New.
- Enter a name, i.e., Google Ads remarketing tag
- Choose Tag Type – Google Ads Remarketing
- Enter Conversion ID and Conversion Label
- Leave all other settings as default and click Continue
- In the Triggering section, Click the Plus icon in the top right corner and enter the name – I suggest “Pageview – Users with the free plan”. Choose Pageview as a trigger type.
- Suppose you don’t want this tag to fire on every page. In This Trigger Fires on section, click Some Page Views and enter the following rule: dlv – pricingPlan equals Free. This means that the Google Ads remarketing tag will fire only when pricingPlan Data Layer variable is exactly Free. Premium users will not trigger the rule.

#6. Using Data Layer Events as Triggers
Another common example of Data-layer-based triggers is to use events. In addition to custom data, you can also push events to the Data Layer by using window.dataLayer.push.
window.dataLayer = window.dataLayer || [];
window.dataLayer.push({
  'formLocation': 'footer',
  'event': 'new_subscriber'
});
The parameter event indicates that this is a Data Layer event. All events can be seen in the Preview and Debug mode’s stream.

Now, let’s set this event as a trigger for the Google Analytics Event Tag.
- Go to Triggers and click New
- Enter name. I suggest calling it Custom – new email subscriber
- Choose type – Custom event (all Data Layer events are treated as custom events in GTM).
- Fire on – new_subscriber. You need to enter the exact title of the event that you see in Preview and Debug console.

Let’s get back to our window.dataLayer.push event example. Here’s the code:
window.dataLayer = window.dataLayer || [];
window.dataLayer.push({
 'formLocation': ‘footer’,
 'event': new_subscriber
});
Wouldn’t it be nice to pass the formLocation data to Google Analytics? Google Tag Manager will not catch this parameter by default, so we need to create another variable. Go to Variables > User-defined variables and click New.
- I recommend naming it dlv – formPosition.
- Choose type – Data Layer Variable. Variable Name – formPosition (that’s exactly how the parameter is called in the previous code example.) Leave all other settings as is and click Create Variable.

Finally, let’s create a Google Analytics Event tag when a new subscriber submits his/her email address.
- Go to Tags and click New
- Choose the Tag Type – Google Analytics > Google Analytics: GA4 Event
- Enter Measurement ID or a variable that contains the measurement ID
- Add event name as new_subscriber.
- In the Event Parameters, put form_location as the Parameter Name and {{dlv – formPosition}} as the value.
- As for triggering conditions, select the Custom – new email subscriber trigger previously created.
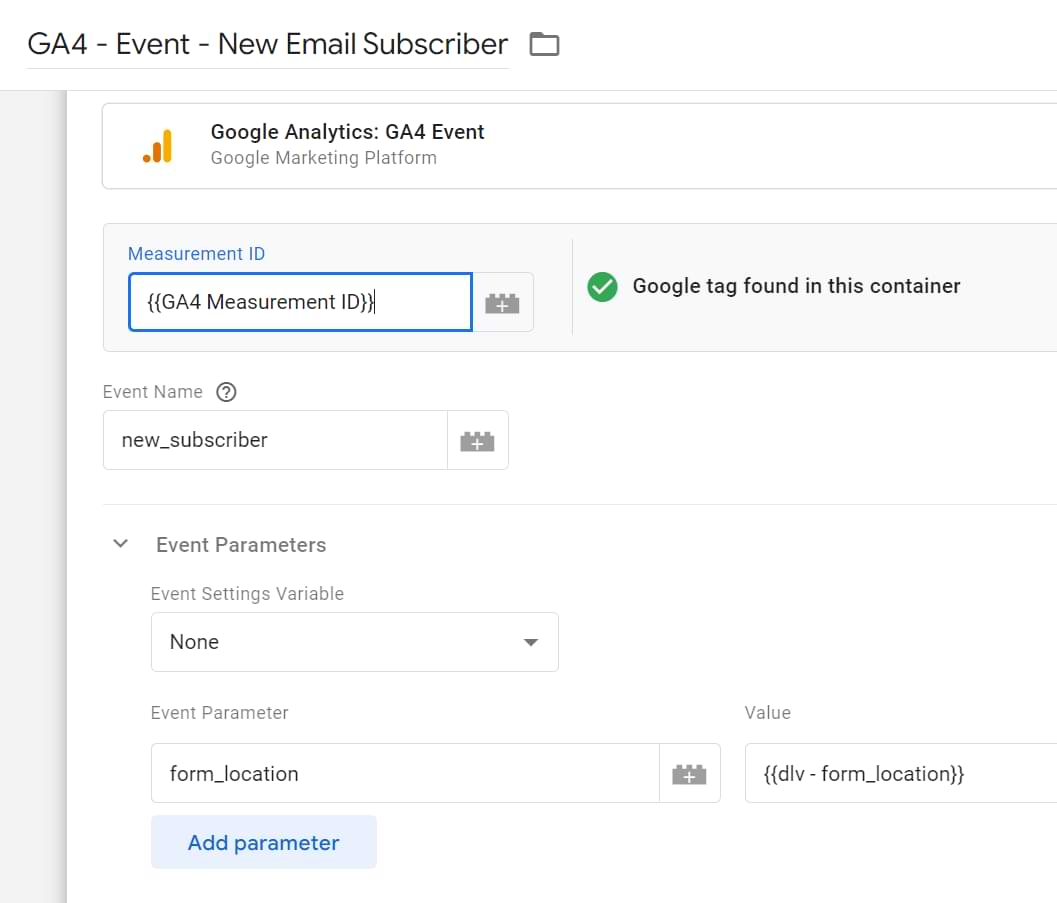
- Click Continue
- Done. You’re good to go!
The following (and final) steps are:
- Check all new tags in Google Tag Manager Preview and Debug console (whether they fire correctly)
- Check Debugview in the Google Analytics account (whether new_subscriber event is working properly)
- Install Google Tag Assistant legacy (in Chrome Browser) to make sure whether remarketing tag fires correctly
You can learn more about Custom Event Trigger in this blog post.
Troubleshooting common data layer issues
If your Data Layer variables or triggers aren’t working as expected, check these common problems:
- Variable returns “undefined”: This is the most common issue. It means GTM cannot find the key you specified at the moment the variable is needed.
- Check for typos: Data Layer keys are case-sensitive. pagePostAuthor is different from pagepostauthor. Double-check your variable configuration in GTM against the key in the Data Layer tab of the Preview mode.
- Check the timing: Make sure the dataLayer.push() containing your data occurs before the GTM event where your variable is being used. If you are trying to use a variable on the “Container Loaded” event, but your data is pushed on “Window Loaded”, the variable will be undefined at first.
- Check the scope: Is the key nested inside another object? If so, you must use dot notation (e.g., attributes.pagePostAuthor).
- Custom event trigger isn’t firing: For a Custom Event trigger to work, the dataLayer.push() must contain an ‘event’ key. Make sure the event name in your trigger configuration exactly matches the value of the ‘event’ key in the push.
- Check for typos: Data Layer keys are case-sensitive. pagePostAuthor is different from pagepostauthor. Double-check your variable configuration in GTM against the key in the Data Layer tab of the Preview mode.
- Data is overwritten: If you find that data is disappearing, a developer may have used a direct dataLayer = [{‘key’: ‘value’}] declaration instead of dataLayer.push(). This overwrites the entire Data Layer. Always use the .push() method to add data.
Data Layer best practices
To make sure your Data Layer implementation is robust, follow these key best practices:
- Always use dataLayer.push(): Avoid declaring the dataLayer directly above the GTM snippet. The dataLayer.push() method is the safest and most reliable way to add information without overwriting existing data or interfering with GTM’s operations.
- Work with your developers: For custom data, provide developers with clear specifications for the event names and data structure you need. A well-defined dataLayer.push() is more reliable than relying on DOM scraping. If a developer is not available (but you’re working with a popular content management system), then look for a Google Tag Manager plugin. They usually are pretty good with adding data to the dataLayer.
- Use a consistent naming convention: Standardize your event and variable names. A common practice is to use “snake_case” (e.g., add_to_cart, product_id) for event and parameter names, as it’s readable and widely used.
- Use the event key for triggers: When you want an action to be available as a trigger in GTM, always include an event key in your dataLayer.push(). This is what creates a custom event in the GTM event stream.
Google Tag Manager Data Layer: Conclusion
If you read the entire Google Tag Manager Data Layer tutorial, well done (and thank you)! If you skipped to the summary without reading the entire thing, I suggest bookmarking this page so you can return later.
In this Google Tag Manager Data Layer tutorial, I’ve explained the key concepts of what the Data Layer is, why you should bother learning more about it, why is it important, etc. If you haven’t read this guide and just scrolled down to the conclusion, then spoiler alert, it’s SUPER IMPORTANT.
In a nutshell, here’s what the Data Layer is and how it works:
- Data Layer is a central place (virtual layer) of a website where you, your developers, various tools can store data (about the user, his/her behavior, etc.). From there, Google Tag Manager reads that information and sends it further to other tools, Google Analytics, Google Ads, Facebook, etc.
- Data Layer is not some magical place on a server where you keep the data. It’s a temporary data storage created after GTM has loaded and is completely wiped out whenever the page refreshes or is closed.
- When the Google Tag Manager code is loaded on the page, the Data Layer is created automatically.
- If you want to have some custom data in the Data Layer, you (or your developer) have to use window.dataLayer.push method to push the data. If you don’t know how to code, ask developers to do that or look for 3rd party plugins/tools which can do that.
- By default, Google Tag Manager does not recognize custom data stored in the DL. Therefore, you need to create Data Layer variables in GTM. In the case of Data Layer events, you also have to create Custom Event Triggers.
- Finally, feel free to insert Data Layer variables in tags (within Google Tag Manager), e.g., Google Analytics 4 event tag, Custom HTML tag, etc. Variables must be surrounded by double curly brackets {{ }}.
Is there anything I missed in this Google Tag Manager Data Layer tutorial? Let me know in the comments section below.
32 COMMENTS
I have a question regarding dataLayer variable. When submitting data to GTM and for analysis when we view the submitted data in GTM it gives us the access of submitted variable values. In addition to custom variable using standard variable we can get PageURL information also.
If I would like to restrict submission of complete URL with query string to GTM (e.g. if page access URL is https://yordomain.com/a.aspx?id=12345678 then I would like to submit only URL as https://yourdomain.com/a.aspx) then what changes are needed, Is it possible or not?
Please suggest.
If you want to work with particular parts of the URL, you should use a URL variable in GTM.
Hello,
Thank you for writing this blog. I have an issue that I am facing with the data layer now. I am hoping someone can please help me with this: my problem is this: On my WordPress website when a user creates a comment, the button 'Submit' is clicked, when it is clicked, through code I push an event 'Comment added' to the datalayer. But when the button submit is clicked the page also reloads and in my header file.php that loads with every page the datalayer is recreated there before the GTM code. So basically my event 'Comment Added' does not fire to the Google Analytics platform. So how can I stop the datalayer from refreshing on a page reload? Or how can I ensure that there is only one datalayer for each session and not have it reload whenever the user navigates to another page?
The dataLayer does not refresh your page. The comment submission does (so one of the solutions, I guess, could be a timeout between the comment submission and the page refresh (that should be handled in your php code. I'm not a coder so I cannot help you here).
The other solution could be to use transport: beacon setting in your GA tags. This is not supported on all browsers but in general, the support is pretty decent. Check this guide for more info https://www.simoahava.com/analytics/leverage-usebeacon-beforeunload-google-analytics/ (it mentions useBeacon but also directs to the most recent solution, transport: beacon).
It will give a moment for the GA tag for properly fire before the browser tab/window is actually closed
thanks for the detailed go-through! i have one question, though.
the custom event value 'new_subscriber'
Fire on – new_subscriber. You need to enter the exact title of the event that you see in Preview and Debug console.
how can we set the exact title if the event value is set to a nested data layer e.g.
'event': [{
'name': 'pageView',
'category': 'Apparel',
'price': 11.99,
'quantity': 1
},{
'name': 'formView',
'category': 'Apparel',
'price': 9.99,
'quantity': 2
}]
the custom event in Tag Manager seem to place one the title of the event if there is only one event in the data layer. what if there are more than one event in the data layer? any idea?
"event" works in GTM only if it is a string. The trigger will not work if your "event" is an array.
Hello
For marketeers this still is a very complex language. All of the articles that i read about Ecommerce GTM is written to developers or someone who understand the language, and so this one is. I really need somethng more basic. Its like, im a marketeer, i dont know anything about code or gtm. How can i set my GA ecommerce tracking on GTM, step by step?I dont want to be an expert now, i just want to get this set.
Hey, Ecommerce tracking is not a walk in a park. If you consider this explanation of the Data Layer complex (in this post), then I have some bad news: things will become even more complex if you plan to implement Ecommerce tracking only on your own.
GTM is a simple tool to do basic stuff like track clicks, scrolling, video interactions (in most cases), etc. But there are things are more complex and might require even some coding basics.
GTM is not some magic tool that totally replaces developers. In some cases you will need to work shoulder-to-shoulder with a developer. And dataLayer implementation (including ecommerce tracking) is one of those cases where developer's input is very much needed.
Here's a guide on how to implement standard ecommerce in GA - https://www.analyticsmania.com/post/ecommerce-tracking-with-google-tag-manager/
It is 100x easier than Enhanced Ecommerce tracking with GTN.
And if you don't want to spend time learning or becoming expert and you just want to get things done, maybe you should hire a professional instead. In the meantime you could focus on other things that matter to your business.
I do want to learn a little about it. I started already with some basic events and im preparing se set the ecommerce tracking, along with the developers team. But of course, they dont know what do i want to measure, i have to give them some instructions, like what data layer goes in what do i want to track, and so on. It must not be rocket science dough, i will get to manage it, but i would be glad to find some information that really help merketeer in this task, and doesnt make it more complex. Thanks for this article, bu i think standart tracking wont do it.
Gotcha. Keep in mind that Enhanced Ecommerce is one of the most difficult GA features to implement thus it won't be a walk in a park for marketers who are just starting. Eventually, you will have to dig deeper and understand what Data Layer is, how it works and how to instruct a developer where to implement it.
Hey, is there is a limit to the number of values you can have in a dataLayer? Have a travel site with a TON of filters and data points that would be easiest to track in the dataLayer, but wasn't sure if there was a hard (or practical) limit that I should keep in mind.
Thanks again. Great post. I've been reading and re-reading it for a couple of years now.
I know that there is a limit of last 300 dalaLayer.pushes in the preview and debug mode (which has no serious implications). Regarding the number of data points in DL, I am not aware of limits (but that does not mean there is none). I just never faced it.
Hello, You are the best at Google Tag Manager and GA. I have learned a lot at this website, i am a junior web developer and i am facing an issue, i want to implement Google Tag Manager and GA on a flight and hotel booking website the requirements are that i want to track what user has searched in the search box like in the case of flight booking i want to track the origin and destination, date and time and number of passengers who want travel that flight. after the search form is submitted which flight are shown to user after submitting the search form and which flight user select from the listing(search results). after that does the user go to add passengers details page and pay the amount and move to confirmation page.
first thing which i can't figure out is can i track what was the search query of user and which flights are shown to the user. also can i implement eCommerce or enhance eCommerce in this scenario or there can be some other good option.
Your response will be very helpful for me
Thanks
Definitely not a one- or two-step solution. For tracking the search boxes you'll probably want to store those values in the data layer. You can then pass them to GA using variables in Google Tag Manager. As far as which flights the user selects you could set events that capture the values when the user clicks "select" or whatever. But I'd probably utilize the data layer here as well. You also mention the next steps, which is basically the sales funnel. You can set goals for tracking whether uses do the 1 > 2 > 3, etc. step process to complete the purchase. This would be easy if your funnel isn't too complicated. Otherwise you can use events in addition to tracking the URL.
Thank you very much Adam O'Donnell, As a junior web developer i under stand the concept of data layer and i know how to set values in data layer and how to get value of a single data layer variable in Google Tag Manager. but the problem is how i will see all the values of data layer in Google analytics. The data layer below is a dome data layer of flight search form.
dataLayer.push({
'form_type':'flight_search_form',
'origin' : 'London, United Kingdom, (LON) - All Airports',
'destination' : 'Dubai, United Arab Emirates , (DXB) - Dubai International Airport',
'departing' : '03/17/2020',
'return' : '03/19/2020',
'trip_type' : 'Round Trip',
'travellers' : '2',
'class' : 'business',
'currency' : 'USD',
})
now i know how to get the values of all the variables in data layer one by one. but i don't know if i can add a complete data layer in one variable in Google Tag Manager? I can attach variable to the "search form submit" event but is there any complete chart or table which can show me what query user searched which flights are shown to the user which flight user and does he went to the confirm booking or not. My main problem is how will i see all the data pushed in the data layer on search form submit event in google analytics.
Hope you can understand the question.
Well, Julius or someone else might have better ideas, but my work is very similar to this and I just create variables for them and pull them out one-by-one as you say. You can have more than one event fire at the same time (or sequence them so that they go in the order you want). Maybe one captures the flight info like to, from and dates, then another that captures class so you can track how many biz class vs. coach or something. You can also stack them together - i.e. in Category put "Flight Searches", then Action gets your location variables such as "{{Flight-Origin}} to {{Flight-Destination}}", then do the same with dates in your Label.
But before you start getting into all that, I would suggest stopping and thinking about what you need to track and why. Not saying you don't want to track anything and everything, but do you need to track whether they chose USD during the search process? I don't know your needs so maybe, but it seems like something I'd be worried about at the end when they actually purchase. If I'm understanding you correctly, you're tracking the search form and then you'll use ecommerce to capture the actual details of the purchase. So, what I do is track what they searched for vs. what they actually purchased. That's why I put the destination in an eventAction, along with a specific category. And for most of my events I use a timestamp in the eventLabel so I can string the session steps together if I need to. Then I'll have another event that captures dates because it's of interest to me to track how far out people are searching for travel options. But that's a different report so it's a different event.
Again, just my take. Others might have other ideas. I would just say that your ecomm is going to capture all the purchase details. For search data you need to think about what is actually needed and how you want to use it.
Thank you. I am trying to add custom dimensions and adding the all the data layer variables to that custom dimension i hope that this can give me some lead. if you can give any better advice than custom dimensions then i can implement that also.
You can pass them over as custom dimensions too. Usually through your main page view tag, but there are other ways. I would just caution that you only have like 20 custom dimensions and you probably want to use a couple of those for high priority things like client IDs. You can get creative with multiple Views but that can get sticky so just be careful how many data layer values are necessary as custom dimensions.
Thanks for the article.
My question is regarding the dynamics of data. I've never implemented data layer. All of the examples seem to have the key values set by developer (since it's in ''), unless I am looking at it wrong. Looking at the code I would image, the key value should be a variable that returns value. Am I incorrect at this point?
dataLayer.push({
'commentAuthor':'Laurynas'
})
how does it know that this comment's author is 'Laurynas'?
I would guess that it should be:
//some variable to grab the data
var commentAuthor = ;
dataLayer.push({
'commentAuthor': commentAuthor
})
Yes, you are right. In the code, there will be some variable that outputs the desired value, e.g. comment author's name. But on different websites, the names of those variables will be different, therefore, I cannot give you a very specific universal code example.
Hi Julius,
Hands down, It's an awesome blog. I have learnt a lot from it. I do have a question too.
Talking about pushing custom events via datalayer, my concern is, how does GTM know that it has to show "FormSubmitted" event when the only thing we did was just initiate a key-value parameter as defined above for subscribe form
"""
window.dataLayer = window.dataLayer || [];
window.dataLayer.push({
'formLocation': 'footer',
'event': 'new_subscriber'
});
"""
I hope my question us easy to be answered :)
From your code, it won't show "FormSubmitted". It will show "new_subscriber" because that is the value in the "event" key.
"When set correctly, this will not return the value of the first item. Refer to the screenshot below." <--- did you mean to say:
"When set correctly, this will NOW return the value of the first item. Refer to the screenshot below."
Thanks for spotting the typo. I have now fixed it.
In the example above, you show how to extract a single items price - well IF the customer purchased multiple products I want that data to be sent. So how do I get ALL of the items data? Instead of items.0.price - I want ALL items key value pairs. I don't see a way to do that.
You would need to write JavaScript code to loop through all the products and then return them as an object, or array, or whatever output you need. Data layer variable cannot do that alone.
Do you have an example of how to do that in GTM?
You would need to complete several JavaScript courses and get familiar with topics: Arrays, objects, for loops
I have exp in js and know how to write different kinds of loops. I'm wondering if you have an example of how to do this in GTM.
Custom JS variable that looks something like this:
function(){
var products = {{datalayer var that returns products}};
var newOutput;
//some loop that goes through the items in the products variable and pushes the wanted output in the newOutput variable
return newOutput
}
hi Julius, many thanks for the useful guide :) what are the best practices around storing PII - specifically email address - in the data layer? would this violate GDPR or any other laws? is there a compliant way to store an email address in the data layer?
I would say that storing email in the data layer itself is not a problem. Sending that data further is the main question.