October 13, 2025
Setting up cookie consent for Microsoft Clarity (V2)
Updated: October 13th, 2025
When you enable Microsoft Clarity on your website, it automatically sets cookies on a visitor’s browser regardless of consent, but you can configure this behavior to comply with privacy requirements.
If your website receives visitors from the European Economic Area (EEA), the United Kingdom (UK), or Switzerland (CH), you’re required to use the Microsoft Clarity Consent API to handle user consent correctly. Even if you’ve previously set up consent handling for Clarity, you may need to update your implementation to align with the latest version, known as Consent V2.
What happens if you don’t implement consent V2? Without it, Clarity will treat each pageview as a separate session from a new user. This results in significant limitations, such as each page view generating a new session and a new user, which restricts your ability to create multiple page funnels. As a result, metrics like pages per session will only ever be one. Microsoft provides more information on Clarity reporting without cookie consent here.
Don’t worry, it’s a pretty easy process, and I’ll take you through it step-by-step. Let’s get into it!

Table of Contents
Here’s what you will learn in this article
- Disable automatically set cookies in Microsoft Clarity
- Options for informing Clarity when a visitor gives consent
- Test the tag
- What to do if Clarity tg fires only if consent is given?
- Final Checklist
- Final Words
Video tutorial
If you prefer video content, here’s a tutorial from our Youtube channel.
Disable automatically set cookies in Microsoft Clarity
In this tutorial, I assume that you have already installed Clarity on your site. If not, here is some documentation on how to do so (there is a method to use GTM for your installation, which may be the simplest option).
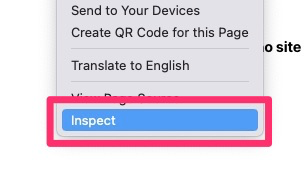
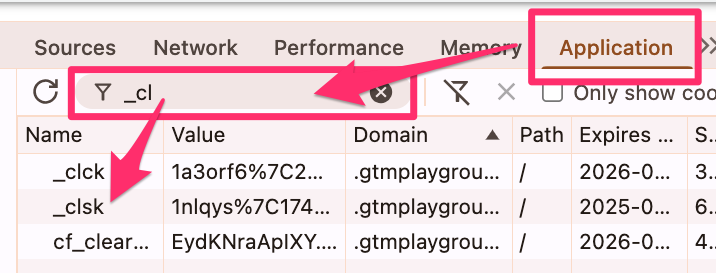
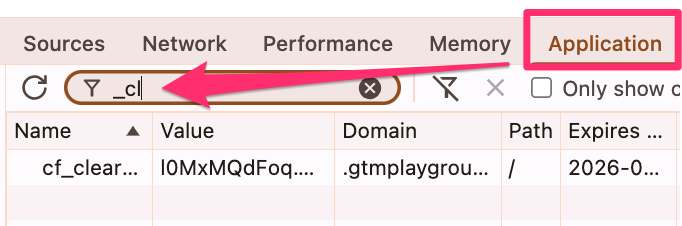
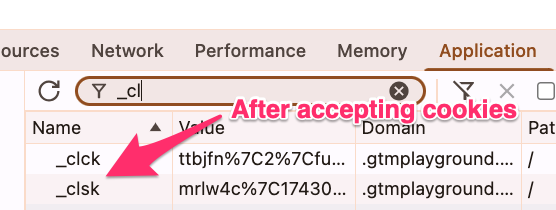
When you enable the Clarity tag on your site, it sets two cookies. To find the cookies that Microsoft Clarity sets, right-click on your webpage and select “Inspect” from the drop-down menu. This will open the Developer Tools (which you can also access through the Chrome menu by going to “More Tools”).
Once the tab opens, go to the Application section, search “_cl”, and you should see two cookies: _clck and _clsk. These are the cookies we want to set only when a user gives consent for analytics tracking.
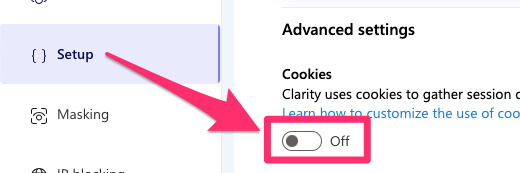
In Microsoft Clarity, go to Settings > Setup and under Advanced settings, toggle off “Cookies” to disable the cookies from automatically being set when a user lands on your site.
When you turn the cookies off, you can still see data and recordings of each page. However, as a user goes from one page to another, Clarity will use a new session ID and user ID (aka it will think the user is a new user) on each page, so those pages will not be tied into a cohesive session.
However, it’s possible to set cookies after a user has provided consent for them. According to Microsoft’s documentation, if you want to tell Clarity that a visitor has explicitly consented to cookies (e.g., through a consent pop-up), you can use this code:
window.clarity('consentv2', {
   ad_storage: "granted" | "denied",
   analytics_storage: "granted" | "denied"
});
In the next chapter, we will go through the process of setting up a tag that makes sure Clarity only sets cookies when a user provides consent (using the code above).
Options for informing Clarity when a visitor gives consent
To make sure Microsoft Clarity handles user consent correctly, you’ll need to inform it when a visitor agrees (or doesn’t agree) to cookie tracking. Thankfully, there are three main ways to do this, and chances are you’re already using one of them: Google Consent Mode (GCM), a supported Consent Management Platform (CMP), or manual setup.
Below, I’ve provided a quick overview of the methods discussed in this guide, which should help you get a clearer picture of each approach:
| How It Works | Required Action | |
| Google Consent Mode (GCM) | Clarity automatically detects the consent signals sent by your existing GCM implementation. | None. If you have GCM set up, the integration is automatic (available since mid-September 2025). You only need to verify it’s working. |
| Supported Consent Management Platform (CMP) | Your CMP communicates the user’s consent choice directly to Clarity’s Consent API. | None. The integration is handled automatically by the platform. You can check Clarity’s list of supported CMPs to confirm yours is included. |
| Manual Setup with Google Tag Manager | You create a custom tag in GTM that sends the consent status to Clarity after a user interacts with your cookie banner. | Configuration required. This is the most flexible option and will work with any cookie consent solution, but it requires a step-by-step setup we will cover in this guide. |
Google Consent Mode
If you’ve already implemented Google Consent Mode on your website, good news: there’s nothing else you need to configure. Microsoft Clarity will automatically pick up consent signals from GCM and adjust its behavior accordingly.
This integration should be available starting in mid-September 2025, so if you’re reading this after that time, Clarity should already be compatible with your GCM setup. The only thing left to do is verify that it’s working correctly—we’ll show you how to test that later in this article.
Consent Management Platform
If you’re using a supported Consent Management Platform, the process is also automatic. These CMPs already communicate directly with Microsoft Clarity through its Consent API. So, when a visitor interacts with the CMP, say, by clicking “I agree” on your cookie banner, Clarity will also receive that consent status.
You can check which CMPs Clarity officially supports here. If you’re not sure whether you can integrate your platform with Clarity, it’s worth asking your CMP provider if they currently support Microsoft Clarity or have plans to do so.
Manual Setup
The main method we’ll focus on for this article is the manual process, which is the most widely available option for everyone (since it doesn’t require any other programs).
According to Microsoft’s documentation, if you want to tell Clarity that a visitor has explicitly consented to cookies (e.g., through a consent pop-up), you can use this code:
window.clarity('consentv2', {
   ad_Storage: "granted" | "denied",
   analytics_Storage: "granted" | "denied"
});
You might have something similar already implemented that looks more like the code below, but this is the old version, so you need to update to the new version (the code above):
window.clarity('consent');
While there are many options for a cookie consent solution (any of which would work), for this setup, we will leverage the community template created by CookieHub. If you are using a different cookie consent system, the following steps will differ, but you should be able to follow the logic to adapt it to your situation.

Using CookieHub to trigger cookies
While there are many options for a cookie consent solution (any of which would work), for this setup, we will leverage the community template created by CookieHub.
We’ll start by exploring how this tag works. Go to the Tag section and click “New” to create a new tag. Click on the ”Tag Configuration” section and go to the Community Template Gallery.
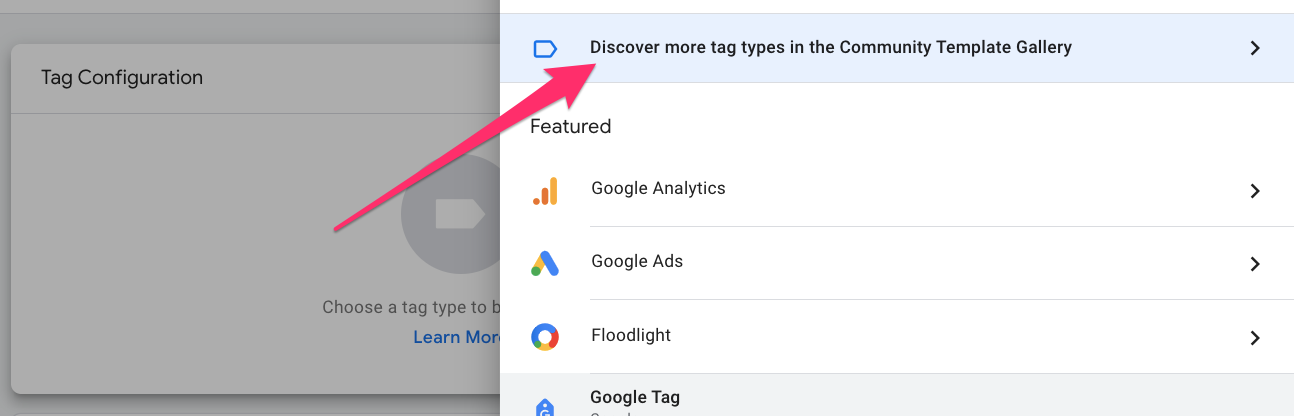
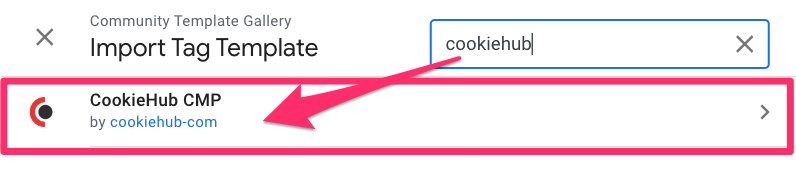
Search “CookieHub CMP” and click “Add to workplace” to add it to the tag.
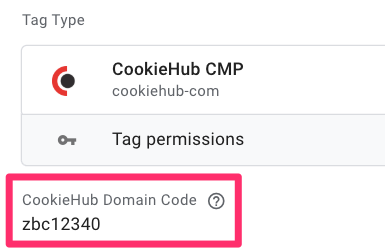
You will need to go to register your account with CookieHub and enter your Domain Code in the textbox (which you can find next to your site’s URL in the Domains tab once you’ve registered).
Set the trigger to “Consent Initialization – All Pages” (which is automatically available in your GTM container). Name the tag “CH” (or “CookieHub”) and save.
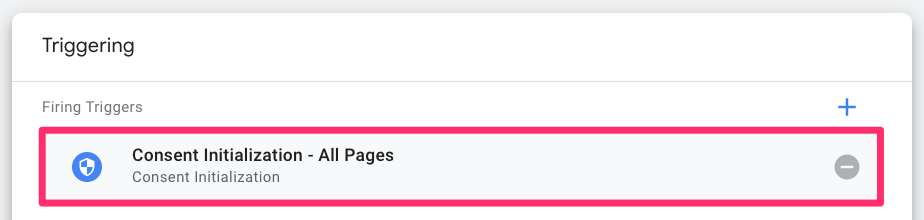
The “Consent Initialization – All Pages” is a trigger in GTM that is designed to fire before all other tags (except for those that are also on a consent initialization trigger). This is necessary for consent management because it makes sure that your consent banner is displayed and the user’s consent status is known before any tracking tags have a chance to fire.
To see how CookieHub works, click Preview and load your site. You should see the cookie consent pop-up on your page.

If you go to the Application tab (right-click and select “Inspect”) and refresh the page, you will notice that the previously set cookies are no longer there.
Now, click “Allow all cookies” on the consent pop-up. You should notice a bunch of events show up in Preview mode, including cookiehub_consent_update.
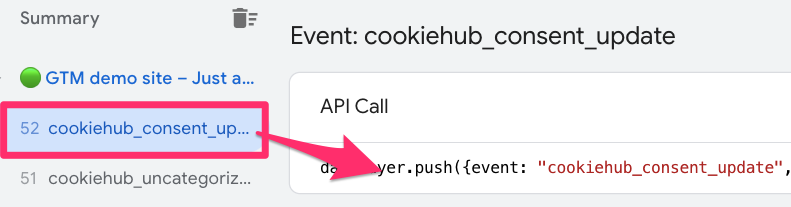
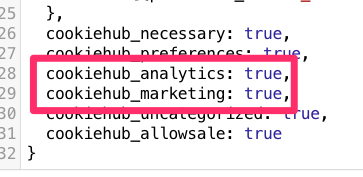
Using this information, we can allow Clarity to set cookies when the cookiehub_consent_update event is triggered by a user allowing cookies, which happens when cookiehub_analytics and cookiehub_marketing are true (you can see this by going to the Data Layer tab).
You’ll notice that CookieHub uses true/false for the consent indicator, but Clarity wants it in the form of “granted” or “denied,” so we need to use some code to update this.
Create variables for cookiehub_analytics and cookiehub_marketing
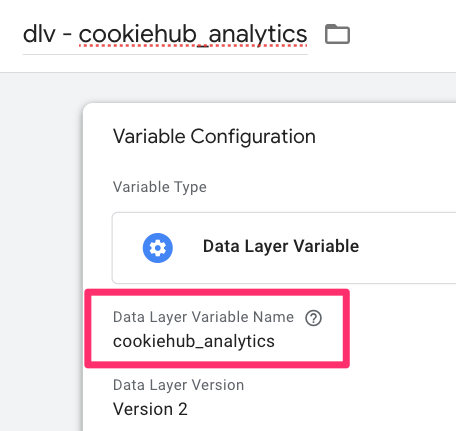
In Google Tag Manager, go to Variables and select “New” under User-Defined Variables. For the Variable configuration, select “Data Layer Variable” since the parameter is available in the data layer.
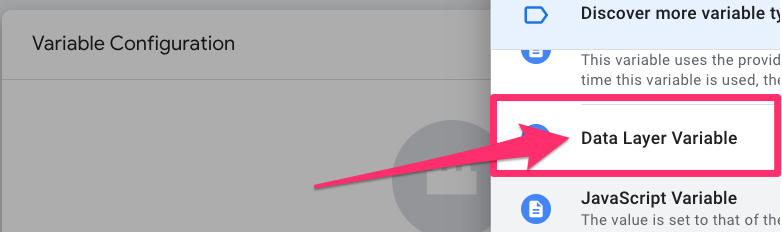
For the first variable, enter “cookiehub_analytics” as the Data Layer Variable Name and name the variable “dlv – cookiehub_analytics” (to keep things easy).
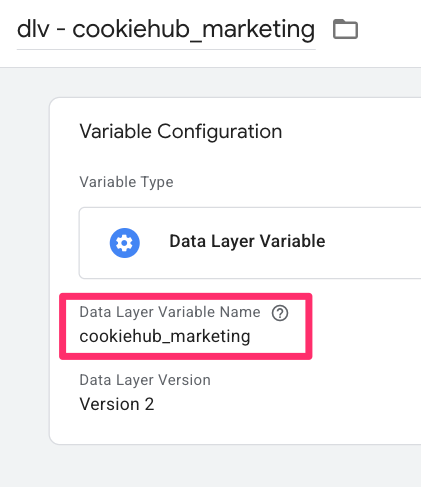
Follow the exact same process for the next variable, but enter cookiehub_marketing instead.
Create a trigger for cookiehub_consent_update
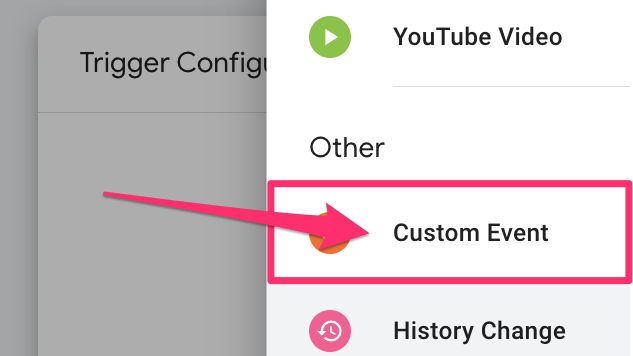
Now, go to the Triggers section and select “New”. Under Trigger Configuration, select Custom Event.
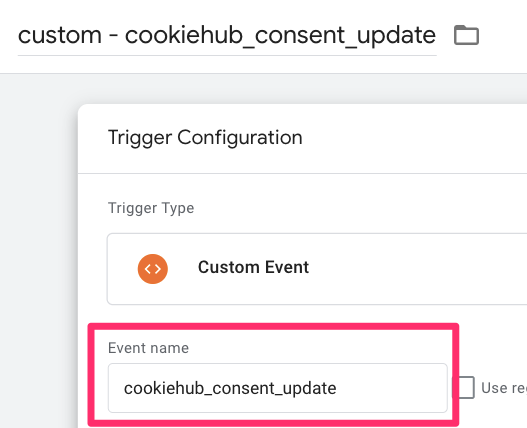
Enter “cookiehub_consent_update” as the Event Name and name the trigger “custom – cookiehub_consent_update” (following proper naming convention).
Create a tag that will activate cookies based on consent
Let’s put it all together now! Just a quick note that this method is for when the values of the data layer variables created above differ from the values that Microsoft Clarity accepts, i.e., granted & denied.
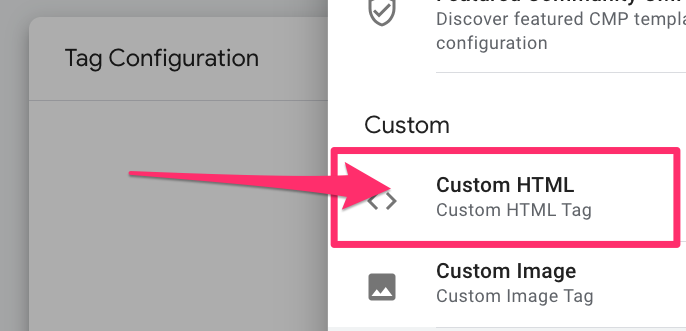
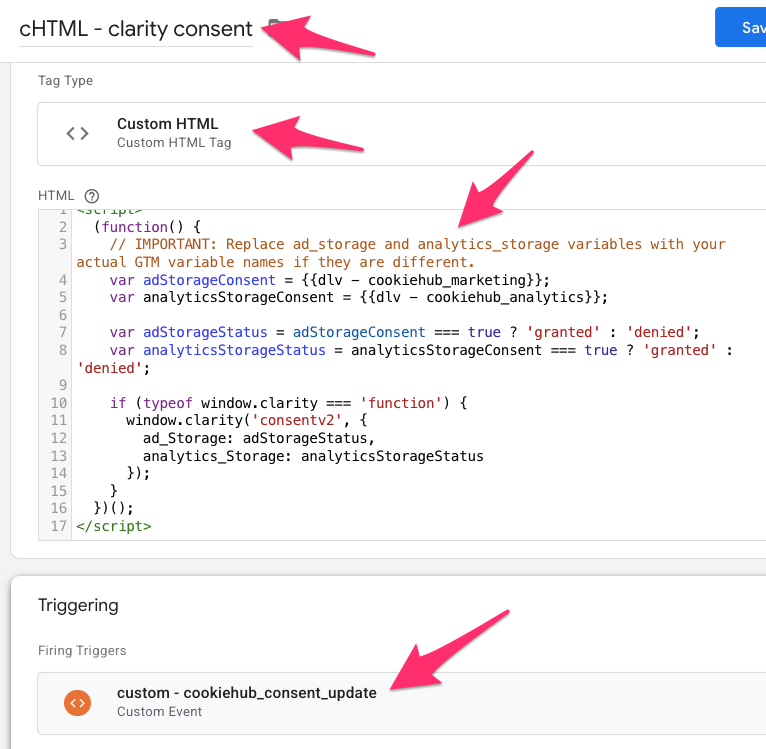
Create a new tag and select “Custom HTML” as the tag type.
In the textbox, add this code:
<script>
  (function() {
    // IMPORTANT: Replace ad_storage and analytics_storage variables with your actual GTM variable names if they are different.
    var adStorageConsent = {{dlv - cookiehub_marketing}};
    var analyticsStorageConsent = {{dlv - cookiehub_analytics}};

    var adStorageStatus = adStorageConsent === true ? 'granted' : 'denied';
    var analyticsStorageStatus = analyticsStorageConsent === true ? 'granted' : 'denied';

    if (typeof window.clarity === 'function') {
      window.clarity('consentv2', {
        ad_Storage: adStorageStatus,
        analytics_Storage: analyticsStorageStatus
      });
    }
  })();
</script>
This code is basically looking at whether the consent is true or false, and if it’s true, only then will it trigger the Clarity consent code to fire cookies.
If your data layer variable value will be one of “granted” or “denied”, then you can use this more simplified code:
<script>
  window.clarity('consentv2', {
   ad_Storage: {{dlv - cookiehub_marketing}},
   analytics_Storage: {{dlv - cookiehub_analytics}}
});
</script>
Important: As you can see in the comment in the code, if you named the data layer variables we created above (cookiehub_analytics and cookiehub_marketing) differently, you will need to enter that name in the code (e.g. where I have {{dlv – cookiehub_analytics}} will need to be replaced with the name of your variable).
Now, add the previously created trigger under Triggering. Name the tag “cHTML – clarity consent” and save.
Test the tag
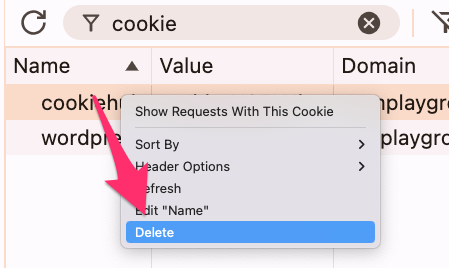
As always, we need to test the tag to make sure it’s working properly before publishing the GTM container. Go to your site and open the Application tab in the Developer Tools. Search for “_cl” and make sure you don’t see Clarity’s cookies.
Then, search “cookie” and delete the cookiehub cookie to make sure you trigger the consent pop-up again.
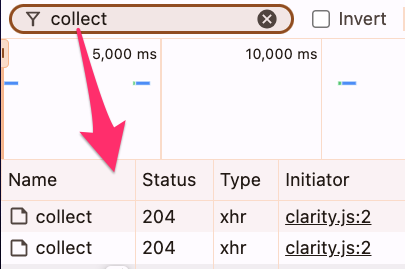
Now, go to Preview mode and, once your site loads, open the Network tab in the Developer Tools. Search “collect” to see the requests going to Clarity (which we expect to see).
In the Application tab, search for “_cl” and there should be no cookies. But, if you provide consent in the Cookiehub pop-up and search for “_cl”, there should be cookies now!
Another way to check is to go to the Console tab, enter the code below and click Enter. You should see that the consent status is denied for both variables. Once you’ve agreed to allow cookies, it’ll be granted.
clarity('metadata', (d, upgrade, consent) => {
       console.log('consentStatus:', consent);
  }, false, true, true);
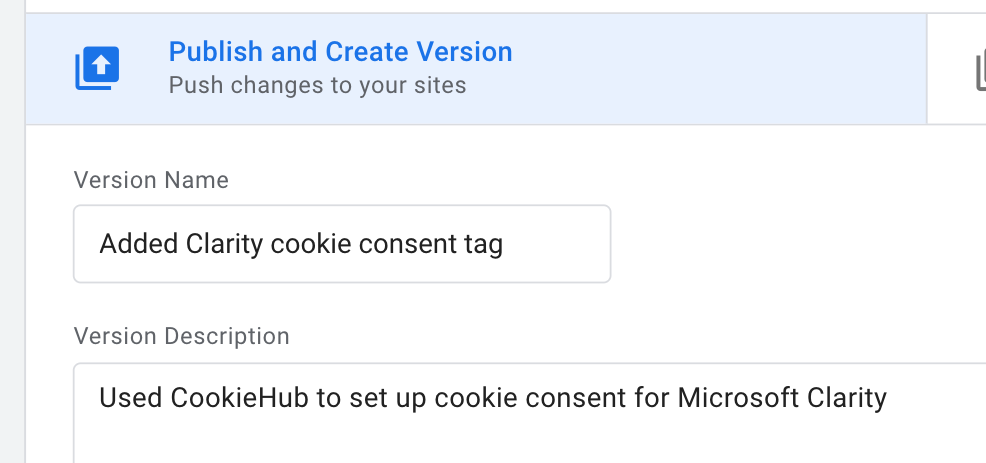
Once you have tested the tag and confirmed it is working as intended, you can publish your GTM container to save all the changes (make sure you use proper naming conventions to name and describe the changes to the container)!
What to do if you fire Clarity Tag only if consent is given?
Everything until this point was explaining a scenario where you activate Microsoft Clarity’s tag even if consent is not given. In that case, the cookies are not set by default.
But what if you want to be more cautious and only fire the tag if consent is given? That is also possible.
In general, you would have to fire the Clarity tag and then almost immediately fire the consent tag, which is responsible for setting consent signals. This can be achieved with Tag Sequencing.
Why is Tag Sequencing needed here? The window.clarity(‘consentv2’, …) command can only work if the main Clarity tracking script has already been loaded and executed on the page.
By setting your consent tag to fire immediately after the main Clarity tag, you can rest assured that the Clarity script is available and ready to receive the consent signal. This prevents potential race conditions or errors where the consent command fires before the Clarity object has been initialized.
If the Clarity tag fires only if analytics and marketing consent is given, then simply create a Custom HTML tag with the following code:
<script>
  window.clarity('consentv2', {
    ad_Storage: 'granted',
    analytics_Storage: 'granted'
  });
</script>
If you have variables for each consent group, then your code could look like this, instead:
<script>
  window.clarity('consentv2', {
    ad_Storage: {{dlv - cookiehub_marketing}},
    analytics_Storage: {{dlv - cookiehub_analytics}}
  });
</script>
DO NOT add any trigger to this tag. Save it.

Then open your Microsoft Clarity tag and go to Advanced Settings > Tag Sequencing > Fire a tag after Clarity fires and select the custom HTML that includes the consent command.
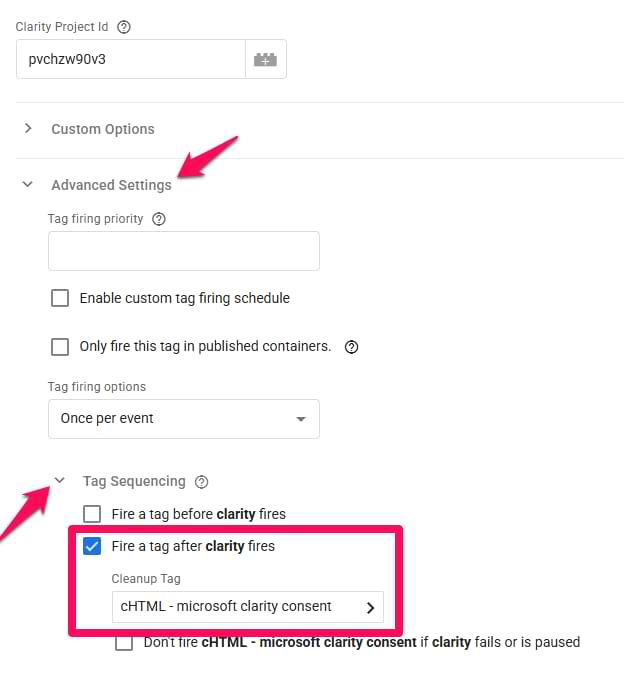
Save the tag. What will happen here is that when your Microsoft Clarity tag fires (and it does only when consent is given), your consent tag will fire immediately after that. This guarantees that Microsoft will still get the consent signals.
Final Checklist
Before you publish your GTM container, run through this final checklist to make sure you’ve covered all your bases:
- Disabled automatic cookies in Clarity: In your Clarity project settings, make sure the “Cookies” toggle is set to “Off”.
- Installed a consent management solution: You should have a consent banner on your site, and the corresponding tag should be firing on the “Consent Initialization – All Pages” trigger.
- Created the necessary variables and triggers: You should have variables to capture the user’s consent status and a trigger that fires when consent is given.
- Created the consent tag: You should have a Custom HTML tag that calls the window.clarity(‘consentv2’, …) API.
- Tested your setup: Use the GTM Preview mode and your browser’s developer tools to verify that your setup is working as expected.
- Published your GTM container: Once you’ve confirmed that everything is working, publish your container to make your changes live.
Setting up cookie consent for Microsoft Clarity: Final Words
The main goal of this article is to make sure that Microsoft Clarity does not set cookies unless consent is explicitly provided by the user. There are a few ways you could do this using either Google Consent Mode, a compatible consent management program, or manually using Google Tag Manager.
These days it’s extra important to be compliant with all regulations that could impact your analytics, so it’s good to get ahead of the game and make sure you’re only setting cookies when a user explicitly provides permission for you to do so (it’s the right thing to do after all).
If you’re looking for a quick recap, here are the main points to keep in mind:
- Consent V2 is required for session tracking in Microsoft Clarity. Without implementing consent, Clarity treats every pageview as a new session from a new user, making session analysis impossible.
- Start by disabling automatic cookies in Microsoft Clarity. Your first step is always to go into your Clarity project’s Settings > Setup > Advanced settings and toggle “Cookies” to Off.
- Choose your integration method. Clarity can automatically read consent signals from Google Consent Mode or a supported CMP. If you don’t use either, you must implement a manual setup with Google Tag Manager.
- The manual setup relies on a custom event. When a user provides consent via your cookie banner, a custom event should be pushed to the data layer. This event is then used as a trigger in GTM to send the consent status to Clarity.
- Always test your implementation. Use your browser’s developer tools to verify that Clarity’s cookies (_clck and _clsk) are only set after you grant consent and are not present if you deny it.

11 COMMENTS
When I test my website, I do not see MS Clarity cookies in the developer console until I accept "All Cookie" consent.
I have implemented CMP Cookiebot and added analytics_storage consent check to the tag in GTM.
Is this not applicable when using Cookiebot CMP?
Thanks for this article and detailed explanation.
Just a hint: I used the cHTML code from the text box but got an error message in GTM about a missing closing parenthesis ")". So I used the code from your GitHub as mentioned in your YouTube video and that worked just fine.
What about "CLID" cookie ? How to manage this based on user consent ? It is an HTTP only cookie. Calling 'window.clarity("consent", false)' is not removing this cookie or its value.
Also there is no mention of this cookie in documentation of Microsoft.
Is this relevant when my Clarity tag is only triggered when a user gives consent for Clarity? As Clarity is not loaded without consent it will not set cookies...
Yes, you still to send "granted"
Thanks, Julius! Just one question (Clarity support is unavailable): I'm already sending _clck _clsk via “Advanced Settings, Cookies” (ON) when users accept marketing consent.
I'm using Clarity as a third-party service without “consent mode scenario.”
All console tests are valid.
So, I think I'm already compliant with the October 31 deadline.
What do you think?
Use the console command I shared at the end of the blog post. If you see both consent groups in the console (and their status is granted after the user gives consent), you should be good.
yes, after accepting consent i see this output :
consentStatus: {ad_Storage: 'granted', analytics_Storage: 'granted'}
also
document.cookie.indexOf('clck') is greather than -1
so it should be fine.
Thank you.
Hi. I am using GCM and everything was working fine until this morning when suddenly clarity cookies have no value no matter what I do. Site is www.laqo.hr. I've tried making changes in GTM, but no luck. Any ideas?
Hi,
I have a question about what to expect in the different scenarios for integration listed above.
When I use the manual option, I either see or do not see cookies as expected and as described in the article.
When I rely on the automatic communication of consent via Consent Mode or the CMP, I still see cookies being set but they are blank session scoped cookies. Is this expected behaviour.
Thanks
What about automatic configuration but you disable cookies in clarity's settings?