April 30, 2025
How to Track Chat with Google Tag Manager and Google Analytics 4
If you have a chat widget on your site, you probably wonder how often users interact with it or if it’s influencing user journeys. But how to track that with GTM and GA4?
Most likely, custom code will be needed. If you’re lucky, maybe someone already wrote it. If not, things get a bit more complicated.
In this blog post, I explain two options how to track chat with Google Tag Manager and Google Analytics 4. Without further ado, let’s dive into this.
Table of Contents
Here’s what you will learn in this article
Option 1: Find a listener
Your first instinct for tracking a chat widget on your site may be to use one of the built-in triggers in Google Tag Manager, such as click triggers. However, this won’t work as you expect. Chat widgets typically use an iFrame, which is like a mini website within a website, so you don’t have the same access to the iFrame as your site.
What we want to do instead is find a listener (a function that waits for specific events to occur and then executes code in response to that event) that is coded to listen for the interaction between the chat and make it available in the data layer.
This is where good search skills come in handy, as you’ll need to do some Googling to find a listener for the specific tool you’re using.
Let me show you an example of chat widgets created with Smartsupp. If you are also using this tool, you can find the code for the listener here. Even if you are not using this specific tool, you can still follow the steps below using whatever listener you’ve found for your chat widget (of course, some adaptation is necessary).
<script>
  smartsupp('on', 'message_sent', function(message) {
    window.dataLayer = window.dataLayer || [];
    window.dataLayer.push({
      event: 'SmartsuppChatEvent',
      chatAction: 'message sent',
      chatBoxID: message.chatId,
      visitorID: message.visitorId,
      messageID: message.id,
      ChatSubType: message.subType,
      userLang: navigator.language
    });
  });

  smartsupp('on', 'message_received', function(message) {
    window.dataLayer = window.dataLayer || [];
    window.dataLayer.push({
      event: 'SmartsuppChatEvent',
      chatAction: 'message received',
      chatBoxID: message.chatId,
      visitorID: message.visitorId,
      messageID: message.id,
      ChatSubType: message.subType,
      userLang: navigator.language
    });
  });
</script>
Add a listener to GTM to listen for chat actions
Once you find the appropriate listener, go to the Tags section in GTM and create a new tag. For the Tag configuration, select “Custom HTML“ and paste the listener code.

Set the listener to fire on “All Pages” trigger and name the tag “cHTML – smartsupp listener” and save.

As always, we need to test the event, so go to the Preview mode and enter the URL of your site. Once a new tab/window with your site opens, open the chat widget and send a message. Now, check the Tag Assistant (GTM preview mode).
For this specific example, you should see the SmartsuppChatEvent event. In your case, this will be named differently if you are using a different tool, but you should still see something.
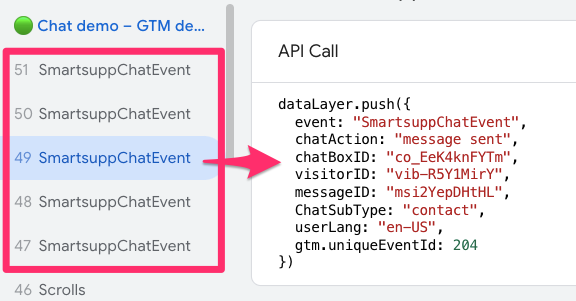
Opening the event, you can see some information collected by the listener, including the action that the event tracked using the chatAction parameter.

In this case, we are interested in the “message sent” action and want to ignore the “message received” since this is a bit redundant.

Send data about the chat widget to GA4
Now that the listener is sending some useful information to the data layer, we need to create a tag to help us collect this information and send it to Google Analytics 4.
Create a trigger for when a user sends a chat message
Since we only want to track when a user sends a message, we need to create a data layer variable for chatAction, as it will tell us the user’s action.
In GTM, go to the Variables tab and select “New” under User-Defined Variables.

For the Variable configuration, select “Data Layer Variable”, enter “chatAction” in the textbox, name the variable “dlv – chatAction”, and save.

Now, go to the Triggers tab and create a new trigger. For the Trigger configuration, choose “Custom Event” and enter the event name “SmartsuppChatEvent” (exactly as it shows up in the event from the previous chapter).

Select “Some custom event” and set the condition to chatAction equals “message sent” and save. This will ensure that we only track when a user has sent a message. Name the event “custom – SmartsuppChatEvent” and save.

Make sure to adapt this to how the chat widget you’re working with sends events.
Create a tag for when a user sends a chat message
Let’s put it all together now. Create a new tag, and under the Tag configuration, select Google Analytics > GA4 Event.

Paste the Measurement ID, which can be found in the GA4 config tag within the container (labeled as the Tag ID in the config tag).

Deciding on an event name depends on how many events you want to track, e.g., chat_closed or chat_open. Here, I just want to track when a user sends a message through the chat, so I’ll name the event “chat” and enter that into the textbox.

To limit the number of times the chat event is fired (since it may occur multiple times per page), we can set the tag so that it only fires once per page. For example, if a visitor navigates to another page, the event will fire again. To do this, go to Advanced Settings and under Tag firing options, select “Once per page”.

For the trigger, add the custom event trigger we created above. Name “GA4 event – chat” and save.

To make sure everythingl works, preview the container. Start a chat on your site and send a message.

Check that the tag fires on the SmartsuppChatEvent with the “message sent” chatAction.

To see how GA4 receives this data, go to Admin > Data display > DebugView. DebugView is a tool that allows you to see real-time event data as it’s sent from your website. It displays incoming events and their parameters, making testing and troubleshooting your tracking setup easier.

Confirm you see the chat event.

Once everything looks good, publish your GTM container. Be sure to use good conventions and give the container a name and description (your future self will thank you).

Option 2: Use JavaScript (more advanced)
If you don’t have any luck with an event listener, you can search if the chat widget you work with has a JavaScript API that you can use to listen for chat interactions. I was able to find one for the Smartsupp chatbot that provides options for several different events, such as message_sent, message_received, and messenger_close.
Before we get into this option, there are a couple of things I want to cover first:
- For the sake of this example, I will remove the previous Smartsupp listener that we implemented in GTM using custom HTML.
- You will need some basic JavaScript knowledge for this option. If you want to have a much better understanding of JavaScript, you can check out my JavaScript for Google Tag Manager course.

Understanding the JavaScript code
While I assume you have a basic understanding of JavaScript, I think it’s still helpful to walk through this step by step to understand how the JavaScript API works.
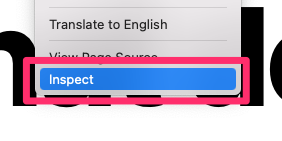
On your site, open Developer Tools (right-click on the page > Inspect).
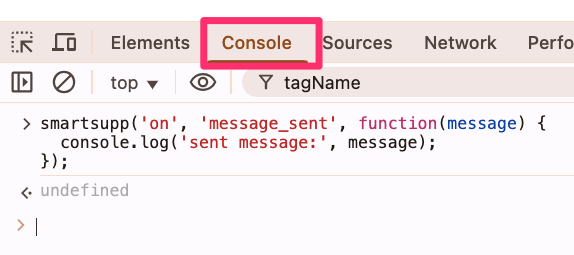
In the Console tab, paste the message_sent code. This code will depend on the tool you are using, but if you’re also using Smartsupp, you can use the code below.
smartsupp('on', 'message_sent', function(message) {
  console.log('sent message:', message);
});
The idea behind this code is that when a visitor sends a message through the chatbot, the JavaScript code will log the “sent message” in the console (the window you are in right now).
To see how this works, send a message in the chat and view the message logged in the console by the JavaScript API.

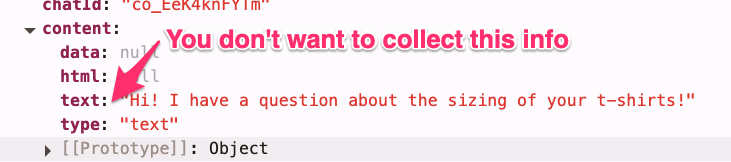
Expand the message to see the information that is collected.
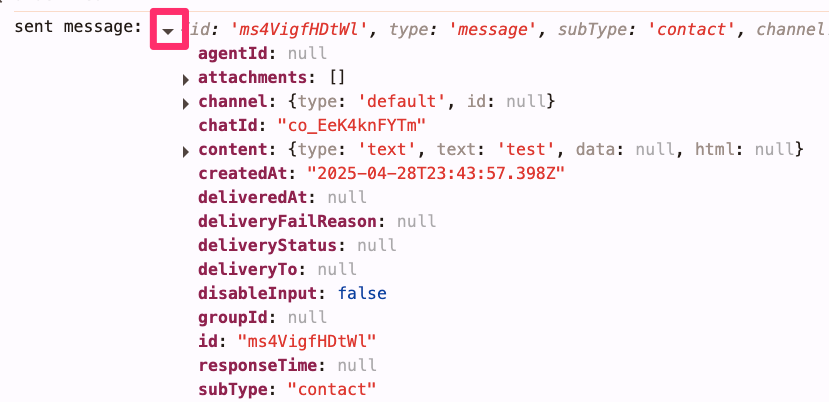
One thing to caution is that the content of the message (i.e., what the user sent through the chatbot) is included in the message, but Itl think it’s not good to include this in your analytics – consider privacy and all.
Manipulating the code to get the information you want
Let’s explore how we can manipulate the above code to get the information we want. Let’s say there is some information in the message that you’d want to send to GA4 with the event (that we will eventually create); how can you access this data?
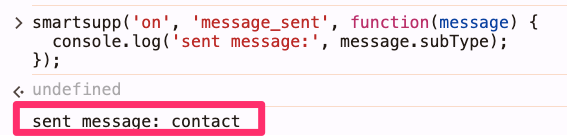
If you want access to the subtype, you can update the code to “message.subType”, which will only show this information in the console.
smartsupp('on', 'message_sent', function(message) {
  console.log('sent message:', message.subType);
});
Now, in the console, you only see the value of the subType.
Creating a dataLayer.push event
Hopefully, you understand how the JavaScript code works a bit better now. To send this information to the data layer so that we can pick it up in GTM, you need to modify the code from above slightly:
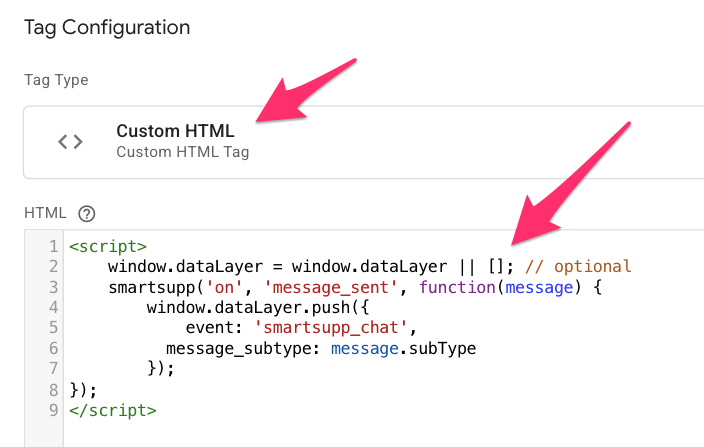
<script>
    window.dataLayer = window.dataLayer || []; // optional
    smartsupp('on', 'message_sent', function(message) {
	    window.dataLayer.push({
	        event: 'smartsupp_chat',
		  message_subtype: message.subType
	    });
});
</script>
Below, I explain the reasoning for each of the updates:
- window.dataLayer = window.dataLayer || []; is an optional line of code to include. It’s typical for listeners to include this, but since you’re implementing this code directly in GTM, it’s already implied. If you have a developer adding this to the source code of your website, you definitely need to include this line.
- window.dataLayer.push sends the data to the data layer so that GTM can access it
- event: ‘smartsupp_chat is the name of the event
- message_subtype: message.subType provides some additional information on the event. You can pull through any information that you find helpful from the console log.
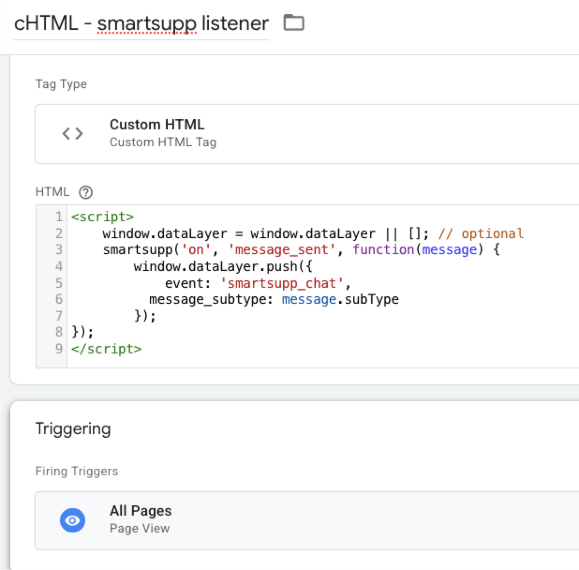
Copy the above (updated) code. In GTM, create a new tag. For the Tag configuration, select “Custom HTML” and paste the copied code.
Set the trigger to fire on All Pages, name the tag “cHTML – smartsupp listener”, and save.
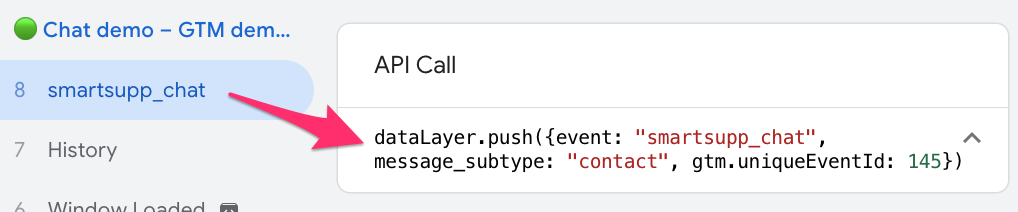
Preview the container to test the listener. Once your site opens in a new tab, enter something in the chat. Ensure that in Tag Assistant, you see the smartsupp_chat event. You can also confirm that the message_subtype is populated.
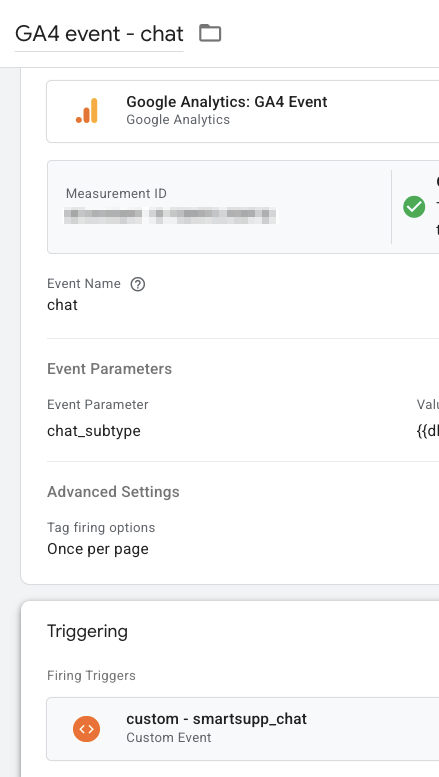
Create a tag for when a user sends a chat message
To keep things simple, I’ll just update the variable, trigger, and tag from the previous example using the Smartsupp listener.
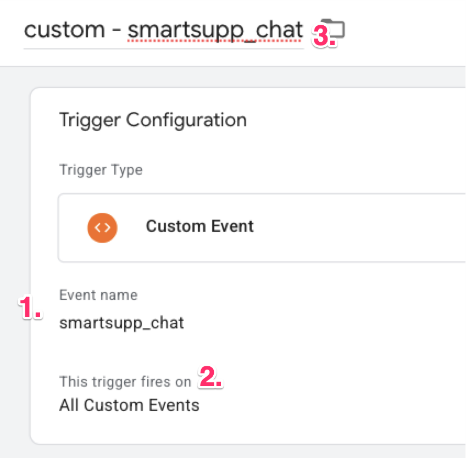
First, go to the trigger that we previously created and update:
- The event name to “smartsupp_chat” (as in the code),
- Remove the trigger condition, and
- Change the trigger name to “custom smartsupp_chat” and save.
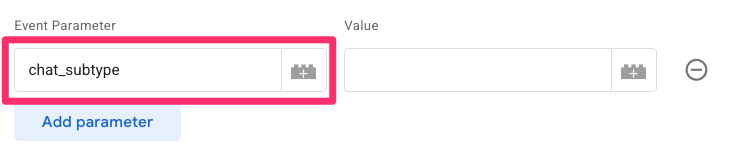
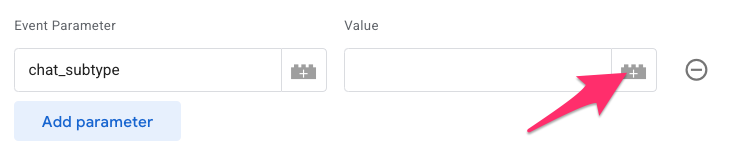
Now, we can go to the tag we created for the last example and make one update: Add the custom parameter subType to the tag. For the event parameter, enter chat_subtype.
For this parameter, you will need to create a new variable. Click the block icon next to the Value input, and then, in the new window, select the “+” in the top-right corner.
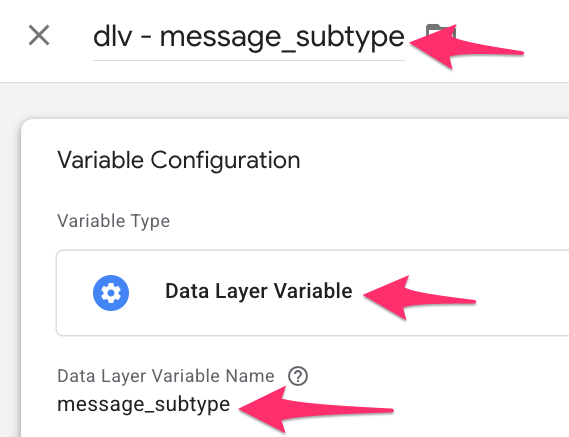
For the Variable configuration, you’ll select “Data Layer Variable” and enter “message_subtype” as the Data Variable Name. Name the variable “dlv – message_subtype” and save.
We have already updated the trigger, so we just need to save the new tag and test it.
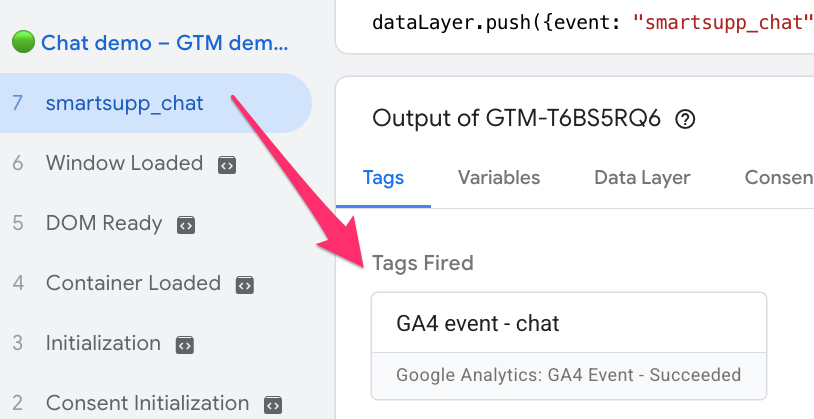
You know the drill now: open Preview mode, enter something in the chat, and check Tag Assistant to see if the tag fired on the smartsupp_chat event.
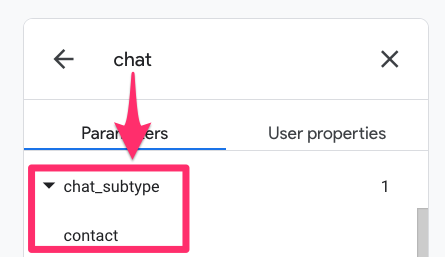
We will also check DebugView to see how GA4 received the data and confirm the parameters are working.
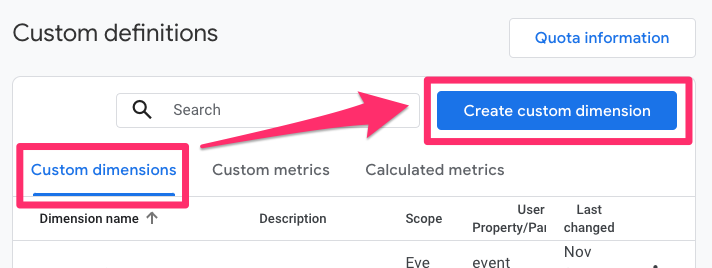
If you want to create reports using the message_subtype parameter, you will need to create a custom dimension. This is pretty simple. In GA4, go to Admin > Data Display > Custom Dimensions. Click “Create Custom Dimension”.
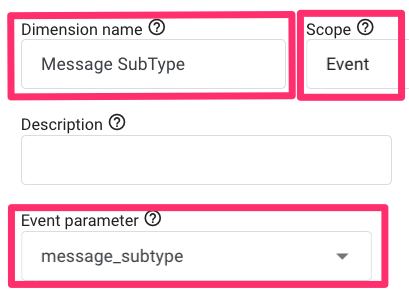
There are three elements that you need to consider:
- The Dimension name is the name that will be displayed in GA4 reports, i.e., Message SubType
- The Event property needs to be the same name as in Google Tag Manager, i.e,. message_subtype
- Set the scope to “Event”
Track chat with Google Tag Manager and Google Analytics 4: Final Words
If the chat widget provider you use doesn’t have either of these options available, it may be worth reaching out to them to ask if they have any other solutions. It’s also a good idea to check if you’ve missed something available online.
If you use a chat widget and were able to find either a specific event listener or a JavaScript API to track its usage, let everyone know in the comments below!

0 COMMENTS