February 17, 2026
How to view Social Media Traffic in Google Analytics 4?
Social media can play a big role in driving traffic and conversions, but that value isn’t always obvious in GA4 without a little setup. When your social media data is organized correctly, you can easily compare organic versus paid performance, see which platforms are actually pulling their weight, and clearly demonstrate social ROI.
In this article, we’ll walk through a few straightforward ways to view social media traffic in Google Analytics 4 (and clean it up), whether you’re just doing a quick check or building reports you’ll use again and again.
Table of Contents
Here’s what you will learn in this article
Video tutorial
If you prefer video content, here’s a tutorial from my YouTube channel.
Method 1: Quick overview to view social media traffic in Google Analytics 4
This method uses GA4’s standard Acquisition reports to quickly check in on your social media traffic without setting anything up in advance. Use this method when you want to view social media traffic in Google Analytics 4 for a quick check or snapshot, are doing ad-hoc analysis, or want to explore the data without creating anything permanent.
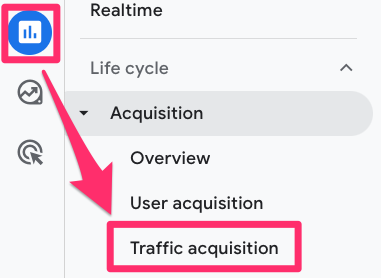
Head to the Acquisition reports in Google Analytics 4, specifically the Traffic Acquisition report. Since GA4 is customizable, your property may not look the same as mine, so the location of this report may be elsewhere.
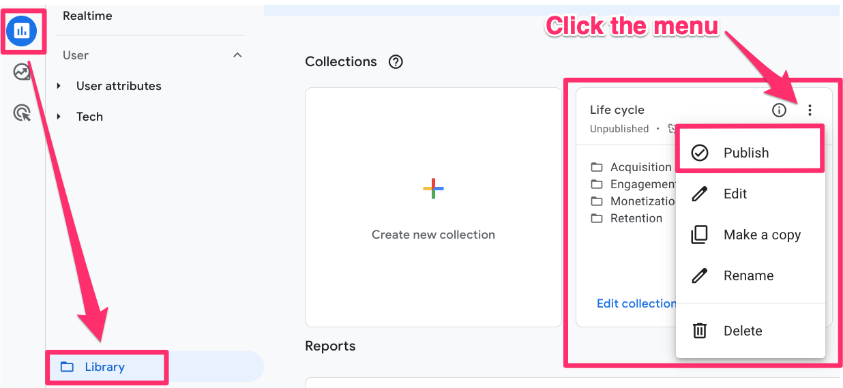
You can also add this report collection to your reports tab if you don’t have it by going to the Library and publishing the “Life cycle” collection.
You’ll notice a table at the bottom of the report. The default dimension will be the Session default channel group. Unselect all channel groups first, then select only the channel groups you’re interested in to see a quick overview (look for Organic Social or Paid Social).
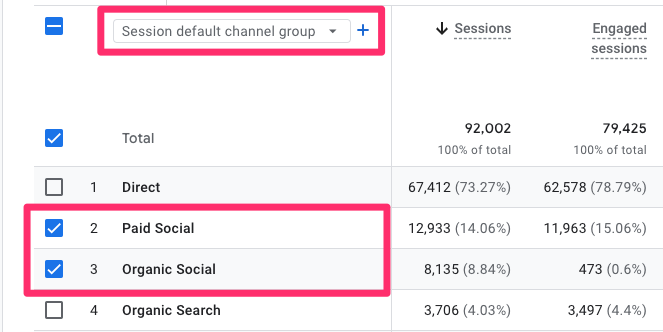
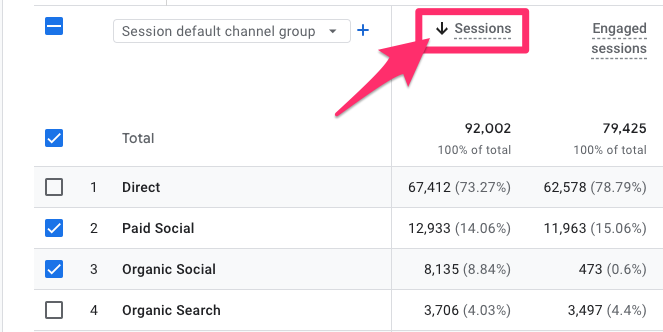
To choose which metric appears in the chart (above the table), sort the table by your metric of choice, e.g, Sessions.
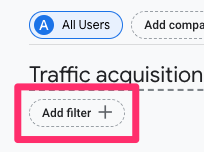
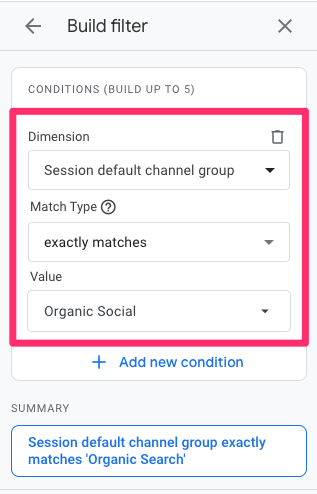
To see the table with only the two channel groups of your choice (Organic Social or Paid Social), select “Add filter” at the top left of the report.
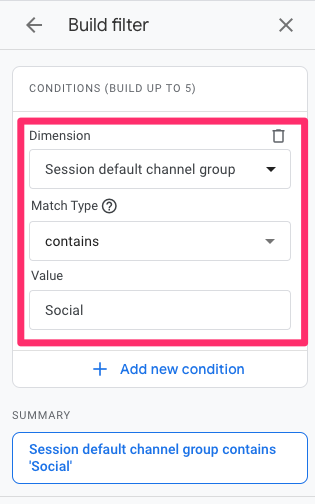
The filter will be: Session default channel group contains Social. This will look for any channel groups that include “Social” in the name. Keep in mind that this filter is case-sensitive, so you need to capitalize it correctly.
You can update this section as needed. For example, if you want only Organic Social, update the filter to be: exactly matches Organic Social.
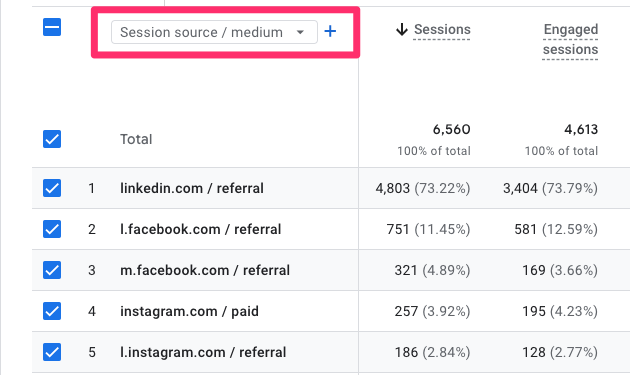
To drill down further, from the dimension drop-down, select “Session source/medium” instead to get the traffic sources. In the screenshot below (and in your own data), you might notice that there are multiple names for seemingly the same traffic source, e.g., l.facebook.com, facebook.com, and lm.facebook.com. We will address this later in the article, so don’t worry about it too much for now!
Heads up! GA4 only applies temporary filters to your current view. If you leave the page or refresh, the filter is removed. To preserve your filter setup, create a custom report (coming up next).
Method 2: Create a custom report to view social media traffic in Google Analytics 4
This method involves creating a custom report by copying the Traffic Acquisition report. It is the most robust way to view social media traffic in Google Analytics 4, allowing you to filter and show only the social media traffic sources you’re interested in. This approach is best for situations where you require recurring reporting, want a clean and consistent view for stakeholders, or aim to standardize social media reporting across the team.
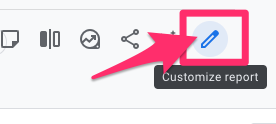
To create the report, start in the Traffic Acquisition report and select “Customize report” on the top-right side of your interface (make sure you have the required permissions).
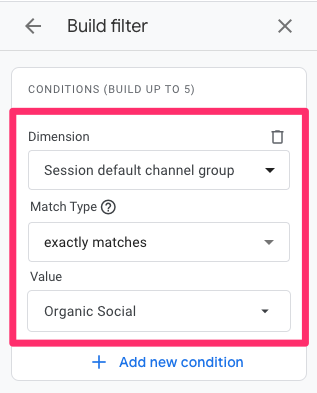
Add the following filter: Session default channel group exactly matches Organic Social.
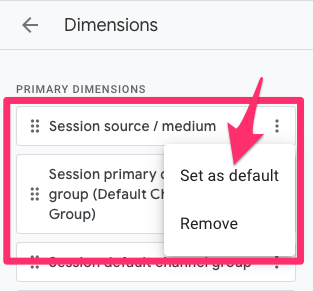
Next, set Session source / medium as the default dimension (you can move it to the top of the list for easier access).
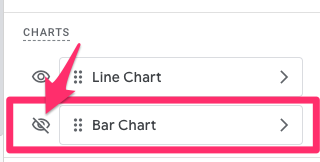
Optionally, in the Charts section, you can hide the bar chart if it’s not useful (I don’t find it to be helpful).
Go to Save > Save as new report and name the report something clear and descriptive, such as “Organic social media”.

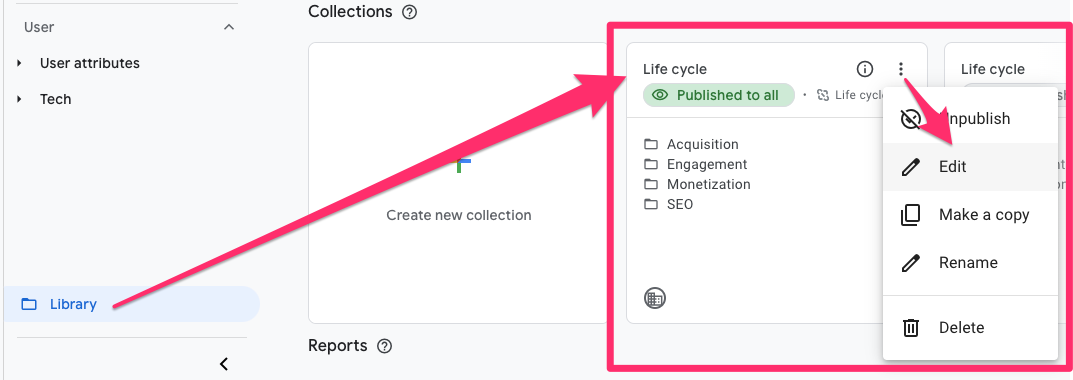
To make the report easily accessible, add it to a collection so it appears in the sidebar. Go to Library (at the very bottom of the Reports sidebar) > Life cycle > Edit Collection. You’ll add your report here to keep it with the other Acquisition reports.
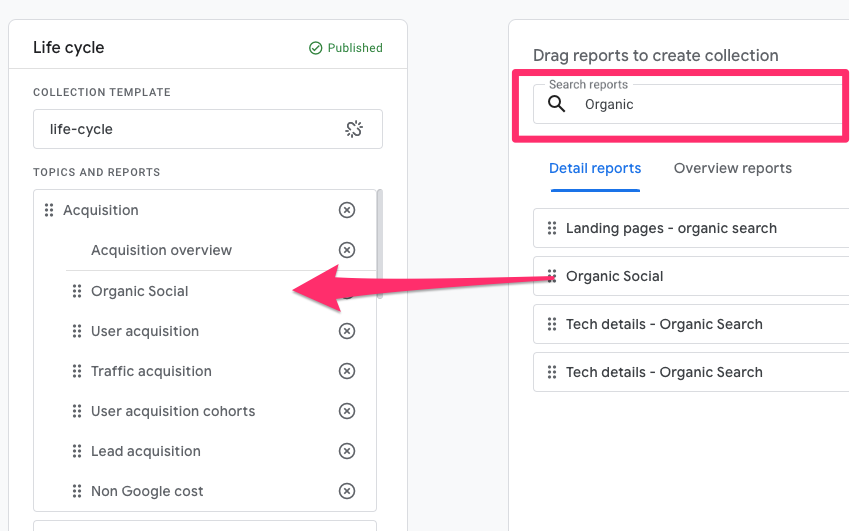
Search for your report, and drag it under the Acquisition section.
Note: Once you add a report to a collection and it appears in the sidebar, all users will see this report and have access to it, so make sure it has a clear name that helps people understand what the report is for!

Custom Channel Groups
As we saw before, there are multiple different names for seemingly the same traffic source, e.g., l.facebook.com, facebook.com, and lm.facebook.com. This can be a bit frustrating for acquisition reporting because they’re all Facebook, yet they appear in separate rows. This can be remedied with some customization: custom channel groups!
I have an entire article just about custom channel groups in GA4 if you want more details, but I will provide a quick overview here.
Note: You’re only able to create a maximum of two custom channel groups (one is reserved for the Default Channel Group), so be strategic about what groups you prioritize.
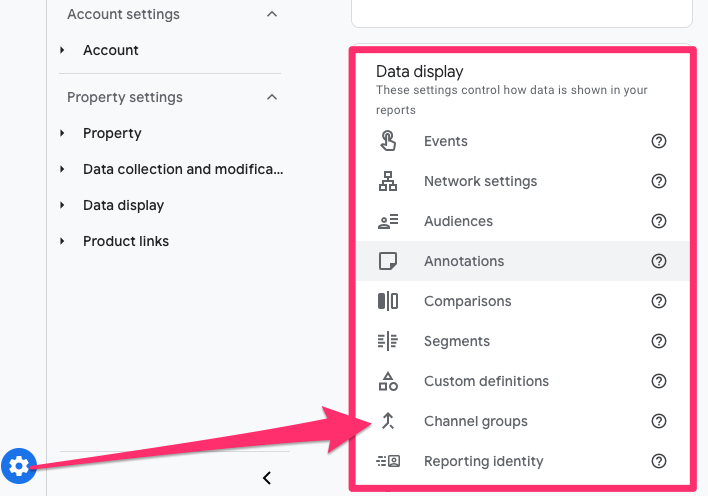
To create a custom channel group, go to Admin > Data display > Channel groups.
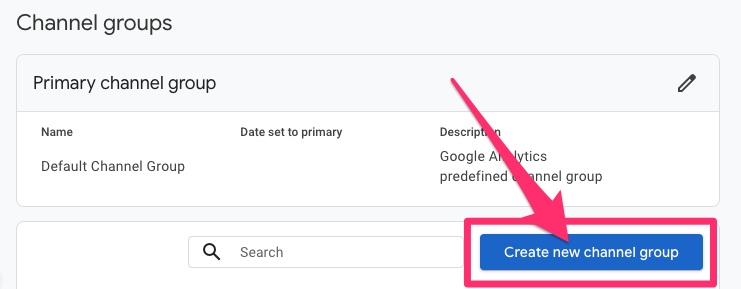
To create a new channel, click on the “Add new channel” button.
Name the new channel group, e.g., “Social network”, and delete all the existing channels (these are just provided as suggestions and examples, but we want to create our own).
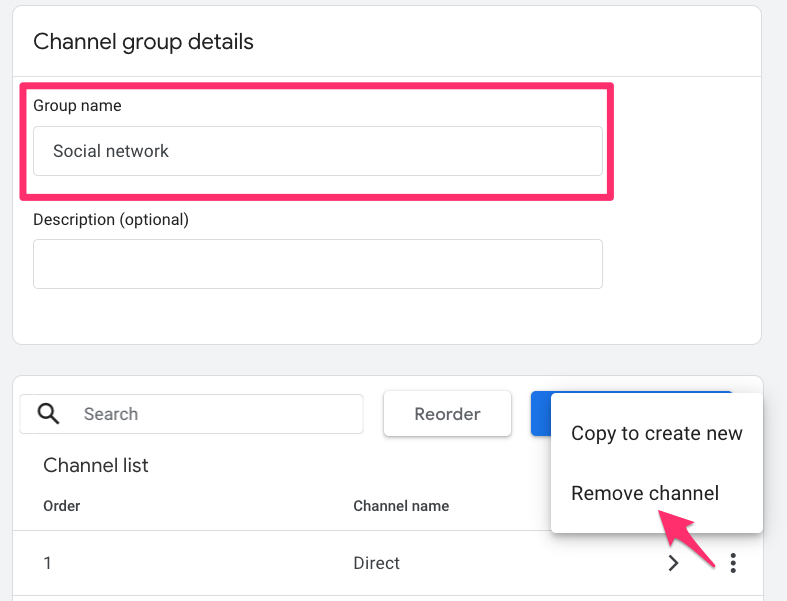
To create a new channel, click “Add new channel”.

Some background information: A custom channel group can have up to 25 channels. For each channel, you can set the name and the conditions that define your channel. The conditions can be filtered on: default channel group, medium, source, source platform, campaign ID, and campaign name. The names and rules for the channels will depend on your data and how you would like to view social media traffic in Google Analytics 4 reports.
For the channels I’m making for this channel group, I organized them by:
- Whether it’s paid or organic, and
- The social media platform, e.g. facebook, linkedin, etc.
So, we’ll have: Paid Facebook, Organic Facebook, Paid LinkedIn, Organic LinkedIn, etc. But you can, of course, choose to do this in whatever way makes sense for your business.
If you need guidance on determining your channels, you can use the Traffic Acquisition report. Go to the report and use this filter: Session default channel group exactly matches Paid Social (or Organic Social or both).
Set the dimension in the table to Session source / medium. This will show you all the traffic that you want to create channels for and group together.
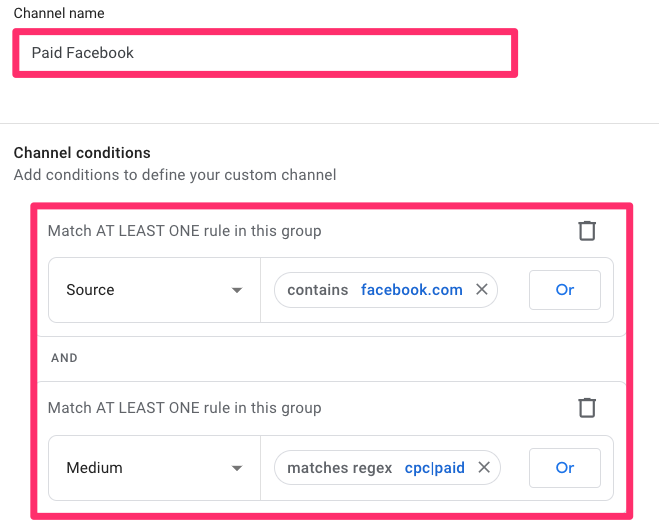
For example, you can create a channel for Paid Facebook by setting the conditions like this:
- Source contains facebook.com (this will group all Facebook-related domains such as l.facebook.com, m.facebook.com, etc.)
- Medium matches regex cpc|paid (this ensures only paid traffic is included). It’s possible that in your case, medium values might be different. So, it’s a good practice to check the acquisition reports and make sure that you enter correct Medium in channel group’s settings.
For Organic Facebook, use the same Source condition (Source contains facebook.com) but remove the medium filter so it captures all non-paid Facebook traffic.
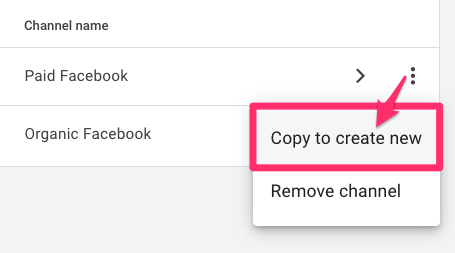
Hint: Once you create one channel, click the three dots next to it and select “Copy to create new”. This makes it faster to build the remaining channels (for example, Instagram, LinkedIn, etc.).
As you build these channels, be sure to check your Traffic Acquisition report regularly to make sure you captured all versions of the source names that appear in the table. If you miss one, that traffic may end up in a different channel or in your catch-all bucket
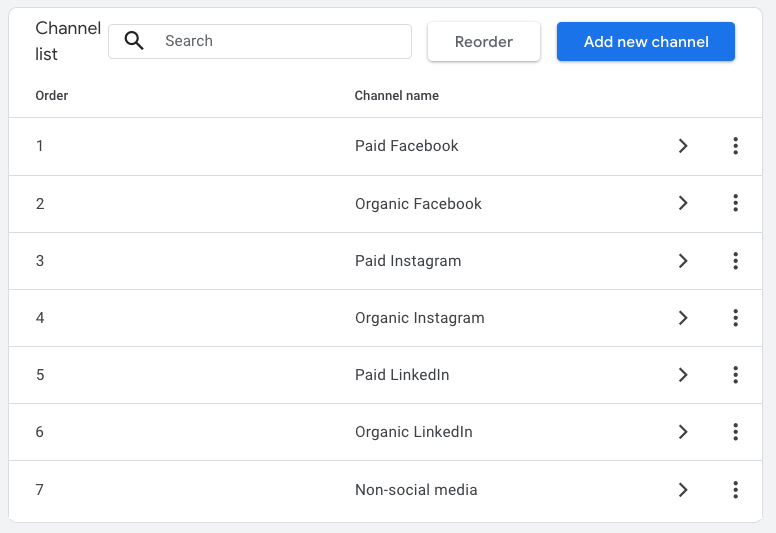
Once you’ve gone through all social media platforms, we’ll create a channel called Non-social media that captures all remaining data with the following filter: Medium matches regex .*

Every time GA4 captures a session, it will try to categorize that session into one of these channels, evaluated in the order provided, so if the traffic doesn’t fit into any of the other channels, it will be grouped into this catch-all channel.
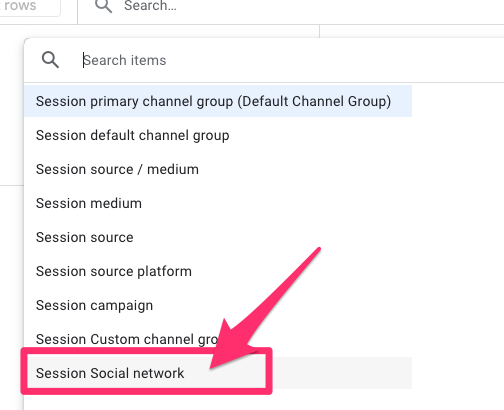
To see this data, go to the Traffic Acquisition report, remove any existing filters and choose your custom channel group, e.g., Session Social network, from the dimension drop-down in the table.
Hint: In the report that uses this custom channel group, you can also filter out the non-social channel group. While it’s helpful to keep it available, filtering it out allows the report to show only social media traffic, which is likely your focus if you’re following this tutorial.
Important note: When you save a new channel, it will go to the bottom of the list within the channel group. It is important to note that the order of the channel groups matters. In this case, we want Paid Facebook to appear before Organic Facebook because Organic Facebook is our catch-all for anything that doesn’t have a medium indicating it came from a paid source. For all the remaining social media sources, be sure to follow the same pattern, with the paid source listed before the organic one.
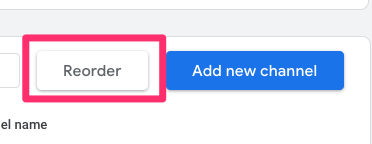
If your channels aren’t in the right order, click “Reorder” to rearrange them.
Bonus: Sometimes GA4 may miss some social media platforms, so you can check whether anything has been added to the Referral session default channel group by going to the Traffic Acquisition report and using the filter: Session default channel group exactly matches Referral.
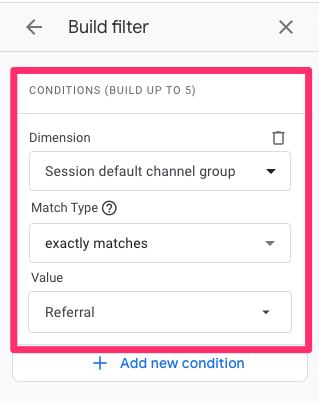
Then set the dimension in the table to Session source / medium. Scroll through this list to see if there is anything else that GA4 doesn’t capture as a social media platform, but you would consider to be one. For example, in the screenshot below, I have lnkd.in / referral, which I didn’t see before, so I can add that to my Paid LinkedIn channel.

If you’re viewing your data and things look weird, you may have a mistake in your custom channel group. Use the method above to filter the Traffic Acquisition report and view all Traffic source/medium entries for Paid Social and Organic Social to ensure your channels are filtered correctly.
If you realize that something was not filtered properly, this is not an issue! You can simply change the filters for that channel, and GA4 will retroactively update this field in your data. Return to the report, and you will see your updated data.
Quick UTM Reminder
To consistently view social media traffic in Google Analytics 4 with high accuracy, make sure your UTM parameters are consistent:
- utm_source should match the platform (e.g., facebook, linkedin, tiktok)
- utm_medium should be consistent (e.g., paid, cpc)
- utm_campaign should clearly describe the campaign
If UTMs are missing on paid ads, GA4 may incorrectly classify that traffic as organic. Learn more about UTM parameters in my guide to UTM parameters in Google Analytics 4.
How to view social media data in Google Analytics 4: Final Words
And that’s it, a few simple ways to view social media traffic in GA4, whether you just want a quick snapshot or you need a clean, repeatable report! Once you set it up, you’ll be able to compare organic vs. paid performance, see which platforms are actually driving results, and prove social ROI without guessing.

0 COMMENTS