
March 3, 2026
Google Tag Manager Tutorial for Beginners
Updated: March 3rd, 2026
Google Tag Manager is an amazing tool. Need to add a particular tracking pixel to a website? Not a problem! Want to track submissions of a newly created form? Consider it done—all thanks to GTM.
Google Tag Manager is a free tool that allows you to manage and deploy marketing and analytics tags (snippets of code) on your website without having to modify the site’s code directly. Its primary benefit is giving marketers and analysts the power to add tracking scripts for tools like Google Analytics, Google Ads, and Meta Pixel quickly and easily from a central web interface.
Instead of waiting (for days) for a busy developer to add those tracking codes, you could do this yourself (in many cases). Even though you will not replace developers 100% (and, in fact, you never should), with Google Tag Manager, you (and your team) will become more agile in implementing new marketing campaigns and/or web analytics tracking.
But where should you start? Tag Manager looks like a tank that requires specific knowledge, and your regular driver’s license won’t help much here. Just like any other tool, GTM has its learning curve. That’s why I decided to create this Google Tag Manager tutorial. It’s the first step towards becoming more independent + having more control over your analytics/marketing tracking codes.
Ready? Let’s start. If you have questions about GTM, feel free to comment.
By the way, I’ve prepared a free Google Tag Manager ebook containing even more useful information, so if you’re serious about learning GTM, download it.

Table of Contents
Here’s what you will learn in this blog post
- Before we continue: The Pre-Tag-Management World
- What is Google Tag Manager?
- Google Tag Manager vs Google Analytics
- Top benefits of Google Tag Manager
- How Does Google Tag Manager Work?
- Create a Google Tag Manager Account
- How to Install Google Tag Manager?
- How to check if Google Tag Manager is working?
- Creating Your First Tag in Google Tag Manager
- Save the tag
- Testing with GTM Preview Mode and GA4 DebugView
- Publishing the Google Tag Manager Container
- What’s next?
- If you need to become a GTM professional
- What should you learn next after you read this Google Tag Manager tutorial?
- Frequently Asked Questions
- Final words
Video tutorial
If you prefer to learn from the video content, I have recorded a Google Tag Manager tutorial and published it on YouTube. To get started, click on the video player below or click this link.
Before we continue: The Pre-Tag-Management World
Before we dive deeper into what Google Tag Manager is, let’s take a quick look at the world we used to live in (a.k.a. “without tag management”). Whenever you want to install Google Analytics or some other web tracking tool, it prompts you to add a piece of their JavaScript code (a.k.a. tag) on your website. Pretty standard, right?
It can be Hotjar, Google Analytics, or some other tool, but they all ask you to add their code (tag) to your site. When a visitor lands on your website, that tracking code is also loaded. Therefore, a visitor is tracked.
Adding that one tag to a site isn’t a big deal. You ask a developer, and he/she will do that (sometimes on the same day, sometimes over several days, but still reasonable because this has to be done only once).
But here’s the catch. Out of the box, GA4 offers plenty of metrics and some automatic event-tracking capabilities. But to make really good and thoughtful decisions, you need to track much more: interactions (e.g., form submissions), sales, etc.
This means that more tracking codes must be added to a website. And usually, this is not just a “one-time project”. You must constantly add new tracking codes and modify/remove the current ones.
That’s where the developer (and the IT department) becomes a bottleneck. Since he/she is working on his/her own tasks/projects, marketing/analytics tasks are often a B priority. Therefore, you and your team have to wait. And wait a bit more. And more.

That’s where the GTM saves the day, and this Google Tag Manager tutorial will show you how.
What is Google Tag Manager?
Google Tag Manager is a tag management solution that is a middleman between a website and marketing/analytics tools. All you need to do is add your tracking codes to GTM and then configure rules when they should be activated(on page load, click, form submission, etc.).
Imagine that Tag Manager is a Toolbox where you keep all your tools: a ruler (Google Analytics), a hammer (Google Ads), etc.
Google Tag Manager also lets you test your tracking tags to ensure they are triggered when you load a page or click a particular button.
Another great benefit: you can change your tags and how they work without actually changing the source code of your website. Instead, you just edit tags in the GTM user interface and publish changes with a button click.
Google Tag Manager vs Google Analytics
Many beginners confuse Google Analytics with Tag Manager by asking which one they should use now. The answer is both. These two tools do not replace each other. They work together. Google Analytics is a tool that collects visitor data and displays it in various reports, while Google Tag Manager is responsible for activating tools like GA4.
To summarize, Google Tag Manager lets you manage various JavaScript tracking codes (a.k.a. Tags) on your website. Google Analytics tracking code is one of those tags.
If you still feel confused about the relationship between Google Analytics and GTM, read this guide or watch the video below:
As I mentioned, Google Analytics is not the only tag compatible with Google Tag Manager. Other examples include:
- Google Ads Conversion Tag and Remarketing Tag.
- Facebook Pixel code
- Pinterest tag
- Any other custom HTML/JavaScript code
- etc.
Top benefits of Google Tag Manager
There are many benefits of using Google Tag Manager, but I’d like to point out, in my opinion, the most important ones.
REASON #1. Fast Deployment of Tracking Codes
Instead of having to wait days or weeks for a developer to implement your tracking codes, in many cases, you will be able to do it by yourself (without actually editing the website’s code).

REASON #2. All Tags Are Controlled in a Single Place, your GTM account
In the past, all tags were coded directly in the website’s/app’s source code. The worst part was that those little pieces of JavaScript code snippets were scattered across different website files. So if you need to make a change, the developer most likely needs to: (1) find all those codes, (2) update them.
I’ve seen many cases when, due to a human error, some codes were missed. Therefore, this caused inaccuracy in data collection.
Thanks to Tag Manager, this process is made easier: all tags are controlled in one place.

REASON #3. Built-in and 3rd-Party Testing Tools
Troubleshooting and correcting tag errors is simplified via Tag Manager’s Preview and Debug mode, which shows which tags are fired on a page and which are not. It also includes information about triggers that fire tags and data contained within tracking tags.

Why is it important? With Google Tag Manager debugging solutions, you ensure your tags work before publishing them to the live site. Also, let’s not forget other useful browser extensions such as Tag Assistant, Data Layer Inspector, etc. I’ve listed many more of them in a blog post called Top Google Tag Manager Extensions for Chrome.
Still not convinced? Continue reading this Google Tag Manager tutorial, and I’ll show you the goldmine.
REASON #4. Fairly simple event tracking
As I have mentioned, event tracking involves custom JavaScript codes that a developer has to add to a website to track events like clicks, form submissions, etc. To make things easier, Google Tag Manager comes with a feature called auto-event tracking.
Once you enable a certain trigger in Tag Manager, it will start automatically listening to particular website interactions. Some setup is still required, but it is relatively straightforward. You can use those interactions to fire tracking codes, e.g., GA Event Tag.
Basic events that you can track (by default) in Google Tag Manager are based on:
But wait, there’s more! Thanks to the growing community of GTM users and enthusiasts, the number of auto-event tracking functions constantly increases. You can also add custom features that record things, such as video players and much more.
Just keep in mind that more complex events still might require a developer’s input. Although Google Tag Manager gives you some superpowers, it doesn’t make you almighty.
REASON #5. Ready-made Tag templates
Google Tag Manager has several important built-in tags for Google Analytics 4, Google Ads conversions, remarketing, and more. This allows a marketer with little or no coding knowledge to customize tags without implementing complicated code or asking for a developer’s help.

And if you cannot find a tag template you need, check the community gallery where other members are building super-useful stuff. Or as an alternative, you can use a Custom HTML tag.
If you still have some doubts about whether you should start using Google Tag Manager, here are some additional posts tailored to you:
- Google Tag Manager benefits
- Things you can do with Tag Manager (A LOT of them)
How Does Google Tag Manager Work?
For beginners, there are three concepts to understand: tags, triggers, and variables.
A tag is a piece of code that must be fired on a website under certain circumstances. It can be a tracking code, some piece of code that changes the text or a particular website element, or even code that changes the color of the browser’s address bar, you name it. When you create a tag, you basically instruct Tag Manager to “do this”, “do that”, “track page views of this visitor”, “track this click and send to Google Analytics”, etc.
A trigger is a condition when a tag must fire. Should a tag fire on all page views? Or maybe on certain clicks? How about successful form submissions? All of these examples are triggers. When a particular condition (or a set of conditions) is met, a trigger is activated, and all the tags (linked to it) are dispatched.
A variable is the final member of this trinity. Variables are little helpers that can be used in tags, triggers, or even in other variables. A variable can:
- hold a single piece of data (like page URL, website domain, product ID, text of a link, etc.)
- hold a set of data/settings (GA settings variable (for Universal Analytics) contains multiple settings related to GA, like Tracking ID, Display Advertising settings, etc.)
- be a complex function (but this one is too advanced for beginners. Therefore, let’s skip it, at least for now), etc.

The best way to understand the relationship among tags, triggers, and variables in Google Tag Manager is to take a look at an example (see the image below).
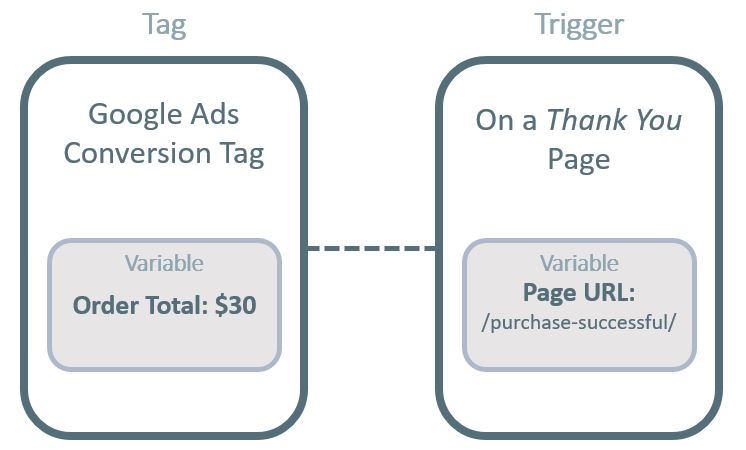
- Google Ads Conversion Tag is a tag. With it, you instruct the Google Tag Manager to do what? Track a conversion.
- When must this tag be fired? The answer is On a Thank You Page (a.k.a. order confirmation page). This condition is our trigger.
- Now, we need to use some additional information to send more precise data to Google Ads and to make our trigger actually work.
- With the Google Ads conversion tag, we can send Order Total, a variable. Whenever a successful purchase is complete, the G Ads tag will fetch the value of the variable Order Total and send it over to Google’s servers. Variables are things that make Google Tag Manager tracking dynamic.
- In the trigger, we must instruct Google Tag Manager when to fire precisely. Saying on a Thank You page is comprehensible for a human. But in Tag Manager, we need to be more specific. What is a Thank You page? The answer: it’s the page of which the Page URL contains “/purchase-successful/” (P.S. this is just an example). In this case, the Page URL is variable, and we have instructed GTM to check the Page URL when the page loads constantly. If a variable (URL) contains “/purchase-successful/”, the trigger will be activated.
So as you can see, variables can be used in both Tags and Triggers. You can also use them in other variables, but you’ll learn that in the future (not in this guide).
Create a Google Tag Manager Account
To get started, first, let’s create a GTM account.
Go to Google Tag Manager’s official website and click the main call-to-action to create a new GTM account.

Like any other Google product, you will use the same Google account for Tag Manager. So if you’re already on Gmail (Google Ads, Google Analytics, etc.), you will be automatically logged in to Google Tag Manager. If not, create a Google account first (I will not show that procedure, so you’re on your own here 🙂 ).
Once you log in, you’ll be asked to create a new GTM account and a new container.
In the Account Name field, enter the name of the business (e.g., your company’s business or your client’s business). If you are an agency, it is a better practice to ask your client to create a GTM account and then share the access with you.
In the Container Setup section, enter the name of your website (it can be a domain (e.g., example.com) or just a name (e.g., My website). In this blog post, we will cover Web tracking, thus choosing the Web as the target platform.

The Google Tag Manager account works the same as the GA account. Usually, it’s for a company/business/client, while a container is usually for a website or application. A single container can contain many tags, triggers, and variables.
However, if several websites belong to a single business and their structure is very similar (plus, their tracking implementation is similar), feel free to use one container on multiple websites.
How to Install Google Tag Manager?
After you create a container, you’ll get two codes that must be added to a website.
Hand over these two snippets to a developer and ask him/her to carefully follow the instructions (the first code should be added somewhere in the <head> of a website, while the second should be added right after the opening <body> tag).

You might wonder why GTM requires two pieces of code. Each one serves a distinct purpose:
- The <head> script: This is the main JavaScript snippet. Without it, GTM would not work. Placing it high in the <head> of your website ensures that GTM loads as quickly as possible. This is highly recommended for accurate tracking because it allows your tags to fire early in the page load process, preventing you from missing data.
- The <body> noscript snippet: This is a fallback for the small number of users who have JavaScript disabled in their browsers. The <noscript> part of the code is an HTML <iframe> that provides a basic level of tracking even when JavaScript is unavailable. Personally, I think you are free to ignore it because many modern websites would not properly work without JavaScript anyway.
Thanks to this code (implemented on a page), all the tags will be fired when they are configured to do so.
If you want to learn more about the proper installation, read this guide on how to install Google Tag Manager on a website.
If you’re using a popular content management system, like WordPress, chances are that there is a ready-made GTM plugin that eases the installation process + adds some additional benefits.
For example, in WordPress, there is an awesome plugin GTM4WP. Not only will it help you easily install Google Tag Manager, but you can also get some additional data from it, like page author, page tags, etc. Later, this data can be turned into GTM variables and used in tags and triggers.

Feeling tired? If yes, bookmark this Google Tag Manager tutorial for beginners and come back any time later when you’re ready to dive into the world of tag management.
How to check if Google Tag Manager is working?
No installation is complete until you’ve confirmed it works. Never assume the code was added correctly. Taking a minute to verify the installation will save you from the future pain of discovering you’ve been collecting no data. There are several options you can choose from (all of them are explained in detail here). The easiest one:
- Enable preview and debug mode and see whether it appears on the screen. Click the Preview button in the top right corner of the GTM interface, then go to the website (refresh it) and check whether a GTM preview mode works.
The tips above are the main ones you could try right now. I have a longer (and more detailed) list here (in case you need it).
Troubleshooting common beginner issues
If you’ve followed the steps but things aren’t working as expected, check for these common mistakes:
- GTM preview mode won’t connect: This is often caused by a browser extension (like an ad blocker) interfering with the connection. Solution: Try disabling your extensions or testing in your browser’s incognito/private mode. You can learn more solutions here.
- “Tag not fired” in preview mode: If your GA4 tag isn’t firing, double-check that you assigned the correct trigger to it. For the basic setup, the “Initialization – All Pages” trigger should be used.
- Changes aren’t live on the website: Remember that after you create/edit tags and verify them, you must click the blue “submit” button in GTM to publish your changes. Until you publish, none of your work will be active on your live site.
Creating Your First Tag in Google Tag Manager
Usually, the first tag marketers/web analysts install with Google Tag Manager is the basic Google Analytics 4 tracking. This is equivalent to the procedure where GA4 asks you to add their gtag tracking code snippet to all website pages. But instead, we’ll choose a more flexible road, GTM.
To get started, go to analytics.google.com. Then go to the Admin section of your Google Analytics interface (by clicking the Admin at the bottom-left corner) and then (in the Property section) click Create Property.

Then enter the name of your property. It might be the name of your website, of your company, a brand, etc. Choose your company’s country, reporting time zone, and the main currency that your business operates in.

Then press Next, and answer several questions. Then you will need to select your business objectives. Based on these choices, the reports you will have in the interface will also change. To make things simpler right now, select Get baseline reports.

Click Create. The next step to complete is to configure your first data stream. It is a data source from which events will be sent to your Google Analytics 4 property. You can have multiple data sources in a single property. For example, three web properties, 1 for Android app, and 1 for an iOS app.
In this blog post, I will focus on a Web stream. Select it.

Then enter the URL of your website (for example, https://www.mywebsite.com). Note that the protocol (https) is already selected. After that, enter the name of your website.
When you create a web data stream in Google Analytics 4, you can enable/disable Enhanced Measurement. It is designed to help marketers get as many events in the reports as possible without the need to cooperate with developers or configure them in Google Tag Manager.

When you’re ready, press the Create stream button.
When you create a data stream (web), you will see a Measurement ID.

In the top-right corner, you will see the tracking ID of your new property. Copy it. We’ll need to use it in Google Tag Manager.
By the way, if you ever get lost in the GA4 interface and need to revisit this page, go to Admin > Data Streams > choose your most recently created stream, and then you will return to the same window I have displayed in the screenshot above.
Then go to your Google Tag Manager container > Tags > New > Google Analytics and choose Google Tag.
In the Tag ID field, enter the ID you copied in the GA4 interface.
In the Triggering section, select All Pages and then name the tag, e.g., Google Tag – [measurement-id].
Save the tag
That’s it! Save the tag. This is all you need to do with basic Google Analytics 4 implementation. If someone asks you to install the standard tracking with GA4, that is all you need to do: create a Google tag. It is the equivalent of adding that gtag tracking code (which is provided in the Admin section of the GA property) to the website’s source code.
Testing with GTM Preview Mode and GA4 DebugView
Before we publish these changes and start tracking all the visitors, we must ensure everything is configured properly.
That’s where the GTM Preview Mode becomes very useful (in fact, this is one of my favorite features in Google Tag Manager).
Google Tag Manager Preview mode allows you to browse a site where your GTM container code is implemented.
To enable Google Tag Manager Debug mode, click the Preview button in the top right corner of your GTM interface (near Submit button).

Once you click the Preview button, a new browser tab will open with tagassistant.google.com. If it does not, read this guide.
A pop-up will ask you to enter the URL that you want to test and debug. It might be the address of a homepage, or it might be a specific page’s URL, and then press Start.

A new browser tab (or window) should appear where you will see the URL that you entered in the previous popup. At the bottom of that page/tab, you must see the following badge:

And if you go back to the tagassistant.google.com tab, you must see this success message.

Click Continue in that popup to see the Preview and Debug page (a.k.a. the Debugger). If you want to learn more about the preview mode, watch this video.
Once you enable the Preview mode, click the Initialization event on its left side. This is the earliest moment when your tag might fire.
After you click it, you should see your Google tag in the “Tags Fired” section.

Great! Before we start celebrating your first tag, we need to check whether that data actually reached Google Analytics (because the fact that the tag was fired does not mean that data was properly sent. For example, a tag may be incorrectly configured and send page views to the wrong GA property).
The primary feature built for debugging GA 4 data is the DebugView section. You can find it by going to Admin > DebugView on the left side of the GA4 interface. Click it.

Do not mix this with the GTM Preview and Debug mode. They are two different beasts.
To enable the debug mode in GA4, you have several options (any of them will work):
- Enable the GA debugger Chrome extension
- Send a debug_mode parameter together with an event
- Have enabled Google Tag Manager’s Preview mode on a page that you’re debugging
But since we are working with Google Tag Manager, having the GTM Preview mode enabled automatically sets the debug_mode to true. Thus, the data will start appearing in the GA4 DebugView.
When you start seeing data in the DebugView, you can click on every event, and then a list of parameters will be displayed.
Click on that parameter to see the value that GA4 received. Now, that is some granular debugging!

Publishing the Google Tag Manager Container
Once you’ve finished configuring and testing tags/triggers/variables in the container, publish it (otherwise, those changes won’t go live, and your visitors/users will not be tracked). Every time a container is published, a new container version of it is created. This is very useful because in the case of “oops….”, you can restore to one of the previous versions quickly.
In the top right corner of the Google Tag Manager interface, click the blue SUBMIT button.

Choose to Publish and Create Version. Although the Version Name and Version Description fields are not required, it is highly recommended to fill them out. Once your container version history grows to 10, 20, or more versions, those names and descriptions will become very useful (when you try to find out when a certain change was implemented).
After that, once you hit the PUBLISH button, your changes will go live, and you will start tracking page views of visitors (and additional events if Enhanced Measurement is enabled).
A quick off-topic. Do you enjoy this Google Tag Manager tutorial and find it useful? If yes, consider subscribing to my newsletter and further advance with GTM.

So what’s next? What should you do now?
My suggestion: start using Google Tag Manager on all new projects. The size does not matter; it might be a simple website, or it might be a larger e-commerce business. Even if you don’t plan to go advanced and just need the basic tracking, still use GTM. Google Tag Manager first, then Google tag.
Because you never know, maybe one day you’ll suddenly need to track something in that X project, and you’ll be able to do that in no time (because Tag Manager will already be implemented there).
But what about those projects/websites that already have some Google Analytics or other tracking tools implemented (not via Google Tag Manager)?
There are a couple of options here:
- The most recommended: migrate all the hardcoded tracking scripts from the website’s source code to Google Tag Manager. This process is not easy and will require both your and the developer’s input, but in the long run, it will definitely pay off. Just think about how long digital marketing campaigns were delayed because the developer was busy with other projects/tasks. With GTM, you could implement tracking much faster, and you/your team would become more agile.
- You can implement new tags with Google Tag Manager while old tags are still hardcoded (P.S. In this contest, “hard coded” means that tracking scripts are added directly to the website’s source code). Just make sure that you’re not tracking the same interactions with both hardcoded script and Google Tag Manager (otherwise, your data in reports will be duplicated).
If you need to become a GTM professional as fast as possible
This Google Tag Manager tutorial is just the first little step in learning how to master GTM. There are MANY more things that a beginner must learn. You have two options here:
- Take the long path and try to figure out the stuff on your own, read/watch countless GTM tutorials in random order, and connect the puzzle pieces on your own.
- Take the proven and shortest way + to get mentored. That’s where my Google Tag Manager Masterclass for Beginners is irreplaceable. In it, I will show you the correct (and shortest) path that a beginner should take to solve the most common web tracking challenges. And if you are even more serious about learning GTM, take a look at my intermediate/advanced course as well.
What should you learn next after you read this Google Tag Manager tutorial?
The list of Google Tag Manager topics that you can learn is definitely a long one, but if you’re starting, here are my suggestions (some of these guides might still be using Universal Analytics as a tool of choice):
- Form tracking
- Video tracking
- Data Layer
- Click tracking
- Virtual page view tracking (on a Single-Page Website)
The list goes on (I’m just scratching the surface here). If Google Tag Manager were a narrow topic, I wouldn’t have published hundreds of GTM blog posts. But it’s totally possible to achieve, you’ll just need a lot of time, determination, and will to learn.
Not sure where to start? Let’s learn how to track your first event with this video.
Frequently Asked Questions about Google Tag Manager
I bet that there are still a lot of questions in your head right now. That’s normal! Here are the most common ones. If you have more questions (that were not answered in this guide), feel free to leave a comment below.
#1. Does Google Tag Manager work only with Google Products? No. Google Tag Manager plays well with a lot of platforms/tools. It offers a wide range of predefined tag templates (like Google Analytics, HotJar, Twitter Universal Tag, etc.). Additionally, you can add custom codes with the help of a Custom HTML tag.
#2. Is Google Tag Manager free? GTM has both Free and Premium plans. A free plan is more than enough for small and medium businesses. Large enterprises can benefit from a paid Google Tag Manager 360 option. You can compare both pricing plans here.
#3. What if my content management system does not allow me to place the Google Tag Manager code in the <head>? Don’t worry, this is not the end of the world. GTM <script> code can be placed anywhere on the website. The higher you put it in the website’s source code, the sooner it will load. Therefore, your web tracking will be more precise. But if your CMS allows placing all codes only in the <body> tag, that is still fine. The most important thing is that you must not place the <noscript> code in the <head> of a website. All other variations are allowed (e.g., both codes can be placed right after the opening <body> tag or both codes before the closing </body> tag).
#4. Do I need to learn to code to use Google Tag Manager? No, but JavaScript, HTML, CSS, Regular Expression, and DOM knowledge will be super useful and open an entirely new horizon of possibilities for you in web tracking with GTM. But even without these skills, you can achieve some great results.
#5. Do I still need developers after I start using Google Tag Manager? It depends on what your goals are. Even though many new opportunities open up to digital marketers after they start using GTM, sometimes a developer’s help is still necessary. Such interactions as video player actions, scroll tracking, elements’ appearance on the screen, etc., will be pretty easy for you to track (as you get more experienced with GTM). But if you need some server-side data (which is not accessible by Google Tag Manager), for example, user ID, or user’s pricing plan, you’ll need to cooperate with the developer.
#6. Where can I get help regarding Google Tag Manager?
- Google Tag Manager Community on Facebook (recommended and the most active)
- Google Tag Manager Community on Reddit
- Official community forum
- Stack Overflow
Google Tag Manager Tutorial: Final words
GTM is one of my all-time favorite tools that has saved me a lot of time and helped me become agile in digital marketing/web analytics. In this Google Tag Manager tutorial for beginners, you’ve learned that GTM is like a middleman between a website/app and 3rd party tools (e.g., Google Analytics, Google Ads, Facebook (Meta) pixel).
Back in the old days, all tracking codes (tags) were controlled by developers who had to add them to the website’s source code. This workflow caused several problems. To name a few:
- Developers were too busy, and marketers/web analysts had to wait days or even weeks to have their tracking scripts implemented.
- Multiple tracking codes meant they were scattered across different places on the website, which meant more difficulties in maintaining the code.
Thanks to Google Tag Manager, adding, editing, and removing tracking scripts have become much easier. In a single interface, marketers can control codes (read: tracking tags) of various tools, like GA4, FB Pixel, etc. To make things much easier, the most popular tools can be controlled with the help of tag templates, which do not require coding knowledge.
Also, in this Google Tag Manager tutorial, I’ve explained what tags, triggers, and variables are in GTM, what their role is, and how they are connected.
Tags are various pieces of code (or templates) that are activated under certain circumstances. Triggers are those conditions that activate tags. Variables are little helpers that can hold data (or some useful settings/functions) and can be inserted in tags, triggers, and even other variables.
1 COMMENT
the best route for starting GTM as a beginner.