


October 16, 2026
Major Google Tag Manager Update: Optimized Tagging Experience
If you opened Google Tag Manager recently, you might have noticed a new Settings section, a diagram of your Google tags, and an invitation to optimize your container. There are also changes to the tag types you use for Google Analytics and Google Ads.
In a nutshell, Google is bringing Google tag and Google Tag Manager together. The Optimized Tagging Experience lets GTM send data to Google destinations without loading the additional Google tag libraries, and moves shared tag settings into the container.
The migration wizard handles much of the work. But you still need to choose which settings to keep, review who gets access, and test your tracking before publishing.

Table of Contents
Here’s what you will learn in this article
- Why Google is changing the tagging setup
- What are destinations in Google Tag Manager?
- How to migrate to the Optimized Tagging Experience
- What happens to your existing tags?
- Shared settings in the GTM container
- How to test the migration
- Can you undo the optimization?
- Should you migrate now?
- Frequently asked questions
- Final words
Video tutorial
If you prefer video content, watch this tutorial from my YouTube channel.
Why Google is changing the tagging setup
In the previous setup, your GTM container loaded a Google tag for Google Analytics. If you also used Google Ads, you could have another Google tag for that product, with your Google Ads conversion tags using its library.
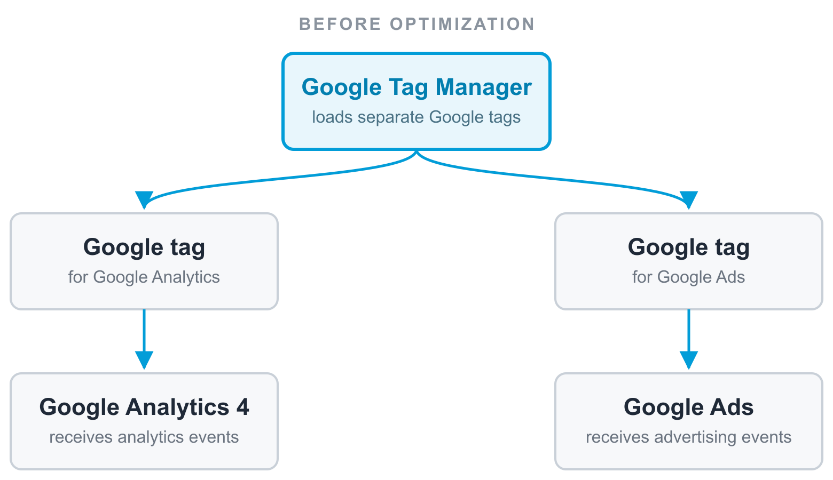
That meant extra JavaScript for the browser to load and process. Adding more Google tags could increase the work your website was asking the browser to do.
In my demo container, I have two Google tags, one for Google Analytics and one for Google Ads. You can see the extra step between the GTM container and the destinations in the Overview diagram.
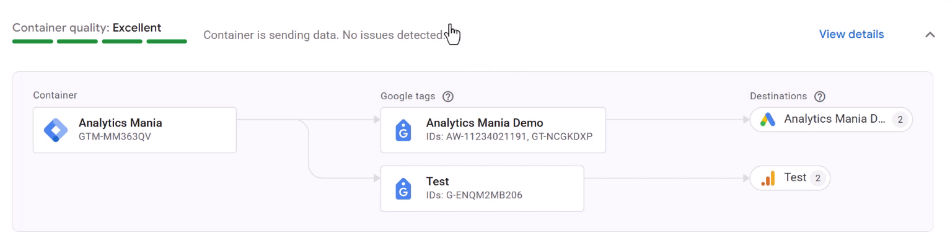
With the optimized setup, GTM handles those Google destinations directly. The extra Google tag library loads are removed for the destinations you optimize.
I welcome that change. However, I wouldn’t promise a specific improvement in page loading speed without measuring it on your website. The effect depends on your current tagging setup and everything else the page loads. But on the other hand, you would most likely to notice at least a small improvement.
What are destinations in Google Tag Manager?
One of the main messages of this migration is that “Google Tags are now replaced by Destinations”. So what are they?
A destination is the Google product receiving your data, such as a Google Analytics 4 data stream or a Google Ads account. The new destination tag types are called Google Analytics, Google Ads, and Google Floodlight.
For example, the Google Analytics destination tag contains the GA4 Measurement ID. Your GA4 event tags still send events such as purchase to that destination. Visually, a destination tag looks very similar to good ol’ Google Tag.
And you will still work with tags, triggers, and variables. The main change is how the Google destination is initialized and where its shared settings are managed.
These shared settings apply to the Google destinations using the optimized setup. They don’t configure your Meta Pixel, Snapchat tags, or other vendors’ tags.
How to migrate to the Optimized Tagging Experience
This is not done automatically for you. You will need to be involved, at least to some extent.
Luckily, the migration is a workspace change that you can test before publishing. And that’s good. You’ll have more control that way. I would start by checking your existing Google tag settings, particularly if your GA4 and Google Ads configurations differ.
The walkthrough below uses a container with separate Google Analytics and Google Ads tags. Google’s container optimization documentation also covers the shorter flow for containers whose Google tags already use the same settings.
#1. Open the optimization wizard.
Go to your container’s Overview page and look for the Optimize your Tag Manager container banner. Depending on your setup, the button can say Review details or Get started.
In the screenshot below, I hovered my mouse over one of the Google Tags in the workflow chart.
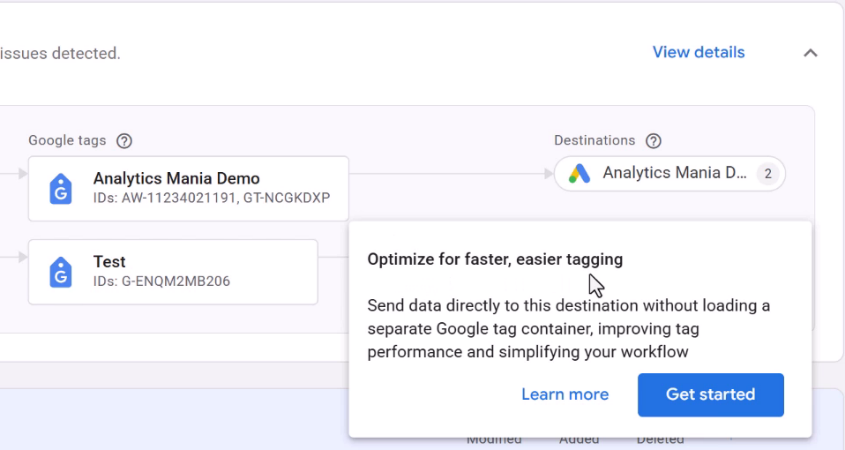
Another option is Settings > Google destinations: hover over “No” in the Optimized column and click Get started.
#2. Choose the Google tags to migrate and review access.
The wizard lists the Google tags available for optimization. In my example, I select both the Google Analytics tag and the Google Ads tag.
Also, check the access setting beside each tag. Keeping Read access allows users with access through that linked Google tag or destination to view the GTM container.
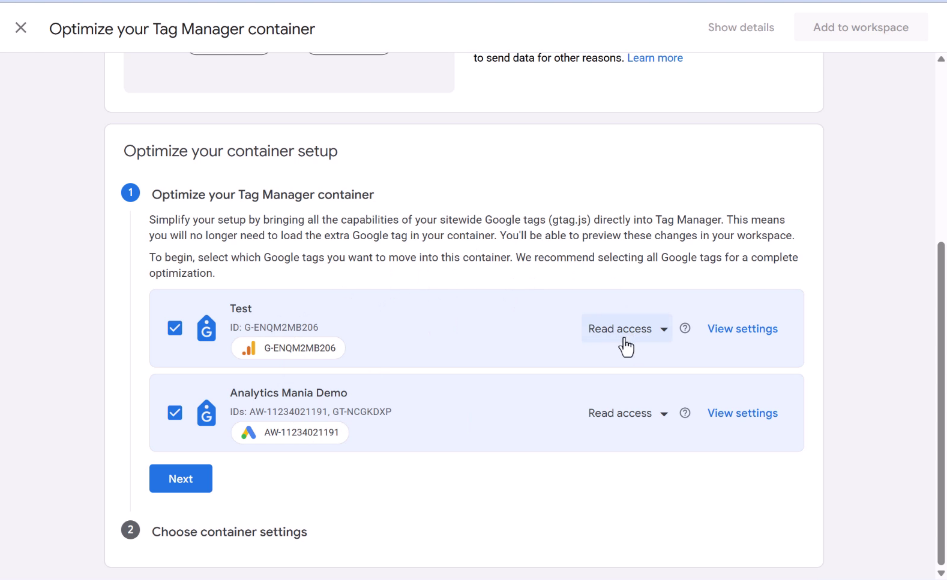
Read access means that if a person has access to Google Analytics or Google Ads, they will be able to see what’s inside the Google Tag Manager container, too. They won’t be able to make changes, though.
If you don’t want to grant that visibility, select No access. Don’t leave the default selected without checking who can access the linked Google products.

#3. Choose the container settings.
When your Google tags have different settings, the wizard asks which tag’s settings should become the GTM container settings. Use View settings to inspect the options before choosing.
In my demo, I select the Google Analytics tag as the source. Its Google tag settings are copied into the GTM container and become the shared settings for the optimized destinations (this means that they would also apply to Google Ads tag).
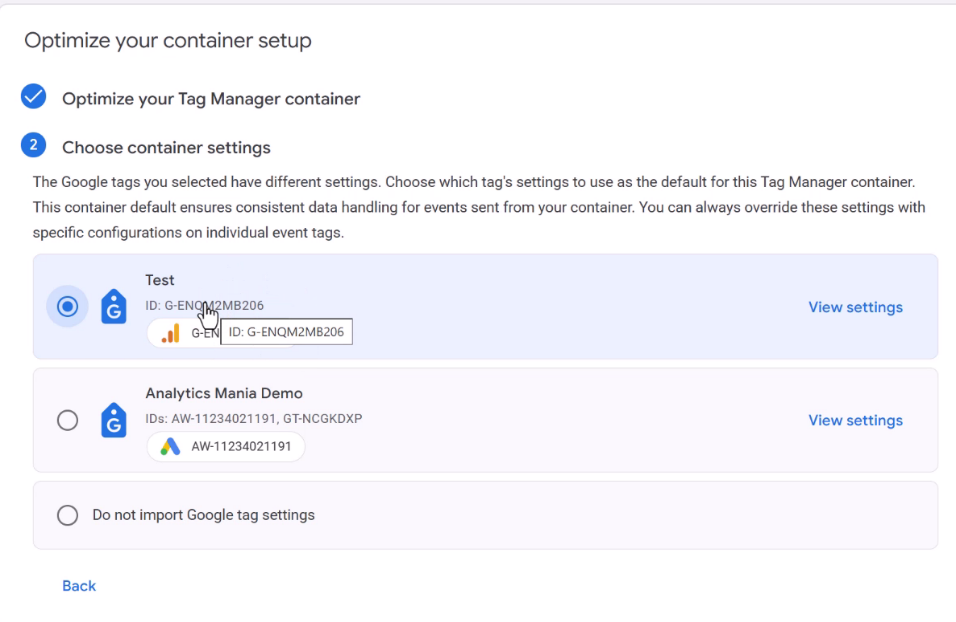
This is the part where I would slow down. Choosing a tag here is more than choosing a name from a list: you are deciding which configuration the destinations will inherit.
Review settings such as your cross-domain configuration, automatic event detection, and user-provided data collection. If your Google Ads tag and Google Analytics tag have intentionally different configurations, check what the shared setup will do to each destination.
If some differences are a deal-breaker for you, maybe you should postpone the migration until we get more clarity from Google.
The wizard also has a Do not import Google tag settings option. Choose that only if you intend to configure the container settings yourself.
#4. Review the changes and add them to the workspace.
Open Show details in the top right corner of the wizard. Check which tags will be modified and review the permission changes.
The before-and-after diagram is useful here. It shows which destinations will connect directly to the GTM container after optimization.
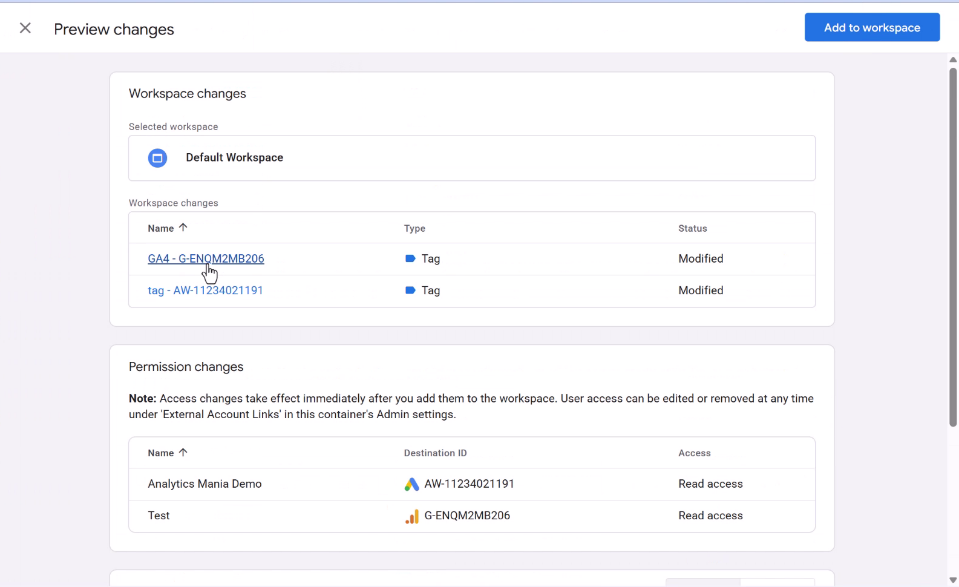
Once you have verified everything and are ready to migrate, click Add to workspace. The tagging changes are now in your workspace, ready for testing.
Don’t click Submit yet. First, check the updated tags and the shared settings.
What happens to your existing tags?
After migration, the tags you optimized use the destination tag types. In other words, tags with “Google Tag” template are now migrated to use “Google Analytics”, “Google Ads” or “Floodlight” tag templates. Destination tags replaced Google Tags.
Open the Google Analytics tag (personally, I still prefer calling it “GA Config tag”) and you will still find familiar options, including the Measurement ID, configuration settings, and shared event settings. Review the existing values and the firing trigger.
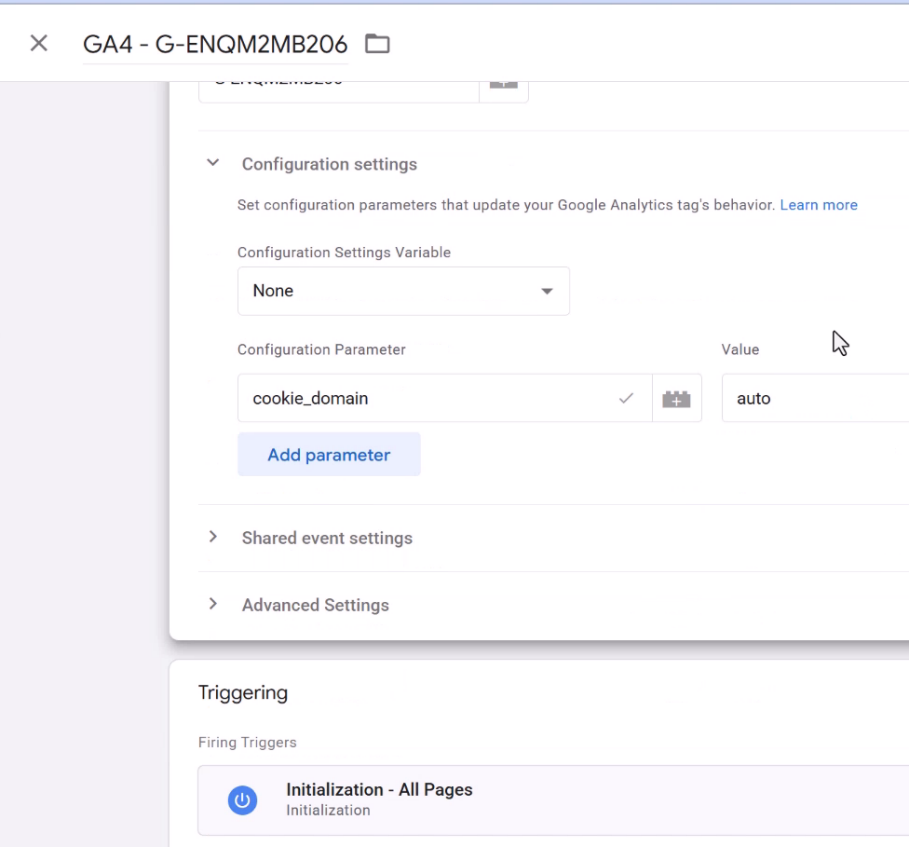
The GA4 event tags (and all non-google tags) remain in place. In my purchase event tag, the interface now confirms that a destination was found in the container, where it previously referred to a Google tag.
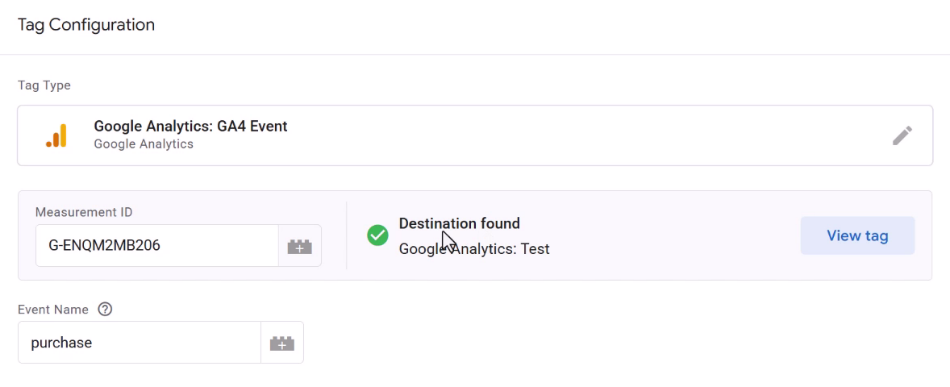
You don’t need to recreate every event tag just because you migrated. Still, include those events in your tests. A successful migration dialog doesn’t prove that a purchase event sends the right data.
What happened to the old Google tag and Conversion Linker?
When you create a new tag, you will find the destination types under their respective Google products. For Google Analytics, select Google Analytics for the destination, or the GA4 event tag when you need to send an event.
The old Google Tag is still available under Other Google. Conversion Linker is also there, and it’s marked as Legacy in the tag picker.
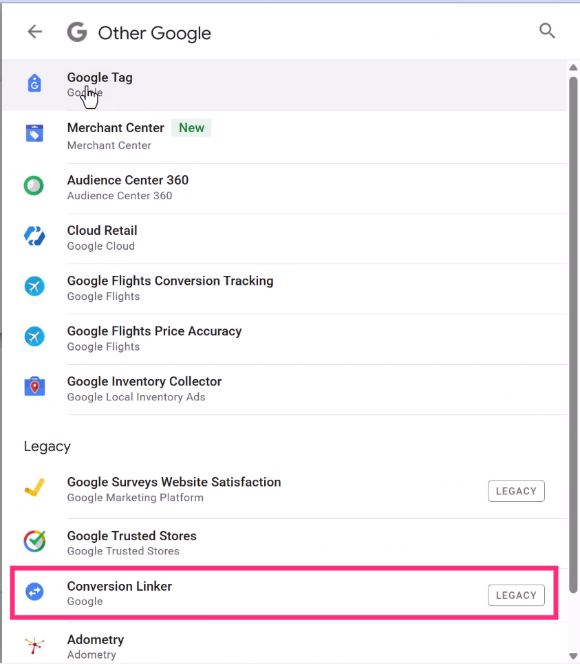
The optimized destination tags handle the conversion-linking functionality. Once your relevant destinations are migrated and tested, you are free to delete the Conversion Linker.
However, if you are migrating only part of a container, check the remaining setup before removing tags. Keeping a tag temporarily is better than deleting something you haven’t checked.
Shared settings in the GTM container
Open Settings in the left sidebar of Google Tag Manager. At the top, Google destinations lists the configured destinations and shows whether each one is optimized. If you have a Google tag in the container which was not migrated, then “Optimized” will display “no” next to it.
Below that list are the shared settings. These include options such as Manage automatic event detection, Configure your domains, and Allow user-provided data capabilities. It’s pretty much the same list that you are used to seeing in Google Analytics > Admin > Data Streams > Web stream > Configure tag settings.
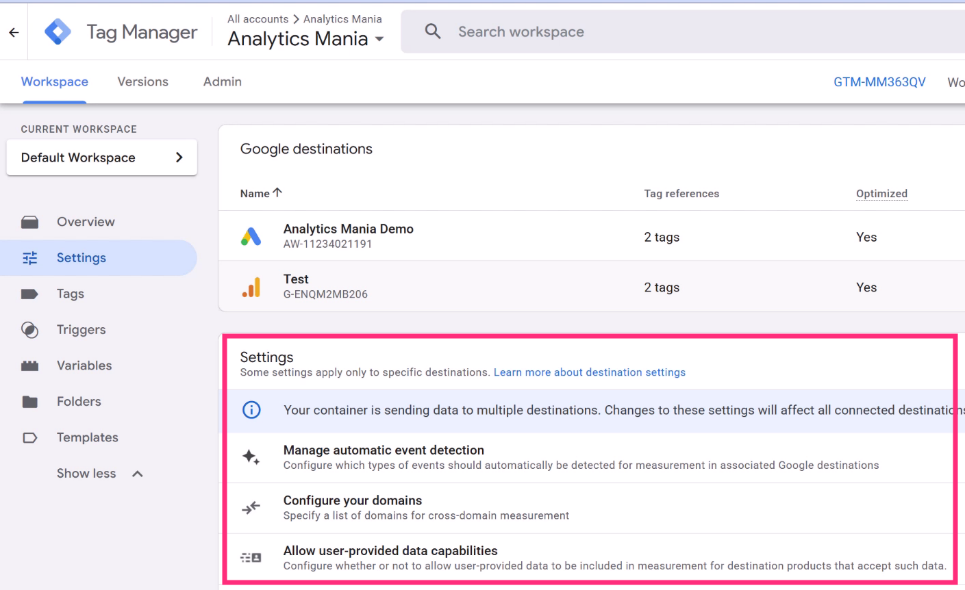
All optimized Google destinations in the same GTM container inherit the shared settings in this section. If you change those settings, you are changing the shared configuration for all of those destinations.
For example, suppose you use Google Analytics and Google Ads on two domains that are part of the same measurement setup. Go to Settings > Configure your domains and add both domains there. You can manage the domain list in one place instead of maintaining it separately in each Google tag. That’s convenient.
The migration wizard copies the settings from the Google tag you selected. That selection becomes the starting configuration for the container. After migration, use GTM’s Settings section to manage the shared configuration.
This also changes how you publish those settings. Saving a change adds it to the workspace, where you can review it and test it in Preview mode. The settings change goes live only when you publish the container, and it becomes part of the container’s version history.
For example, after updating your domain list, test the cross-domain setup before publishing. The shared configuration affects every optimized destination in the container, so check both Google Analytics and Google Ads if you use both.
The Configuration settings and Shared event settings inside an individual destination tag are separate controls from the container’s Settings page. If you change something in the tag (e.g., add a “linker” parameter there, it will overwrite whatever is configured in the “Settings” tab of GTM container.
How to add another destination
If you ever need to add more destinations to the GTM container, you can do it through Tags > New > Tag Configuration and select Google Analytics, Google Ads, or Google Floodlight. Creating a tag there adds the destination.
Another option is a shortcut under Settings > Add destination. Select the destination you want to configure, and GTM opens the same tag creation flow.

How to test the migration
After you complete the migration wizard, the next step is to test. Click Preview in GTM, enter your website URL, and connect Tag Assistant. Check the destination tags and the events that matter to your implementation before publishing.
If you need a refresher, my Google Tag Manager Preview mode guide explains how to use the debugger.
One visible change is the Hits Sent tab under the GTM container itself. Previously, you would switch to a Google Analytics or Google Ads ID to inspect those requests.
In my demo, Hits Sent shows a page view going to Google Analytics and another request going to Google Ads.
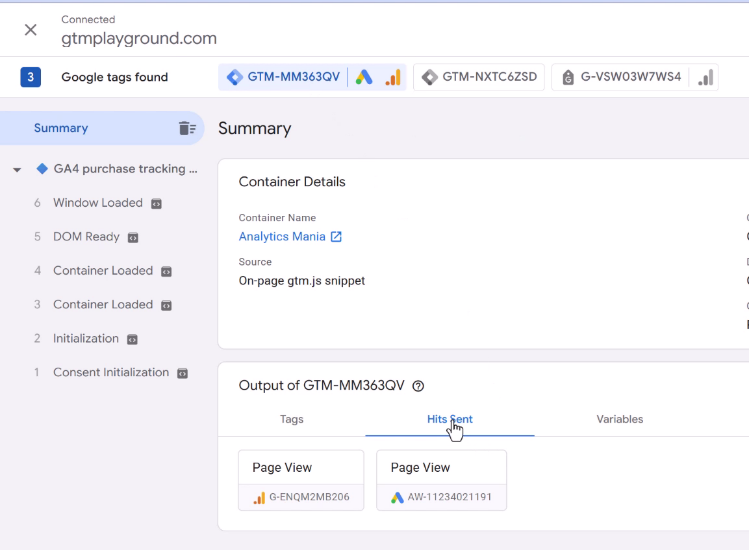
The Tags tab also shows the shared tag settings used by the optimized destinations. Open a setting to inspect its configuration while debugging.
For the migration, I would check:
- The Google Analytics and Google Ads destination tags fire on the intended triggers.
- Page views and your important events reach the correct destination IDs. For example, you can verify this with Google Analytics DebugView.
- A test purchase or lead sends the expected parameters and doesn’t create duplicate events.
- Your consent behavior still works when consent is denied, granted, or changed.
- Any cross-domain setup and settings you carried over still behave as intended.
Check the data in the receiving product too, where its debugging tools allow it. For GA4, DebugView is useful for inspecting the events and parameters from your test session.
When the tests pass, click Submit in the GTM container and publish a container version with a description of the migration (Gemini will generate it for you). Then check the published setup as well.
Can you undo the optimization?
You can undo the tagging changes in the workspace before publishing. If you have already published them, you can roll back to a previous container version.
However, permissions need a separate check. Google’s optimization documentation explicitly says, “Permissions are not versioned.” Restoring an older container version won’t undo the access you granted during optimization.
To change that access, go to Admin > External account links in the container. Review the linked accounts and adjust their access there.
Should you migrate now?
I would plan the migration rather than leave the container on the old setup indefinitely. Fewer Google tag library loads and a single place for shared settings are useful improvements.
If you have a straightforward container and time to test it, the wizard makes this fairly simple. With multiple destinations and conflicting settings, allow more time to compare the configurations before publishing.
You don’t have to treat the optimization banner as a reason to rush an untested change onto your website.
Frequently asked questions
What changes should I make in my server-side GTM container after migration? No changes are required in your server-side GTM container for this migration. The Optimized Tagging Experience changes the web container. SGTM behavior does not change. Keep your existing server container configuration. After migrating the web container, test that requests still reach your tagging server and that the expected server tags fire.
Should I remove the Conversion Linker from my server container? In the web container – yes (after the migration). However, the server-side GTM container (if you have configured Google Ads tracking there) will still ask you to add the Conversion Linker tag there (and that’s ok)
Optimized Tagging Experience in Google Tag Manager: Final words
Google Tag Manager’s optimized setup removes the extra Google tag library loads for migrated destinations and brings their shared settings into the container. Your existing event tags remain part of the setup.
The work is in choosing the right settings, checking access, and testing the data after migration. I think this is a welcome update, even if it means getting used to another change in Google’s tag names.
If you want to get more comfortable with tags, triggers, and testing your tracking setup, take a look at my Google Tag Manager Masterclass for Beginners.

0 COMMENTS