Updated: May 12th, 2021
This blog post contains Google Analytics 4 examples. If you are looking for Universal Analytics examples, read this guide instead.
Disclaimer: This method should never be your first form tracking option with Google Tag Manager. Try using any other Google Tag Manager Form tracking method mentioned in this blog post.
If developers often update the website’s code, you should treat DOM scraping as the last resort. It is risky and can break faster than you think.
Even a slight change committed by the developer might break your implementation. Also, it requires some knowledge of Javascript and DOM concepts (which is not a very common skill among marketers).
For this example, we’ll be using DOM Element Variable. It is a variable in Google Tag Manager which lets you scrape content directly from Document Object Model (in other words: with its help you can transfer any text on your website into a Variable and pass it on to your Marketing tools (e.g. Google Analytics)). But first, let’s create a GA tag.
Create a Google Analytics Tag
You are probably already familiar with the main Google Tag Manager concept: every interaction you want to track needs a tag and a trigger. If you want to track all form submissions with Google Analytics 4, you’ll need to create a Google Analytics Tag and a Trigger (rule) when a tag must fire.
Creating a tag is the easy part of this process. Let’s make one – you’ll need it in the upcoming chapter of this blog post.
In this article, I presume that you have already installed Google Analytics 4 and already have the GA4 configuration tag. If not, read this blog post first.
After you have a GA4 config tag in your GTM container, it’s time to create a GA4 event tag that will be used in all of the examples of this article.
- Go to Tags
- Press New button
- In Tag Configuration choose Google Analytics: GA4 Event
- In the Configuration Tag field, select your current GA4 configuration tag. The event tag that we are creating will reuse some of the settings from the configuration tag (e.g. Measurement ID)
- In the Event Name field, I enter generate_lead
- Leave the Triggering part empty (for now) and click Save. We’ll get back to it later.
![]()
![]()
Let me quickly explain some of the choices. The reason why I used generate_lead as an event name is that it is in the list of GA4 Recommended events. But if you want, you can name it something else.
Trigger
As an example, I’ll use a Shopify demo store. There is a Signup up to our mailing list form at the bottom of their homepage.

Quick off-topic note: If you haven’t, consider subscribing to my monthly email newsletter for more useful Google Tag Manager guides
Enter [email protected] in that Shopify form and hit Subscribe. A page will refresh, the web address will change to https://somewebsite.com/?customer_posted=true#contact_form, and that little form displays a “Thank you” message.

In this case, we could easily track form submissions with the Pageview trigger of Thank you page, but let’s imagine that the page’s address (URL) did not change. This is not a common situation, but it’s possible. That’s where DOM Element Variable might come in handy. We could create a trigger that could scan a website and look for a success message “Thanks for subscribing”.
First, let’s create a DOM element variable looking for that particular success message. Hover your mouse cursor over the success message’s text, right-click and choose Inspect.

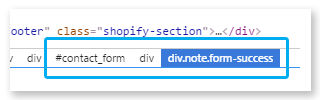
A developer’s console will appear with a lot of HTML code. Note that success message’s code is already selected in that console. That message does not have any unique ID so we’ll need to utilize CSS Selectors.

At the bottom of the screenshot, you can see a line of CSS selectors, e.g. div.note.form-success. These selectors can help us identify the exact element of the website.
Let’s create a DOM Element variable and try to scrape the “Thanks for subscribing” text.
- Go to Variables
- Scroll down to user-defined variables and click New
- Choose Variable type – DOM Element Variable
- Selection method – CSS selector
- In Element selector field enter div.note.form-success


See what I did there? I entered the last CSS selector from the screenshot above. - In case there were more than one possible success messages on a website with a similar CSS selector, I would have used a longer CSS selector, for example, “#contact_form div div.note.form-success” (without quotation marks). If you want to learn CSS Selectors and how to apply them in GTM, take a look at this course.
- Leave the Attribute name empty.
- Variable’s title could be DOM – Form Success Message.
- Hit Save.
Let’s test
- Enable Preview and Debug mode
- Submit the form.
- Choose DOM Ready (not Container Loaded) event in Preview and Debug console and click Variables.


- If DOM – Form Success Message variable’s value is Thanks for subscribing, you did a good job.
Alright! Now we need to create a trigger that depends on our new DOM variable.
- Go to Triggers and click New
- Choose Trigger type – DOM Ready
- This trigger fires on Some Pages
- Enter the following condition: DOM – Form Success Message equals Thanks for subscribing. This means that the trigger will fire only on those pages where the Form success message is displayed to visitors.
- Save the trigger
Do not forget to test:
- Assign this new trigger to the Google Analytics 4 Event Tag that you created at the beginning of this blog post.
- Open a Preview and Debug mode (or refresh)
- Fill in the form and submit. After successful submission, Google Analytics Tag should fire (it will be displayed in Preview and Debug mode).
- You should also check the incoming events in Google Analytics 4 Debug View.
- Also, try submitting a form with an intentional error and see whether the tag fires (it shouldn’t).
In Case DOM Scraping Isn’t the Right Method for You
I have created a very detailed Google Tag Manager form tracking guide which includes a bunch of different from tracking techniques.
If you have questions, feel free to contact me via social media accounts or write a comment in this blog post.