
October 11, 2023
Recommended Events in Google Analytics 4
Updated: October 11th, 2023
There’s a lot to cover regarding event tracking in GA4. But since the platform is now event-based, it’s natural that I have a bunch of guides related just to events. In this quick guide, we’ll take a closer look at one group of events, recommended events.

The list of recommended events (in alphabetical order)
I presume that some of the visitors of this blog post are just looking for the full list of all recommended events in Google Analytics 4. If you’re one of them, then here it is. I have combined all lists from Google’s documentation into a single list. But if you want to learn the full picture of the recommended events, then jump to the next chapter and read/watch with great attention.
- add_payment_info (when a user submits their payment information).
- Parameters: coupon, currency, items, payment_type, value.
- add_shipping_info (when a user submits their shipping information).
- Parameters: coupon, currency, items, shipping_tier, value.
- add_to_cart (when a user adds items to a cart).
- Parameters: currency, items, value.
- add_to_wishlist (when a user adds items to a wishlist).
- Parameters: currency, items, value.
- begin_checkout (when a user begins the checkout).
- Parameters: coupon, currency, items, value.
- earn_virtual_currency (when a user has earned virtual currency (coins, gems, tokens, etc.)).
- Parameters: virtual_currency_name, value.
- generate_lead (when a user submits a form or request for information).
- Parameters: value, currency.
- join_group (when a user joins a group).
- Parameters: group_id.
- level_end (when a user completes a level in the game).
- Parameters: level_name, success.
- level_start (when a user starts a new level in the game).
- Parameters: level_name.
- level_up (when a player levels up in the game).
- Parameters: character, level.
- login (when a user logs in).
- Parameters: method.
- post_score (when a player posts his or her score).
- Parameters: level, character, score.
- purchase (when items are purchased by a user).
- Parameters: affiliation, coupon, currency, items, transaction_id, shipping, tax, value.
- refund (when a refund is issued).
- Parameters: affiliation, coupon, currency, items, transaction_id, shipping, tax, value.
- remove_from_cart (when a user removes items from a cart).
- Parameters: currency, items, value.
- search (when a user searches your content).
- Parameters: search_term.
- select_content (when a user has selected content).
- Parameters: content_type, item_id.
- select_item (when an item is selected from a list).
- Parameters: items, item_list_name, item_list_id.
- select_promotion (when a user selects a promotion).
- Parameters: items, promotion_id, promotion_name, creative_name, creative_slot, location_id.
- share (when a user has shared content).
- Parameters: content_type, item_id.
- sign_up (when a user has signed up).
- Parameters: method.
- spend_virtual_currency (when a user has spent virtual currency (coins, gems, tokens, etc.)).
- Parameters: item_name, virtual_currency_name, value.
- tutorial_begin (when a user begins a tutorial).
- No parameters.
- tutorial_complete (When a user completes a tutorial).
- No parameters.
- unlock_achievement (when a player unlocks an achievement).
- Parameters: achievement_id.
- view_cart (when a user views their cart).
- Parameters: currency, items, value.
- view_item (when a user views an item).
- Parameters: currency, items, value.
- view_item_list (when a user sees a list of items/offerings).
- Parameters: items, item_list_name, item_list_id.
- view_promotion (when a promotion is shown to a user).
- Parameters: items, promotion_id, promotion_name, creative_name, creative_slot, location_id.
And now, let’s move to the actual tutorial on recommended events in Google Analytics 4.
Video
If you prefer video tutorials, I have published one on my Youtube channel. Subscribe to it to stay up-to-date with Google Analytics 4.
Note: some parts of the video show a bit older workflow in GTM, so you’ll need to adapt a bit.
GA4 event tracking in a nutshell
Recommended events are just a part of the entire event tracking concept in Google Analytics 4. So if you want to learn the full picture, feel free to read this guide instead. It covers 4 types of events (including recommended events).
But if you are in a hurry, here’s the process in a nutshell. There are 4 types of events in Google Analytics 4: Automatically tracked events, Enhanced Measurement, Recommended events, and Custom events.
When planning to track a particular interaction, you must come up with the event name. According to GA’s recommendation, first, you should check whether that event is not already covered by automatic tracking or by Enhanced Measurement. If you did not find an event there, then check the list of Recommended Events. And in this blog post, we’ll focus on them.

Recommended events in Google Analytics 4
I’ll repeat myself here a bit. When you are trying to pick the name (and the parameters) for your event, first take a look at automatically tracked events (maybe those events are already being tracked), then check the Enhanced Measurement events. If none of those events cover your case, take a look at the list of recommended events in Google’s documentation.
For example, if you want to track when a user logs in, then you will find the “login” event in the list of “All properties”.

Even though the Google Analytics 4 data model is very flexible (and you can use a different event name for login, for example, logged_in), Google recommends that you implement their recommended events when it makes sense to you.
That should help Google Analytics’ reports better understand your data and apply it to their Machine Learning capabilities. However, it’s still unknown what those capabilities are.
Also, for most of those recommended events, Google recommends some parameters. Speaking of the login event, there is a method parameter. If users can log in to your website via email, google login, facebook login, etc., then it might make sense to track the method as well.

But you are free to include any custom parameter that you can think of.
Example of a Recommended Event: login tracking
Let’s continue with the login example. Let’s say that I am working on a website where visitors can log in. I want to track the exact moment when users/visitors do so, and which login method they use.
I have asked a developer to activate the following dataLayer.push code when a user logs in to his/her account.
<script>
window.dataLayer = window.dataLayer || [];
window.dataLayer.push({
	'event' : 'login',
	'loginMethod' : 'email' // this should be replaced with an actual login method
});
</script>
The value of the loginMethod should be replaced with the actual login method that a user used. That is the developer’s job to write custom code that replaces it.
When a developer implements that code, and I successfully log in, in GTM’s preview mode, I should see the following Data Layer event (see the screenshot below). Now, remember that this event is a GTM (or Data Layer) event. It is not sent to GA4 (or any other platform) yet. Right now, it is just a collection of data points at our disposal, meaning that we can send the data further to other tools like GA or Facebook (or any other analytics/marketing platform we use).

Now, let’s create a Data Layer Variable that will access the value of the loginMethod and also a Custom Event Trigger for the login event in the Data Layer.
In Google Tag Manager, go to Triggers > New > Custom Event, enter the following settings, and press Save:

Then go to Variables > User-defined variables > New > Data Layer Variable and enter the following settings:

I entered the loginMethod because that is exactly what a developer pushed to the Data Layer. If your parameter’s name is different, then enter that name. Important: variable names are case-sensitive.
After you create a variable and a trigger, it’s time to create a Google Analytics 4 event tag. With it, we can send the event data to GA4.
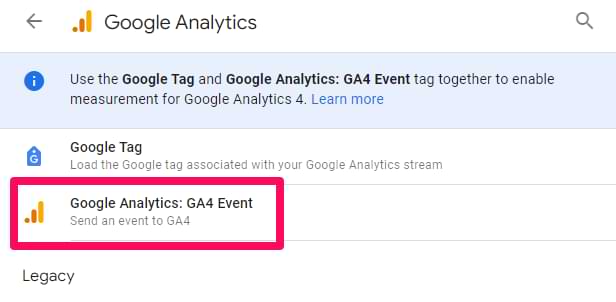
In Google Tag Manager, go to Tags > New > Google Analytics > Google Analytics: GA4 Event.
Before you do this, I expect that you are already tracking pageviews and you already have a Google Tag (a.k.a. Google Config tag).
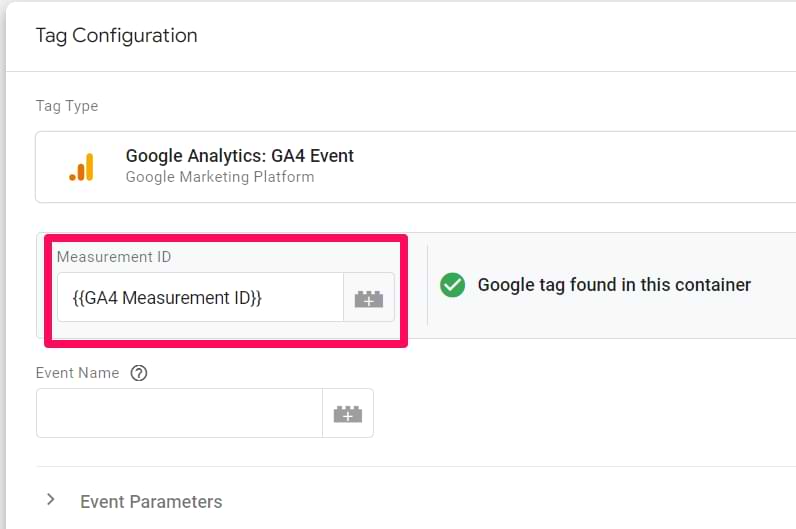
So, when you create a new GA4 event tag, you will need to:
- Define the GA measurement ID (or a constant variable that stores it)
- And then event name + parameters
This tag can contain a lot of settings/configurations. If you link it with other GA4 event tags, they will inherit some changes.
But at the same time, you can still configure additional settings in your event tag.
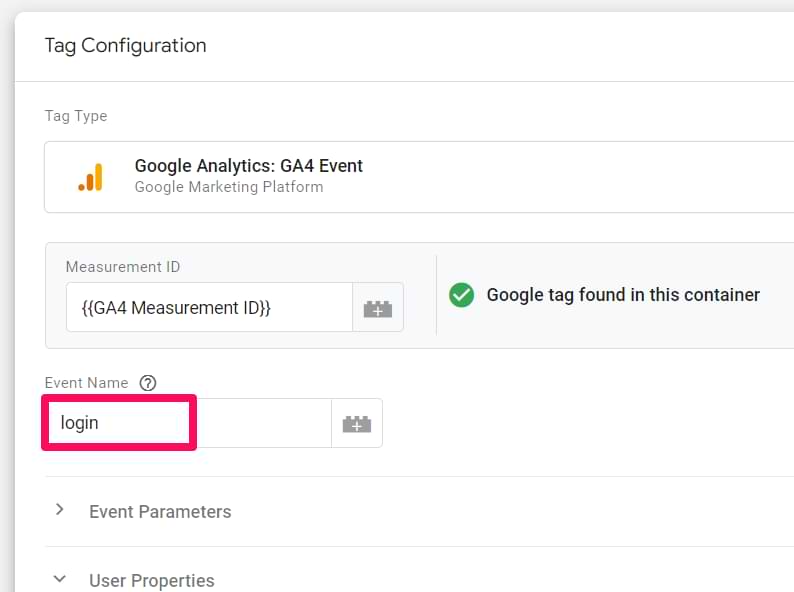
Now, let’s continue the configuration of an event. Enter the event name. Since we are tracking the login event and the name “login” is recommended by Google, this is exactly what we will enter.
And then, let’s enter an additional parameter, the login method. To do that, expand the Event Parameters section, click Add Row, and then enter method in the Event Parameter field and insert the previously created Data Layer Variable in the Value field. You can insert the variable by clicking the button next to that field.
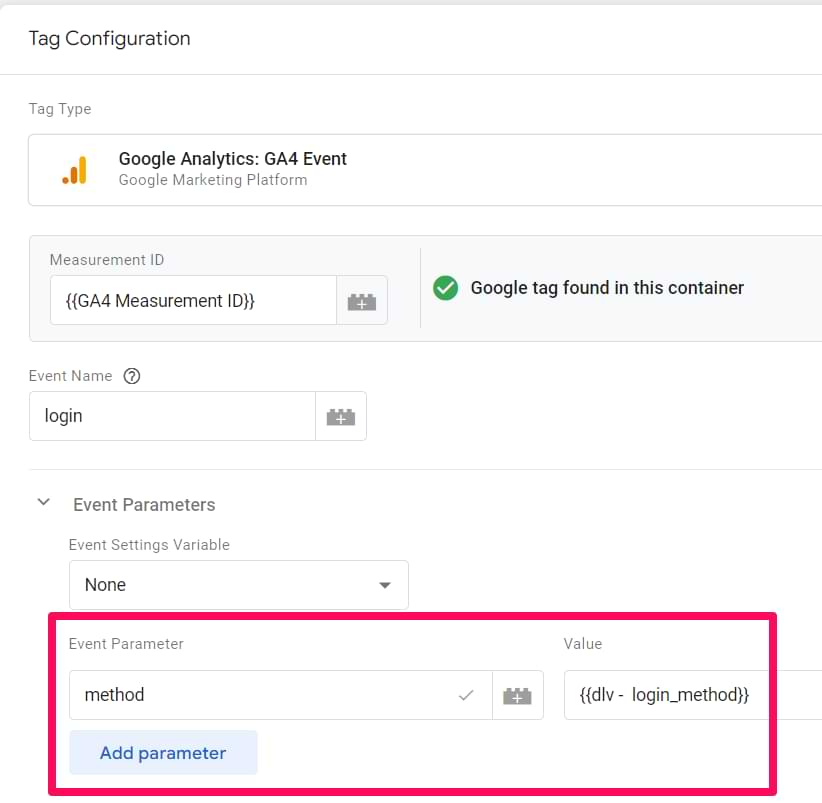
Why did I enter the method in the Parameter Name field? Because I saw that in the list of Recommended Events.
What about custom parameters? What if you also want to pass the user’s pricing plan or something else? Sure, you can do that. But I will explain custom parameters/dimensions in this blog post. All you need to know right now is that it’s completely possible to send custom parameters with recommended events.
Test your recommended events in Google Analytics 4
Once you configure your recommended events, it’s time to test them. The primary feature built for debugging GA 4 data is the DebugView section. You can find it by going to GA4 Admin > Debugview.

That’s the place where your debugging should take place. Do not mix this with the GTM Preview and Debug mode. They are two different beasts.
To enable the DebugView in GA4, you have several options (any of them will work):
- Enable the GA debugger Chrome extension
- Send a debug_mode parameter together with an event
- Have enabled Google Tag Manager’s Preview mode on a page that you’re debugging
In this blog post, I will focus on the 3rd option. In other words, you need to have the GTM Preview mode enabled to start seeing data in the GA DebugView.
When you start seeing data in the DebugView, you can click on every individual event, and then a list of parameters will be displayed. In the screenshot below, I am already seeing the login event.
Click on that event (1), and you will see the parameters that were sent with it to GA4. Let’s check the value of the method parameter. Click it (2), and then you will see the value (3). Now, that is some granular debugging!
However, I have noticed some delays between the event actually happening on a website and then appearing in DebugView. Sometimes, I have to wait for several minutes until the events come in, and then they are sent into the past (as I have to scroll down to “10 minutes ago” to see the event that was just displayed).
That’s a bit unfortunate, and hopefully, the team behind Google Analytics 4 will improve this in the future. If Debugview is not working for you, you can also take a look here.
Also, ensure you have selected the correct Debug device in the top left corner.

If multiple visitors have enabled the debug view (e.g. they all have enabled the Chrome extension), you will see multiple devices there, and it might require some time to find yourself.
Once you made sure that the data is coming in and is displayed properly, you should submit your GA4 changes in the GTM container and publish it.
You can do that by clicking the SUBMIT button in the top right corner and then completing all the other steps that the user interface asks you to do.

After that, you should soon start seeing the new data coming in your real-time reports as well.
On the left sidebar of the Google Analytics 4 interface, go to Realtime. This is where you will see the data coming into your reports. Unlike in the previous version (Universal Analytics), the new report offers you the capability to see the data on a much more granular level.
First, you will see a map and a bunch of cards with traffic sources, the most popular events, and the number of users in the last 30 minutes.
You can also take a look at the snapshot of an individual user. You can do that by clicking the View user snapshot button in the top right corner.

Then, you will see a stream of all events of that particular user, you can click on them (just like in the DebugView) to see things on a more granular level. If you wish to look at another user/visitor, you can click the button here:

To exit the snapshot, simply press the Exit snapshot button in the top right corner.
Register event parameters as custom dimensions (optional)
Some parameters (that you send with recommended events) will be available by default in custom reports (Explorations), but in some cases, they won’t be.
For example, if you want to see the “Form ID” (form_id) dimension in GA4 reports or Looker Studio, you will need to register that parameter as a custom dimension. This might change in the future, though.
If you send a recommended login event and you want to use the recommended parameter method in a Free Form exploration, you won’t need to register the dimension. It is already available in the list of all dimensions:

I talk more about custom dimensions in this article.
And now we wait. Within the next 24-48 hours, the custom parameters will appear in your Google Analytics 4 reports.
It’s important to understand that this change does not apply to historical data that has already been collected. If you plan to register a custom dimension, you must do that as soon as possible.
Recommended events in Google Analytics 4: Final Words
These are the essentials that you should know about recommended events in GA4. To sum up:
- If you want to track an event with GA4, you should first check whether that event is not already covered by automatic tracking and enhanced measurement. If not, then check the list of recommended events.
- The purpose of these events is to help GA better understand what kind of data you are sending in and in which reports to display it. For example, events like purchase will be displayed in the Monetization reports. Hopefully, in the future, GA will offer more predefined reports, and then more of the recommended events will be displayed there. Also, GA says that recommended events will help us benefit from Machine Learning more. What does that mean? That’s still unknown.
- You might still need to register some recommended parameters as custom dimensions. Try to check the GA4 interface and see if you can find that dimension. If not, then you should register it as a custom dimension.
2 COMMENTS
Where can we see the event parameters in GA4 except for the live view.
What if I need to change my checkout flow like begin_checkout, contact_info, shipping_info, shipping_method, payment_type, review, purchase?