October 10, 2025
Google Tag Gateway: What is it, and How to Configure it
Updated: October 10th, 2025
You’ve probably heard about the growing concerns about how increasing privacy restrictions and blockers make it harder to collect accurate analytics data. Google has given us the tools to deal with this, like server-side tagging and Google Tag Gateway.
In this article, we’ll explore Google Tag Gateway: what it is, how it works, and the key benefits it provides for improving your website’s tracking setup.
You’ll learn how to configure it using Google Tag Manager and Cloudflare, and we’ll walk through different scenarios to help you decide whether Google Tag Gateway is the right solution for your needs.
If you’re looking to reduce the impact of browser extensions and build a robust tracking system, then let’s get into it!
Table of Contents
Here’s what you will learn in this article
- Learn through examples
- What is Google Tag Gateway, and how does it work?
- Benefits of Google Tag Gateway
- The main requirement to configure Google Tag Gateway
- How to configure Google Tag Gateway
- Should you be using Google Tag Gateway?
- Final Words

Video tutorial
If you prefer video content, here’s a tutorial from our YouTube channel.
Note: I should have done a better job explaining which extensions are still blocking with Google Tag Gateway. In the video below, I mentioned Ghostery. Actually, it will still block GA even with Google Tag Gateway. However, some extensions no longer block, for example, DuckDuckGo (at least for now).
So, you should look at Google Tag Gateway as a way to reduce the impact of *some* browser extensions, not all of them. Thus, in a couple of clicks, you can still (at least slightly) increase your data accuracy. But a better/more robust solution would be using custom solutions like Stape’s custom loader.
Learn through examples
To better understand the potential benefits of Google Tag Gateway and how it works, let’s look at a situation that can arise when you install tracking on your site using Google Analytics 4.
A visitor lands on your site where you have installed Google Analytics 4, but they use a browser extension, like DuckDuckGo, that blocks tracking. These types of extensions look at the requests sent from your website, and if the request is being sent to domains that contain something like google-analytics.com/g/collect, /gtag/, googletagmanager.com or anything similar, they will block it. As a result, the extension blocks both Google Tag Manager and Google Analytics 4 tracking.
This scenario negatively impacts your tracking, as you won’t get the best image of what’s happening on your site.
To mitigate this, you could implement Server-side tagging, which routes data through your own server. While it’s effective, the issue is that server-side tagging requires certain technical knowledge and comes with added costs. While I am a fan of it, I understand this is not a realistic option for many businesses because of these barriers.
To address this, Google offers a simpler and most cost-effective alternative for those mainly using GA4, GTM and Ads: Google Tag Gateway. It’s free (nice!).
Note: Technically, you can mix server-side GTM with Google Tag Gateway, but my main point of this article is to show a quick solution for those who want to increase the accuracy of their tracking setup but don’t want to dive into the weeds of SGTM.
What is Google Tag Gateway, and how does it work?
Google Tag Gateway enables users of Google Analytics 4 to deploy Google tags for GA4 and Google Ads using their own website’s domain. Instead of sending data requests directly to Google’s servers, an intermediary, called Cloudflare, is between the website and its visitors. Other content delivery networks can also be used, but the setup is manual and not as convenient.
Let’s say your website URL is mywebsite.com. A traditional GA4 setup sends data to Google’s domain (e.g., google-analytics.com/g/collect…). But, with Google Tag Gateway, those requests are sent to your own domain instead (e.g., mywebsite.com/a/g/c…), using a dedicated subfolder to store GA4 and GTM data.
Essentially, instead of your website directly requesting tags from Google’s domains, the requests are routed through your own domain first.
Benefits of Google Tag Gateway
Since the analytics requests are sent to your own domain instead of a Google domain, browser extensions designed to block tracking requests will not be as effective (At least for now. Who knows what will happen in the future?).
When it comes to Apple’s Intelligent Tracking Prevention (ITP), things get a bit more nuanced.
If you use Google Tag Gateway for your client-side GTM/GA setup (and server-side tagging is not involved anywhere here), then the cookie lifetime will still be limited by ITP. But if you apply Google Tag Gateway for server-side GTM setup, then cookies set from the server container will have a longer expiration date. However, we won’t dive deeper into the SGTM + Google Tag Gateway in this tutorial. Maybe that’s a topic for another article.
However, if you have already handled proxying and cookie-lifetime extension properly (before using Google Tag Gateway), for example, with Stape’s Custom Loader + Cookie Keeper, or Addingwell’s solutions, then you don’t need Google Tag Gateway. Your SGTM setup is already giving you the benefits you are looking for.
The term “future-proofing” is one of those popular LinkedIn things, but you could still say that Google Tag Gateway would be future-proofing your analytics by relying more on first-party data. At least, for some time 🙂
Limitations and Considerations
While Google Tag Gateway can be a valuable tool, it’s important to understand what it does and does not do. Keep these points in mind:
- It’s not a complete bulletproof solution: This method can reduce the impact of *some* browser extensions, but not all of them. More sophisticated extensions, like Ghostery, will still identify and block Google Analytics (or other vendors’) requests even when they are routed through your domain.
- It does not extend cookie lifetime on its own: When used with a standard client-side setup, Google Tag Gateway does not change how Apple’s Intelligent Tracking Prevention (ITP) limits the lifespan of cookies. To achieve longer cookie expiration, you would still need a full server-side GTM implementation.
- CDN is a requirement: The primary requirement is that your website uses a Content Delivery Network (CDN), with Cloudflare being the most seamless option due to its native integration. If you are not using a CDN, you will need to set one up first, which might be the most complex part of the process.
The main requirement to configure Google Tag Gateway
The main requirement for setting up Google Tag Gateway is that your website must be connected to a Content Delivery Network (CDN). If you already have one set up for your site, then great!
In this example, I will be using Cloudflare (since that’s what I use for my site + it’s natively integrated with Google Tag Gateway), so if you don’t have a CDN set up for your site, you can use Cloudflare to make it easier to follow along with this tutorial.
I have been using Cloudflare for years and, in general, would highly recommend it. If you’re concerned about the cost of adding yet another tool, don’t worry! I have been using a free plan for Cloudflare from the start, so it won’t introduce any additional costs (unless you have to migrate from another similar tool).
So, what is Cloudflare? Cloudflare acts like a middleman between your website and the rest of the world. It’s a Content Delivery Network, which means it loads a hashed version of your website to the visitor from servers that are geographically closest to them. If someone is browsing from Europe, Cloudflare will load your website content from one of its European servers. The same goes for the US and so on.
This setup improves your website load time and reduces the number of requests your website servers receive, so any traffic spikes will not impact your website. It also helps protect your site against bot attacks by filtering and blocking certain suspicious activity.
While I will not cover transferring your domain to Cloufalre, you can check out this resource on the Cloudflare site to learn more. If you have to migrate to Cloudflare, this will probably be the most difficult part of this process.
You can also set up Google Tag Gateway in Cloudflare, but I prefer doing it directly in the Google Tag Manager interface (or GA4), so that is what we will do in this tutorial.
How to configure Google Tag Gateway?
We will start with the assumption that you have Cloudflare but have not yet installed Google Analytics 4 or GTM on your site. If you already have GA4 installed on your site, you can check out my comments in the next chapter (spoiler alert: it’s not an issue!).
We will be using Google Tag Manager to complete this installation. If you don’t already have a GTM account, you can follow the steps for how to create one here. If you want, you can also follow the steps in this chapter to create a Google Tag, although this is not a prerequisite for this tutorial. Once you have this base setup, you will be ready for the next steps.
Note: If you are not using GTM and you have installed Google Analytics directly in your website’s source code, you can still use Google Tag Gateway. For that, go to GA Admin > Data streams > Select your website data stream > Configure Tag Settings > Admin > Google Tag Gateway. It will open the setup wizard, very similar to what you’ll see below.
Enable Google Tag Gateway in GTM
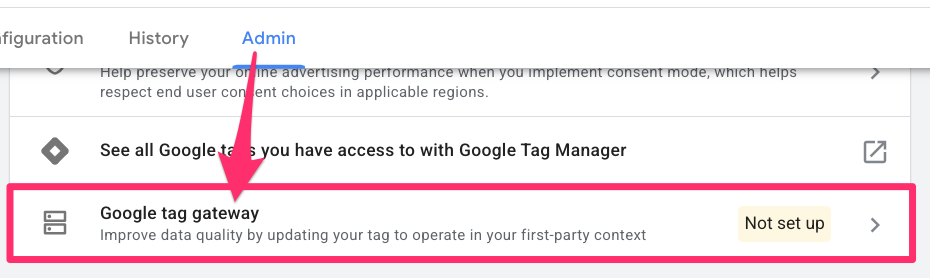
Go to Google Tag Manager and click Admin in the top tab. Find the Google tag gateway option under your container. It should say, “Not set up.”
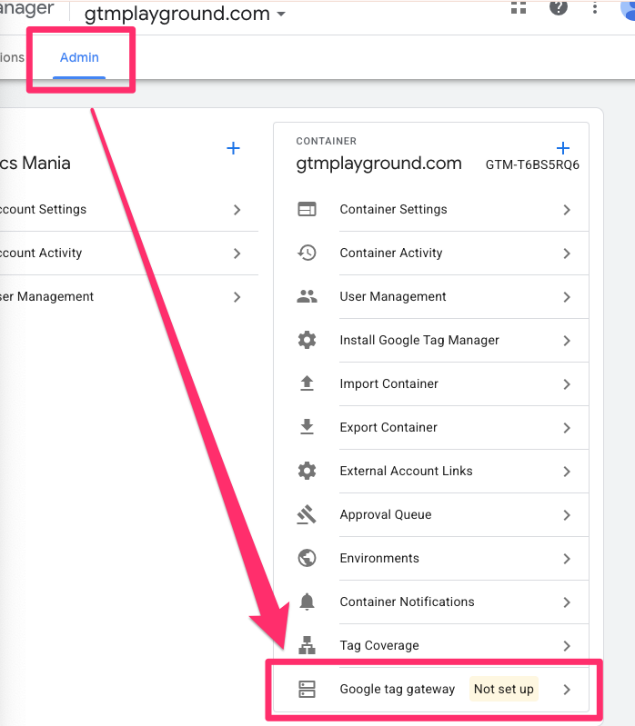
Here, you can see that Google Tag Gateway will not only apply to GTM but also to other Google products, like GA4 and Google Ads, which is great (two birds, one stone, as they say!)

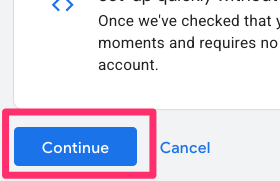
Read the information that Google provides to get another quick overview of why Google Tag Gateway is helpful and how it works. Then, click “Continue” at the bottom.
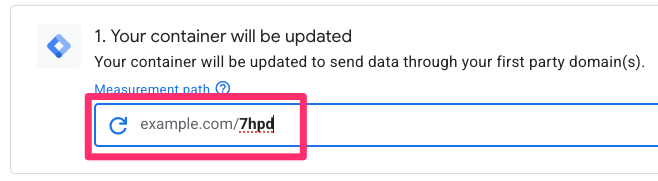
On the next page, you will need to do a couple of things:
- Review the measurement path: This is the subfolder (or path on your domain) where the container will route analytics requests. If you change this, make sure to use a value that doesn’t conflict with existing paths on your domain. Personally, I prefer just to use the default path that Google suggests.

- Sign in to Cloudflare > Click “Allow” to connect GTM to Cloudflare.
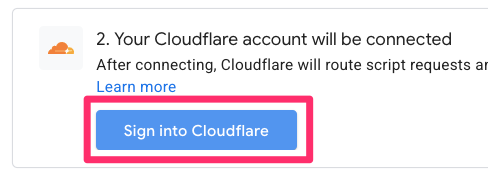

- Click “Complete setup.”
Now go to your website > reload it > do the right-click > View page source. You’ll notice that Cloudflare has automatically injected a Google Tag Manager container snippet. Since Cloudflare is a content delivery network, it loads your website’s HTML from its servers. Thus, they are capable of adding additional code to the HTML of your site. Cloudflare configured this snippet to send requests to the subfolder of your website that you specified during the setup process above.
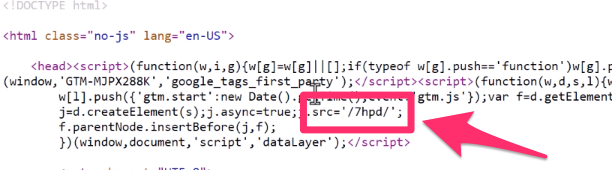
It’s important to note that your website’s source code on your server remains unchanged. Because Cloudflare acts as an intermediary between your server and the visitor, it can modify the HTML of your page on the fly just before it’s delivered to the user’s browser.
This is how it can seamlessly inject the new, modified GTM snippet without requiring any action from you or your developers.
From here, copy the measurement path. Go back to your site and open developer tools (right-click > Inspect). Go to the Network tab and enter the path into the search.
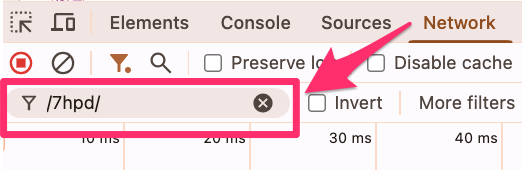
When you refresh the page, you can see all the requests coming through. Click on one of the requests and go to the Preview tab. Here, you’ll see the GTM container in action.
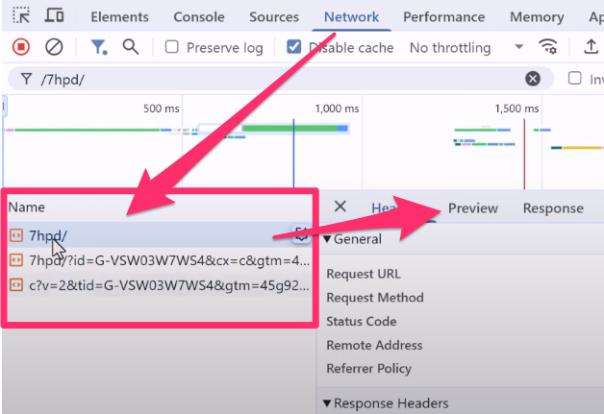
If your GTM container includes GA4 tags (or Google Ads, for example), you will also see those requests being sent through your domain and subfolder, confirming that Google Tag Gateway is correctly configured.
What’s cool about this setup is that if you’re starting a new project and want to use GTM/GA immediately, you don’t have to add GA4 tracking code to your site’s source code. Cloudflare automatically injects the necessary GTM or GA4 code when it loads the HTML code. This is appealing for those who are using very limiting content management systems that do not have the GA4 integration and don’t allow you to add custom codes.
What if you already have a GTM/GA4 snippet on your site?
If you already have a Google Tag Manager or Google Tag snippet installed on your site, this won’t cause any conflicts with Google Tag Gateway.
The tag that Cloudflare injects will recognize and respect your existing GTM setup (or hardcoded Google Tag), so everything will continue to function smoothly. Even better, your previously added GTM container snippet will still use the subfolder path you’ve configured in Google Tag Gateway.
You’ll still get the benefits of Google Tag Gateway since your requests will still go through your first-party domain, which is exactly what we want!
To confirm everything is working properly, you can check the Network tab in developer tools. You should see that the same number of requests are sent as before (without any duplicates), and they’re routed through the subfolder on your domain.

How to configure Google Tag Gateway if you don’t use Google Tag Manager?
Even if you’re not using server-side tagging or Google Tag Manager for your Google Analytics 4 setup, you can still enable Google Tag Gateway.
Simply go to your GA4 property, go to Admin > Data collection and modification > Data streams > Select your website.
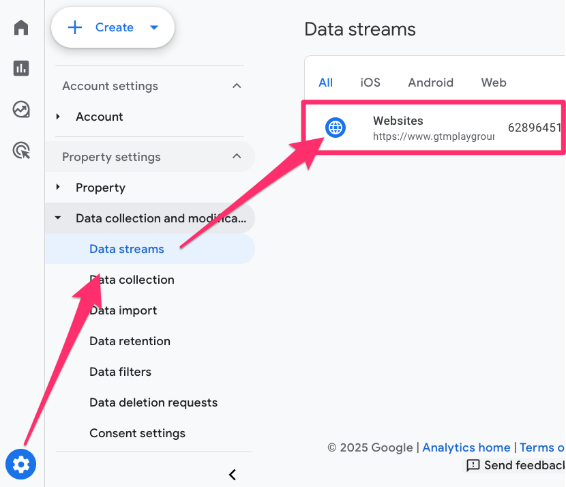
Then, scroll down to Configure tag settings.
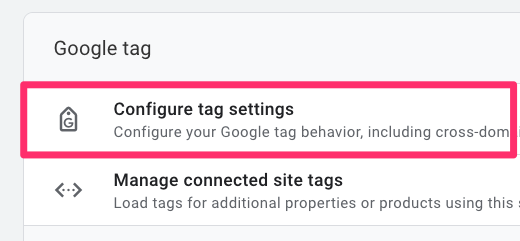
In the new popup, open the Admin tab and find Google tag gateway (it should say that it’s not setup yet).
Then, you just need to follow basically the same initial steps as in the Enable Google Tag Gateway in GTM chapter!
Should you be using Google Tag Gateway?
Naturally, it depends 🙂
If you are using server-side Google Tag Manager, then you don’t necessarily need Google Tag Gateway, especially if you’ve used Stape’s Custom Loader + Cookie Keeper. Your server-side setup already provides many of the same benefits that you would get from Google Tag Gateway, such as cookie longevity and protection from browser extensions, so it’s not any more beneficial.
If your setup is limited to just Google Analytics 4, Google Ads, and web-based GTM, then the answer is a definite yes! Google Tag Gateway is a no-brainer in this situation since the setup is super simple for the benefits it provides, especially if you are already using Cloudflare. And don’t forget, it’s cost-free!
Even if you have non-Google Tags, like Meta Pixel in your GTM container, along with the Google tags, you should implement Google Tag Gateway.
The goal is to improve data accuracy without adding unnecessary complexity. Here’s a quick guide to help you decide:
|
Your Current Setup |
Recommendation |
Rationale |
| Using only GA4, Google Ads, and client-side GTM. | Yes, definitely | This is a no-brainer. The setup is simple, free, and provides immediate benefits by reducing the impact of some tracking blockers. |
| Already using server-side GTM with a custom loader (e.g., from Stape). | No, it’s not needed | Your advanced server-side setup already provides the same (or better) benefits, like cookie longevity and protection from browser extensions, so adding Tag Gateway is redundant. |
| Using a mix of Google and non-Google tags (like Meta Pixel) in client-side GTM. | Yes | You should still implement it. While it primarily benefits Google tags, routing the GTM script itself through your own domain can help the entire container load more reliably. |
| Starting a brand new project and already using Cloudflare. | Yes, absolutely | This is the ideal scenario. Cloudflare can automatically inject the GTM code for you, simplifying the initial setup and ensuring you start with a more robust tracking foundation. Unless you plan to use server-side GTM. Then, the Google Tag Gateway is not needed. |
Google Tag Gateway: Final Words
If you’re not using server-side tagging, I definitely recommend implementing Google Tag Gateway. Honestly, even if you are using SGTM, it might still be worth implementing it. Google Tag Gateway provides great benefits with a very simple installation, including more reliable data by avoiding browser extensions, and who doesn’t want that?
While any CDN works for this installation, not having one shouldn’t feel like a hurdle. Setting up Cloudflare is pretty simple and, not only does it assist in implementing Google Tag Gateway, but it’s also a great no-cost solution for improving site speed, reducing server load times and adding security features.
However, if you have already handled proxying and IP addresses of the SGTM setup, Google Tag Gateway is not needed.
In short, if you’re using GA4, GTM, and (or) Google Ads, Google Tag Gateway is a great low-effort upgrade that will get you better data and “future-proof” your tracking!
If you’re looking for a quick recap, here are the essential things to take away:
- What is Google Tag Gateway: A free feature that routes Google tracking requests (for GA4, GTM, and Google Ads) through your own domain.
- Primary benefit: It helps reduce the impact of some browser extensions that block trackers, leading to slightly more accurate data.
- Who it’s for: It is a must-have if your setup is limited to client-side Google tags (GA4, GTM, Google Ads).
- Who it’s NOT for: If you already have a server-side tagging setup with a custom loader, you likely don’t need it as you already have the benefits.
- Main requirement: Your website must use a Content Delivery Network (CDN). The integration with Cloudflare is native and the easiest to configure.
- It’s not a magic bullet: It will not bypass all trackers or extend cookie lifetimes on its own (that still requires a full server-side GTM setup).

14 COMMENTS
Hey!
Great article, thanks. I would be super happy about an article using Google Tag Gateway when having a Shopify Shop. The CDN Set Up is not 100% clear here for me.
But I am not sure if your blog is the right place to address it. Anyway thanks!
Hi Adrian, if you find it, pls share!
Hi Julius - thanks for the consistently helpful content, makes things much easier to navigate!
Does this have much of an impact towards Consent Mode and any CMPs that are utilised on the website? We serve most (if not all) via GTM, but presume that these will still work as expected and we don't need to do anything?
I have the same question! Were you able to find an answer?
It won't have much impact. But if you ask me, it would be better if CMP was installed directly in the website's code (rather than GTM)
Hey!
Is it possible to add a second GTM container with another (new) GA4-property and (new) Google Ads Conversion Tags initially for testing purposes and to compare numbers to a traditional server or client-side-setup? Or will all existing Tags automatically be loaded through the tag gateway when enabling it, even though it is connected through a different GTM?
Thank you
Hi Julius, thanks for the guide!
Unfortunately it looks like my setup is not working. Even though in GTM at the admin tab it says Tag Gateway is active for my domain, I do not see any changes to my GTM code in the page source. Also the measurement path doesn't give any matches when I filter for it in the network tab in Developer tools.
What could be going wrong?
Not sure, I never had this issue before. Check the google tag gateway settings in cloudflare. Maybe it's disabled there.
Hi Julius,
Thanks for your reply. The Gateway setting is active in Cloudflare.
I see, that in your video guide, there was no GTM container code active before activating Cloudflare, in my case there already was.
In Cloudflare there is a slider option called 'Set up tag', which is advised to turn off when you already have a Google tag (code) on the website. This was active, so I turned this off, but nothing happend to the code.
So maybe the change of the code through Cloudflare only happens when it is not hard coded already? and if is already there, you need to manually adjust it to the form of the gateway/ measurement path?
In this case, check the network requests and see if Google Analytics requests are using your domain. If yes, you're good to go
Hi Julius, I have several Google Floodlight tags on my site. Now I want to use the Google Tag Gateway for these two different IDs. Do you know if I can also set up the CDN with multiple Google Tag IDs, such as DC-ABC and DC-XYZ?
Hi Julius, has anyone noticed issues with CF passing the geo (visitor IP) data when using CF auto setup for Tag Gateway?
Since I set up Tag Gateway + CF tag, my city geo report in GA4 is 90% (Not Set)
Thanks!
This is great information, but a massive number of Shopify sites have no control over their CDN.
Also did you guys get purchased by Stape?? The "Cookie Keeper" that they seem to own in your article is nothing new. Simo wrote about it like what 4-5 years ago?
Overall, I don't see the point of this whole path vs SGTM for the majority of websites.
We are not purchased by Stape :D
As a name, Cookie Keeper might not be new (I don't know), but the technology behind this changes regularly. So Simo's article from 4-5 years ago is naturally outdated because it uses a solution that has been limited by Apple some time ago.
As for the path - if you are using some popular platform (like Shopify) and you install Stape's plugin, it helps with the cookie restoration (because the plugin sets the "master" cookie) from the website's server.
But if you are using a custom website, then it might be simpler to configure the "path" setup because then you don't have to handle the cookie from the website's backend.
To sum up, there is no ideal solution. You need to weigh pros and cons.