
February 12, 2025
Pages per Session Conversions for Single-Page Applications (GA4)
This article was written by Jude Nwachukwu, who was kind to share his tips with Analytics Mania’s readers.
One of my previous articles on Analytics Mania was about tracking pages per session conversion in Google Analytics (GA4), commonly called page depth goal in “Universal Analytics,” and in that article, I discussed the two approaches for measuring this type of goal, with the JavaScript method being my preferred option.
Since all websites are not equal and with the existence of Single Page Applications (SPAs), additional customization may be necessary to measure pages per session conversion in your GA4 property effectively.
This realization inspired me to work on this blog post, where I’ll explain the implementation changes required to set up this type of website engagement conversion on SPA websites (for example, your Wix website). The process is simple, as we will leverage the similar code outlined in the initial blog post. However, you may have to make adjustments to your tracking configuration.
While it’s possible to use the GA4 Audience Trigger feature to track conversions when visitors reach a specified number of pages, I won’t cover this method as I already did in the previous article. Still, take caution when adopting the “Audience Trigger” approach as it has some potential impact on data quality, such as the absence of landing page or page-related insights that aid in performing a conversion analysis. The fact that the page reloads or the page accessed through the browser back and forward button means that the page that was previously visited gets counted when calculating the number of pages the user has visited in that session. Hence, I generally recommend the JavaScript-based approach.
Suppose you arrived at this webpage through search engines or other platforms, and your website is not a “Single Page Application“. In that case, you should refer to the “How to create pages per session conversions in GA4” blog post tailored for traditional/conventional websites. However, if your website is an SPA, please continue reading.
Table of Contents
Here’s what you will learn in this article
- Brief Overview of a Single Page Application (SPA)
- How to Measure Pages Per Session Goals in SPA using GA4
- 1. Creating a Variable to Determine The Page Navigation Type
- 2. Create the Tag to Track Page Views Count and its Trigger
- 3. Create a Variable to Retrieve the Number of Pages Viewed in a Session
- 4. Send the Pages Per Screen Conversion Event to Google Analytics 4
- Mark the GA4 Event as a Conversion
- Final words
Brief Overview of a Single Page Application (SPA)
Single Page Application (SPA) is a type of web application that loads a single web document and subsequently updates the body content of that document using JavaScript APIs like Fetch when different content needs to be displayed.
SPAs are renowned for providing an enhanced user experience by dynamically rewriting the current web page with new data from the web server, contrasting with the conventional approach of a web browser loading entire new pages. This allows users to navigate websites without the need to load complete new pages from the server, leading to performance improvements.
In simpler terms, when a visitor accesses a traditional website like “example.com,” the web page loads normally, and upon visiting another page on the website, the entire page reloads. However, in the case of a single-page application type of website, the page doesn’t reload; instead, it continues to serve the website content to the visitor.
While SPAs come with certain trade-offs, I won’t discuss them in this article, as our focus is on Google Analytics and the measurement of conversion events in GA4 when a visitor reaches a specific number of pages.
Let’s go into the implementation phase.
How to Measure Pages Per Session Goals in a Single Page Application (SPA) using GA4
Before going directly into the implementation process, here is an overview of the steps in tracking pages per session conversion actions on your SPA website.
- Create a variable to determine how the user accessed the page, and we’ll be utilizing browser history source and page navigation status. Doing this ensures that pages reloaded or accessed through the browser’s back and forward buttons are not counted, avoiding double-counting page view counts.
- Create a tag responsible for counting the number of pages the user has viewed in a session, along with the corresponding trigger for that tag.
- Create a Google Tag Manager (GTM) variable designed to retrieve the number of pages the user has visited in that session, which gets stored in a cookie, and then transform the variable to use it in building your GA4 event tag trigger.
- Send the conversion event data to Google Analytics.
Now, let’s explore each step within the implementation process in detail.

1. Creating a Variable to Determine The Page Navigation Type
This initial step in the setup process aims to determine how the user accessed the page, and we are doing this to exclude specific navigation types to prevent an inflated page view count. The excluded navigation types are as follows:
- Pages accessed by the user reloading the browser
- Pages accessed by the user using the back or forward button indicate that the user has visited the web page in that session before. This ensures the counting of almost unique page exposure.
- Pages accessed by the user clicking a link that takes them back to the same page they are currently on (a behaviour mostly common when interacting with menu links). This differs from a reload, as in a Single Page Application (SPA), the web page does not refresh.
Now that we have identified the navigation methods that may contribute to an inflated page count, which doesn’t accurately represent a true page view, let’s explore how to set this up in Google Tag Manager.
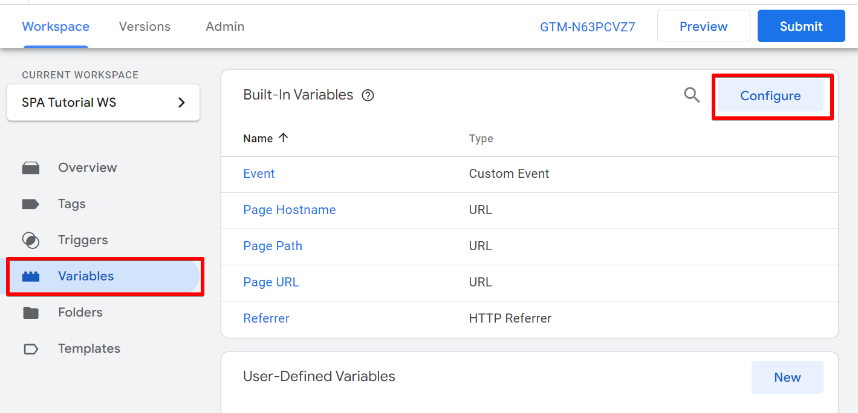
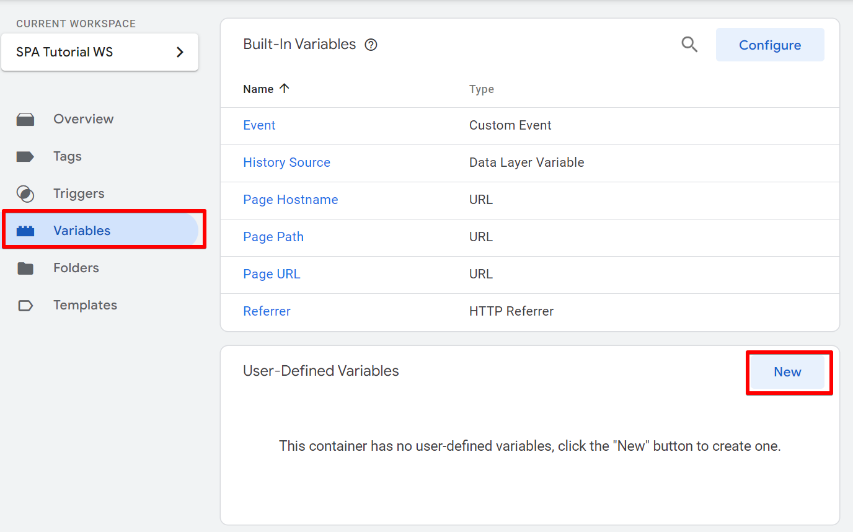
The first step involves navigating to the “Variables” section of your Google Tag Manager container. In the “Built-In Variables” section, check if the “History Source” variable is enabled for the GTM container.
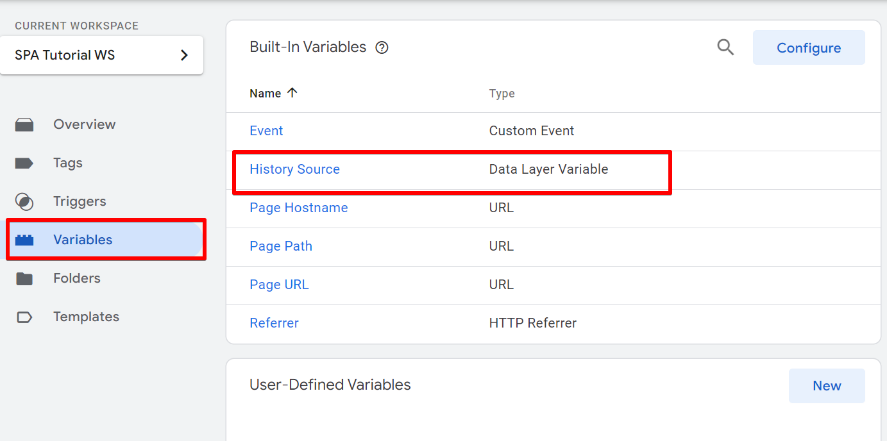
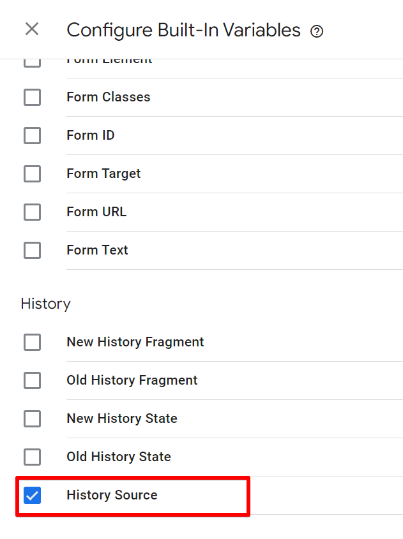
If not, click the “Configure” button and enable the “History Source” variable.
Check the “History Source” variable to have it enabled.
The next step is to add a new “Custom JavaScript Variable” in GTM. This variable type allows you to use a JavaScript code that checks the history source information and the browser navigation status.
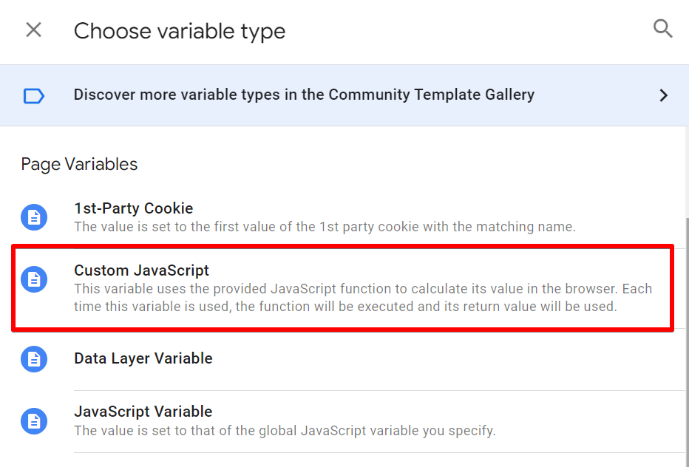
Within “User-Defined Variables,” click the “New” button and select the “Custom JavaScript” variable type.
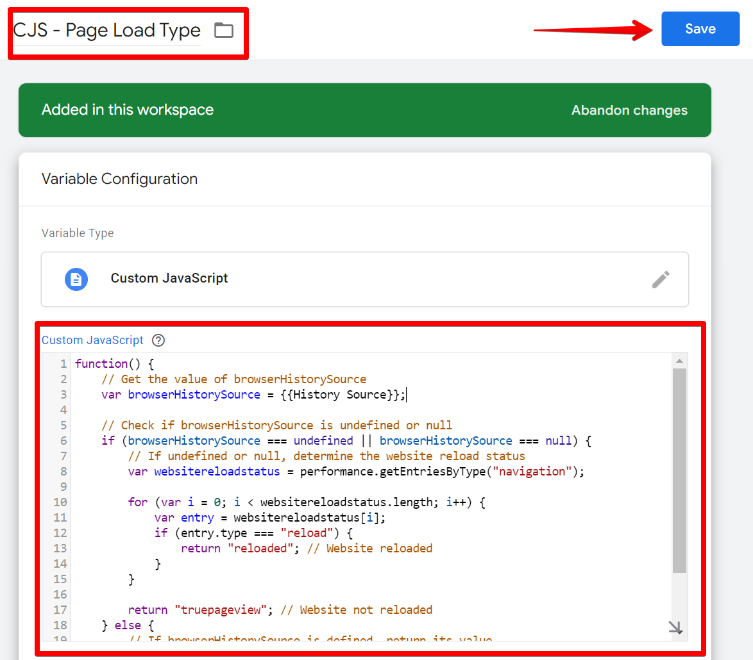
In the variable configuration view, copy and add the JavaScript code provided below. The code does not require any modifications.
function() {
    // Get the value of browserHistorySource
    var browserHistorySource = {{History Source}};

    // Check if browserHistorySource is undefined or null
    if (browserHistorySource === undefined || browserHistorySource === null) {
        // If undefined or null, determine the website reload status
        var websitereloadstatus = performance.getEntriesByType("navigation");

        for (var i = 0; i < websitereloadstatus.length; i++) {
            var entry = websitereloadstatus[i];
            if (entry.type === "reload") {
                return "reloaded"; // Website reloaded
            }
        }

        return "truepageview"; // Website not reloaded
    } else {
        // If browserHistorySource is defined, return its value
        return browserHistorySource;
    }
}
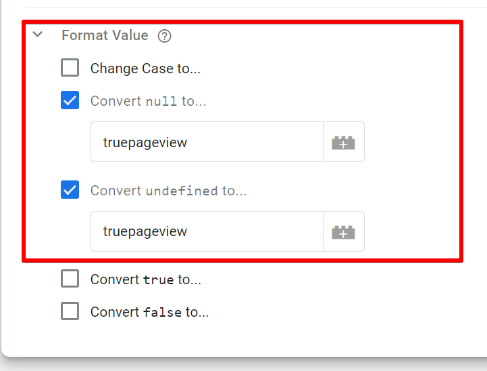
Additionally, expand the “Format Value” section and transform “NULL” and “UNDEFINED” values to “truepageview.”
After completing these steps, assign a name to the variable and save. I have mine named “CJS – Page Load Type“.
Here is an explanation of what the JavaScript code accomplishes. The script checks if the declared variable “browserHistorySource” (the “History Source” built-in variable) is undefined or null. If so, it determines the website’s reload status using the provided code. If “browserHistorySource” is defined, meaning available, it returns its value corresponding to the “History Source” variable.
The variable returns five types of values, each explained in basic, understandable terms:
- pushState: it’s just as you would access a new page on a conventional website.
- popstate: when a user accesses the page using the back or forward button (potentially inflating page view count)
- replaceState: when a user clicks on a link leading to the same page they are currently on (it should also not impact page view count)
- truepageview: when the history source information is not available upon the initial visit or an actual page refresh, indicating the user did not reload the current webpage
- reloaded: during an actual page load where the browser history source value is “undefined” or “null“, it checks how the user accessed the webpage. When the value is “reloaded,” it signifies that the webpage was reloaded and not a true page view.
Now that you understand this variable’s expected values let’s proceed to the next step in the implementation process.

2. Create the Tag to Track Page Views Count and its Trigger
In this step, we’ll create a tag that uses JavaScript to count and calculate the number of pages a website visitor has viewed in a specific session window. However, we commence by making the trigger, allowing us to count “truepageview” instances and history sources exclusively with a value of “pushState.”
The number of triggers required for executing this tag depends on your SPA dataLayer implementation, and I’ll be covering three potential scenarios:
Scenario 1: If in your SPA website, your team has implemented a dataLayer event for every page view (in this case, the dataLayer event is consistent), serving as a substitute for a GTM native Page view trigger. In this case, you’ll need just one trigger.
Scenario 2: You have the page view dataLayer event, but it doesn’t trigger on the initial or subsequent page reloads; you’ll use two triggers.
Scenario 3: You’ll create two triggers if no page view dataLayer event is implemented.
Here, I explain in detail how to create these triggers associated with your scenario.
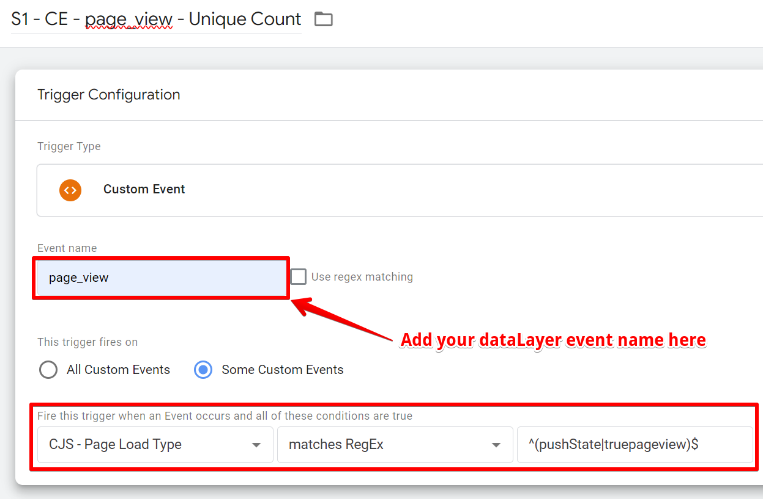
Scenario #1
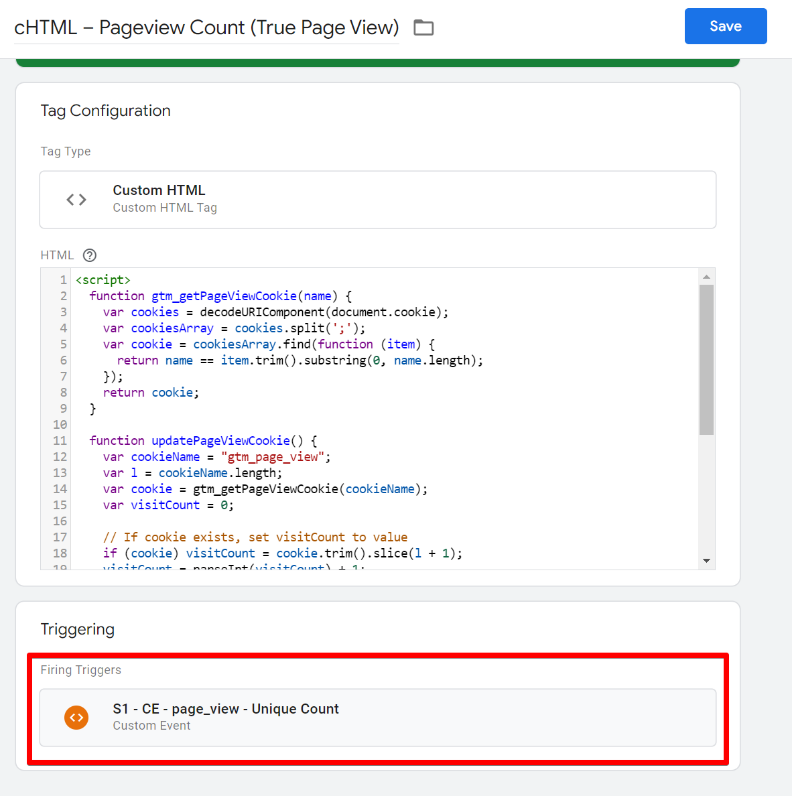
For Scenario #1, you’ll need only one “Custom Event” trigger type, where you enter the dataLayer event name. Include a condition using the custom JavaScript variable from the first implementation step, with an additional regex match with the pattern “^(pushState|truepageview)$“. Please assign a name to the trigger and save it.
Scenario #2
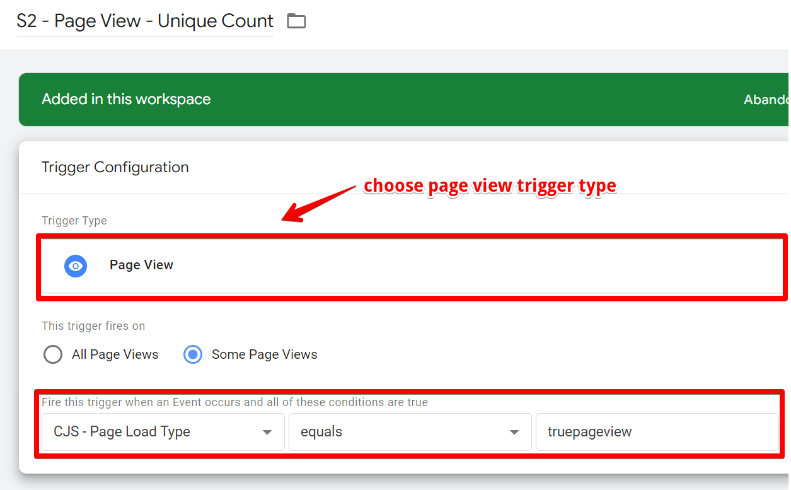
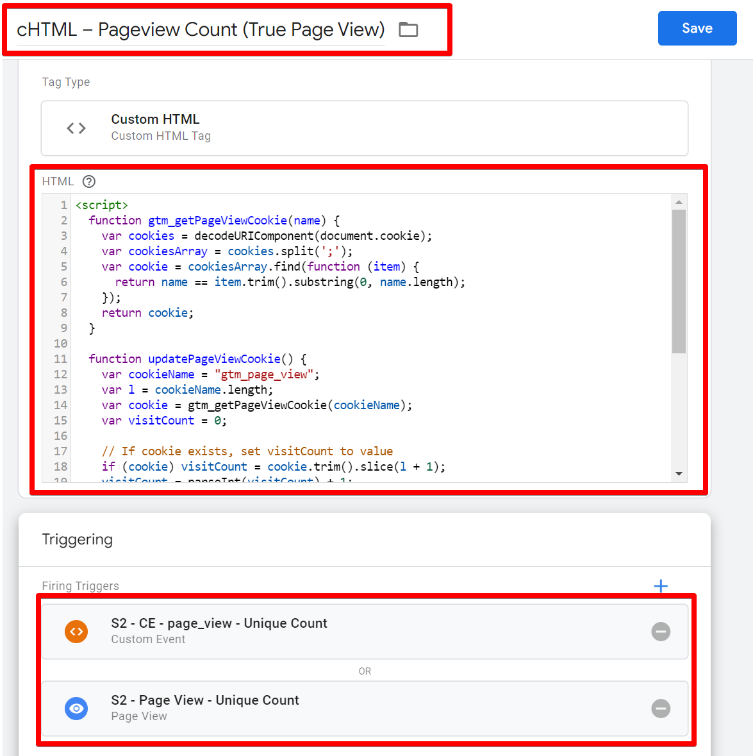
In Scenario #2, two triggers are needed, with the first one creating a trigger similar to Scenario #1 but changing the condition type to “Equals” with the value “pushState.”

Additionally, create a second trigger of the “Page View” type. Select the variable determining how the webpage was accessed and set the condition as “Equals” with the value “truepageview.” Follow the configuration as shown below, name the variable, and save it.
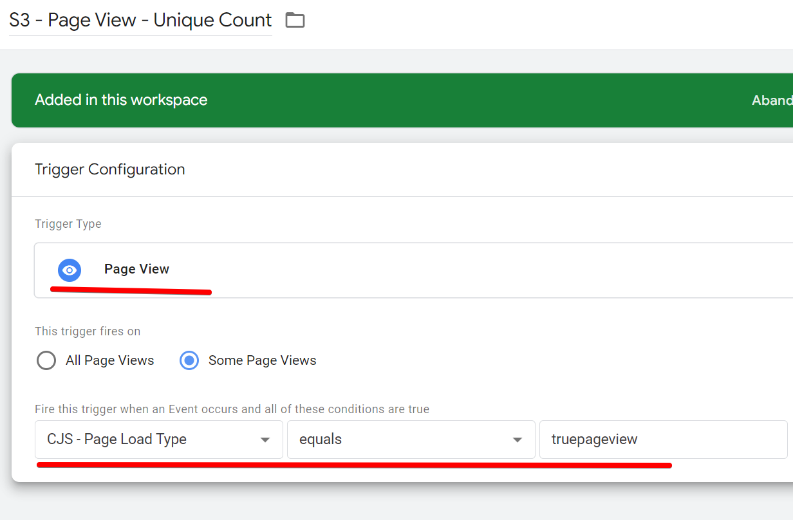
Scenario #3
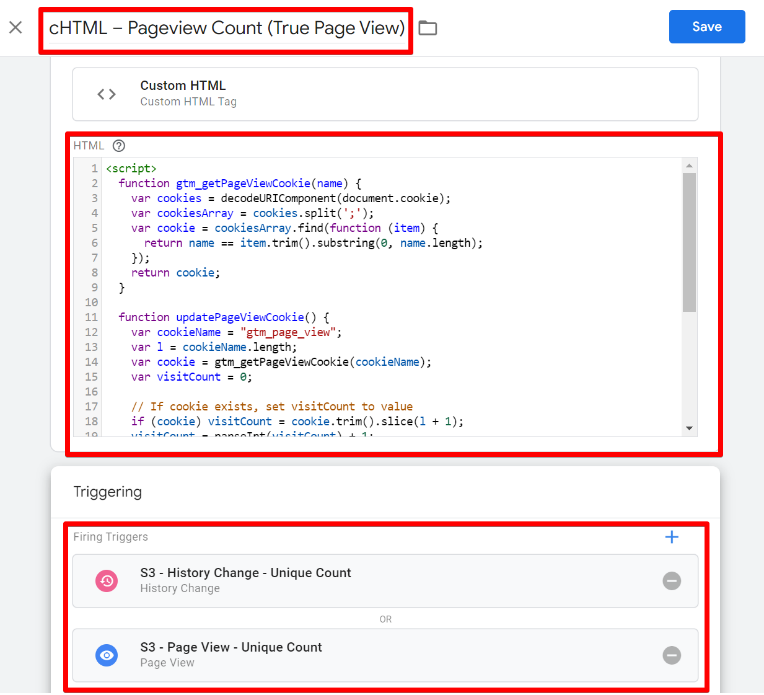
For Scenario #3, create a “Page View” trigger similar to Scenario #2. The configuration should match the one below.
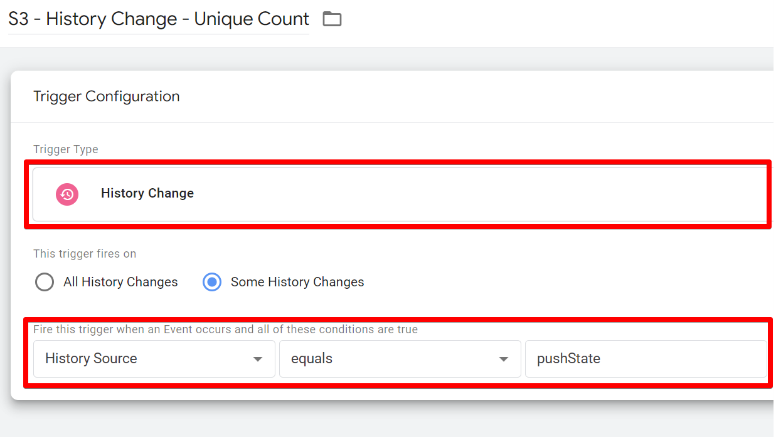
The second trigger will be a “History Change” trigger type in Google Tag Manager. The condition can either be when the “History Source” variable “Equals” “pushState,” or you can use the previously created variable (“CJS – Page Load Type“) to determine webpage access with the condition type “Equals” and the value “pushState.”
Creating the Page View Counter Tag in GTM:
Once you’ve set up the trigger aligned with your SPA measurement scenario, create a GTM “Custom HTML” tag type. Copy and paste the provided code into the HTML field.
Note: you can also use a Custom tag template (as an alternative to the Custom HTML tag explained in this chapter).
<script>
  function gtm_getPageViewCookie(name) {
    var cookies = decodeURIComponent(document.cookie);
    var cookiesArray = cookies.split(';');
    var cookie = cookiesArray.find(function (item) {
      return name == item.trim().substring(0, name.length);
    });
    return cookie;
  }

  function updatePageViewCookie() {
    var cookieName = "gtm_page_view";
    var l = cookieName.length;
    var cookie = gtm_getPageViewCookie(cookieName);
    var visitCount = 0;

    // If cookie exists, set visitCount to value
    if (cookie) visitCount = cookie.trim().slice(l + 1);
    visitCount = parseInt(visitCount) + 1;

    var cookieExpiry = new Date();
    // Set expiry time of 30 mins (in milliseconds)
    cookieExpiry.setTime(cookieExpiry.getTime() + 30 * 60 * 1000);
    var expires = "expires=" + cookieExpiry.toUTCString();

    // Set cookie
    document.cookie = cookieName + "=" + visitCount + ";" + expires + ";path=/";

    // dataLayer event that executes to state that page view count got increased
    window.dataLayer = window.dataLayer || [];
    window.dataLayer.push({
      'event': 'page_view_count_update'
    });

  }

  // Execute on tag trigger
  updatePageViewCookie();
</script>
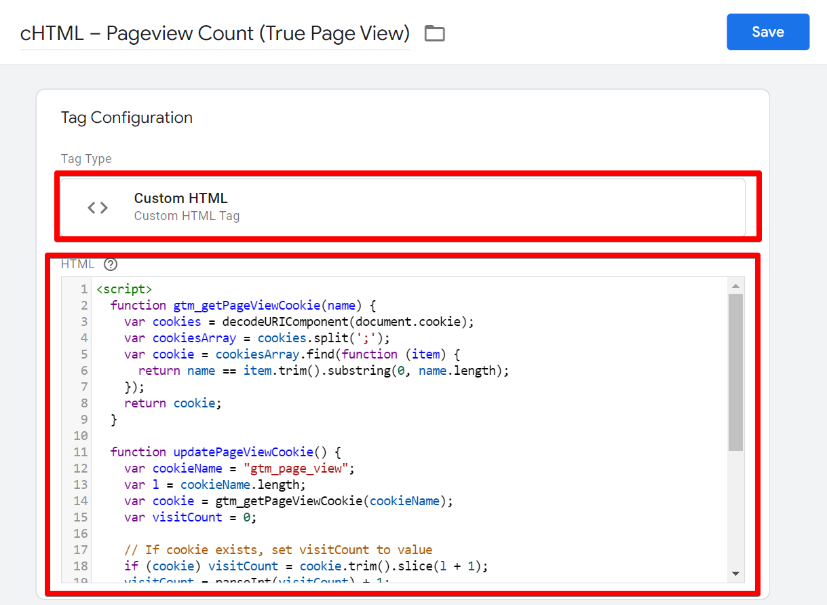
This code counts the number of pages a user has visited and stores the value in a cookie named “gtm_page_view.” The page view count is stored in a cookie that expires in 30 minutes, extending its duration by another 30 minutes each time a page is viewed.
You can change the cookie expiration window depending on your Google Analytics session timeout configuration.
If your Google Analytics property session duration exceeds “30 minutes“, update the JavaScript code with the equivalent time setting in minutes. You can do this by changing the “30” in the expiration part of the code to the number of minutes you choose.
Additionally, upon each page view count increase, it also executes a dataLayer event with the name “page_view_count_update” This will be very helpful later in the implementation, as it will help streamline the trigger configuration of the GA4 event tag.
Name the HTML tag as “cHTML – Pageview Count (True Page View)” and add the trigger or triggers based on your specific scenario.
– For Scenario #1, the setup resembles the one below.
– Scenario #2 should be configured as displayed below.
– If your situation falls under Scenario #3, set up as shown in the screenshot below.
The “cHTML – Pageview Count (True Page View)” tag will only fire on all page loads, excluding reloads/refreshes or pages accessed through the back and forward buttons, ensuring we count only true page views.
Once this implementation phase is complete, you’ll have to create a variable to retrieve the number of page views the user has visited in that session, and I’ll be discussing how to go about this shortly.

3. Creating a Variable to Retrieve the Number of Pages Viewed in a Session
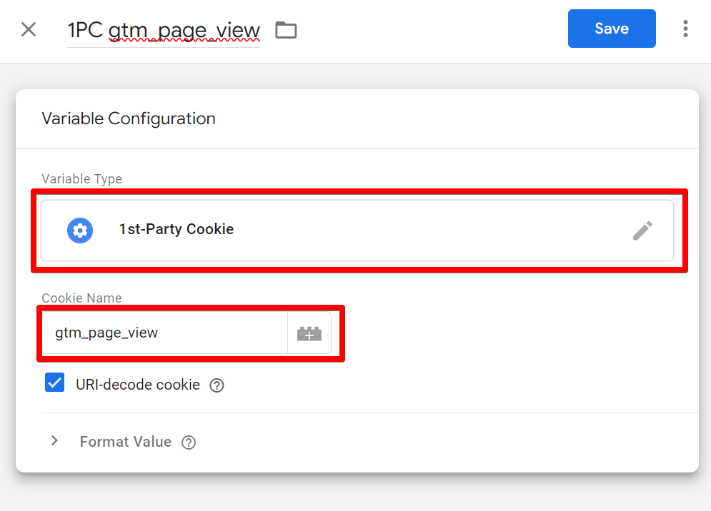
To capture the number of pages a user has viewed in a session and use it as a trigger for executing a GA4 event tag when visitors reach a specified page count deemed a conversion, you’ll need to create two variables: a “1st-Party Cookie” and a “Custom JavaScript” variable for transforming the value retrieved by the 1st Party Cookie variable type.
For the 1st-Party Cookie, set the cookie name to “gtm_page_view.” For this tutorial, name the variable “1PC gtm_page_view.”
Now, transform this value to ensure it appears as a number in case it comes as a string data type when retrieved from the user’s browser. To achieve this, use the provided JavaScript code. Copy this code and add it to the code field of the new “Custom JavaScript” variable that you’ll create.
function() {
  var pageviewnumber = '{{1PC gtm_page_view}}';
  return parseInt(pageviewnumber);
}
Name this variable; for example, let’s call it “CJS – Page View Number.” This variable aids in transforming the retrieved number of pages viewed by the user in that session.
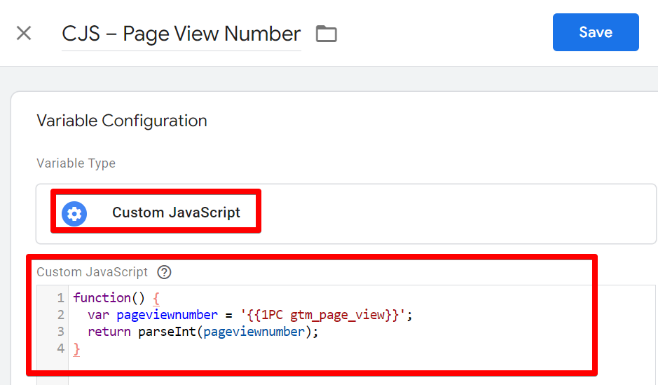
The code accesses the value that the “gtm_page_view” cookie variable returns, which represents the number of pages viewed by the user in a session, and then transforms it as a number data type.
The next step in the implementation process is to create a GA4 tag and trigger for sending the data to the Google Analytics property.
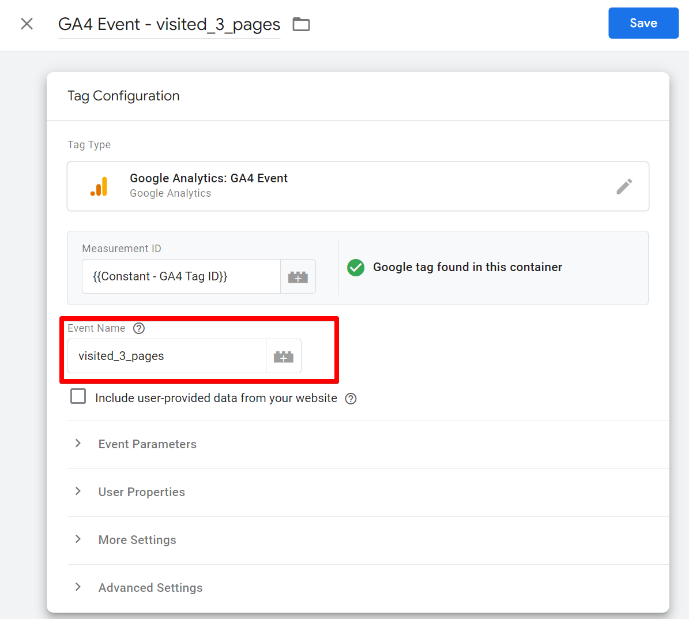
4. Send the Pages Per Screen Conversion Event to Google Analytics 4
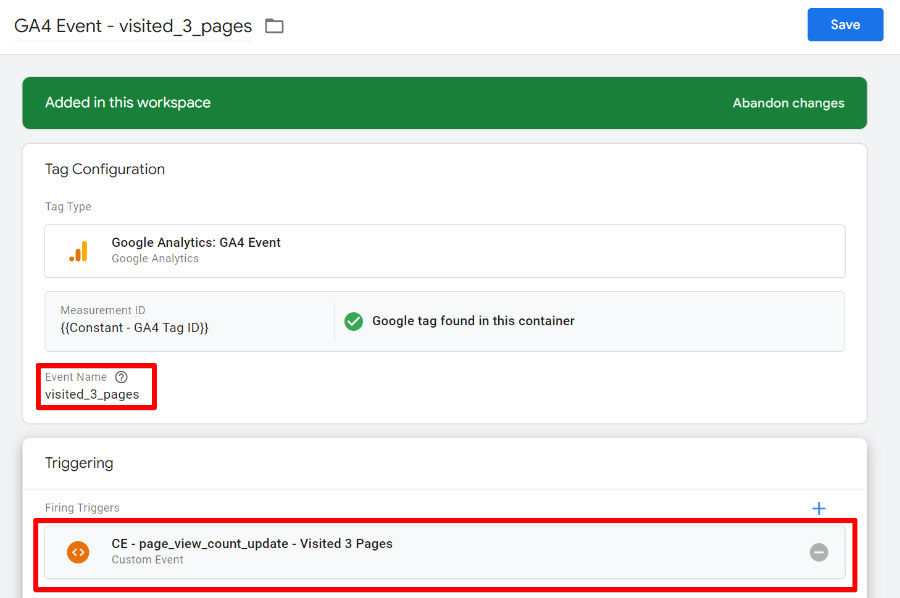
Create a GA4 event tag in Google Tag Manager and add the event name. For this example, use “visited_3_pages” as the Google Analytics event name, triggering a conversion when users visit three or more web pages on the Single Page Application website.
After creating the tag, add a trigger. In this section, no matter the setup scenario your setup belongs to, all you need is just one trigger, and this is a custom event trigger using the dataLayer event “page_view_count_update” emitted by the page view counter tag.
Using this approach protects you from any race condition or issue that might arise and helps streamline the setup process.
To create the trigger, select a “custom event” trigger type in the config screen, add the event name “page_view_count_update” as the event name, and include the two variables conditions:
- CJS – Page View Number equals 3
- CJS – Page Load Type matches regex (ignore cases), insert “^(pushState|truepageview)$“
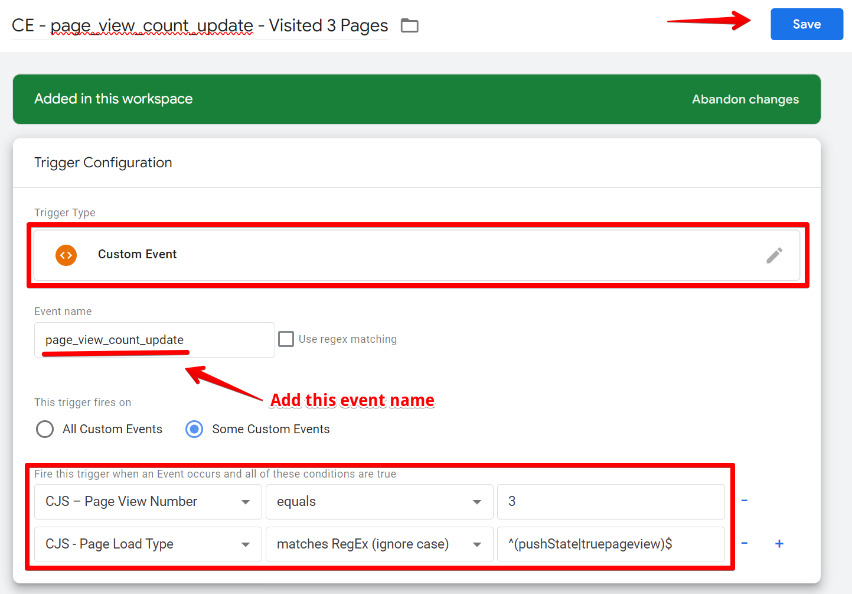
This configuration ensures that when a user reaches the third page in their session, the trigger checks if it’s a “pushState” browser history or “truepageview,” used to determine if it’s not a reload. If the value is either of the two, it triggers the pages per session conversion Google Analytics event, preventing the wrong and duplicate conversion count.
Your final setup should be similar to what I have in the screenshot below.
Next, save your tag setup, debug, and test your implementation. Visit three pages, and you should observe the event firing.
Marking the GA4 Event as a Conversion
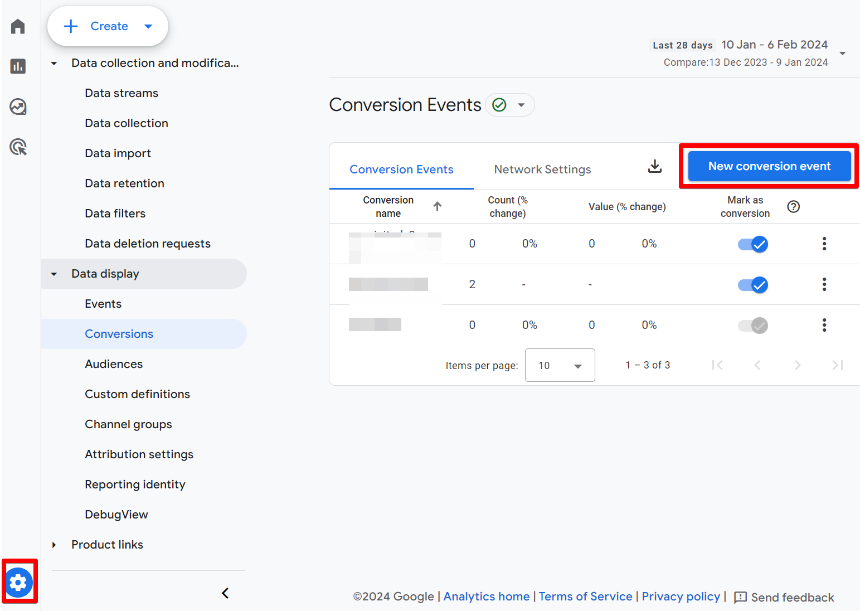
Before Google Analytics recognizes the event as a conversion, you need to mark it as one. To do this, navigate to your analytics property’s “Admin” screen.
The next step is to select the “Conversion” option under the “Data Display” category. From that screen, click the “New Conversion Event” button.
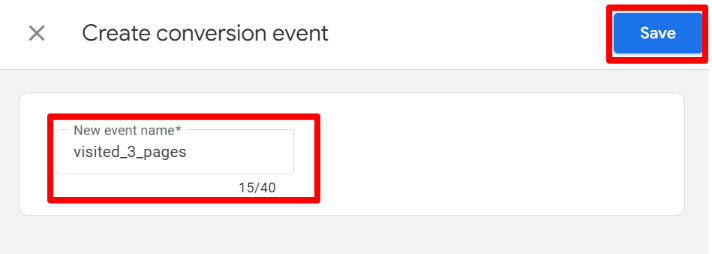
In the subsequent screen that appears, insert the GA4 event name we created to measure when users visit the third page in a single session. In my illustration, the event name is “visited_3_pages.”
Congratulations! You have now marked that event as a conversion. You can test your setup both in GTM and inside the GA4 debugView.
During the “Google Analytics debugView” test, your event should appear with a green flag, indicating that it’s a conversion event.
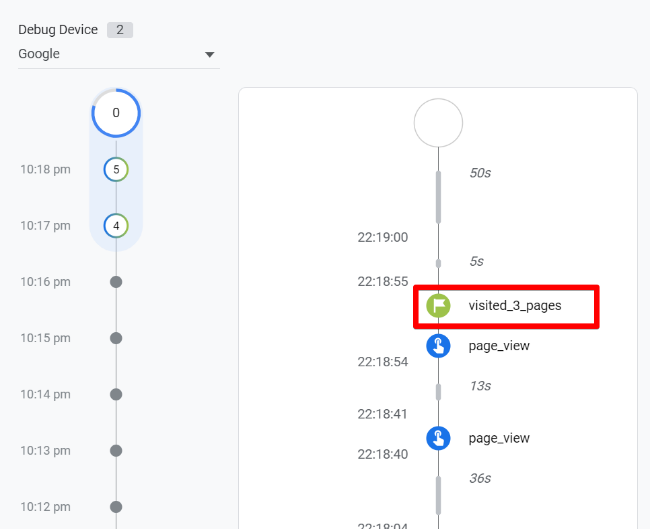
Note that after the GA4 event has triggered for you in a session, it will only activate the GA4 event again when the session expires, with the user starting a new session, or you delete the browser cookie that counts the page view or clear your entire website cookies in your browser.
The beauty of this approach lies in its reusability for conversion tracking across other ad platforms like Facebook, Google Ads (if you don’t want to use the GA4 conversion import option), TikTok pixel, etc.
Pages per Session Conversions for Single-Page Applications: Final words
While it’s known that single-page application websites have their advantages, we’ve observed the complexity of the setup for measuring when your website visitors visit a specified number of pages in a session.
We also reviewed the implementation process in the blog post, covering all possible scenarios.
Now that you know the steps involved, feel free to share your thoughts on measuring pages per session GA4 conversions on the Single Page Application website.


1 COMMENT
Thank you - this solution worked PERFECTLY for our client's SPA website. Much appreciated.