
July 15, 2020
Use GA Standard Ecommerce Data in Facebook Pixel with GTM
In 2019, Simo Ahava has posted a guide on how to reuse the Google Analytics Enhanced Ecommerce data in Facebook Pixel. While Enhanced Ecommerce is definitely a recommended solution to track sales with GA, there are still quite many projects that use its primitive predecessor, Standard Ecommerce.
In case you did not know, Standard Ecommerce is built to track just sales and products that were purchased. That’s it. Enhanced Ecommerce, on the other hand, is built to track the entire journey – from product impression to add to cart to purchase, etc.
Since Simo has already provided a solution to reuse the Enhanced Ecommerce data (in fact, his Facebook Pixel Custom Tag Template can do that automatically), I decided to help those who are using the Standard Ecommerce in Google Analytics.
In this guide, you’ll learn how to use Google Analytics Standard Ecommerce data in Facebook Pixel via Google Tag Manager.
Contents
- The Requirement
- The Process
- The Code
- Data Layer Variable
- Facebook Pixel Tag (implemented via Tag Template)
- Facebook Pixel Tag (implemented via Custom HTML Tag)
- Let’s test
- Final Words
The Requirement
Keep in mind that the solution I’ll describe in this blog post works ONLY with the Standard Ecommerce already being configured on your website. So, if you haven’t yet, read this guide first and ask developers to help you with that. Your final goal – a developer (or a plugin) must push the properly formatted transaction data to the Data Layer.
Here’s an example of the final output that you must already see on your website’s Order Confirmation page (obviously, the values will be different).
<script>
window.dataLayer = window.dataLayer || [];
dataLayer.push({
 'event': 'purchase',
 'transactionId': '1234',
 'transactionAffiliation': 'Acme Clothing',
 'transactionTotal': 38.26,
 'transactionTax': 1.29,
 'transactionShipping': 5,
 'transactionProducts': [{
   'sku': 'DD44',
   'name': 'T-Shirt',
   'category': 'Apparel',
   'price': 11.99,
   'quantity': 1
 },{
   'sku': 'AA1243544',
   'name': 'Socks',
   'category': 'Apparel',
   'price': 9.99,
   'quantity': 2
 }]
});
</script>
Not all of these data points are required by Google. But just keep in mind that Google strictly requires you to follow their naming convention and data structure. If you have no idea how to get Standard Ecommerce implemented on your site, read this guide.
Some people have implemented the Facebook Pixel via Custom HTML while others are using Simo Ahava’s Facebook Pixel custom tag template. In this guide, I’ll offer solutions for both of them.
The Process
Here’s the process that we’ll need to follow:
- Create a Custom JavaScript variable that checks the Data Layer. If it contains the GA Standard Ecommerce data, it takes it and outputs a transformed version of the data (supported by Facebook Pixel). Don’t worry, the existing GA Standard Ecommerce data layer will remain unaffected.
- That variable will be inserted in the Facebook Pixel tag that’s responsible for sending the purchase data
The Code
First, let’s take a look at the code.
function() {
  var ecproducts = {{dlv - transactionProducts}};
  if (Array.isArray(ecproducts)) {
    var productIds = ecproducts.map(function(products){
      return !!products.sku && products.sku.toString();
    });

    var productTotalValue = ecproducts.reduce(function(total, current){
      return !!current.price && !!current.quantity ? total + (current.price * current.quantity) : total;
    },0);

    var productQuantity = ecproducts.reduce(function(total, current){
      return !!current.quantity ? total + parseInt(current.quantity) : total;
    },0);

    var contentsArr = ecproducts.map(function(products){
      return {
        id: !!products.sku ? products.sku.toString() : undefined,
        item_price: !!products.price ? parseFloat(products.price) : undefined,
        quantity: !!products.quantity ? parseInt(products.quantity) : undefined
      };
    });

    return {
      content_ids : productIds,
      value : productTotalValue,
      num_items : productQuantity,
      contents : contentsArr,
      content_type : 'product'

    };
  };
}
If you don’t care about the explanation of how this code works, just copy this code, create a Custom JavaScript variable in GTM (Variables > New > Custom JavaScript), paste the code, add any name to the variable, and skip to the next chapter.
If you’re interested to learn what’s under the hood, continue reading.
To create this code, I used Simo’s solution as a major inspiration.
Since we are using a Custom JavaScript variable here, we need to start with an anonymous function that will return a final object for the FacebookPixel. At the very beginning, I define an ecproducts variable that will take the transactionProducts array from the Data Layer (I’ll explain more about this variable in the next chapter of this blog post).
function() {
  var ecproducts = {{dlv - transactionProducts}};
  if (Array.isArray(ecproducts)) {
So, if the transactionProducts exists and its type is an array, the Custom JavaScript variable in GTM will start building the Facebook-friendly output.
That’s where the main magic happens. First, it takes the sku of every product in the array and turns it into a string (if sku exists at all). All of these skus will be stored in an array.
    var productIds = ecproducts.map(function(products){
      return !!products.sku && products.sku.toString();
    });
This is needed because Facebook Pixel will be expecting a parameter called content_ids that contains the array of all the purchased product ids. To better understand how this part of the code works, you should learn the array map method.
Then the code prepares a parameter that will return the total value of all products that were purchased. This part will check every product in the transactionProducts array. If a product object contains price and quantity keys, then it will calculate the total value of that particular product that was purchased (e.g. 4 products x $12) will return 48:
    var productTotalValue = ecproducts.reduce(function(total, current){
      return !!current.price && !!current.quantity ? total + (current.price * current.quantity) : total;
    },0);
Speaking of the productTotalValue code above, there are two useful things you should learn: array reduce method and ternary operator.
The next step is to take quantity key of each product and calculate the total amount. If quantity key exists, then it is turned into an integer (in case that type of that key was different) and then added to a total sum:
var productQuantity = ecproducts.reduce(function(total, current){
      return !!current.quantity ? total + parseInt(current.quantity) : total;
    },0);
Then the code will build an array of all the products in the Standard Ecommerce dataLayer.push and will make it more FB-pixel-friendly. It uses the array map method and it takes 3 keys of each product: ski, price, quantity. Then it builds a new array where every product will contain 3 keys: id, item_price, quantity. If a certain key of a product does not exits, undefined will be returned.
var contentsArr = ecproducts.map(function(products){
      return {
        id: !!products.sku ? products.sku.toString() : undefined,
        item_price: !!products.price ? parseFloat(products.price) : undefined,
        quantity: !!products.quantity ? parseInt(products.quantity) : undefined
      };
    });
And finally, let’s build the final output of all the data points that were processed. This final return statement will return an object, where all the product ids will be stored in a content_ids array, the total value will be returned as the value key, the total number of products will be returned as the num_items key and the contents key will be an array that contains all the product details (id, price, quantity).
return {
      content_ids : productIds,
      value : productTotalValue,
      num_items : productQuantity,
      contents : contentsArr,
      content_type : 'product'

    }
In the Requirement chapter of this blog post, I’ve shared an example of the Standard Ecommerce data layer push. If we used the Custom JavaScript variable that I’ve just described, its output would be:
{
  content_ids: ['DD44', 'AA1243544'],
  value: 31.97,
  num_items: 3,
  contents: [
    {id: 'DD44', item_price: 11.99, quantity: 1},
    {id: 'AA1243544', item_price: 9.99, quantity: 2}
  ]
}
Data Layer Variable
To make the custom code (from the previous chapter work), you need to create a Data Layer Variable that returns the transactionProducts key from the Data Layer.
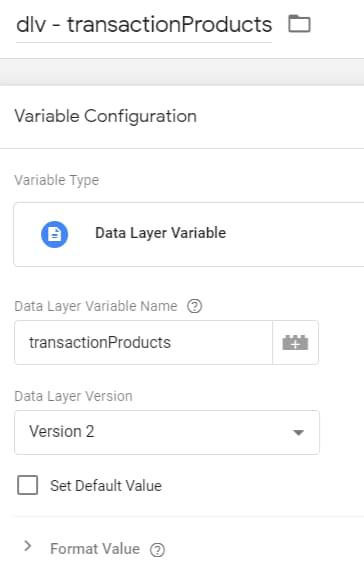
Name it exactly dlv – transactionProducts. If you want to use a different name, then edit the 2nd line of my code.
function() {
  var ecproducts = {{dlv - transactionProducts}};
Instead of “dlv – transactionProduct”, enter the name of your Data Layer Variable.
Facebook Pixel Tag (implemented via Tag Template)
First, I’ll start with the Custom Tag Template. If you haven’t created a purchase tag yet, go to Tags > New > Facebook Pixel and enter the following settings:
- Facebook Pixel ID
- Event Name > Standard > Purchase
If you have additional configuration used in other FB Pixel tags (e.g. GDPR settings), configure them here as well.
If you have no idea how to work with that template, download my Facebook Pixel Cheat Sheet (in the form above this chapter).
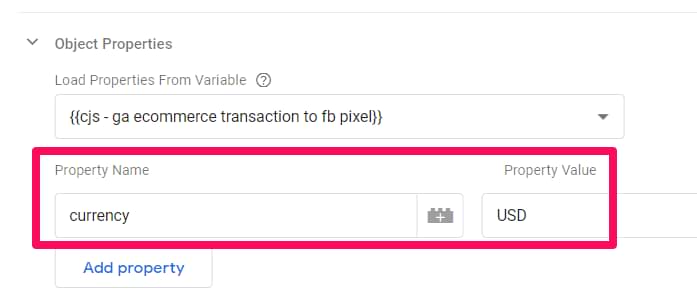
Then go to Object Properties > Load Properties From Variable and select the Custom JavaScript variable that you’ve created earlier in this blog post.

Facebook Pixel also requires passing the Currency Code together with the Purchase data. If your website always operates just in one currency, you can manually add it like this (of course, enter the currency code that you’re using):
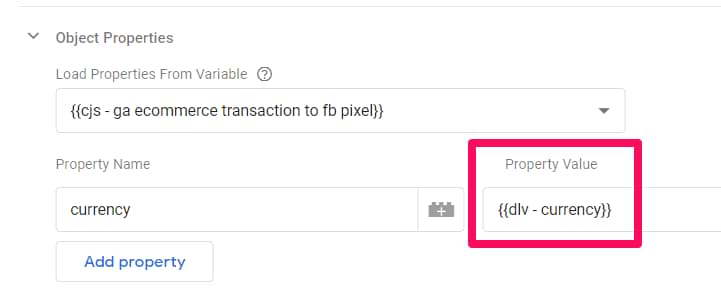
Alternatively, if currency code is stored in the Data Layer, you can create a Data Layer Variable and use that in the setup (here’s an example – you might need to adapt it to your case):
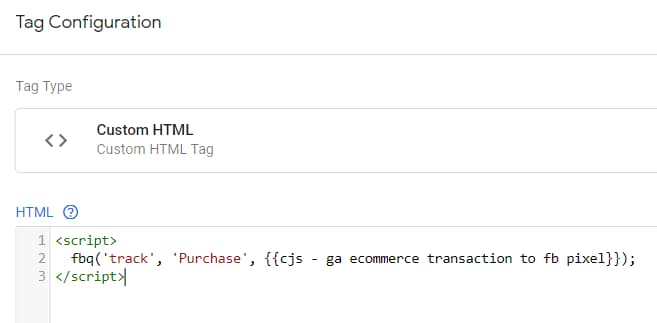
Facebook Pixel Tag (implemented via Custom HTML tag)
If you have implemented Facebook Pixel via Custom HTML Tag, use this code in your purchase tag:
<script>
  fbq('track', 'Purchase', {{cjs - ga ecommerce transaction to fb pixel}});
</script>
Replace cjs – ga ecommerce transaction to fb pixel with the name of your Custom JavaScript variable. Additionally, you should do a little update in that custom JS variable’s code.
In the final return statement, add an additional key currency and then enter the currency code that your store is using (if you’re operating under one currency). Also, add a comma after contentsArr.
    return {
      content_ids : productIds,
      value : productTotalValue,
      num_items : productQuantity,
      contents : contentsArr,
      content_type : 'product',
      currency : 'USD'
    }
This code will always return the USD. If you have currency code dynamically pushed to the Data Layer, you could create a Data Layer variable and use that instead:
    return {
      content_ids : productIds,
      value : productTotalValue,
      num_items : productQuantity,
      contents : contentsArr,
      content_type : 'product',
      currency : {{dlv - currencyCode}}
    }
When you have updated/created a tag, you can use the same trigger as you used in the GA Standard Ecommerce tag. If you want, you can also fire the Facebook Pixel purchase tag at some point later (e.g. when all the other scripts have loaded). But make sure that you do not fire the FB Pixel tag BEFORE the standard e-commerce data is pushed to the data layer.
After you add/update the trigger, save the tag.
Let’s test
Now, the time has code to test your setup. After you’ve made all the changes in the container, refresh GTM’s preview and debug mode.
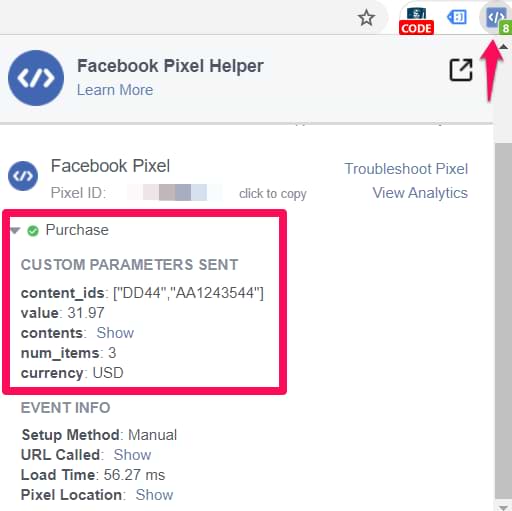
Also, you will need to install the Facebook Pixel Helper browser extension. When you’ve done that, make a purchase on your website. When you do that, you should see that Facebook Pixel Helper’s icon has changed to color to blue. Click it.
Among various events that were tracked, you should also see the Purchase event. Click it to see what kind of custom parameters were sent. Those parameters must match that e-commerce data that you see in the GTM Preview mode’s data layer tab.
If you cannot see the Purchase event, check if your FB Pixel Purchase tag fired at all. In my case, the dataLayer.push is using an event value transaction. Therefore, I clicked it and checked whether the tag fired.
![]()
![]()
If your tag is not firing, read this troubleshooting guide.
The next place where you could check is business.facebook.com. Log in to that account, go to Events Manager and open that Pixel to which you are sending the purchase data. If you have no idea how to navigate Facebook’s business manager interface, this guide should help you.
Then go to Test events and check whether you see the Purchase events (you will be asked to enter your website’s URL).

Once you see the event, click it to check what kind of data was sent.
If you are not using dynamic ads, feel free to ignore the following warning:
- Pixel and Catalog Not Paired
And that’s’ about it!
How to reuse GA Standard Ecommerce data in Facebook Pixel: Final Words
This blog post is one of those situations where you can feel the power of Google Tag Manager. Instead of asking a developer to push FB-pixel-friendly data to the Data Layer, you can reuse the data that is already present.
Of course, this option requires some coding knowledge but believe me, being able to achieve something like this is very rewarding 🙂
Got any questions? Feel free to post a comment below.
1 COMMENT
The Custom JavaScript variable doesn't get the value of transactionShipping.
Is it possible to add transactionShipping to this varaible?