
May 13, 2020
How to Set Up Ecommerce Tracking with Google Tag Manager: Full Guide
Updated: May 13th, 2020. While Google Analytics offers a lot of tracking functionality out of the box (pageviews, sessions, traffic sources, etc.), the real magic begins after implementing custom features, like events or ecommerce tracking. Only then you’ll start seeing what really matters, conversions, and/or revenue.
By tracking important interactions, you’ll be able to combine their data with the default GA functionality and see what really drives sales, which traffic sources are more effective than others, etc.
But before you can analyze all of that, proper tracking must be set up. In this guide, I’ll show you how to implement Google Analytics Standard Ecommerce tracking with Google Tag Manager.
Table of Contents
- Prerequisites
- What is Google Analytics Ecommerce Tracking?
- Ecommerce tracking with Google Tag Manager: What’s the plan?
- #1. Enable Ecommerce reports in Google Analytics
- #2. Transaction data in the Data Layer
- #3. Configure Google Tag Manager to send Ecommerce data to Google Analytics
- #4. Let’s test
- Prevent duplicate transactions
- Checking GA Ecommerce reports
- Missing a bunch of Ecommerce transactions?
- Bonus: What if the “Thank you” page’s URL does not change? What trigger should be used?
- Ecommerce tracking with Google Tag Manager: Final words
Prerequisites
By writing this guide about Ecommerce Tracking with Google Tag Manager (GTM) I presume that you are already familiar with what GTM is and what purpose does it serve. If you have never heard of it or have never used it, take a look at these guides first:
- 13 reasons to start using Google Tag Manager
- GTM vs Google Analytics. What’s the difference?
- Best ways to learn Google Tag Manager
- How to install Google Tag Manager?
- How to get Google Tag Manager help?
Also, I presume that you already know some Google Analytics basics and are familiar with its interface.
What is Google Analytics Ecommerce Tracking?
By doing some additional configuration, you can start tracking sales with Google Analytics. All thanks to Ecommerce tracking features.
By implementing them, you will be able to measure the number of transactions, revenue that your website generates, etc.

Once a user completes a purchase (and is redirected to the Order Confirmation page) this moment can be captured by Google Analytics. By sending transaction data to GA (like Order Total or Purchased products) you’ll unlock new reporting possibilities and will start seeing how your marketing efforts are actually impacting online sales.
There are two main types of Google Analytics ecommerce implementation methods:
- Standard Ecommerce reports in Google Analytics allow you to analyze purchase activity on your site or app. You can see product and transaction information, average order value, ecommerce conversion rate, time to purchase, and other data.
- Enhanced Ecommerce adds functionality to your Google Analytics reports. Enhanced ecommerce shows when customers added items to their shopping carts, when they started the checkout process, and when they completed a purchase. You can also use enhanced ecommerce to identify segments of customers who fall out of the shopping funnel.
Which Ecommerce Reports Option Is Right for You?
If you want to see only sales data and how well each product performs, which traffic sources generate sales, then choose Standard Ecommerce functionality.
If you want to see not only purchases but visitor’s journey as well (data related to Add to cart activity, Checkout steps, etc.), then Enhanced Ecommerce should be your option.
However, it is much more difficult to implement Enhanced Ecommerce functionality, additionally, it requires much more developer’s time to get things going. Therefore, you’d need to weigh your options. With EE, you’ll get much more insights, but it’s much more expensive to properly implement.
This guide will explain only how to implement Standard Ecommerce reports. A very thorough step-by-step process with practical and actionable examples is explained in my Intermediate Google Tag Manager course (+ Advanced Topics).
Ecommerce Tracking with Google Tag Manager: What’s the Plan?
Although Google Tag Manager is usually promoted as the tool which enables marketers/web analysts to control web tracking without developer’s input, this time you’ll most likely need to get his/her help. Compared to Enhanced Ecommerce tracking, Standard Ecommerce requires a fairly small amount of developer’s time to successfully implement sales tracking.
Here’s the plan that you’ll need to follow in this guide:
- First, you’ll need to enable Ecommerce Reports in Google Analytics
- Then you’ll need to ask a developer to push a transaction data to the Data Layer (or get a plugin for that purpose, if possible)
- Send the Ecommerce transaction data to Google Analytics (via Google Tag Manager)
- Test if everything is working properly
Ready to implement Ecommerce tracking with Google Tag Manager? Let’s roll!
#1. Enable Ecommerce Reports in Google Analytics
Log in to your Google Analytics account and go to the Admin section. You can reach it by clicking the gear icon in the bottom left corner:

…and then choose Ecommerce Settings on the view-level. Then click the toggle button to enable Ecommerce features. Leave Enhanced Ecommerce features disabled (because it’s out of the scope of this guide).

That’s it! Easy. The upcoming steps of Ecommerce tracking with Google Tag Manager won’t be that simple 🙂
#2. Transaction Data in the Data Layer
If you’re not familiar yet, the Data Layer is one of the key components of Google Tag Manager which can contain useful information that is later used in GTM tags, triggers, and variables. If you’re not familiar with it (or want to learn more), read this guide.
In order to make GA Ecommerce tracking with Google Tag Manager work, first, we need to get the transaction data pushed to the Data Layer. Then, we’ll instruct GTM to read that data and transfer it to Google Analytics. And it always works like that:
- A developer (or a plugin) adds the transaction data to the Data Layer (after a purchase is successfully completed)
- GTM is taught to recognize the successful purchase
- GTM (with help of Universal Analytics tag) transfers that data from the Data Layer to Google Analytics
Here’s the code that needs to be added to the Data Layer (I’ll also refer to this code as the GA Ecommerce dataLayer.push code):
<script>
window.dataLayer = window.dataLayer || [];
dataLayer.push({
 'transactionId': '1234',
 'transactionAffiliation': 'Acme Clothing',
 'transactionTotal': 38.26,
 'transactionTax': 1.29,
 'transactionShipping': 5,
 'transactionProducts': [{
   'sku': 'DD44',
   'name': 'T-Shirt',
   'category': 'Apparel',
   'price': 11.99,
   'quantity': 1
 },{
   'sku': 'AA1243544',
   'name': 'Socks',
   'category': 'Apparel',
   'price': 9.99,
   'quantity': 2
 }]
});
</script>
Not every parameter is required. In fact, most of them are optional. But the more data you pass, the more you’ll see in Ecommerce reports.
Speaking of the transaction parameters, only transactionId and transactionTotal are required. If with every sale you also pass transactionProducts, then the aforementioned dataLayer.push JavaScript snippet must also include name, sku, price, quantity.
If you want to see the full list of supported parameters, head over to the official Google’s documentation and expand the Standard Ecommerce section.
#2.1. Several Things to Keep in Mind
There are several additional things you need to know before you copy that code and send it to the developer:
- Blindly copying the aforementioned code and pasting it on a “Thank you” page won’t work. The developer must replace the value of each parameter with actually meaningful data. If the order total is $30, then the value of transactionTotal in that code must be 30.00. So in other words, the values of all the parameters must be replaced dynamically by the function(s) written by the developer.
- The names of those parameters and the entire structure of the code must be identical to the one which is displayed in the aforementioned code and Google’s documentation. You are free to skip optional parameters, but you cannot rename transactionTotal into something else like orderTotal. Custom parameters are not supported in the code, therefore the developer must follow the exact naming convention used in that Ecommerce Transaction JS code.
- If you are using a popular Ecommerce platform, like WooCommerce, then there is a high chance that a ready-made plugin exists which can send the GA Ecommerce transaction data to the Data Layer (in a proper format) after a successful purchase. In WooCommerce’s case, such a plugin is called GTM4WP. You can enable Standard Ecommerce tracking by going to plugin’s settings > Integration > Woocommerce and clicking Track classic e-commerce.


#2.2. Where to Place that GA Ecommerce dataLayer.push Code?
In order to know where that dataLayer.push code must be added, first you need to think more about what happens after a successful purchase?
- Is the client redirected to a “Thank you” page?
- Or does the page remain as it is and only a “Success” message is displayed on the screen (but the URL of that page stays the same)?
If the client is redirected to a “Thank you” page, then that GA Ecommerce dataLayer.push code must be placed above the GTM container code. It’s very important to place it above. Why? Because then the Ecommerce transaction data will be already available for Google Tag Manager when it starts loading.
The sooner that data is pushed to the Data Layer, the sooner you’ll be able to send this data to Google Analytics.
Have you noticed that every time a page loads and GTM Preview and Debug mode is enabled, there are 3 events displayed there: Pageview, DOM Ready, and Window Loaded? If a developer places the GA Ecommerce dataLayer.push code above the GTM container, then you will be able to send the Transaction data to GA with the Pageview event. And that Pageview event is the earliest moment when you can fire tags.

If for some reason, a developer placed the Ecommerce dataLayer.push code below the GTM container, then the earliest moment when you can send that Ecommerce data to the GA will be DOM Ready trigger.
If the page does not reload when the purchase is successfully made, then your developer can place the code whenever he/she wants but one additional modification is needed then. A developer must add an additional parameter called “event” (its value can be whatever you want, e.g. “purchase”, “sale”, “ecommerce” or anything else that makes sense to you).
Here’s what a final dataLayer.push code looks like after that additional line of code is added (see the line no.4):
<script>
window.dataLayer = window.dataLayer || [];
dataLayer.push({
 'event': 'purchase',
 'transactionId': '1234',
 'transactionAffiliation': 'Acme Clothing',
 'transactionTotal': 38.26,
 'transactionTax': 1.29,
 'transactionShipping': 5,
 'transactionProducts': [{
   'sku': 'DD44',
   'name': 'T-Shirt',
   'category': 'Apparel',
   'price': 11.99,
   'quantity': 1
 },{
   'sku': 'AA1243544',
   'name': 'Socks',
   'category': 'Apparel',
   'price': 9.99,
   'quantity': 2
 }]
});
</script>
If that’s the case of your current project, you’ll need to create a custom trigger in GTM to catch this interaction. I’ll explain that a bit later.
Let’s take a look in action, what happens when a developer implements the Google Analytics Ecommerce dataLayer.push code on a website (or installs a plugin for that purpose).
#2.3. Testing the GA Ecommerce dataLayer.push Code with Google Tag Manager
Once the developer informs you that the transaction dataLayer.push code is now implemented, it’s time to test it. What you should do is:
- Enable Preview and Debug mode
- Go to the website/online store where you want to track transactions and complete a purchase
- Complete the purchase
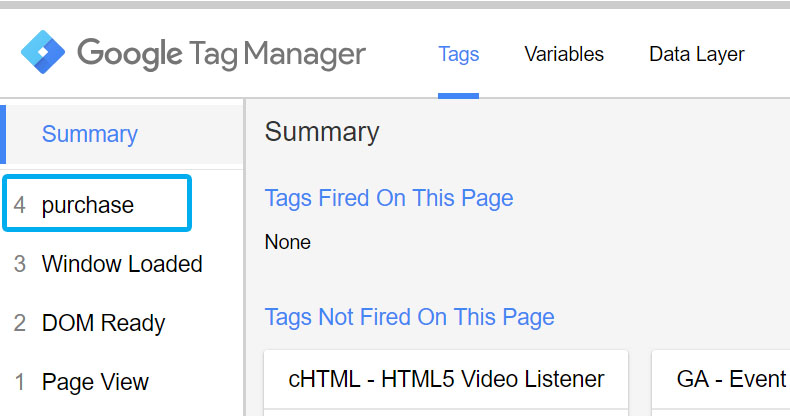
Scenario #1. The Ecommerce dataLayer.push code is added above the GTM container (on a “Thank you” page). Since this dataLayer.push does not have an “event” parameter, it will be displayed as a is “Message” (see the screenshot below). Such push (“Message”) cannot be used as a trigger in GTM (firing condition which then activates tags) so the earliest moment we can send the transaction data to Google Analytics is on Page view event.
But since our Google Analytics Ecommerce dataLayer.push is already initiated before the entire GTM did, its data is already in the Data Layer, therefore, we can continue using that transaction data in all the subsequent events, including Page view.
![]()
![]()
Scenario #2. The Ecommerce dataLayer.push code is added below the GTM container (on a “Thank you” page). Since this dataLayer.push also does not have an “event” parameter, it is also displayed as a “Message” (see the screenshot below). However, this time the dataLayer.push was completed a bit later (because it is placed below the GTM container), therefore, with Page View event we cannot reach the data stored in the “Message”.
Only all the subsequent events (DOM Ready, Window Loaded) can access the transaction data. That’s why in this case you and I will be using DOM Ready event as a trigger.

Scenario #3. The Ecommerce dataLayer.push code is activated on a page which is not reloaded (a.k.a. “event” parameter is added to the .push code). In this case, a developer added an additional parameter “event” of which value is “purchase”.
In order to use this moment as a tag firing condition, you and would need to create a Custom Event Trigger.
Now, let’s take a closer look at what data was pushed to the Data Layer. Click the “Message” or “Purchase” in the Preview and Debug mode (it depends on a project/website) and go to the Data Layer tab.
You should see something like this (P.S. my screenshot contains some fake product or transaction data):

So the screenshot above displays what a developer pushed to the Data Layer. Double check if:
- All the needed parameters are included
- Their values match the actual transaction information
- Names of the parameters match those which are displayed in Google’s official documentation (or this blog post that you are currently reading).
If you answered “No” to at least one question, discuss that issue with a developer and try to resolve it as soon as possible. If everything is fine, then proceed to the next step.
#3. Configure Google Tag Manager to Send the Ecommerce Data to Google Analytics
In this chapter, you’ll have to complete the following steps:
- Create a Google Analytics Transaction tag which will send the purchase data over to Google’s servers
- Create a trigger which will fire that Transaction Tag (p.s. the trigger’s configuration depends on the scenario of how the dataLayer.push was implemented)
Let’s start with the easy part, a tag. In your Google Tag Manager container, go to Tags > New and choose the Universal Analytics tag template. In Tag Configuration, enter the following settings:

If you don’t know what to choose in Google Analytics Settings field, read the guide about the Google Analytics Settings Variable. Save the tag without the trigger (for now). We’ll come back here later.
Now, the triggers. Let’s remember those three scenarios from the previous chapter.
- Scenario #1. The Ecommerce dataLayer.push code is added above the GTM container (on a “Thank you” page)
- Scenario #2. The Ecommerce dataLayer.push code is added below the GTM container (on a “Thank you” page)
- Scenario #3. The Ecommerce dataLayer.push code is activated on a page which is not reloaded (after a successful purchase)
Depending on your project’s/website’s specifics you’ll have to choose one of these scenarios and create a trigger respectively.
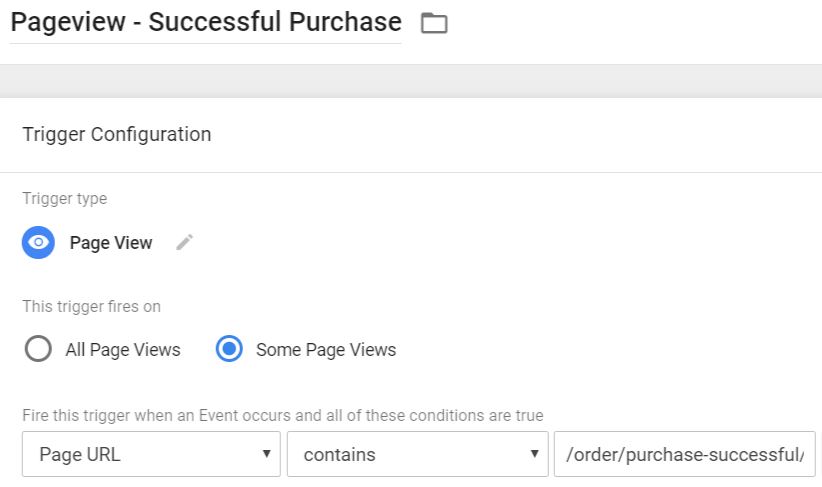
SCENARIO #1. The Ecommerce dataLayer.push Code Is Added Above the GTM Container
In this case, we know that the transaction data is pushed to the Data Layer before the Page View event occurs, therefore we can choose the Page View type for the trigger.
That’s why you should go to Triggers (in your GTM container) and click New, then choose Page View trigger type.
But we don’t want this trigger to fire on all pages, just on some pages. Let’s take a look at the order confirmation page’s URL (web address). Is it unique in any way compared to other pages?
By saying “unique” I mean “is it possible to distinguish (from the page URL) that the purchase was successfully completed?” A good example would be www.example.com/order/purchase-successful.
If yes, then we’ll use a fraction of that Page URL in our trigger. This technique is called “Thank you” page tracking. So let’s imagine that the address of our “Thank you” page is this: www.example.com/order/purchase-successful/23749372. The last digit is the order ID. /order/purchase-successful/ is a good indicator that the order was indeed successfully completed.
Let’s enter it in our trigger. I chose Page URL variable but Page Path would have also worked fine.
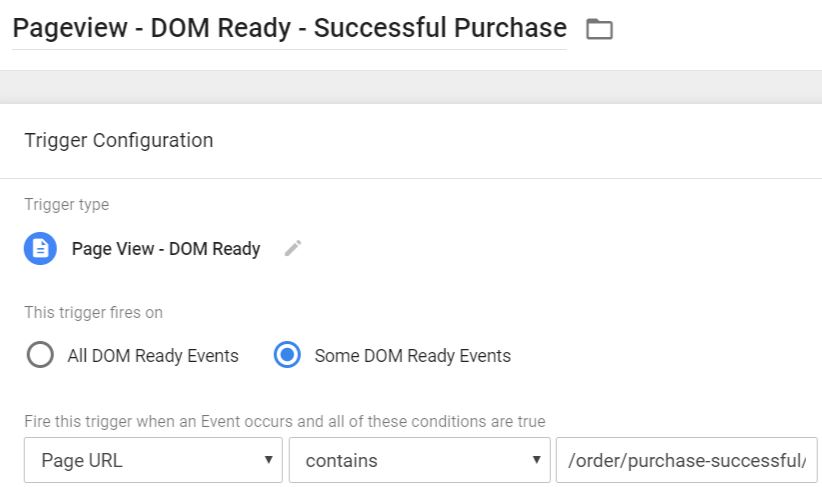
SCENARIO #2. The Ecommerce dataLayer.push Code is Added below the GTM Container
If a developer could not add the dataLayer.push code above the GTM container, then you should create a DOM Ready trigger. Its condition will be the same as in the previous trigger, except trigger type should be DOM Ready.
SCENARIO#3. The Ecommerce dataLayer.push Code Is Activated on a Page which Is Not Reloaded (dataLayer.push Contains an “Event” Parameter)
In fact, the “event” parameter can also be used in the #1 and #2 scenarios as well. But I want to emphasize that it is a must if the page does not reload after the purchase is complete (therefore Page View and DOM Ready event are not very useful).
Let’s take a quick reminder of what is happening in the Preview and Debug mode in this scenario:
Since the “event” parameter’s value is “purchase”, its name is displayed on the left side of the GTM P&D mode and thanks to it, we can use this dataLayer.push as a trigger. What we’ll need to do is to create a Custom Event trigger.
In GTM container, go to Triggers > New > Custom Event.
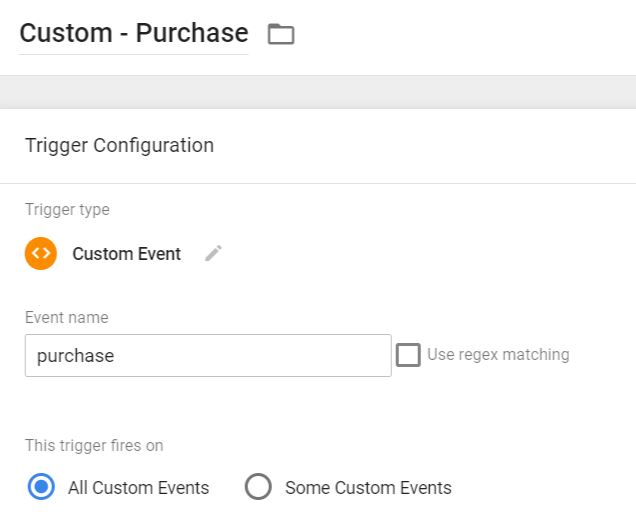
Make sure that in the “Event name” field you enter purchase precisely (this field is case-sensitive). What we just did is we instructed Google Tag Manager to catch all the “purchase” events in the Data Layer and turn them into a trigger.
In other words, a purchase is made → purchase event is pushed into the Data Layer → GTM catches that event and uses it as a Custom Event trigger → the trigger fires a tag which sends the data to Google Analytics.
The next step here is to assign a trigger (which you have just created) to Universal Analytics Transaction tag. Just to make sure, after reading this guide you have to create only one firing trigger, not three. I just explained 3 possible options based on several specific situations.
#4. Let’s Test Our Ecommerce Tracking with Google Tag Manager
We’re almost there. Now it’s time for testing. Save all the changes in the container (to the Universal Analytics tag and the trigger, refresh Preview and Debug mode, and complete a purchase. In my case, a client is redirected to a “Thank you” page and the dataLayer.push is added above the GTM container.
Here’s what I see:

The GA Transaction tag fired as expected and sent the data over to Google Analytics. But how can we be sure that the data was indeed properly sent to GA? Let’s use Tag Assistant and GA debugger extensions. If you haven’t yet, install it in your browser. P.S. I highly recommend using Chrome browser while working with Google Tag Manager because there is a whole bunch of other useful GTM extensions.
Once you have installed Tag Assistant, a blue icon will appear in the top right corner. Click it while being on the website (that you’re working on) and then click Enable.

Refresh the page. Now the Tag Assistant (TA) starts to monitor what’s happening on the page. Complete the purchase once again and take a closer look at the TA icon, a number should appear there. Click the icon once again to see the list of Google’s products installed on your website (GTM, GA, Optimize, etc.).

Click Google Analytics for more information. In the screenshot below there is one Pageview request (because I have a Pageview tag fired) and some mysterious Other Request.
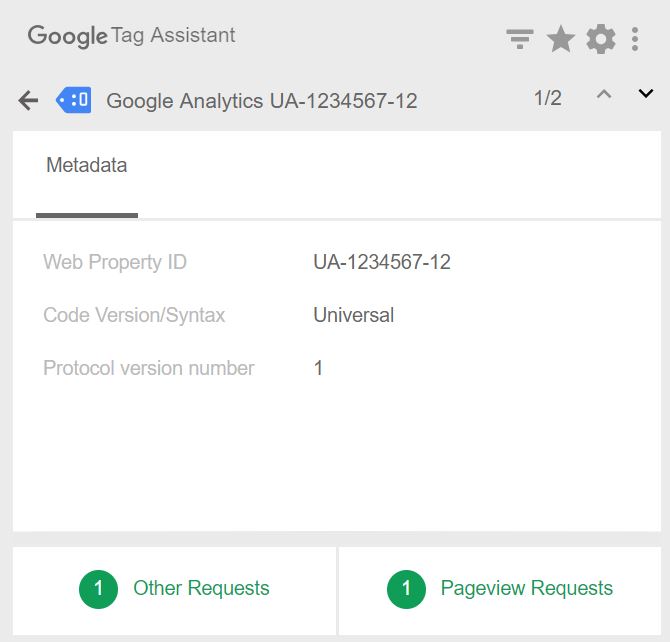
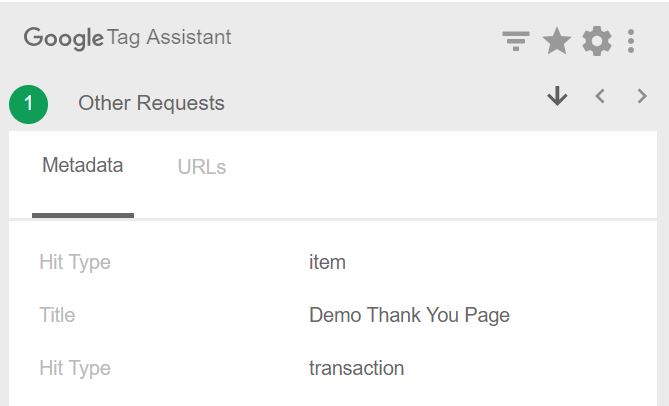
Let’s click that Other Requests. Bingo! Here’s our transaction sent over to Google Analytics. A green circle indicates that everything was sent properly. Yellow or red colors would have meant that something’s not right.
If you want to learn more about Tag Assistant and how to properly use it, read this guide.
Let’s do an additional test. This time with another extension called GA Debugger. Install it and click its icon so that the badge “ON” appears.
![]()
![]()
Then enable your browser’s Developer Console (here’s a quick tutorial how to do that), refresh the page, and complete the purchase once again. You will start seeing some unusually looking information appearing in the console. GA Debugger is checking the website and printing all the GA-related information to the console (so that you can check whether everything is working properly).
First, keep looking for the hitType: transaction. This is the purchase that was sent over to Google Analytics. ec:id, ec: revenue and ec:tax are data points which were transferred along.
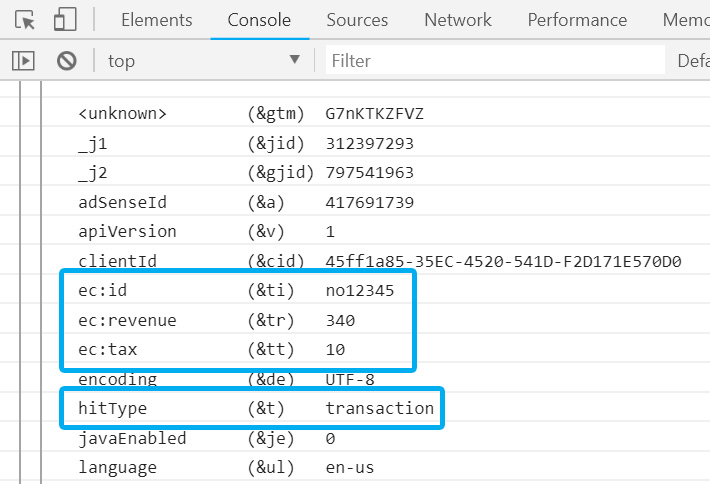
Scroll down and keep looking for another block of data containing product information (if a developer has pushed the product data to the Data Layer).
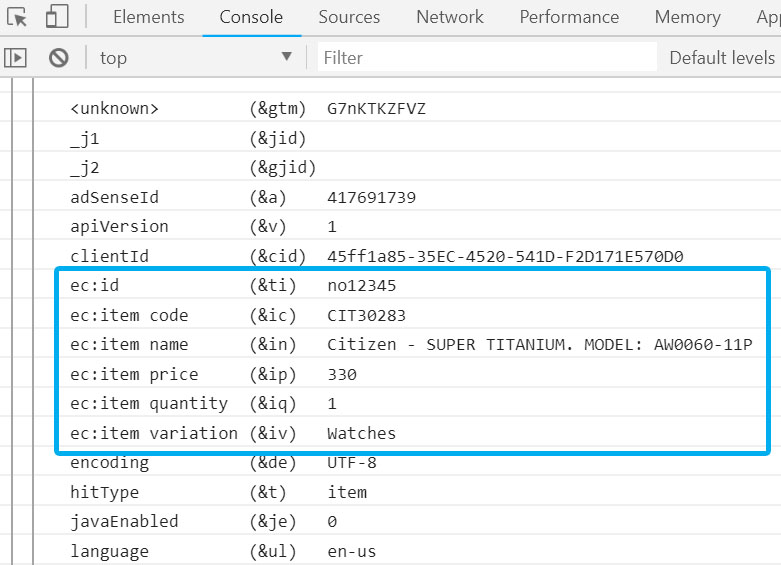
Keep navigating the console and see if any errors are displayed. If yes, fix them, consult with a developer or use other means to find the solution.
If no problems are found, congratulations! If you have just implemented the Google Analytics Ecommerce tracking with Google Tag Manager.
However, there is one more thing that can improve the quality of your Ecommerce tracking with Google Tag Manager. Continue to the next chapter.
Prevent Duplicate Transactions
Have you noticed what happens if a customer lands on a “Thank you” page and refreshes it after a while? Most probably, the GA Transaction tag will fire once again. What does it mean? Duplicate orders and inflated numbers in your Ecommerce reports.
How can this be prevented? There are mainly two options:
- You ask a developer to fire the dataLayer.push code only once. If the page is reloaded, that shouldn’t be done again. This solution is the most robust.
- If the previous option isn’t possible, Simo Ahava has posted a solution which stores order IDs in the cookie. And when the “Thank you” page is reloaded, GTM will check the cookie. If the cookie already contains the order ID of the current “Thank you” page, the Transaction tag is blocked.
For this solution, you’ll need to do 6 things:
- Create a Data Layer Variable that reads the transaction ID (we already have such data in the Data Layer, we’ll just need to reach it)
- Create a 1st-party Cookie Variable that stores the list of all the transaction IDs that a visitor/customer has completed
- Create a Custom JavaScript Variable that will check whether the transaction ID of the current order is already stored in a 1st-party cookie or not
- Create a Custom JavaScript Variable that stores the transaction ID in a cookie
- Update your Universal Analytics Transaction tag and add the Variable #4 into the field of hitCallback
- Update your trigger that fires a Universal Analytics transaction tag. From now on, it should fire only if the 3rd variable (in this list) does not equal to true. This means that is the transaction ID of the current order is already stored in a cookie, your transaction tag will not fire once again, thus you’ll avoid the duplicate transaction.
#1. Create a Data Layer Variable “Transaction ID”
In your GTM container, go to Variables > New > Data Layer Variable and enter transactionId
![]()
![]()
#2. Create a Data Layer Variable “Transaction ID”
In your GTM container, go to Variables > New > 1st Party Cookie and enter the following settings:
![]()
![]()
#3. Create a Custom JavaScript Variable that checks whether the transaction ID is already stored in a cookie
Go to Variables > New > Custom JavaScript and paste the following code:
function() {
return /(,|^){{dlv - Transaction ID}}/.test({{Cookie - User Transactions}});
}
The code is a bit different compared to Simo’s code because I used different variable names.
![]()
![]()
#4. Create a Custom JavaScript Variable that stores the transaction ID in a cookie
Create one more Custom JavaScript Variable with the following code:
function() {
  return function() {
   var d, expires;
   var cvalue = '';
   // Run the code only if a transaction is found in the data layer
   if ({{dlv - Transaction ID}}) {
     d = new Date();
     d.setTime(d.getTime() + (2*365*24*60*60*1000));
      expires = 'expires='+d.toUTCString();
      // If the cookie already exists, append not overwrite
      if ({{Cookie - User Transactions}}) {
        cvalue = {{Cookie - User Transactions}} + ',';
      }
      document.cookie = 'user_transaction_ids=' +
        cvalue + {{dlv - Transaction ID}} + '; ' + expires + '; path=/';
    }
  };
}
Name this variable CJS – set Transaction ID in a cookie
#5. Update Universal Analytics Transaction Tag with hitCallback
In your GA Transaction Tag, click the checkbox Enable overriding settings in this tag, then click More Settings > Fields to Set and enter hitCallback (case sensitive) and in its Valuefield insert the Custom JavaScript Variable that stores Transaction ID in a cookie.
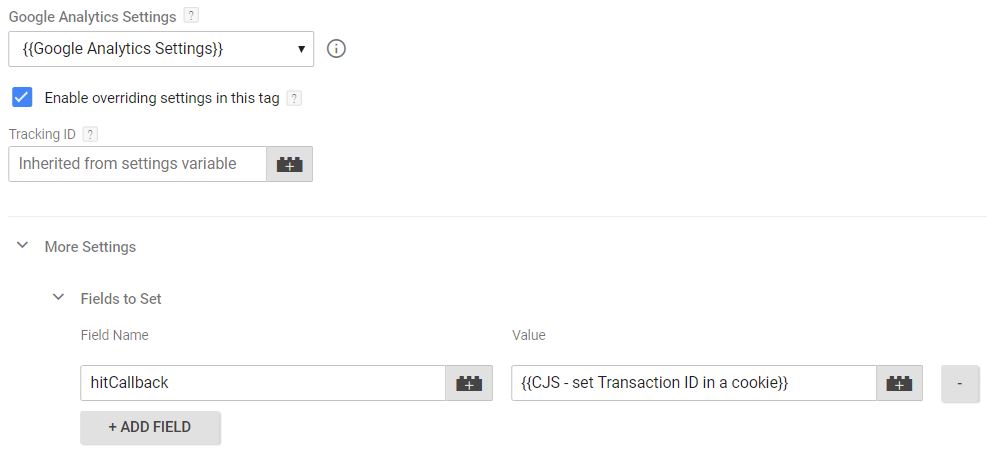
hitCallback is a feature that is activated when a Universal Analytics tag was successfully fired and the data was sent to Google Analytics. When all of this successfully happens, hitCallback feature can invoke a variable that is inserted in its Value. In our case, that variable is Custom JavaScript that stores the transaction ID in a cookie.
In short:
- GA Transaction Tag is successfully activated and sends the purchase data to Google Analytics
- hitCallback activates and invokes our Custom JS variable
- That variable stores the value in a cookie that will be used as an additional condition in our purchase trigger. Continue reading and I’ll explain this.
#6. Update the transaction trigger
Open the trigger that you are using for the GA Transaction Tag and add the following condition: CJS – Transaction ID is in a cookie does not equal true. This means that if the Transaction ID (or the current purchase) is already in a cookie, the transaction trigger will not be activated, thus you’ll prevent the duplicate transaction.
That’s it! Now the testing time has come. Complete one order ==> the Transaction Tag should fire normally. Then refresh the thank you page and check if the Transaction Tag has fired again. This time, it shouldn’t.
The same result can be achieved with customTask too. Simo Ahava has posted another guide that you can also check.
Checking GA Ecommerce Reports
After a while, your sales data will land on Google Analytics Ecommerce reports. In your GA account, go to Conversions > Ecommerce > Overview. Don’t panic if they are still empty. It takes some time for the data to be processed and appear in those reports. Be patient. Normally, that information appears within several hours (usually, even faster). However, if it takes longer, please be patient for up to 24 hours.

If it takes longer, start digging deeper to find what’s causing this issue.
Missing a bunch of Ecommerce transactions?
Once you have successfully implemented Google Analytics Ecommerce tracking via Google Tag Manager, you will need to keep monitoring your reports and compare them with the actual sales you’re getting.
Chances are that you will be missing a portion of transactions. If you are facing such a situation, read this blog post. It can be applied to any analytics platform you’re using to track sales.
Spoiler: you will probably never reach the 100% accuracy but you should definitely try to improve as much as possible.
Google Analytics Ecommerce Tracking with Google Tag Manager: Final words
So there you have it: the guide on Ecommerce tracking with Google Tag Manager. Here are the key takeaways you need to remember:
- A developer or a 3rd party plugin must push the transaction data to the Data Layer (with help of dataLayer.push).
- The dataLayer.push code must be of the exact structure as in the official Google’s documentation.
- Feel free to get rid of optional parameters (like transactionAffiliation or transactionTax) but under any circumstances do not rename the names of parameters or their structure/type. If the type of the transactionID is string (a.k.a. “text”), then it must remain as that. Don’t try to use your own names for the parameters, it won’t work.
- It is recommended to have that dataLayer.push code above the GTM container. If that’s not possible, then place it below and use DOM Ready trigger to fire the transaction tag. You can also ask a developer to add the “event” parameter to the dataLayer.push and then use it as a triggering condition (in the Custom Event Trigger).
- Ecommerce transaction information can be passed to GA with help of the Universal Analytics tag (Tracking type: Transaction).
- To prevent duplicate transactions, store their IDs in the 1st-party cookie and use that cookie to block repeating transactions.
Did I miss anything related to Google Analytics Ecommerce tracking with Google Tag Manager? Let me know in the comments!
52 COMMENTS
Thank you, thank you, thank you!
Great guide! Gives a great overview of the process and makes it so much easier to grasp.
I for one am really curious about the part with the developer's job. Like those functions that dynamically transmit the values for the parameters. (if you have some resources for that also I'd be really grateful).
Also, I was wondering, the code which needs to be placed by the developer above the GTM snippet, it should only be present on the thank you page (if there is one), right?
Thanks so much!
Hey,
Regarding dynamically inserted values: this depends on the programming language that is used in the backend of the website (PHP, Python, JavaScript, etc.), therefore there is no single universal way of doing that.
As for the second question, yes, the code snippet must be added above GTM container on the "Thank you" page.
Hi,
Really loved the step by step explanation. However, I am facing one issue - I am getting "Message" multiple times like 5 times or 6 times or even 12 times as long as I stay on the thank you page. Why would it happen?
You should consult a developer regarding this. There's something wrong on his/her side.
A message is a dataLayer.push but without an "event" parameter, so my guess would be that a website/application is constantly sending dataLayer.pushes.
I'd recommend asking a developer to fix this. If that's not possible, read this guide how to avoid duplicates - https://www.simoahava.com/gtm-tips/prevent-repeat-transactions/
But once again, I highly recommend fixing the issue with developer's help.
Does it works with new gtag.js tag or only for analytics.js users?
This for Google Tag Manager + GA. And if you have implemented GA via GTM, the difference between gtag.js and analytics.js does not matter. Because in this case, a developer is pushing the data to the data layer and then that data is passed to Google Analytics via GTM.
A great article as always Julius. It would be great to see the Enhanced eCommerce Post, however, I'd also love to get your thoughts on best practice implementation for Shopify stores?
I haven't worked with EE on Shopify, but I've heard people talking that this plugin https://apps.shopify.com/gtm-datalayer-by-elevar is very useful. It passes EE data to the Data Layer and then you can import their ready-made container.
Awesome tips and step by step explanation on Ecommerce Tracking with Google Tag Manager.
Really appreciate the way you have written and explained.
I am really gonna apply this for the future.
Good work..!!
Would be helpful if you could update the guide with implementing multiple currency handling - tearing my hair out with it as Japanese Yen orders being reported in GBP
Seems to be plenty of advice online but none use the same method and cannot get any to work
Good idea, Serge. I'll update this GA Ecommerce guide right away.
whats the difference between using the data layer and following the tag manager recommendation vs sending the event directly via gtag? I mean, why add to the data layer and check if its above or below the GTM code etc when you can send it from that point directly?
can we not use a combination of GTM tags for standard dynamic content (minimize clutter) and gtag for ecommerce (since code will be added anyway)?
Thanks.
It's better to have everything in Data Layer because you might also want to send ecommerce data (like order total) to other tools (facebook pixel, etc.)
And in general, I don't see any benefit of having part of the tags in GTM, while some tracking is hardcoded. It's not that flexible.
Thanks for the answer. While GTM is the most obvious route we are checking our options. From your examples above GA & GTM scripts are both available for usage. Were moving to use GTM completely. Is there any reason to keep GA script specifically?
Thanks.
What do you mean by saying "keep GA script specifically"? If you plan to fully move to the Ecommerce Tracking via GTM, there will no GA script remaining on the page. DataLayer code is not a GA script. It's specifically for the data layer and for GTM.
"If you plan to fully move to the Ecommerce Tracking via GTM, there will no GA script remaining on the page. " Right , ahh its just the Google tag assistant extension example above is showing both scripts for GA and GTM running. I was wondering if I misunderstood anything.
Thanks very much
Fabulous article,
I am having one issue with my implementation. I have an insurance website that output quotes to users. The value/price of the quoted service is available from the quote page, but does not get passed to the thank you page after purchase.
How can I pass this value across to enable me to see the true value of the purchases transacting on the site?
Do you have access to a developer? The most robust solution would be to ask a developer to make sure that the data layer on the "Thank you" page also gets the service price available.
Great article!
I implemented on my website and it is working but not for all payments methods. Im using prestashop 1.6, and the transaction tracking works with COD and bank transfer payments methods however for the payments with credit card the user is redirected to an external website that validate the transaction and in this cases the transaction are not reported to GTM.
Do you know how to work with this case?
Thanks
Cooperate with developers and make sure that a customer is redirected after a successful payment back to your website. Then ask him/her to push the transaction data to the data layer.
That would be the best.
Thank you for this excellent guide. Please produce one for EE too!
I was thinking about this but Simo Ahava did a great job producing a guide on EE, therefore, I'm not sure there is a place for another EE guide :)
I am grateful to you. Nice explanation.
Hey Julius - really great article. Thanks for being so thorough with it - I tried to implement everything with standard tracking just as you have outlined - but the only problem I'm finding is that I'm not seeing "other events" being fired to google analytics when using the tag assistant. I have more details here https://stackoverflow.com/questions/56564810/google-tag-manager-not-sending-ecommerce-data-to-analytics-standard-ecommerce - with more screenshots and info. Anything you can think of why my ecommerce data isn't sending to GA?
My guess is that dataLayer.push with ecommerce data contains some errors.
Thanks for the response - here is what the dataLayer.push looks like - https://i.imgur.com/yACDjfb.png - as far as I can tell, no errors?
transactionProducts is empty. That's you problem
Apologies, I must've grabbed a test order without a product. Here is what it looks like with actual product data there in transactionProducts: https://i.imgur.com/fbq0rSW.png
The only thing I notice is in the Tag Manager debugger under "Page View" our ecommerce tag says "Still Running" for some reason - https://i.imgur.com/OJEXxNH.png
Appreciate your advice on this
Then you should read this https://www.analyticsmania.com/post/google-analytics-tag-in-gtm-still-running/
Thank you so much for that resource! Manually entering in my Analytics ID into the tag itself fixed that problem and now I see it firing through google tag assistant. Thanks so much for your assistance!
Do you have a guide for those who have GTM connected already but want to add this Enhanced ECommerce to our account in GA? I believe our last marketing firm used a plugin and we don't want to use a plugin. We just want the code we need to add to a custom event.
However, I already have a Google Univ Tag installed. Do I create another one just for this event? That's where I'm getting confused. I don't add to the existing GAU? Correct?
Hey, no I don't have a guide about EE. You can read this https://www.simoahava.com/analytics/enhanced-ecommerce-guide-for-google-tag-manager/ (there are A LOT of things you need to know) and this is one of the most complex things to set up in GA. If you feel confused about that guide, I also explain this topic in my Intermediate GTM course. There is a module dedicated just to GA Enhanced Ecommerce implementation where I teach how to prepare EE code snippets, how to cooperate with developers, what are best practices, etc. In the end, you will know how to own a process of the custom EE implementation.
After MONTHS of searching for the right solution for transaction processing, this worked like a charm! Thank you! Now, if I can only figure out how to track transactions with a 3rd party (AXS) where I am unable to get access to the backend.
If you cannot get access to the backend or place your tracking codes, I'm afraid you're out of luck.
You need to find a way to have developers to either place your GAl or GTM code, or have them to directly send transactions to GA via a thing called Measurement Protocol.
Julius,
Thank you for the insight. I am adding this to my to-do list.
Cheers!
I've read and watched too many guides on how to set up eCommerce tracking, and I found your article which helped me a lot. This is a great guide with detailed points and steps with easy and clear language(I mean codes and confusing names). Thank you for doing such kind of great help to others.
Hey Julius, I works. You solved my biggest problem. Thanks a lot for this post :)
I thank you so so so so much!
This is the first post about events (purchase/ Thank you page) I can use because for me it´s not possible to edit the data layer code (wix store). Now I have changed the trigger into "DOM is ready" and it works!
Thank you so much!
Best regards,
Tim
Hey Julius. I am doing researches two weeks from now and can't find a solution to this problem I have. I need to track transactions of products in a cms myfactory (based in Switzerland). What I don't understand is that do I need to find a developer who can implement some js or PHP into fields to get data dynamically or do I need to implement the dataLayer with corresponding data of the product every time a transaction is made? Thank you in advance.
Hi, you need to find a developer who will dynamically push the transaction data to the Data Layer. He/she will need to code additional functionality to your CMS.
How can I check if the 'Cookie - User Transactions' cookie has been set correctly? I thought I could check this with EditThisCookie extension in chrome, but I don't see any result.
Should this cookie be set when you enter the website or only on the thankyou page?
Yes, editThisCookie should show the cookie. If you don't see it, then the cookie was not set. You should spend more time testing/debugging your setup.
Thank You so much for the explanation of the 3 possible scenarios. It helped much. Great article.
Great article!!!
Your post is saving lives, and time!!!
Thank you!
Thank you for always saving me so much time, Julius!
Question: I have a hotel client that generates separate confirmation numbers (transaction IDs) for each room booked, even if it is booked in the same transaction. Here is how the transactions IDs come through in the dataLayer:
{
gtm: {start: 1605828982453, uniqueEventId: 1905},
event: 'gtm.js',
transactionId: '[2116276951,2114095176]',
transactionTotal: '$147.93',
transactionTax: '9.35',
transactionProducts: [
{
sku: '307',
name: 'Phoenix',
category: 'Metro',
price: '69.29',
quantity: '2'
}
]
}
How can I break these apart?
Hi Julius,
//added some details about the Angular website
I'm trying to configure the purchase event UA tag for an Angular site that has a /thank-you page.
At the moment, the dataLayer has a purchase event and on purchase, it shows in a Chrome extension [datalayer checker] with the transaction/product details but not in GTM preview mode. As a result, I can't fire the purchase event in GTM.
With a /thank-you page, is it still possible to use a Custom Event "purchase" as the trigger? I'm also wondering if Angular might be complicating it as on subsequent page loads, there is no full round trip and the GTM script is already loaded on the first page of the session and all other pages.
Would you have a view on possible issues/solutions? Thanks.
I've also opened a support thread here with some details.
https://support.google.com/tagmanager/thread/124782877/datalayer-for-e-commerce-purchase-event-shows-in-chrome-extension-but-not-in-gtm-preview-mode
I installed the PlugIn GTM4WP on my wordpress shop with woocommerce.
It will (hopefully) create a data layer with product, addtocart, etc. informations.
But how I can work with it in GTM? And how can I redirect these informations to Pinterest?
Hi, maybe this will help https://www.analyticsmania.com/post/use-enhanced-ecommerce-data-in-pinterest-pixel-with-gtm/
If you need a better understanding about GA ecommerce setup in general, then take a look at this course https://www.analyticsmania.com/courses/intermediate-google-tag-manager-course/
Hi Julius,
I have set all correctly, but I'm not seeing the item names on GA4, just the value, currency and transactionId.
My datalayer have the "item_id" and "item_name" with another names and I don't know how to pull that with the GA4 event
Hi, I want to capture availability of item i.e. whether product is In stock or out of Stock,so I crated custom dimenssion as availability so what will be the scope for that Event or User
GA4 currently does not support custom iten scoped dimensions
Hi Julius,
Is it possible to migrate a 'transaction set-up' to GA4 without the help of a developer? So I don't have a purchase event, I only have the transaction data upon a pageview of a thank you page.