
September 16, 2017
Track When Element Is Visible on the Screen with Google Tag Manager
Several weeks ago, I noticed a question in GTM Google+ community asking if it’s possible to track when a particular website element is visible on the screen. There were several hints offered but no ready-made solution for non-developers like you (probably) and me. So today, I’m going to show you a custom listener which will track particular website elements (you’ll have to configure it) and fire a dataLayer.push event when that element/section comes into the browser window view.
Disclaimer: since this blog is entirely dedicated to non-developers (and I am one of them), I wouldn’t be able to write this listener by myself. So I asked my coworker who’s awesome at JavaScript to write one this for me. I just gave him clear instructions:
- I must be able to configure which element(s) I want to track with CSS Selectors.
- I want to track when an element either shown or hidden.
- I don’t want to spam my Google Analytics reports. If a particular element has already appeared in the browser window, I don’t want the shown event to fire once again. After the page is reloaded, the shown event can fire once again.
- I want to pass some additional data with the Data Layer event after a particular element is shown/hidden.
- This Element Visibility listener must rely only on scrolling. If a particular element appears on the screen with some additional effects (e.g. carousel), it won’t be tracked.
- And, finally, I gave the developer a sample dataLayer.push event code snippet that I wanted him to fire.
window.dataLayer = window.dataLayer || [];
     window.dataLayer.push({
       'event': 'elementVisilibity', // the value is always the same
       'visibilityStatus': 'shown', //  possible values: 'shown' or 'hidden'
       'elementAttribute': 'attributeValue' // some unique value

Requirements
Keep in mind that there are several requirements for this tracking method to work.
- Auto-event listener heavily relies on scrolling. When a visitor scrolls down and starts seeing a particular website element, a dataLayer.push event will fire.
- The desired website element must be static. If you’re planning to track a moving carousel and want to fire an event when the 2nd slide appears on the screen, this blog post won’t help you. Actually, I haven’t tested such custom situations but I’m guessing it won’t work.
In other words, when a visitor scrolls down to a particular website element (which is always in a certain place) and that element comes into the browser window view, a Data Layer event will dispatch. We’ll use that event as a trigger to fire a Universal Analytics tag.
Keep in mind that there is still a chance that this listener won’t work on some websites as they use different techniques to load website elements. And if a page contains lots of fancy animations to load various website sections, this technique will definitely won’t work (but you can still try your luck).
Configuration of An Auto-Event Listener
Just like every custom tracking solution, this one starts with a listener. It’s a JavaScript code snippet which keeps looking for particular elements and when they appear on the screen. If you’re not a developer, feel free to skip first ~110 lines of code. The important part (for you) starts at line: 112.
<script>
 (function(w, d, ns) {
  var _ns = "_" + ns;

  w[_ns] = w[_ns] || {
   elements: [],
   addElements: function(selector, onShow, onHide) {
     var elements = d.querySelectorAll(selector);

     for (var i = 0; i < elements.length; i++) {
      w[_ns].elements.push({
        element: elements[i],
        onShow: onShow,
        onHide: onHide,
        wasShown: false,
        wasHidden: false
       });
      }

      w[_ns].checkElements();
     },
     checkElements: function() {
      for (var i = 0; i < w[_ns].elements.length; i++) {
       var rect = { top: 0, left: 0 },
         isVisible = false;

         if (typeof w[_ns].elements[i].element.getBoundingClientRect === "function") {
         rect = w[_ns].elements[i].element.getBoundingClientRect();
      }

      if (rect.top + w[_ns].getWindowOffset() > w[_ns].getWindowOffset()) {
       if (rect.top + w[_ns].getWindowOffset() < w[_ns].getWindowOffset() + w[_ns].getWindowHeight()) {
        isVisible = true;
       }
      }

      if (rect.top + w[_ns].getWindowOffset() + w[_ns].elements[i].element.offsetHeight > w[_ns].getWindowOffset()) {
       if (rect.top + w[_ns].getWindowOffset() + w[_ns].elements[i].element.offsetHeight < w[_ns].getWindowOffset() + w[_ns].getWindowHeight()) {
        isVisible = true;
       }
      }

      if (isVisible) {
       if (!w[_ns].elements[i].wasShown) {
         w[_ns].elements[i].wasShown = true;

          if (typeof w[_ns].elements[i].onShow === "function") {
           w[_ns].elements[i].onShow(w[_ns].elements[i].element);
            }
           }
          } else {
           if (w[_ns].elements[i].wasShown) {
            if (!w[_ns].elements[i].wasHidden) {
             w[_ns].elements[i].wasHidden = true;

              if (typeof w[_ns].elements[i].onHide === "function") {
               w[_ns].elements[i].onHide(w[_ns].elements[i].element);
              }
             }
            }
           }
          }
         },
         getWindowOffset: function() {
          return (w.pageYOffset || d.documentElement.scrollTop) - (d.documentElement.clientTop || 0);
         },
         getWindowHeight: function() {
          return w.innerHeight || d.documentElement.clientHeight || d.body.clientHeight;
         },
         bindWindow: function() {
          if (typeof w[_ns].onWindowResize !== "function" || typeof w[_ns].onWindowScroll !== "function") {
           w[_ns].onWindowResize = function() {
            w[_ns].checkElements();
           };

         w.attachEvent ? w.attachEvent("onresize", w[_ns].onWindowResize) : w.addEventListener("resize", w[_ns].onWindowResize, false);
          w[_ns].onWindowScroll = function() {
           w[_ns].checkElements();
          };

         w.attachEvent ? w.attachEvent("onscroll", w[_ns].onWindowScroll) : w.addEventListener("scroll", w[_ns].onWindowScroll, false);
         }
        }
       };

         w[ns] = w[ns] || function(selector, onShow, onHide) {
          if (d.readyState === "complete") {
           w[_ns].bindWindow();
            w[_ns].addElements(selector, onShow, onHide);
          } else if (d.attachEvent) {
            d.attachEvent("onreadystatechange", function() {
             if (d.readyState === "complete") {
              w[_ns].bindWindow();
               setTimeout(function() {
                w[_ns].addElements(selector, onShow, onHide);
               }, 500);
              }
             });
            } else {
             d.addEventListener("readystatechange", function() {
              if (d.readyState === "complete") {
               w[_ns].bindWindow();
                setTimeout(function() {
                 w[_ns].addElements(selector, onShow, onHide);
                }, 500);
               }
              });
             }
            };
           })(window, document, "watchElements");

   watchElements("ENTER_YOUR_CSS_SELECTOR_HERE", function(element) { //change the CSS Selector
     window.dataLayer = window.dataLayer || [];
     window.dataLayer.push({
       'event': 'elementVisibility',
       'visibilityStatus': 'shown',
       'elementAttribute': element.getAttribute("ENTER_ATTRIBUTE_HERE") //change the attribute (optional)
     });
   }, function(element) {
     window.dataLayer = window.dataLayer || [];
     window.dataLayer.push({
       'event': 'elementVisibility',
       'visibilityStatus': 'hidden',
       'elementAttribute': element.getAttribute("ENTER_ATTRIBUTE_HERE") //change the attribute (optional)
     });
 });
 </script>
Let’s take a closer look. The entire script (line 1 – 110) will be looking only for particular elements so we need to configure it precisely. In line 112, instead of enter_here_your_CSS_selector, you’ll have to enter a CSS Selector. In short, CSS Selector is a pattern that is used to find a particular element (or elements) on the page.
For example, you want to track an element of which ID is thisAwesomeButton, your CSS Selector will be #thisAwesomeButton.
If you want to track images which have an image-large CSS Class and are descendants of the block with ID veryImportantSection. In that case, the CSS selector will be div#veryImportantSection img.image-large.
Yes, I know that this is advanced for non-developers, but trust me: the more I work with Google Tag Manager, the more I utilize CSS Selectors.
Simo Ahava has posted extremely useful guides (Link 1 and Link 2) teaching how to use CSS Selectors in GTM. Every time a CSS-Selector-related question pops up, I always open one of these guides.
Anyway, back to the configuration of the Element Visibility Listener. First, you need to edit enter_here_your_CSS_selector. If a particular element (which meets your CSS Selector) appears on the screen, a Data Layer event elementVisibility will be dispatched with two additional parameters:
- visibilityStatus. Possible values: shown and hidden. Each status can occur only once (for one website element), meaning that if the element (1) appeared, then (2) hid, and then (3) reappeared again, only two Data Layer events will fire, one “shown” and one “hidden”. But if there are two elements which are tracked, then each element can have two events: “shown” and “hidden” for the 1st element, “shown” and “hidden” for the 2nd. If a page is reloaded, these rules reset.
- elementAttribute. It is an optional but useful parameter which helps you differentiate which element, in particular, was seen. But it needs to be configured additionally.
A quick example. Say, you want to track appearance of all images which meet both conditions:
- CSS class equals to .image
- Images must be descendants of a block with ID veryImportantSection.
Therefore, CSS selector will be div#veryImportantSection img.image-large.
In total, there are 5 images on a page. If a visitor scrolls to the very bottom of the page, he’ll see all five of them. This means 5 identical Data Layer events, but you’d like to differentiate them somehow in Google Analytics reports, right?
Luckily, in our case, every image has an alt attribute with a unique value. Here’s an example:

Alt parameter’s value is Bigcommerce. Let’s turn it into a variable in the elementVisibility Data Layer event, shall we? Actually, it’s pretty easy, just replace enter_attribute_here with alt.
Here’s what a configured code snippet should look like (we’ve edited lines 1, 6 and 13):
   watchElements("div#veryImportantSection img.image-large", function(element) {
        window.dataLayer = window.dataLayer || [];
        window.dataLayer.push({
            'event': 'elementVisibility',
            'visibilityStatus': 'shown',
            'elementAttribute': element.getAttribute("alt")
     });
   }, function(element) {
         window.dataLayer = window.dataLayer || [];
         window.dataLayer.push({
             'event': 'elementVisibility',
             'visibilityStatus': 'hidden',
             'elementAttribute': element.getAttribute("alt")
Save the Custom HTML tag and test it.
Let’s test
Enable GTM Preview and Debug mode, refresh the page we’re working on and scroll down until we see the first image we wish to track. If everything is configured properly, the following event should appear in the Preview and Debug Console:

Event name is elementVisibility, visibilityStatus is shown, elementAttribute is Bigcommerce. If you scroll down even further, the image will disappear from the window and another Data Layer event will be dispatched with visibilityStatus = hidden.
Trigger and Variables
As I have already mentioned in multiple blog posts, by default, Google Tag Manager does not recognize custom events and data layer variables. So if you want to use events as triggers or pass the data to Google Analytics, you’ll need to create a trigger and Data Layer Variables.
First, let’s create two Data Layer Variables:
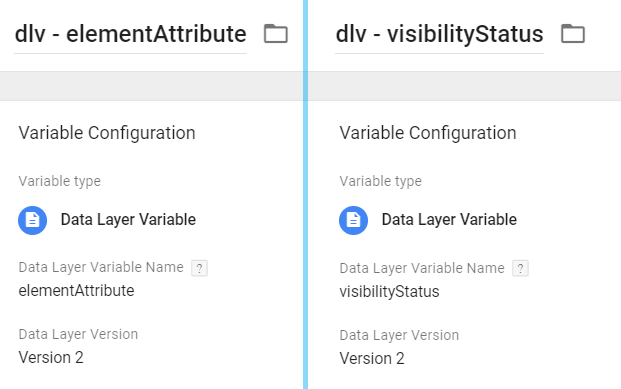
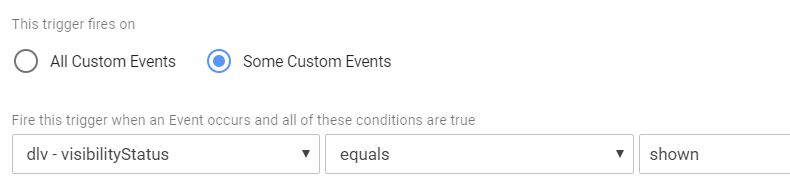
Then, we should create a trigger and set it to fire on all elementVisibility events (including both shown and hidden events).
 Alternatively, we can set the trigger to fire only on shown (or hidden) events.
Universal Analytics Tag
Finally, let’s send the data to Google Analytics. Create a tag with the following settings:
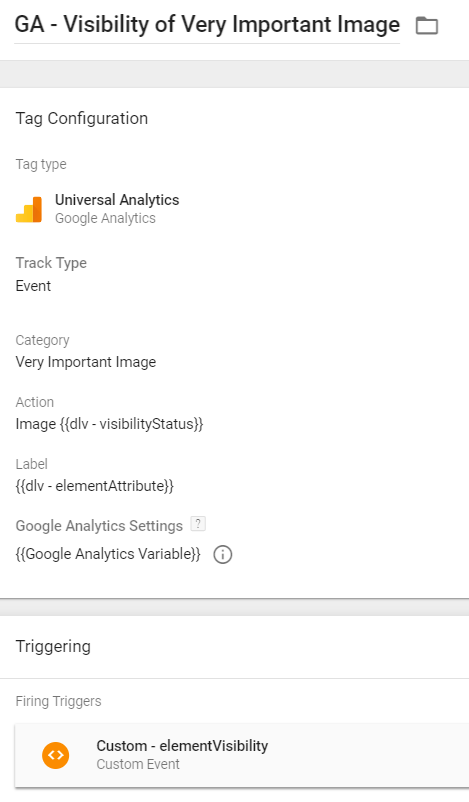
Try to come up with some meaningful title (rather than Very Important Image). This one’s just an example 🙂 By the way, if you’re not sure what Google Analytics Variable is, read this tutorial.
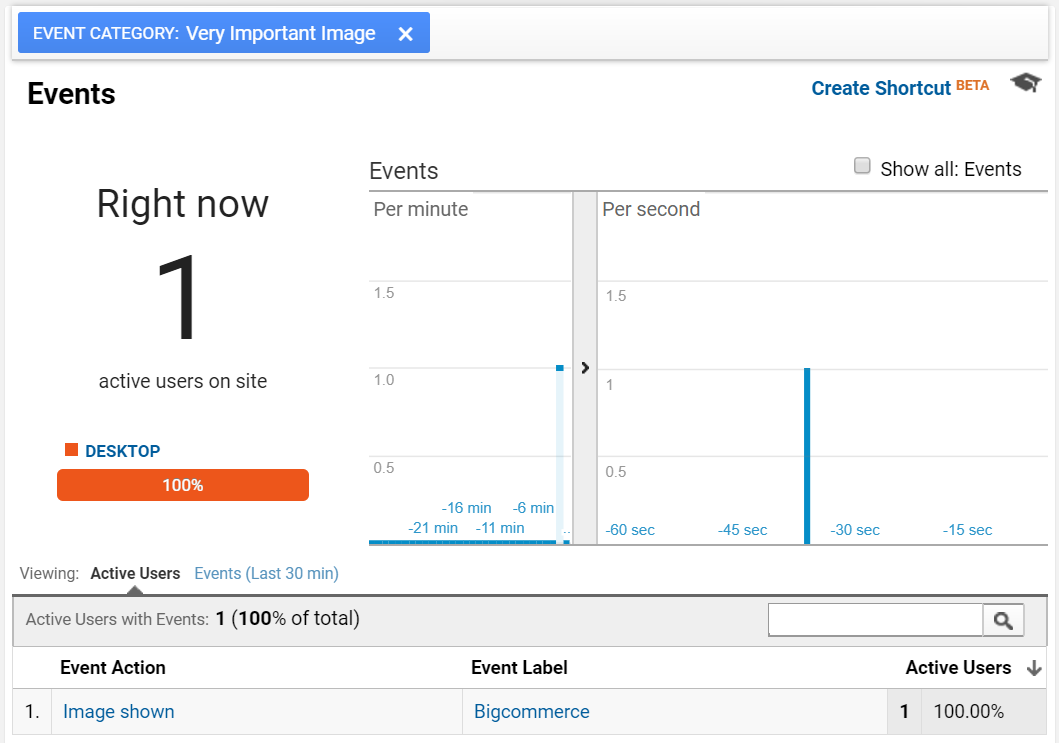
And don’t forget to test this implementation with Google Analytics Real-time reports.
How to Track iF Element is Visible on The Screen with GTM: Conclusion
Yet, another GTM tutorial has come to an end. In this one, I’ve explained how to track whether a particular element is visible on the screen. All you need to do is:
- Create a Custom HTML tag with Element Visibility listener.
- Configure it with CSS selectors (follow Simo’s tutorials and you’ll succeed).
- Optionally, you can fetch the value of element’s attribute and turn it into a variable which can be further passed to Google Analytics.
Keep in mind that in some websites elements might be loaded a bit differently, thus there’s a chance that this Element Visibility listener won’t work. Anyway, I suggest giving a shot, maybe you’ll find it useful.
7 COMMENTS
Thank you. I tried this to track the success message shown after the newsletter subscription. It worked for some pages especially start with '/contact' page, but
It could not work for most of the pages of the site.
What is the issue for that? Is that an issue with the site?
Hi, is that element same on all pages?
Anyway, Google's team have released a more robust solution how to track appearance of elements. You should try it - it's called Element Visibility Trigger. You could try it - https://www.simoahava.com/analytics/element-visibility-trigger-google-tag-manager/
It will appear as a success message on all pages if the subscriber successfully subscribe the newsletter. In all the pages we can identify it with the same CSS selector.
Anyway thank you for your help. I will try the Trigger. Thank you so much.
It is working with the Element Visibility Trigger. :-)
Thank you.
You're welcome!
I would like to create a tag that checks if an element is visible and fires an event if it is not visible. How can I do that?
Hey Julius, big fan of your blog and what you do here.
I am looking to use and modify your solution to track triggers when a page element (card, directory data) is viewed based on scrolling.
What I was looking for is - if its doable, to find what card is being viewed and based on that to position them for conversion purposes.
Will custom Class or ID for each card work with your setup?