
March 24, 2020
Track Accordion Clicks with Google Tag Manager
Accordions might be useful when you want to present content in a more structured way. Usually, website owners use them for sections like FAQ (frequently asked questions) where people can just quickly skim the list of questions and if they find something useful, they click it to see the answer.
In today’s blog post, I’ll show you several examples of how to track accordion clicks with Google Tag Manager.
By the way, accordions are also sometimes known just as collapses (at least that’s what they are called in Boostrap).
Before we continue, here’s a quick disclaimer. There are no standards for how accordions are coded. That totally depends on developer’s imagination (or the framework he/she is using).
Therefore, the methods I’ll show you below are just examples. They are not universal. My goal in this blog post is to give you some inspiration about how to tackle similar issues.
Note: this blog post teaches how to track events with Universal Analytics. If you want to get familiar with event tracking in Google Analytics 4, you can also refer to this blog post.

Table of contents
- Different accordions, different ways to track
- What exactly are we going to measure?
- Case #1: Only label is clickable
- Case #2: A row/title of the accordion consists of more clickable elements
- #2.1. Requirement
- #2.2. The Solution
- #2.3. Polyfill (Custom HTML tag)
- #2.4. Custom JavaScript variable No.1 – Find the correct element
- #2.5. Custom JavaScript variable No.2 – Accordion section title
- #2.6. Test the variable
- #2.7. Update the click trigger – Option #1
- #2.8. Update the click trigger – Option #2
- #2.9. Google Analytics Tag
- #2.10 Test
- #3. If it is possible to distinguish when the element is collapsed, do this
- Looks complex?
- Final words
Different accordions, different ways to track
Just as I mentioned at the end of the introduction, accordions can be coded in different ways. Consequently, there are different approaches on how to track them.
In this blog post, I’ll show you two examples of accordions:
- Where only text is clickable

 (and after you click it, the section is expanded)
 - Where multiple elements are clickable (label + icon)

What exactly are we going to measure?
If you have, say, 20 items in the accordion list that can be clicked, you would probably be interested in which sections are clicked the most. And that is exactly what we are going to measure.
Our goal is to send an event with the click text once the accordion element (that expands/collapses) is clicked. By sending the text value, we will be able to know which accordion list items are clicked the most.
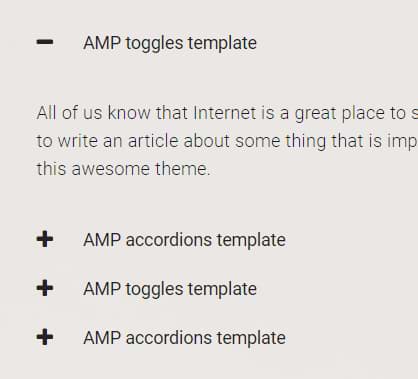
Case #1: Only label is clickable
Here is an example of the accordion that I have in mind. Only a text that is clickable. If you click anywhere on the background of that button, section, nothing happens.

If, however, you click anywhere and it expands, then skip to the next chapter where I explain how to deal with multiple clickable elements.
#1.1. Enable click-related variables
If you haven’t yet, go to GTM > Variables > Configure (in the Built-in Variables section) and enable all click-related variables (by clicking checkboxes).

#1.2. Click Trigger
GTM offers two click-related triggers, Just Links and All Element Clicks. Which one should you choose? That depends on how the accordion was coded. Usually, Just Links trigger does not work in such situations.
That’s why I work with the All Element Clicks trigger in such cases.
In GTM, enable/refresh the debug mode and check what happens after you click any element on a page. If you don’t see Click event in the preview mode, this means you have no active click triggers on a page.
In that case, go to Triggers > New > Trigger Configuration > All Element Clicks trigger and save the trigger. Enable or refresh the preview mode, then refresh the page where the accordion is located and click it. The click event should appear.
Now, do the following:
Click on the title within the accordion
Then click anywhere on the background in that accordion (but you must click the background of the area that usually expands the section.
In GTM preview mode, click the Click event (that appeared when you clicked the title of the section) and go to the Variables tab.
Do you see the proper text in the Click Text variable? I mean, do you see the title of that accordion section in the Click Text variable? If yes, continue reading this chapter. If not, then jump to Case #2 of this guide.

Now, choose the 2nd Click event that appeared when you clicked on the background of the accordion button that expanded the section. What is the value of the Click Text variable? If it is undefined, skip to Case #2 of this blog post.
If in both cases, the Click Text variable contained the proper value (that is the title of that accordion section), implement the following steps.
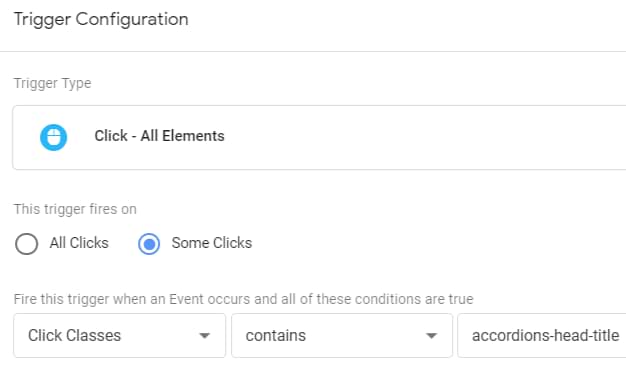
#1.3. Update the click trigger
Now, it’s time to update the trigger. Remember those two Click events that I described in the previous chapter of this blog post? (where you had to check the Click Text variable).
Now, do the same thing but check the Click ID or Click Classes variable, instead.
If both clicks had the same (or similar) Click IDs or Click Classes, then you could use them for the trigger.
In my example, both events contained the same value of Click Classes (the value of it is accordions-head-title), therefore, I decided to go with that.
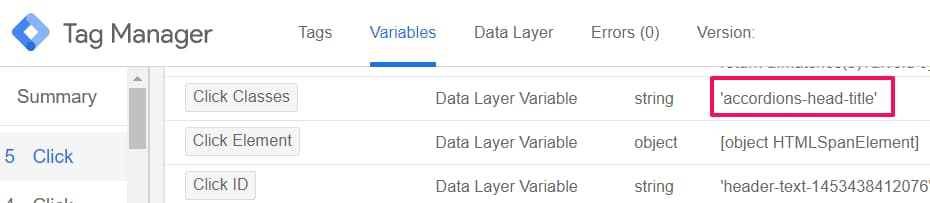
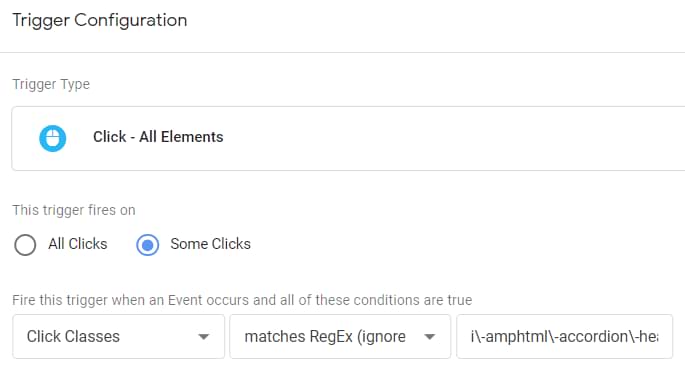
Go to that All Element Clicks trigger you have created in the previous chapter and update the condition. In my example, I switched to Some Clicks and then entered the following condition:
Click Classes contains accordions-head-title
#1.4. Google Analytics Tag
Now, let’s send the accordion click as an event to Google Analytics. In GTM, go to Tags > New > Universal Analytics and enter the following configuration:
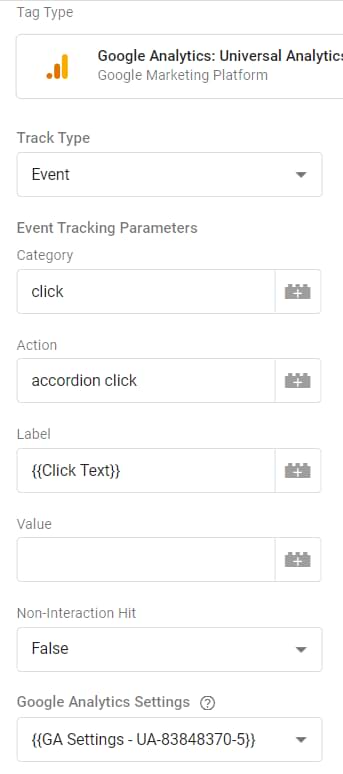
Then assign the Click trigger we’ve updated in the previous chapter.
As a result, when a visitor clicks a website element of which Click Class is accordions-head-title, a Google Analytics Tag will fire and will send an event to Google Analytics. With that event, we will also send (automatically) the Click Text (the title of that accordion section).
#1.5. Let’s test
Save all the changes in your container. Refresh the preview and debug mode, then refresh the page where the accordion is located. Click the title of any title in the accordion. You should see the Click event on the left side of the debug console. Click it and check whether your GA tag has fired.
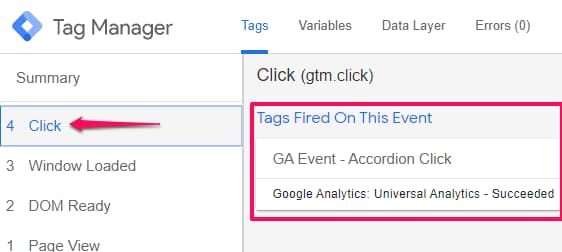
Then click on the background of that title in the accordion, then click the Click event and check whether the GA tag has fired. Then try to click other non-related website elements and check whether your GA tag is not firing (because it should not).
Once you make sure that your tag fires only when it is supposed to, go to Google Analytics > Realtime > Events and check whether the events is visible there.
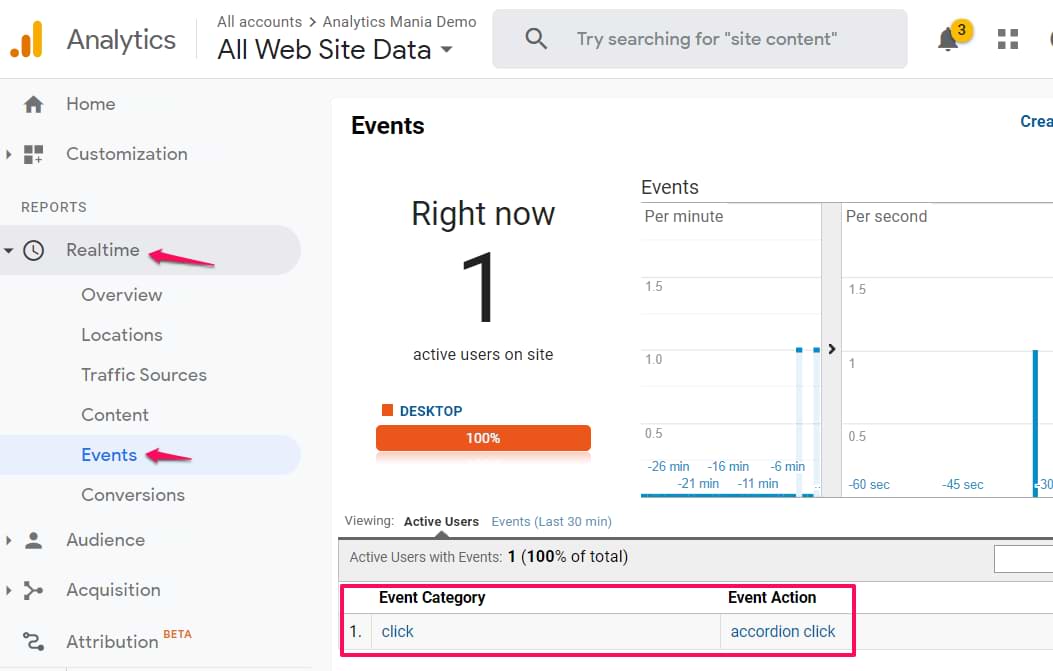
After a while, your events will also appear in standard GA reports (Behavior > Events > Tops events).
After everything is working and tested properly, publish the container (Click the Submit button in the top-right corner) and then complete all the steps.

Case #2: A row of the accordion consists of more than one clickable elements
This case is more common (at least based on my experience). Each row of the accordion contains not only the title that can be clicked but also other elements, e.g., an arrow or a plus icon.
![]()
![]()
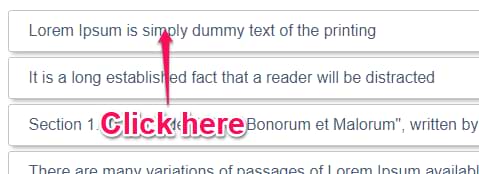
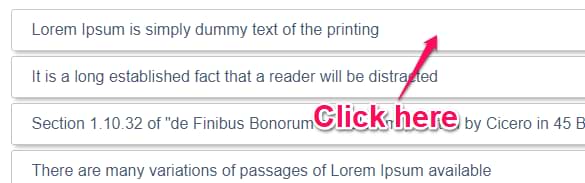
Of you click the arrow, the section will also expand, however, the value of the Click Text variable will be undefined.
And that is what makes this challenge more tricky. With Google Tag Manager, we will try to somehow return the Click Text of the expanded section even if the clicked element contains no text whatsoever.
#2.1. Requirement
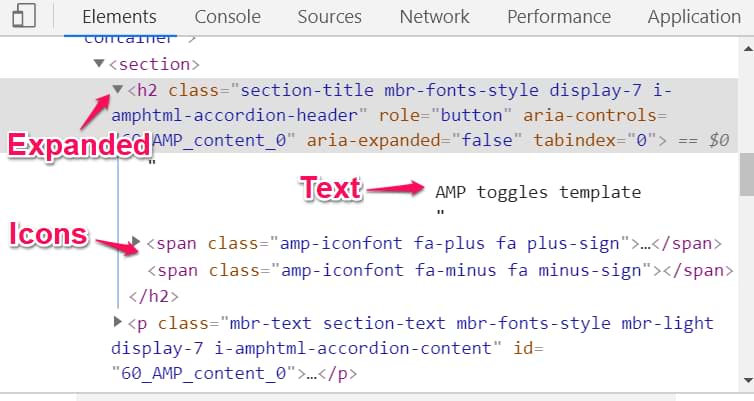
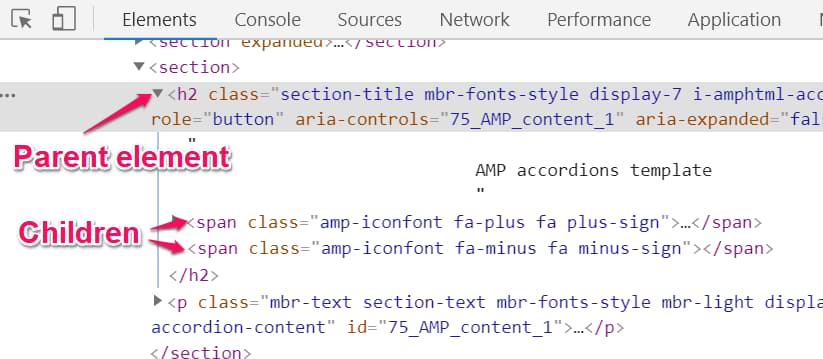
This method will work of all other clickable elements (that expand the section) are children of the section’s title that we want to access. Let me illustrate this.
In this example, the part that expands the accordion section is a Heading 2 (h2). I know that because I did the right-click on that title and then chose Inspect Element.
Once I expanded it, I see multiple elements:
- The text
- Icon (it can be either “plus” or “minus” depending on whether the section is expanded or collapsed).
In my example, all those elements are direct children of the main h2 element.
If your case looks similar (in terms of hierarchy, the following solution will work properly).
#2.2. The Solution
The credit for this solution goes to Simo Ahava who wrote this awesome piece. I have adapted it (and made some slight changes specifically for this case, therefore, use code snippets from my blog post to save some time and headache).
#2.3. Polyfill (Custom HTML tag)
Not all browsers support this solution by default, therefore, we need to create a Custom HTML tag that solves this. Copy the code below, create a new Custom HTML tag, paste the code and fire the tag on All Pages. Do not change anything in that code.
<script>
  if (!Element.prototype.matches) {
    Element.prototype.matches =
        Element.prototype.matchesSelector ||
        Element.prototype.mozMatchesSelector ||
        Element.prototype.msMatchesSelector ||
        Element.prototype.oMatchesSelector ||
        Element.prototype.webkitMatchesSelector ||
        function(s) {
            var matches = (this.document || this.ownerDocument).querySelectorAll(s),
                i = matches.length;
            while (--i >= 0 && matches.item(i) !== this) {}
            return i > -1;
        };
  }
</script>
#2.4. Custom JavaScript variable No.1 – Find the correct element
Then go to Variables > New (in the User-defined Variables section) > Custom JavaScript and paste the following code (do not change anything in it):
function() {
  return function(target, selector) {
    while (!target.matches(selector) && !target.matches('body')) {
      target = target.parentElement;
    }
    return target.matches(selector) ? target : undefined;
  }
}
Important: name the variable “cjs – find closest” (without quotation marks). The name here is super important because we’ll use that name in the next variable.
#2.5. Custom JavaScript variable No.2 – Accordion section title
This variable will return the proper title of the Accordion Section based on the element that was clicked to expand (or collapse) it. This one will require editing and it will be challenging for beginners.
function() {
  var el = {{cjs - find closest}}({{Click Element}}, 'ENTER YOUR CSS SELECTOR HERE');
  return typeof el !== 'undefined' ? el.innerText : undefined;
}
There are several important things here:
- Make sure that your Custom JavaScript variable No.1 is called cjs – find closest. If you used a different title, update the abovementioned code accordingly
- Make sure you have enabled Click Classes variable in your GTM container (that is a built-in variable)
- You will need to enter the CSS Selector that will pick the accordion section title (instead of ENTER YOUR CSS SELECTOR HERE). This one will be a tough task if you are not familiar with CSS Selectors.
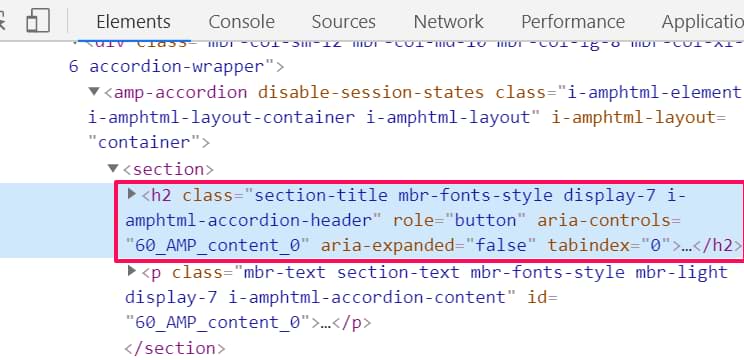
Let’s take a look at my example. I do the right-click on the accordion section title and then choose Inspect Element. This is the element that I’m interested in.
Its class is section-title mbr-fonts-style display-7 i-amphtml-accordion-header.
The i-amphtml-accordion-header looks like a good way to distinguish any random element from the accordion title.
Let’s use this and prepare our CSS Selector. In CSS, a class always starts with a dot in front of it.
.i-amphtml-accordion-header
Also, we might want to be more specific and instruct GTM that we are interested in such class only if an element is a Heading 2 (h2). We must add this to the beginning of the selector.
h2.i-amphtml-accordion-header
Done! This is our selector. Let’s copy it and paste it to the code of our Custom JavaScript variable No.2.
function() {
var el = {{cjs - find closest}}({{Click Element}}, 'h2.i-amphtml-accordion-header');
return typeof el !== 'undefined' ? el.innerText : undefined;
}
Give this variable a title, e.g. cjs – accordion section title and save the variable.
Important: it is also a good practice to check whether your CSS Selector is not tracking any unnecessary elements (because maybe there are more items that are returned by the same selector).
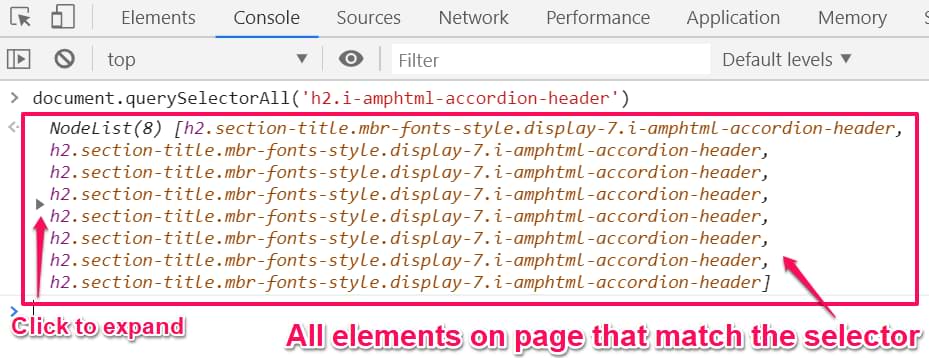
Open your browser’s JavaScript console and paste the following command:
document.querySelectorAll(‘ENTER YOUR CSS SELECTOR HERE’)
Where instructed, paste your CSS selector and hit ENTER. Check how many items were returned. You can click a black triangle, expand the list and then check (by hovering your mouse and seeing which element is highlighted on a site) whether there are no false positives.
#2.6. Test the variable
Make sure that you have enabled at least on All Element Clicks trigger on a page (the trigger condition does not matter for now). Then enable or refresh the Preview and Debug in GTM and click multiple parts of the accordion section title (the text, the icon, the background).
As a result you should see multiple Click events in the Preview console. Click the first one and go to the Variables tab of the debug console and find cjs – accordion section title variable.
Its value should be the title of the accordion section.
Then check another click and do the same thing. Expected result: all of the clicks that expanded the accordion section must return a proper cjs – accordion section title value.
#2.7. Update the click trigger – Option #1
There are different ways of how you can approach this.
First of all, check the Click Classes or Click IDs of the element that expands/collapses the accordion section.
In my case, there are two elements: text and icon. Text’s Click Classes equals to section-title mbr-fonts-style display-7 i-amphtml-accordion-header while icon’s Click Classes is amp-iconfont fa-minus fa minus-sign.
Unfortunately, icon’s classes are not unique enough to be sure that that is specifically used in an accordion. However, IF it was something like this amp-iconfont fa-minus fa minus-sign accordion-icon, I could then use the following condition in my click trigger:
Click Classes Matches RegEx (ignore case) i\-amphtml\-accordion\-header|accordion\-icon
I pasted i-amphtml-accordion-header and accordion-icon, then separated them with a pipe | and then added a backslash in front of every dash (learn more about RegEx here).
Save the trigger.
#2.8. Update the click trigger – Option #2
Let’s go back to my case where the icon did not have a proper class. What kind of condition should we use in our click trigger?
We should change our way of thinking and say this: we want to track clicks of all elements that are direct children of the main element that expands the accordion section.
Yup, sounds confusing. Bear with me.
Looking at my example, the top element is h2 that contains a text and several children (“plus” and “minus” icons).
What we would like to do is to track any click that happens within the boundaries of the parent element (h2). This can be done with a Wildcard CSS selector.
First, let’s use a CSS selector of the top element we are interested in (h2).
h2.i-amphtml-accordion-header
add comma
h2.i-amphtml-accordion-header,
add space and paste the CSS selector again
h2.i-amphtml-accordion-header, h2.i-amphtml-accordion-header
add space and an asterisk
h2.i-amphtml-accordion-header, h2.i-amphtml-accordion-header *
Done! This is the new CSS selector that will select all the elements that either match the h2.i-amphtml-accordion-header selector or are its descendants (means that they in some level below that h2 element (think of children, grandchildren, etc.).
Let’s use this in our click trigger.
Go to GTM > Triggers > New > Trigger configuration > All Element Clicks and create enter the following conditions:
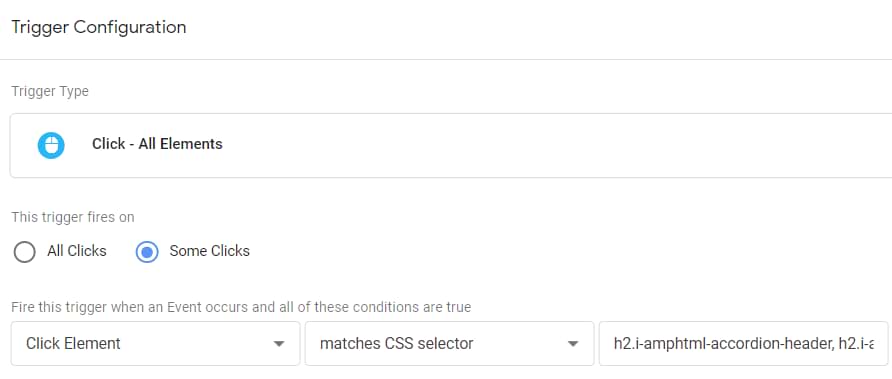
Important: use the Click Element variable. Other click-related variables will not work.
Save the trigger.
#2.9. Google Analytics Tag
The final step is to create a tag that will send an event to Google Analytics whenever an accordion section is expanded or collapsed.
Go to Tags > New > Universal Analytics and enter the following settings:
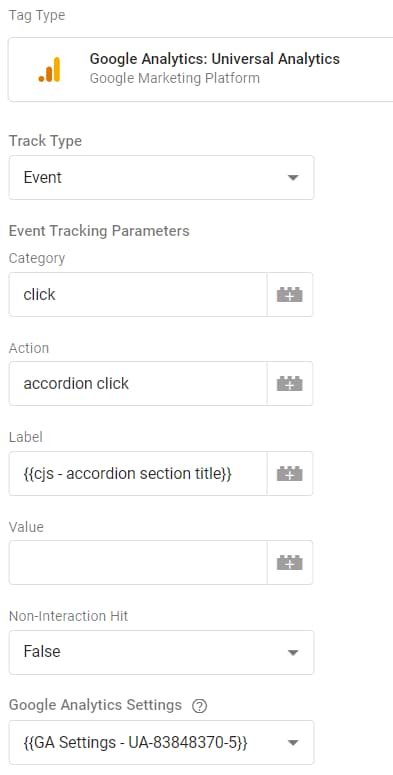
If you haven’t yet, I highly recommend that you use the GA Settings Variable.
Assign the click trigger we have created in the previous chapter.
Save the tag.
#2.10 Test
Refresh the preview mode, refresh the page where the accordion is located and test whether:
- your tag is firing
- you see the click data in your GA realtime reports
Go and check the #1.5. chapter of this blog post to see what I mean.
#3. If it is possible to distinguish when the element is already expanded, do this
The solutions that I’ve described above will track any click on the accordion title. It does not matter whether it is expanded or collapsed.
And that is probably not exactly what you are looking for, right? What if we could track only when a visitor expands a certain section?
Let’s take one more look at my example.
Inspect the accordion’s title that expands a section. While keeping the browser’s developer tools open, expand and collapse the section several times. Do you notice any changes in the developer tools?
In my case, there is one parameter that keeps changing and it is called aria-expanded. If the accordion section is collapsed, aria-expanded‘s value is false. When I expand the section, the parameter’s value changes to true.
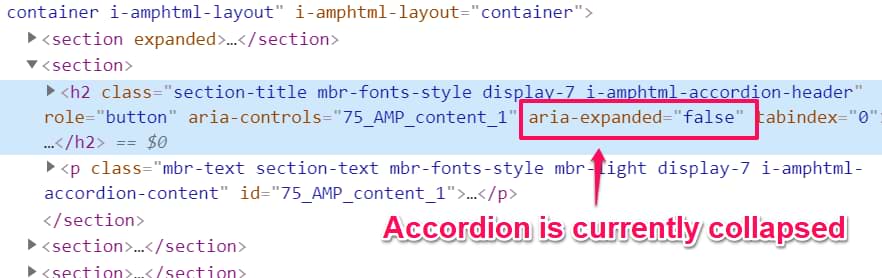
We could update our trigger to fire the GA tag only when aria-expanded‘s value equals to false (meaning that it’s closed).
Important: aria-expanded is available in my example. In your case, the parameter might be (and probably will be) different. Therefore, don’t blindly copy my solution, adapt it to your needs.
#3.1. The variable that returns aria-expanded’s value
Create a new Custom JavaScript variable and paste the following code:
function() {
  var el = {{cjs - find closest}}({{Click Element}}, 'h2.i-amphtml-accordion-header');
  return typeof el !== 'undefined' ? el.getAttribute('aria-expanded') : undefined;
}
There are several things to mention:
- Line 2: use the same CSS selector that you used in the variable of chapter #2.5. In my case, that’s h2.i-amphtml-accordion-header .
- Line 3: I changed el.innerText to el.getAttribute(‘aria-expanded’) . If you want to get another attribute of your element, just replace aria-expanded with some other name that is used in your element.
Save the variable.
This variable will return true if the accordion section is already expanded.
#3.2. Update your click trigger
Open the click trigger you’ve created in chapter #2.8 and add an additional condition:
cjs – aria-expanded (or whatever you called that variable) equals to false.
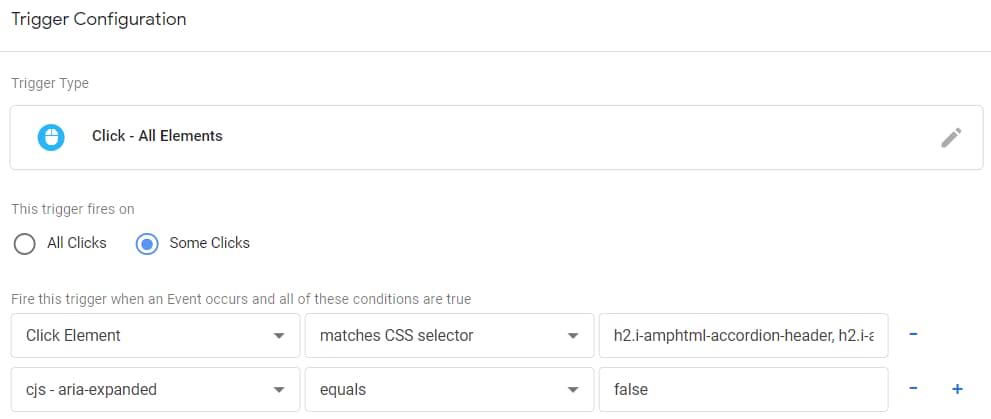
This means that ig the section is not yet expanded, the click trigger will be activated.
Looks complex?
It takes some time to get familiar with these tracking techniques. So, if you feel overwhelmed, don’t worry. You’re not the only one.
However, if you want to be able to solve tracking issues of a similar level in the future, check out my Intermediate/Advanced Google Tag Manager course.
My students always get priority support. So, if you’re stuck at any topic/module of the course, I’ll help.

Final words regarding how to track accordion clicks with Google Tag Manager
Even though I don’t have to deal with accordions very often in my projects, I occasionally notice questions about them in forums, communities, etc. That’s why I’ve decided to write this guide and cover a couple of possible cases.
By following the steps I’ve described above, you will be able to track accordion clicks with Google Tag Manager and send that data to Google Analytics. Every event will also contain the text of a clicked section.
If you want to track ONLY when a visitor expands the section, make sure to follow the tips listed in chapter #3 of this blog post.
Any questions? Post them below.
7 COMMENTS
Hi - how do you set up the goal in Google analytics? I didn't see any instructions for this... I'm actually trying to measure clicks on our Back to Top button. It's firing in the test, but doesn't show in real-time in GA. Do I need a GA goal for this anyway?
Here's one of the pages where goals are explained https://support.google.com/analytics/answer/1032415?hl=en#zippy=%2Cin-this-article
Hi,
When trying to add this:
function() {
var el = {{cjs - find closest}}({{Click Element}}, 'ENTER YOUR CSS SELECTOR HERE');
return typeof el !== 'undefined' ? el.innerText : undefined;
}
It does not recognise 'cjs - find closest' variable, even though this has been created as per the instructions. Do you know why?
Thanks
Natasha
Twy to replace the "–" with another dash in both places: GTM variable name and Custom JS code
Hi,
thanks for this precious guide.
Is there any way to use this implementation to track accordion click and bring it in GA4?
Do I have to create a custom event in GA4 and use custom parameters and values to specify click accordion event?
Thanks in advance for your support!
Paolo
You need to create a custom event in GA4 and come up with your own parameters.
It works perfectly! Thanks.