
January 15, 2024
Track Convertkit Forms with Google Analytics 4 and Google Tag Manager
Updated: January 15th, 2024
Convertkit is a top-rated email marketing platform used by creators. I have been using it since 2019, and since then, many of the creators I know also started moving to it.
One of the features that Convertkit offers is forms (popups, landing pages, embedded forms, etc.) that allow you to get subscribers and grow your email list. And if you care about analytics as much as I do, you probably want to know the traffic sources from which your leads/subscribers are coming.
The built-in reports of forms in Convertkit are quite lacking. That’s why Google Analytics can be useful and give you additional insights.
In this article, I will show you how to track Convertkit forms with Google Analytics (and Google Tag Manager).
Table of Contents
– Hide table of contents –
- Google Tag Manager template
- Two ways to track
- Method #1: When the success message appears
- Method #2. “Thank you” page tracking
- Where to find the form submission data in Google Analytics 4 reports?
- How to track Convertkit’s landing pages with GTM and GA4
- Final words
Video tutorial
If you prefer video content, here’s a tutorial from my YouTube channel. Note: there were several changes in the GA4 interface after the video was recorded but most of it is still valid.
Google Tag Manager template
I also prepared a Google Tag Manager container template (a.k.a. recipe) to save you some time. You can download it here.
Two ways to track
There are two ways to track based on how you have configured your forms.
Some creators show a success message when someone subscribes, while others redirect visitors to a “Thank you” page. I belong to the 2nd group.

In this article, I will explain both options (because the setup will be different).
Method #1: When the success message appears
If you submit a Convertkit form and see a message like this.

…this chapter of the blog post is for you.
Listener
We will use a custom code to look for form submissions on a page. Suppose the submission is related to Convertkit (meaning that the form submission includes a parameter called data-sv-form (specific to Convertkit)). In that case, it will push the form submission data to the data layer.
“Form submission data”, in this case, means “the event that CK form was submitted” and “CK form ID”.
Go to Google Tag Manager > Tags > New > Custom HTML and paste the following code there:
<script>
(function() {
  document.addEventListener('submit', function(event) {
    if (event.target.dataset.svForm) {
      window.dataLayer.push({
        event: 'convertkit_submission',
        ck_form_id: event.target.dataset.svForm
      });
    }}, true);
})();
</script>
Click the Triggering section and select All pages trigger.
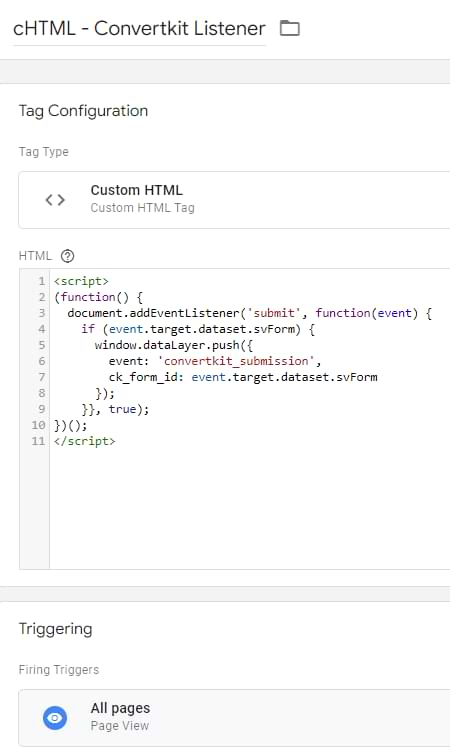
This tag should fire on all pages where you have Convertkit forms. In this article, I presume you have at least one form on all pages.
Trigger and variable
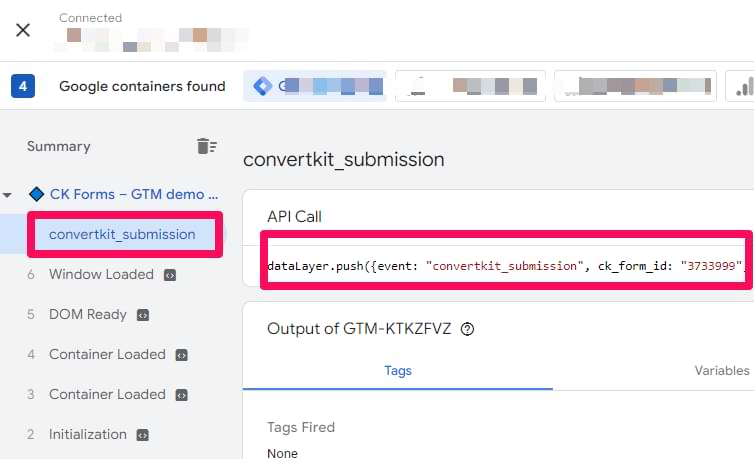
If the Convertkit form is submitted (after our Custom HTML tag is activated in GTM), this data will be visible in Google Tag Manager’s preview mode
To use that data in GTM, we will need to create two things:
- A trigger for the “convertkit_submission”
- A data layer variable that returns the value of ck_form_id.
Go to Triggers > New > Custom Event in Google Tag Manager and enter the following conditions.
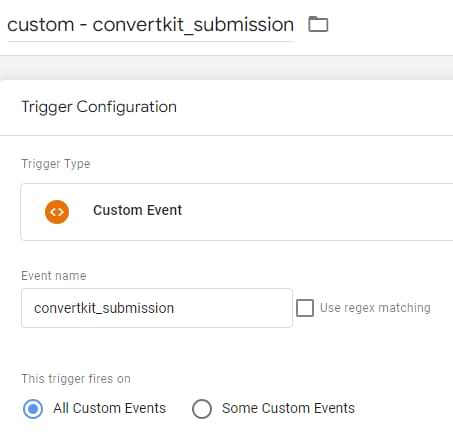
This is case-sensitive, so make sure you enter convertkit_submission exactly as I do in this article. Save the trigger.
Then go to Variables > New > Data Layer Variable and enter the following variable name:
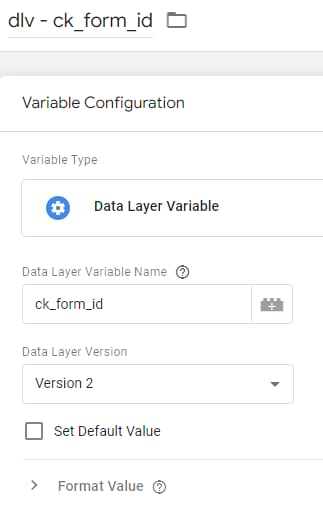
Leave all other settings as they are. Save the variable.
GA4 event tag
Once you have created the variable and a trigger, it’s time to create a Google Analytics 4 event tag (it will send the form submission event to GA4).
In Google Tag Manager, go to Tags > New > Google Analytics: GA4 Event. In this article, I presume you have already installed Google Analytics 4 on your website. If not, follow this guide first.
Enter the following settings:
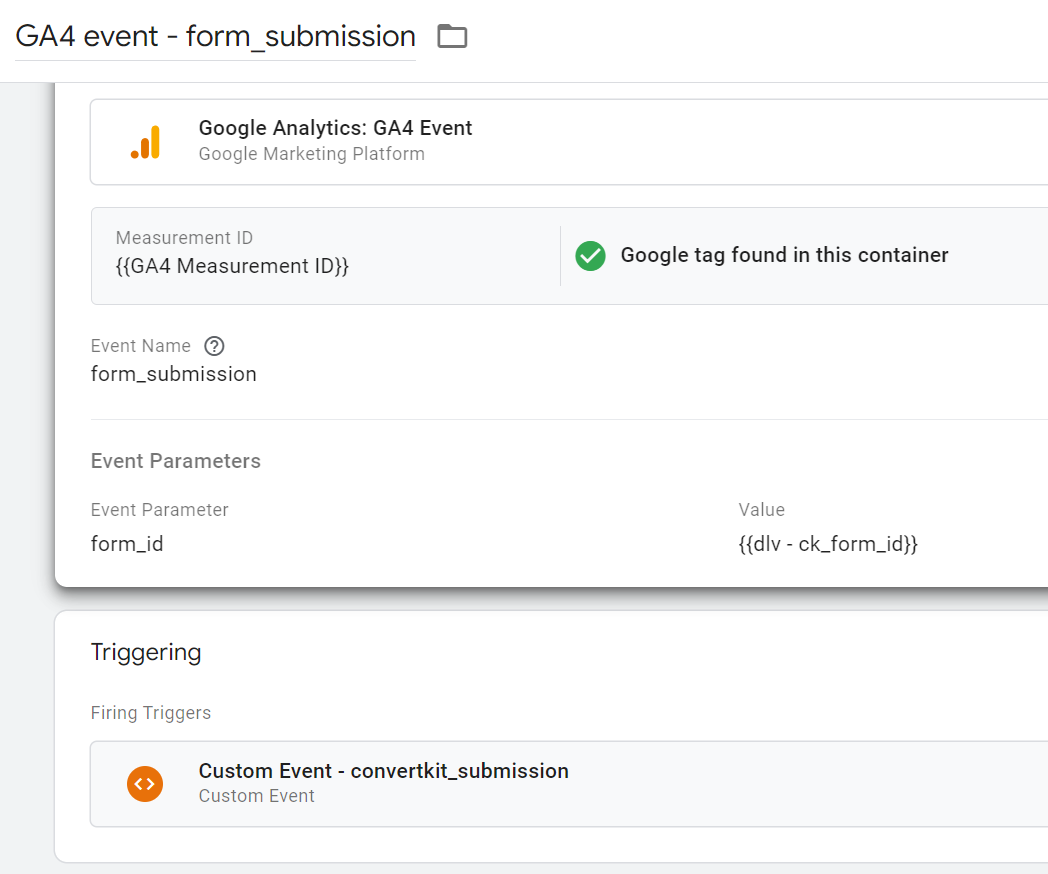
The event’s name can be anything you want. Google recommends using form_submission, but you can name it convertkit_form_submission or anything else (if you wish). In the “Event parameters” section, I added the form_id parameter, and its value is the data layer variable that returns ck_form_id.
In the triggering section, click anywhere and select the Custom event trigger you created in the previous chapter.
Save the tag.
Test the setup and publish
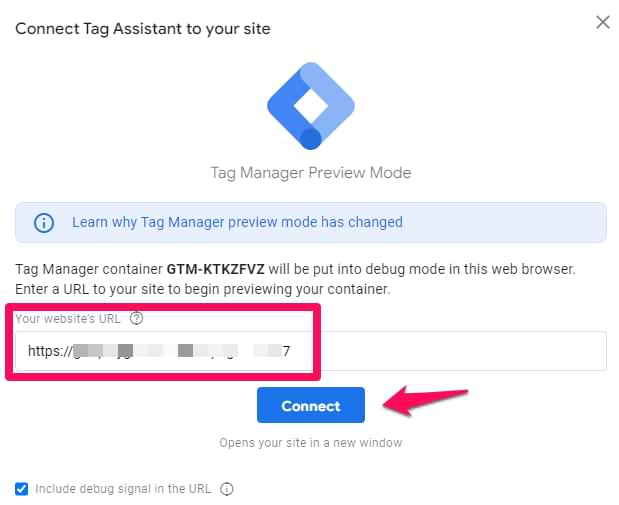
In Google Tag Manager, click Preview.

Then, enter the URL of the page where you have the Convertkit form. Click Connect.
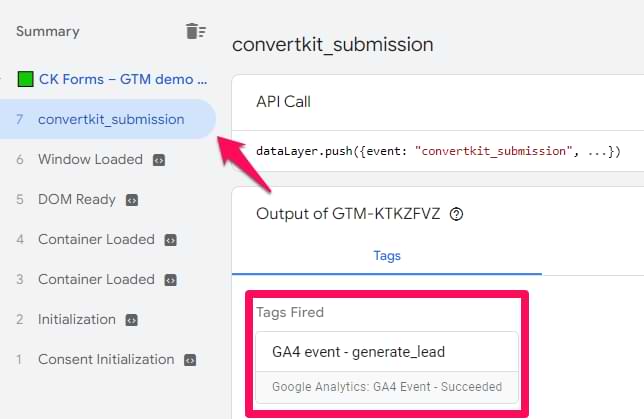
Now, enter the email address in Convertkit’s form and submit it. Go to Google Tag Manager’s preview mode. On the left sidebar, you should see the “convertkit_submission” event.
Click it, and you should see the GA4 event tag in the “Tags fired” section.
The final step is to test if this event was received by Google Analytics 4. Go to GA4 > Configure > DebugView.
Eventually, you should see the form_submission event there. If DebugView is not working for you, read this guide.
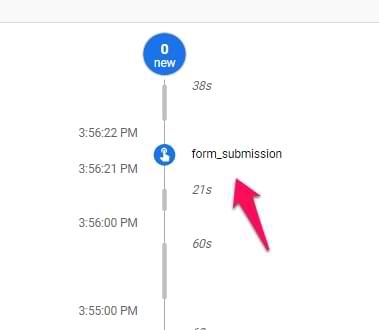
If you see the event, congratulations! You can click it and then check what parameters were sent with it (e.g., form_id).
Publish this configuration live. Click SUBMIT at the top-right corner of the GTM interface and complete all the required steps.

Also, you can mark the form_submission event as a conversion in Google Analytics 4. Read this guide to learn more.
If you want to learn where to find form submission data in Google Analytics 4, go to this chapter.
Caveat
This solution, however, isn’t perfect.
If a visitor enters the email address like this: email@domain (or anything else where the domain is incomplete), the Convertkit form still dispatches the form submission event, and GTM will track it (as a successful submission).
However, if a visitor leaves the field blank or enters just “email@” (without the domain at all), that will not be tracked (which is correct).
From a practical perspective, it’s rare that people would mistakenly enter just a part of the domain in their email address. Thus, I would say that the impact of this caveat is insignificant).

Method #2. “Thank you” page tracking
You should use this method if your Convertkit forms redirect visitors to another page (after a successful submission).
Decorate the URL of the thank you page (optional)
There are different ways you probably have structured your “Thank you” pages:
- You might have multiple forms that redirect a visitor to the same “Thank you” page
- Or you might have unique “Thank you” pages for each form
If you belong to the first group (one page for multiple forms), here’s what I would recommend: add a parameter(s) to the URL that describes what form a user came from.
For example, if the URL of your “Thank you” page is mywebsite.com/thank-you/, change it to mywebsite.com/thank-you/?form=some_popup (replace “some_popup” with the actual name of the form). Do the same thing for all forms redirecting to that “Thank you” page (obviously, the value of the “form” parameter in each form should be different).
This should be configured in the settings of each form:
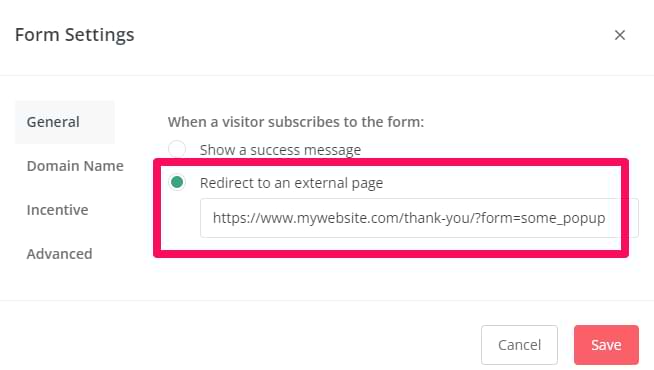
If you have unique “thank you” pages for each form (and you can clearly distinguish which form it is related to), then there is no need to decorate the URLs
Trigger and variable
In Google Tag Manager, go to Triggers > New > Pageview. Select Page URL as the variable of your condition. Its value should be part of the “Thank you” page’s URL (that lets you distinguish a regular page from the confirmation page.
For example, if your “Thank you” page’s URL is mywebsite.com/thank-you/, enter /thank-you/.
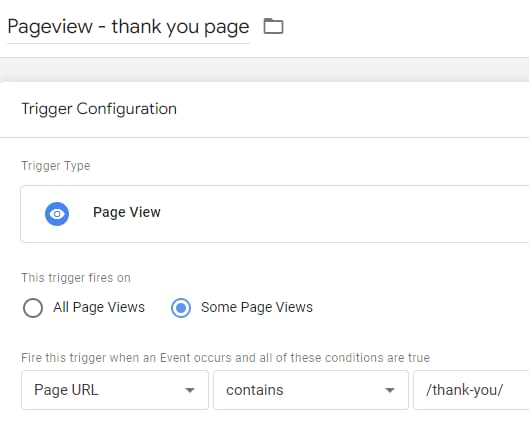
If you have multiple URLs of confirmation pages, you can enter them separated with a pipe ( | ), for example, “/thank-you/form-1/|/thank-you/form-2”.
If you have decorated the URL of the “Thank you” page (e.g., mywebsite.com/thank-you/?form=some_popup), you should also create a URL variable. Go to Variables > New > URL variable and enter the following settings:
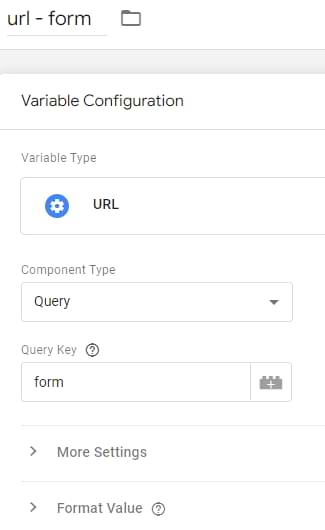
In the Query Key field, enter the name of the parameter used in the URL. That would be “form” because the “Thank you” page address looks like this: mywebsite.com/thank-you/?form=some_popup.
GA4 event tag
Let’s put all the puzzle pieces together. Go to Tags > New > Google Analytics: GA4 event and enter the following settings (if you have unique “Thank you” pages for each form and the URL tells you what form it is related to).
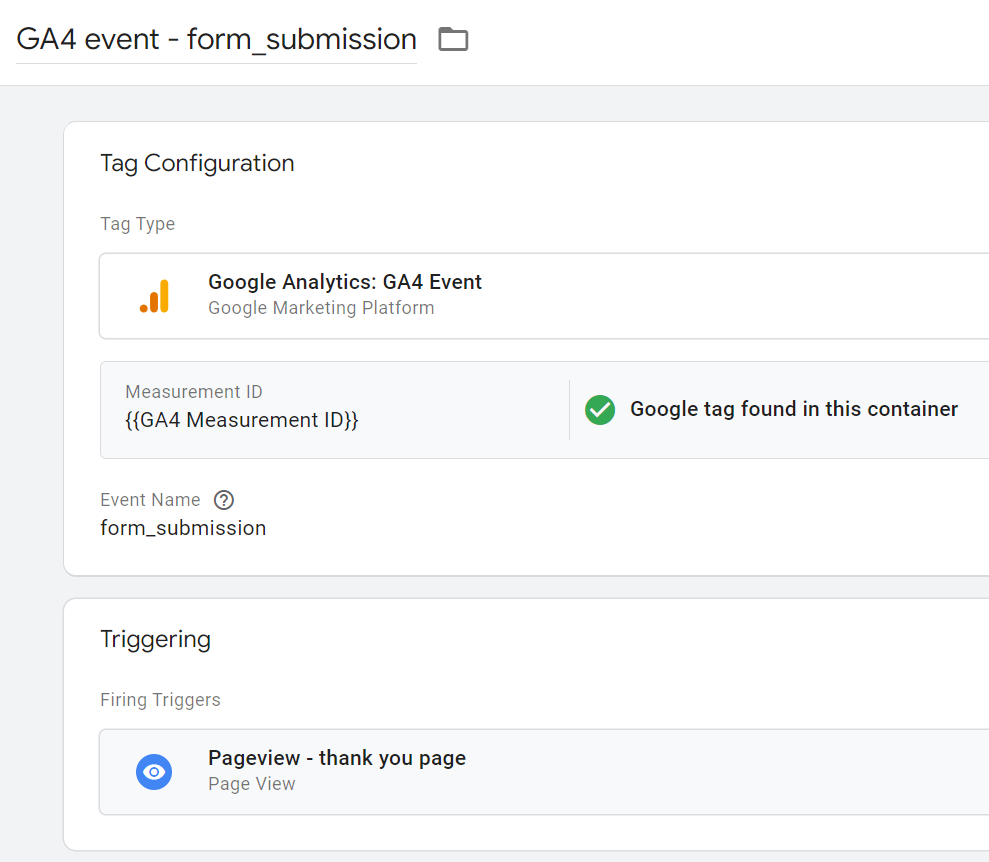
If you are using the URL variable (because maybe you have one URL for different forms), then also add an additional parameter to the tag. You can name it whatever you want. I named it form_id.
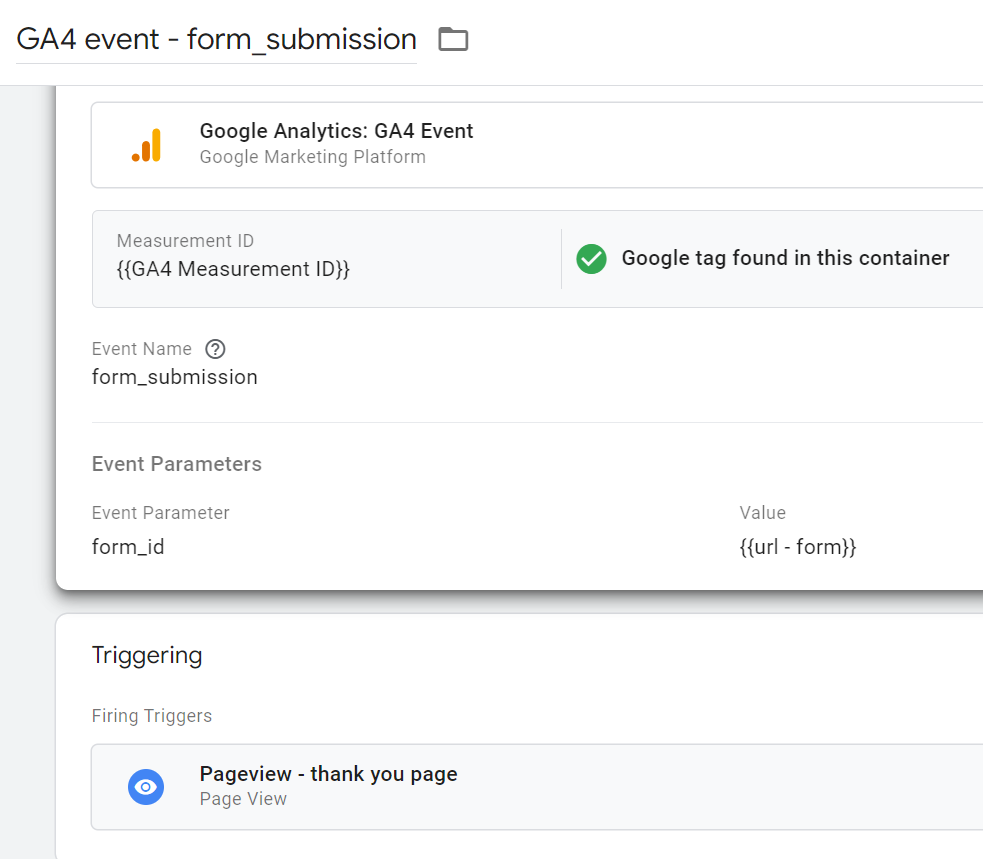
Save the tag
Test and publish
In Google Tag Manager, click Preview.
Then, enter the URL of the page where you have the Convertkit form. Click Connect.
Now, enter the email address in Convertkit’s form and submit it. You will be redirected to a “Thank you” page. Go to Google Tag Manager’s preview mode. On the left sidebar, click the Container Loaded event.
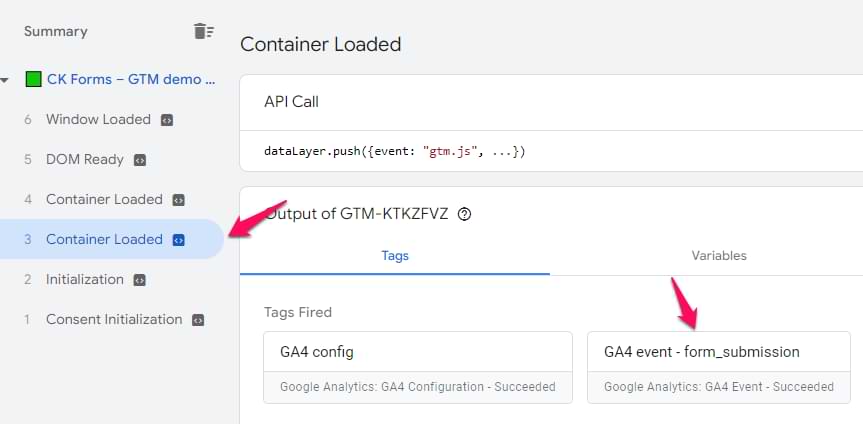
You should see the GA4 event tag in the “Tags fired” section.
The final step is to test if this event was received by Google Analytics 4. Go to GA4 > Configure > DebugView.
Eventually, you should see the form_submission event there. If DebugView is not working for you, read this guide.
If you see the event, congratulations! You can click it and then check what parameters were sent with it.
Publish this configuration live. Click SUBMIT at the top-right corner of the GTM interface and complete all the required steps.
Also, you can mark the form_submission event as a conversion in Google Analytics 4. Read this guide to learn more.
If you want to learn where to find form submission data in Google Analytics 4, read the next chapter of this blog post.
Where to find the form submission data in Google Analytics 4 reports?
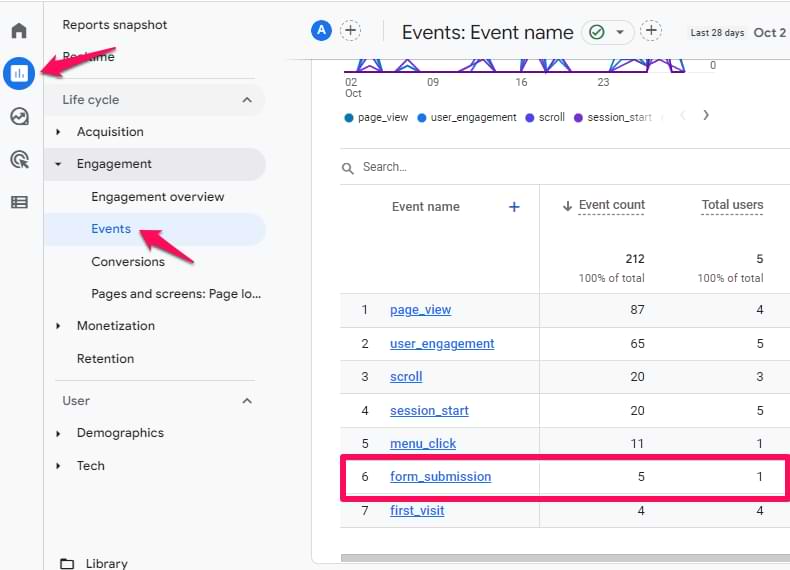
To find the total count of form submission events, go to Reports > Engagement > Events and click “form_submission” (or whatever event name you sent to GA4).
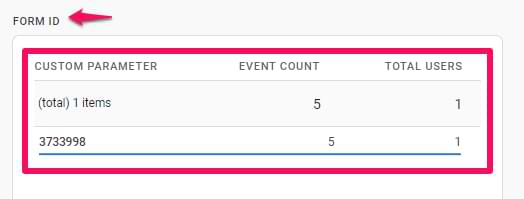
If you are also sending an event parameter (e.g., form_id), you should register it as a custom dimension in GA4. Read this guide on how to do that.
48 hours after you register the custom dimension, go to Reports > Engagement > Events and click “form_submission” (or whatever event name you sent to GA4).
Then, one of the widgets will be related to that custom dimension, and here, you will be able to see the number of events and users and what are the most popular forms.
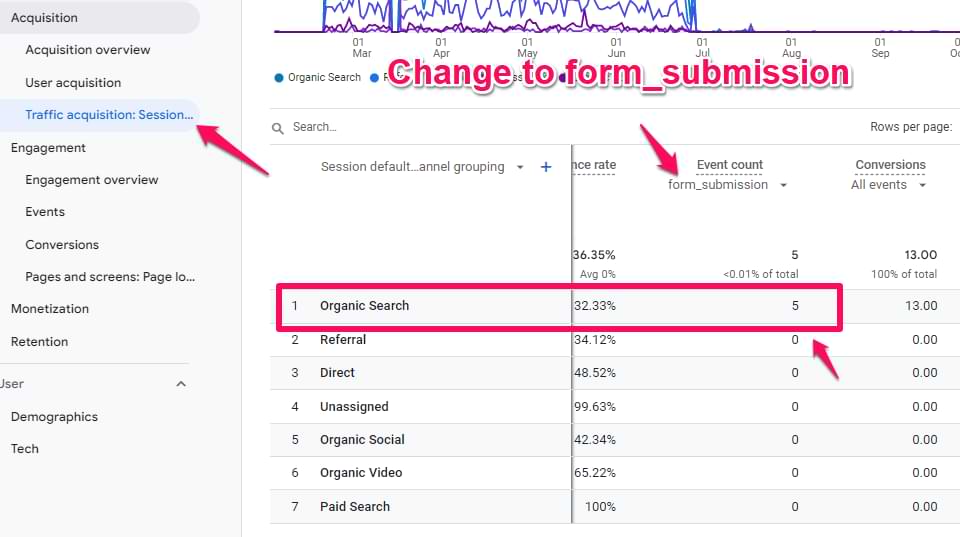
If you want to see traffic sources and which ones drive the most form submissions, go to Reports > Acquisition > Session acquisition and then select the form submission event in this column:
If you need custom reports, you must use Free Form explorations. Here’s a guide on how to get started with them. And if you want to be even more confident with reports, how to build them, and how to find the data you need, enrol in my Google Analytics 4 course.
How to track Convertkit’s landing pages with GTM and GA4
Convertkit provides not only popups or embeddable forms. They also let you create hosted landing pages with forms. If that’s what you’re using, the tracking process is similar to what I have already described in this blog post.
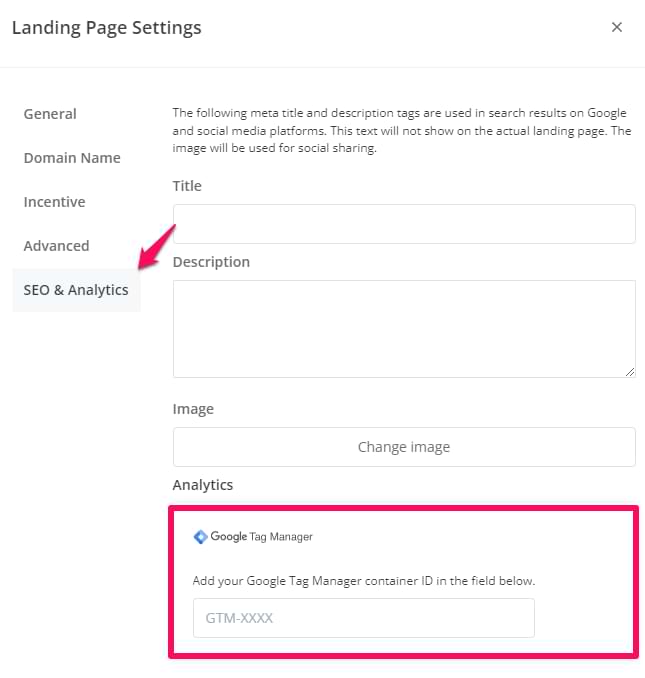
But before that works, you must install Google Tag Manager on Convertkit. You can do that by going to the settings of the CK landing page > SEO & Analytics > Google Tag Manager.
Then, enter the ID of your GTM container.
After you save the changes, apply either method #1 or #2 from this article.
Track Convertkit Forms with GA4 and GTM: Final words
There are two methods of how you can track Convertkit forms with Google Tag Manager and send them as events to Google Analytics 4. You can use the Custom event listener (when the success message is displayed after a form submission) or track pageviews of a “Thank you” page.
I prefer the 2nd option (that’s what I am using on this blog) because I can also decorate URLs and add additional information such as form type (embedded form, popup, etc.), form name, and so on.
1 COMMENT
Is is possible to get the email address also?