
December 4, 2025
Content Groups in Google Analytics 4
Updated: December 4th, 2025
Have you ever explored the pages on your site and felt like you could not get the insights you needed because the data was too granular? To better understand your data, it may seem necessary to export your page-level data into another tool and use regular expressions (or another method) to combine the pages into groups. If this is the case, perhaps content groups are what you need!
Content groups allow you to aggregate your data based on page categories or types of content defined by you directly in Google Tag Manager. Content groups provide an opportunity to understand how users interact with different content on your site, and it’s easier than you think!
Table of Contents
Here’s what you will learn in this article
- What are Content Groups?
- Benefits of Content Groups
- Different Methods of Implementing Content Groups
- Method #1: Using the Data Layer
- Method #2: Using a Regex Table
- Adding Additional Content Groups in GA4
- Final Words
Video Tutorial
If you prefer video content, here is a tutorial on the Analytics Mania YouTube channel.
Note: there were some changes in GTM and GA4 since the video was published. However, it still explains the concept pretty well.
What are Content Groups?
Content groups allow you to categorize content in a way that makes sense to the context of your site!
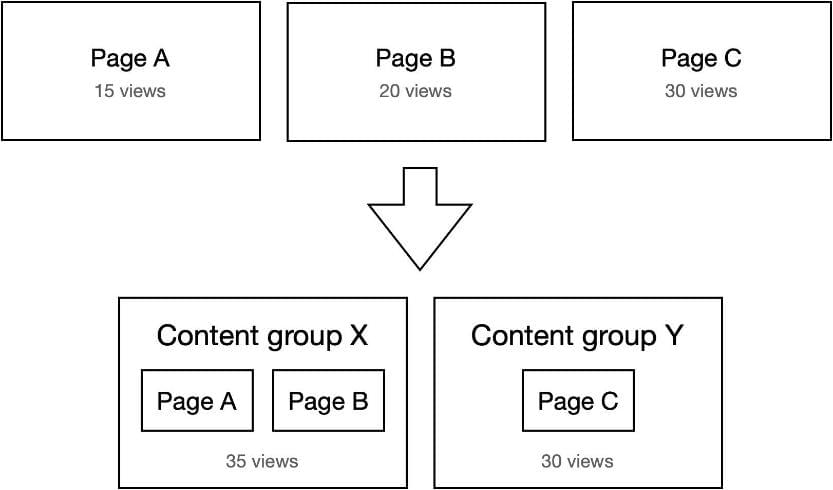
Imagine you have three pages – Page A, Page B, and Page C – with 15 views, 20 views, and 30 views, respectively. These three pages fit into two content groups: X and Y.
In content group X, you have Page A and Page B, and in content group Y, you have Page C. As a result, content group X will have 35 views (the sum of the two pages’ views), and content group Y will have 30 views.
Benefits of Content Groups
Now that you know what content groups are, what are their benefits? Implementing content groups may provide higher-quality insights compared to looking at pages individually!
You may have come across situations where you want to see how different sections of your site are performing compared to each other. To answer this, you may need to export your page-level data into another tool and then do some filtering magic to group your pages to find more meaningful insights.
To avoid all this extra work, content groups can be implemented in Google Tag Manager to categorize the pages of your site into groups that can be analyzed together!
This won’t change any of your page-level data, so you can still see granular page information, but it creates an added benefit of having an aggregate view of what users are viewing on your site. This will allow you to quickly compare the performance of different sections of your site to each other, providing insights on what types of content perform best and areas to focus on and improve.
Although this tutorial recommends getting the help of a developer to implement content groups within the Data Layer, they can also be implemented without any code in Google Tag Manager, so it’s a simple step to take to improve your analytics!
Different Methods of Implementing Content Groups
Content groups can be implemented in Google Tag Manager (GTM), allowing data to flow into Google Analytics 4 (GA4). If you need information about how to install GA4 on your site, please see the blog post on how to set up and install Google Analytics 4. There are a few different approaches you can take to define your content groups:
- Using the page URL
- Scraping the site for a specific element (this is more advanced and a bit risky)
- Getting a developer to push a value into the Data Layer (or dataLayer)
| Data Layer Method (Recommended) |
Regex Table Method (Alternative) |
|
| Accuracy | High: Uses explicit code on the page. | Variable: Depends on URL structure consistency. |
| Developer Need | Yes: Requires code changes. | No: Done entirely in GTM. |
| Robustness | Strong: Won’t break if URLs change. | Weak: Breaks if URL structure changes. |
| Best For | Enterprise sites, complex structures. | Small sites, marketing teams without dev resources. |
The last option is the most robust method, but we will also review how to use the page URL with a regex table to create content groups without needing a developer. Follow the guides below for a step-by-step tutorial on implementing content groups.
Method 1: Using the Data Layer to Implement Content Groups
Implementing events within the Data Layer for more robust tracking is recommended. To learn more about the Data Layer, check out the Google Tag Manager Data Layer Tutorial.
Step 1: Developer implementation
First, you want a developer to push the value that captures the content groups directly into the Data Layer. For example, if there was a section of your site called “Blog,” you could categorize all pages on the section of the site into the ‘blog’ content group. An example of this code is posted below:
window.dataLayer = window.dataLayer || [];
window.dataLayer.push({
'section_of_website' : 'blog'
});
Note: you can use any naming convention that works for you (for both the parameter key and parameter value), this is just an example!
Step 2: Check that the data was implemented properly
Once the code has been added to the Data Layer by a developer (or yourself, if you’re able to do so!), you want to use Google Tag Manager to check that the code has been properly implemented. In your GTM container, you want to click “Preview” and insert the URL of the website on which the code has been implemented.
If you’re unsure how to use Google Tag Manager or need a refresher, check out the Google Tag Manager event tracking guide for a step-by-step guide on getting started with Google Tag Manager.
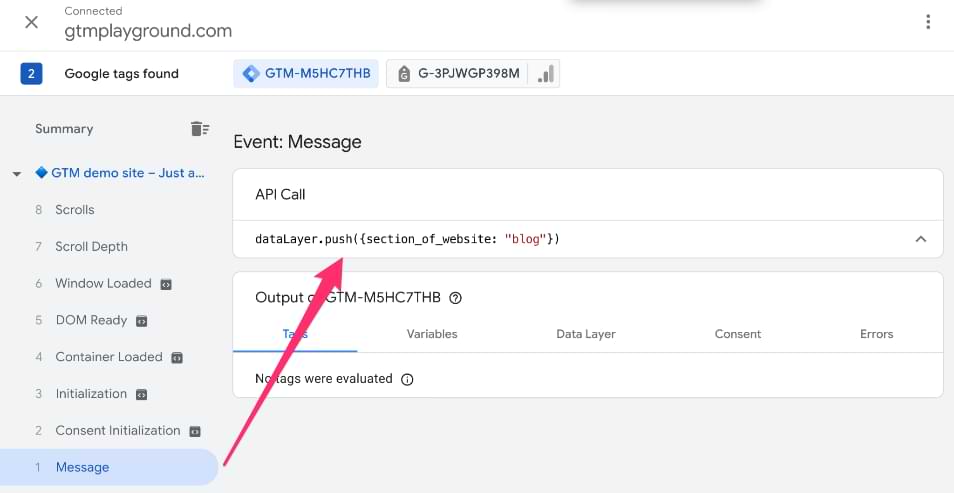
Once Tag Assistant (the preview mode of GTM) has loaded, you can go to the Message tab, and (if the code has been implemented correctly) you will see the information pushed to the Data Layer.
This isn’t the end, though! You still need to send this value to Google Analytics 4.

Step 3: Create a new Data Layer variable
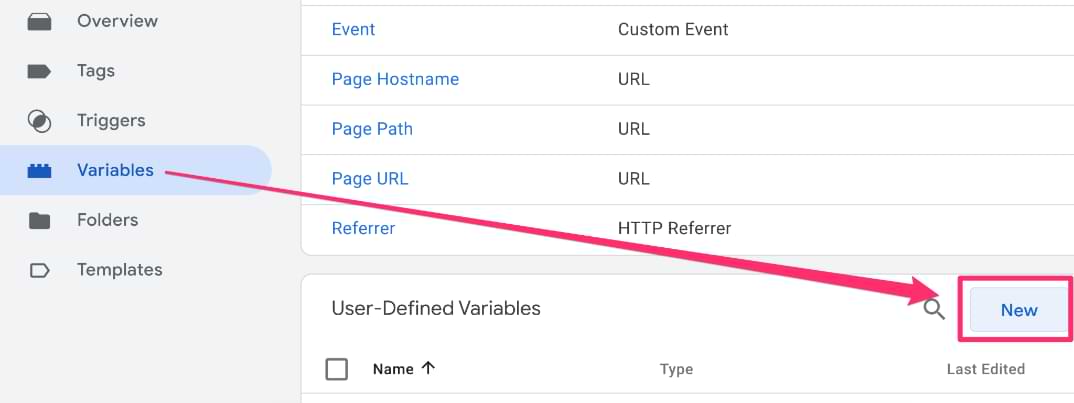
Back in Google Tag Manager, you need to create a new Data Layer variable for the value that the developer implemented. In the main navigation, click on “Variables” and then under User-Defined Variables, click on the “New” button.
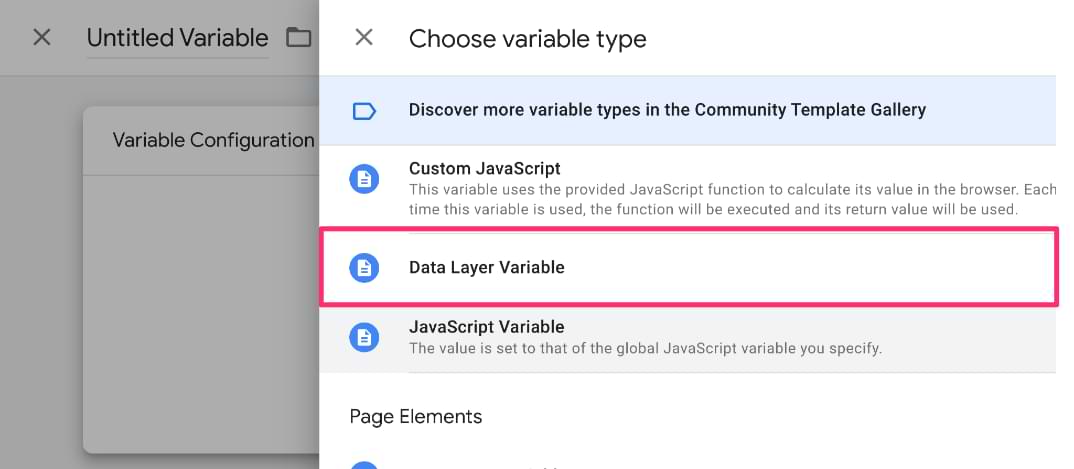
Click on “Variable Configuration” and select the “Data Layer Variable” variable type.
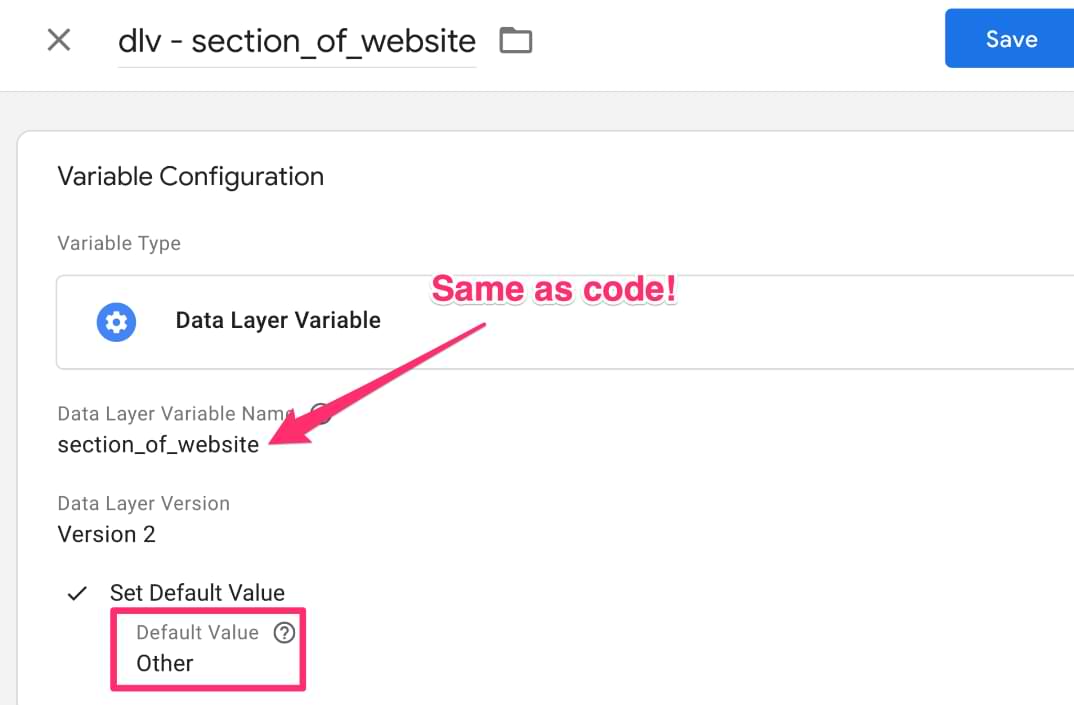
The most important part of this step is ensuring that the variable’s name is exactly what was implemented in the dataLayer code. You can also set a Default Value, such as “Other”, for when the Data Layer variable returns undefined. Now, save this new variable.
Step 4: Update Google Tag: Event Settings Variable
The next step is to update the Google Tag: Event Settings variable. If you have already set up this variable, then you can move on to Step 4.2: Add the new Data Layer variable to the Event Settings variable.
Why use the Event Settings Variable? The Google Tag: Event Settings variable acts as a reusable “container” for parameters. Instead of manually adding the content_group parameter to every single GA4 Event tag (which is tedious and error-prone), you add it once to this variable. Then, you simply attach this variable to all your tags, ensuring consistent tracking across your entire setup.
Step 4.1: Set up the Google Tag: Event Settings variable
In the main navigation, click on Variables, and then under User-Defined Variables, click on the “New” button.
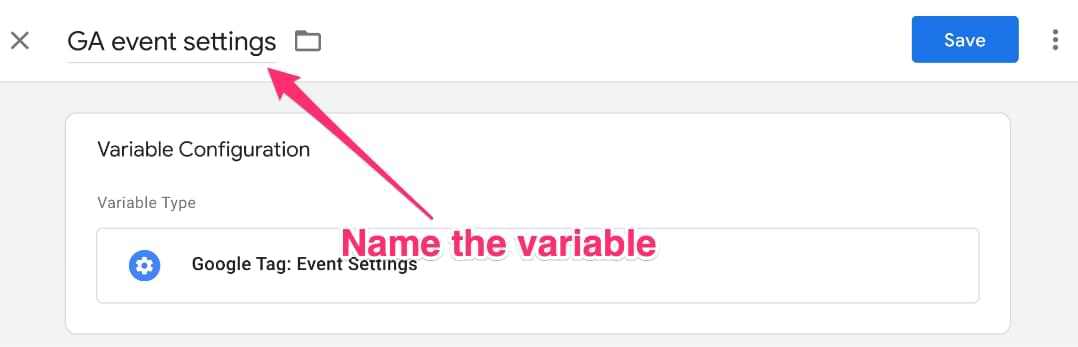
Click on Variable Configuration and select the “Google Tag: Event Settings” variable type.

Lastly, name the variable.
Now, you are ready to begin adding parameters!
Step 4.2: Add the new Data Layer variable to the Event Settings variable
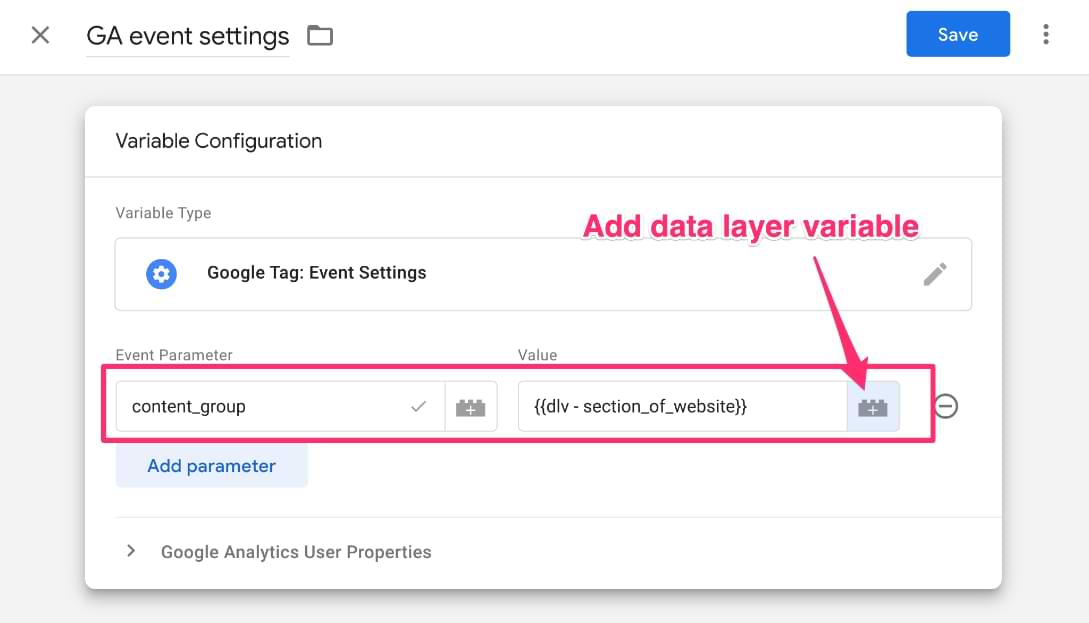
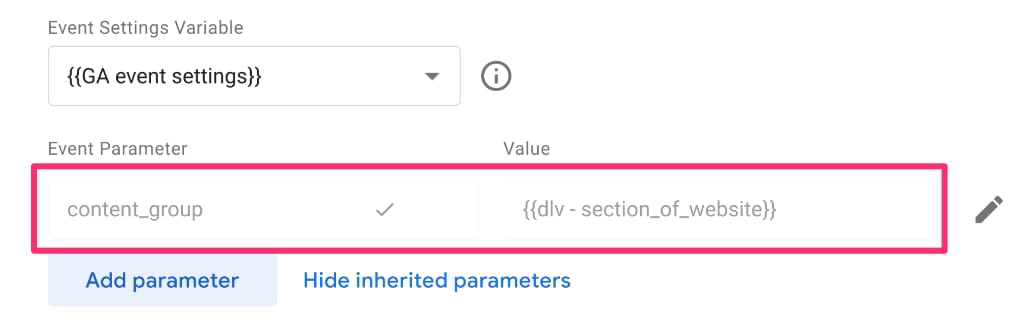
To add the new Data Layer variable to the Event Settings variable, click on “Add Parameter”. The Event Parameter will need to be named exactly “content_group”. For the Value, you will add the new Data Layer variable.
Now, save the Event Settings variable!
Step 5: Update the Google Tag and GA4 Event Tags
To complete the setup for content groups, you will need to update the Google Tag and any existing GA4 Event Tags.
Note: If you already have the Event Settings variable set within the Google Tag and the GA4 Event Tags, then you can move on to Step 5.3: Check in Preview.
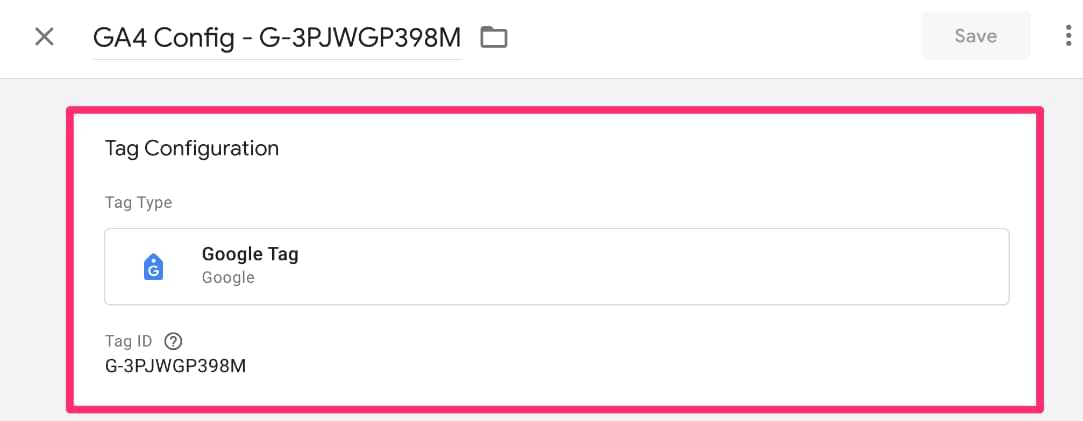
Step 5.1: Update the Google Tag
First, go into the GA4 Google Tag and click on the Tag Configuration section. If you are unfamiliar with the Google Tag, you can read more about that here.
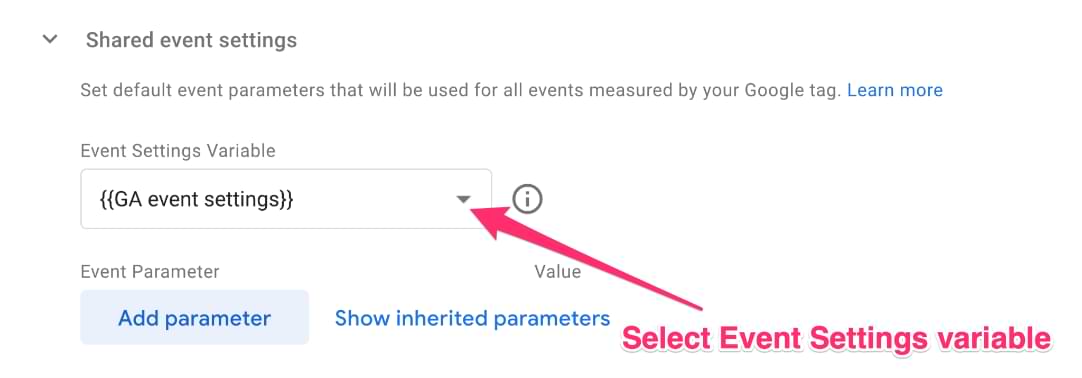
In the Shared event settings, click on the drop-down under “Event Settings Variable” and select the Event Settings variable that you set up in Step 4.1.
If you click on “Show inherited parameters”, you will be able to see all the parameters included in the Event Settings variable and confirm that the content_group parameter is there.
Now, save the Google Tag!
Step 5.2: Update the GA4 Event Tags
To ensure that the parameters in the Event Settings are being sent with every event, you will also need to update each of your GA4 Event Tags.
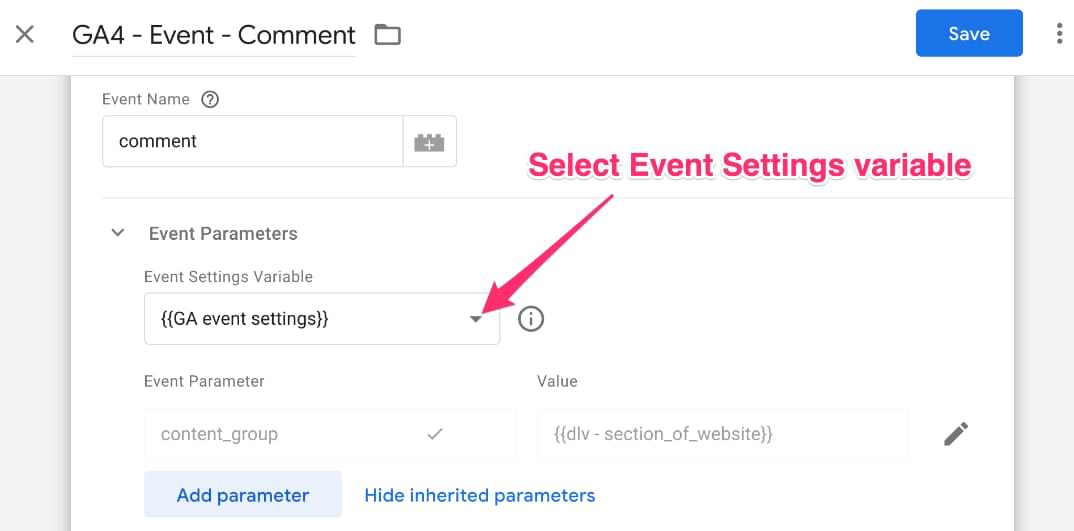
Very similar to above, within your GA4 Event Tags, click on “Event Parameters” and under the “Event Settings Variable” dropdown, select the Event Settings variable from Step 4.1.
Step 5.3: Check in Preview
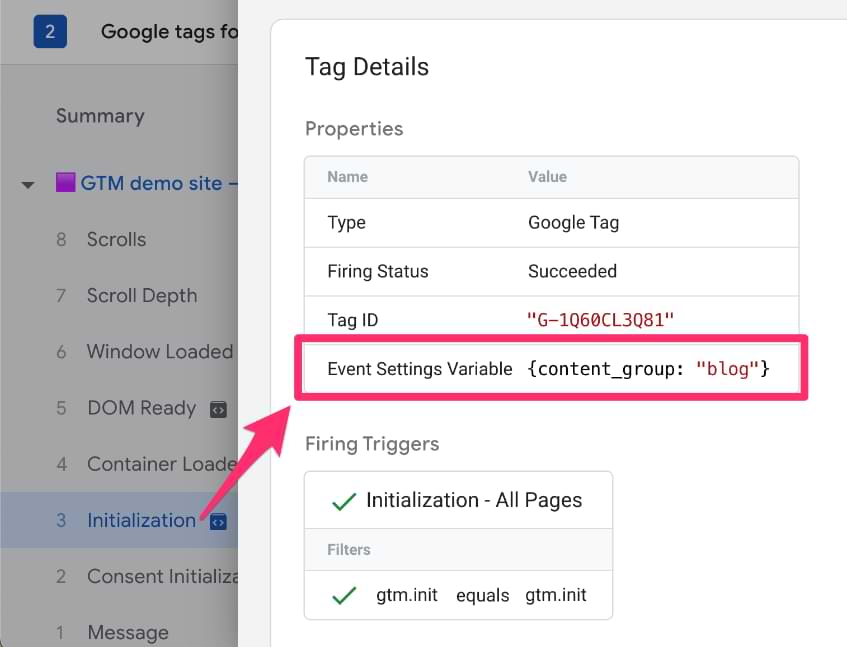
Once you have updated the Google Tag and all your GA4 Event Tags, you want to preview the container. In Tag Assistant, if you click on “Initialization”, you will see the Google Tag under Tags Fired.
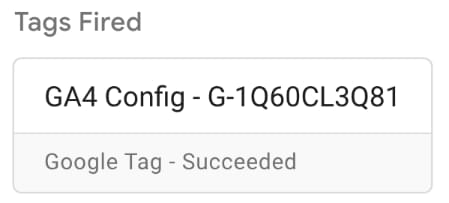
Click on the Google Tag to get the Tag Details and you should now see the new content_group parameter appear in the Event Settings Variable.
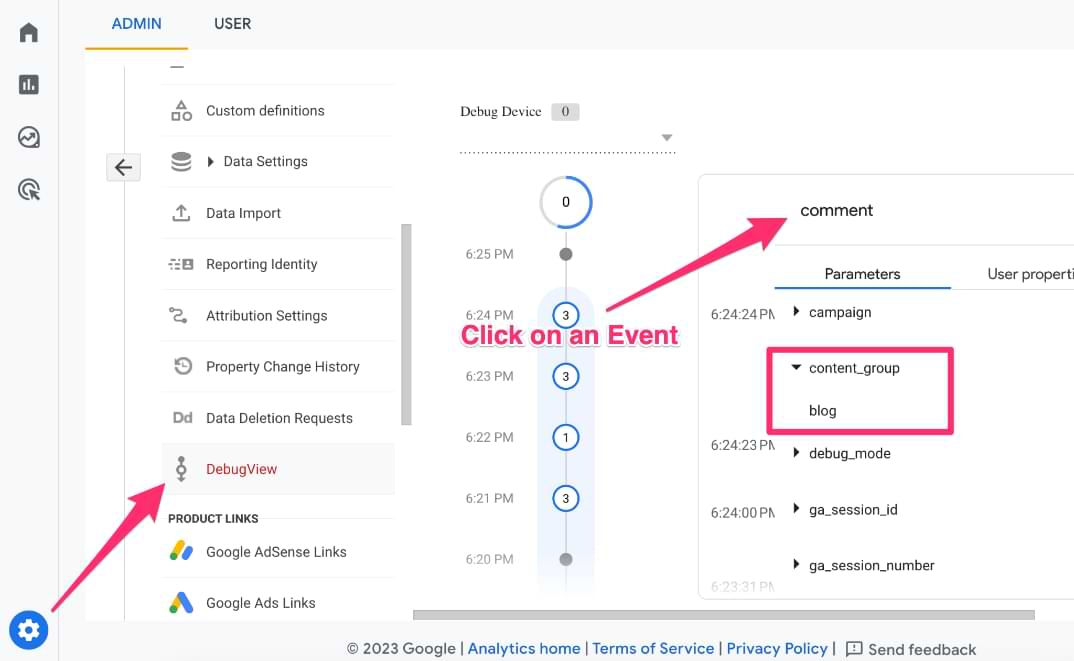
Step 6: Checking data in Google Analytics 4
Using the Debugview in GA4, you will be able to see the content_group parameter with each event on your site. If you’re unfamiliar with the Debugview, you can read A Guide to DebugView in Google Analytics 4 to learn more.
It is important to note that once you have published your GTM container with the new parameter, it will take anywhere from 24 to 48 hours for the data to appear in GA4. The new parameter will only apply to data after it is implemented. It will not act retroactively (as with any new parameters).
Step 7: Viewing data in Google Analytics 4
Once you have confirmed that the code has been properly implemented by the developer and the new parameter has been properly implemented within GTM, then you can publish the container!
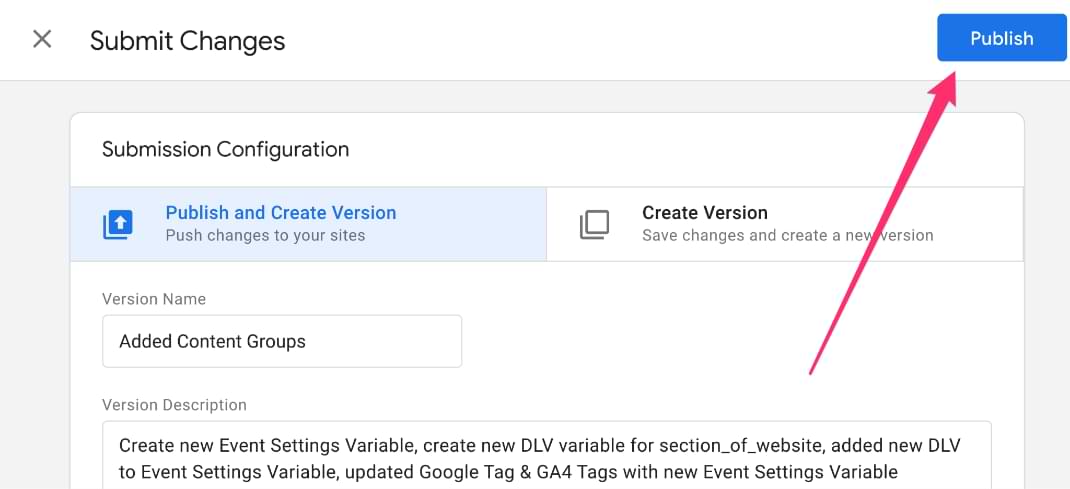
As mentioned before, you will need to wait 24 to 48 hours before the data will be available in GA4, but once it is, you can begin to view the data in the Pages and screens standard report.
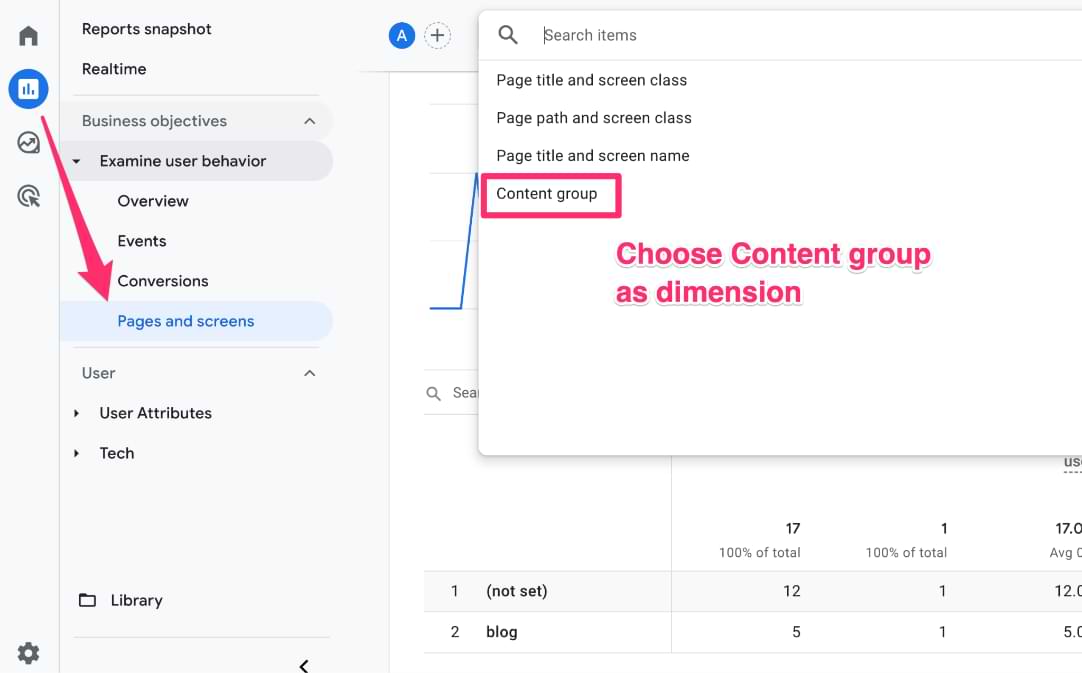
Useful tip: If you want to build a similar report in the Explore section, click the “Edit comparisons” icon, and in the bottom right of the tab, there is an Explore button, which will rebuild the existing report as an exploration. This allows you more customization abilities without building a report from scratch!
If you want to learn more about customizing standard reports in GA4, check out this blog post and if you want to learn more about free-form exploration in GA4, check out this blog post.
That’s it! You have now implemented content groupings on your site using the Data Layer!
BUT, if you are looking for a method of creating content groups without the need for a developer, then follow the steps below!
Method 2: Using a Regex Table to Implement Content Groups
If you want to get the benefit of content groups but aren’t able to implement code within the Data Layer of your site, then you can use a Regex table within Google Tag Manager to get the same results! We still recommend using the Data Layer method, but since resourcing may not always be available, this is a great alternative.
Step 1: Create the Regex Table
As the title of this method suggests, the first step is to create a regex table in GTM. This will replace the developer implementation step of the Data Layer method above.
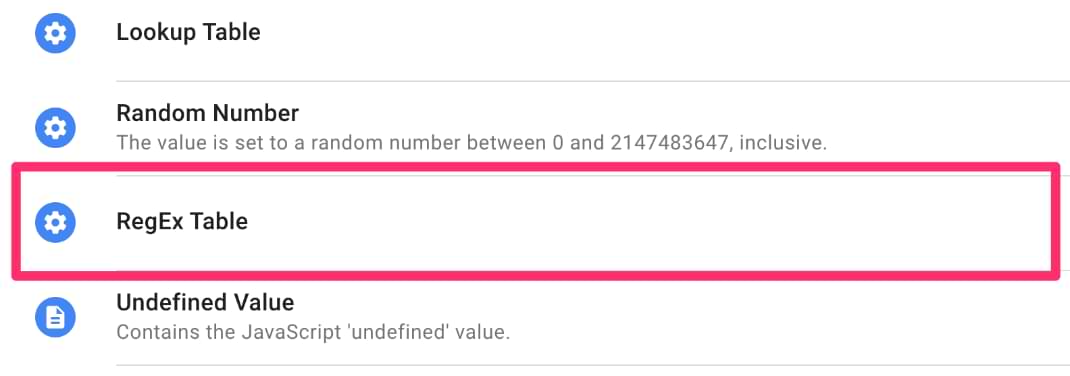
To start, select “Add New Variable” in your GTM container, and under the Variable Configuration, select “RegEx Table”.
Step 1.1: Choose the input variable
Now, when it comes to the Input Variable selection, there are two variables that you can use: Page Path and Page URL. I will be using Page Path since I’m only interested in what comes after the domain, and I won’t be relying on query parameters.
If you’re unsure which variable makes the most sense for you to use, you can read more about the difference between the two variables here.

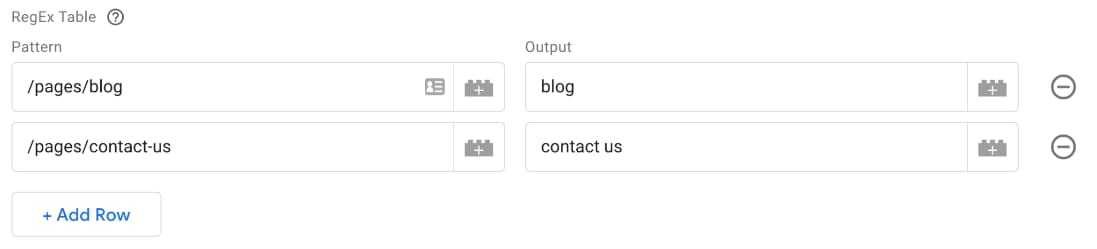
Step 1.2: Determine the output and pattern
This next part will be heavily dependent on how you want to track content groups on your site, so there are two things you want to collect:
- Output: The sections of your site that will correspond to a content group
- Pattern: The regular expression (regex) that will capture all the pages that fall under that content group
The output will be the names of your content groups and what you will see in GA4, so you want to name them something clear and significant. In this case, I am defining two sections of the site: blog and contact us. You can add in as many rows as makes sense for your site and what you wish to track.
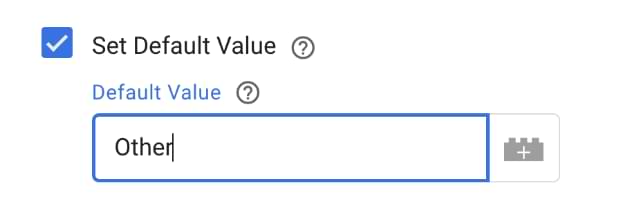
You can also set a default value so if the page URL being viewed doesn’t match the pattern of an existing content group, then it will be automatically assigned a label, such as “Other”.
This is not necessary, but it will make your data look cleaner in GA4 since you’ll avoid (not set) values in your reports (so it’s recommended you do).
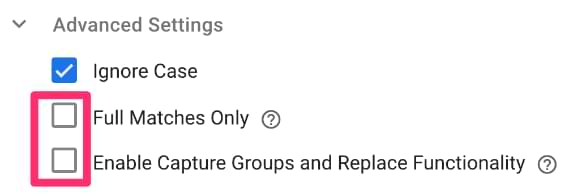
Step 1.3: Advanced settings
You want to toggle off the Full Matches Only and Enable Capture Groups and Replace Functionality options for the best results.
Step 1.4: Name and save the new variable
Once you have added in all the Pattern-Output pairs and updated the Advanced Settings, you want to name your new variable whatever makes the most sense to you (I chose to put Regex Table in the title to make it easier to recognize) and save it.

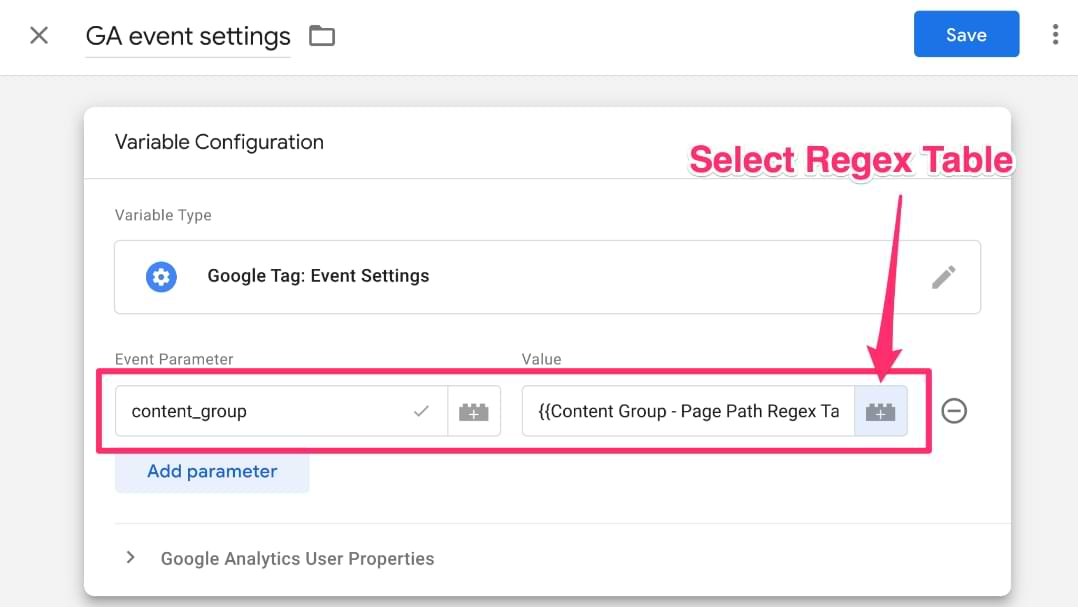
Step 2: Update the Event Settings variable
Like in the previous method, you must update the Events Settings variable to capture the new content groups parameter. If you have not set up the Events Settings variable yet, go to Step 4.1: Set up the Google Tag: Event Settings Variable from the Data Layer method above.
Once the Event Settings variable is created, you can add the new content group variable!
Click on “Add parameter”. The Event Parameter will need to be named exactly “content_group”. For the Value, you will select the Regex Table that you created in the previous step.
Now, you can follow along from Step 5: Update the Google Tag and GA4 Event Tags from the Data Layer method above to:
- Learn how to add your Event Settings variable to the Google Tag and any GA4 Event Tags you have implemented
- Check that your content groups are being captured with Tag Assistant and the GA4 Debugview
- See how you can view your data in GA4
If you already have the Event Settings variable set up and added to all your tags, you can move on to Step 5.3: Check in Preview.
Congrats! Once you have confirmed that the data is being collected in GA4, you are all done!
Troubleshooting Content Groups
If your content groups are showing as (not set) or aren’t appearing, check these common culprits:
- Wait 24-48 hours: Content groups are not retroactive and take time to process.
- Check variable names: Make sure that the Data Layer variable name in GTM matches exactly with the code on your site (case-sensitive).
- Verify Regex logic: If using Method 2, test your Regex patterns to make sure they actually match your URLs. Use a tool like Regex101 to verify.
- Unassigned pages: If a page doesn’t match any of your defined groups (and you didn’t set a default value), it will show as (not set).
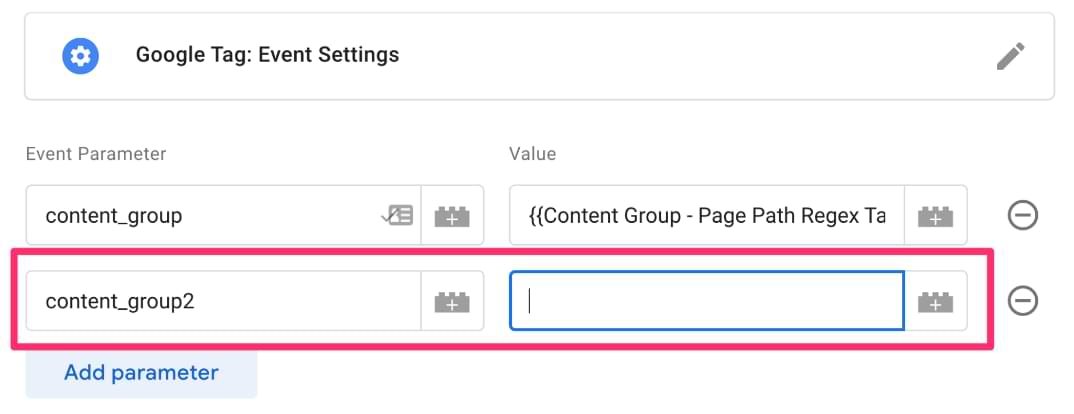
Adding Additional Content Groups in GA4
Google Analytics 4 only allows one content group parameter out of the box.
However, if you want to create more groups, you can set up additional parameters in the Event Settings variable and register the parameters as a custom dimension in the GA4 interface. If you want to learn more about custom dimensions, you can find additional information in A Guide to Custom Dimensions in Google Analytics 4.
Content Groups in Google Analytics 4: Final Words
Content groups are an easy way to categorize your website to generate more insightful data and better understand what content is performing the best and what content may need some more work.
Although it’s recommended to push the values for content groups through the Data Layer with the help of a developer, this tutorial also shows how it is possible to use a Regex Table, so not all hope is lost!
For both methods, you need to:
- Update (or create) the Event Settings variable to contain the content_group event parameter and the respective value (either the Data Layer variable or the Regex Table)
- Add the Event Settings variable to your Google Tag and all GA4 Event tags (if you haven’t already done this)
Additional content group parameters can also be added to the Event Settings variable.
Remember to check that your content groups are being properly captured by testing with Tag Assistant and Debugview in Google Analytics 4. It may take 24-48 hours for the data to begin populating into your GA4 reports.
Here’s an implementation checklist you can use:
- Choose method: Decide between Data Layer (Robust) or Regex Table (No-Code).
- Configure GTM: Create your variables and update the Event Settings variable.
- Apply to tags: Attach the Event Settings variable to your Google Tag and GA4 Event Tags.
- Test: Verify data in GTM Preview Mode and GA4 DebugView.
- Analyze: Wait 24 hours, then check the “Pages and screens” report.
I hope this was helpful and that you can elevate your analytics with content groups!
7 COMMENTS
Hi Julius,
Thanks for this useful post. My question is where should I (or developer) add this code-
window.dataLayer = window.dataLayer || [];
window.dataLayer.push({
'section_of_website' : 'blog'
});
You have a minor typo at step 1.1 for the variable method.
"Path Path and Page URL. I will be using Page Path"
You use Path Path instead of Page Path
Thanks, fixed
Hi, Julius
Thanks again for your very useful tips.
When you said : Add the Event Settings variable to your Google Tag and all GA4 Event tags (if you haven’t already done this)
Do you include the e-commerce events such as add_to-cart, purchase, etc. or others events like login, phone click, submit form ?
Thank you, Julius. What if I want a page to have multiple content tags. So lets say www.hello.com/article1 needs to be tagged as both diy and kitchen. While www.hello.com/article2 needs to be tagged as just kitchen. And www.hello.com/article3 needs to get diy and livingroom. Etc.... None of these tags are more primary vs. secondary, so its not like a categorytag1, categorytag2, etc. makes sense or would help with running reports. Any thoughts? Thank you in advance!
I have the same issue. I have a number of content tags that can all be applied to the same page.
Hey,
Great article as always!
Do I need to set up two settings variables - one for events and one for Google Tag?
Thanks
J