
December 3, 2025
How to import Meta ad cost data to Google Analytics 4?
Many advertisers run paid campaigns on Meta platforms like Facebook and Instagram, but one big limitation is that by default, Meta’s ad cost data doesn’t automatically show up in Google Analytics 4. This makes it harder to calculate ROI or compare Meta performance with other channels.
Fortunately, GA4 offers a campaign data import feature that lets you bring Meta ad cost data directly into your property. When you do, analysis becomes much more unified and far easier to work with. In this post, we’ll walk through how to import Meta ad cost data to Google Analytics 4, why it’s useful, and a few other things to keep in mind!
Table of Contents
Here’s what you will learn in this article
- What is the import Meta ad cost feature in GA4?
- Why importing meta ads cost into GA4 matters
- Things to keep in mind before starting
- Set up the Import Process
- Finding the data
- Final Words
What is the import Meta ad cost feature in GA4?
The Meta ad cost import feature in GA4 lets you sync your Meta Ads campaign data directly into your Google Analytics 4 property. When you do, GA4 will automatically populate metrics for your paid Meta traffic, including ad cost, clicks, and impressions, essentially giving you your Meta ad spend and performance data inside GA4.
Not only does it bring in new data, but it also attempts to pull up to 24 months of historical data from Meta, helping create a more comprehensive picture of your ad costs.
Why importing meta ads cost into GA4 matters
There are a few reasons why you might want to set up Meta ad cost imports to your GA4 property:
- Reducing manual processes: Most obviously, if you were previously manually importing Meta ad cost data, this now automates the process. Who has time for manual processes these days? This also reduces any potential for errors that come from manual CSV uploads.
- Unified view of advertising: This setup avoids the common problem where cost data lives in one platform’s dashboard while conversion data lives in another. By bringing Meta ad cost into GA4, you can compare paid Meta campaigns alongside Google Ads (and other channels) in one report.
- Better ROI measurement: Because GA4 already tracks conversions, sessions, revenue (and other events, including your custom events), combining cost data enables you to calculate cost-per-conversion and overall ROI for Meta campaigns just like you do for Google campaigns.
Things to keep in mind before starting
Before we jump into the setup, there are a few things I want you to keep in mind about this import to ensure you get the most return for your time:
- Avoid duplicates: If you previously imported cost data through a CSV file, you should delete overlapping imports; otherwise, you may double-count.
- Timing delays: Once you’ve completed the setup, imported cost data will probably take a few hours to appear in GA4 reports, but it could take up to 24 hours.
- Proper UTM tagging: Ads must include at a minimum utm_source and utm_medium. Make sure all paid Meta traffic uses the same utm_medium and a consistent utm_source (or per Meta platform) so GA4 can correctly match cost data. I will remind you of this later, once we reach this stage of the setup.
- Privacy: The integration only pulls campaign performance data; you’re not giving GA4 access to your creative assets, audiences, or anything sensitive inside Meta.
- You can review Google’s official documentation here.
There is only one prerequisite that you’ll want to check off before starting:
- You need a Meta business + ad account, and you must have at least the “Editor” role in the GA4 property.

Set up the Import Process
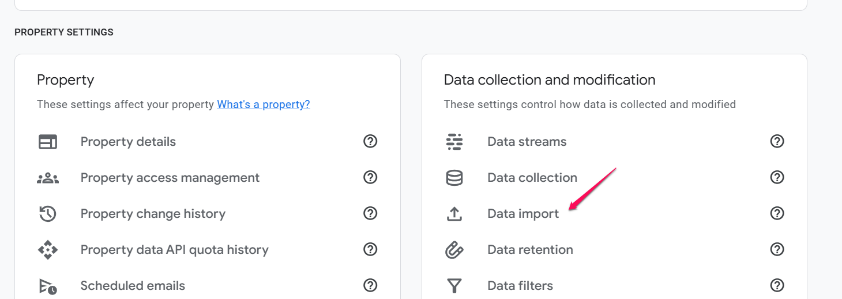
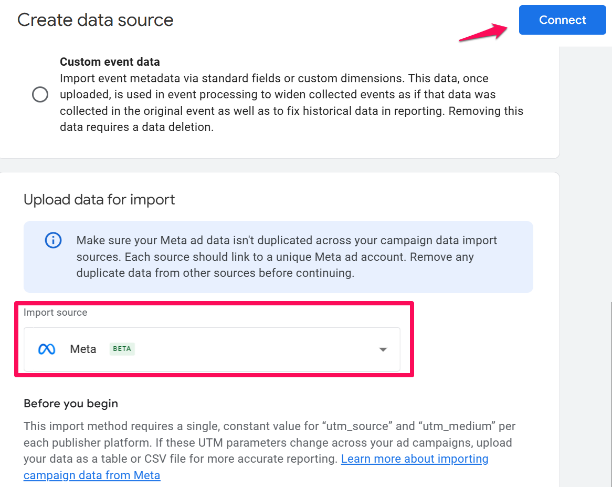
To set up the import, go to the GA4 property tied to your site and head to Admin > Data collection and modification > Data Import.
Click “Create data source”.
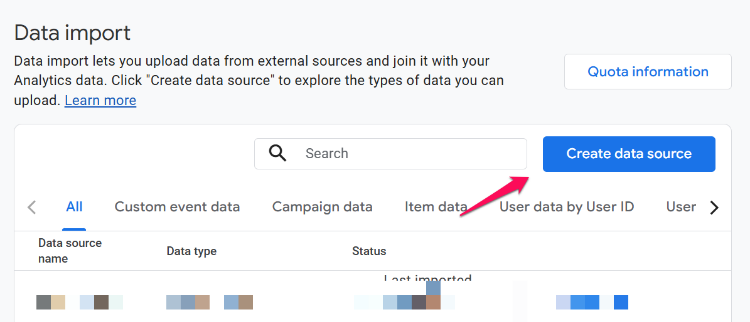
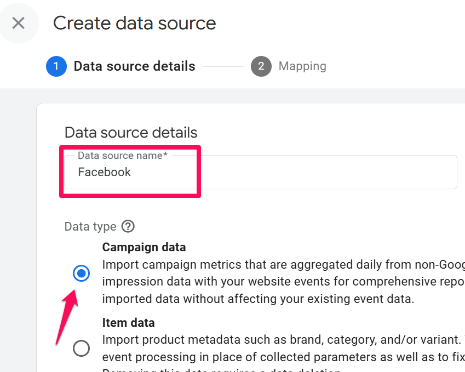
Give the data source a simple name like Meta or Facebook, and choose “Campaign data”.
Select Meta as the import source, then click “Connect” to finish this part of the setup.
Note the “Before you begin” textbox. If the UTM values change from ad to ad, GA4 can’t reliably map the imported cost to the right traffic. For automated import to work properly, every Meta ad must use the same utm_source and utm_medium values, like:
- utm_source=facebook
- utm_medium=display.
If your UTMs (source and medium) vary across ads or campaigns, the matching breaks. In that case, using a manual CSV or table import is a better option because it allows you to define multiple UTM mappings.
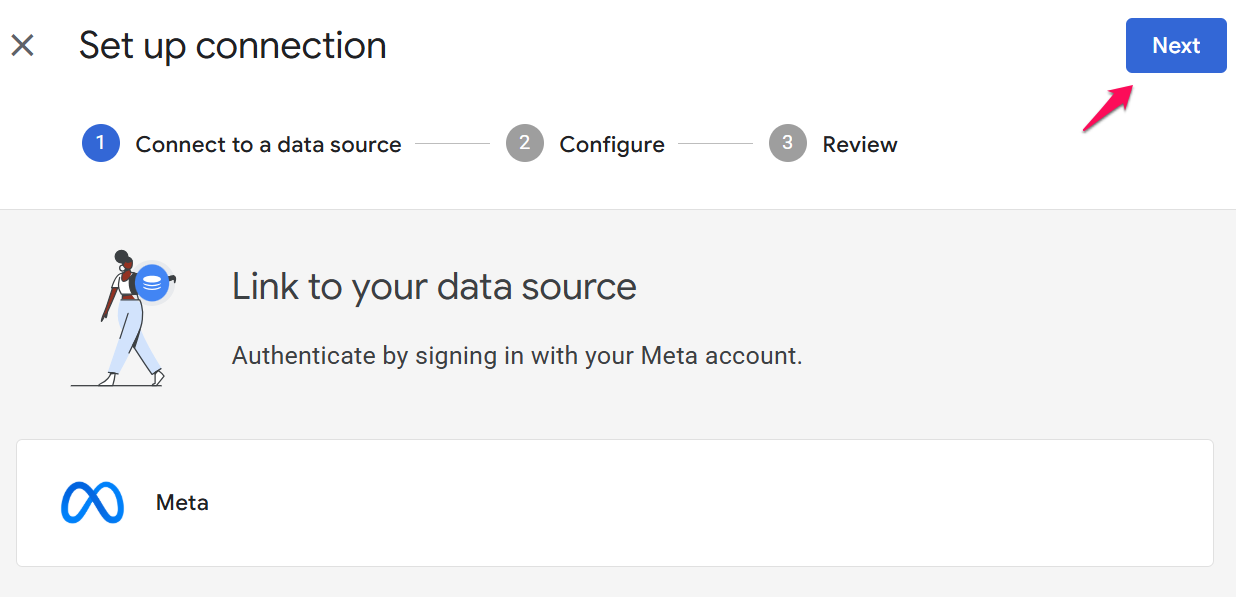
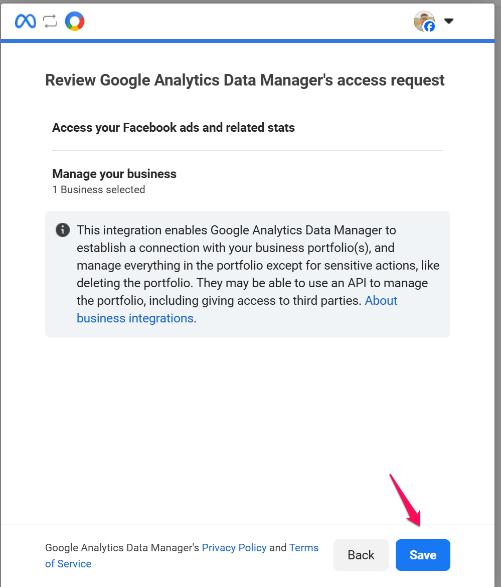
After clicking “Connect”, a setup wizard appears. Click “Next” to continue.
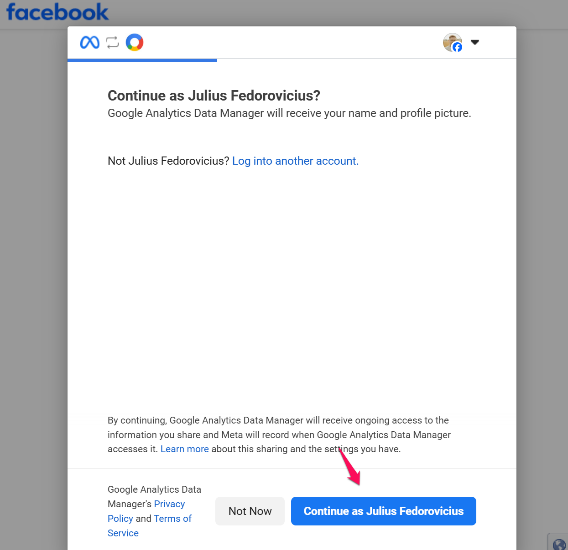
Connect your Meta account (sign in via the pop-up or continue if you’re already signed in) to grant access.
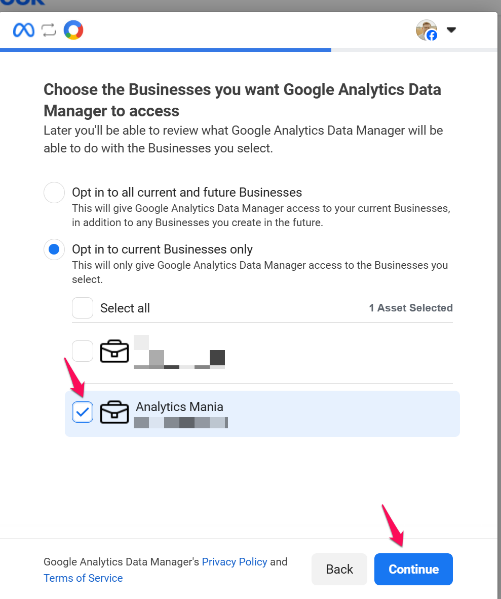
Then, select the business account from which you want to import Meta ad costs. Click “Continue” to finalize the connection to your account.
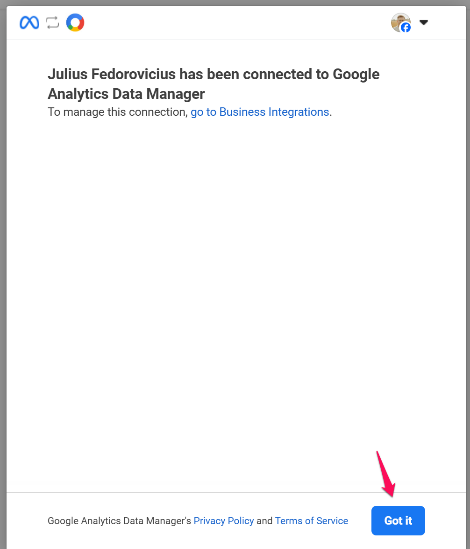
On the next screen, simply click “Save” to finish things off.
Finally, click “Got it” to make sure you understand everything.
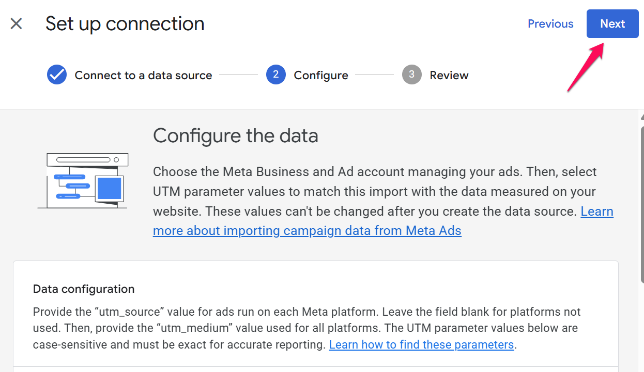
After the wizard is completed, you’ll be redirected back to Google Analytics. In this step, you’ll need to configure the data. In the Things to keep in mind section, we mentioned that the integration will work only if your UTM parameter values are consistent across ads (utm_medium and utm_source).
You must enter at least one valid utm_source value. If you have different utm_source values for different Meta’s channels (e.g., one for Facebook, one for Instagram, etc), enter them in separate fields.
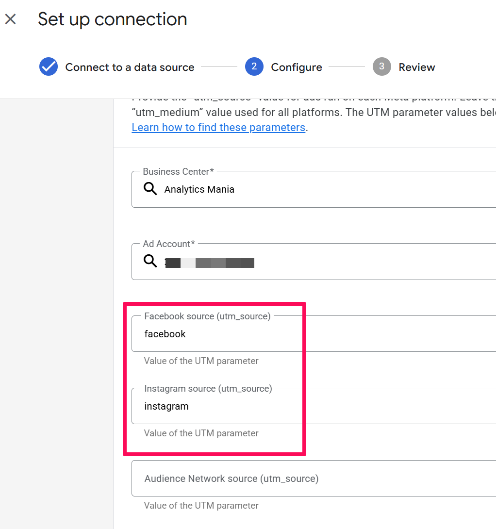
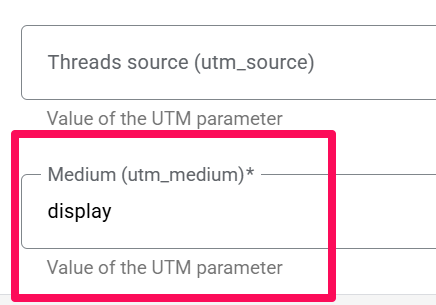
The value for utm_medium must be the same across all Meta’s channels for the automated import to work properly. In this case, I used “display” as the value.
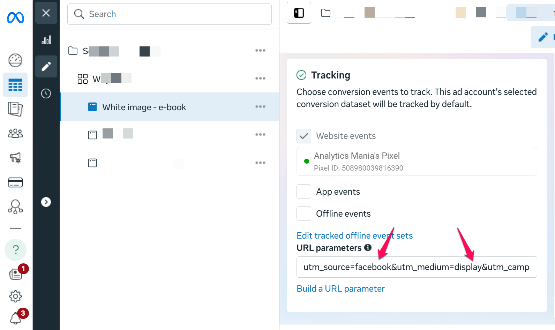
If you are not sure where to find the value of your utm_source and utm_medium in Facebook:
- Go to business.facebook.com.
- Navigate to the Ads manager, find your ad, and click “Edit” next to it.
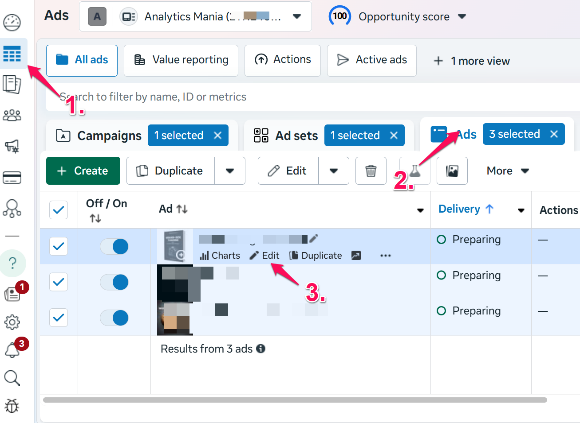

- Scroll down to the “Tracking” section and look at the value of URL parameters (utm_source and utm_medium).

There is also a “Filters” option where you can select which particular campaigns to import (but in most cases, you will probably want to import all campaigns, so this section can remain empty).
Once everything is configured, click “Next” to review everything.
Review what’s on the page and click “Finish” to complete the setup.
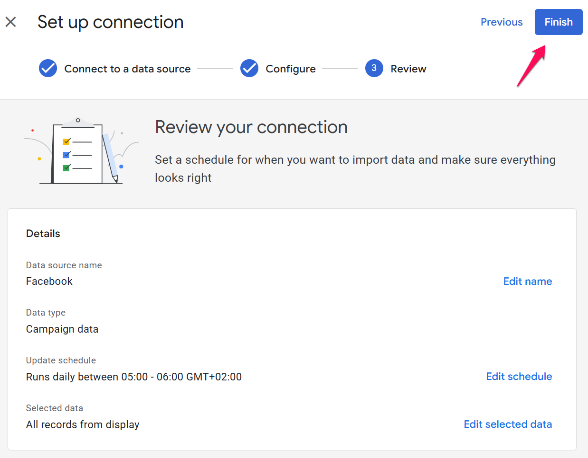
And that’s it, the data import is configured! It will be displayed as “Processing” for a while.
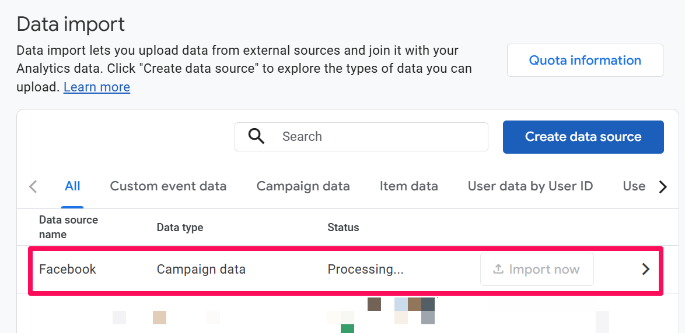
Once created, the connection is established. Data may take up to 30 minutes to begin processing and up to 24 hours to appear in reports. GA4 will attempt to backfill up to 24 months of past data, and new data will sync automatically going forward.
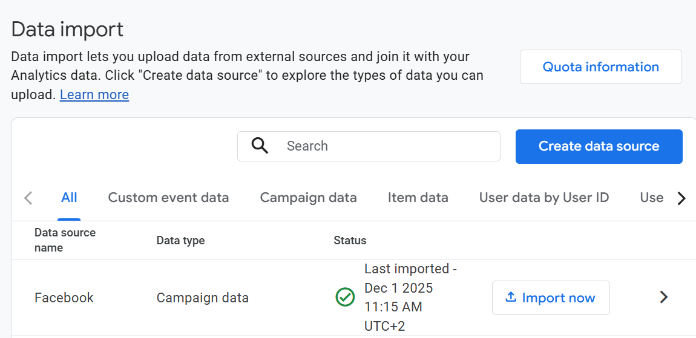
Eventually, the status of such imports will change to “Imported”, letting you know that Meta ad costs are now available in your property.
If you don’t see data after 24 hours:
- Check that your UTMs match exactly.
- Make sure you selected the right Meta business account.
Finding the data
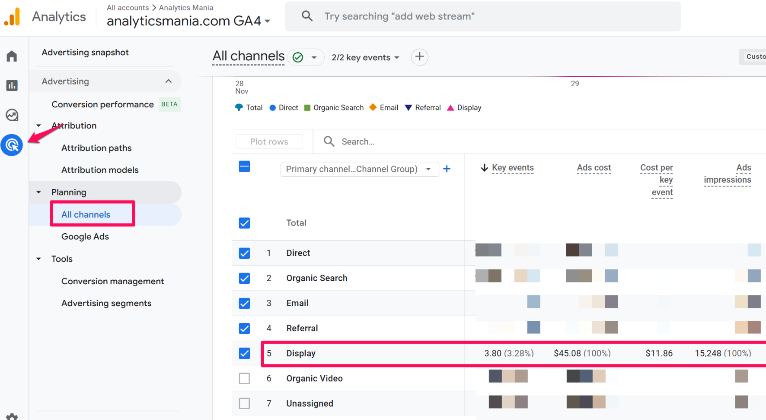
To find the imported data, go to Advertising > All Channels inside GA4. Your cost-related metrics, like ad spend, cost per click, and cost per conversion, will be available there, giving you a full picture of your Meta advertising performance right alongside your other channels.
Import Meta Ad Cost Data to Google Analytics 4: Final Words
Bringing Meta ad cost into GA4 is one of those small setup tasks that pays off quickly. Once everything is connected, you get a clearer, more accurate picture of your marketing performance without juggling multiple dashboards or manually uploading data.
If you encounter any problems with your setup, review the steps and tips in this article, and, if they persist, leave a comment below!
5 COMMENTS
Thanks for the helpful guide!
I managed to import the cost, but the issue is that I can't manage to display the data that I have in GA4 in Looker Studio Reports. The Ads cost metric stays empty, next to Meta campaign names.
I checked and it works fine for me. as a test, I added session source/medium and ads cost to the table in LS. I see cost data populated next to facebook.
Maybe you need to wait longer? If you imported data today, try checking the report tomorrow.
So far we can't match ad and GA data on campaign name level but only for channel, source and medium.
However, using (dynamic) campaign ids (utm_id) provides us this kind of granularity. What is your experience with it?
Campaign works fine. I went to Advertising > Planning > All channels, selected the Campaign there as a custom dimension and I see ad cost data attributed to Facebook campaigns.
you see ads cost data next to key events (same row) on campaign level? for us this works only on source/medium level. After adding the campaign name, ad cost data isn't alongside GA data anymore.
Interesting, since I don't see any differences in your setup compared to ours.