
June 4, 2018
Track The Timing of Form Submission with Google Tag Manager
Form tracking is one of the most popular topics on this blog. Chances are that you’ve already seen some of my guides, like 6 Ways How to Track Forms, How to Track Form Abandonment, Contact Form 7 tracking, Enriching Form Submission Data, and many others. In fact, I even created a separate post category for those who are willing to learn more.
Recently, I’ve revisited one of Simo Ahava’s blog posts, Form Field Timing, and thought to myself what about the timing of the entire form? And that question led me exactly to the birth of this blog post where I’m playing around and trying to track the timing of form submission, or in other words, how long does it take to successfully submit a form.
Prerequisites
This guide assumes that you already know how to track forms with Google Tag Manager. Don’t feel very confident yet? Not a problem, read this guide and then come back.
Also, Click Tracking will be important as well so double check if you know how to utilize it.
Take your time and read/watch those two resources first, otherwise, you might feel confused in the upcoming chapters.
Ready? Let’s continue our journey.
Track The Timing of Form Submission: Action Plan
It will be a pretty long (read “usual”) post so brace yourself. Here’s the action that we’ll follow:
- Capture the moment when a visitor starts to fill in form fields and save that exact time as a variable (let’s call it a Start Time).
- After a form is successfully submitted, we’ll calculate the duration of how long did it take to fill in the fields and submit a form.
- Send this data to Google Analytics by using Timing hit type.
Note: some forms refresh the page (or redirect somewhere) after a successful submission, while others don’t. Therefore, there are two methods of how to store the Start Time and I’ll cover them both.
#1. Capturing the Start Time
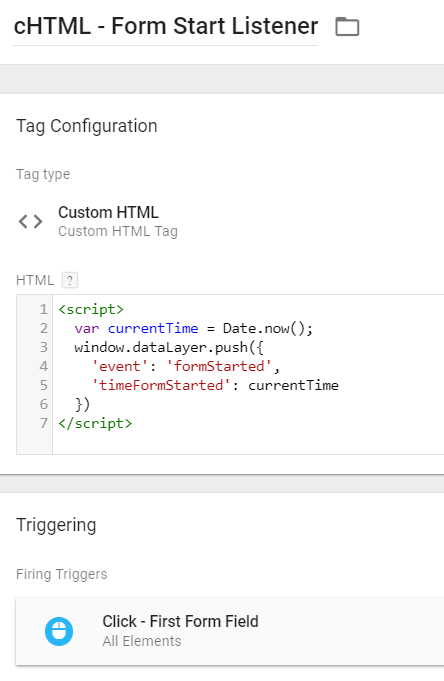
First, we need to capture the moment when a visitor starts to fill in the form and (surprise surprise…) there’s a script that. It will push the exact timestamp when that happens to the Data Layer.
<script>
 var currentTime = Date.now();
 window.dataLayer.push({
 'event': 'formStarted',
 'timeFormStarted': currentTime
 })
</script>
In case you didn’t know, this JavaScript uses a method Date.now() which returns the number of milliseconds elapsed since January 1, 1970 00:00:00 UTC.
Just like any other JavaScript snippet, it needs to be pasted in a Custom HTML Tag. What is the best moment to fire that tag? The answer is “when a visitor clicks the first form field”.
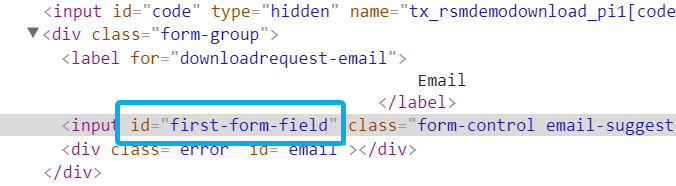
If you haven’t yet, enable any Click Trigger (+ click variables) in your GTM container, then activate Preview and Debug mode, click the form field and try to find a variable/parameter which can help you identify the first field of the form. Not just any form field, but the first one.
Ideally, that form field could have an ID. If not, your second option would be CSS Selectors. I won’t dive deeper into them in this guide, Simo has written a great post on that topic already, so go and check it out).
Let’s assume that in this example, the first form field has an ID “first-form-field” (what a convenience! 🙂 ).
Then, our Click Trigger could look like this:
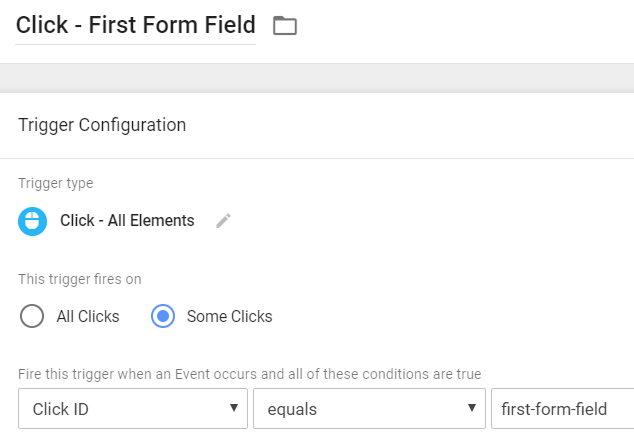
Assign this trigger to the Custom HTML Tag that we’ve previously created (which pushes that Start Time to the Data Layer).
#1.1. Test
Enable/refresh Preview and Debug mode and head to the website you’re working on. Click the first form field. This is the result you should expect:
- After the first form field is clicked, cHTML – Form Start Listener tag will be fired (on gtm.click event).
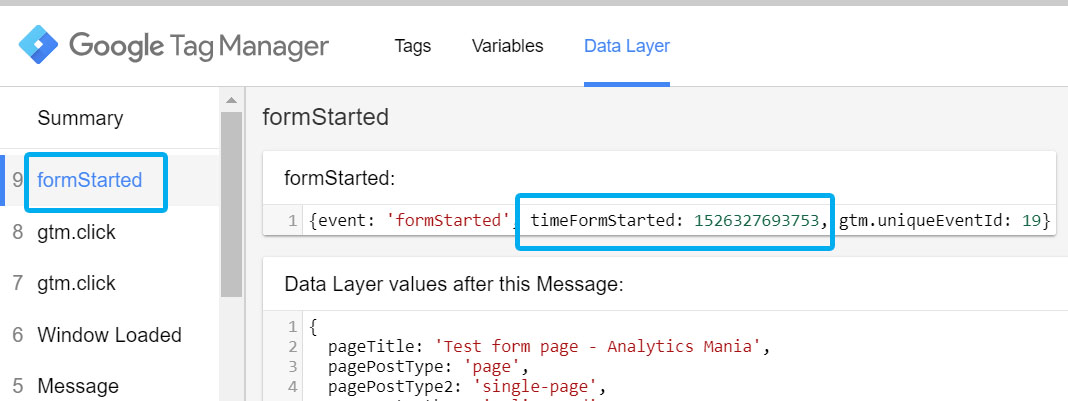
- Immediately after that, formStarted event should also appear in Preview and Debug mode’s event stream.
- Click other form fields. The cHTML tag must not fire on those clicks.
Click it and go to the Data Layer tab. That’s where you should see timeFormStarted which contains the exact moment when the first field was clicked.
So what? Once a visitor submits the form, we’ll subtract the Start Time from the Submission Time thus will get the duration of how long did it take to successfully submit a form.
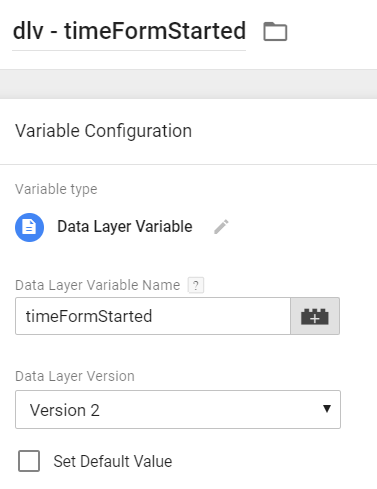
We’ll need this information (as a variable) in the next chapter so let’s create a Data Layer Variable.
Important: Every time a page refreshes, all keys and values in the Data Layer are wiped out and you start once again from the white piece of paper. So if you capture the Start Time and a visitor then refreshes the page before the submission, you won’t be able to track the time to submit the form. Unless you’re patient enough and will continue reading (because I have an alternative solution in the 2nd part of this guide).
#1.2. Avoiding recurrent clicks on the first field
If a visitor fills in all 3 fields and then clicks the first one once again, the value of timeFormStarted will be reset (and that makes your data inaccurate). You can go the extra mile and forbid the Custom HTML tag to fire if timeFormStarted Data Layer Variable already exists.
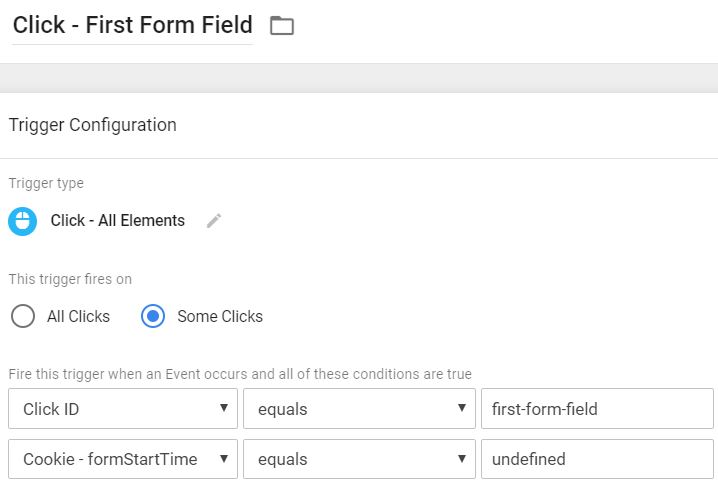
Let’s open a previously created Click Trigger and add an additional condition:

Such trigger will fire only if clicked element’s ID is first-form-field and if timeFormStarted does not exist yet. All subsequent clicks on the first form field will be ignored. After the page is refreshed, timeFormStarted will be reset back to undefined.
#2. Calculating the Duration
Now, let’s create one more variable, this time it’s Custom JavaScript. It will capture the current time (again, with Date.now()) and then subtract formStartTime from it.
Here’s the code:
function() {
 var currentTime = Date.now();
 var formSubmissionDuration = currentTime - {{dlv - timeFormStarted}}; //Rename the Data Layer Variable if necessary
 return formSubmissionDuration;
}
Keep in mind that I’ve inserted the previously created dlv – timeFormStarted so if you gave it a different name, make sure you also change it in the function above.
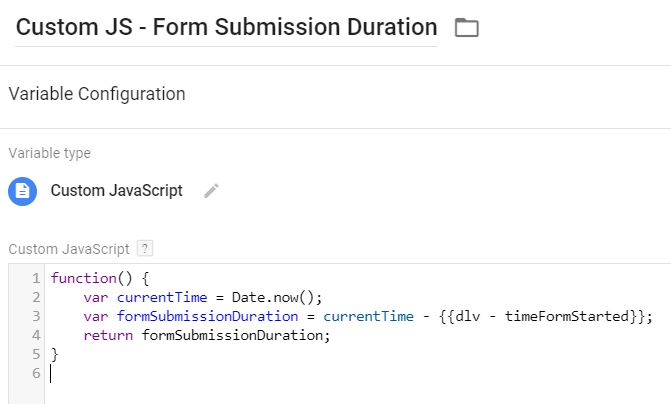
What this little script does is it takes the current time and subtracts the Form Start Time from it. As a result, you’ll get the duration of how many milliseconds have passed between the initial click on the first form field and the final form submission.
This variable will be resolved with every change in the dataLayer that you see in the GTM Preview and Debug mode, therefore, you’ll always have the up-to-date value.
#3. Sending Timing Data to Google Analytics
As I have mentioned at the beginning of this blog post, you should be skilled enough to track successful form submissions by yourself, therefore, I will not go into details here. If you still have doubts regarding your knowledge, go ahead and read the guide on how to track forms with GTM. Go, you’ve got plenty of time. Meanwhile, I’ll be waiting here.
As an example, let’s imagine that you’ve already set AJAX form tracking. This leaves you with a Google Analytics Event Tag, ajaxComplete custom event trigger and several new Data Layer Variables. What you need to do now is to create an additional Universal Analytics tag with the following settings:
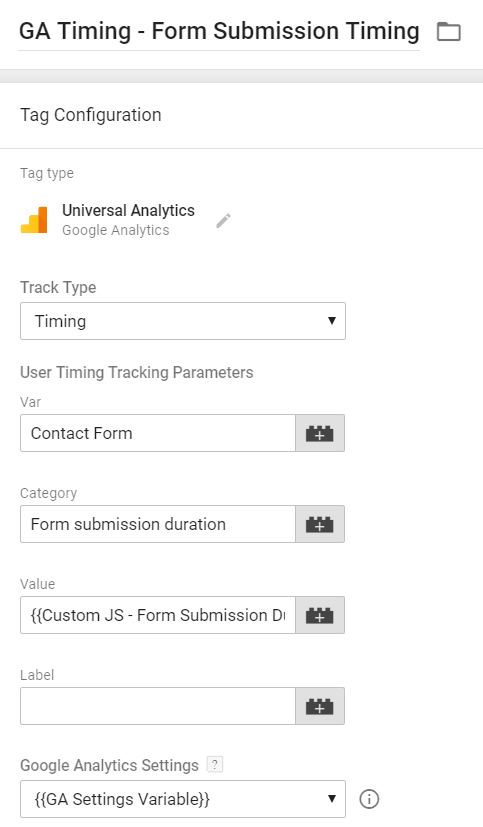
Feel free to rename Category and Var (as they serve the similar purpose as Event Category and Event Action in GA event tracking). Make sure that in Value field you’ve entered the aforementioned Custom JavaScript variable which calculates how long did it take to submit the form.
Link this Timing tag with the same trigger you used to fire a Google Analytics Event tag (I’m talking about the Form Submission event tag that is also mentioned in this guide).
#4. Check The Data in Google Analytics
Unfortunately, Real-time reports won’t help you here as they do not display timing hits. However, there are several other options here:
- Use Tag Assistant. When the Timing tag fires, click the Tag Assistant and check if it shows any errors.
- Use GA Debugger to see if the request was successfully sent. Install this Chrome Extension, open browser’s Console and fire the Timing tag. If something’s wrong, it will show you errors.
- Push the data to GA and wait a couple of hours for it to appear in reports. In Google Analytics, User Timings report can be found in Behavior > Site Speed > User Timings.


#4. To Sum Up
Here’s the entire process in the nutshell:
- A visitor clicks the first form field. With the help of GTM, we capture that moment and store that information (Start Time) in the Data Layer.
- Then we created a Custom JavaScript Variable which checks the moment for form submission and subtracts Start Time from it. This variable is resolved with every change in the Data Layer (click, scroll, form submission, etc.)
- Finally, we created a Universal Analytics tag (track-type: Timing) and linked it to the Form Submission trigger. In this guide, we skipped the process of creating Form Submission Trigger part because it’s already fully explained here.
- So, when a visitor clicks the first form field, then submits the form, Universal Analytics Timing tag will send the time of how long did it take for a person to successfully submit the form.

However, there’s one BUT. If a page is refreshed somewhere in the process, the Form Start Time data will be lost, therefore, you’re always at risk of losing valuable information.
How can we track the Timing of Form Submission then? What’s the solution? The answer is Cookies.
#5. What if the form refreshes the page and loses “Form Start Time”?
If you need some data to persist across multiple page views, cookies are your best friend. If you’re new to cookies, read the guide where I explain how to set, edit, and delete them with Google Tag Manager.
Comparing to previous chapters of this guide, the implementation plan here will be more or less the same, just scripts will be different.
#5.1 Storing the Form start time in the cookie
Instead of a script mentioned in chapter #1, use this one. It will store the start time in the cookie called formStartTime. The cookie will automatically expire in 24 hours.
<script>
 var currentTime = Date.now();
 window.dataLayer.push({
 'event': 'formStarted' // this push is not required, just to make debugging easier
 });

 var cookieName = "formStartTime"; // Name of your cookie
 var cookieValue = currentTime; // Value of your cookie
 var expirationTime = 86400; // 24 hours in seconds
 expirationTime = expirationTime * 1000; // Converts expirationtime to milliseconds
 var date = new Date();
 var dateTimeNow = date.getTime();

 date.setTime(dateTimeNow + expirationTime); // Sets expiration time (Time now + one month)
 var expirationTime = date.toUTCString(); // Converts milliseconds to UTC time string
 document.cookie = cookieName+"="+cookieValue+"; expires="+expirationTime+"; path=/; domain=." + location.hostname.replace(/^www\./i, ""); // Sets cookie for all subdomains

</script>

</script>
Paste this code in the Custom HTML tag and use the trigger mentioned in that very same chapter #1.
#5.2. Calculating time to submit a form
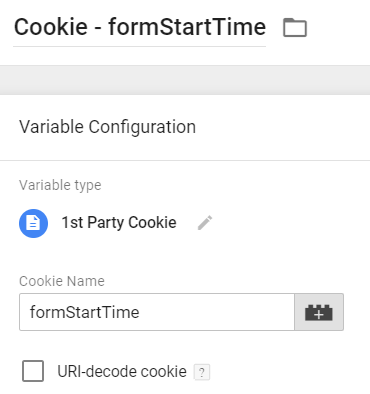
In chapter #1, you had to create a Data Layer Variable dlv – formStartTime. This time, we stored that time data in the cookie rather than Data Layer, therefore, we need to use appropriate measures to access that information.
Create a 1st-party cookie variable that will access the timing data (P.S. the cookie name is case-sensitive):
Now, take the script from the #2 chapter and replace {{dlv – timeFormStarted}} with the new {{Cookie – formStartTime}}.
function() {
 var currentTime = Date.now();
 var formSubmissionDuration = currentTime - {{Cookie - formStartTime}};
 return formSubmissionDuration;
}
Also, if you also want to avoid the recurrent clicks of the 1st form field (which reset the timing data in the cookie), change click trigger’s rules to the following conditions:
#5.3. Sending Form Timing Data to Google Analytics
Nothing changes here. Chapter #3 is totally fine.
#5.4. Optional: Cleaning After Yourself
When Universal Analytics Timing tag is fired, it passes the timing data from the cookie and thus completes his mission. To keep things tidy, I’d suggest deleting the cookie right after the data is sent to GA. We’ll do that with help of hitCallback (Lunametrics have published an amazing blog post about it). Plus, if you haven’t yet, you’ll learn something new.
- First, we’ll need to create a function (as a variable) which deletes the Cookie – formStartTime.
- This function will be called upon Universal Analytics Timing hit’s successful completion.
#5.5. Cleanup Variable
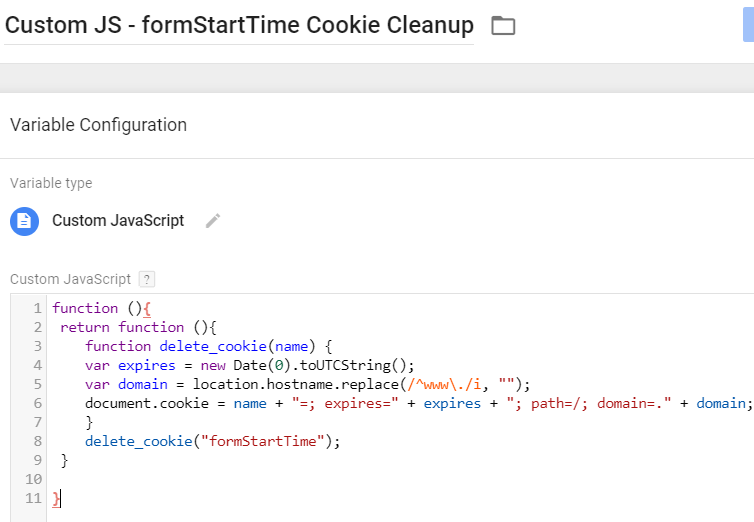
Create a Custom JavaScript variable with the following code snippet:
function (){
 return function (){
 function delete_cookie(name) {
 var expires = new Date(0).toUTCString();
 var domain = location.hostname.replace(/^www\./i, "");
 document.cookie = name + "=; expires=" + expires + "; path=/; domain=." + domain;
 }
 delete_cookie("formStartTime");
 }
}
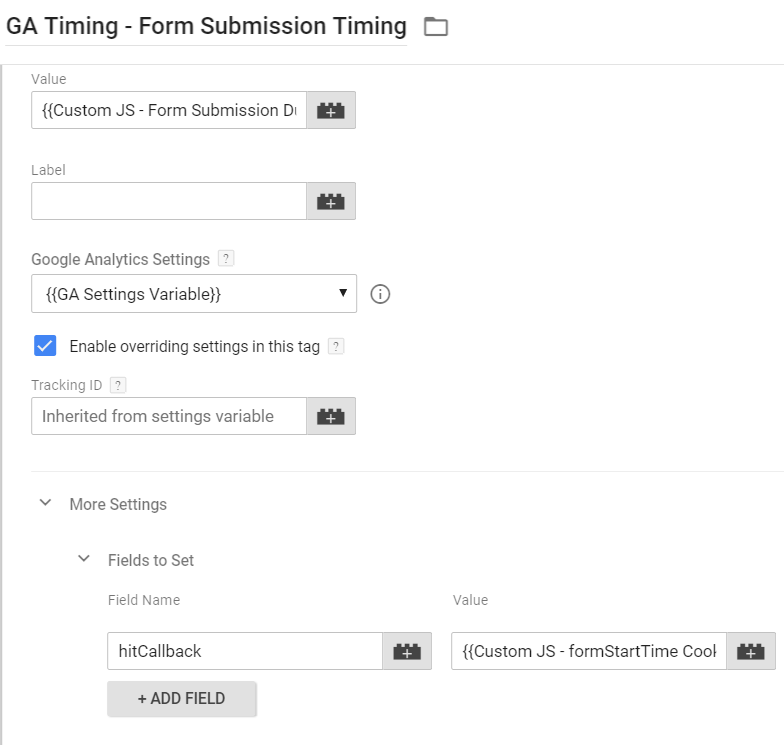
The next step is to open our previously created Universal Analytics Timing tag and:
- click the checkbox Enable overriding settings in this tag
- then click More settings > Fields to set > Add field
- enter hitCallback and in Value field insert the Custom JavaScript variable which should clear the cookie.
Let’s sum up what we’ve just done.
When a form is successfully submitted, our Universal Analytics Timing tag is fired. After it is successfully dispatched, Google Analytics sends an “OK” signal (in form of a hitCallback). After hitCallback is initiated, our Custom JavaScript Variable will be activated.
That variable is not just a simple value, it’s a function that deletes the cookie with timing data.
Tracking Timing of Form Submission with GTM: Final Words
Yet another form tracking (with Google Tag Manager) guide has come to an end. This time, I’ve explained how to add an additional metric to your analytics reports: the time of how long does it take visitors to successfully submit a form.
You can use this technique next to Form Abandonment Tracking or Form Field Timing which should give you a better understanding how visitors/prospects/customers are interacting with forms.
9 COMMENTS
Hi Julius,
Interesting read. I was wondering if there were any advantages of using this as a timing variable vs passing it as an event with value field = duration [as I think cat/action/label would make this a string]?
Thanks.
Hey, actually sending timing information as event value will also be useful.
User timing reports offer the same reporting functionality as Page Timing reports. You can see how different times are distributed on the world map, etc. Timing reports give you additional and easy-to-access view on data.
If you're interested just in timing itself (like knowing average timing numbers, then event + value is fine as well.
If you want to get some more ways how your data is displayed, user timing reports are the way to go.
Go to Behavior > Site Speed > Page Timings and you'll see how the report example of how your form timing data might look like. At the top of report are 3 tabs: Explorer, Distribution, Map overlay. Feel free to explore them.
Great, thanks for the info!
Hi Julius,
I did exactly what you recommend in the article but it didn't show me the average user timing (sec). It's quite weird because in the preview mode i check the custom js and it send me the correct value in miliseconds.
What do you think about this? what could be the issue or the mistake?
Thanks in advance!
Hey,
1. But have you inserted the Custom JS variable in the Google Analytics tag?
2. Did the timing tag fire when the form is complete? Click the tag to check what the data was passed.
3. Have you tried to use GA Debugger chrome extension to see if the data was actually sent to Google Analytics?
Hey,
Thank your for the quick response.
All the answers are affirmative. The trigger is sending the information to analytics but the problem is that i didn't get the metric average user timing (sec), just the user timing sample.
Send me an email (to julius @ analyticsmania.com) with screenshot of your GA reports and with the link to your shared preview and debug mode.
Great article as always. I just implemented this on GTM, but still waiting to see if it comes through to GA correctly. One thing I noticed is the duration variable returns in ms whereas the GA Avg. User Timing is in seconds. Do we need to convert the ms to sec?
Hi,
Great guide! How would you modify this for GA4? I can't find a GA4 tag to substitute the UA-tag you write about in #3.