
January 1, 2022
Custom Image Tag Demystified (GTM)
Updated: January 1st, 2022
If you’re just starting to learn GTM, you probably already have this question in mind (or you’ll have it soon). You’ve already implemented some Google Analytics Tracking to your site, so you’re not completely unfamiliar with GTM. But the question keeps bugging you. What is Custom Image Tag in Google Tag Manager?
I’ve seen some blog posts on the web mentioning it, but no comprehensive resource which could answer more specific questions. In this blog post, I’ll show you what’s behind the curtain.
Custom Image tag in a nutshell
The custom image tag requests an image from a particular URL. The interesting part is that by making the request you’re actually transmitting information to a server. For example, if you request an image via URL https://www.example.com/something?parameter1=good¶meter2=123, the receiving server processes parameter1 and parameter2 and acts accordingly (e.g. registers those parameters as an event).
Easy as that.
Custom Image Tag is just another way for Google Tag Manager to send the data from your website to other tracking tools, e.g. Facebook Pixel, etc.
Google Analytics, Custom HTML and other tags rely on JavaScript. Those regular tags become useless when JavaScript is disabled in a browser and that’s where the Custom Image Tag becomes the hero of the day.
The Tag is loaded via iFrame (which is created with help of <noscript> part of the GTM snippet).
<!-- Google Tag Manager (noscript) -->
<noscript><iframe src="https://www.googletagmanager.com/ns.html?id=GTM-XXXXXXX"
height="0" width="0" style="display:none;visibility:hidden"></iframe></noscript>
<!-- End Google Tag Manager (noscript) -->
This means that you can dispatch a Custom Image Tag regardless of what are the JavaScript settings in a browser (on or off).
Fields and settings
Frankly, there aren’t many settings in a Custom Image Tag:
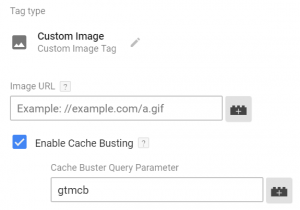
- Image URL.
- Cache busting parameter.
All other settings are pretty much standard (compared to other tags): Tag Firing Priority, Tag Sequencing, etc.
Image URL is the field where you should enter the address of the image with all parameters necessary to pass the data. For example, https://www.example.com/something?parameter1=good¶meter2=123.
- Use “//” (instead of https://) if protocol-relative versions of the image are available, e.g. //www.example.com/something?parameter1=good¶meter2=123
- Select “https://” if only a secure version of a tracking pixel is available.
Cache Busting ensures that hits are registered from browsers that have cached versions of the image. You can use either the default Cache Busting Parameter (gtmcb) or set your own.
What is a Cache Busting Query Parameter (gtmcb)?
One of the reasons why websites are loading fast enough is cache. It is a temporary storage location on your computer for files (CSS style sheets, JavaScript scripts, images, etc.) downloaded by your browser to display websites.
When you revisit a website, the browser checks which content was updated in the meantime and only downloads updated files or what is not already stored in the cache. This reduces bandwidth usage on both the user and server-side and allows the page to load faster.
Sound awesome, right?
For the end-user, yes. For the marketer/digital analyst/conversion specialist, not always.
If you didn’t use the cache busting, your Custom Image Tag would work only the first time it loads. On the second loading attempt, no data would be transmitted to the receiving server. Why? Because the image would be already saved in the cache and would be loaded from the browser’s internal storage instead of an external server.
This means that the newest data will not reach the target, e.g. Facebook Pixel’s server.

So what’s the solution? Well, the image’s URL must be different every time it is loaded and that’s where the Cache Buster comes in handy.
Cache Busting Query Parameter (gtmcb) is a function that returns a string of numbers every time a Custom Image Tag fires and adds it as a query parameter to Image URL, e.g. https://www.pixelreceiver.com/track?parameter1=usa>mcb=1199950751.
Every time gtmcb is called it returns a different value, thus Image URL will always be different (which is good because you’ll avoid browser cache).
So what should you do regarding the gtmcb parameter in Custom Image Tag settings? Nothing. Leave it as it is. Google Tag Manager recognizes this function and automatically adds the unique number to the Image URL.
Here’s an example of Custom Image Tag which sends page view events to Facebook servers.
![]()
![]()
You’re probably wondering what Trigger am I using in the example above. Obviously, we do not need to fire the Custom Image Tag on all pages because Facebook Pixel <script> is already doing that. Instead, the ideal moment to fire is when JavaScript is disabled. Luckily, there’s a Custom JavaScript Variable for that:
 function() {
 return true;
}

It returns true only when JS is enabled. So I used it in a trigger and assigned to the Custom Image Tag.
You can learn more about using Custom Image Tag with Facebook Pixel in this blog post.
By the way, you can also use GTM’s {{Random Number}} variable instead of gtmcb.
How can I test a Custom Image tag?
There are some nuances here. Google Tag Manager Preview and Debug mode is an awesome tool that helps you test and identify issues prior to deploying tags to the live environment. However, there’s one but. It requires JavaScript enabled in your browser. No JS = No Preview and Debug mode.
So how can one test a Custom Image Tag without a JS?. Here is my two-step process of debugging Custom Image Tag.
#1. Fire the Image Tag on All Pages
First, I want to make sure that I pasted the correct Image URL and gtmcb generates a unique string of numbers every time it loads.
- So I just add the All Pages trigger to the tag.
- Enable/refresh Preview and Debug mode.
- Refresh the website and check if the Custom Image Tag fires.
- If yes, then I go to the browser’s Developers Tools > Network. In Google Chrome, you can find Developer tools by going to Menu > More Tools > Developer Tools
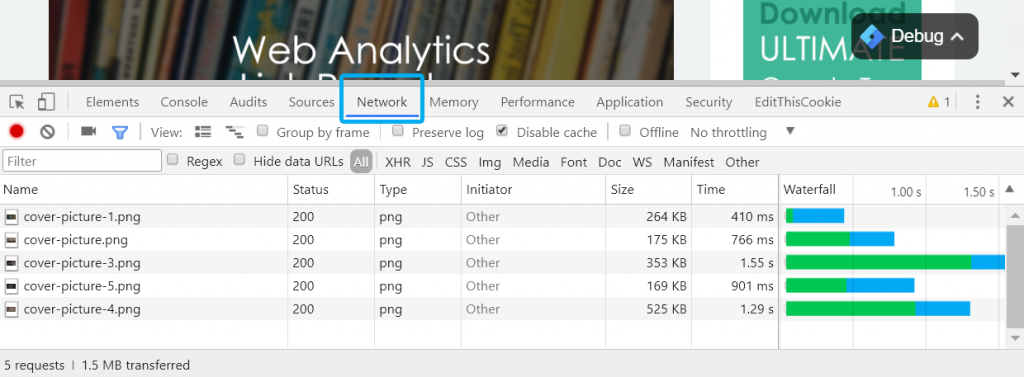
A panel with various tools will appear at the bottom of the screen. Click Network tab and then refresh the page. You’ll see a lot of lines appearing in this table. This is what’s happening under the hood when you browse websites. Every line represents a request, you can see its size, loading time, etc.
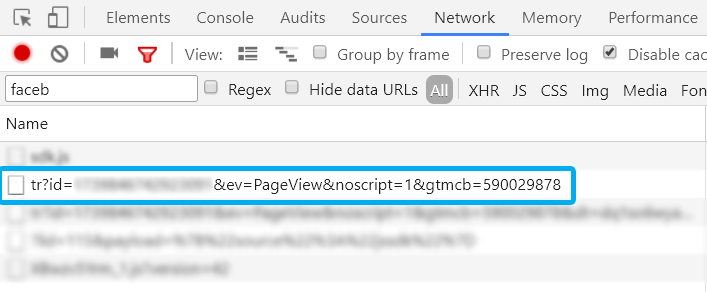
Currently, we are interested in our Custom Image Tag. Do you remember what Image URL did we enter in GTM? It was https://www.facebook.com/tr?id=423329234239&ev=PageView&noscript=1, so let’s use the filter and find our that request. Here it is:
![]()
![]()
As you can see, gtmcb equals to a string of random numbers. The Image URL also contains a Pixel ID (I’ve blurred it out) and event name (PageView).
The 1st step of the test is complete. We’ve checked whether the Custom Image Tag fires and transmits the data to the external server (in our case, Facebook).
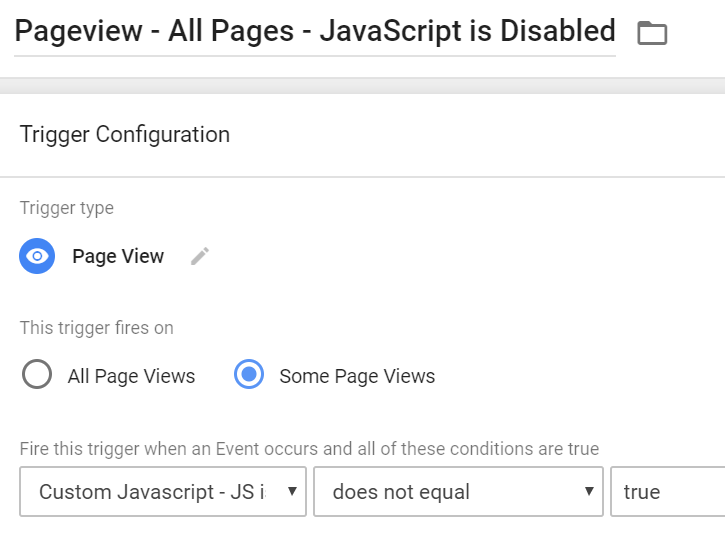
Now, remove the All Pages trigger and make sure that only Pageview – All Pages – JavaScript is Disabled trigger is linked to the Custom Image tag. All Pages was used only for testing/debugging purposes.
Publish all changes to the live environment.
#2. Testing in Live Environment
Now, let’s do some field-testing.
- Disable JavaScript in your browser. I won’t write the instructions because every browser has different menus. Just google that.
- After you’ve done it, open the Network Tab in Developer tools.
- Use the filter to find the Image URL you’ve used in the tag (just start entering Image URL and you’ll quickly find what you’re looking for).

- If there are no errors connected to the request, that’s a good sign. Also, check whether Facebook Pixel Helper reports successful data transmission.


Where can I use the Custom Image tag?
The first example that comes to mind is Facebook Pixel. It consists of two parts: <script> and <noscript>. The first one will work only when JavaScript is enabled in the browser (deploy it with Custom HTML tag), while another one tracks only those users who have disabled JS.
So if you also wish to track that tiny fraction of users with no JavaScript, you’ll have to implement it separately via Custom Image Tag in Google Tag Manager.
I have published a detailed guide on how you can achieve that.
The second use case is to send interaction data to Active Campaign. Measureschool has posted a video tutorial on this topic.
In a nutshell, you have to fire image tags whenever a user interacts with your website/web app (clicks something, views content, etc.). Every time the image is loaded, a bunch of parameters will be passed to Active Campaign’s servers. You can later segment contacts by the actions they did and send emails to them.
But don’t limit yourself to only these two examples. There are many more possibilities. You can even send Google Analytics Pageview events with help of Custom Image Tag, but you’ll have to be familiar with Google Analytics Measurement Protocol.
Mistakes and misconceptions
There are several mistakes/misconceptions that I notice among GTM users:
- Custom Image Tag is not designed to add pictures to your website. I’ve seen several situations where people try to add an actual image to the footer of their website. Although it’s called an IMAGE tag, its purpose is to load a teeny tiny pixel of which URL is used to transmit the data. If you want to add an image/picture to your website, use Content Management System or ask a developer to do that.
- Custom Image Tag can be used only when JavaScript is disabled. This is not entirely true. You can also fire image tags for users who have JavaScript enabled. The aforementioned Active Campaign example explains how to track all visitors and send the corresponding events with the help of the custom image tag.
Conclusion
Custom Image Tag in Google Tag Manager empowers you to track interactions when the default Google Analytics or Custom HTML tags will fail. I’m talking about situations when JavaScript is disabled in a browser.
The custom image tag loads a tiny image (invisible for visitors) from the given URL with various parameters, e.g. https://www.facebook.com/tr?id=173223234236923&ev=PageView&noscript=1. Those parameters are enough for the receiving server to process the data as event/interaction/whatever. So by requesting an image, you’re actually sending tracking data. Awesome, huh?
The most common use cases of the Custom Image Tag are:
- Facebook Pixel tracking for visitors with disabled JavaScript (because if just paste the entire pixel code to the Custom HTML tag, the noscript part will be useless)
- Active Campaign event tracking. Fire Custom Image Tags whenever an important interaction occurs on your website and then create segments based on those events.
8 COMMENTS
thanks so much for your Information about google tag manager.
how can i use GTM for my website?
im the webmaster of http://www.bimehmosafer.com website, looking forward for your guide.
Best Regards,
Reza
Hi,
1. Install the GTM https://www.analyticsmania.com/post/how-to-install-google-tag-manager/
2. If you want to track clicks, here's a tutorial https://www.youtube.com/watch?v=iaJ9HHvKeL8
3. If you want to track form submissions, here's a guide https://www.analyticsmania.com/post/google-tag-manager-form-tracking/
4. More ideas what can you do https://www.analyticsmania.com/google-tag-manager-recipes/
Hello, Thanks for your valuable content. I would like to know I have a ecommerce website and I installed GTM for the website but while I tried to click on images of any particular product than it opens a new page where product description is available. on that page GTM is not working properly i mean GTM is not tracking any type of event inspite of setting tags and triggers. Need your kind assistance regarding this issue.
Difficult to give advice. Maybe GTM is not installed on that page? This would require an audit and/or a consultation call (analyticsmania.com/call)
Nice post, Julius!!
I would like to receive on the server where the image is hosted the complete url (host+path+queryParams) of the website where the image is being displayed.
I got this by using the referrerpolicy="unsafe-url" attribute on the img element and the server receives the full referrer (host+path+queryParams).
But GTM does not allow this attribute to be used.
Shows "Invalid HTML, CSS, or JavaScript found" error when I preview changes in GTM
Do you know if there is any alternative to this?
Hello, Thanks for your valuable Information.
How to track my email open or not?
please guide step by step
thank you
Hi Julius,
First of all thanks for the article, really useful and interesting, I would like to ask you this: for a salesforce email campaign the url that appears when I land on the page contains parameters that I should dynamically pass in the Image URL field of the image tag.
How can I do in this case?
A thousand thanks
Technically, all the html code does is to reconstruct a file out of the browser that is already on the computer by simply sending some script that gives the instructions for the reconstruction. Text is not a problem but images are. If the image is stored on the browser instead, it will take fewer bytes of code to display. A 1 MB image could be stored in the browser which could be displayed using less than 100 bytes of transmission data from the html file on the server. All that counts is that the intended target recognizes the tag and has the associated image.
I remember the days of the dialup servers using 9600 baud. This reconstructive code is the only way that they could possibly function. I would suppose that it would also have a security advantage for associations using the same browser.