
January 2, 2026
Google Analytics 4 User ID for cross-device tracking: how to configure it
Updated: January 2nd, 2026
Google Analytics 4 has three ways of identifying people who visit your website: User ID, Google Signals, and the device. “Device” basically means 1st party cookies. If a visitor clears cookies or starts using a different device, that will be treated as a new one. Google Signals uses data from people who use Google Accounts and have enabled ads personalization. However, the most accurate way of identifying visitors is the User ID. But it works well only if people can log in to your website.
In this blog post, I will explain how to configure User ID in Google Analytics 4 with Google Tag Manager and where you can later see that data in GA4 reports.

Table of Contents
– Here’s what you will learn in this article –
- #1. What is the User ID feature in Google Analytics?
- #2. How to send user ID to Google Analytics 4?
- #3. How to get a user ID?
- #4. Insert the User ID variable in GA tags
- #5. Let’s test
- #6. Where can you find/use user ID data?
- Final Words
Video tutorial
If you prefer video content, here’s a tutorial from my YouTube channel.
#1. What is the User ID feature in Google Analytics?
The User ID feature in Google Analytics 4 lets you track a single person across multiple devices and sessions by assigning a unique and non-personally identifiable ID that you provide.
For example, when a user logs into their account on your website, you can send their unique customer ID from your database to GA4. This allows Google Analytics to stitch together their journey from their phone to their desktop, giving you a unified view of their journey.
This method is the most accurate way to identify users because you are providing the identifier, not Google. While other methods like device ID (cookies) or Google Signals are useful, they can’t confidently link a single person across different browsers or devices. By implementing User ID, you are telling GA4 exactly who the user is based on your own system’s data.
The reason the User ID is accurate is that you are providing the identifier, not Google. While Google Signals is powerful, it only works for users logged into their Google accounts who have also enabled ad personalization. The standard device ID, which relies on browser cookies, can easily mistake one person using two different devices as two separate users. By implementing the User ID, you are telling GA4 exactly who the user is based on your own system’s data, which is the most reliable source of truth available.
To better understand the value of User ID, here’s a quick overview:
| Identification Method | How It Works | Strengths |
Weaknesses |
| Device ID | Relies on a first-party cookie stored in the user’s browser. | Simple, works out of the box. | Easily fragmented. A user on a new device or with cleared cookies appears as a new user. |
| Google Signals | Uses data from users logged into their Google accounts who have enabled Ads Personalization. | Can track users across devices without a login if they meet the criteria. | Only works for a subset of your users and data is often thresholded for privacy. Plus, relies on 3rd-party cookies |
| User ID | You pass a persistent, non-PII ID from your own system to GA4 when a user logs in. | Most accurate method for cross-device and cross-browser tracking. Provides a unified view of the customer journey. | Only works for logged-in users, which may be a small portion of your total traffic. |
You will be able to see how users are using different devices. The example below is not the best one, but that’s the quickest one I had:

But that’s the reality when most of your traffic comes to anonymously read content (and not log in to accounts).
You will see those users in the user explorer, too:

The count of users will be more accurate (if the same user uses multiple devices, you will see one user instead of multiple).
But I can’t emphasize this enough: user ID will work well for your business only if a visitor can log in to your website/app. This means that once a visitor/user accesses his/her account, you have its ID in your database.
Later in this blog post, I will show you how to send that ID to Google Analytics 4.
#2. How to send a user ID to Google Analytics 4?
The process is pretty simple. And, if you already know me, I will explain how to do this with Google Tag Manager. In GTM, you must already have a Google Tag. If you have no idea what it is, read this guide on how to install GA4 with Google Tag Manager.
In that tag, we will need to set the user_id parameter.
As a safeguard, we should also include the user_id parameter in all GA4 event tags. If, for some reason, the Google Tag cannot access the user ID, all other GA4 event tags will still be able to do it.
If a user is browsing your website anonymously (read not logged in), that variable will return undefined. Therefore, the user_id will not be sent to GA4. However, once the user logs in to his/her account on your website, the ID should become available. Then GA4 event tags will start getting the user ID, and the Google Tag will access it on the next page load.
Now you might wonder where and how I can get that user_id?
There are several possible options depending on how your website is coded. In the several upcoming chapters of this blog post, I will explain them.
But before that, I want to share several important things.

#2.1. Not everything can be a User ID in Google Analytics
It’s really important to understand that Google Analytics’ Terms of Services do not allow tracking PII (Personally Identifiable Information), such as Email Addresses, Social Security Numbers, etc., stored on their servers. The same principle applies to the User ID. Even if you use email addresses to identify users in your system/CRM/etc., you cannot use email as a User ID in GA.
However, you can still use a less readable User ID from your system (that consists of random numbers, letters, etc.) e.g. 1234567 or 123aboasdb2234. These are acceptable User IDs that you can use in Google Analytics.
But you might say Hey, aren’t such IDs still PII? I can look that ID up in my CRM and still identify the visitor.
Well, yes, you can. But GA allows that. Kind of a gray area, but the industry aligns with it. So don’t panic and use them. To sum up:
- [email protected] – CANNOT be used as a User ID in Google Analytics
- 5239asbd923fade923da – CAN be used as a User ID in Google Analytics.
The reason this is an accepted practice is that the User ID is only identifiable within your own private system. To Google’s servers, an ID like “5239asbd923fade923da” is a meaningless, random string of characters because they do not have access to your customer database.
#2.2. Historical data, User ID length, and other quick tips
Before we get the user ID, here are several more tips and gotchas.
Historical data. User ID is not applied to historical data that goes beyond the scope of the same session. When a new visitor lands on your website, Google Analytics 4 stores a cookie with a randomly generated ID (this is NOT a user ID). This client ID is then used on every page.
If, after several sessions, that same user decides to register on your website, they get a user ID. However, a user ID is not automatically applied to all those past sessions. You could do some magic with BigQuery if you know how to work with it, but there is no automatic user reverse-stitching.
On the other hand, if a visitor does event 1, e.g., a page_view (without a user ID), then logs in during the same session, user ID will be automatically applied to page_view, too. So, the events that happen before the user ID is sent to GA4 during the same session will also get the user ID.
A good way to think about this is like assigning a name to a regular customer at a coffee shop. For weeks, they are just “the customer who buys a latte”. All their past visits are logged under that anonymous description. The moment they introduce themselves as “John”, all of today’s actions, even the latte they bought just before saying their name, can be linked to “John”. However, you cannot go back in time and change last week’s anonymous “latte customer” receipt to say “John”. The new ID only applies from that session forward.
User ID length. The maximum length of the user ID that you can send to Google Analytics 4 is 256 Unicode characters.
User ID can’t be merged across GA4 properties. To track a single-user journey in GA4, you must use the same GA4 property (even if that means sending data from multiple websites to the same property).
You must send user_id with every event to GA4 (when user_id is available). You should set the user_id field in the GA4 config tag (but then ensure all other event tags use that config tag).
user_id cannot be registered as a dimension. You should also not try to register any other custom dimension (e.g. crm_id) to see the user ID in reports. This will cause a high cardinality issue.

#3. How to get a user ID?
There are several options. Some are more reliable, and others are not so reliable.
#3.1. Method No. 1: Asking a developer to push the User ID to the Data Layer (or get a plugin)
If your website has an authentication feature (login), you can ask a developer to push the User ID to the Data Layer. You can hand him/her the following code (a developer must replace the ID with an actual ID of the user):
window.dataLayer = window.dataLayer || [];
window.dataLayer.push({
  'event' : 'login',
  'userId' : '1234567' //this number must be replaced with an actual User ID
})
This is the most robust way compared to other alternatives.
If you’re working on a regular website (that refreshes the entire page when the user is navigating), then it’s preferred to have this code placed above the GTM container (that way, you’ll have it available even with the All Pages GTM trigger).
If you’re working on a Single Page Application, then the location of this code does not matter. Also, the ‘event’ parameter is not required. But if implemented, you can use it as a trigger to track Login events.
Another important thing would be to ask a developer to push the User ID every time a new page loads (I mean when the page entirely refreshes and the previous values in the Data Layer are wiped out). Then the code could look like this (placed above the GTM container snippet):
window.dataLayer = window.dataLayer || [];
window.dataLayer.push({
  'userId' : '1234567' //this number must be replaced with an actual User ID
})
After a developer starts pushing the User ID to the Data Layer, get back to your Google Tag Manager account, go to the container of the website you’re currently working on, and enable Preview and Debug mode.
Now, head over to your website, refresh it (while being logged out of that website), and log in. After you successfully authenticate, a login event should appear in the Preview console. Switch to the Data Layer tab of the Preview console and keep looking for the userId parameter. It should contain some value (the actual User ID).

Quick note: If you are working with a popular website builder/ecommerce platform, chances are that readymade Google Tag Manager plugins exist for it. For example, there is a WordPress plugin called GTM4WP. It can also push the user ID to the data layer once the user logs in.
Even though the User ID is in the Data Layer, you cannot simply use it in your tags or triggers without actually turning that piece of information into a GTM Variable. That’s why you must create a Data Layer Variable for that User ID.

Note: Data Layer Variable Name (the field that I’ve highlighted in the screenshot above) is case-sensitive. So if there is a userId (with the uppercase I) parameter in the Data Layer, you must also use the uppercase I in the variable’s name (in GTM user interface).
#3.3. Method No. 2: Fetch the User ID from the already existing cookie
There’s a chance (that a website/shop/etc. you’re working on) already stores the User ID in a cookie. In that case, you could just read its value with Google Tag Manager and then (later) send it over to Google Analytics. If you have direct access to the developers of that website/shop/etc., ask them whether they store the User ID in a cookie and its name.
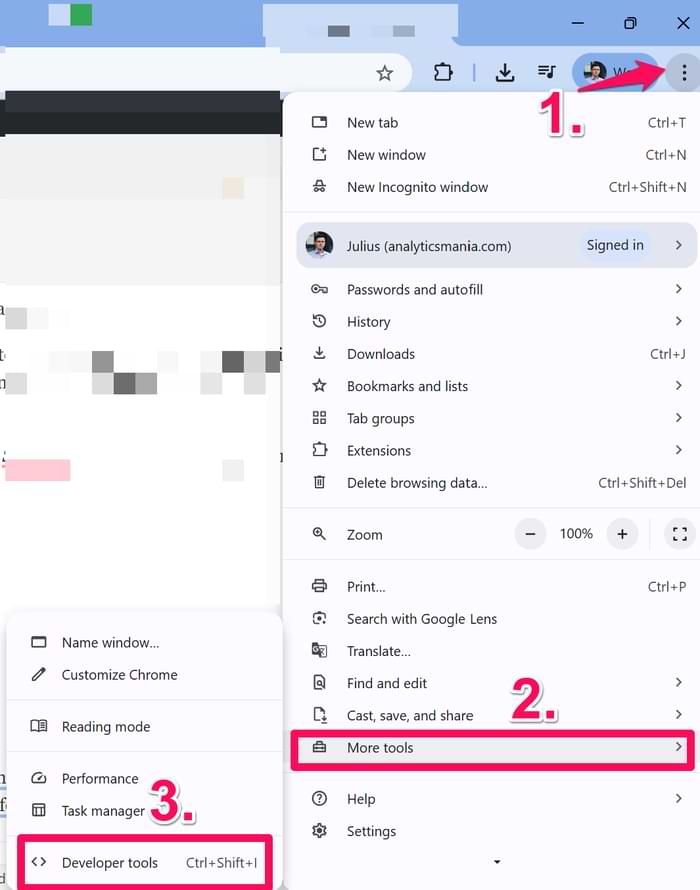
Otherwise, you can check this hypothesis by yourself. Go to your browser’s developer tools. I’m using Chrome, so I’ll go to More Tools > Developer Tools.

Then go to Application > Cookies and choose the domain of your website.
Now browse and keep looking for a name that might be related to a User ID. There is no standard name for that thus various options are possible. Once you find something, it would be good to ask the client/colleague to confirm whether that’s the actual User ID.

So if you got lucky with the cookie (insert your fortune cookie pun here), memorize its name and go to Google Tag Manager UI > Variables > New (under the User-defined variables). Choose the variable’s type, 1st Party Cookie and enter the name of the cookie here:

So if this User ID fetching method worked for you, Feel free to skip to Chapter #4 of this guide, where I’ll show you how to use that User ID in the Google Analytics tag (within GTM).
account_id cookie is just an example. It does not mean that the name of a cookie on your website (if such exists) is named like that.
#3.4. Method No. 3. JavaScript Variable
I’ve explained this technique in a dedicated blog post so if you want to learn more, go check it out. Here’s a quick summary.
In short, the JavaScript variable lets you access the values of global JavaScript variables available on that page. For example, a browser language, the title of the current page, etc.
I’ve seen many cases where the User ID was also stored in a Global JavaScript Variable. So all you need to do is to find it.
How do you do that?
- Option A: ask a developer who is involved with that website/shop/etc.
- Option B: try to find it yourself.
Option A is easy and should always be your first choice.
Option B requires much more time. To start the search, go to your browser’s developer console (here’s the tutorial on how to do that on Chrome), type window, and hit enter (like in the screenshot below).

Click the black triangle near the Window, and you’ll see a list of properties that we can access with a JavaScript Variable in GTM. Brace yourself. That list will be huge.

Now, imagine you’re working with a Shopify online store. Intuitively, I’d scroll down and start looking for a shopify property. To save you some time, I can say that shopify property does not contain the User ID. However, ShopifyAnalytics does (I just had to spend some time looking for it).
Click the black triangle to expand the property and dig deeper. Unfortunately, I don’t see an ID anywhere, but there are some other possibly useful data points. Let’s dig even deeper. If you go to meta > page, you’ll find the customerId. This is exactly what you were looking for.

Now, head over to Google Tag Manager interface > Variables > New > JavaScript Variable and enter the entire path from top to both that you followed to reach that customerId (window is not required). The final value of the variable must be ShopifyAnalytics.meta.page.customerId (case-sensitive). Every level is separated by a dot.

Save the variable, refresh the Preview mode (in the GTM UI), then go to the page and refresh it, too (make sure you’re logged in to that website/shop/etc. as a user/customer). In the Preview console, go to Variables and check whether your JavaScript variable returns an actual User ID. If not, check for spelling mistakes in your JS variable.
So if this User ID fetching method worked for you, feel free to skip to Chapter #4 of this guide, where I’ll show you how to use that User ID in Google Tag Manager (Google Analytics tag).

#3.5. Method No. 4. DOM Scraping
This option is risky due to its fragility (especially in websites where developers constantly implement improvements/changes/AB tests in the front end).
In a nutshell, DOM scraping is a method to get a value from the website’s document object model by, well, scraping it. So if you, as a logged-in user, see your User ID displayed somewhere in the interface, you could fetch its value with the help of DOM Variable or Custom JavaScript Variable in Google Tag Manager. In this blog post, I’ll show how to use the DOM Element Variable.
DOM Variable enables you to pick a website element and read its text or one of its HTML attributes (e.g., href, title, ID, etc.). You can pick an element by defining its ID (if such exists) or by using CSS Selectors. In order to make use of it, knowledge of HTML and CSS Selectors is required. Also, be familiar with what DOM is in general.
There are millions of websites. Therefore, there might be millions of ways of how that particular element is coded. If you’re lucky, maybe that element will have an ID:

In that case, it should be a no-brainer to use the DOM Variable with the following settings:

If there is no Element ID, you could then try to fetch the element based on its (and its parents’) CSS Classes.

That’s where the knowledge of CSS Selectors would come in handy. Speaking of the screenshot above, the user ID is a span element with the class username. Let’s pretend that we know that there are more elements on a page with the same class. Thus we need to be more precise. This element is a descendant of the li element with ID wp-admin-bar-my-account. We can use this in our CSS Selector:

The CSS Selector I’ve used above means that I’m targetting elements that have a CSS class username and are descendants of an element with an ID wp-admin-bar-my-account.
Just don’t forget that several items on a page might be caught by the same CSS Selector. That’s why you should use the document.querySelectorAll() method to ensure you’re fetching only that element that contains the User ID. Read tip #20 in this guide to learn more.
Public Service Announcement: When you’re using a DOM Variable with the CSS Selectors (or a Custom JS variable generated by the GTM Variable Builder), you’re telling Google Tag Manager the exact path to that website element in the entire website document (e.g., from its parents to that very exact element).
Now, if that path changes anywhere along the way (due to the developer’s input or something else), your CSS Selectors or Custom JS variables will break and return undefined. This means your User ID tracking in Google Tag Manager will stop working.
A Word of Caution: While DOM scraping can feel like a clever workaround, it should be treated as a last resort. This method is fragile and likely to break without warning if a developer makes even a minor change to the website’s layout or code. An analytics setup that breaks silently is worse than no setup at all because it provides false confidence.
Your first, second, and third choices should always be to work with a developer to push the User ID to the data layer (or maybe your website is built on a popular platform that supports GTM plugins).
It is the only truly robust and reliable method for this task. Use DOM scraping only if you have absolutely no other option and you understand and accept the risks.
You + Developer + Data Layer is an unbeatable trio in tag management.
Anyway, if this User ID fetching method worked for you, Feel free to skip to Chapter #4 of this guide, where I’ll show you how to use that User ID in Google Tag Manager (Google Analytics tag).
#4. Insert the User ID variable in the Google Tag
To implement User ID tracking, we must send the user_id parameter with every event (when the user is logged in) to Google Analytics 4. To make sure that the setup works well, we’ll do it in two places:
- Google Tag
- All GA4 event tags (in case the user ID sometimes is not available on the “initialization” event).
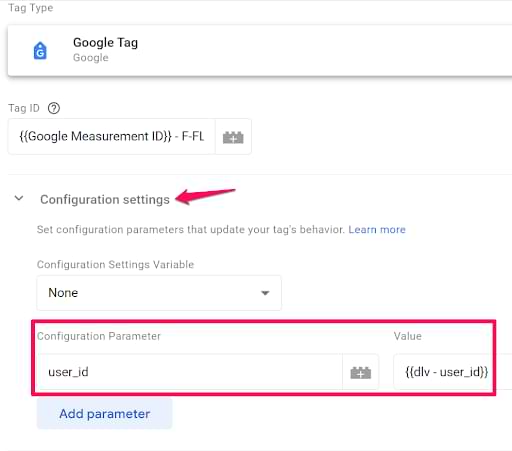
#4.1. Google Tag
Open your Google Tag, click Configuration settings > Add parameter, and enter user_id. The value of this parameter must be some variable that returns the actual user ID of a user who logs in on your website.
That variable might be a data layer variable, cookie variable, or something else (this depends on how your website is coded). I will explain this in chapter #3 of this blog post.
#4.2. Event settings variable
User ID must be sent with every event to Google Analytics 4 (when a user is logged in). Sometimes, it’s possible that the ID is not yet available when the Google Tag (GA4 config) fires. As a backup, you should also include the user_id in all event tags.
You can either manually set the user_id parameter in all GA4 event tags, or you can use the Event Settings Variable. I recommend that 2nd option.
The reason this is recommended is that it makes your GTM setup much cleaner and more future-proof. Think of the Event Settings Variable as a central rulebook for all of your GA4 event tags. Instead of manually adding the user_id parameter to dozens of individual tags, you define it once in this “rulebook”. Then, for every event tag, you simply instruct it to follow the rules. This saves a lot of repetitive work and reduces the risk of forgetting the parameter on a new tag you create later.
If you already have a settings variable in your container, open it.
If you haven’t created the Event Settings Variable yet, go to Variables > New > Variable Configuration and select Google Tag: Event settings.
In that variable, click Add parameter and enter user_id.
The value of this parameter must be some variable that returns the actual user ID of a user who logs in on your website.
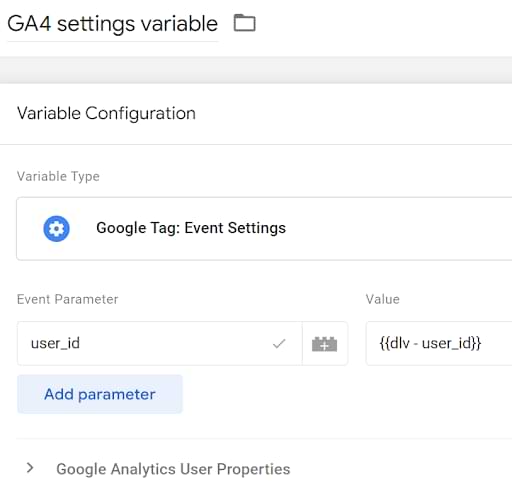
That variable might be a data layer variable, cookie variable, or something else (this depends on how your website is coded). I will explain this in chapter #3 of this blog post.
Save the settings variable.
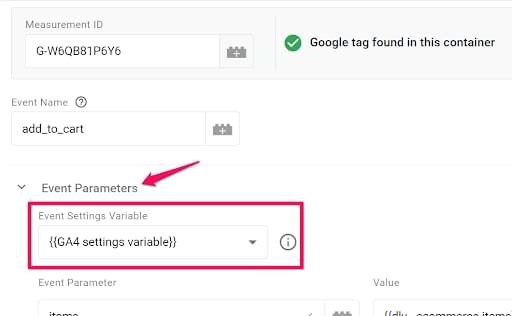
Now, you must include that variable in every GA4 event tag of your container (if you haven’t already done it before).
Open any GA4 event tag, then click Event parameter and select your settings variable in the Event Settings Variable field. Repeat the same steps in every other GA4 event tag in your container.
#5. Let’s test
After you create a User ID variable, include the user_id parameter in the Google Tag and GA Event Settings Variable, and enable the GTM Preview mode by clicking the Preview button in the top right corner of the GTM interface.

Then, you should see that your configuration tag has fired. In this blog post, I presume you fire it with the Initialization trigger. Click Initialization in the preview mode and click the Google Tag.
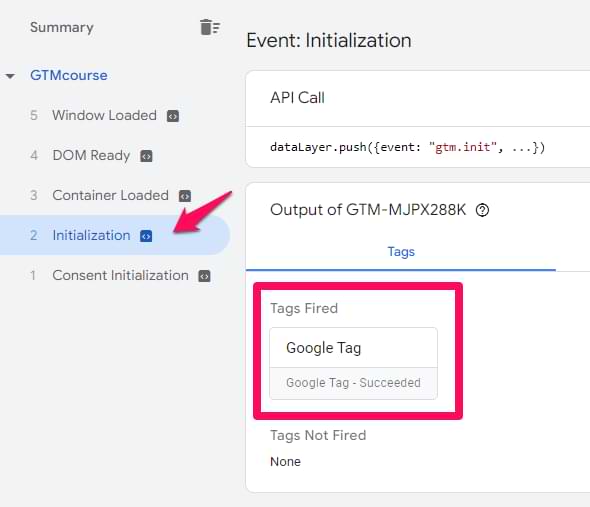
Then, switch to the values in the top-right corner of the preview mode. You should see that your tag also sent the user_id parameter with a certain value.

Also, randomly check several GA4 event tags and see if they are also sending the user_id parameter.
You can do that by using browser’s developer tools. In your browser, open them and then go to a tab called Network (or something similar). The steps of enabling developer tools vary in different browsers. In Chrome, for example, you can do that by clicking Three dots > More Tools > Developer Tools > Network.
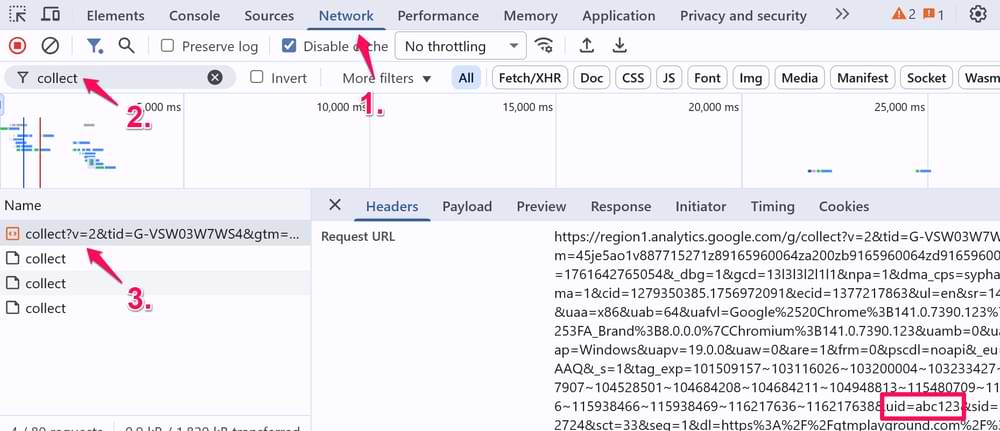
Once you are in the Network tab, enter “collect” in the search field and reload the page of your website. You will see the request sent to Google Analytics. Click it and look for a uid parameter. This is the User ID you’re sending. If you see this parameter and a correct value, the User ID tracking is implemented correctly.
If everything works correctly, you can now publish your changes in the GTM container. Click Submit button in the top-right corner of the GTM interface and complete all the steps that you will be asked.

#6. Where can you find/use user ID data?
You might notice that the number of users will decline within 24 hours after you have implemented and published your GA4 user ID tracking setup. It does not mean this will happen 100%, but there is a chance. The reason for this is that GA4 will start seeing several devices as the same user (if that user is using multiple devices to log in).
User exploration. If you go to Explore > User Explorer, you will start noticing two types of App Instance ID values. The first one is the usual GA client ID. It contains a dot in the middle of it, e.g., 2101187682.1610061461. The other IDs will be the ones you send as user_id to GA4. You can click on that ID and see what that particular user did on a website.
Note: User IDs will be displayed in User Explorer only if your GA4 reporting identity is set to Observed or Blended.
However, keep in mind that user_id does not affect historical data. If an anonymous visitor visited your site five times before signing up (and getting the user ID), you wouldn’t see that data linked to the user ID.
Segment overlap. You can also see how users are using your website with different devices and how their devices overlap. Go to Explore > Segment overlap. Add two default segments: Tablet traffic and Mobile traffic.

Create one more segment with the following settings:
- User Segment
- Include users where the device category contains desktop at any time.

Save the segment and add it to the segment comparison.
Then, you might see that some segments overlap. This means that some users are using multiple devices to log in to your website/service.

Signed in with User ID dimension. By implementing user_id tracking, you will also unlock a new dimension called Signed in with User ID. It does what it says. If a visitor has signed in to your website and you send user_id to GA4, the value of this dimension for that user will be true. Otherwise, false. So if you want to quickly see how many people have signed in, you can make a quick comparison.
In the Reports > Reports Snapshot section (or any other standard report) of GA4, click Add comparison. Then enter the following condition: Signed in with user ID equals true. Save the comparison.

Now, you will see how many people (compared to all visitors) have logged in to your website.

You can also use this dimension in other parts of the GA4 interface, like Explorations.
User ID in Google Analytics 4: Final Words
User ID tracking in Google Analytics 4 is an improvement compared to Universal Analytics. You don’t need to create a separate view for that. The data is applied to the entire property as soon as you start sending the user_id parameter with all events where the user is logged in.
However, it is still not perfect. I wish the User ID was available as a dimension out of the box. But I bet that this will never happen, unfortunately.
To sum things up, here are the key points to remember from this article:
- What is User ID: It is a feature that stitches together a user’s journey across multiple devices and sessions using a persistent, non-PII identifier that you provide.
- Primary benefit: It provides a more accurate user count and a unified view of how your most valuable, logged-in users interact with your business over time.
- Main requirement: It only works for websites where users can log in, as you need to capture a unique ID from your own system after they authenticate.
- Best implementation method: The most robust way to capture the User ID is to have a developer push it to the data layer upon a successful login (or use a plugin that does it, if available).
- Don’t use PII: Never use personally identifiable information like an email address as the User ID. Use an anonymized ID from your database instead.
62 COMMENTS
Hi,
In case of website without login, so apparently without any key to use as UserID it will be impossibile configure it isn't it?
I was thinking that maybe with newsletter inscription I could ask to developer to push me a alphanumeric code.
Do you think will work? Any ideas?
Thank you
Andrea
It's better than nothing but not as good as real user id when a user logs in
I'm a little confused about why should the userID be posted on each page load (I'm planning to implement 3.1. method). Isn't UserId a dimension with User-level scope, meaning - isn't it enough, for UserId to be declared once, and GA4 will remember to add it to all session?
User id is not a user-scoped custom dimension. It does not persist on websites.
Is there a way to mimic the "alias" call from segment where I can tell GA4 that someone's user ID has changed?
no
If configuring User ID as a dimension is not recommended, how can we get the user information? Do you recommend using API or Bigquery instead?
Yup
Hello,
One thing about this:
https://stuifbergen.com/2022/01/making-sense-of-event-parameters-in-ga4/
It is advised here that the config tag only supplies initial values. It seems that because users first see my login screen, where the value of user_id would be undefined, this configuration does not work.
I was just having an issue because, despite a seemingly correct setup, no events were actually inheriting the user_id parameter from the config tag--even after signing-in.
I tested this by creating a "default_event" tag and set it to fire immediately AFTER the config tag every time the config tag fires. Then I put the user_id into the config tags "Fields to set" and "User properties". Event "default_event" still failed to produce the user_id.
I double-checked my implementation of the user_id variable by directly setting it on "default_event"'s parameters and user properties. Sure enough, it finds its way to GA4 in this case.
My question now is, how would you recommend solving this? I still need the user_id associated with every event--and inheriting the value from configuration is the only architecture that makes good sense. Should I delay the config tags fire until a logged-in session can be confirmed active?
Just want to advice. I triple confirmed this by setting a hardcoded param in the config tag "test_inherited_param" with value: "test_value".
With this, the parameter and value made it to GA4 with all events. So, I'm pretty sure of the issue here. Configuration tag's "parent" property seems useless if it can potentially be nullified by getting an undefined value for a param first. I wish there was an option like "Do not persist parameter values if they are undefined".
In this case, set the user_id in all event tags too.
Hi Julius,
Does this mean if we choose device-based as the reporting identity then there is no where to see the user ID in reports without creating a custom dimension (which I know is not recommended)? And if so, is there a perfect world where we could use both User ID and device ID and not have the limitations of data thresholding? Thank you.
User ID will still be visible in User Explorations.
In the perfect world, you should not use Google Signals because it is causing threshold. So if you use just device ID and user ID (but google signals was never enabled), thresholding should not be a problem.
The article mentions the following:
'You must send user_id with every event to GA4'
What I'm seeing is that once I set the user_id, I then see it in every subsequent event in DebugView whether I set it or not.
When the user logs out, I still see it. Do you know how I can reset the user_id once a user logs out?
Hello Asad,
i apologize for my poor English. Now, regarding your question. I'm not a developer, but in our case, it was initially like that, and the solution seemed to be, that we didn't push any values to the data layer for logged-out users. Instead, you have to push the value "empty." Otherwise, the previous value of the variable (here f. e.: User_id "123456") won't be overwritten.
I hope that helps you.
Greetings,
Daniel
Hey the signed In with user ID value does it show true or yes anymore in the reports or segments…
I think there is a mistake: you define user_id in the "Google Tag: Event settings" in the Event scope (as Event Parameter).
It should be user scope, because when you check it in the debug view, you check user properties.
No, user_id must be an event parameter, not user property
Hi Julius,
I have created the event setting and added it to all GA4 Events on Tag Manager. But when I check on Preview an event, the Event Settings Variable appears as {} (i havent logged in). Is this OK? I thought there should be some kind of data before i'm logged in. Once I'm logged in, all events are showing OK the userId.
Hi,
If the user is not logged in, but I still pass the parameter in the code, how should I populate it?
user_id=null or user_id="null" or not send it at all if the user is not logged in?
This I'm trying to seek clarity on myself. However, do NOT send as "null" as this is string which will be considered a user_id in itself. "Null" will cluster all logged out users as "Null".
This is my question I am asking / posting to AnalyticsMania:
Hi AnalyticsMania - Can you clarify on the following, not covered in your article? How best to handle users logging OUT (having been logged in)?
See this source:
~https://developers.google.com/analytics/devguides/collection/ga4/user-id?client_type=gtag
"Don't send a user ID when a user isn't signed in. If a user isn't signed in, don't pass the user ID parameter, or leave the value as undefined. Don't set a custom value, like "empty" or "NA". Setting the same value for all sessions without a user signed in causes issues with the accuracy of your reporting."
AND
See this source:
~https://support.google.com/analytics/answer/9213390?hl=en
"Note: If you don’t set a unique user ID, then these JavaScript values will be set as the user ID:
undefined: No user ID will be sent on the hit as the hit will not be logged as the user_id. This will also happen if you never set a user ID at all.
null: An empty or unset user ID value will be sent on the hit. You will be considered as a "logged out" user who doesn’t have a stable user_id.
Empty string (""): This is equivalent to null.
All other values are interpreted as unique user IDs, and will be sent as such. This even includes the strings "undefined" and "null", which are different than the JavaScript values explained above."
Should it be undefined? Or does that signal user never signed in? Or do we use null to set 'logged out' signal, but then it says it sees it as an 'unstable user_id', so would that mean it doesn't trust it? It's a bit unclear. I imagine it's probably undefined, but seeking your opinion. Thanks
Hi,
can we able to track user id from incognito mode , when user try to logged in from incognito mode
Hi,
can we able to track user id from incognito mode , when user try to logged in from incognito mode .
Hi Julius,
At first, thanks for this guide.
I have a question. I used this guide to scrap my usertypes of my website(user, admin). I wanted to be able to create audiences in GA4 with that usertype dimensions. First I used DOM element method and it worked well, but because I also want to set an expiration date on that usertype, changed my method to cookie based one.
Then it doesn't work. Whenever I test it, GTM couldn't track the value and says its undefined. Checked this guide a couple of times and stucked. What can be cause that?
Will appreciate if you get back to me.
Cheers
Hi Julius,
At first, thanks for this guide.
i have a question regarding ga4 exported data in big query.
few times getting null user id in big query using ga4 and tag. in my code i passing the local storage like this script2.innerHTML = 'window.dataLayer = window.dataLayer || []; function gtag(){dataLayer.push(arguments);} var temp = JSON.parse(localStorage.user); gtag("js", new Date()); gtag("config", "' + environment.ga4MeasurementId + '", {"user_id": temp.email,"user_name":temp.incognitoUser});';
and written custom variable in gtag and adding all page view event , but few times getting null user id ,but getting page location and event name and custom id in big query tables , why we are getting null users.
Hi Julius, great article.
I used the 3.4 JavaScript method to fetch the user ID and everything worked great from there on by following your guide.
But I would love to get a step-by-step guide on how I can remove the user ID for signed-out user activity. I think this should have been included in the guide to make it 100% perfect :)
Google states: The Google Analytics User ID policy requires that you stop any measurement based on user ID once a user signs out of your website.
What is the difference between using an Event Settings Variable for the user_id and setting the user_id in the "Shared event settings" section?
Your guide says to put the user_id in the "Configuration settings" for the Google Tag, but you don't get the "This is a known property" tick when you put it there. When you put it in "Shared event settings" you do. Does that mean it needs to be put here?
Don't worry about that tick
Hi Julius,
Question regarding GA4 conversion metrics & revenue reporting. We are pushing through user_id correctly. However we are trying to determine whether GA4 has the capability to track a brand new user_id first purchase within our custom app. Can GA4 use our user_id data layer and determine if that was their FIRST transaction with us? Or would we need to go back to our devs and build out an additional data layer that allows us to track first time transactions / conversions / revenue - to ultimately determine our CAC.
We are trying to achieve two custom reports / metrics within GA4;
1. One that allows us to track a brand new transaction linked to a brand new user_id (first time purchase). So that we can link this back to our marketing efforts (ie. ad spend) & determine our CAC.
VS
2. A returning customer / user_id making a transaction (ie. Win Back). To also link back to marketing efforts to capture additional revenue thats segmented away from brand new user_id's first transaction.
I hope this makes sense.
Thanks,
Kieran
Hi Julius,
I have a question concerning pushing a User ID to the Data Layer. We have a SPA, and we're tracking each page load with a VirtualPageview trigger. At the moment we push the User ID parameter with the following even (when a user logs in or signs up):
window.dataLayer = window.dataLayer || [];
window.dataLayer.push({
'event' : 'login',
'authentication_method' : 'email',
'user_id' : 'abc123'
});
Do we have to add 'user_id' parameter to the virtualpageview snippet as well?
<script>
window.dataLayer = window.dataLayer || [];
window.dataLayer.push({
'event': 'virtualPageview',
'pageUrl': 'our actual url is here',
'pageTitle': 'Title of our page'
});
</script>
The reason I'm asking is that I don't see the user id in GA4 Debug View, so I'm trying to troubleshoot that. Also you mentioned, that the user id should be sent with every page load.
Thanks in advance!
I Julius.
Thank your for this article.
I can only see user_id in GTM Tag details, but in the event stream of the debug mode I can only read "non_personalized_ads" instead of the user id.
May You know why?
Hi guys,
I noticed that chapter #7 is missing, in which this 'user ID as a
custom dimension' is supposed to be. According to the comments, it is not a recommended solution, but I don't see why. Is there any specific reason for the cancellation? And is there any other way to use the userID as a dimension?
It's because of high cardinality
Hi Julius,
Thanks for the amazing guide,
Is there any specific reason why you've added user_id parameter in the "Event Parameters" section instead of "Google Analytics User Properties" section of the event setting variable.
Because user id is not a user property
"But there is a recommended workaround. Read the next chapter."
Which chapter is this where you write about it?
This paragraph was from the past. There is no longer a recommended workaround. I removed the sentence you mentioned in your comment.
custom user id shows in user explorer but the problem when i click on the id to view the activity it open new tab user activity and then says page not found (in alret) ...
but if theres no user id , app instance id , it show the activity ...
ps: i use the date range only yesterday ..
I am testing that on my localhost, can i view the events in the debug view of analytics?
"You can either manually set the user_id parameter in all GA4 event tags, or you can use the Event Settings Variable." I have tested it and If Google Tag is firing first and after Google Tag we are sending events there is no need to add user_id to every event in GTM ;)
This is a safeguard
If we don't create a custom dimension for user id in google tag manager, then how can we get the user id using the GA4 API? I am trying to extract the GA4 data and load it into snowflake!
The reason why I am asking this is because I read that creating user id as a custom dimension is not recommended due to high cardinality. Is it not recommended to be used inside GA4 report environment? then it should be fine if we only needed it to extract the data to an external Datawarehouse!
What are the cons and I wonder if there is another way!
We tried to implement user ID into Google Analytics 4, but it seems to have an issue when checking users' activities.
Screenshot to describe the issue: https://snipboard.io/w9Qk27.jpg
I'm not sure how can we resolve this. Does it impact building an audience on GA4?
Fantastic post, thank you for writing. I have a site where users would 'log in' (expose a User ID to the datalayer) only occasionally - about one visit a month.
Would it work to set a first party cookie with the User ID on those rare times that they do log in, so that it can be added to GA4 events on subsequent visits?
Is there a downside to this? Would it cause high cardinality events?
I could experiment to find out, but would like to know what you think.
Hi Julius, fantastic guide—really helpful!
Quick question: if the user ID is properly implemented, and a user signs up during their 2nd or 3rd session before making a purchase, would GA4's data-driven attribution model still assign credit to the initial channel for the conversion? Of course given the user uses the same device and the sessions happen in the lookback window.
Thank you for this guide. I am following things to the letter, but the user_id refuses to show up inside Google Analytics. If I send it as user__id, then I can see it, however the standard user_id is just not working for me.
It is sending the information same as in your screenshot, and the variables are populated... I am not sure where to go from here.
Hi dear,
Can you help me?
Actually i want to know. How can i got a website users in Google Analytics 4 please tell me.
Such a detailed and practical guide! This step-by-step explanation of tracking User IDs with Google Tag Manager and GA4 is incredibly helpful, especially for troubleshooting and improving data accuracy.
The insights on using data layer variables, JavaScript, and DOM scraping are invaluable. Loved the testing and debugging tips to ensure setup correctness—great resource for marketers and developers alike!
Hi Julius,
Thank you for this article. I configured correctly in every step, but the "Effective user ID"s (which used to be "App-instance ID"s) are all strangely starting with symbols like @^_
Those are not the original user IDs from company database. Could you please kindly share insights and thoughts on this?
Thank you!
Do you request permission from the user before adding their user ID to the data layer? OR could the use of their user ID be disclosed when they create their store account, so the permission is implied by their logging in. I am not sure what options we have that satisfies Google's User ID Policy https://support.google.com/analytics/answer/12150158?hl=en&utm_id=ad
I would love to see your views on this.
This is a test to check HTML support.
Great article on setting up User ID tracking in Google Analytics 4! I’ve been working on tracking User ID for my site, and thanks to my developers, I can see the User ID firing as an event called 'login,' with a parameter value like 'ABC123,' so that part seems to be working well.
I have two questions regarding the best practice for tracking User ID across the site:
1. Should the User ID be firing on every page load if I want to track all pages a particular user visits or just key engagement events?
2. I’m trying to build a report in GA4 where I can easily see all the pages a User ID visited. Right now, I can only see the User ID in the User Explorer template under 'Effective User IDs,' but it’s not as straightforward as I’d like—it’s more event-based, and I’d prefer a clearer page-level view.
Would triggering the User ID on every page load be the best way to solve this reporting challenge? I'd love to hear your thoughts or suggestions on how to build such a report efficiently!
I have sent it via cookie value. in GTM preview mode for every event I can see my user ID but in Debug view mode of GA4 I am not able to see user_id
I am confused why we are not seeing the user_id property in the User Properties tab in GA4 DebugView. We also don't see the orange "user_id = 12345" in the log of events there. It always just has one for "non_personalized_ads = 0".
We have included user_id as a configuration parameter on the base GA4 tag and as an event settings variable on all other event tags.
Any thoughts on what we've done wrong? I see the uid parameter in the GA4 tab when I am in GTM preview, and see the user_id variable populating correctly on all tags.
Same problem here
Hello Julius,
I am very curious: why did you register the user_id parameter inside the configuration parameters? Shouldn't the user_id be configured as a user_property instead of a configuration parameter?
User ID is not a user property. It's a special parameter.
Hi, thanks for this article it's been really helpful when trying to troubleshoot some client's GA4 data. We recently relaunched a new Shopify theme for this client and with all of the internal testing the client is doing it's triggered a "Your data was affected by a user ID implementation" warning inside GA4.
"Significant activity was detected on one or more user IDs. This might have impacted data attribution, session recognition, and conversion measurement. To ensure accurate reporting, each user needs a unique ID."
They have multiple locations with numerous employees all accessing the site for testing and other internal purposes. Would your other guide How to Exclude Internal Traffic in Google Analytics 4 be the best approach to make GA4 ignore that internal traffic? i.e. will excluding all of their internal IPs be the best approach to get the most accurate data collection?
Thanks again!
Hi Julius Fedorovicius,
nowadays I am interested in tracking users with their user_id, i could send user_id in data layer, and published it, but, still i am not able to track users with their user_id.
This article provides an excellent explanation of GA4 User ID implementation and its importance for accurate cross-device tracking. The step-by-step approach makes a complex topic easier to understand, especially for marketers and analysts using Google Tag Manager. By highlighting the advantages of User ID over cookies and Google Signals, it demonstrates how businesses can gain more reliable customer journey insights.