November 28, 2025
How to install Google Analytics 4 on Shopify (4 methods)
Updated: November 28th, 2025
This article was written originally by Rick Beijen, who was kind to share his tips with Analytics Mania’s readers. After this blog post was initially published, Shopify started pushing their users to use Checkout Extensibility (custom pixels) to install tracking codes. As a result, I updated the blog post to include that method, too. Plus, I added several updates here and there.
If you’re running an e-commerce store on Shopify and want to measure its performance with Google Analytics 4, you will first need to install it properly.
In this blog post, I will show you different methods how to install Google Analytics 4 on Shopify. We will look at implementing it via the Google & YouTube Channel App, Google Tag Manager, and the GTAG. After that, I will give my thoughts on the pros and cons of each method.
So don’t rush to implement everything you see here. First, read the article thoroughly, the pros and cons of each installation method, and then pick the one that fits your needs the best.
Table of Contents
Here’s what you will learn in this article
- Create a GA4 account
- Option #1: Install GA4 with Google & YouTube Channel App
- Option #2. Install GA4 with GTM
- Option #3. Install GA4 with GTAG
- Option #4. Shopify Google Analytics Apps
- Which option should you choose?
- Final words
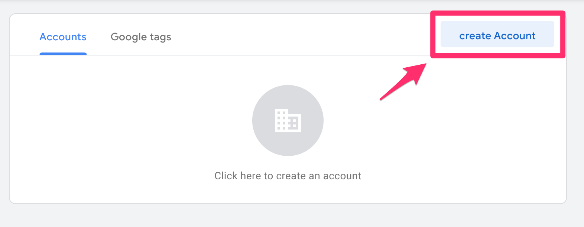
Create a GA4 account
For every method, you will need to have a GA4 account. Let’s take a look at creating a new account (you can skip this part if you already have one).
To create your new GA4 account, go to analytics.google.com and click on Start measurement. Give the account a name and move on to the creation of the property.
Then, enter the name of your property. It might be the name of your website, your company, a brand, etc. Choose your company’s country, reporting time zone, and the main currency your business operates.

Then press Next and answer several questions. Then, you will need to select your business objectives. Based on these choices, the reports that you will have in the interface will change, too. To make things simpler right now, select Get baseline reports.

Click Create.
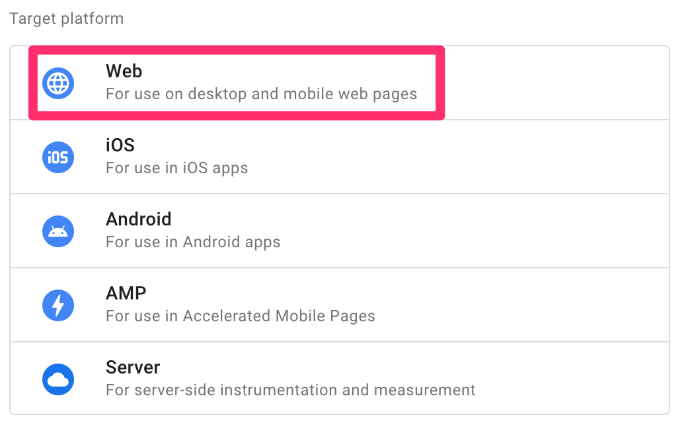
The next step is to configure your first data stream. It is a data source from which events will be sent to your Google Analytics 4 property. You can have multiple data sources in a single property. For example, three web properties, 1 for an Android app, and 1 for an iOS app.
In this blog post, I will focus on a Web stream. Select it.

Then, enter the URL of your website (for example, www.mywebsite.com). Note that the protocol (https) is already selected. After that, enter the name of your website.
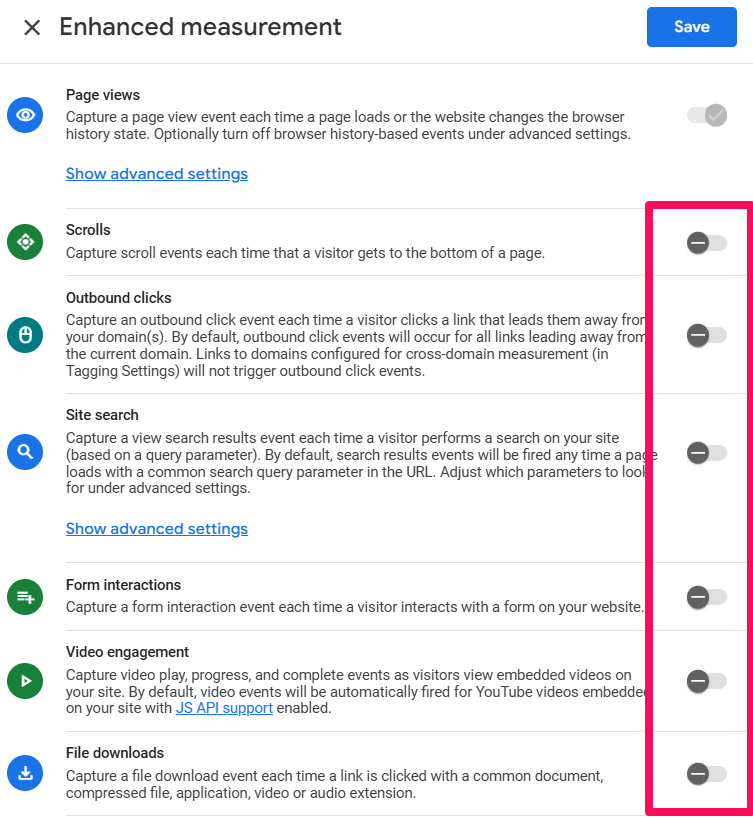
When you create a web data stream in Google Analytics 4, you can enable/disable Enhanced Measurement. It is designed to help marketers get as many events in the reports as possible without the need to cooperate with developers or configure them in Google Tag Manager.
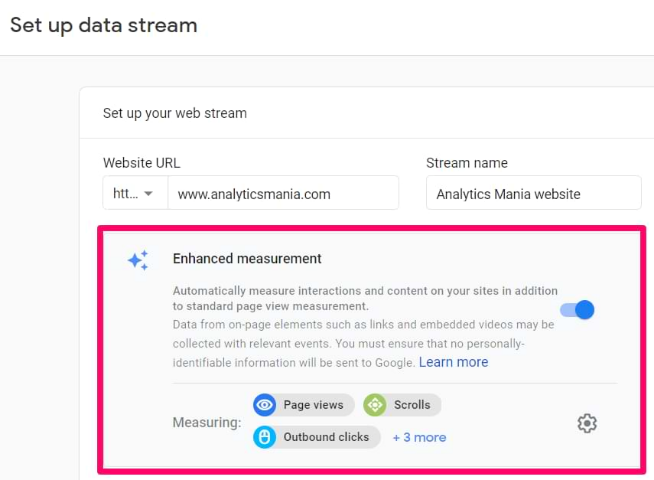
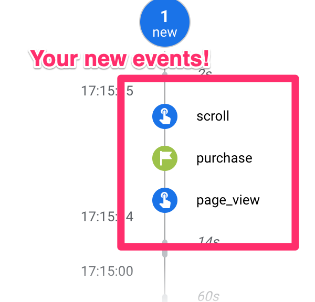
By default, this feature is enabled and will automatically track the following events:
- Page view (event name: page_view)
- Scroll (event name: scroll)
- Outbound link click (event name: click with the parameter outbound: true)
- Site search (event name: view_search_results)
- Video Engagement (events: video_start, video_progress, video_complete)
- File Download (event name: file_download)
- Form events (form_start, form_submit)
If you want, you can disable/enable events individually. You can do that by clicking the gear icon in the Enhanced Measurement section and then clicking the toggle buttons.

When you’re ready, press the Create Stream button.
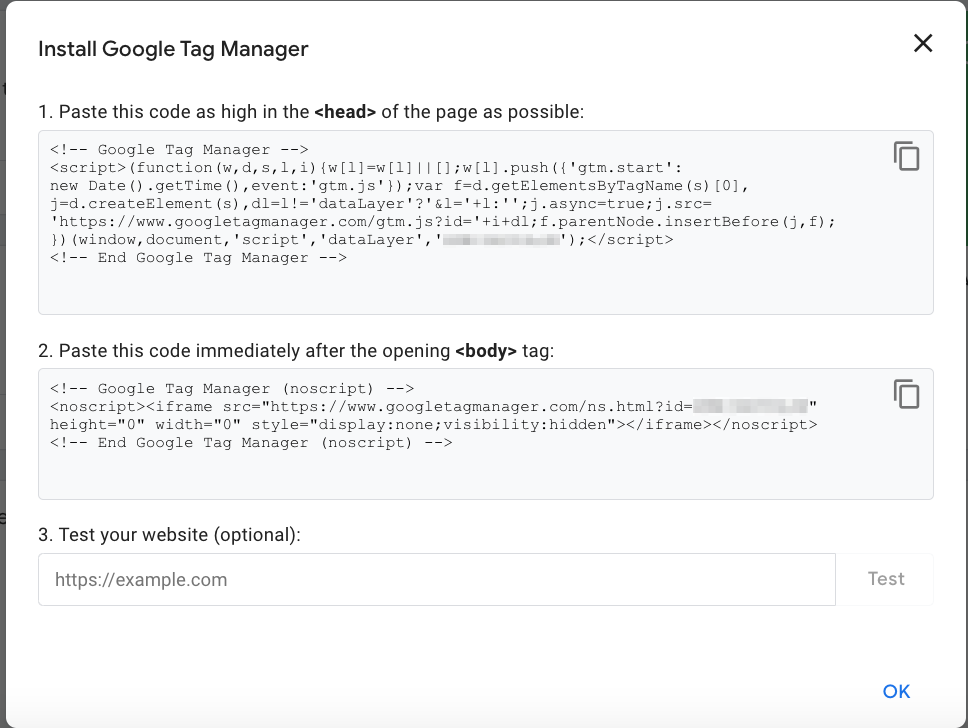
After that, your data stream will be created, and you will see the Installation instructions. You will need these in some of the next steps.

Option #1: Install GA4 with Google & YouTube Channel App
The first (and the easiest) way to install Google Analytics 4 is via the Google & YouTube Channel App. Back in the good ol’ Universal Analytics (UA) days, Shopify used a native integration where you could add your UA tracking. But, with GA4, Shopify replaced the native integration with the Google & YouTube channel App.
Please note that non-shopify-plus stores will not be able to track checkout steps with this method.
#1.1. Install the Google & YouTube Channel App
There are multiple ways to install the Google & YouTube Channel App.
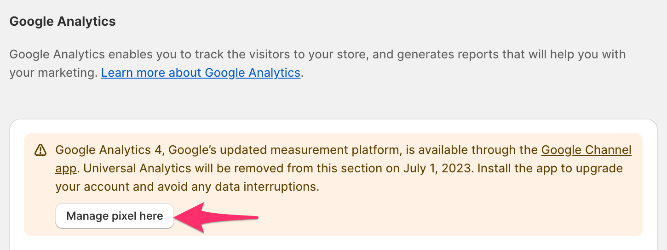
The first way is to go to Online Store > Preferences and scroll down until you see Google Analytics.

You will see the yellow banner with “Manage pixel here”. Click on it.
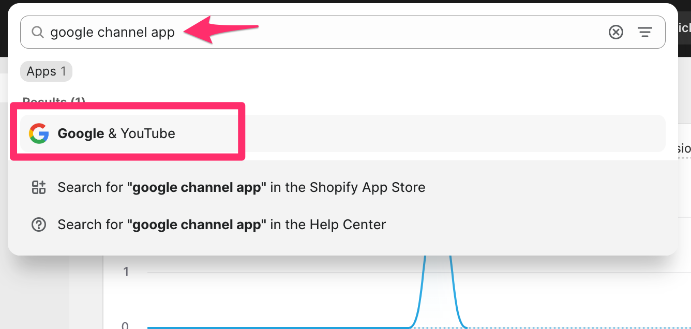
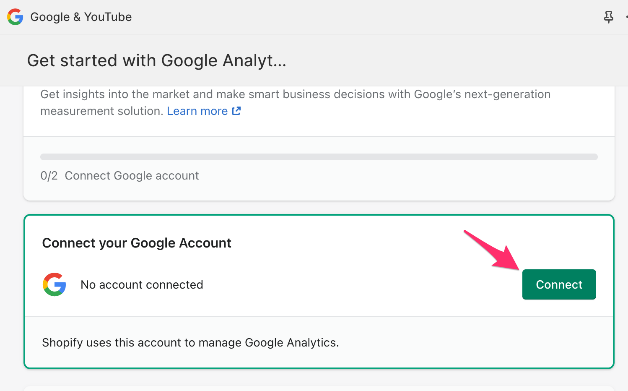
Now, you are redirected to the Google & YouTube Channel App. The second way of getting there is to use the search bar in the admin section of your Shopify account. Search for the Google channel app and click on Google & YouTube.
You will need to connect your Google Account. Click Connect and connect your Google Account.
After your Google Account is connected, scroll down to connect your Google Analytics Property. You should find your account in the list.
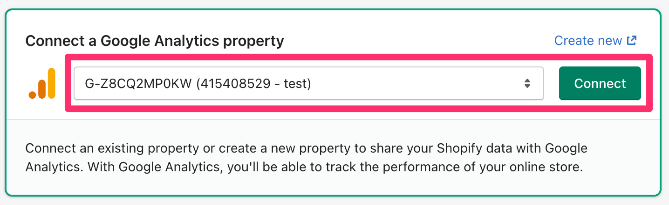
Click on Connect to connect your store.
#1.2. Test the setup
The last thing to do to make sure that everything works as expected is to test your setup.
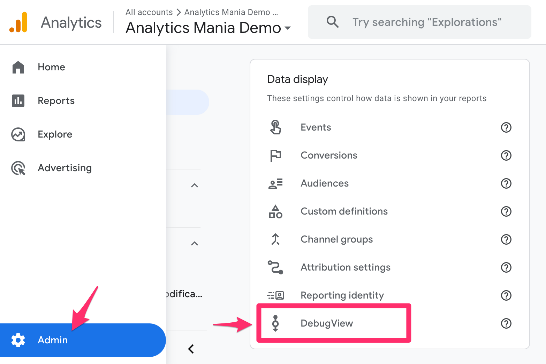
For this, you can use the DebugView in GA4. But, to get the data to show, you need to install a Google Chrome browser extension called Google Analytics Debugger.
Install the extension here, and then click its icon (so that you can see the ON ribbon). From this moment, you will start seeing your events coming into DebugView.
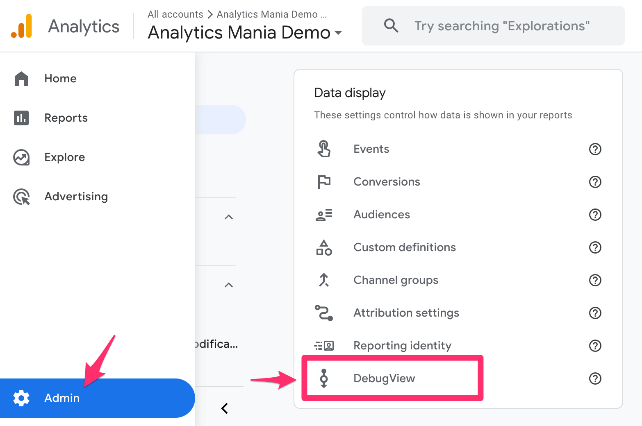
You can find the DebugView in Admin > DebugView in your GA4 property.
Go to your webshop URL with the analytics debugger extension enabled. Now you should see events come into the DebugView.

And you’re all set! You’ve successfully connected your GA4 account to your Shopify store with the Google & YouTube channel App.
#1.3. What does it track
After installing the Google & YouTube channel App, you will see the events configured in the Enhanced Measurement. Depending on which ones you have enabled, you will be able to see:
- page_view
- scroll
- click
- view_search_results
- video_start, video_progress, video_complete
- file_download
- form_start, form_submit
Next to that, you will have a selection of e-commerce events:
- view_item
- add_to_cart
- begin_checkout
- add_payment_info
- purchase
Option #2. Install GA4 with GTM
Note: This part of the blog post was updated after Shopify started pushing users to use checkout extensibility/custom pixel. That’s why I replaced Rick’s original text with mine.
The second method is adding GA4 via Google Tag Manager. I will show you the overview of the process, but to learn all the technical details, please refer to this blog post.
In this section, you will learn how to create a Google Tag Manager account and add a tag, but if you want to know more about Google Tag Manager, check out this article from Julius.

Shopify’s checkout extensibility (a.k.a. Sandboxed setup) severely limits what things can be measured with tracking codes. As a result, most standard GTM triggers like element visibility, scroll, history change, click, JavaScript error, and others won’t work. To avoid unexpected data, we also recommend turning off GA4’s Enhanced Measurement events.
To learn about other limitations, please refer to this guide.
#2.1. Create a GTM account
First, you’ll need to create your Google Tag Manager account. Go to tagmanager.google.com and create a new account.
Give the account a name and select ‘Web’.
After this, your new GTM container is created and ready to be added to your Shopify store. You will see something like this:
You’re now ready to add the new container to your Shopify store.
#2.2. Add GTM codes to Shopify
To get started, you can download the necessary scripts from our GitHub repository here: https://github.com/karolk95/shopify-customer-events-plain
Here’s a brief overview of the three scripts we’ll install to make GTM work with Shopify’s new system:
- Storefront script: Tracks events on your regular store pages and makes them available to the Custom Pixel script (#3)
- Theme script: Connects the Storefront script to your site’s <head>.
- Custom Pixel script: The most important part. It acts as a bridge to track events in the secure Checkout and Thank You pages.
To make use of the Customer Events and custom pixels, you must first upgrade to Checkout Extensibility, if you haven’t done so already. Go to the settings of your store > Checkout and then upgrade.

There are three separate scripts in the GitHub repository, each needing to be inserted in specific areas of Shopify. Follow these steps for proper installation:
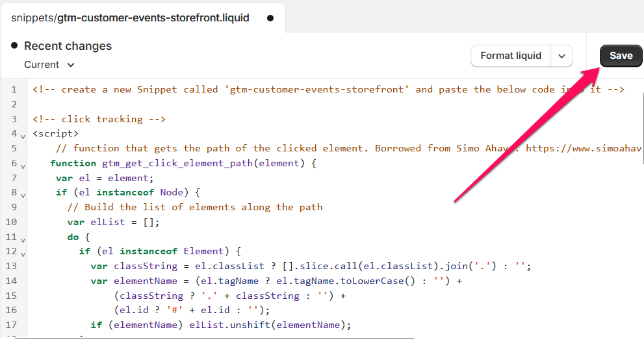
#1. The ‘gtm-customer-events-storefront’ script
This script listens to click events on the storefront and sends them to the custom pixel, pushing them to the data layer.
Navigate to Online Store > Themes > Edit Code, and locate the ‘snippets’ section:
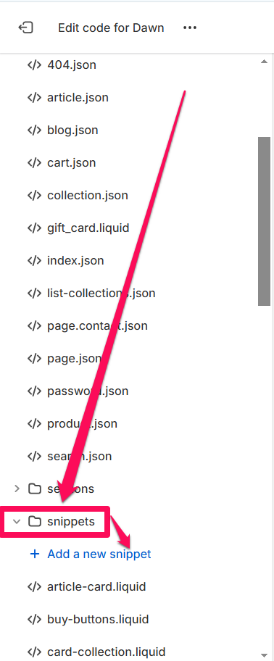
Create a new snippet and name it ‘gtm-customer-events-storefront’ (without quotes), exactly like that.
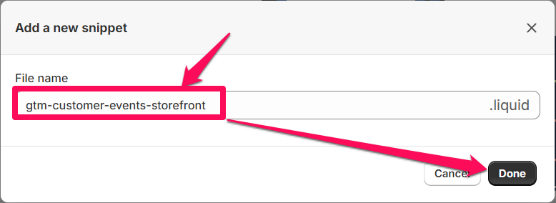
Paste the contents of the ‘gtm-customer-events-storefront’ script into the newly created snippet.
#2. The ‘theme’ script
With the code editor still open, locate the theme.liquid file. Paste the contents of the ‘theme’ script as high in the <head> section as possible:
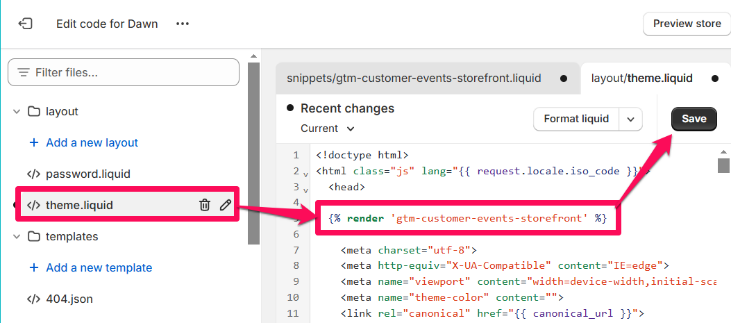
This will add the ‘gtm-customer-events-storefront’ snippet to the theme. Technically, you could just add the ‘gtm-custom-events-storefront’ contents directly to the theme, but separating the two makes the code more readable and cleaner.
#3. The ‘custom pixel’ script
This is the backbone of the solution. It installs GTM via custom pixel, then listens to customer events and pushes their information to the data layer.
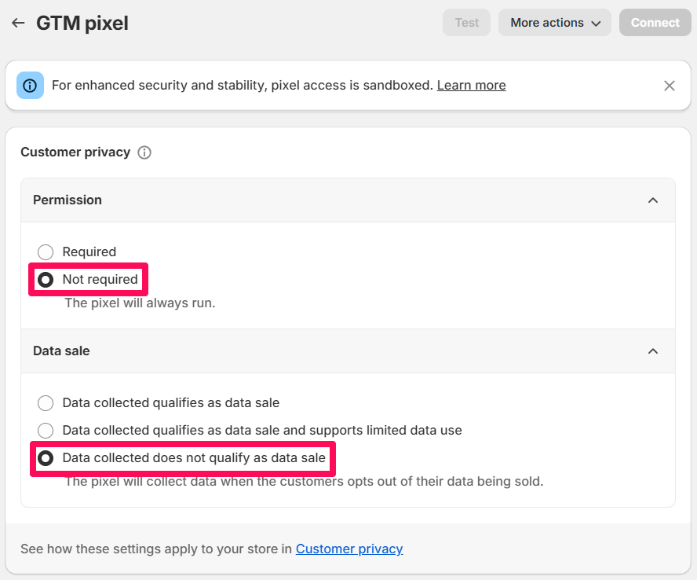
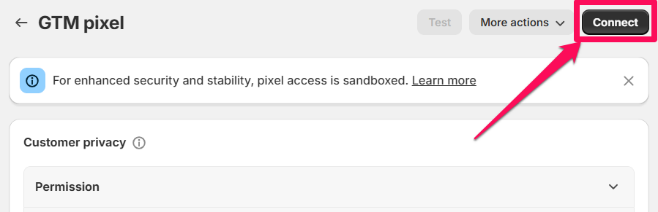
Navigate to your store’s Settings > Customer Events > Add custom pixel.
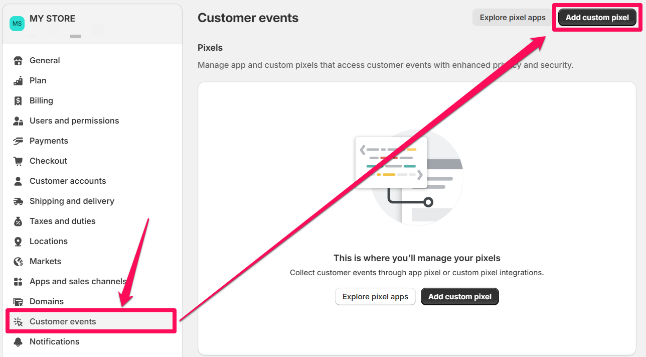
Name the pixel (e.g., ‘GTM pixel’) and open it.
In the Customer Privacy section, select:
- Not required (in the Permission section)
- Data collection does not qualify as data sale (in the Data sale section)
Then, scroll down to the Code section:
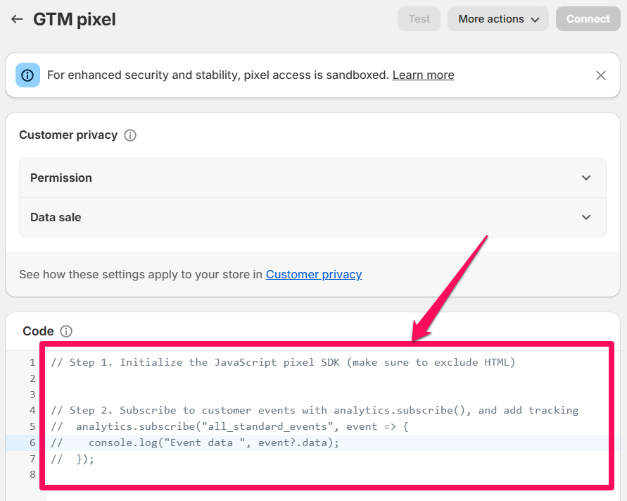
… and replace the placeholder code by Shopify with the contents of the ‘custom pixel’ script:
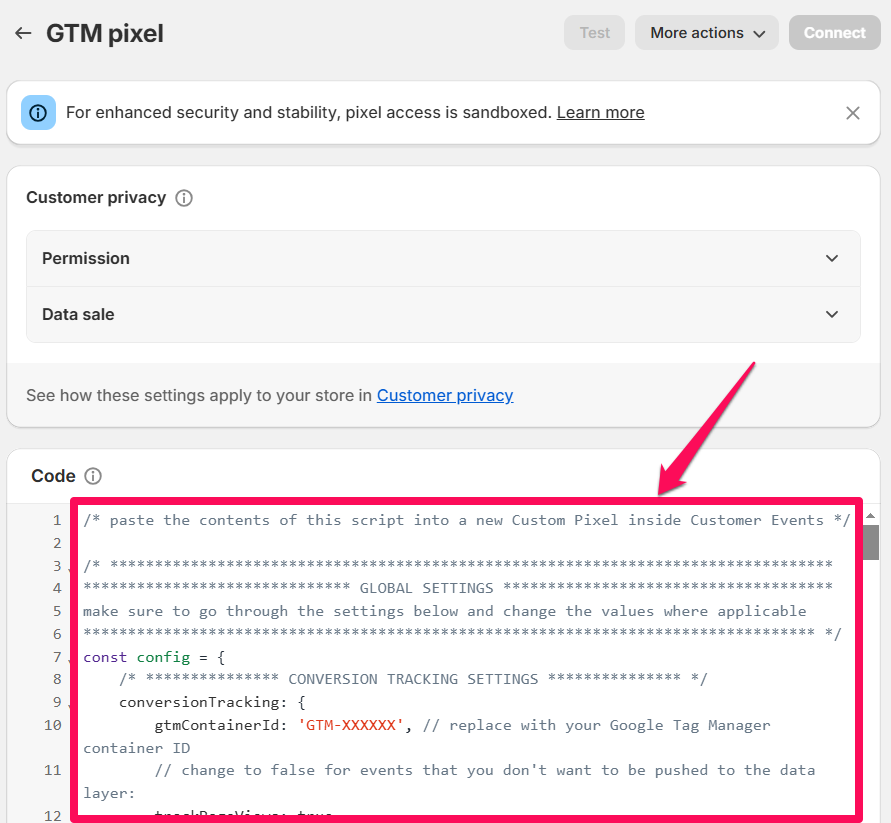
At the top of the custom pixel script, you’ll see a global settings section consisting of three parts – conversion tracking settings and store settings:
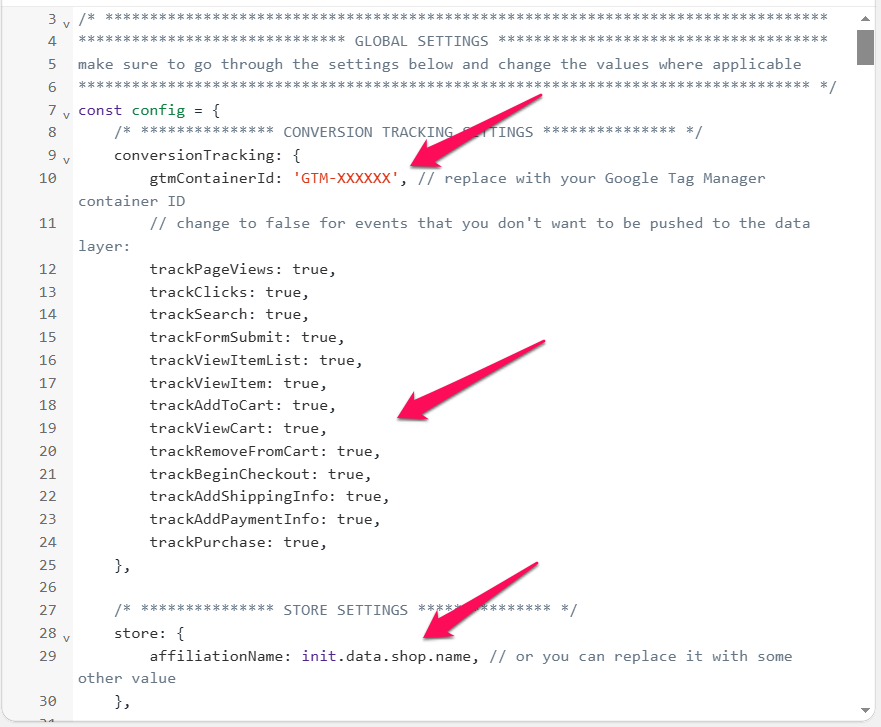
Review these settings – it’s the only place in the script where you need to make changes.
- Firstly, be sure to replace the GTM container ID placeholder with your actual one.
- As for the events, they’re all set to be tracked by default. If you want to disable any of them, you can do so by setting their value to false.
- Lastly, the affiliation. This is a parameter that’s used by the GA4 ecommerce setup. It automatically fetches your store’s name. If you’d prefer to use a custom value, simply replace it with your chosen text, enclosed in single quotes (e.g., ‘My Store Name’).
Finally, make sure to Save and Connect the custom pixel:
Testing this part will be tricky. Please refer to this article to learn more.
#2.3. Add Google Analytics 4 tag
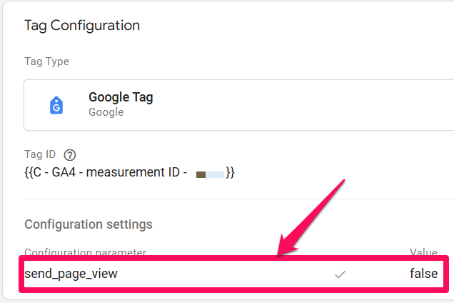
Go to Google Tag Manager > Tags > New > Tag Configuration > Google Analytics > Google Tag and enter your GA4 measurement ID in the Tag ID field (or you can use a constant variable, like in the screenshot below).
We will separate page view tracking from the Google Tag by setting the send_page_view parameter to false:
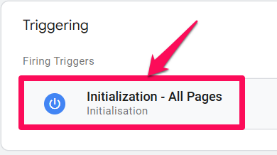
Set this tag to fire on the Initialization – All Pages trigger:
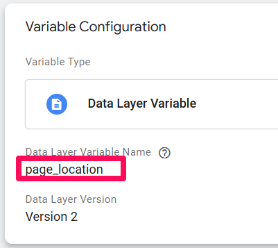
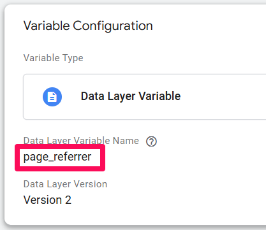
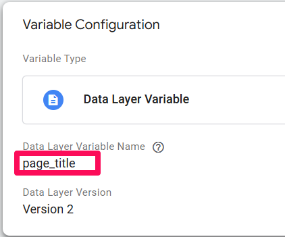
Create the following three Data Layer variables in GTM for the page location, referrer, and title:
- page_location
- page_referrer
- page_title
These will pull clean page information from the parent frame. You can create data layer variables by going to Variables > New > Variable configuration > Data Layer variable.
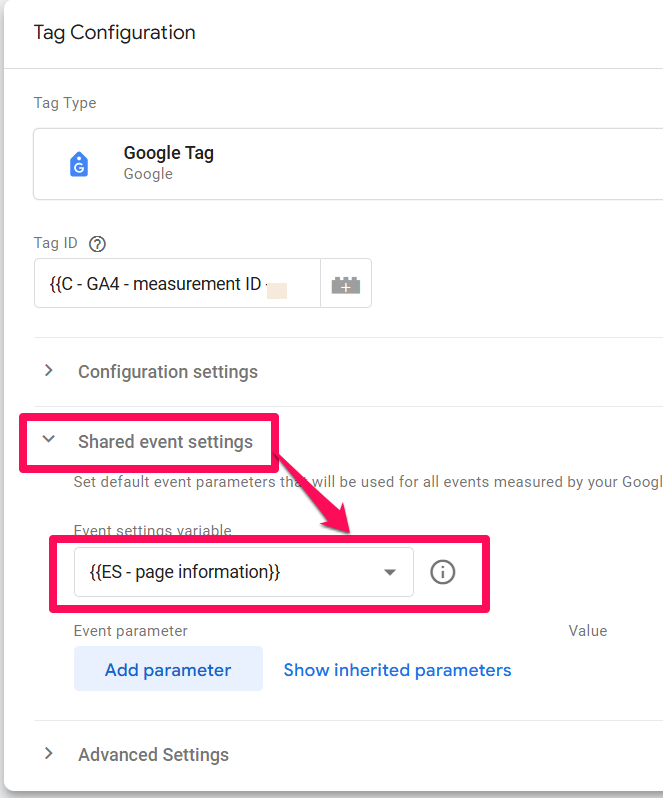
Since we want to reuse these 3 parameters across all events, it is a good idea to set them up within an Event Settings variable.
Navigate to User-Defined Variables > New > Variable configuration > Google Tag: Event settings variable. Add the page_location, page_referrer, and page_title parameters with their corresponding data layer variables that you just created:
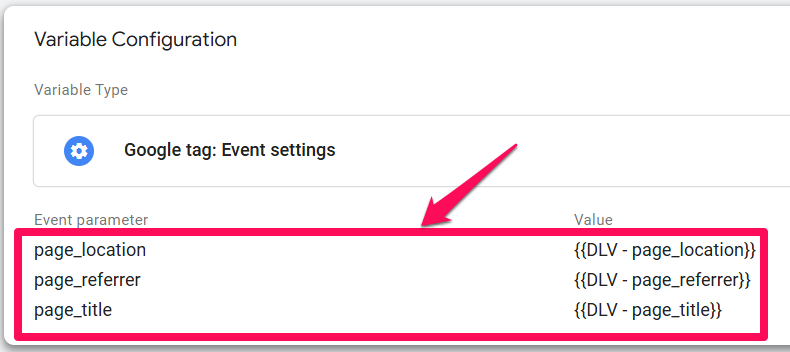
Save the variable.
Then, create a new GA4 Event tag and add the Event Settings Variable you just created under Event Parameters:
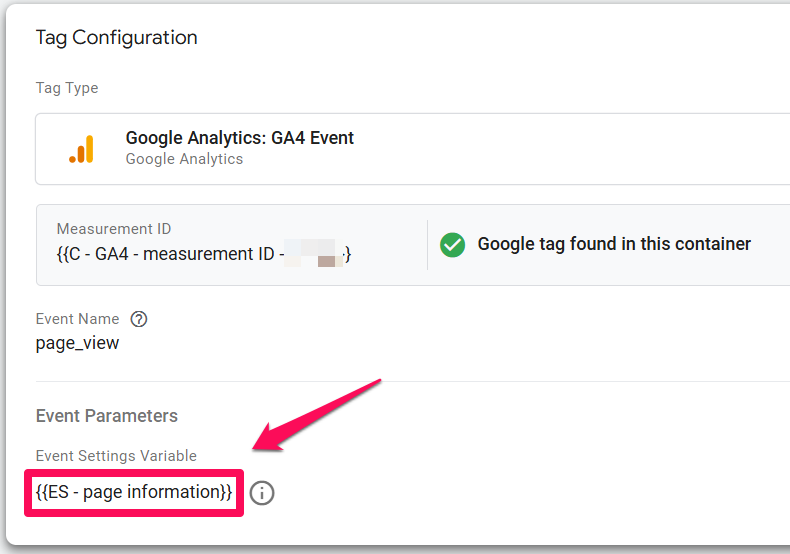
This ensures that the polluted page location is replaced by the clean URL from the parent frame.
Create a new Custom Event trigger using the page_view event name that is pushed to the data layer:
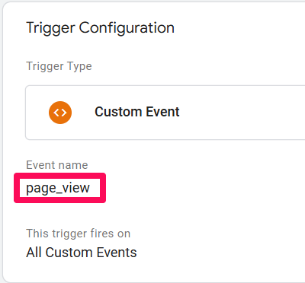
Why page_view? Because that’s the event name that our custom pixel code pushes to the data layer.
Finally, modify your GA4 Google Tag to also include the Event Settings variable that holds the clean page information:
#2.4. Test the setup
Publish your GTM container, open your store’s website, and test the setup using one or more of the testing methods covered in the previous section. Yes, you need to publish the changes to test your setup. Checkout extensibility blocks the GTM preview mode from working. GTM preview mode won’t work in checkout because Shopify’s “Custom Pixels” run in a sandboxed environment (a secure, isolated container), and GTM’s preview mode cannot “see” into the checkout steps. To learn more, refer to this blog post.
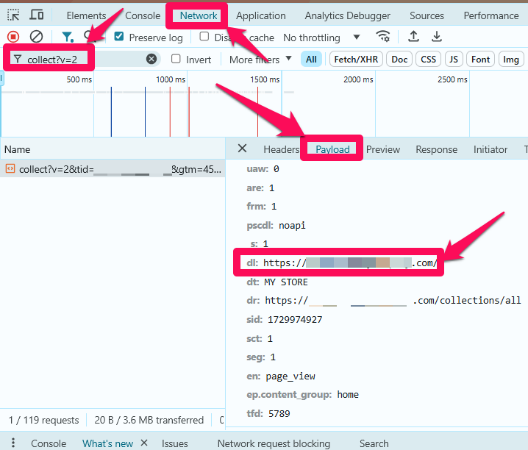
If everything is configured correctly, you should see a page view network request to GA4 with the ‘dl’ parameter (document location) containing the clean page URL:
#2.5. Configuring other events (ecommerce, clicks, etc.)
The previous steps explain how to install the basic GA4 setup. But don’t stop here. There are plenty of other things you could measure, like “add to cart”, “purchase”, etc.
If you want to learn how to do that, please refer to this blog post (you will also get a GTM container template. Import it and all necessary event tags/triggers/variables will be added to your container automatically).
Option #3. Install GA4 with GTAG
IMPORTANT : This option uses the legacy approach of installing tracking codes on Shopify and is no longer recommended
The last method I wanted to show is installing GA4 by directly adding the GTAG code snippet. I do not recommend this method without a clear reason why it needs to be added like this. If you choose to install the GTAG, you will be able to load tracking codes that are only related to Google (Google Analytics, Google Ads).
But, if you want to implement a different pixel (like Meta, or LinkedIn), you will need a developer to implement it. This is very time-consuming, and this is one of the most significant advantages of installing Google Tag Manager.
Julius wrote an extensive article comparing GTAG with Google Tag Manager here if you want to know more.
#3.1. Add GTAG to your Shopify theme
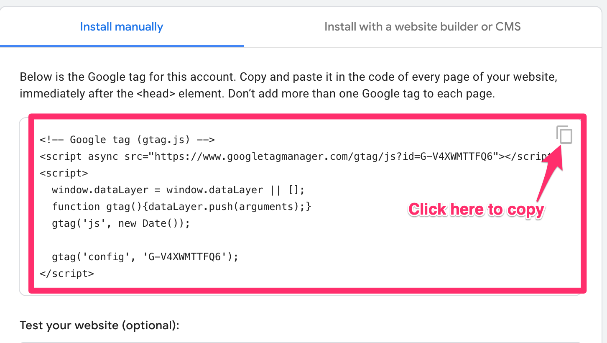
Copy the GTAG from the installation instructions of your GA4 account. It will look something like this:
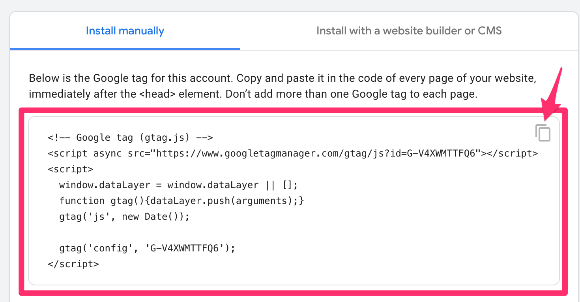
You can copy the code by clicking on the copy icon.
Next, go to your Shopify admin section and Online Store > Themes.

Now click on the three dots next to the ‘Customize’ button and click on ‘Edit code’.
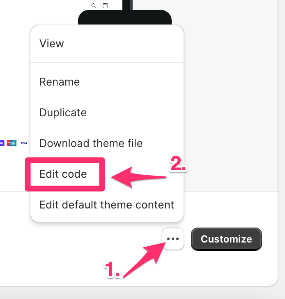
Select the theme.liquid file.
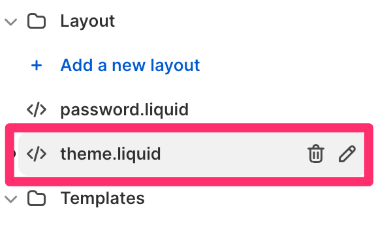
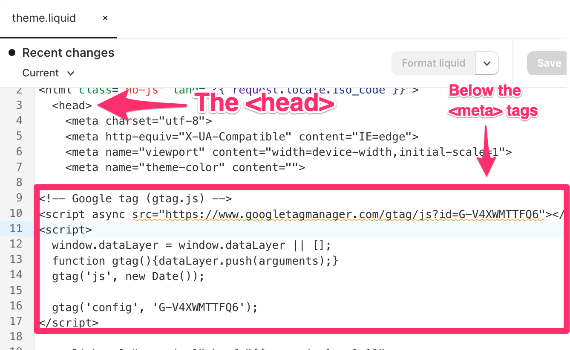
You’ll need to copy and paste the GTAG into this file. Go back to the Installation Instructions of your GA4 account and copy the GTAG.
Now, go back to your theme.liquid file. You’ll need to paste this code in the <head> section of the file, right below the <meta> tags like this.
Click ‘Save’.
#3.2. Add GTAG with purchase tracking to your thank you page
Next, you’ll need to add the GTAG codes to the thank you page. But, instead of copying and pasting the same GTAG code, you can add a purchase event to it, which will then be a purchase event for every order.
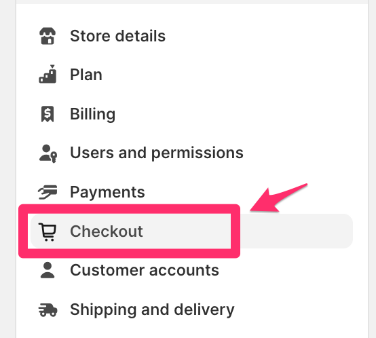
Go to Settings:
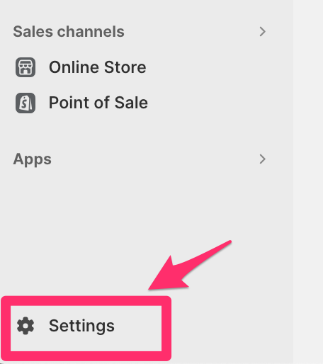
Select Checkout:
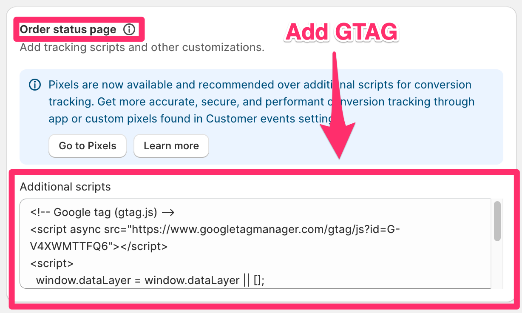
Scroll down until you find the ‘Order status page’ block with ‘Additional scripts’, copy and paste this code and make sure you add your own measurement ID. You’ll need to do this in two places.
<!-- Global site tag (gtag.js) - Google Analytics -->
<script async src="https://www.googletagmanager.com/gtag/js?id=G-XXXXXXXXX"></script>
<script>
window.dataLayer = window.dataLayer || [];
function gtag(){dataLayer.push(arguments);}
gtag('js', new Date());
gtag('config', 'G-XXXXXXXXX);
{% if first_time_accessed %}
  gtag("event", "purchase", {
    transaction_id: "{{ order.order_number }}" || "{{ checkout.id }}",
    value: {{ total_price | times: 0.01 }},
    tax: {{ tax_price | times: 0.01 }},
    shipping: {{ shipping_price | times: 0.01 }},
    currency: "{{ shop.currency }}",
    items: [
      {% for line_item in line_items %}
      {
       item_id: "{{ line_item.product_id }}",
       item_name: "{{ line_item.title | remove: "'" | remove: '"' }}",
       currency: "{{ shop.currency }}",
       price: {{ line_item.original_price | times: 0.01 }},
       quantity: {{ line_item.quantity }}
      },
     {% endfor %}
    ]
  });
{% endif %}
</script>
Code is also taken from Loves Data with the same modifications as for the purchase tracking for Google Tag Manager.
Paste the code.
Scroll down and hit ‘Save’ after that.
#3.3. Test the setup
The last thing to do to ensure everything works as expected is to test your setup.
For this, you can use the DebugView in GA4. But, to get the data to show, you need to install a Google Chrome browser extension called Google Analytics Debugger.
Install the extension here, and then click its icon (so that you can see the ON ribbon). From this moment, you will start seeing your events coming into DebugView.
You can find the DebugView in Admin > DebugView in your GA4 property.
Go to your webshop URL with the analytics debugger extension enabled and make a test purchase. Now, you should see events come into the DebugView.
#3.4. GTAG and the Shopify Checkout
Just like with GTM, it’s not possible to add the GTAG tracking code to the checkout pages (unless you have a Shopify Plus store).
So again, the only data you will miss is what happens inside your checkout. But like I said, the question is how valuable that data is, when you’re not able to make changes to your checkout.

Option #4. Shopify Google Analytics Apps
While the methods mentioned above are effective, some can be complex and time-consuming, especially for those who aren’t technically inclined. If you want to opt for a simpler solution to install Google Analytics 4 on Shopify, you can take a look at Shopify GA4 apps.
One of the options in this category is Analyzify.
Analyzify is an all-in-one data analytics solution tailored for Shopify merchants. It simplifies the process of installing GA4 (and 10+ major marketing platforms) on your Shopify store, ensuring all important e-commerce metrics are tracked to provide reliable & actionable insights for confident decisions.
#4.1. Shopify Checkout Extensibility
When setting up GA4 for your Shopify store, it’s crucial to consider Shopify Checkout Extensibility (that’s the approach that is also being used here). This feature replaces the traditional checkout.liquid customization method and has significant implications for analytics and tracking.
Key points about Shopify Checkout Extensibility:
Deprecation of checkout.liquid:
- Shopify is phasing out checkout.liquid in favor of Checkout Extensibility. There are important deadlines to be aware of:
- August 13, 2024: Deadline for upgrading Information, Shipping, and Payment pages.
- August 28, 2025: Deadline for upgrading Thank you and Order status pages, including script tags and additional scripts.
Enhanced Tracking: Checkout Extensibility allows for more comprehensive tracking of the checkout process.
Improved Performance: It offers 2X faster checkout interactions and page transitions, potentially increasing conversion rates.
App-based Customization: Checkout Extensibility is customized using apps, making it more secure, performant, and upgrade-safe.
Integration with Shop Pay: Customizations can be added to Shop Pay, creating a consistent experience across different checkout methods.
Future: As Shopify continues to develop this feature, stores using it will be better positioned to adapt to future changes in e-commerce analytics.
Therefore, when considering your GA4 implementation method, it’s important to choose an option that supports Checkout Extensibility. Some methods, like using specialized Shopify apps often include built-in feature to comply with Checkout Extensibility, making it easier to take advantage of these advanced tracking capabilities.
Which option should you choose?
Now that you know the different ways to install GA4 on your Shopify store, the million-dollar question is which method should I choose?
Unfortunately, there is no simple answer to that question other than it depends.
There are many reasons why you can choose one or the other, but I think it’s important to know the differences between them and the pros and cons, so I made a quick list for each of them below.
Google & Youtube Channel App
Pros
- Very easy to set up.
- Automatic measurement of important e-commerce metrics.
- Maintained by Shopify and Google.
Cons
- No flexibility and no customization possible.
- No configuration settings, so whenever something is not working, it’s pretty hard to debug why it’s not working and to fix the problem.
- Fluctuating accuracy. I’ve seen accounts with data accuracy between 50% and 80% for purchase events.
Google Tag Manager (via Checkout Extensibility)
Pros
- A bit more flexibility compared to the Google & Youtube channel app.
- Has higher data accuracy than Google & Youtube channel app.
- The ability to add non-Google pixels
Cons
- GTM preview mode does not work
- It requires a bit more technical skills (luckily, Julius has courses for that).
- You will need to set up everything yourself. Nothing will be tracked automatically (so you will miss the e-commerce events the channel app tracks automatically). But if you configure your tags, you’re good to go.
- Most of the GTM features will be severely limited (e.g., DOM scraping)
GTAG
Pros
- For developers with high restrictions on the website, this method fits better.
Cons
- Only relevant to developers
- Every other GA4 event needs to be coded by a developer.
Shopify Google Analytics Apps
Pros
- Easy to set up and use, ideal for non-technical users
- Automatic measurement of important e-commerce metrics
- Additional features beyond basic GA4 setup (e.g., enhanced conversions, data validation)
- Seamless integration with multiple marketing and analytics platforms
- Advanced & customizable e-commerce tracking
Cons
- Paid solution
Here’s a Quick Decision Guide to help you navigate your options:
|
Method |
Best for… | Difficulty |
Key limitation |
| 1. Google & YouTube App | Beginners & Standard Stores | Easy | No customization; hard to debug errors. |
| 2. GTM (Custom Pixel) | Marketers & Power Users who want flexibility | Hard | Requires GTM knowledge; Preview mode doesn’t work in checkout. |
| 3. GTAG (Legacy) | Developers (Old Setup) | Medium | Not recommended. |
| 4. Shopify Apps (e.g., Analyzify) | Store owners wanting a powerful solution and more flexibility compared to Google’s Youtube app. | Easy | Paid solution. |
In the end, it all comes down to what level of flexibility and control you need. If you are just starting your webshop and you don’t need to track more data, just integrate the Google Channel App (or a paid Google Analytics app). But if you need more than the events from the Google Channel app or something is not working how it should, you will need Google Tag Manager (in this case, you can either install GTM yourself via Checkout extensibility or use a paid app that does this for you).
How to install Google Analytics 4 on Shopify: Final words
As you can see, there are many ways of installing GA4 on your Shopify store, each with its pros and cons. It’s important that you think about your needs in terms of flexibility and consent for your shop before choosing your method.
Of course, those needs can change over time, and you can find yourself needing more flexibility after just using the Google channel app for a while. Luckily, you can always change your setup without losing data (considering that you will still send it to the same property).

8 COMMENTS
Thanks for summarizing.
I think the easiest method is the first one. This is where the consent management becomes difficult. Method two is therefore my favourite choice. However, you have to store all EEC events manually as dataLayer in the theme, which is a bit tricky. But you have everything perfectly separated.
One thing I want to clarify that you can still get the checkout page events using GTM even if you are not in a Shopify plus plan. I think @Rick Beijen missed it.
Thanks for this great article!
Hot topic right now is implementing Consent Mode V2, is the method #2 the only way to do it? Do you have tips or guidelines for easy implementation on a Shopify store?
Would love to know too!
Hey, thank you very much for your detailed guidline.
Regarding methode 2.
Is it not nesseccary for the ga4 purchase event to set up the event parameter like: items - {{Ecommerce Items}} ?
Does the setup with "send ecommerce data" make this not relevant?
I used option 2 and all is working fine, thx for this! i am just wondering if I can also add other tags and triggers from ex: Gads, Cookiebot,Hotjar,... using the same container?
I am using method 2 with webhasan's code which provides different code for the non-checkout pages and the checkout pages: https://github.com/webhasan/gtm-datalayer-for-shopify. I think method 2 is the most flexible way, and it works for me. Some shopify site may have many marketing apps or features develped by the site owner, for example, the add to wishlist feature is provided by a specific app, and the add to wishlist action needs to be tracked, the existing Shopify Google Analytics Apps may not meet the needs. I don't think the Shopify Google Analytics Apps offer free support to make these addtional tracking work, but it is easy to get it done with method 2.
I have my gtm installed on theme.liquid and then in customer evetns but now i am facing a weird issue. I am seeing nearly 35% unassigned traffic and two page views. one from the theme.liquid container and the other one from the gtm container call in the customer events.
https://abc.com.au/wpm@b17fa82aw73fba6b9p1784f85em446306ea/custom/web-pixel-99385482@46/sandbox/modern/?utm_source=test&utm_medium=test>m_debug=1752042884820