
January 5, 2026
How to Track Custom Events with Google Analytics 4
Updated: January 5th, 2026
Google Analytics 4 has a steep learning curve.
In one of my previous blog posts, I explained how GA4 event tracking works in general. But if you understand the basics of Google Analytics 4 and want to dive deeper into custom event tracking, you’ve come to the right place.
A custom event in Google Analytics 4 is an event that you define and name yourself to track interactions that are not automatically captured by GA4. Unlike standard events, these are specific to your unique business needs, such as tracking a specific menu click or a form submission that doesn’t match standard definitions.
In this blog post, I’ll explain how to track custom events with Google Analytics 4 and Google Tag Manager.
– Here’s what you will learn in this article –
- GA4 Event tracking in a nutshell
- Example #1: Custom Event in GA4 (with GTM) – Menu Link Click
- Register custom definitions
- Example #2: Creating custom events directly in the GA4 interface
- Test your custom events in Google Analytics 4
- Where can I find custom events in Google Analytics 4 reports?
- Turning Google Analytics 4 Custom Events into key events
- Limitations
- Want to learn more about event tracking in Google Analytics 4?
- Final Words
Video tutorial
Prefer video content? Take a look at the tutorial below (from my YouTube channel).
GA4 Event tracking in a nutshell
To understand the full scope of event tracking in Google Analytics 4, read this tutorial. It also includes a detailed video tutorial.
But here’s a quick 2-minute brief if time is of the essence. GA4’s event tracking does not require parameters like event category, action, or label to function correctly. Instead, you can use other recommended parameters or come up with your own.
There are four event types in Google Analytics 4:
| Event Type | Description |
Do you need to set it up? |
| Automatically collected | Basic events like page_view, session_start. | No, automatic. |
| Enhanced measurement | Common interactions like scroll, file_download, video_start. | No, enabled by a switch in Admin. |
| Recommended | Events Google suggests for specific verticals (e.g., login, purchase) but doesn’t track automatically. | Yes, you must implement them using Google’s specific names. |
| Custom | Anything else! Events you name yourself to track unique interactions. | Yes, you define the name and parameters entirely. |
Since the scope of this article is tracking custom events, we must make sure that the custom event names do not match those already defined by Google. To avoid this confusion, here’s a simple process that you can follow to structure your events (names and parameters) properly:
- Check if the event that you want to track is among the automatically collected events
If not, then check if your event name resembles any event among the Enhanced Measurement events (e.g., scroll or file_download) - If not, then check the recommended events and their naming convention
- If none of the above categories apply to your events, you will need to create a custom event.

Let’s now talk about the type of events in this article’s scope – custom events.
The configuration of Custom events is pretty much identical to the recommended events. The only difference is that you will need to come up with event names on your own.
For example, if you want to track clicks on a particular image, you can use any of these as the event name:
- image_click
- click_image, etc.
When configuring custom events, there are a few things to remember. For example, your event name should not exceed 40 characters. So be sure to name your custom events seriously. You can check other limitations here.
Now, let’s look at the example where we want to measure clicks made to menu links on a website.

Example #1: Custom Event in GA4 (with GTM) – Menu Link Click
Let’s start with the example where I show how to send custom events to Google Analytics 4 with Google Tag Manager. Later I will show you an example of configuring an event directly in the GA4 interface.
I prefer the Google Tag Manager option because it’s more powerful and flexible, and all your configuration is located in one place.
Note: menu link click tracking trigger conditions (that I will show you) differ on most websites (because of different click classes, IDs, etc.). Try to do your best to apply this example.
I have several menu links on a demo website that I want to track.

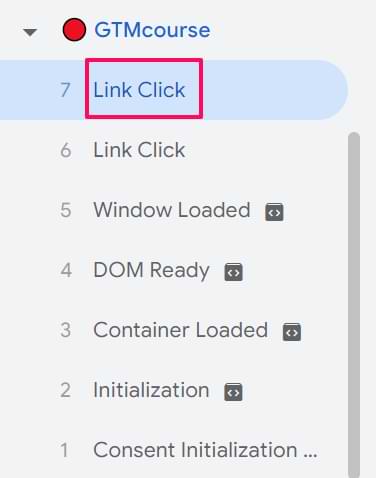
First, you need to create a trigger that will indicate to Google Tag Manager when the menu link click event should fire. Enable Google Tag Manager’s Preview mode and try clicking on any of the menu links on a website. By doing this, you should see the Link Click event in the Preview mode’s left sidebar.
If you don’t see it, you should:
- have at least one Just Links GTM trigger activated on a page
- or have “File download” or “Outbound links” tracking enabled in your Enhanced Measurement Settings
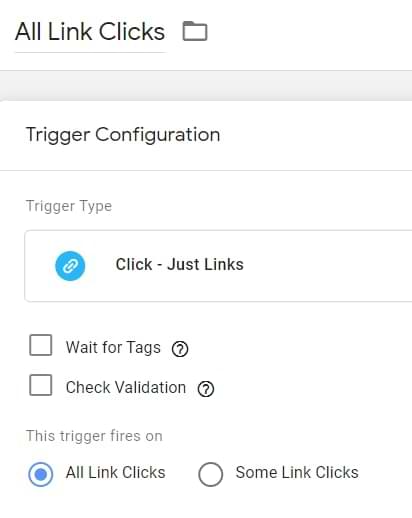
Let’s say that you don’t use Enhanced Measurement in GA4. Go to Google Tag Manager > Triggers > New > Just Links. Set the trigger to fire on All Link Clicks and save the changes.
Creating this trigger will signal Google Tag Manager to activate its link-tracking functionality.
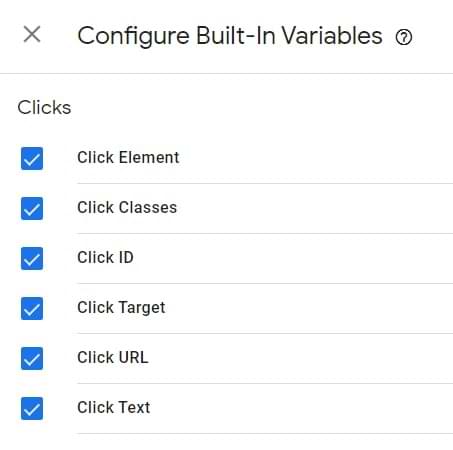
Then go to Variables > Configure (in the “Built-in Variables” section) and enable all Click-related variables.
Refresh the preview mode (by clicking the Preview button once again).
Now, head to your website and click any of the menu links (at least two of them).
Return to the preview mode, and you should start seeing Link Click events in the preview mode. Then, click the first Link Click event, and go to the Variables tab of the preview mode.
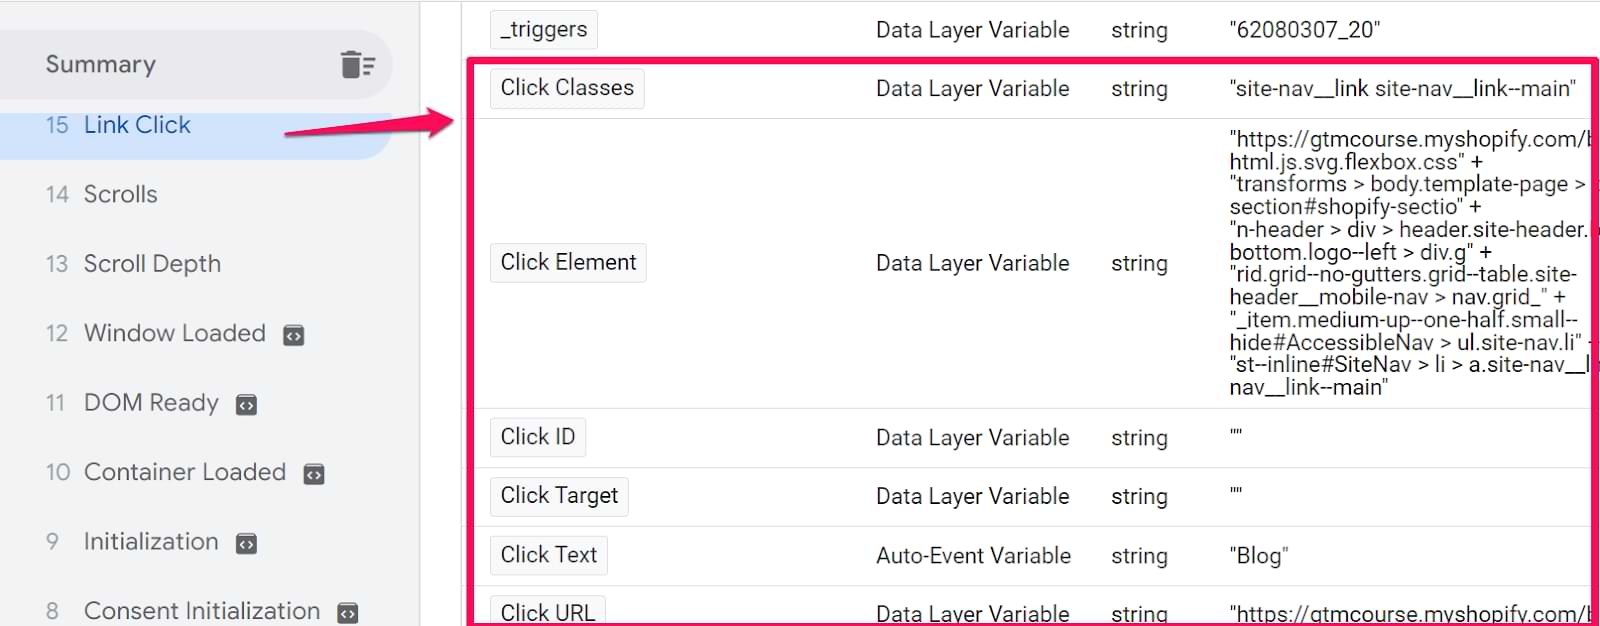
Then click on the second Link Click event. I am currently looking for a variable that I could use to distinguish a menu link click from other link clicks. This variable will help me fire the Google Analytics 4 event tag at the correct action.
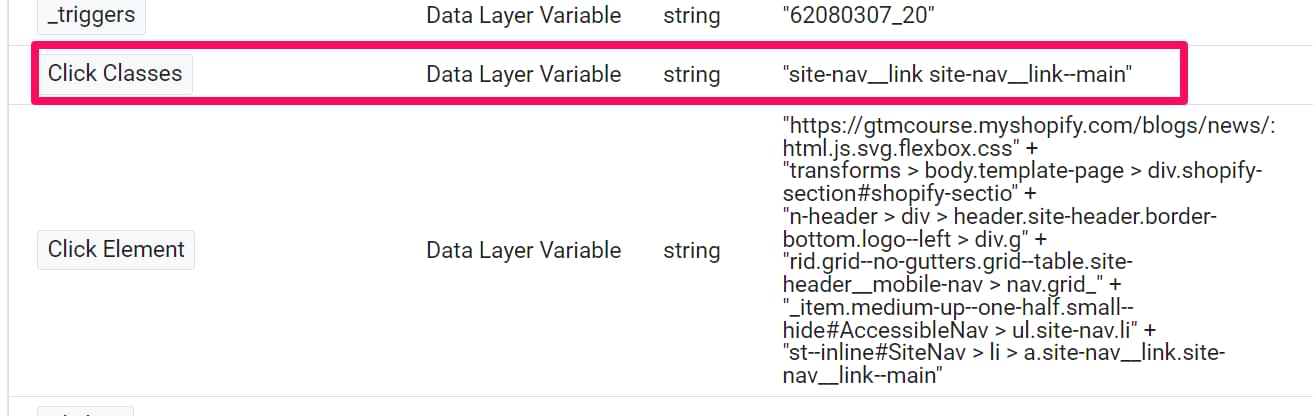
On closer inspection, both links contain the same Click Classes value, site-nav__link site-nav__link–main. By the way, nav means navigation. I will use this in my Just Links trigger.
Tip: If your website does not have unique Classes, look at other variables in the Debugger like Click ID, Click Text, or even Click URL to find a unique identifier for your menu.
Go back to the list of triggers in your GTM container and click the previously created trigger for All Link Clicks. We’ll edit it and add a condition: Click Classes contains site-nav__link–main
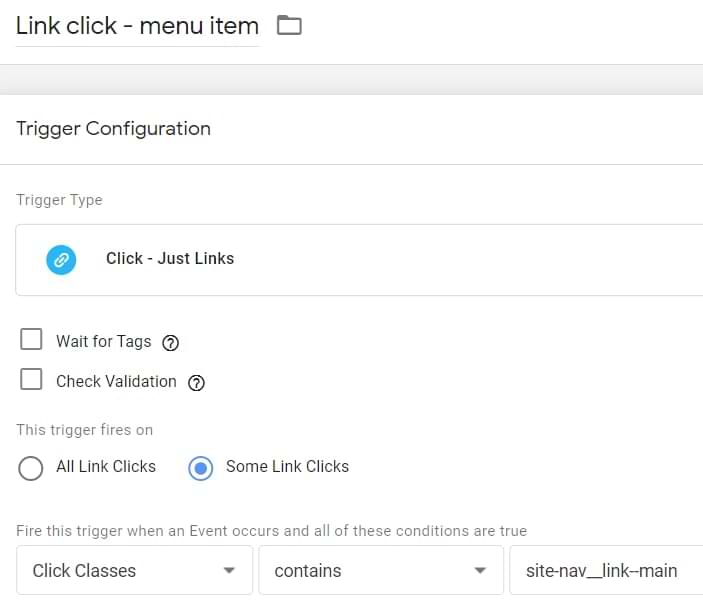
Go ahead and save the trigger.
Now, it’s time to pass the information to Google Analytics 4.
In this blog post, I presume you have already installed Google Analytics 4 with Google Tag Manager. If not, please read this article first.
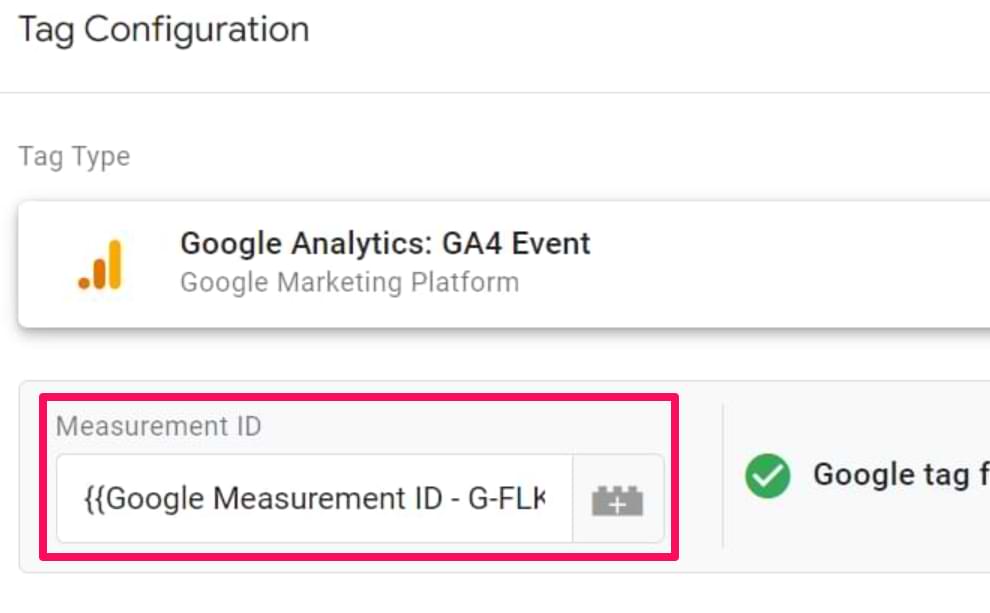
Navigate to Tags > New > Google Analytics > Google Analytics: GA4 Event. Enter the measurement ID of your GA4 data stream (or, even better, enter your measurement ID as a constant variable).
Then, enter the event name. Its value is up to you. Any of the following options are perfectly fine:
- menu_click
- menu
- menu_item_click
- menu click
- etc.
These are just some examples and are not limited to these. Just keep in mind to follow the limitations of name length.
In my case, I used menu_link_click as the event name. But this time, sending just the event name is not very useful. You’d probably want to know which menu items get the most clicks. How about the menu item’s name and URL?

We could do that by sending additional event parameters. Even though you could use parameters already mentioned in the documentation of the Enhanced Measurement Events (like link_url and link_text), let’s create two custom parameters (because I just want to show you how to configure them).
I am going to pass two parameters, menu_item_url, and menu_item_name. I made these parameter names up, and you can do it too.
To send custom parameters, you must expand the Event Parameters section in the Google Analytics 4 event tag and then click Add Row.

Enter the name of the first parameter. In my case, that is menu_item_url. In the Value field, I will insert a variable that returns a clicked URL. Luckily, GTM already offers such a variable, it’s called Click URL. Click the Insert Variable button and then select the {{Click URL}} variable.
Let’s add another parameter, menu_item_name. GTM offers another built-in variable {{Click Text}} for that purpose. Insert it as well. Since visitors of your website can translate your page, {{Click Text}} value will also change. Hence, you will see a more diverse list of collected values in your GA4 reports.

If you want to send more parameters, you are free to do that. You can send up to 25 parameters with a single event.
Assign the previously created Just Links trigger to this tag and save it.
Refresh the GTM Preview mode and click a couple of your menu items. Go back to the Preview mode and click those Link Click events. Check if the GA4 event tags for Menu Link Clicks have fired.
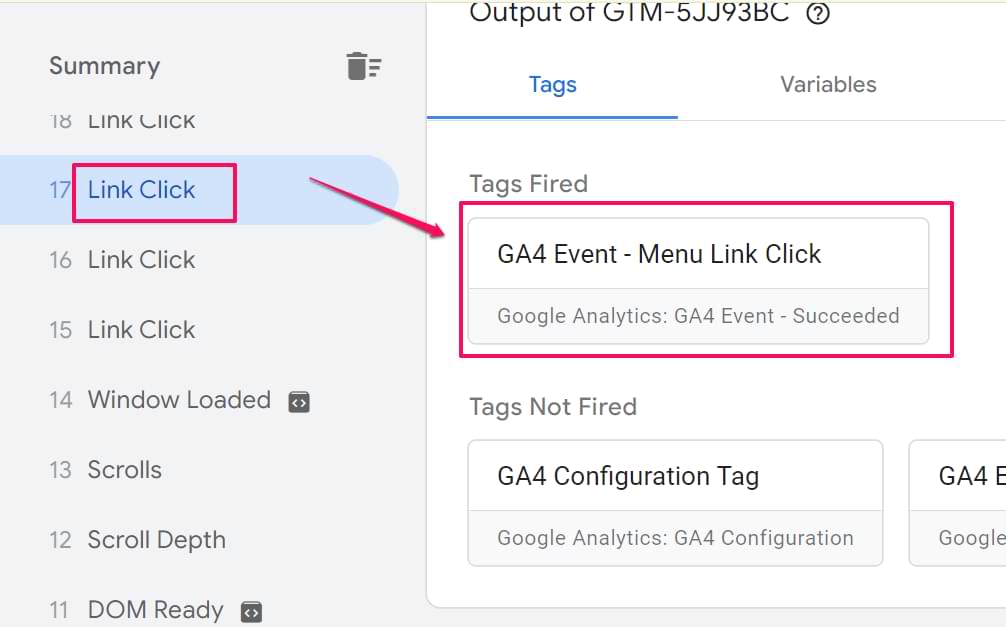
Head to Google Analytics 4’s DebugView to ensure the event has registered.
IMPORTANT: Even though you will see your custom parameters in Real-time reports and DebugView in GA4, you will not be able to see them in other GA4 reports. Unless you register those parameters as custom dimensions in Google Analytics. Read the next chapter of this blog post.
IMPORTANT: Register custom definitions
All custom parameters must be added as custom definitions in Google Analytics 4 if you want to see/use them in places like Funnel reports, Exploration, see their reporting cards in standard reports, etc.,
In Google Analytics 4, go to Admin > Custom Definitions. Since we sent two custom parameters with the menu link click, we must register them here.

Click the Create Custom Dimensions button and then enter:
- The name of the parameter. You can enter whatever you want. Accordingly, GA4 will display the dimension in your reports. For example, you can name it “menu_item_url”, “Menu item URL”, or anything else.
- Scope. Since we want to apply this parameter only to one event (and not to all events of the same user), we need to select Event.
- Event parameter. Here, you must enter the name precisely as you entered it in the GTM tag. For example, if your parameter name is menu_item_url, you must enter it here like that. Don’t worry if the autocomplete feature of that field does not show your parameter yet. Instead, just enter it and save the dimension.

Then, register a second parameter (in my case, menu_item_name) and save it. By the way, I sometimes use the words “custom parameter” and “custom dimension” interchangeably. In general, custom metrics and custom dimensions are both grouped as custom parameters.
Choosing dimension vs. metric:
- Custom dimension: Use this if your parameter sends text (e.g., menu_item_name = ‘About Us’). This allows you to slice and dice your reports by these names.
- Custom metric: Use this if your parameter sends a number that you want to do math on (e.g., score = 50, items_count = 3). This allows you to see averages, sums, and totals in your reports.
In our example, menu_item_url and menu_item_name are text, so we register them as custom dimensions.
And now we wait. Within the next 24 hours, the custom parameters will start appearing in your Google Analytics 4 reports.
Example #2: Create custom events in the Google Analytics 4 interface
This option might be convenient for those who are not using Google Tag Manager or just don’t want to mess with the technical stuff. While this option (creating events in the GA4 interface) is convenient, it’s also more limited.
Google Analytics 4 has a feature called “Create event”. It allows you to create events based on other events already tracked by GA4. For example, if you track page_view events and you want to create a separate event just for the “Thank you” page, you can use this feature to create a thankyou_page_visit event.
Let’s take a look at how you can do this. Go to Admin > Events page, click Create Event, then click Create.

Enter the name of the custom event. You can name it whatever you want. Make sure the name is clear to understand. thankyou_page_visit might be a good option.
Then, let’s move on to the Matching Conditions section. Here we must tell GA4 what kind of event we are looking for. Then, when that particular event is spotted, our thankyou_page_visit should also be created.
In my case, I need to enter the following conditions:
- event_name equals page_view
- page_location contains /thank-you/
In your case, the page_location parameter’s value will probably be different.

If you want to copy all the parameters from the page_view event to the new event, keep the checkbox Copy parameters from the source event enabled.
After you complete this, GA4 will automatically start tracking a thankyou_page_visit event when a page_view event is fired on a page containing /thank-you/ in the URL. Remember that you can have up to 50 “Create event” rules in a single GA4 property.
Test your custom events in Google Analytics 4
Once you configure your custom events, it’s time to test them. The primary feature built for debugging GA4 data is the DebugView section. You can find it by going to Admin > DebugView.

That’s the place where your debugging should take place. Do not mix this with Google Tag Manager’s Preview and Debug mode. These are two different beasts.
To enable the debug mode in GA4, you have several options (any of them will work):
- Enable the GA debugger Chrome extension
- Send a debug_mode parameter together with an event
- Have enabled Google Tag Manager’s Preview mode on a page that you’re debugging
In the case of the first option, install the extension here, and then click its icon (so you can see the ON ribbon). From this moment, you will start seeing your events in the DebugView tab.
The other option is to send a debug_mode parameter with every event you wish to see in the DebugView. In Google Tag Manager, you can do that by opening the Google tag and adding the following parameter:

If the debug_mode parameter contains any value, the event will appear in DebugView. If you use a hardcoded gtag.js, here are the instructions for including the debug_mode parameter.
But since we are working with Google Tag Manager, having the GTM Preview mode enabled automatically sets the debug_mode to true. Thus the data will start appearing in the GA4 DebugView.
When you start seeing data in the DebugView screen, you can click on every individual event, and the appropriate list of parameters for each event will populate.
Click on that parameter to see the value that GA4 received. Now that is some granular debugging!

However, I have noticed some delays between the event happening on a website and then appearing in DebugView.
Sometimes, I have to wait several minutes until the events come in. That’s a bit unfortunate, and hopefully, the team behind Google Analytics 4 will improve this in the future.
Also, ensure you have selected the correct Debug device in the top left corner.

If multiple visitors have enabled the debug view (e.g., they all have enabled the Chrome extension), you will see multiple devices there, which might require some time to find yourself. I’ve seen this apply especially to my blog. Many of my readers enable the GA Debugger Chrome Extension. So, it became my task to find my device among the rest.
Anyway, once you start seeing data in DebugView, things will look like this.

Blue icons highlight events, and green icons represent key events. Please ignore the fact that I treat menu_click events as key events. It is just for demonstration purposes.
You will see the parameters sent together with an event when you navigate to the event. Click on the parameter to see its value.

Once you have made sure that the data is coming in and displayed correctly, you should submit your GA4 changes in the GTM container and publish it.
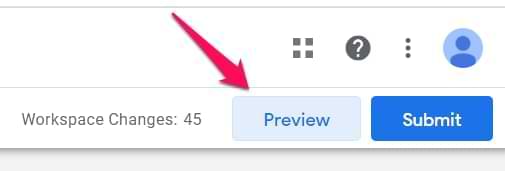
You can do that by clicking the SUBMIT button in the top right corner and completing all the steps the user interface asks you to do.

After that, you should soon start seeing the new data in your real-time reports.
On the left sidebar of the Google Analytics 4 interface, go to Realtime. Here, you will see the data coming into your reports. Unlike in the previous version (Universal Analytics), the new report allows you to see the data on a much more granular level.
First, you will see a map and a bunch of cards with traffic sources, the most popular events, and the number of users in the last 30 minutes (by the way, Universal Analytics’ real-time report shows the number of users in the last 5 minutes).
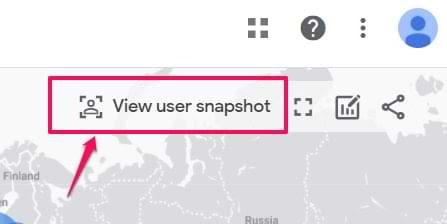
You can also take a look at the snapshot of an individual user. For example, you can do that by clicking the View user snapshot button in the top right corner.
Then, you will see a stream of all events of that particular user. You can click on them (just like in the DebugView) to see things on a more granular level. If you wish to look at another user/visitor, you can click the button here:
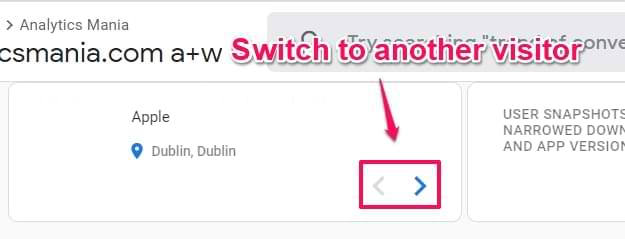
Press the Exit snapshot button in the top right corner to complete examining the snapshot.
Where can I find custom events in Google Analytics 4 reports?
This blog post focuses mainly on tracking custom events with Google Analytics 4. I will not dive deep into how to find insights, raise questions, answer questions, etc.
However, I can show you several places where you can find the event data you just sent to Google Analytics 4.
Keep in mind that Google is constantly updating Google Analytics 4. So if something looks different from what this blog depicts, don’t worry. Keep browsing the interface, and you’ll eventually find what you need.
So, let’s take a look at what we have now. Here are some of the reports:
- Admin > Events (this will show just the list of events with counts. Nothing fancy.
- Reports > Engagement > Events
- Explore (a.k.a. Exploration reports)
But that is not all. Since GA4 is an event-based analytics platform, every report is affected by events you send (in one way or another). The reports mentioned above are just the most notable examples.
“Reports → Engagement → Events” report
The Events Report gives you an overview of all events sent to your property, plus a couple of charts. Below them, you will see a list of events; if you click on any of them, you can look at the various parameters captured during the event.

You could also create a custom report in the “Reports” section. For more examples, you can take a look at this guide or this.
Explore (a.k.a. Exploration reports)
The Explore section is the place where you will be able to drill down into your data. In the Exploration, you can use reports such as Free Form, Funnel Exploration, Path Exploration, etc.
Here is an example of a Free Form report. Remember that you might need to wait ~24 hours for the data to come into your reports. So if you don’t see the data now, be patient.
Let’s say I want to see how users with different device categories interact with my site’s menu bar. Remember, I set up the menu_click event?
So, let’s go to Explore and click on the Free Form block.

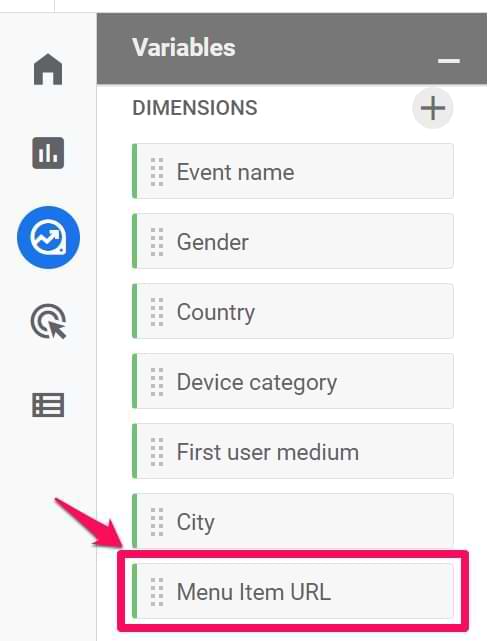
Then in the Variables column, I need to include the menu_item_url custom dimension because I want to see how many clicks each menu URL got. Then, click the Plus icon and then find the menu_item_url dimension. Then, select it to be added to the list of possible dimensions in the report.

If you CANNOT see the menu_item_url (or whatever custom parameter you are looking for), you must register that custom parameter in Admin > Custom definitions > Create custom dimension. And then wait for 24 hours until the data appears in the reports. If the reports don’t work correctly, wait longer.
Then let’s edit the Tab settings. Remove the existing dimensions in the ROWS and include the custom definition you want. In my case, that’s menu_item_url.
In the COLUMNS section, I used the Device category dimension. In the VALUES section, select the metric you want to see. I used the Event Count.
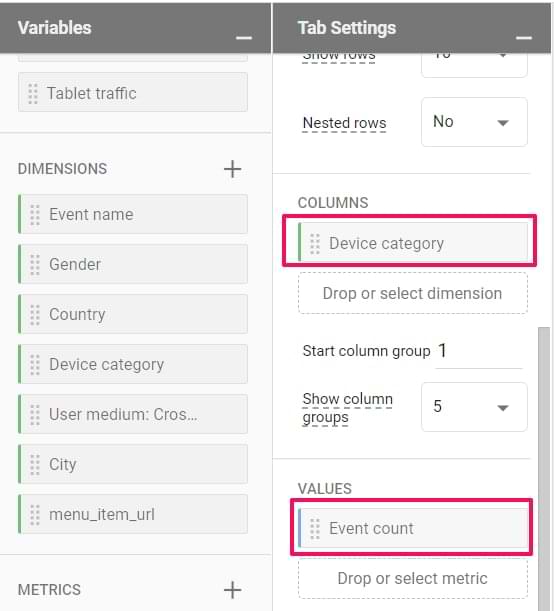
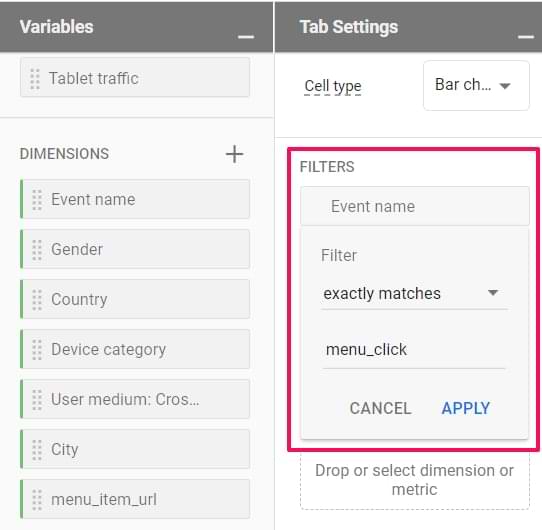
Then, you will need to filter only those events that contain the menu_item_url dimension. In my case, that is just a menu_link_click event.
That’s why you should enter a filter at the bottom of the Tab Settings section: “Event name exactly matches menu_link_click.”
That’s it. Your report will now display how different device categories are clicking menu items, which ones are the most popular, and how many clicks they got.

Also, don’t forget to change the date range if you need it. You can do this in the top-left corner of the Exploration interface.
You can also use event data in things like funnel reports, but let’s keep it for another tutorial (hopefully) in the future.
Turning Google Analytics 4 Custom Events into Key Events
Some events are more important than others; for example, the most important interactions were called goals in the previous GA version. Later, they were renamed to conversions. And now, they are known as key events.
If you want to learn how to configure key events in Google Analytics 4, watch the video tutorial below or read this in-depth blog post:
Limitations of custom events in GA4
Before you go wild with creating custom events in Google Analytics 4, be aware of these limitations (actually, they apply to regular events too):
- The maximum length of an event name is 40 characters. If you use more, you won’t be able to mark it as a key event.
- Some event names (of automatically tracked events) are reserved (but not all of them). For example, you cannot send the session_start or first_visit events by yourself. But you can send enhanced measurement events with your custom setup (e.g., with Google Tag Manager), for example, file_download, view_search_results, etc.). You can find the list of reserved event names here. Even though the documentation says you cannot use enhanced measurement event names, I tried it multiple times, and they work fine.
- Your event names must start with a letter and contain only letters, numbers, and underscores. Don’t use spaces. It is best practice only to use small characters (a.k.a. snake_case)—for example, menu_link_click.
- Even though Google Analytics 4 documentation says you can use non-English letters in event names, I had mixed results. For example, if you try to create an audience trigger, non-English letters might cause problems.
Speaking of event parameter limitations, keep in mind that:
- You can send up to 25 event parameters together with the event. Based on various experiments, automatically collected parameters (like page_location, etc.) are counted in this limit.
- The maximum length of the parameter name is 40 characters.
- The maximum length of the value (of a parameter) is 100 characters
Other limitations are listed here.
Want to learn more about event tracking in Google Analytics 4?
Honestly, in this tutorial, I was scratching the surface of what you should know about event tracking. If you want to learn more, head over to this blog post. In it, you will find topics like:
- How to plan your event structure
- Automatic event tracking
- Recommended events in Google Analytics 4
- How to create custom events directly in Google Analytics 4 interface
- How to modify events directly in Google Analytics 4 interface
- and more!
Tracking Custom events with Google Analytics 4: Final Words
This article was longer than expected because there’s so much to cover. But if tracking custom events with Google Analytics 4 adds value to your work, it is worth it. If you want to learn more about tracking events, you can learn more about it here):
- Check the automatically tracked events and what Enhanced Measurement has to offer.
- If an event (that you wish to track) is not listed, check the recommended events and try to use their naming convention and parameters.
- If none of the recommended events match your need, create a custom event in Google Analytics 4 (the entire blog post was just about this part).
Here are some key takeaways:
| Do |
Don’t |
| Check existing events (Auto/Enhanced) before creating custom ones. | Don’t use spaces in event names; use underscores. |
| Use snake_case (e.g., menu_click) for all names. | Don’t forget to register custom parameters as Custom Dimensions. |
| Test using DebugView to verify incoming data. | Don’t exceed 40 characters for event or parameter names. |
- GA4 rids you of the need to define parameters like Event Category, Event Action, and Event Label fields. You can create them manually as custom parameters, but doing so won’t make sense.
- You can send custom parameters (dimensions and metrics) with events (both recommended and custom).
- You can send up to 25 parameters with a single event.
- If you want to see a parameter in the GA4 report, register it as a custom definition. There is a limit of 50 registered custom dimensions and 50 registered custom metrics per property.
- Use Google Analytics 4 DebugView to test the incoming events granularly.
17 COMMENTS
Hello Julius,
I tried to set up meniu link click tracking, but in the preview mode "Click Classes" value equal - ". As you mentioned in the article it should have some differentiator like in your example - "site-nav__link site-nav__link–main". But in my case, the value is - ". So how should I get that differentiator? Should web developer to set up it?
Ask a developer. Or learn CSS selectors
Thanks!
Hi Julius,
Thank you for your amazing guide.
I'm wondering if I can still see the old data if I register the custom parameter after a while the associated events have been recording.
E.g. I started recording events and the corresponding parameters in Oct, but I only enable the custom parameters on GA4 UI in Dec. Can I still see the custom parameter data of Oct and Nov on the report?
Thanks a lot.
Hi, you won't be able to see the parameter in GA4 reports before it was registered
Hi Julius, thank you for your prompt reply. And the old data won't be backfilled even the events and associated parameters have been recording before the registration on GA4 UI, right?
Thanks a lot.
Hi, thank you for the very interesting post. We use GTM and both a normal GA property and now a GA4 property.The GA4 property is linked to the GA property (as far as I can see). I then setup GTM with the GA4 event tag and in GA4 I can see in the DebugView that data for an event has been transmitted. However, when I switch to "Configure" and click on "Events" none of my custom events is shown in the "Existing events" table. By contrast, the message "Integrate the SDK or set up tagging to start getting event data. You'll see your first event reports here within 24 hours." is displayed here. When I click on "Modify event" I can see my two configured custom events, but they are not listed in the overview table as mentioned before.
Do you know why this message appears? The GA property stream is configured as Webstream.
Hi, your question contains the answer. 24 hours.
Hey, Thanks for the guide. It's super useful :)
What if I want to add a dynamic value to a event. I already have a dataLayer that is passing the value.
Thanks
Then you need to set the parameter and use a dataLayer variable as its value.
Hello Julius,
I have created a custom value and passed some parameters like currency, value, booking id, roomname. My booking event is booking_done. Which is also my conversion. when i click on conversion report tab i didn't see any value for that event. in egagement report, i didn't get value for this booking_done event. If i click on booking_done event on engagement report, i see event count, event value. is it possible to see in value conversion report for the custom events. all data are collected from data layer.
Hi Julius
I created a tag in GTM to track the clicks to my home page main banner. I created a Click-All Elements trigger with Click Class equal to the value from Data Layer. I included click class since other click parameters doesnt have a value. So after that as per your article I created a custom definition as well.
To clear my doubt, I want to know if I have to add a custom event as well on GA4. Im asking this because if we go to events on GA4 we see a set of events including clicks. But I dont see any event for banner-clicks which I have named the event name on GTM Tag.
Are you able to clarify this for me, Thank you
Is it possible to use the "modify event' functionality for events that are sent from the backend to GA4 via the measurement protocol?
We've tried different permutation / combinations, but have not been able to have the "modified event" show up.
How can we setup an event in GA4 to track the lead form submissions for a landing page build on Leadpages.
Thanks in Advance
I've noticed one limitation that doesn't make a lot of sense. You can't use stuff like "transaction ID" or "currency", prescribed GA4 parameters, in a custom event. It seems that it has to be a custom dimension such as "transaction_id_custom" or "currency_used" (or whatever you name them) because they don't seem to populate custom event values. This is making up for an unnecessary opening of custom dimensions when needed.
Hi Julius! I previously was pulling data for our owned ads via outbound link UTM's through an exploration using "link_url" and filtering from there. It was tracking outbound clicks and would tell us which ad was clicked on based on the UTM parameters Google picked up via the link_url. We've recently implemented a script to better track our UTM's now that Google has a URL parameter limit of 100 characters.
I'm noticing a significant difference between what our ad-tracking is picking up VS the exploration I previously used. The ad-tracking is essentially counting half of what the exploration is picking up. My question is, is the ad-tracking going off of engaged sessions perhaps while the exploration is just picking up clicks alone (even those that exit immediately)? Thank you in advance!
Hi Julius -
Old thread, but we're just restarting GA4 after a gap. On our eCommerce site, I set up two custom events for Add to Quote and Quote Submit, and we have defined eCommerce objects for them. The data appear correctly in the GTM tags, I can't get them to come through in Analytics. For the built-in eComm events like Purchase, in Debug View you'll see an Items tab in addition to the main parameters and user properties for each event, but I don't see that with my custom events. I can't find anything in the custom event documentation about eComm per se nor custom event scoping - for custom dimensions, you can set the scope to event, user, or item.
I tried ticking the Send Ecommerce data in the GTM event tag, and it appears in the tag when fired, but is not in Analytics Debug. I looked at the Event Settings Variable in the tag setup, but this seems to be just a shorthand for saving parameter sets. Any ideas?