
December 11, 2025
How to track promotions with Google Analytics 4 ecommerce
Updated: December 11th, 2025
Promotions are banners or popups that you can show on your ecommerce site to promote certain sales or special offers. The idea here is that visitors will be incentivized by the offers on these banners and popups to make a purchase.
Promotions are helpful to increase user activity, but how can you measure their actual impact? This is where GA4 can help! We can track not only when users have viewed and clicked on these promotions but also associate ecommerce events with them to see their impact further down the user’s journey.
In this article, we will be getting into the thick of things. While following something step-by-step is generally pretty easy, I think actually understanding what you’re doing and why it works the way it does leads to far better results in the long run.
The end goal of this article is for you to understand how to track clicks and views on promotions with Google Analytics 4 (and all the nuances that come with this) and update your existing ecommerce tracking to include promotions data.
You will soon discover that this may not be as simple as it seems, but fear not. We have all the information you could need right here. Let’s get into it!

Table of Contents
Here’s what you will learn in this article
- Prerequisite
- The Promotions Report
- Sending promotions data with ecommerce events
- Set up tracking for views and clicks on promotions
- Implement dataLayer.push() events
- Where to place the promotion parameters
- Promotion parameters are placed at the event-level
- Promotion parameters are placed at the item-level with products
- Promotion parameters are placed in the items array (without products)
- Which method to choose?
- Some very important notes (must read!)
- Preparation before creating the tag
- Create a tag for the events
- Measurement ID
- Event name and trigger
- Test the tag
- Persisting promotion data without a developer
- Final words
Prerequisite
This article will show how to update your existing tracking to be able to report on promotions, not how to set up ecommerce tracking in general. Before starting this article, I assume you have ecommerce tracking set up with GA4.
If you want to learn how to set up GA4 ecommerce tracking with Google Tag Manager, you can check out my Intermediate-Advanced GTM course. This course will cover:
- How to plan your GA4 ecommerce setup
- How to configure it in GTM (in cooperation with a developer)
- Best practices and how to avoid common mistakes
- How to test your GA4 ecommerce setup
Promotion tracking will work best if you’ve already implemented add_to_cart, begin_checkout, and purchase events.
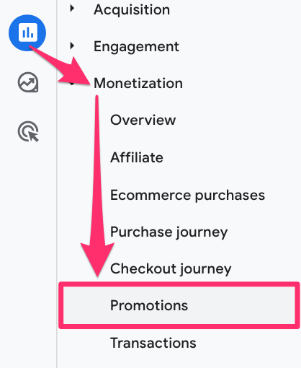
The Promotions Report
Let’s start by looking at the outcome first and work our way back from there. In GA4, go to Reports > Monetization > Promotions. By the end of this article, you will know how to set up your tracking to populate all the data for this report.
You will notice that the report includes seven metrics. These metrics come from five events:
- Items clicked in promotion comes from the select_promotion events
- Items viewed in promotion comes from the view_promotion
- Items added to cart comes from the add_to_cart event
- Items checked out comes from the begin_checkout event
- Items purchased and Item revenue come from the purchase event

|
Metric in Report |
Source GA4 Event |
| Items viewed in promotion | view_promotion |
| Items clicked in promotion | select_promotion |
| Items added to cart | add_to_cart |
| Items checked out | begin_checkout |
| Items purchased | purchase |
| Item revenue | purchase |
The report offers a few choices in dimensions, including Item promotion name and Item promotion ID. These are the two promotion parameters that we will focus on in this article.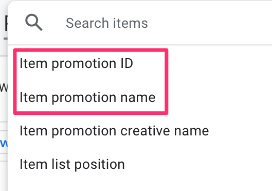 Now that you have an idea of where we will end up, let’s look at how we get here!
Sending promotions data with ecommerce events (includes add_to_cart, begin_checkout, and purchase)
This is the easier part of this tutorial, so that’s why we are starting here. If you want to measure when someone adds an item to their cart, begins checkout, or makes a purchase after they view or click a promotion, you must add at least one of promotion_id or promotion_name to every subsequent e-commerce event (I would recommend adding both). Consistency is key here.In the previous chapter, I explained which metric of the GA4 Promotions report is related to which event. Therefore, the three events you will need your developer to update are:
- add_to_cart
- begin_checkout
- purchase
For each of the above events, your developer should include the promotion_id and the promotion_name parameter in the existing tracking script. This means they must persist in the promotion data throughout the user’s journey, from seeing the product to purchasing it.
Your developer can add these parameters at either the event or item level. If all the items are part of the promotion, add the parameters at the event level; otherwise, leave them out of the event level and add them only to items with the promotion.
Important note: You can have the promotion parameters at both levels, but the item-level value will always overrule the event-level value.
Adding promotion at the event level of the purchase event
<script>
window.dataLayer = window.dataLayer || [];
window.dataLayer.push({
  'event': 'purchase',
  'ecommerce': {
    'transation_id': '12345',
    'value': 50.00,
    'tax': 5.00,
    'shipping': 9.99,
    'currency': "USD",
    'promotion_id': 'P_12345',
    'promotion_name': 'Winter Sale',
    'items': [
      {
        'item_id': 'SKU_12345',
        'item_name': 'Lambswool Fair Isle Sweater'
        'price': 129.00,
        'quantity': 1
      }
    ]
  }
});
</script>
Adding promotion at the item level of the purchase event
<script>
window.dataLayer = window.dataLayer || [];
window.dataLayer.push({
  'event': 'purchase',
  'ecommerce': {
    'transation_id': '12345',
    'value': 50.00,
    'tax': 5.00,
    'shipping': 9.99,
    'currency': "USD",
    'items': [
      {
        'promotion_id': 'P_12345',
        'promotion_name': 'Winter Sale',
        'item_id': 'SKU_12345',
        'item_name': 'Lambswool Fair Isle Sweater'
        'price': 129.00,
        'quantity': 1
      }
    ]
  }
});
</script>
Assuming that you have “Send ecommerce data” checked for each GA4 event tag related to the ecommerce events you update, there is nothing further you need to update, but you should still test each event using Preview mode and GA4 DebugView (the same way we tested the view_promotion and select_promotion events above).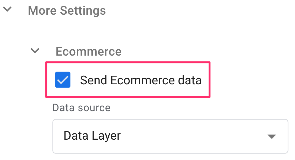 That wasn’t too bad, right? Before we get into the next part, it’s good to have a basic understanding of the promotion parameters, which, hopefully, you now have.

Set up tracking for views and clicks on promotions
To set up the tracking for when users view and select a promotion, you will need to implement two events with the help of a developer:
- view_promotion: Impressions occur when a promotion is shown to a user, for example, through a banner or pop-up.
- select_promotion: This event will be triggered when a user clicks on the promotion/banner.
Implement dataLayer.push() events
For this first step, you will need the help of a developer. The developer must insert two dataLayer.push() events into your site to track when the promotion is in the user’s viewport and when a user clicks on it.
However, before they can do that, you need to decide how you want to track promotions. This all comes down to where you place the promotion parameters. In the next chapter, I will explain the different options and then discuss the process for each and how it will affect your data.
Where to place the promotion parameters
If you recall, I warned in the introduction to this article that tracking promotions is not as simple as it seems. The challenging part comes down to the placement of the promotion parameters. Let me explain.
As with ecommerce events, there are two places the promotion parameters can go, either outside of the items array or within an item in the items array, but there are three different scenarios. I will highlight them here and then go into detail for each one later on.
- Promotion parameters are placed at the event-level (aka outside of the items array): If the item(s) in the items array do not have any promotion parameters inside of them, the items will be associated with the event-level promotion parameters. If any items have item-level promotion parameters, those will override any event-level parameters.
- Promotion parameters are placed at the item-level (if this part sounds confusing, later, I will show code examples):
- With item(s): Each item in the array will be associated with the respective promotion parameters.
- Without any items: Contrary to GA4 documentation, you don’t actually need to have one of item_name or item_id in the items array. For ecommerce events, you probably should, but if your situation is that promotions are not associated with specific items, then this method would work the best for you.
With that overview, let’s get into the details of those three options.
Promotion parameters are placed at the event-level
This method is probably the simplest. Suppose you have promotions that are universal across all products and you want to include specific product information alongside the promotion events. In that case, you just need to add the promotion parameter at the event level.
Tracking script:
<script>
window.dataLayer = window.dataLayer || [];
window.dataLayer.push({
  'event': 'view_promotion', // or 'select_promotion'
  'ecommerce': {
    'creative_name': 'winter_clearout_banner', // optional
    'creative_slot': 'header_banner', // optional
    'promotion_id': 'P_12345', // recommended
    'promotion_name': 'Winter Sale', // recommended
    'items': [
      {
        'item_id': 'SKU_12345',
        'item_name': 'Lambswool Fair Isle Sweater',
        'price': 129.00,
        'quantity': 1
      }
    ]
  }
});
</script>
The above tracking script is for the view_promotion event, but the parameters would be the same as for the select_promotion event, so you just need to update the event value (see comment in the code). Your developer will need to dynamically update the values for each parameter key.
Note: If you choose this option, the metrics “Items viewed in promotion” and/or “Items clicked in promotion” will be affected by the item quantity. If you send one product but its quantity is “4” with the view_promotion event, the metric “Items viewed in promotion” will increase by 4.
Promotion parameters are placed at the item-level with products
This method is useful if you have promotions specific to certain products. Here, we will set the promotion parameters within the items array, and each element will have its respective promotion details. One thing to note is that if item-level promotion parameters are set, this will override any event-level promotion parameters.
Tracking script:
<script>
window.dataLayer = window.dataLayer || [];
window.dataLayer.push({
  'event': 'view_promotion', // or 'select_promotion'
  'ecommerce': {
     'items': [
      {
        'item_id': 'SKU_12345',
        'item_name': 'Lambswool Fair Isle Sweater',
        'price': 129.00,
        'quantity': 1
        'creative_name': 'winter_clearout_banner', // optional
        'creative_slot': 'header_banner', // optional
        'promotion_id': 'P_12345', // recommended
        'promotion_name': 'Winter Sale', // recommended
      }
    ]
  }
});
</script>
The above tracking script is for the view_promotion event, but the parameters would be the same as for the select_promotion event, so you just need to update the event value (see comment in the code). Your developer will need to update the values for each parameter key dynamically.
Note: If you choose this option, the metrics “Items viewed in promotion” and/or “Items clicked in promotion” will be affected by the item quantity. If you send one product but its quantity is “4” with the view_promotion event, the metric “Items viewed in promotion” will increase by 4.
Promotion parameters are placed in the items array (without products)
Even though the GA4 documentation does not show this, technically, you can send just the promotion/banner information in the “items” array (without product data). See the code below:
<script>
window.dataLayer = window.dataLayer || [];
window.dataLayer.push({
  'event': 'view_promotion', // or 'select_promotion'
  'ecommerce': {
     'items': [
      {
        'promotion_id': 'P_12345', // recommended
        'promotion_name': 'Winter Sale', // recommended
      },
      {
        'promotion_id': 'P_67890', // recommended
        'promotion_name': 'Summer Sale', // recommended
      }
    ]
  }
});
</script>
The above tracking script is for the view_promotion event, but the parameters would be the same as for the select_promotion event, so you just need to update the event value (see comment in the code). Your developer will need to dynamically update the values for each parameter key.
If you send promotion data like this, the “Items viewed in promotion” or “Items clicked in promotion” metrics will increase by 1 for each promotion/banner (and product quantity is not used here).
It just seemed like the items array doesn’t always make sense and may inevitably cause bloating in the associated metrics.
So, I decided not to send any item parameters and instead send an array of promotion information. And you know what? It works! While this goes against Google’s documentation, which says that at least one item_name or item_id must be sent with items, it turns out it’s fine if you don’t.
The main thing you’ll need to remember with this method is that the metrics “Items view in promotion” and “Items clicked in promotion” actually refer to the number of promotions sent with the event rather than items.

Which method to choose?
No option is perfect here. But let me explain the problem and my proposed solution. However, you are free to have a different approach.
While sending products with the view_promotion and select_promotion events, one question stuck with me. Which items should be included in those events? All products that are on a page? Just one product that is on a page? What if none of the items on a page are related to the banner?
Let’s say that I am looking at the homepage of a website. That homepage contains a banner (promotion) and 4 products. Those products are not directly related to the promotion.
First, I want to track view_promotion. What should I include in the items array?
All products that are displayed on the homepage? But they are not related to the promotion. If I sent all 4 products with that promotion, it would increase the “Items viewed in promotion” by 4, thus bloating the number.
Maybe I should send the items displayed in a list after clicking the promotion? Maybe. But then it means that “view_promotion” is sent *after* the promotion is clicked, not when the banner was viewed on the homepage. This would ruin the click-through metric’s logic in the Promotions report.
So, here’s my choice of which items to send with view_promotion and select_promotion events:
- When view_promotion is sent to GA4, I would send only *promotions* in the “items” array. Product data would not be included. This means that “Items viewed in promotion” will represent promotions, not products. Like this:
<script>
window.dataLayer = window.dataLayer || [];
window.dataLayer.push({
  'event': 'view_promotion',
  'ecommerce': {
     'items': [
      {
        'promotion_id': 'P_12345', // recommended
        'promotion_name': 'Winter Sale', // recommended
      }
    ]
  }
});
</script>
- Same would apply to select_promotion event. The “items clicked in promotion” would mean “how many times each banner/promotion was clicked”.
- Then, in the add_to_cart, begin_checkout, purchase events, I would include promotion data in the items array, and (of course) I would also include product data. Like this:
<script>
window.dataLayer = window.dataLayer || [];
window.dataLayer.push({
  'event': 'add_to_cart',
  'ecommerce': {
     'items': [
      {
        'item_id': 'SKU_12345',
        'item_name': 'Lambswool Fair Isle Sweater',
        'price': 129.00,
        'quantity': 1
        'creative_name': 'winter_clearout_banner', // optional
        'creative_slot': 'header_banner', // optional
        'promotion_id': 'P_12345', // recommended
        'promotion_name': 'Winter Sale', // recommended
      }
    ]
  }
});
</script>
Then, I would read the Promotions report like this: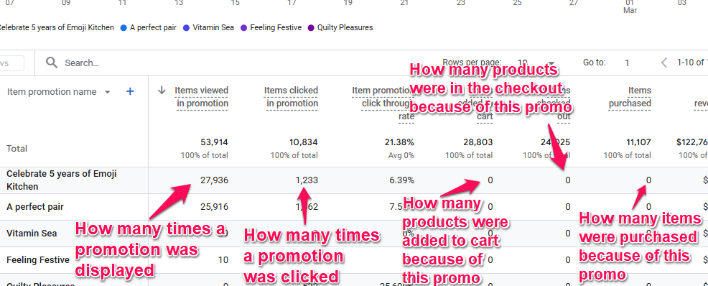 If you choose my way, then you will need to inform people who look at this report that “Items” in the first 2 columns refer to “promotions”, not “products”.
Hopefully, this makes sense.
Some very important notes (must read!)
Some important things to note with view_promotion and select_promotion events:
- Although the GA4 documentation says that none of the promotion fields are required, I highly recommend sending the promotion_id, promotion_name, and, in this scenario, the items array to get the most value out of the GA4 reports.
- Only one of item_id or item_name is required in the items array, but I recommend including both. If you send the promotion parameters for other ecommerce events (add_to_cart, begin_checkout or purchase), you should also include the quantity and price.
- Learn more about the parameters you can and must include here.
Preparation before creating the tag
Alright, we’re done with the data layer structure. What’s next?
You might be thinking we need to create two new tags now (in Google Tag Manager) for these two events (view_promotion and select_promotion), but that is not necessary. We can use one. This approach will only work if the events in the data layer tracking scripts (shown in the previous chapter) match the GA4 requirements–view_promotion and select_promotion.
First, go to Variables, click “Configure” and select “Event” under Utilities. Next, go to Triggers, select “New” and choose “Custom Event” under the Trigger Configuration.
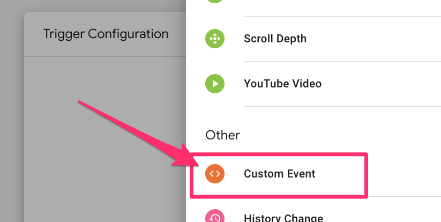 Input “view_promotion|select_promotion” as the Event name and check “Use regex matching” next to the textbox.
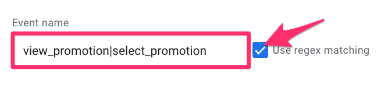
Create a tag for the events
Now, to put it all together, go to the Tags tab and click the “New” button. When the popup opens, select Tag Configuration > Google Analytics > Google Analytics: GA4 Event. 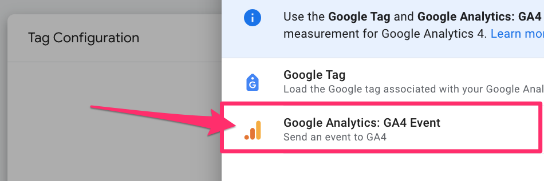
Measurement ID
If you haven’t saved the measurement ID as a constant in your container, you can get it from the GA4 configuration tag in your GTM container. Copy this value.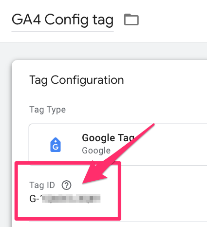 To organize your container, create a new Constant variable to hold the measurement ID. Back in the GA4 tag, click to add a new variable.
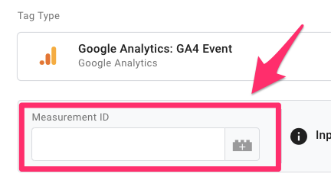 Then, click on the plus in the top right to create a new variable.
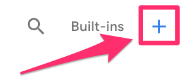 Click on Variable Configuration and select “Constant” as the variable type.
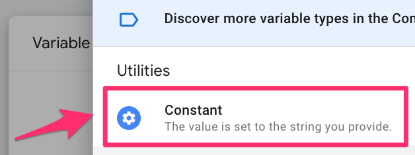 Copy the Measurement ID and paste it into the Value of the constant variable. Save your new variable as “Constant – G-XXXXXXXXXX” (or whatever makes sense to you). Read this blog post to learn more about the constant variable in Google Analytics 4.
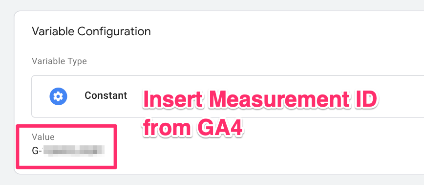
Event name and trigger
This is where we simplify the process so that we only need one tag for both of these events.For the Event name, enter “{{Event}}” which will reference the built-in variable. This means the event name will be whatever is in the data layer push event that triggers the tag.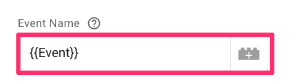 Expand the “More Settings” section and ensure that “Send ecommerce data” is checked. This will ensure that the data within ecommerce and items will be sent to Google Analytics 4 without any additional work on your end.
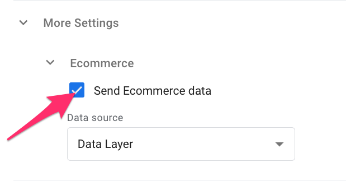 Under the Triggering section, select the trigger that we made that captures both promotion event names.
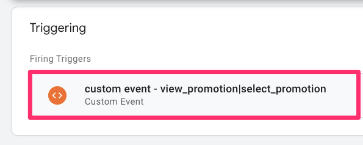 Lastly, name the tag “GA4 event – view_promotion|select_promotion” and test using Preview mode and GA4 DebugView.
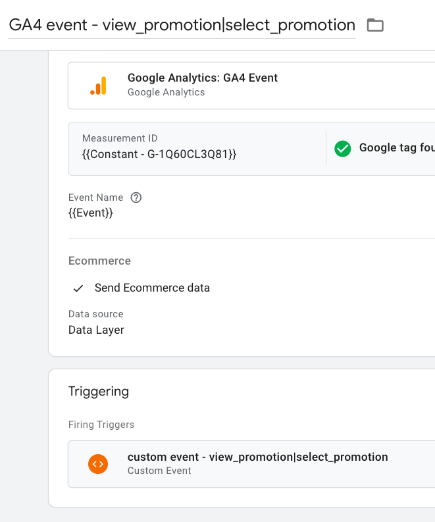
Test the tag
In the top-right corner of GTM, select “Preview” and open your website to a page with a promotion.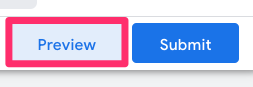 Click on the content. Back in Tag Assistant, you should see both the view_promotion and select_promotion events in the left-side tab.
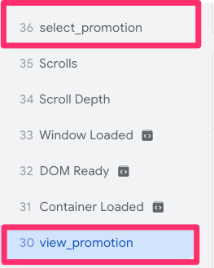 Check that the tag we just created shows up under “Tags Fired” for both.
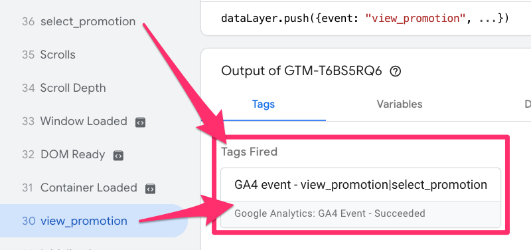 It is best to use GA4 DebugView to check that the included parameters are being sent to Google Analytics 4 correctly. In Google Analytics 4, go to Admin and select “DebugView” under Data Display.
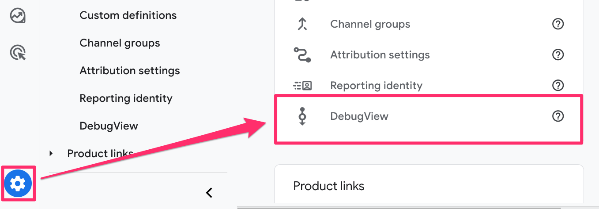 Click the event as it shows up in the timeline, and you will see three tabs: Parameters, User properties and Items. Under the Parameters tab, you will find all the parameters in the ecommerce object, like creative_name,create_slot, promotion_name and promotion_id.
 Note: If you used the third method of putting the promotion parameters in the items array with no product information, you will only find the promotion parameters under the Items tab.
Under the Items tab, you will find the parameter values from the items array. Notice how the event-level promotion parameters are associated with the product in the array.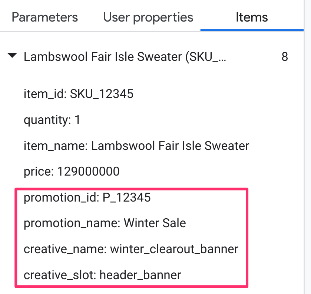 Once you have tested both events and confirmed they are working as intended and the parameters are sent to GA4, you can publish your GTM container to save all the changes!
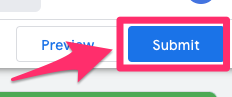 Be sure to follow proper naming conventions when naming and describing the changes to the container.
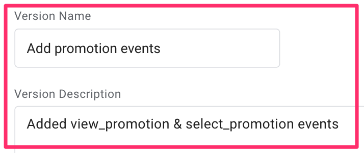 Continue reading to see how you can view data on these events in GA4 and how to tie these parameters to other ecommerce events.
Persisting promotion data without a developer
Updating any of your existing ecommerce tracking with the promotion parameters will require the ability to persist these values, aka keeping them stored somewhere for later use. This means that you’ll need the developer’s help.
If that is not possible (but you still want to update your ecommerce tracking), there is another solution for persisting promotions data across different events. Eivind Savio has built a custom GTM template that you can use for this purpose. It can become technical quickly, but it’s a pretty robust solution.
Troubleshooting: Why is my Promotions Report empty?
If you don’t see data in the Monetization > Promotions report, check these common issues:
- Time delay: It can take 24-48 hours for data to populate.
- Missing parameters: Did you send promotion_id AND promotion_name? Both are highly recommended.
- Scope issues: Did you mix event-level and item-level parameters inconsistently? Item-level will override event-level.
- Attribution: Remember that the “Item revenue” column will only populate if the promotion parameters were passed all the way through to the purchase event.
How to track promotions with Google Analytics 4 e-commerce: Final words
Not only can you track when a user views or clicks on promotional content, like a banner or popup, but you can also associate these promotions with other actions users take further along their journey, like completing a purchase.
If you’ve been frustrated trying to figure out promotions with all the inconsistent information out there, I hope that this guide has helped make things a bit more clear. As with all successful tracking, you will find the most success in collecting promotion data if you take the time to think through your approach and choose the method that will work best for you.
4 COMMENTS
Hi Julius,
first of all, great article!
I'm wondering why an item array has to be used at all, wouldn't it also work if I push the promotion parameters promotion_name and creative_name to the event level in the dataLayer, like for example here:
<script>
window.dataLayer = window.dataLayer || [];
window.dataLayer.push({
'event': 'view_promotion', // or 'select_promotion'
'ecommerce': {
'creative_name': 'winter_clearout_banner', // optional
'creative_slot': 'header_banner', // optional
'promotion_id': 'P_12345', // recommended
'promotion_name': 'Winter Sale', // recommended
}
});
</script>
Looking forward to hearing from you.
Best regards
Thomas
Hi there!
Thanks for the useful material! Also, there is a little type in the text, where you provide tag settings, it says 'view_submission|select_submission' instead of 'view_promotion|select_promotion' :)
Thanks, good catch! Fixed
thanks for the great article! Was very confused about promotions and the google doc.