November 20, 2025
Google Tag Manager Server-Side Tagging with Stape
Updated: November 20th, 2025
If you’re looking to get more accurate data from your website, setting up server-side tagging with Google Tag Manager is a great place to start.
In this article, we’ll walk you through configuring Google Tag Manager server-side tagging with Stape, focusing on sending Google Analytics tags through the server. We’ll also cover how this setup can help you reduce the impact of browser extensions.

Table of Contents
Here’s what you will learn in this article
- How does server-side tagging work?
- Benefits of server-side tracking
- Drawbacks (or Things to Keep in Mind)
- How to configure server-side tagging with Stape
- Step 1: Create a server GTM container
- Step 2: Map a custom domain
- Step 3: Create client(s)
- Step 4: Update the web GTM setup & send data to SGTM
- Step 5: Send data from SGTM to analytics/marketing vendors
- Step 6: Proxy SGTM and GA
- Step 7: Publish all changes
- We were just scratching the surface there
- Final Words
Video tutorial
Prefer video content? Here’s a tutorial from our Youtube channel.
Want to learn more? Take a look at this course.
This tutorial explains just the very first steps of server-side tagging. If you are serious about using this technology, many more things await you.
If you want to learn the topic properly, I have a lot of content about it in my Intermediate/Advanced Google Tag Manager course. You will learn crucial topics like how to send data to Google Analytics and Facebook Conversions API, how to enrich your data, increase the accuracy in your ad platforms, and more.

How does server-side tagging work?
To understand server-side tagging, let’s first look at how traditional client-side tracking works.
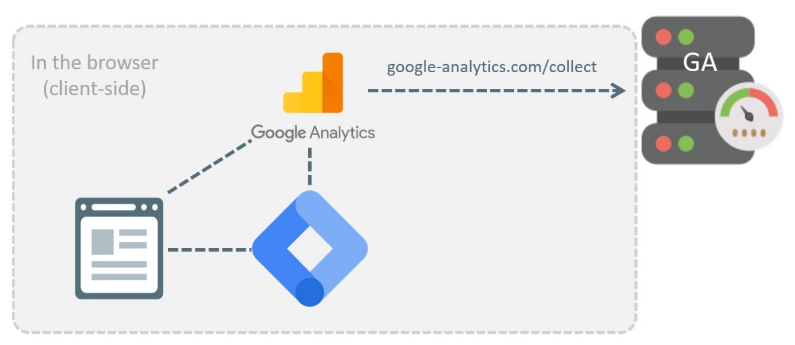
In the usual way, aka client-side tracking, Google Tag Manager is installed directly on your website. When a user visits your site, GTM runs in their browser and fires tags, e.g., GA4 event tags. These tags then send data from the browser to Google servers.
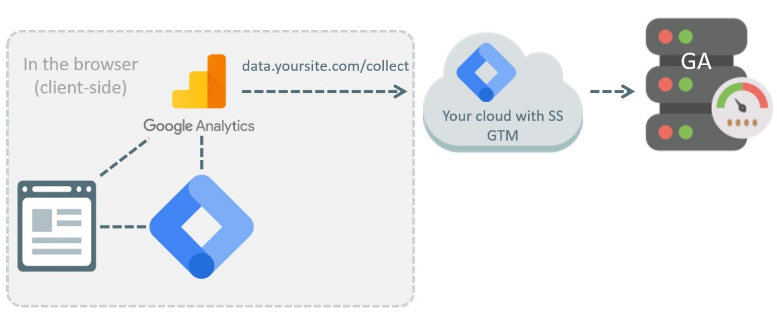
With server-side tagging, the flow changes slightly. GTM is still installed on your website and continues to fire your tags. However, instead of sending data directly to Google Analytics, the data is first sent to your own server-side Google Tag Manager container. Your server then processes that data and forwards it to Google Analytics.
Technically, you could call this setup a “hybrid”. It’s a mix of client-side and server-side components. While pure server-side setup is also possible, I highly recommend having a hybrid one (at least in the context of Google Analytics 4). For GA4, client-side Google Tag does a lot of heavy lifting, so you should still have it installed on your website.
| Feature | Traditional Client-Side Tagging |
Server-Side Tagging (Hybrid Model) |
| Data destination | Browser sends data directly to multiple vendors (e.g., Google Analytics, Facebook). | Browser sends one consolidated data stream to your server container first. |
| Endpoint example | google-analytics.com/collect | data.yoursite.com/collect (or your custom path) |
| Page performance | Can slow down your site by loading many third-party scripts in the browser. | Lighter. Can improve page speed by reducing the number of scripts running in the browser. |
| Data control | Limited. Third-party scripts send data “as-is” from the browser. | High. You can filter, modify, or hash sensitive data (like PII) on your server before forwarding it to vendors. |
| Resilience | More susceptible to being blocked by browser extensions targeting vendor domains. | More Resilient. Requests are sent to your own domain, which is less likely to be blocked by browser extensions. |
| Cookie lifespan | Subject to browser limitations (e.g., 7-day or 24-hour cookie caps from ITP on Safari). | Can extend cookie lifespan. When set from your server (and SGTM IP address’s first two numbers match your website’s server IP), cookies are treated as first-party and can last much longer. |
| Cost | Free (aside from GTM/GA4 being free tools). | Has a cost. Requires paying for server hosting, which starts around $20/month (with Stape) and can be $90/month or more on major cloud platforms, scaling with traffic. |
| Complexity | Standard GTM setup. Familiar to many analysts. | Higher. Requires managing server provisioning, DNS settings, and debugging in two separate GTM containers (web and server). |
There are many benefits to server-side tagging. This extra layer gives you more control over the data, improves loading speeds, and helps make sure your tracking is more resilient to browser extensions that might otherwise block or interfere with client-side tags.
Benefits of server-side tracking
Server-side tagging can seem a bit technical at first, and don’t get me wrong, it definitely is, but it comes with some real benefits that are hard to ignore:
- Faster page load: It can reduce the number of heavy scripts running in the user’s browser, which helps speed up your site to some extent.
- Better data control: You can filter, modify, or hash data (like PII) on your server before sending it to marketing vendors, giving you control over what data they receive.
- Increased data accuracy: It can reduce the impact of browser extensions that might block tracking requests.
- Longer cookie lifespan: When configured correctly, it can help extend cookie expiration on browsers like Safari (which limits ITP), leading to better user attribution.

Reduce the load on a page
Traditional tracking means loading a bunch of scripts in the browser, which can slow down your page loading speed, especially if you keep adding more over time. When a web page loads, it must download and process several resources. As my experiments proved, the JavaScript snippets you add for analytics/marketing purposes can significantly slow down your site, especially if you add new scripts faster than TikTok trends come and go.)
With server-side tagging, you can load just one main script on your site, send the data to your server, and let it handle everything else (like forwarding it to Google Analytics, Facebook, or other tools). That means faster pages and less browser clutter.
Control what data you send to vendors
When you use third-party scripts directly in the browser, they often collect way more than you intended, like device info, URLs, screen size, and more. Some marketing tools might even use fingerprinting techniques to identify users.
Server-side tagging gives you a filter between your site and those vendors. You can decide exactly what data gets passed along, nothing more, nothing less. For example, you can remove or hash personally identifiable info (PII) before it ever reaches tools like Facebook Pixel or Google Ads. This helps reduce the risk of PII leaks, as you have more control over the data you send to third parties.
Here’s an example:
You have a custom-built JavaScript library (e.g., Stape’s Data Tag) that is collecting data about visitor behavior on your site. That library sends the data to your server-side Google Tag Manager container
You configure that container to send the received data to:
- Google Analytics
- Facebook Pixel
- Google Ads
In this case, these 3 analytics/advertising platforms can only get additional data about the visitor if you send it to them. If you send the user ID, then that ID is delivered. However, optional data that standard JavaScript libraries could have accessed on a website is now out of reach.
Why? Because Facebook Pixel in this setup is communicating with your server. It cannot capture data from the visitor’s browser.
If your custom JS library on the site collects some PII, you can process the requests in the server-side container and remove/hash them.
Reduce the impact of ad blockers
Even if a user gives you consent to track them, some browser extensions might still block tools like Google Analytics. Properly configured server-side tagging can help here, too. Instead of sending data to Google Analytics directly, you send it to something like data.yourwebsite.com (a custom subdomain that you control) and then your server sends it to Google Analytics.
Right now, most ad blockers don’t touch requests to custom domains, so your tracking still works (at least for now). Of course, custom subdomains/domains are not enough (but they are an essential component). You would also need to make the request parameters less readable (I will also explain how to do that later in this tutorial).

Extend the cookie expiration on Safari (ITP)
Safari’s Intelligent Tracking Prevention (ITP) limits how long cookies can persist, often to just 7 days or even 24 hours. But if you set cookies from the server (rather than with JavaScript), you can extend their lifespan for up to two years, for example.
There’s a catch. If the first two numbers of the IP addresses of your SGTM server and the website server don’t match, the cookie lifetime extension will not work.
For example, if the website server’s IP address is 1.2.3.4 and the SGTM server’s IP address is 44.55.6.7, the first two numbers (1.2 vs 44.55) do not match; thus, cookies set from the server will still expire in 7 days (or 24 hours).
A solution for that would be to use the same load balancer for your website and for your server-side Google Tag Manager. This makes the IP addresses match and properly extends the lifetime of cookies set from the server. In this tutorial, I will show you how to use Cloudflare’s workers for this purpose.
P.S. I talk more about how to extend cookie lifetime with SGTM in my Intermediate/Advanced Google Tag Manager course.
Drawbacks (or Things to Keep in Mind)
Server-side tagging offers a lot of benefits, but it’s not all smooth sailing. Here are a few things you should consider before jumping in:

Not a silver bullet
This is not a drawback per se, but it’s worth mentioning because you might see various posts online (especially on LinkedIn) saying otherwise. Server-side tagging is not a silver bullet or a solution to all your problems.
Speaking of increased data accuracy, there is a high chance that you will also notice that in your setup. However, there is no 100% guarantee. In my experience, around 80-90% of clients did notice an increase in their conversion numbers and many of them saw a decrease in acquisition costs on ad platforms. But it does not necessarily mean that you’ll get the same results.
Some companies implemented server-side tagging and got no improvement. That could be you. But there’s no reliable way of knowing this upfront. Try it for several months, see if it works, and then decide if you want to keep it.
Also, if you see someone saying that SGTM will help you with consent (e.g., recover more data from unconsented users), run away from them. Server-side tagging was never meant for that and it won’t change anything here. The technology does not matter. If your local laws require obtaining valid consent, you still must do it. With or without SGTM.
It’s a Paid Solution
The GTM server-side container itself is free, and running a basic test setup won’t cost much (or can be done for free). But if you want to run it on a live site with real traffic, you’ll need to pay for hosting.
This isn’t due to any hidden GTM fees; it’s because you need to host the container somewhere, such as Google Cloud Platform, AWS, Microsoft Azure, some specialized SGTM-hosting provider (e.g., Stape), etc.. Stape is usually the most affordable option, starting around $20/month, while a minimal GCP setup can cost about $90/month. Costs go up as your traffic increases.
You can also self-host, but that still requires server resources and setup time, so there’s always a cost, whether it’s time or money. Plus, self-hosting means that you must have technical know-how for that and it will be more difficult to get help/support (because the community is usually working with Google Cloud or Stape).
Nevertheless, think of it as an investment in better data quality, performance, and privacy, especially as browsers and regulations keep tightening up!
It’s Not for Everyone
Server-side tagging requires a more technical skill set. If you already found GTM a bit complex, this takes it a step further. You’ll need to understand how data flows through your tags, how to work with servers, and possibly how to write and debug JavaScript.
Of course, you can always hire help, but it’s something to factor in.
More difficult to Debug
When things break, debugging becomes more involved. You’ll need to check both the client-side GTM and the server-side container to figure out what went wrong. It’s doable, but it adds another layer to your workflow.
This is not to scare you; I truly think that the benefits outweigh the potential drawbacks, but it’s ultimately your call to make. I would recommend trying it out; you won’t have to pay anything if you’re just experimenting with it at first.

How to configure server-side tagging with Stape
We’re going to break down this process into smaller steps, so it doesn’t get too overwhelming:
- Create a Server GTM container (+ host is somewhere, e.g., Google Cloud, Amazon, Microsoft, or a dedicated provider that specializes in SGTM hosting, like Stape)
- Map your server to a custom (sub)domain
- Create client(s) in the server container
- Update the web GTM setup & send data to SGTM
- Forward data from SGTM
- Proxy SGTM and Google Analytics requests
- Publish your changes
Step 1: Create a server GTM container
To create your server-side Google Tag Manager container, you should use the same account where your web container lives (it just seems logical). Click the three dots in the right corner and select “Create Container”.

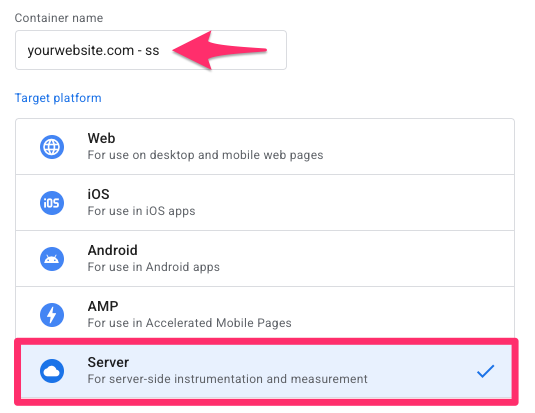
Give it a clear name like “yourwebsite.com – server,” and select “Server” as the container type.
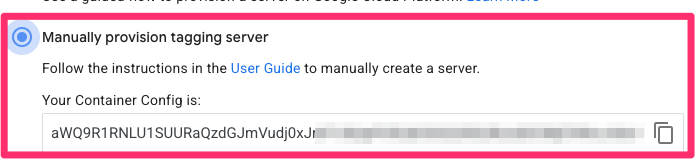
Choose the option to manually provision the tagging server, then copy the container configuration. If you didn’t copy it right away, you can find it later by clicking the container ID in the container itself.
Next, head over to Stape.io and create a new account (assuming you don’t already have one). Note: if a significant portion of your website visitors comes from the European Union, select the “EU” as the location for your tagging server (while signing up).
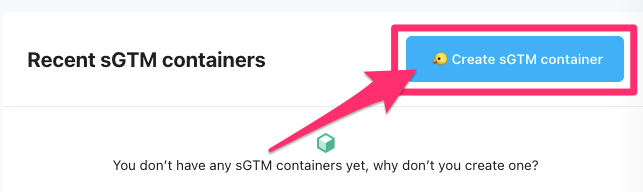
Stape offers a free plan that you can use for testing, but if you want to use the server for a live site with higher traffic volume, you’ll need a paid plan. In your Stape dashboard, click “Create sGTM container” to create a new server GTM container.
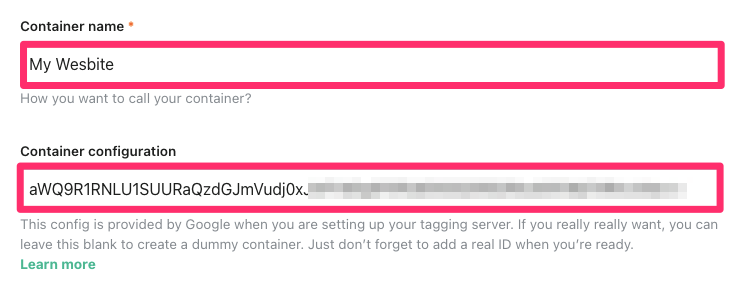
Name the container after your website or domain, paste in the container configuration you copied from GTM, and choose the server location closest to your users.
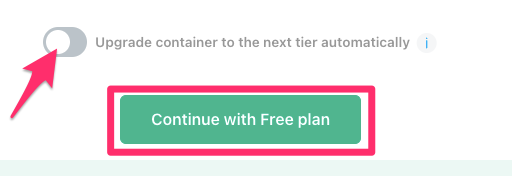
Select a pricing plan (you can do the free version if you’re just testing things, but you’ll want to get a paid version if you’re doing this for real) and toggle off the automatic upgrade for now (though for a real setup, it’s usually best to keep it enabled). To figure out what plan you need, it’s helpful to know that one event equals one request.
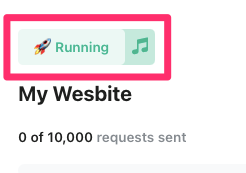
After a few minutes, your server container should show the status “Running”. To check that it’s working properly, copy the server address from Stape, open your browser, and visit https://stape-server-domain/healthy. If you see a simple “ok” message, your server is up and ready to go.
You can find your server by going to your Stape container and then scrolling down to the “Domains section”.
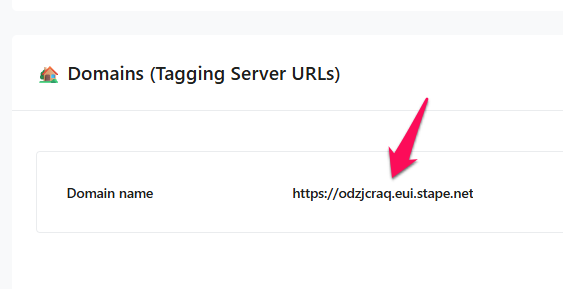
Based on the screenshot above, the URL for testing the server’s health should be https://odzjcraq.eui.stape.net/healthy.
Step 2: Map a custom domain
Even though you could technically start using the server right away, I highly recommend mapping a custom domain as soon as possible. A server-side Google Tag Manager without a custom (sub)domain is worthless.
To route data through your own domain, you’ll need to set up a custom path for your server container. You can either use a subdomain, such as data.yourwebsite.com, or go with a same origin setup, like yourwebsite.com/xyz. I would suggest following the same origin setup, which is what I’ll do for this article.
However, sometimes the same-origin setup is not possible (e.g., on Shopify). So if that’s your case, map a subdomain. But if you are in a more flexible situation, same-origin is the way to go.
Why is same-origin preferred? The primary reason is to extend cookie lifespan on browsers with ITP (Intelligent Tracking PreventioN), like Safari.
- Subdomain (data.yoursite.com): Safari may still treat this as a third-party domain and limit its cookies to 7 days or less.
- Same-origin (yoursite.com/som): Because the requests are sent to the same domain as your website (and browser sees the same IP address), cookies set by the server are treated as first-party and can persist for much longer. This requires a setup (like the Cloudflare Worker shown in this guide ) to make sure the IP addresses match.
The exact steps for setting this up will depend on where you’re hosting your server container and whether you’re using a CDN. In my case, I’ll be using Cloudflare along with Stape. If you’re using a different hosting setup, Stape has a helpful guide that walks you through how to use the same origin approach for server GTM using other systems here.
Create a custom domain in Stape
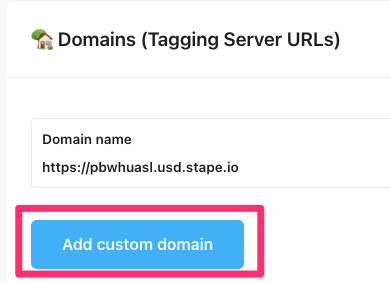
To begin, open your container in the Stape.io interface and click “Add custom domain” (at the bottom of the page).
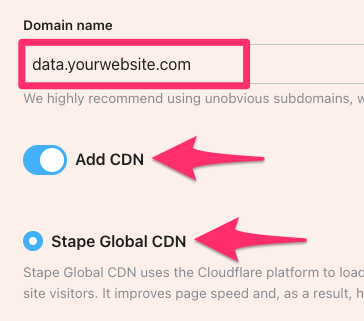
Even if you’re planning to use a same-origin setup later, you’ll still need to create a subdomain first, like data.yourwebsite.com. Just make sure you’re not using this subdomain somewhere else on your site. Toggle on “Add CDN” and choose Stape Global CDN.
Under How to connect, select the “Manual” setup option. Stape will generate two CNAME records that you’ll need to add to your domain’s DNS settings.
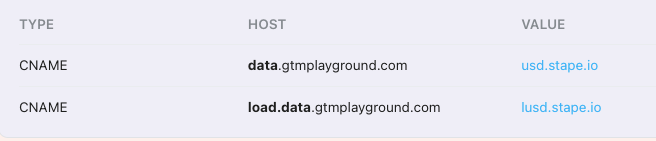
Next, go to Cloudflare, select your domain, and head over to DNS > Records. Click “Add record” and choose CNAME as the type.

For the first record:
- In the Name field, enter “data” (or whatever subdomain you decided to use)
- In the Target field, paste the value provided by Stape
- Be sure to turn off Proxy status.

Repeat those same steps above, but for “load.data” as shown in the screenshot below:

Once you’ve added both records, go back to Stape and click “Verify.” It might take a few minutes to complete, though in some cases, it can take up to 72 hours. For me, verification only took a few minutes.
Important: even though both DNS records have the “Proxy status” disabled, it’s important that your main domain (e.g., yourwebsite.com) is proxied through Cloudflare. This will make sure that your same-origin setup (e.g., yourwebsite.com/abc) uses the same IP address as your website.

Create a worker in Cloudflare
Now that your custom subdomain is ready, the next step is to create a Cloudflare Worker. This worker will receive tracking requests to your main domain (e.g., yourwebsite.com) and redirect them to your server container, which is hosted on the subdomain (e.g., yourwebsite.com/xyz). This approach not only helps extend cookie lifetime (especially in Safari) but also makes your tracking setup more resilient to browser extensions.
It’s worth noting that Workers is a paid feature of Cloudflare that has a free tier. The free tier allows you to process 100,000 requests per month. If you exceed that limit, you will need to upgrade to a paid Workers plan (which, at this time, costs 5USD per month and gives you 10M events per month + $0.3 per additional million). I believe this is still very friendly pricing.
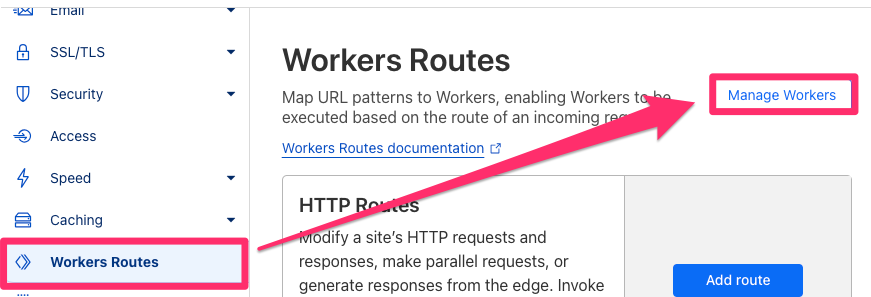
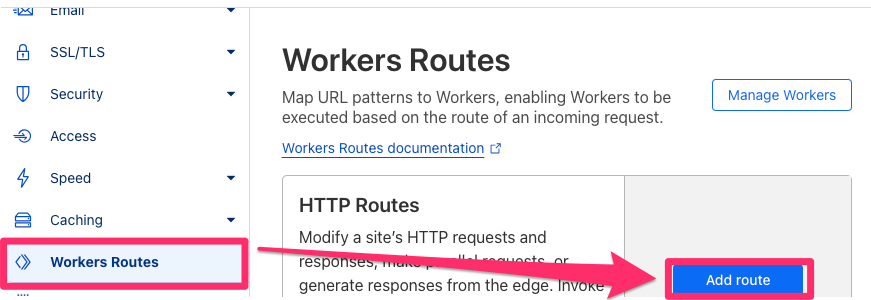
To create a worker, navigate to the Cloudflare dashboard and go to the Workers Routes section. Click on “Manage Workers”.
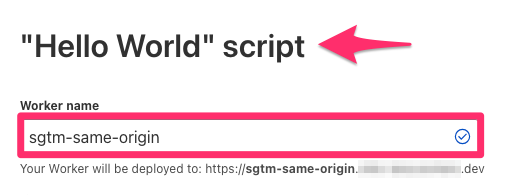
When prompted, select the “Start from Hello World” template. Give your worker a name, such as sgtm-same-origin, and click “Deploy”.
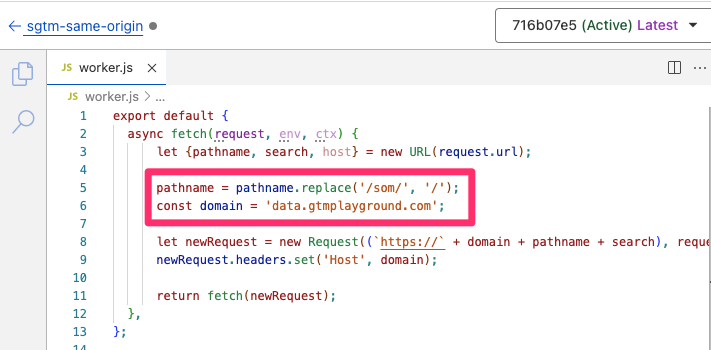
Once you’ve created the worker, click “Edit Code” to open the code editor. Delete the default code that appears in the editor, and replace it with the code provided below (or any redirect logic you’re using).
export default {
  async fetch(request, env, ctx) {
      let {pathname, search, host} = new URL(request.url);

      pathname = pathname.replace('/xyz/', '/');
      const domain = 'measure.gtmplayground.com';

      let newRequest = new Request((`https://` + domain + pathname + search), request);
      newRequest.headers.set('Host', domain);

      return fetch(newRequest);
  },
};
Make sure to update the const domain value to match the custom subdomain you configured earlier in Stape, i.e., data.yourwebsite.com. Additionally, consider choosing a path that’s vague or unrelated to analytics, such as /som or /xyz, as browser extensions may become more aggressive with the requests they block in the future (they already don’t like it if you use /sgtm or something similar). Once you’ve updated the code, click “Deploy” to publish the worker.
In my case, the main domain of the website is gtmplayground.com, and the same-origin setup’s URL is gtmplayground.com/som.
Worker route
Next, you’ll need to configure a route for the worker. Still in the Cloudflare dashboard, return to the Workers Routes section and click “Add Route”.
Enter the domain and path that should trigger the worker, like yourwebsite.com/som*. Then, from the dropdown menu, select the “sgtm-same-origin” worker we made earlier and save.
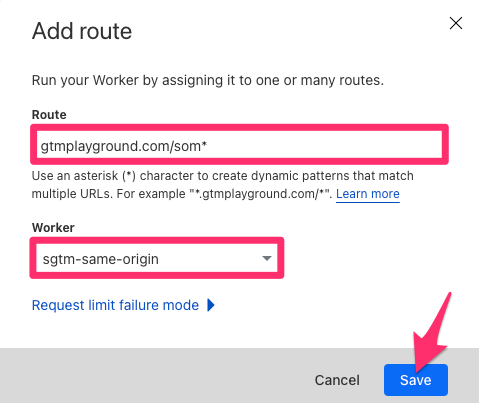
So, if a request is sent to yourwebsite.com/som*, Cloudflare will activate the worker to redirect the request to the subdomain, i.e., data.yourwebsite.com.
Configuration rule for SSL
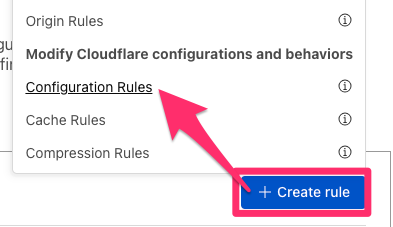
To support this setup, you also need to create a couple of rules in Cloudflare. Go to the Rules tab, click “Create Rule”, and select Configuration Rules.
Name the rule something like “sgtm same origin – ssl”. Set the condition so that it applies when the URI path starts with “/som” (in your case, the same-origin path might be different, e.g., /xyz or something else).
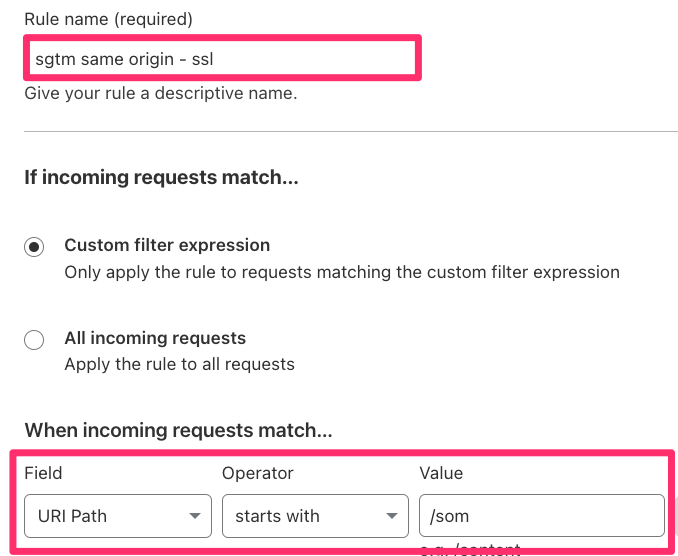
Please note that in the “value” field, I used the same path that I used in the Cloudflare worker’s code.
Then, under the SSL settings, select “+ Add” and choose “Full” from the dropdown menu. Click “Deploy” to activate the rule.
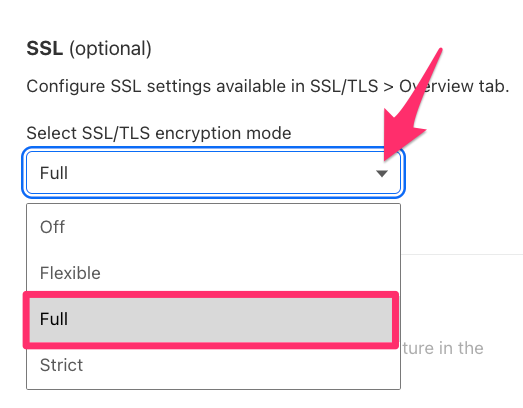
This will make sure that requests sent to your same-origin setup work with SSL (a.k.a. https).
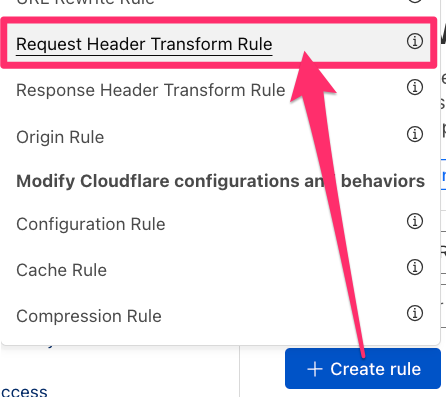
Request header
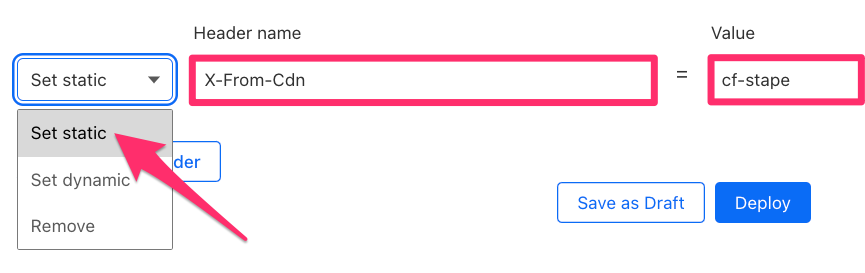
Next, you’ll create a rule to set a custom request header. This helps your server container receive the correct client IP address, which can otherwise get lost. Again, click “Create Rule”, but this time choose Request Header Transform Rule.
Name it “sgtm same origin – headers”. Set the condition to trigger when the URI path starts with “/som”.
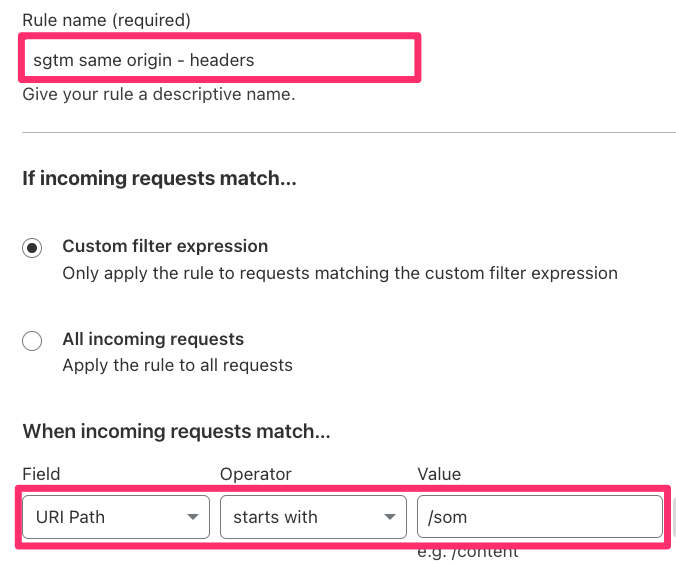
Then configure it to “Set Static”, and create a header with the name “X-From-Cdn” and the value “cf-stape”. Deploy the rule once it’s configured.
Update server URL in the SGTM container
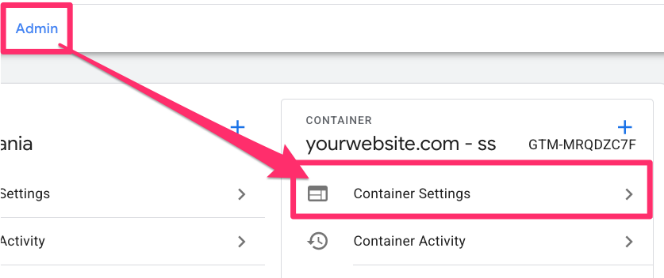
Now it’s time to test your setup. In your server GTM container, go to Admin > Container Settings.
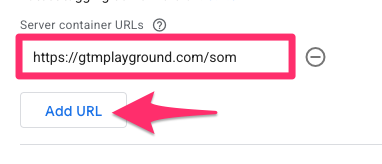
Click “Add URL”, enter the same-origin path you just set up (e.g., https://yourwebsite.com/som), and save it.
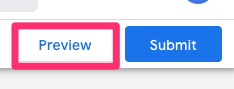
To make sure everything’s working, open Preview mode in your server container. In a new browser tab, go to your same-origin domain and add “/test” to the end (e.g. yourwebsite.com/som/test). You’ll see a 400 error, which is expected. However, if you return to GTM Preview mode, you should see a new test event come through.
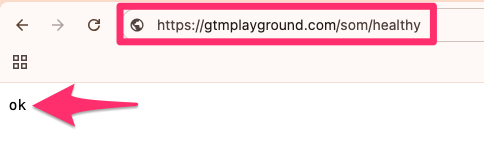
You can also visit yourwebsite.com/som/healthy. If the setup is correct, you’ll see a simple “ok” message, confirming that the redirect is working and your server container is active.
If your setup does not work
Chances are that this same-origin setup is not working for you. Maybe you get redirected to a 404 (page not found) page, or maybe something else happens.
Here are some tips to help you troubleshoot/fix that.
#1. Double-check the domains that you entered in the worker’s code. Check for tiny mistakes like a missing trailing slash. In my code, “/som/” is replaced with “/”. Also, double-check that you entered a correct domain in the “const domain” section.
#2. Check the worker route. In my example (see below), the website is accessible only via gtmplayground.com (there is no subdomain).
If you are planning to use SGTM for multiple subdomains, then enter an asterisk before that (e.g., *yourwebsite.com/som*). See if it helps.
#3. Try changing the “const domain” to Stape’s default server URL. Technically, this will also work. Instead of redirecting a request from a same-origin path (e.g., /som/) to your custom subdomain, you can forward it directly to Stape’s server. Then the code could look something like this:
export default {
  async fetch(request, env, ctx) {
      let {pathname, search, host} = new URL(request.url);

      pathname = pathname.replace('/som/', '/');
      const domain = 'odzjcraq.eui.stape.net';

      let newRequest = new Request((`https://` + domain + pathname + search), request);
      newRequest.headers.set('Host', domain);

      return fetch(newRequest);
  },
};
When I am writing this tutorial, it’s difficult to find the default server URL once you map a custom subdomain. I found two viable options here. Option #1:
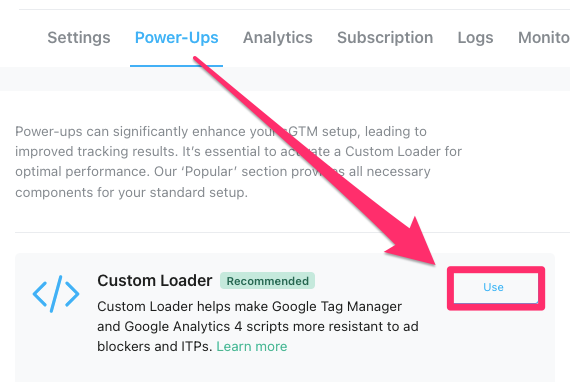
- In Stape, go to Power-ups, click “Use” next to Custom Loader.
- Enable Custom Loader
- In the Domain field, click the dropdown menu and you’ll find Stape’s default domain.
The second option is to contact Stape’s support and tell them that you want to find out the default server URL of your container.
#4. Contact Stape’s support. Describe your situation and they should suggest a solution for you. Maybe there’s something in your domain’s configuration that conflicts with the same-origin setup.
Step 3: Create client(s)
Clients in server-side GTM act as gateways that listen for incoming requests and determine how that data should be handled. For example, when a GA4 event is sent from your website, the GA4 client in your server container picks it up, processes it, and makes the data available for other server-side tags you’ve set up.
Only one client can claim an incoming request at the same time. However, once a client claims it, multiple tags can fire based on that data. So, from a single incoming event, you can send data to Google Analytics, Facebook via the Conversions API, or another platform you’ve set up.
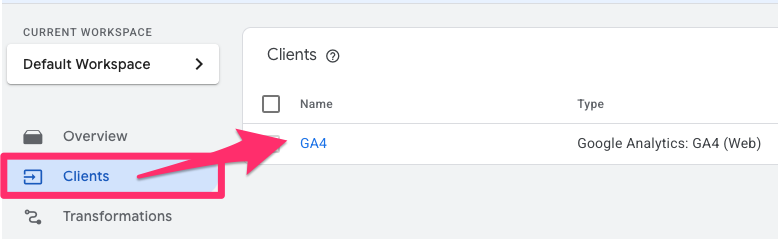
By default, your server container already includes a GA4 client. You can find it by going to the Clients tab in your server GTM interface. In most cases, you won’t need to change anything here.
That said, you can adjust the client’s priority, which is useful if you plan to add other clients that could potentially claim the same request. The client with the highest priority will be the one to claim it.
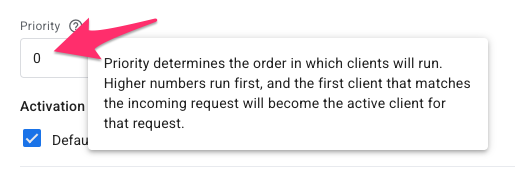
If you are just starting with server-side tagging, keep the priority as 0.
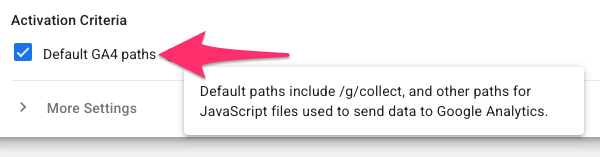
You’ll also see an option to keep the default GA4 paths enabled. This allows the GA4 client to handle different types of GA4-related requests automatically. Keep it enabled.
Under More Settings, you can choose how you want to manage cookies: either Server Managed or JavaScript Managed. Server Managed cookies offer better privacy, as they’re not accessible to JavaScript on the site. However, I have had situations where this caused issues with attribution in some setups. Personally, I usually switch this setting to JavaScript Managed to avoid tracking or reporting inconsistencies.
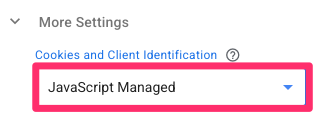
This option does not directly impact the possibility of prolonging cookie lifetime. Even if you choose the “JavaScript managed” option, you can still extend the lifetime.
Once everything’s configured, save the client settings.
Step 4: Update the web GTM setup & send data to SGTM
By default, GA4 tags in your web container send data directly to Google’s servers (e.g., google-analytics.com/…). To route this data through your server-side container instead (e.g., yourwebsite.com/som/…), you’ll need to update your GA4 tags to point to your custom server URL.
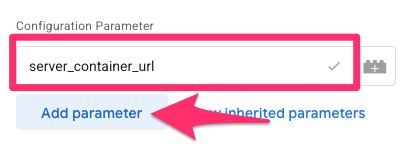
Start by opening your GA4 Config tag (a.k.a. Google Tag) in the web GTM container. Under Configuration Settings, add a new parameter with the field name: server_container_url.
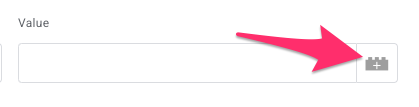
Since you’ll need to repeat this step for each tag, we’ll make it easier by creating a constant variable for the custom domain you just mapped. Select the icon next to the textbox for the value to create a new variable.
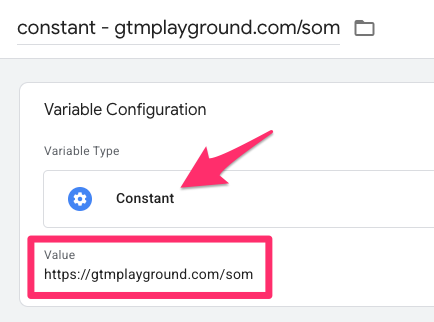
In the new window, click “+”. For the variable configuration, select Constant and enter your full server URL, e.g., https://yourwebsite.com/som. Name the variable “constant – https://yourwebsite.com/som”, and save it.
Set the value of server_container_url to the constant variable you just created and save the tag.

To be safe, repeat this step for any other GA4 tags you’re using (e.g., GA4 event tags), so they all route through your server container. If you already have an event settings variable attached to each event, you can also just update this variable with the server_container_url parameter and save yourself some time. Learn more here!
Go into Preview mode in your web container. Enter your website’s URL and click Connect. Then open your server container’s Preview mode (or refresh it if it was already open) and reload your website.
You should now see incoming events appear in your server container’s Preview mode.

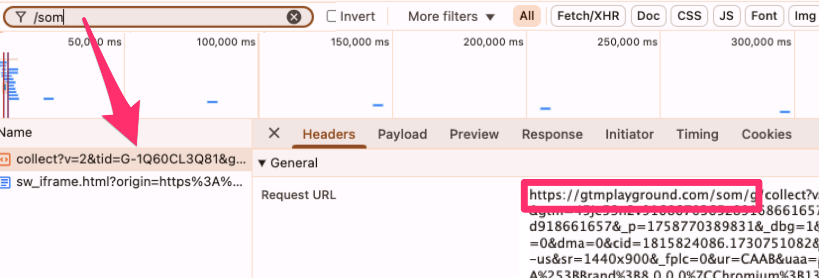
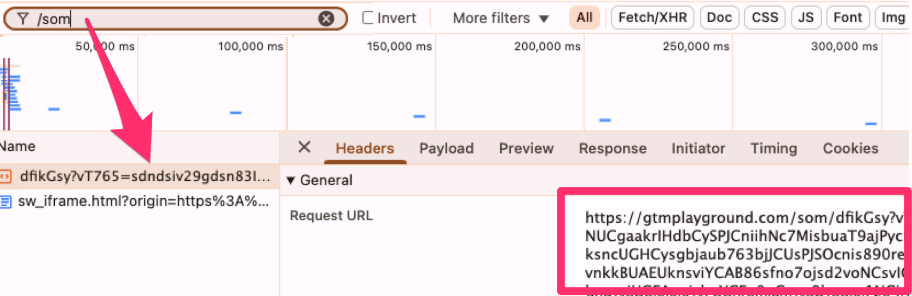
To verify further, open your browser’s Developer Tools, go to the Network tab, and reload the page. Search for your server path, like “/som”, and check that your website is sending requests to the custom server domain.
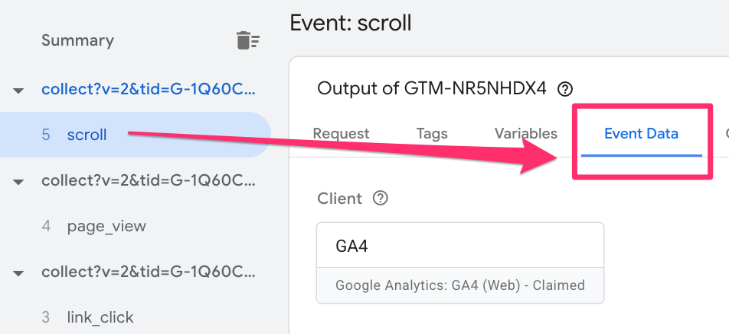
Finally, in the server GTM Preview, click on one of the incoming events and open the Event Data tab. This shows what information the server-side client extracted from that request, confirming that everything is connected and working properly.
Step 5: Send data from SGTM to analytics/marketing vendors
Once your server-side container is receiving incoming requests correctly, the next step is to forward that data to your analytics platform, in this case, Google Analytics 4 (GA4). You can also send data to other platforms, but we’ll focus on GA4 here.
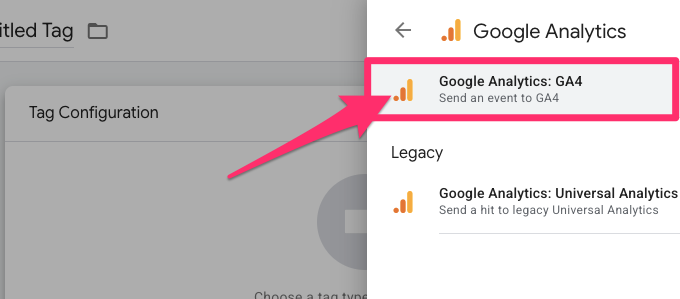
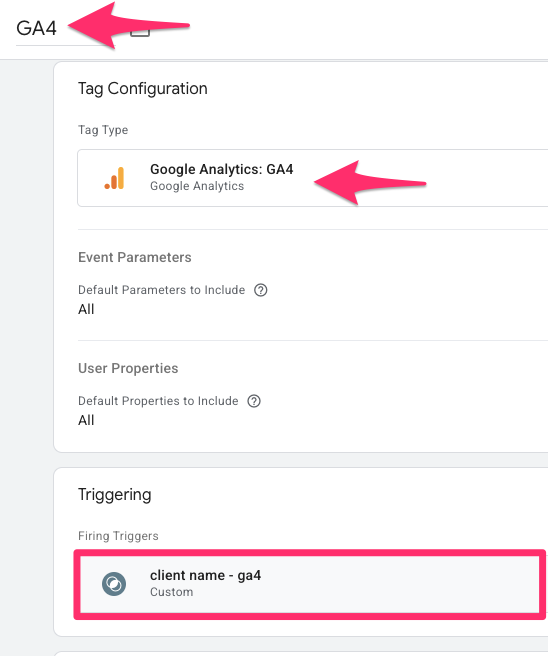
In your server GTM container, go to Tags, then click “New” to create a new tag. Under Tag Configuration, choose Google Analytics > Google Analytics: GA4.
For a basic setup, you don’t need to adjust anything in the tag settings. This tag simply picks up the incoming GA4 request and forwards it to Google’s servers.
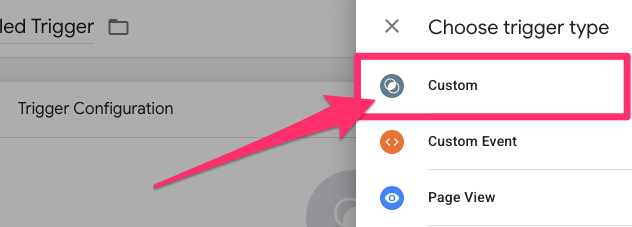
Next, set up a trigger so the tag only fires for GA4 requests. Click on the Triggering section and create a new trigger. Choose Custom for the configuration.
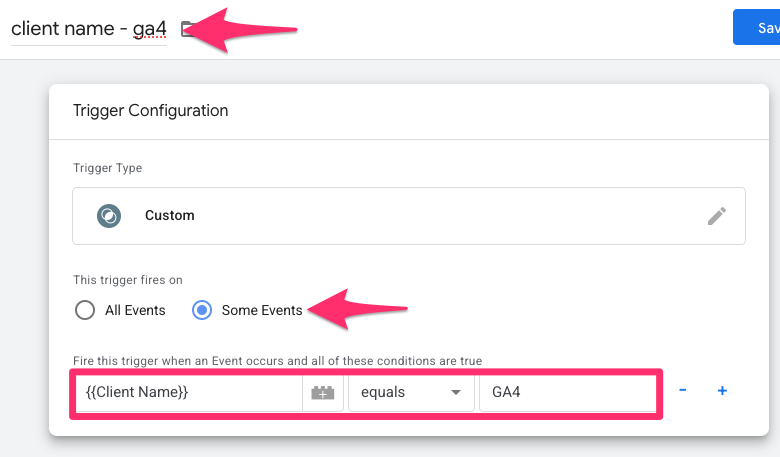
Select “Some Events” to specify the conditions for the trigger. For the filter, set it to {{Client Name}} equals “GA4”. Name the trigger “client name – ga4” and save it.
Now name your tag something like “GA4” and save everything.
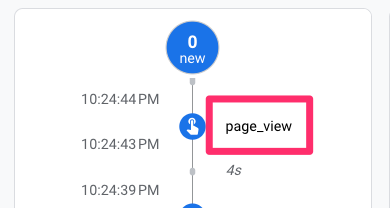
To test it, open the Preview mode for your server container (web container’s preview mode is also enabled). Then refresh your website and trigger an event (like a page view or button click). In the server container preview, click on one of the incoming events, go to the Tags tab, and select the GA4 tag.
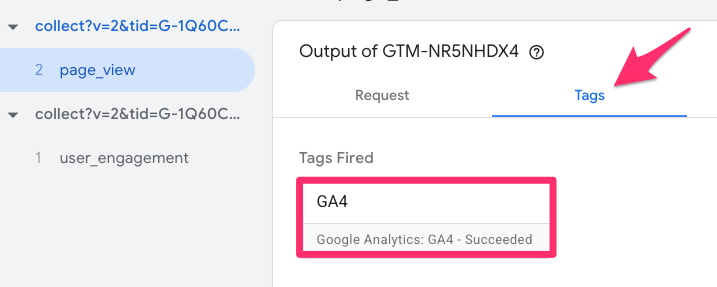
Click on Outgoing HTTP Requests from Server to see what data was sent to Google.
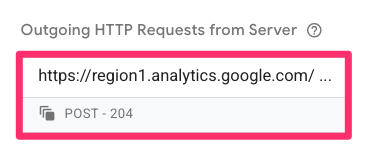
To verify that GA4 received the event, go to your GA4 property, navigate to Admin > DebugView, and look for the event there. If it appears, your server-side container is successfully sending data to Google Analytics.
If GA4 Debugview is not working, please refer to this troubleshooting guide.
Step 6: Proxy SGTM and GA
Even though Google Analytics requests are sent to your custom domain (e.g., yourwebsite.com/xyz/?collect…), Google Tag Manager container and Google Tag are still loaded from Google’s domain (e.g., googletagmanager.com).
Instead of loading your GTM container from googletagmanager.com, you can proxy it through your own domain using the server container (the same idea applies to GA4 as well). This makes your setup more resilient against browser extensions, which often block requests to Google domains by default.
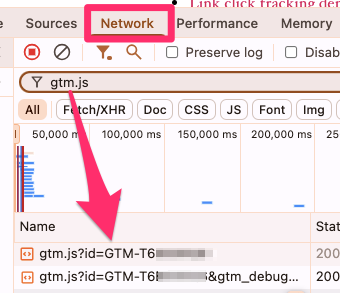
You can check which requests some browser extensions might block by going to your site and opening Developer Tools > Network, then searching for “gtm.js” or “gtag”. These are the requests coming from GTM and GA4, which you do not want to have blocked, as this could reduce tracking accuracy.
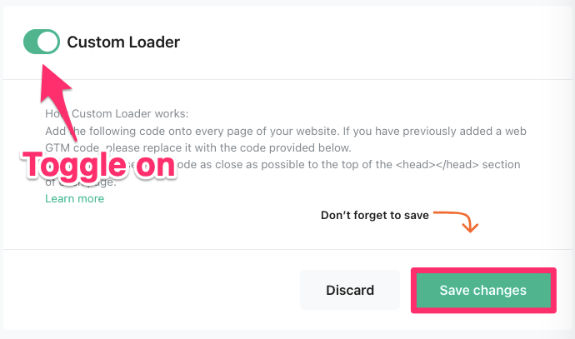
To fix this, Stape offers a helpful feature, Custom Loader. Here’s how to set it up:
- In your Stape container, go to the Power-Ups tab. Click “Use” next to Custom Loader.

- Enable the Custom Loader and save your changes.

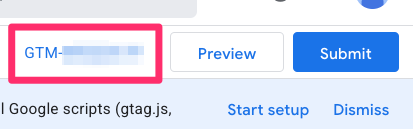
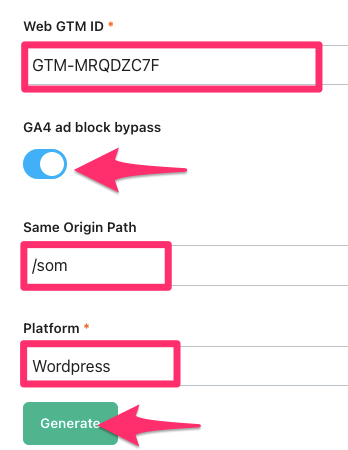
- Under Web GTM ID, enter your web container ID. You can find this on the main page of your GTM container.

- Enable the GA4 ad block bypass option, which modifies the request URL and obscures the parameters, making it more difficult for browser extensions to identify and block them.
- If you are using a same-origin setup, enter the same origin path, e.g., /som.
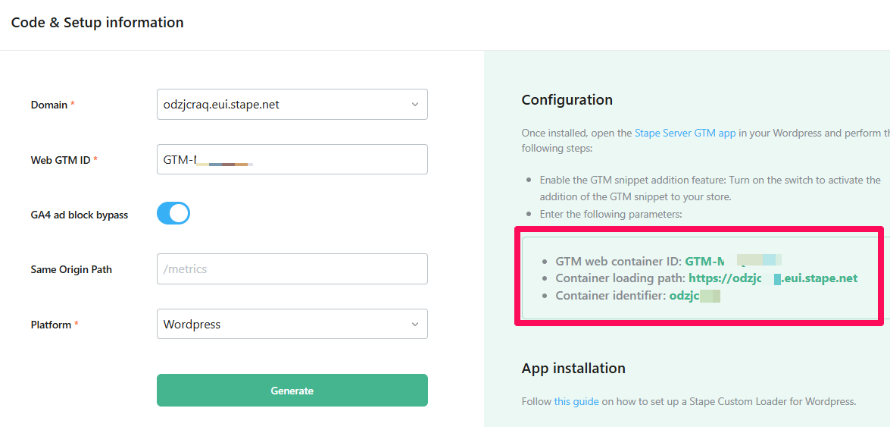
- Select the platform where you host your website, click ”Generate”. This will give you further instructions.

This will show you instructions on what to do next. If you are working on the custom platform (Stape calls it “Other”), you will be given a custom code. Replace your current GTM container snippet on your website with the modified one provided by Stape. If you are using some Stape’s plugin (e.g., for WordPress), then you don’t need to modify the code; the plugin handles that for you. At most, you will need to add the container identifier in the plugin’s settings. So, keep an eye on the instructions.

To test if it’s working, go back to the Network tab in developer tools, search for “/som”, and reload the page. You should now see a request going to your server container. If URL requests don’t look like in the screenshot below, wait for several minutes and try again.
If you click on it, you won’t see any easily readable parameters like event names in the URL. This is by design to help avoid detection.
But don’t worry! In the server GTM Preview mode, you’ll still be able to see all the readable event data by clicking on the event and opening the Event Data tab.
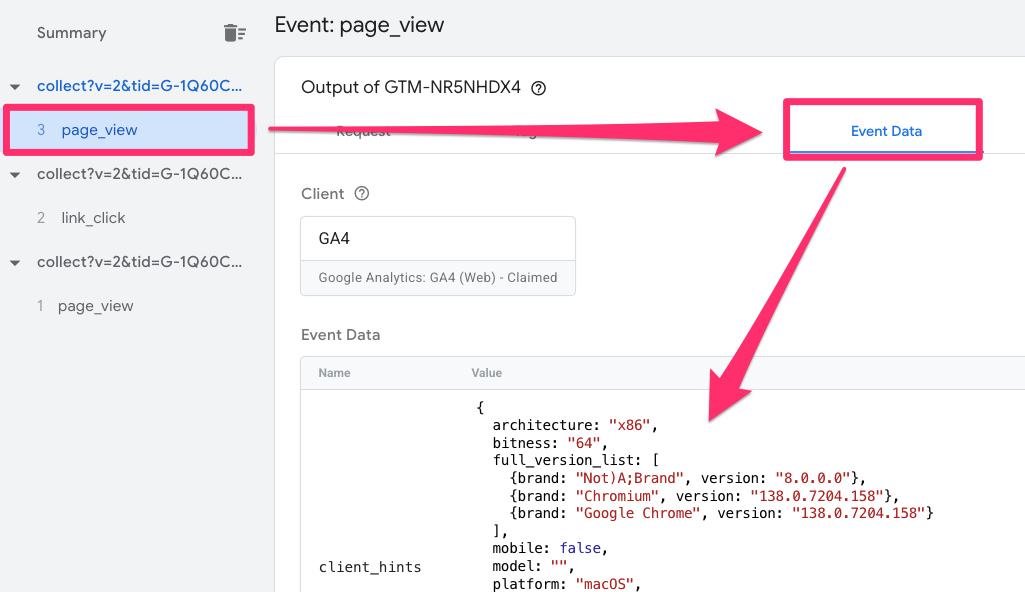
What happens here is that Stape’s custom loader obfuscates the URL parameters sent to the server. And then in the server, the parameters are decoded and become readable for humans again.
Step 7: Publish all changes
Once everything is working correctly in Preview mode, don’t forget to publish your changes in both your web container and your server-side container.
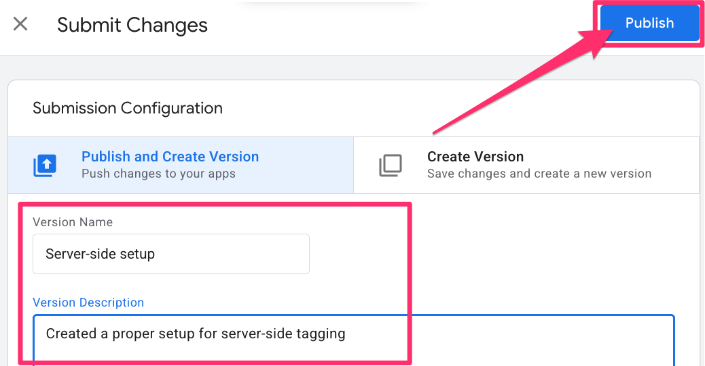
Updates won’t go live until both containers are published, so make this your final step after testing to make sure your setup is fully deployed and tracking as expected.
We were just scratching the surface there
That was a lot! But hopefully, you managed to make it work. If this was your first attempt at server-side tagging, there are definitely several new things to learn and understand.
But we were just scratching the surface here. There are many other things to do, for example:
- How to implement Facebook Conversions API
- How to send data to Google Ads
- How to fetch additional data from external systems (e.g., your CRM) and enrich events send to ad platforms, and more.
If you want to learn all of this (and more), then take a look at my Intermediate/advanced GTM course, where a significant portion of the content is related to server-side tagging (plus, you will learn many other techniques, too).
Google Tag Manager Server-Side Tagging with Stape: Final Words
You’ve made it to the end of this tutorial, and I have to say, congratulations! You’ve just set up your first server-side tagging environment. It was a lot to take in – we started with the basics of setting up your server container and Stape hosting, mapped a custom domain to reduce the impact of ad blockers, and finally connected the web and server containers to get your data flowing.
This is a solid accomplishment. But this is just a small taste of what’s possible with server-side tagging. From here, you can explore things like implementing the Facebook Conversions API, enriching your event data with information from your CRM, etc. If you’re ready to go deeper and learn this quickly, you can do that in my Intermediate/Advanced Google Tag Manager course.
For now, give yourself a pat on the back. You’ve taken a significant step toward a more accurate data collection.
As you move forward, remember these key points:
- It’s a hybrid model: The best setup (in my opinion) uses both a web container and a server container. The web container’s Google Tag still does the “heavy lifting” (like session management), it just sends data to your server first.
- A custom domain is required: A server-side setup without a custom domain is “worthless”. Using a same-origin path (e.g., yoursite.com/som) is the best method for extending cookie lifetime on ITP-affected browsers.
- It’s a paid solution: You must pay for server hosting, so factor this into your budget.
- It’s not a “silver bullet”: Server-side tagging does not bypass consent laws. It’s a tool for better data control and resilience, not for tracking users who have opted out.
- This is just the start: Your GA4 tag is now forwarding data, but the real power comes from adding other tags (like the Facebook Conversions API tag) to your server container.
2 COMMENTS
What is your take on my problem:We have implemented server-side e-commerce tracking for the purchase event using Server-side Google Tag Manager (s-GTM), leveraging the Google Analytics 4 Measurement Protocol (MP).
Our server consistently sends the data and receives a 200 OK status code from Google's validation endpoint, indicating that the payload is technically correct.
Despite this explicit server confirmation, the purchase event is not visible in the GA4 Realtime reports or DebugView for the target property/data stream. We suspect a silent collection failure on Google's end, where data is accepted during validation but dropped before reaching the reporting tools.
Confirmed Troubleshooting Steps (Developer Perspective)
We have performed extensive testing to eliminate all potential configuration errors on our side:
Client-Side Event Verification: Client-side events (e.g., page_view) sent directly from the website to the same GA4 data stream function perfectly and are instantly visible in Realtime. This confirms the data stream is active and we are viewing the correct property.
Payload Structure Validation: We send a clean, minimal MP payload confirming correct format and required parameters (transaction_id, client_id, value, items, etc.).
API Secret & ID Integrity:
We manually copied the Measurement ID directly from the GA4 Admin interface and hardcoded it into the s-GTM tag to rule out whitespace or invisible character errors.
We created and implemented a new API Secret in the s-GTM tag, bypassing environment variables (.env) to ensure the correct, active key is being used.
For every test, our server logs show the successful response: GA4 response: 200 { "validationMessages": [ ] }.
GTM Publication: All changes have been submitted and published to the live server container.
Conclusion and Request
Since every variable (Property, Stream ID, API Secret, Payload structure, and server connection) has been verified as correct, and Google's validation server responds with 200 OK, our conclusion is that there is an internal failure within the GA4 Measurement Protocol collection pipeline for this specific stream. Any suggestions on what to do? I tried support...
Are you also sending a session_id? That one is required, too.