
August 5, 2024
Track Affiliate Sales with Google Tag Manager and Google Analytics 4
Updated: August 5th, 2024
In one of my previous blog posts, I shared how to track affiliate link clicks with Google Tag Manager, which is helpful if you use affiliate links to promote a product on an external site and want to track all outbound affiliate link clicks from your site to that site.
But what if you are the owner of the affiliate program and want to measure which partners are driving sales on your site? In this tutorial, I’ll show you how to track affiliate sales with Google Analytics 4!
Similar to the site search terms with revenue in GA4 article, the process will be to capture the affiliate ID from the URL into a cookie and pass that along with the purchase event (which I will show you how to implement if you don’t have it already), so that the sale can be attributed to the correct affiliate.
If this sounds like something you need, then keep on reading!
Table of Contents
Here’s what you will learn in this article
- The plan
- #1. Collecting and storing the affiliate ID
- #2. Create a purchase event
- #3. View affiliate sales in a GA4 report
- #4. An alternative way to send the affiliate ID
- Final Words
The plan
- Check the URL of each page (we’ll set up Google Tag Manager to do this for us), and if the page contains an affiliate ID, fetch it and store it in a cookie.
- Push the value of the cookie to GA4 as a custom dimension.
- Track a successful purchase and capture the affiliate ID with the purchase (if there is one).
- Build a report with GA4 Explorations to view affiliate ID data.
#1. Collecting and storing the affiliate ID
First things first – you must decide what query parameter you will use to differentiate affiliate traffic, e.g. affiliate_id will be used in this tutorial.
![]()
![]()
To store the affiliate ID value, we will need to create three things in GTM and one thing in GA4:
- A URL variable that fetches the value of an affiliate_id (this may be different on your site, so be sure to use the one that is in your site’s URL);
- A Custom HTML tag that stores that value in a cookie and a trigger that fires that tag;
- A 1st party cookie variable;
- A custom dimension for the affiliate_id so that we can see it in our reports
#1.1. URL variable
When a visitor lands on your site through an affiliate link, you will see that the affiliate ID appear in the URL as a query parameter (it appears after the ?), so we want to store this temporarily in a cookie. Then, when a visitor makes a purchase, we will send that affiliate link with the purchase event. To do this, we must store the value in a URL variable.
In Google Tag Manager, go to Variables > User Defined Variables > New.

Click “Variable configuration” and choose “URL”.
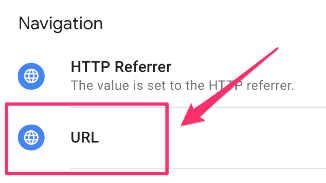
Create a new URL variable with the following settings:
- Component Type is Query;
- The Query Key is “affiliate_id”. This is just an example. Your website might be using a different query parameter; just keep in mind you might need to adjust!
Name the variable “url – affiliate_id” and save.
We will enter Preview mode for testing and insert your site’s URL followed by “?affiliate_id=some_id”, e.g., www.yourwebsite.com?affiliate_id=123.
![]()
![]()
Back in Preview mode, click Container Loaded and then Variables.
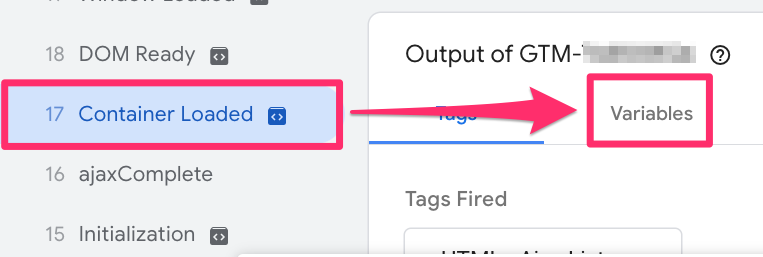
Search for the affiliate ID and confirm that it was collected.
![]()
![]()
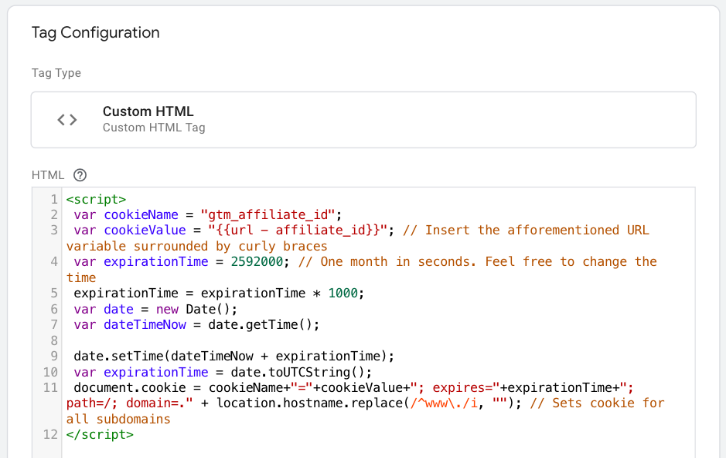
#1.2. Custom HTML tag
Now that we have the affiliate ID as a variable, we need to use the magic of cookies with Google Tag Manager to store this value.
We are reusing the code from the article about how to set and read cookies with GTM but with a few adjustments (you should update these to be consistent with the naming you have used thus far):
- The cookieName to be relevant to what the cookie is capturing
- The cookieValue to the query parameter we made above
- The expirationTime controls how long the cookie is stored. Choose a duration that works for you, such as one or two days. A question to ask yourself is, “If a user lands on your site through an affiliate link, makes no purchase that day, but then makes a purchase one week or month later, do you still want this associate to that affiliate ID?”. If yes, then you can make the duration of the cookie longer (e.g. 30 days). The decision here is yours.
If you are interested, you can read more about how to set and read cookies with GTM!
The updated code is below:
<script>
(function(){
	var cookieName = "gtm_affiliate_id";
	var cookieValue = "{{url - affiliate_id}}"; // Insert the aforementioned URL variable surrounded by curly braces
	var expirationTime = 2592000; // One month in seconds. Feel free to change the time
	expirationTime = expirationTime * 1000;
	var date = new Date();
	var dateTimeNow = date.getTime();
	date.setTime(dateTimeNow + expirationTime);
	var expirationTime = date.toUTCString();
	document.cookie = cookieName+"="+cookieValue+"; expires="+expirationTime+"; path=/; domain=." + location.hostname.replace(/^www\./i, ""); // Sets cookie for all subdomains
})();
</script>
In GTM, go to Tags in the left-side navigation and click “New”.
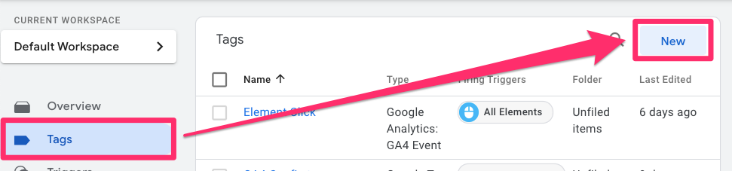
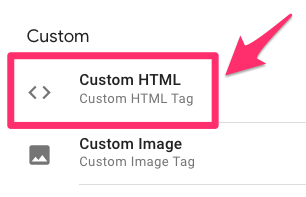
Select Tag Configuration, then choose Custom HTML tag.
Paste the code from above.

#1.3. Trigger for Custom HTML tag
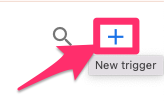
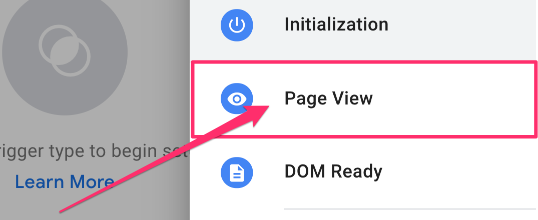
We only want the cookie to fire if the affiliate ID is in the URL, so we add this condition to the tag through a trigger. To make a trigger, click “Triggering” at the bottom of the tag and then “+” at the top right.
Click “Trigger configuration” and choose “Page view”.
Since we want the cookie only to be triggered when the affiliate ID query parameter is present in the URL, we will limit the trigger to fire on only some page views. Select “Some page views”.
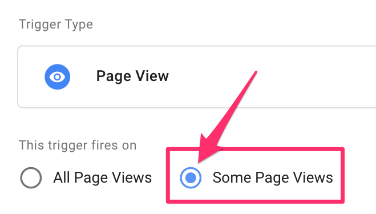
In the conditions, select “url – affiliate_id”, then “does not equal” and type “undefined” in the textbox. This means the cookie will only collect the affiliate ID when it is available in the URL.

Name the trigger “Pageview – affiliate ID” and save.
Back in the tag, which now contains a trigger, name the tag “cHTML – set cookie – gtm_affiliate_id” and save.

#1.4. Test the cookie/tag
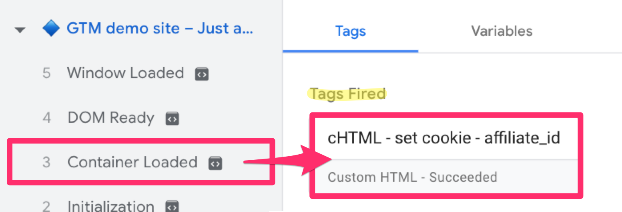
To test the cookie/tag, you will, again, need to open Preview mode (make sure you include the affiliate ID in the URL!) Once your website has loaded, check that the cHTML tag did fire on the first page that opens (since there is an affiliate ID query parameter in the URL).
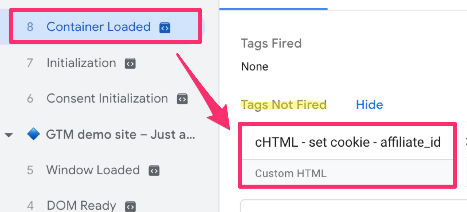
Move to a new page and confirm that the tag did not fire on the Container Loaded event (since the URL no longer contains the query parameter).
Go to the developer tools (right-click on your page and select “Inspect” or navigate there through the browser menu).
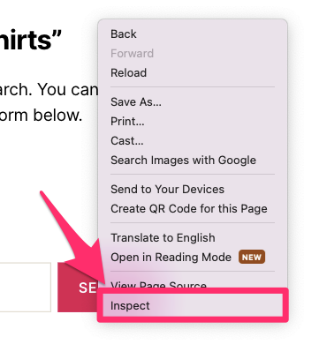
Open the Application tab (along the top menu), select “Cookies” (in the right-hand menu) and click on your site’s URL in the dropdown.

In the search box, type “gtm_” to find the gtm_affiliate_id cookie (or whatever you decided to name the cookie). The Value will collect the affiliate ID from the link that a visitor used to get to your site.

Here, you can also confirm the cookie expiration. Since we set it to one month, the cookie will not show up if you come back in, say, one month and one day.

#1.5. 1st party cookie
Now that we are collecting the value of the affiliate ID, we want to store this value in a new 1st party cookie variable.
In Google Tag Manager, go to Variables > User Defined Variables and click “New”.
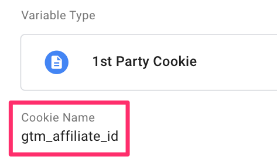
Click “Trigger configuration” and select “1st Party Cookie”.
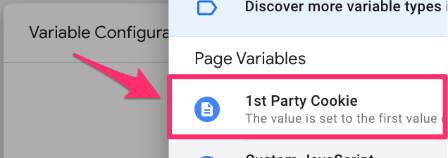
Enter “affiliate_id” as the Cookie Name and name variable “Cookie – gtm_affiliate_id”.
In the case where you will use this affiliate ID for more than just when a user makes a purchase, you should include this in your event settings variable. However, we will only cover the purchase event in this tutorial, so I don’t need to add it to my event settings variable.
#1.6. Create custom dimension in Google Analytics 4
To see the affiliate_id in Google Analytics 4 reports and explorations, you must create a custom dimension (read more here if you’re unfamiliar with custom dimensions) since this is not a recognized parameter in GA4.
In GA4, go to Admin > Data display > Custom definitions.
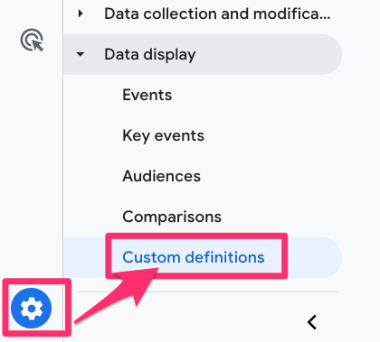
Under Custom dimensions, click “Create custom dimension”.

In the new window, enter the following:
- Dimension name is Affiliate ID
- Scope is Event
- Event parameter is affiliate_id
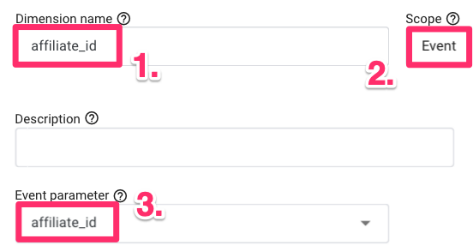
Save this, and once you have data flowing in (at least 24 hours after you publish your GTM container with the changes), you can see any data related to the parameter in your reports.
#2. Create a purchase event
You need to set up an e-commerce event that collects each time a visitor makes a purchase and adds the value from the cookie as an event parameter.
#2.1. Implement the purchase in the Data Layer
Suppose you’re using the Google recommended purchase event (which is what we’ll be referencing in this tutorial). In that case, your developer will need to add the event to your website’s code (Data Layer) to fire each time a user makes a purchase and ensure that the event’s parameters collect relevant information (e.g., the transaction and item information).
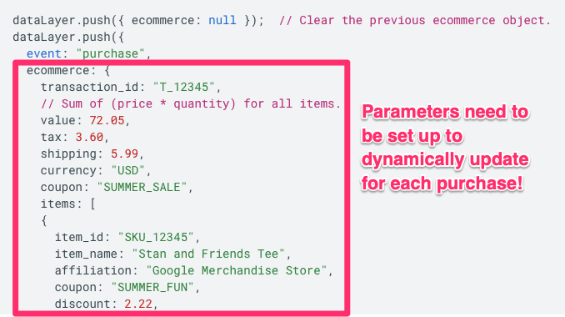
For the remainder of the tutorial, I will assume that you or a developer has implemented a Data Layer push event named purchase. If you’re using the GA4 purchase event, you don’t need to include every parameter that Google lists in the event. My recommendations are:
- From the ecommerce object, include at least the currency, value, transaction_id parameters, and the items object.
- From the items object, include at least the item_name, item_id, price and quantity parameters.
Review this list to confirm whether it applies to your business needs and adapt it to what works best for you!
#2.2. Set up purchase tag in GTM
Now, when a user makes a purchase, the information will be available in the Data Layer for you to collect. To do so, you need to set up a tag in GTM.
If you already have a tag and trigger set up to track purchases, you can skip this step and move to the “Add the other elements” section, specifically looking for where we add the affiliate_id as an event parameter.
#2.3. Create a trigger
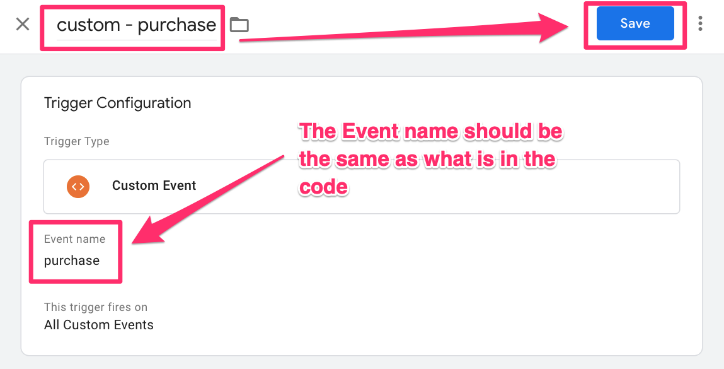
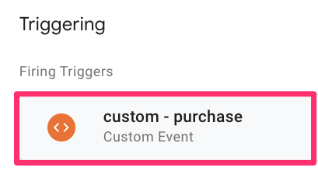
We will begin by creating a trigger to tell our tag when it should fire. To make a trigger, go to Triggers in the left-side navigation of GTM and click the “New” button.
Click “Trigger Configuration” and select “Custom Event” under Other.
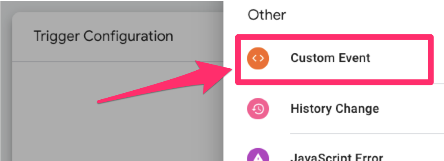
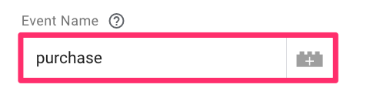
In the Event name textbox, enter purchase. Name the trigger “custom – purchase” and save.
#2.4. Create the tag
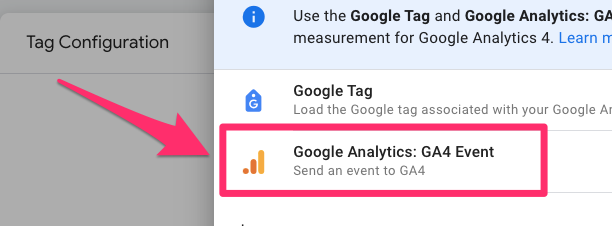
Go to Google Tag Manager > Tags (in the left-side navigation) > New.

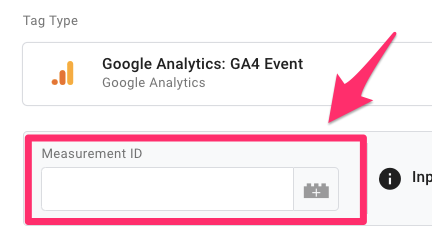
For the Tag Configuration, select Google Analytics > GA4 Event.
The first thing you’ll have to enter is the Measurement ID.
#2.5. Measurement ID
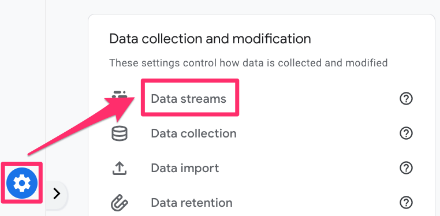
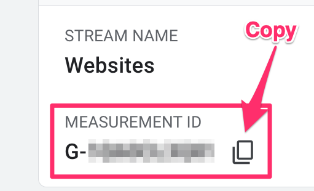
If you don’t have your measurement ID saved as a constant in your container, you need to find it in your Google Analytics 4 data stream. Go to the GA4 interface, then Admin > Data collection and modification > Data streams.
Click the data stream you are interested in and find the measurement ID.
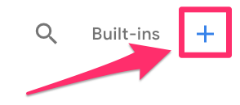
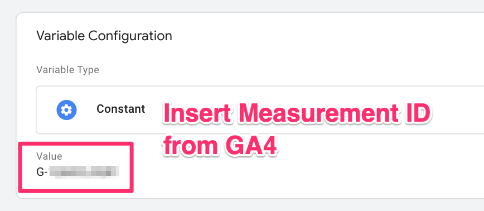
To keep your container more organized, you will want to create a new Constant variable to hold the measurement ID. Click the building block icon to add a new variable.
Then, click on the plus in the top right to create a new variable.
Click on Variable Configuration and select “Constant” as the variable type.
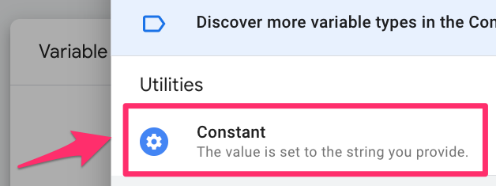
Copy the Measurement ID and paste it into the Value of the constant variable. Save your new variable as “Constant – G-XXXXXXXXXX” (or whatever makes sense to you). Read this blog post to learn more about the constant variable in Google Analytics 4.
#2.6. Add the other elements
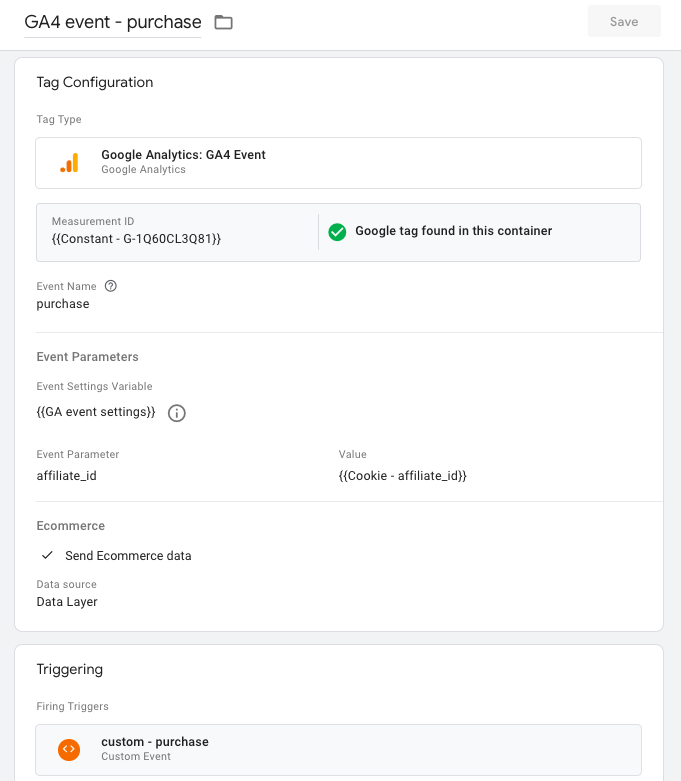
First, you can add an event name. In this case, it’s just purchase.
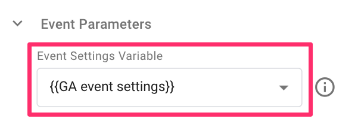
The next part is adding the event settings variable (we have no additional parameters to add). If you use the event settings variable, I highly recommend adding it to all your events, including this one. Check out this article if you don’t have this set up yet!
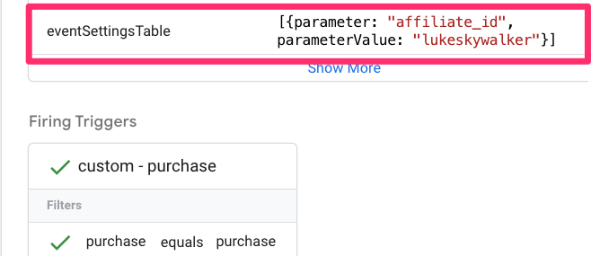
Most importantly (for this tutorial), you must add the affiliate_id from above as a parameter. Name the Event parameter “affiliate_id” and set the value as the 1st party cookie “Cookie – affiliate_id”.
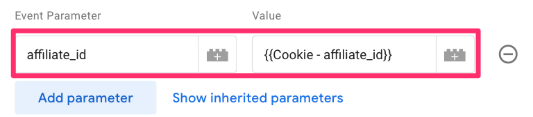
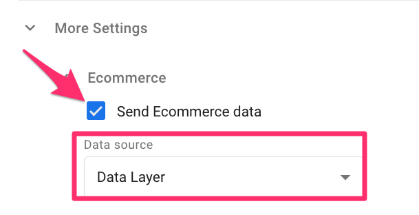
Under More Settings, select “Send Ecommerce data”. Keep the Data Layer as the Data source. This will only work if your Data layer push event follows the GA4 documentation from above, aka the parameter names are the same (you don’t need to use all of them, though)!
Lastly, add the trigger we just created.
Name the event “GA4 event – purchase” (check out this article on naming convention), save it, and let’s check to see if it works!
Go to Preview mode, enter your site’s URL with the affiliate ID query parameter (you can just manually type this in, e.g. add ?affiliate_id=lukeskywalker to the end of your URL) and make a purchase.
![]()
![]()
Back in Preview mode, confirm that the tag appears under the purchase event.
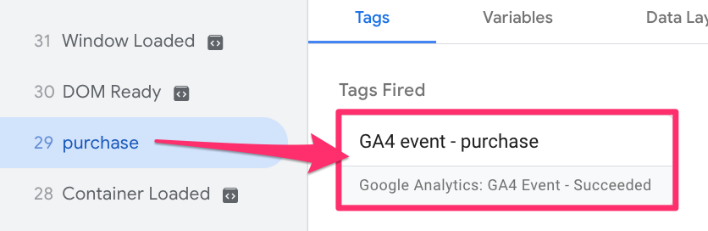
Click on the tag and confirm that you see the expected value as the affiliate_id.
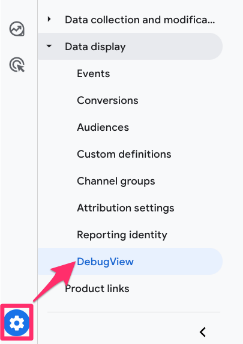
Go to DebugView in GA4 (in GA4, go to Admin > Data Display > Debugview) and check the same information to confirm that the event (and its information) has been collected.
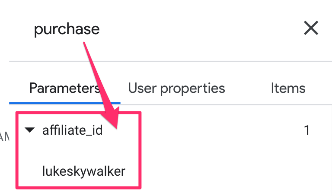
In the DebugView tool, click on the event and go to the Parameters tab to find the affiliate_id.
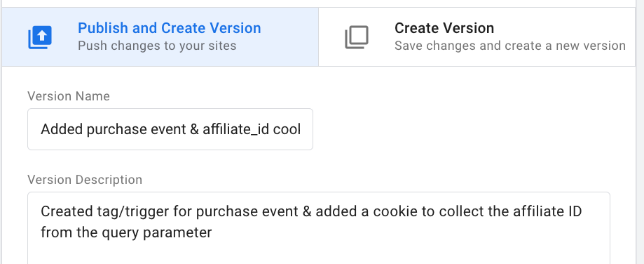
Submit and publish the changes in your GTM container (don’t forget to name the version and add a short description)!
#3. View affiliate sales in a Google Analytics 4 report
While you may be eager to see your new data coming through, you must wait at least 24 hours to see the data in the GA4 interface. To view data in GA4, you can either create a report in the “Reports” section or you can create your own GA4 exploration.
We will explore both options, and you can determine which works best for you!
#3.1. A report in the “Reports” section
The GA4 standard built-in reports are pretty simple, but they’ll get the job done. The cool thing about these reports is that you can customize them!
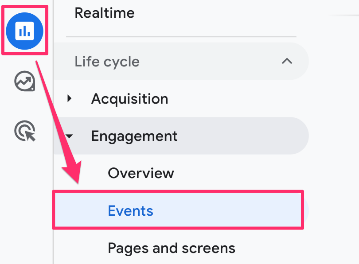
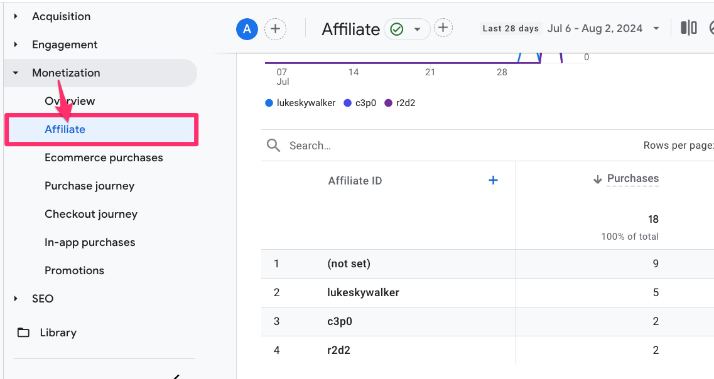
In GA4, go to Reports in the left-hand sidebar and click Life Cycle >Engagement > Events.
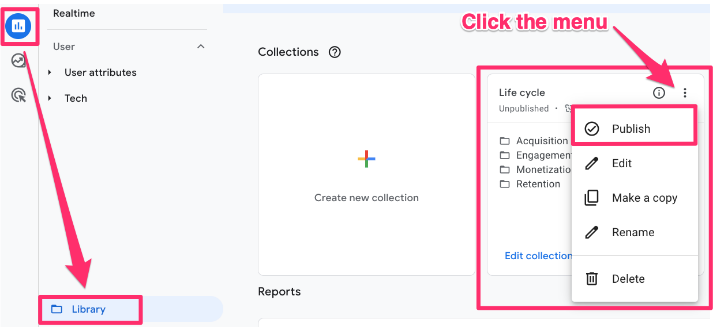
You can also add this report collection to your reports tab if you don’t have it by going to the Library and publishing the “Life cycle” collection.
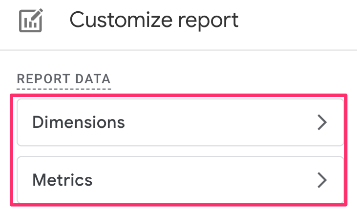
Once the Event report has opened, click the pencil icon in the top-right to customize the report.

There are two parts of the report we want to customize: Dimensions and Metrics.
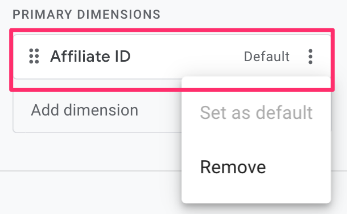
For the Dimensions, select “Affiliate ID”. You can keep or remove the Event name dimension and, if you keep the Event name, you can set the Affiliate ID as the primary dimension by clicking the three dots and selecting “Set as default”.
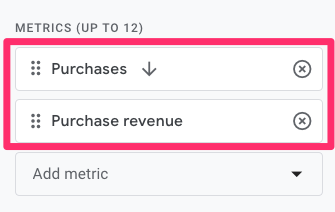
For the Metrics, select “Purchases” and “Purchase revenue”. You can drag the metrics up or down to change the order in which they appear in your report.
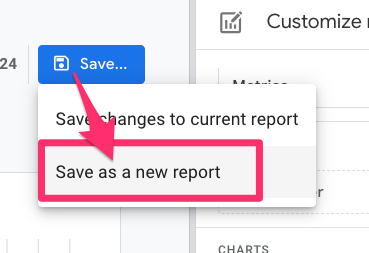
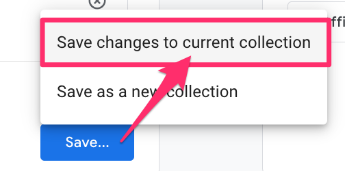
Now, click “Save” and “Save as a new report”, which allows you to save this report within the Reports tab, so you can have easy access to it. Name the report “Affiliate” (or whatever makes sense to you).
One final step is that you need to now add this report to one of your libraries. Go to Library at the bottom of the Reports tab and select the Life cycle library that you have published.
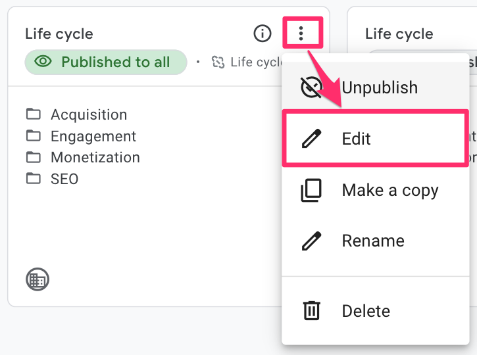
Search for the report you just saved in the right-side search bar and drag it over into either the Monetization section or the Engagement section (again, do what makes sense to you! Maybe you never want to make a new folder altogether).
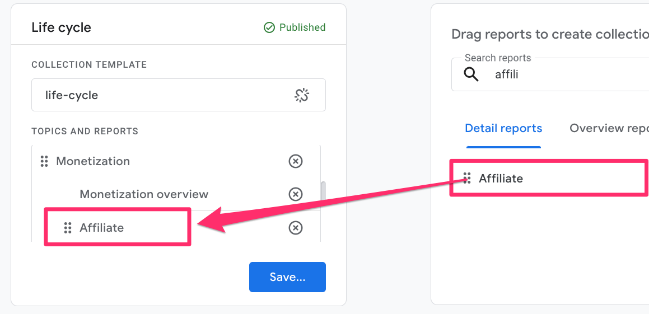
Save changes to the current collection.
Now, your report will be visible in the Reports section of GA4!
Unless this report works perfectly for you, I would recommend creating a GA4 exploration that fits exactly your needs and that you (and your team) can always reference.
If you see a (not set) value (which is normal), it means that those purchases were not related to affiliates.
#3.2. GA4 Exploration
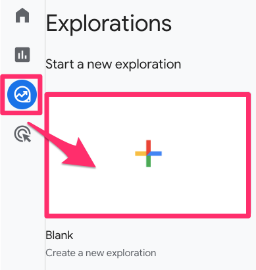
Using GA4 Explorations, you can view the new data you’re collecting. In GA4, go to Explore and select “Blank“.
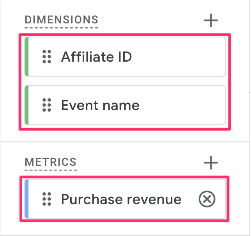
In the Variables tab, select:
- Dimensions: Event name, Affiliate ID (this is why you needed to create the custom dimension)
- Metrics: Purchase revenue

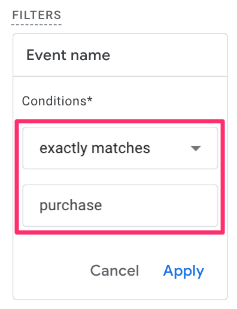
- Filter: Event name exactly matches purchase

Double-click on the Affiliate ID and the Purchase revenue to add them to your report. Now, you can see the revenue associated with each affiliate ID.
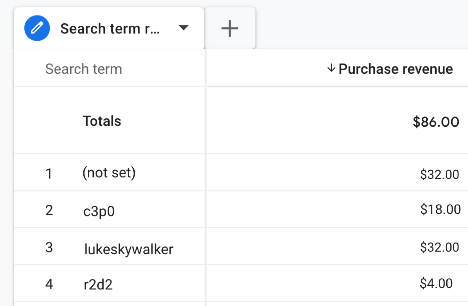
You may notice some blanks under the Affiliate ID. These are just visitors who didn’t land on your site through an affiliate link before making a purchase or those who did use an affiliate link, but it was before you set everything up to collect this information.
#4. An alternative way to send the affiliate ID
For those who don’t have developers readily available to assist in tracking needs, this tutorial shows the power of cookies, custom dimensions, and GA4 reports to get information on revenue from affiliate IDs.
However, if you have a developer to help you out, there is an alternative method you can use. While this may seem like a simpler method, there are a few nuances to consider, which I will go over near the end of this chapter.
In the Google recommended purchase event, there is a field called affiliation. Here, you could the developer to read the affiliate_id cookie that you previously stored and place that ID in the affiliation field whenever a push to the Data Layer is initiated.
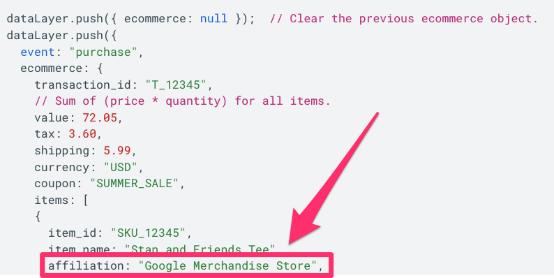
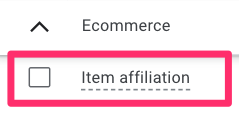
You still need to create the purchase tag and trigger, but everything else will be automatically sent to GA4. The value of the affiliation field will appear in the Item Affiliation dimension in GA4 reports.
You may already be using this field for a different purpose, e.g. discount code or store name, so this solution doesn’t work for you anyway, but it may be useful for some!
Now, the consideration: The Item affiliation dimension is an item-scoped dimension which will not always be compatible with event-scoped metrics. For example, the Purchase revenue metric is not compatible with Item affiliation. You would be forced to use Item revenue instead.
Thus personally, I would recommend using the affiliate_id event-scoped approach that we covered in this article.
Track Affiliate Sales with Google Tag Manager and Google Analytics: Final Words
This (not so short) guide highlighted the ability to accomplish complex things in Google Analytics 4 and Google Tag Manager, even with limited developer skills. While you need the help of a developer to implement the purchase event, you are able to do the remaining steps of creating a cookie and sending this information to GA4 through the purchase event on your own!
If you are able to get some additional assistance from developers, you can skip the manual steps and include the affiliate ID in the purchase Data Layer push event. However, you need to consider the affects that this could have on your ability to report on ecommerce data.
Regardless, anytime the affiliate ID appears as a query parameter in the URL, you will be able to collect the ID and associate it with revenue.
Do you have any ideas/suggestions for tracking affiliate sales with Google Tag Manager and Google Analytics? Let me know in the comments below.

13 COMMENTS
Nice post! Two questions:
1. Would it give any advantage to replace https://mywebsite.com/?affiliate_id=12345abc with an UTM i.e. with https://mywebsite.com/utm_medium=referral&utm_source=promo&utm_campaign=campaign2018. Would it still work?
2. Can you send this to mutiple GA-accounts so the affiliate can als keep a track of the conversion
Thank you in advance!
Joost
1. I'd actually use both. Affiliate_id is needed for conversion tracking while UTM data is useful in acquisition reports.
2. I wouldn't send this to a separate GA property. Instead, I'd use UTMs as you have mentioned before and then create a separate GA for that affiliate. You can create views based on UTMs and even custom dimensions.
Thanks! Blog
Ad1. How do you combine an UTM with an Affiliate ID is the affiliate has one button with a link at the end of their Blog-post?
Again, many thanks,
Joost
If you really want to combine them, you can use utm_content for your affiliate ID.
Hi Julius,
What a great article. Really great stuff.
Quick question. I get the following error message when I want to publish my workspace:
Unsupported reference to the variable, '{{ }}', in a comment.
I followed all the aforementioned steps (changing affiliate_id to a specific affiliate id)
- I set up an url variable called "shopback_id"
- I inserted the url variable into the HTML tag
Here the code:
var cookieName = "shopback_id";
var cookieValue = "{{shopback_id}}"; // Insert the afforementioned URL variable surrounded by {{ }}
Okay for all those who faced a similar issue here is what I found out: The error message came up because I did not delete the comment within the code:
"// Insert the afforementioned URL variable surrounded by {{ }}"
Apparently, Google Tag Manager made a reference to that empty variable ({{ }})
Thanks again Julius for a great article :)
Yes, you are correct.
If you surround something with {{ }}, GTM will be looking for the actual variable. It that variable does not exist, you won't be able to preview/publish container.
Sorry for late reply, Deniz. And thanks for the heads up!
Excelent post! I tried it and now i'm waiting for some results. Hope it will work.
Best regards!
Hi. Thanks for a nice post.
Is it possible to see the direct conversions in Analytics? What I means is without any other touchpoints/funnel. Only the direct conversions.
This still doesn't sound very clear. Could you elaborate?
You can see how the (direct) traffic converts in your source/medium reports. I think I need more explanation about your situation to be able to help.
I have just read it. Nice!
hi
Can you write an article on how to monitor dual events?
For example, event C will only be triggered when event A and event B occur one after another.
I know this can be done through the function of audiences in GA4, but how can I do this through GTM? Because I need to apply it to other platforms, not Google Ads.
I tried recording the status of event A and event B, returning true when both occur, and setting the trigger of event C to occur only when the return value is true. The result did not achieve the expected effect.
Thank you