
February 12, 2023
Track Klaviyo Forms with Google Tag Manager
If you’re using Klaviyo as your email marketing provider, you probably already know that they also offer a bunch of opt-in forms (embedded forms, popups, etc.). If you’re interested in seeing your opt-in data in Google Analytics reports (e.g. which traffic sources are bringing you the most subscribers), this guide will help you achieve that together with Google Tag Manager.
In this guide, we’ll take a look at all the necessary steps you need to take in order to track Klaviyo forms with Google Tag Manager (+ how to send that data to GA & turn it into a goal/conversion).
Note: this blog post teaches how to track events with Universal Analytics. If you want to get familiar with event tracking in Google Analytics 4, you can also refer to this blog post.
Table of contents
- The Listener
- Variables
- Custom event trigger
- Universal Analytics tag
- Testing
- Google Analytics goal
- Checking GA reports
- If you also want to track form field values (+ a warning)
- Final words
Google Tag Manager template for GA4
Even though this guide is using GA3 (Universal Analytics), I have prepared a Google Tag Manager container template (a.k.a. recipe) that works with Google Analytics 4. You can download it here.
The Listener
By default, Google Tag Manager will not be able to track Klaviyo form submissions. Even though you will find the “Form submission” trigger in GTM, it will not track Klaviyo’s forms.
To make things work, you will need to use a Custom Auto-event listener that will be looking only for the successful Klaviyo form submissions. If it catches one, you’ll see the form submission data in the data layer (and in the Preview and Debug mode, of course).
To achieve this, create a Custom HTML tag in Google Tag Manager and paste the following code:
<script>
window.dataLayer = window.dataLayer || [];
window.addEventListener("klaviyoForms", function(e) {
  if (e.detail.type == 'submit') {
	dataLayer.push({
		'event' : 'klaviyo',
		'formId' : e.detail.formId,
		'formTitle' : e.detail.metaData.$source
	});
  }
});
</script>
This listener was based on the code that is mentioned here, but instead of sending data directly to Google Analytics, the listener will push the form’s data to the Data Layer.
Set this tag to fire on all pages (or maybe just on those pages where Klaviyo form is located, this is up to you).
Important: if this solution does not work, try changing the trigger from All Pages to Window Loaded.

Now, let’s test the listener. Save the tag, refresh (or enable) the Preview and Debug mode, go to the website where the GTM container snippet is installed and Klaviyo form is present. Submit the form (if preview mode did not appear on your website, read this).
In the preview and debug console, you should see an event called klaviyo.
If it appeared, you’re on the right track. If not, check whether the cHTML – Klaviyo Listener has fired on all pages (also, a good practice would be to refresh the P&D mode (by clicking the orange banner) and then refresh the web page with Klaviyo form once again).
Click that klaviyo event in the preview and debug mode, then go to the Data Layer tab. Check if you see the form information there (such as form id, form title, etc.).
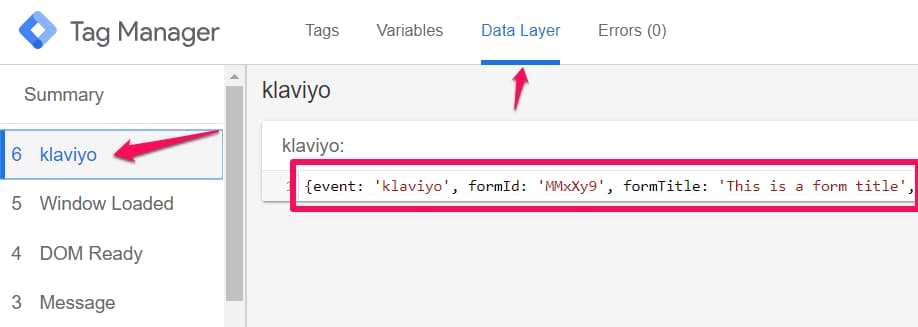
If yes, continue to the next step.
Variables
In this blog post, we will send to GA not only the fact that the form was successfully submitted but also some additional info (like form ID and form title).
This can be done with the help of Google Tag Manager variables.
Even though you see form submission data in the Data Layer, you cannot use that in your GA tag unless you have created GTM variables. Since that data is available in the Data Layer, you’ll need to use Data Layer Variables. Each data point will require a separate Data Layer variable.
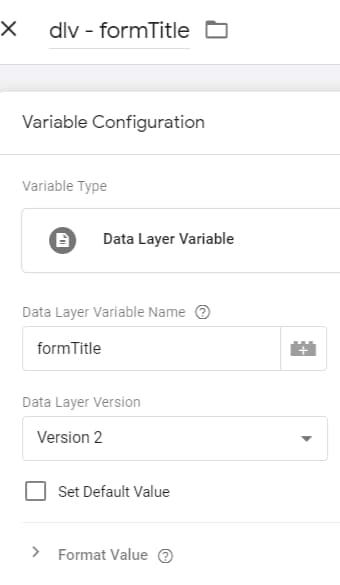
Let’s start with the formId. In the GTM interface, go to Variables > User-defined Variables > New and choose the Data Layer Variable.
Enter the following settings:

I entered formId (with the uppercase I) because that’s how that data point is named in the Data Layer. Where can you find this form ID in Klaviyo? When you open your form list and start editing a particular form, check the URL in the browser address bar. That address will contain the form ID.
If you also want to use formTitle in GTM, create another DLV (Data Layer Variable) for that key as well. Remember, those values are case-sensitive. formtitle ≠ formTitle.
A good practice would be to check whether those variables are configured correctly. After you create both variables, refresh the preview mode and refresh the page with Klaviyo form on it.
Resubmit Klaviyo’s form once again, then click on klaviyo in the preview and debug console > go to Variables tab and check whether those variables display the correct values.
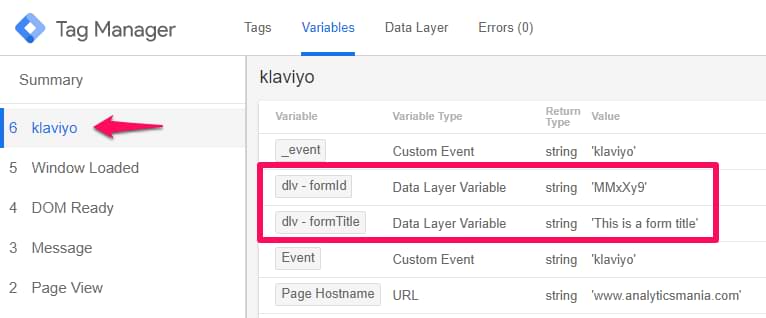
If you see undefined, check the spelling of variables in your GTM interface and refresh the preview mode once again.
Custom event trigger
The next step is to create a condition when do we want to fire a Universal Analytics tag that will send the event information to GA (note: we haven’t created that tag yet).
In plain English, we will want to fire a GA tag when the Klaviyo form is successfully submitted. How can we translate this into something that GTM understands? The answer is when we see a klaviyo event in the preview and debug mode.
All the things that appear on the left side of the Preview and Debug mode are dataLayer.push’es. If something is pushed to the Data Layer, you’ll see that on the left side of the P&D console. If dataLayer.push contains an event key, the value of that key will be visible on the left side of the preview console.
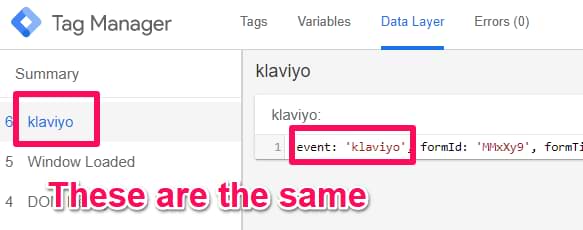
Therefore, the correct way to translate the firing condition would be we want to fire a GA tag when a dataLayer.push contains an event key with “klaviyo” value.
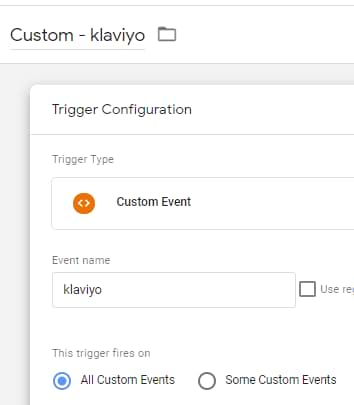
To turn this condition into a trigger in GTM, we will need to go to GTM interface > Triggers > New and choose Custom Event.
This type of trigger allows you to pick any dataLayer.push and use it as a tag-firing condition. Since we are interested in the klaviyo dataLayer.push, we need to enter that in the Custom Event trigger.
P.S. If you want to be more specific with your trigger (and to track only a particular Klaviyo form, you can add an additional condition to the Custom Event trigger, e.g., dlv – formId equals to X97Sd (obviously, the form ID value will be different in your case).
Hit Save.
The next step will be to create a tag that will be activated on klaviyo dataLayer.push and will send the form submission data to Google Analytics.
Universal Analytics tag
In GTM, go to Tags > New > Universal Analytics and enter the following settings.

If you don’t know what to choose in the Google Analytics Settings Variable field, read this.
In the event category and event action fields, I entered two Data Layer variables from one of the previous chapters.
In the Triggering section, I selected the Custom Event trigger from the previous chapter of this blog post.
Save the tag.

Testing
The next step is to make sure that when the Klaviyo form is successfully submitted, the event is sent to Google Analytics.
After you’ve completed all the previous steps of this blog post, refresh the preview and debug mode, then refresh the page with a Klaviyo form on it and then submit it (p.s. Preview and debug console must be visible at the bottom of the browser window).
The expected flow:
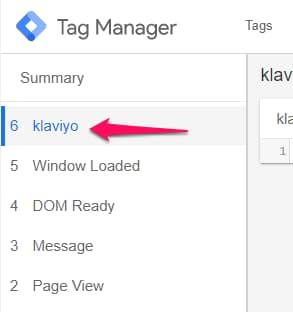
#1. After the form is submitted, klaviyo will appear on the left side of the Preview and Debug mode.
#2. Click it and you should see that the GA Event – Klaviyo Form Submission tag has fired
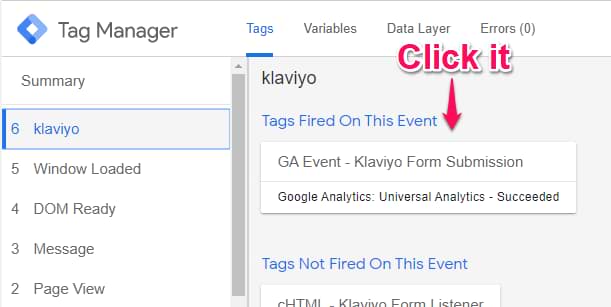
#3. Click that tag (in the P&D console) and see what data was passed to Google Analytics (you will also need to click Show more in the tag’s details)

#4. Go to GA Real-time reports > Events and check whether that Klaviyo form event is visible there.
If you don’t see the event in real-time reports, this is a good resource for debugging.
Google Analytics goal
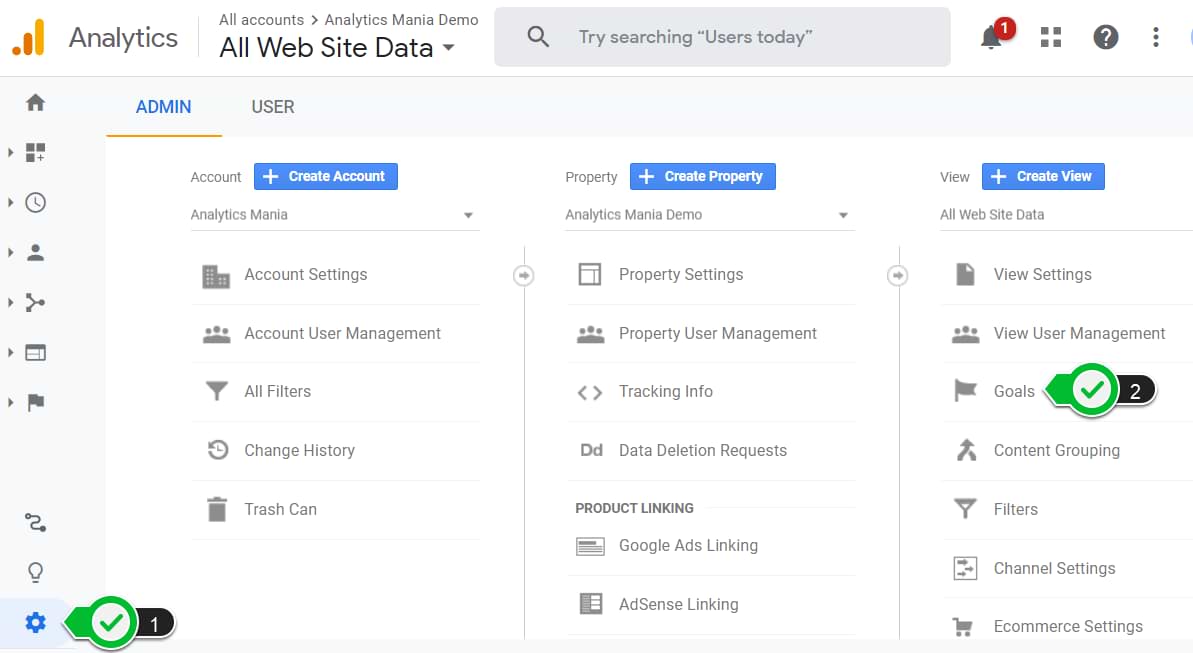
If you want to track those form submissions as conversions, you will need to create a goal in GA. To do that, go to your Google Analytics account and then open the property you are interested in.
Then click the Gear icon at the bottom left corner, choose the GA view in which you want to create a goal and click Goals.
Then click NEW GOAL and enter the following settings:
- Template – Custom
- Name – enter whatever you want, e.g. Form submission (but you should probably use something more meaningful)
- Type – Event
- Goal details:
- Event category – form submission (I entered this because that’s the event category we used in our GA tag).
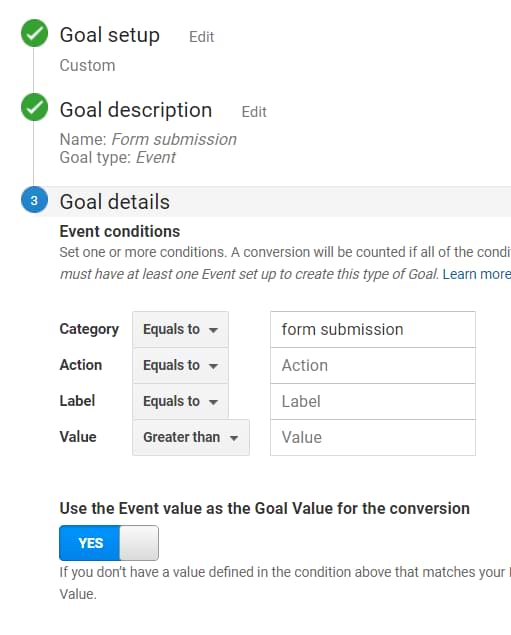
If you enter only the Event category, then all events with the form submission event category will be treated as completed goals. If you want to specify and treat only particular form’s submissions as goals, then you could also enter that form’s ID in the Event Action field.
These configurations are based on what we have passed to GA with the form submission event.
Don’t bother clicking the Verify this Goal link, you will likely get false negative if you have just started sending those form submission events to Google Analytics. Verify this Goal link does not check the very latest data you sent to GA.
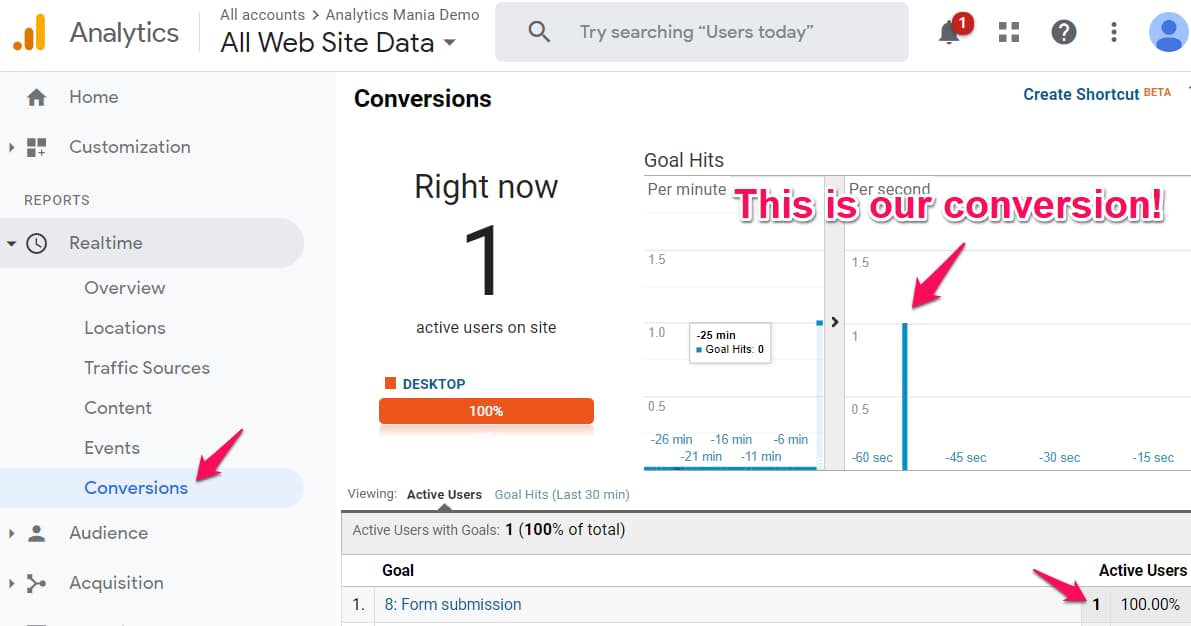
Save the goal and let’s test it. Go to GA Real-time reports > Conversions.
Resubmit the form once again and check whether your goal (a.k.a. conversion) is displayed as completed in the real-time reports. How do you know if it was tracked? You’ll see an increased count next to it.
If you don’t manage to make your goals work, read this guide.
Checking GA reports
Goals (conversions) can be found in many reports of Google Analytics, to name a few:
- Conversions > Goals > Overview
- Acquisition > All traffic > Source/Medium (and then check the last 3 columns of the table). If that report, you can select the goal you want to check and then you will see which traffic sources are bringing you the most email opt-ins.
Just keep in mind that these reports are not real-time and GA will need some time to process the data, therefore, be patient.
If you also want to track form field values (+ a warning)
In the Klaviyo form listener (that I’ve shared at the beginning of this blog post), there was nothing related to the email address that was submitted (or other form fields).
Actually, there is a possibility to extract the values of all the form fields. If you are interested in other fields, use the listener code (see below) in your Custom HTML tag.
<script>
window.dataLayer = window.dataLayer || [];
window.addEventListener("klaviyoForms", function(e) {
  if (e.detail.type == 'submit') {
	dataLayer.push({
		'event' : 'klaviyo',
		'formData' : e.detail
	});
  }
});
</script>
It will push the form submission data to GA in the following format (this is just an example of a form with more fields).
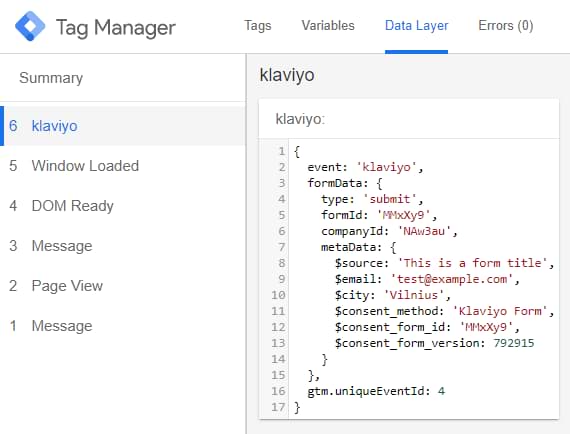
So if you wanted, say, retrieve a value of a $city (see the screenshot above), you should enter this in your Data Layer Variable: formData.metaData.$city
Feel free to apply this to any other data points as well. P.S. you might find this guide useful.
Warning/Reminder: if you plan to send an email address (or any other Personally Identifiable Information (PII)) to GA, don’t do that. This is strictly against Google Analytics’ terms of service.
If on the other hand, you plan to send that data to other tools (that allow you do that), first make sure that you have received a meaningful consent from your visitor/user (if privacy-related regulations apply to your business). But this should be discussed with a lawyer or legal department.
Track Klaviyo Forms with Google Tag Manager: Final words
If you have ever tried to track forms with Google Tag Manager, you probably know that there are many nuances and different tracking techniques (based on how that form is coded). That is the main reason why one of my most popular blog posts is about form tracking.
Luckily, in Klaviyo’s case, we are using a specific form listener that pushes data to the Data Layer only after successful form submission.
At the beginning of this blog post, I shared a JavaScript code that should be used to capture only the fact of form submission and form ID + form title.
If your form contains more form fields and you want to capture them, use the Custom JS code I’ve shared at the end of this blog post (just keep PII in mind).
Still struggling to track Klaviyo forms with Google Tag Manager? If yes, let me know in the comments.
10 COMMENTS
Hi Julius,
Our developer installed the popup code at the bottom of the page, right above the closing body tab. Should this be moved up or installed in GTM in order for the form tracking to work? I'm having trouble installing the form tracking code. It appears fine if I paste the code into the console, presumably after the page loads. However, nothing appears when I run the same code through GTM. It's set to All Pages. In fact, it seems that the code isn't even read correctly by GTM (the closing tag is colored red-orange). Do you have any recommendations on where I could go next?
Thank you,
Leo
Hi, Leo, try changing the listener's trigger from All Pages to Window Loaded.
Thanks Julius. Laser clear.
My form submits are now tracking.
Any pointers how to track form views?
Thanks again,
Winston
With element visibility trigger.
Thanks Julius, a lot of value here.
Have the same doubt, if i use the Element Visibility, should i use the dlv-formId/title as the Element ID?
Hi, element visibility trigger does not check the values in the data layer when it is looking for appearances. You need to use the ID or the CSS selector of the form elements. Before that, usually no klaviyo info will be on the data layer. If you are not familiar with howntonuse CSS selectors. And how to fetch the values of website elements, checkout my Intermediate/advanced GTM course.
Hi Julius,
I've been having some issues with the tracking of Klaviyo signup pop-up form. I've tried many things. However, it's still ongoing. I'd opened a topic related this issue in Klaviyo community.
Could you please look over my topic real quick by chance?
That'd be great if you could help me.
Best,
Sorry, I've missed the link.
https://community.klaviyo.com/developer-group-64/pop-up-signup-form-tracking-in-ga4-and-gtm-issue-9003?postid=36174#post36174
Hi Julius,
cHTML code you shared worked! However, I need to pull the email data from the form submission and send it to our CDP. I've checked embedded Klaviyo form (your script worked on this) and also we have pop-up form and there are several info like name, surname, birthdate, email in the pop-up form. If possible, I also wanna send those info beside email to our CDP. I've tried putting 'email': e.detail.fields.email underneath formTitle but it gave me the email undefined. Could you please help me?
Thanks,
Hey! The Universal Analytics tag doesn't exist anymore with GA4. Will you add an updated instruction for the GA Reporting?