
March 6, 2024
Track Many Forms with One Thank You Page with Google Tag Manager
Updated: March 6th, 2024
Here’s a situation: you want to track form submissions on a website. There are multiple forms, and they all redirect the visitor to the same “Thank you” page. The built-in Form Submission trigger in GTM is not working; thus, you could try implementing the Thank you page tracking method. But how can you distinguish which form was submitted?
In this guide, I’ll show several options for tracking many forms with one Thank you Page (in other words, that redirects to the same ‘Thank you” page).
Table of Contents
Here’s what you will learn in this article
- Option #1. Using the referrer variable
- Option #2. Working with a single page application? Use Trigger Groups
- Option #3. Store the info of the last submitted form in a cookie
- Option #4. Can you change the URL of the Thank you page yourself?
- Option #5. Cooperate with developers
- Where can I find this data in my regular Google Analytics 4 reports?
- How to track multiple forms with one Thank You page: Final Words
Video tutorial
Prefer video content? Here’s a tutorial from my Youtube channel.
Option #1. Using the referrer variable
This method is useful if there is only one form per page.
If the page with a form and the Thankyou page belong to the same subdomain, there is a high chance that you can use a built-in Referrer variable in Google Tag Manager. This variable returns the value of the previous page.
However, keep in mind that this variable becomes more and more limited (due to privacy implications). If your “Thank you” page is on another domain, the Referrer might not return a full URL, meaning you cannot distinguish from which exact page the visitor landed.
To check if this method works (ideally, do this on several browsers):
- Enable GTM preview and debug mode
- Refresh the website with the form you are about to track
- Submit the form (and get redirected to a thank you page)
- Check the Window Loaded event in the preview mode > go to the Variables tab of the debug console and check the value of the Referrer
Can you tell (by looking at it) from which exact page the visitor lands on a “Thank you” page? If yes, then this method is precisely what you need. If not, skip to the option #2.
It’s time to track the form submission. Let’s say that the URL of the “Thank you” page is this https://www.example.com/thank-you/. Let’s create a trigger.
#1.1. Create a Trigger
In GTM, go to Triggers > New > Pageview and enter the following conditions:
- Page Path starts with /thank-you
- The referrer contains www.example.com (replace this with your website’s domain). This is optional, but this condition will prevent the tag from firing if someone accidentally lands on a “Thank you” page from a Google search or somewhere else (not from my website’s other page).


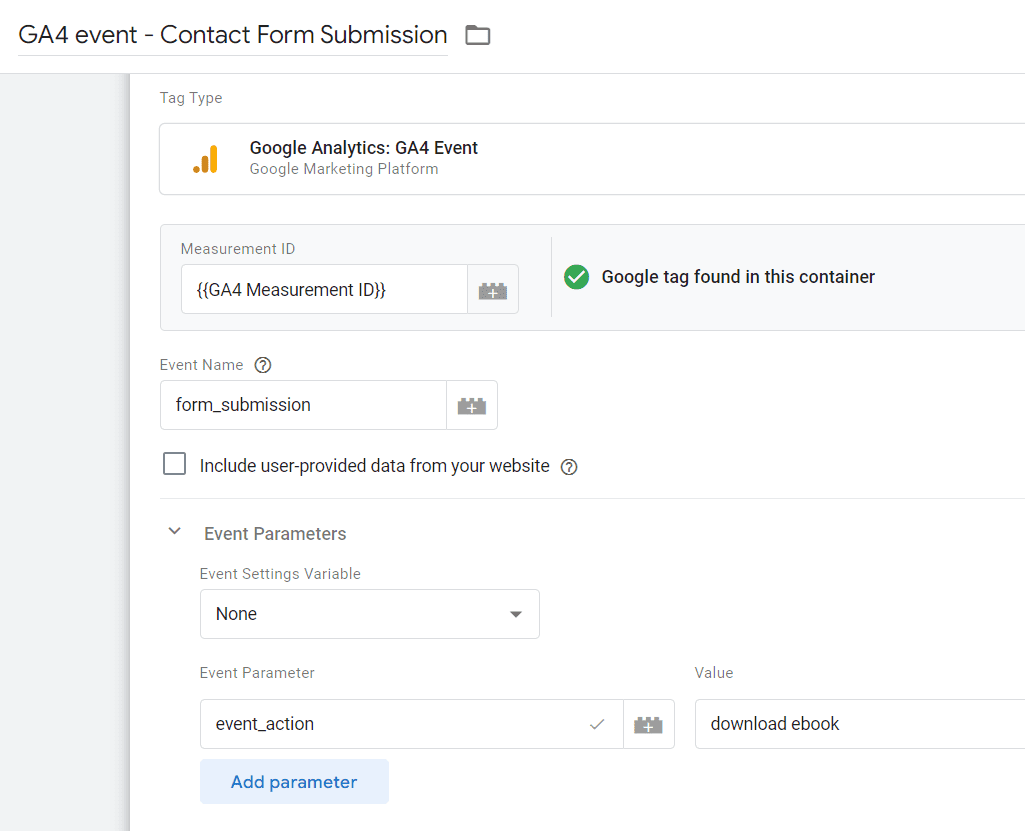
#1.2. Create a Google Analytics tag
In GTM, go to Tags > New > Google Analytics: GA4 Event and enter the following settings:
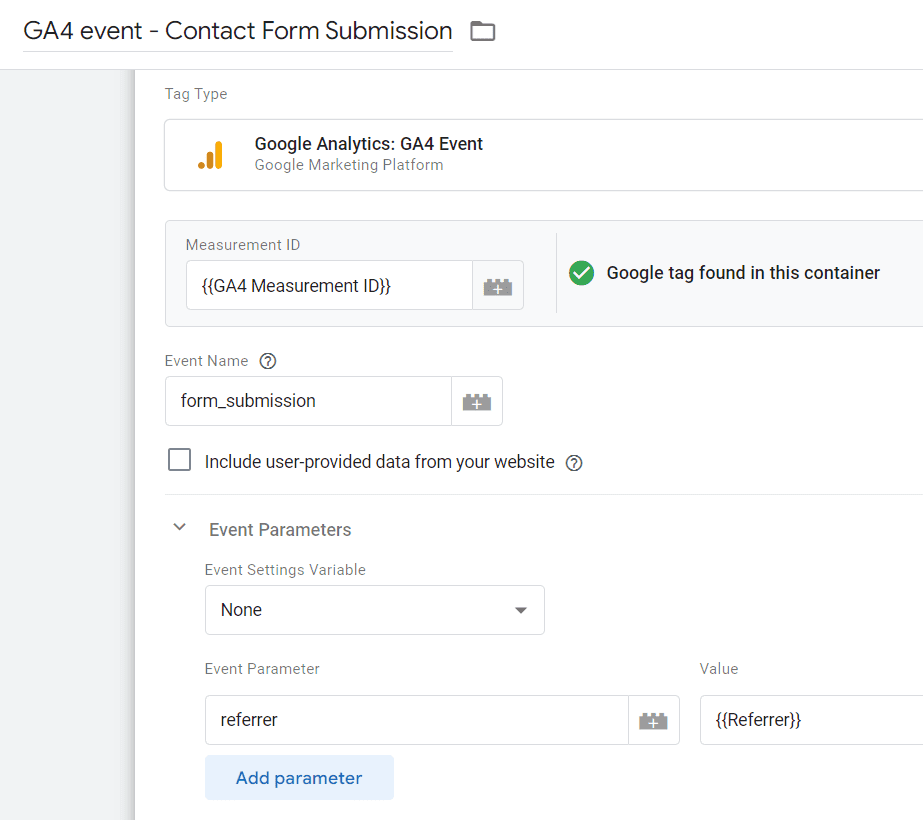
You can use a different naming convention if you wish. The main thing is that we are sending the URL of the previous page (on which the form was submitted) as an event parameter.
If you want to track only the Pathname of the Referrer (not the full URL), you can create a URL variable with the following settings and use it in your GA4 tag instead.

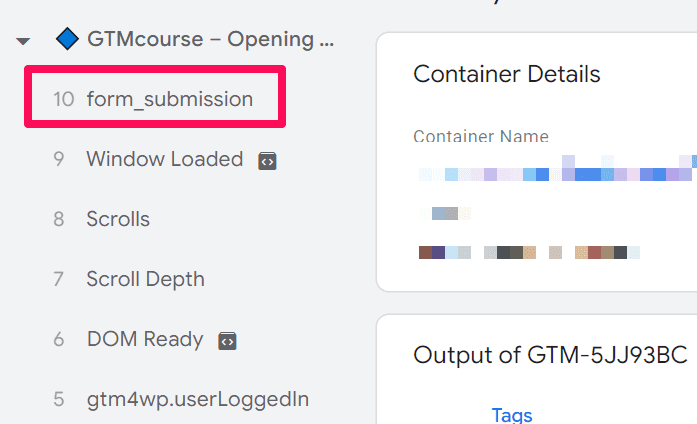
#1.3. Test the setup
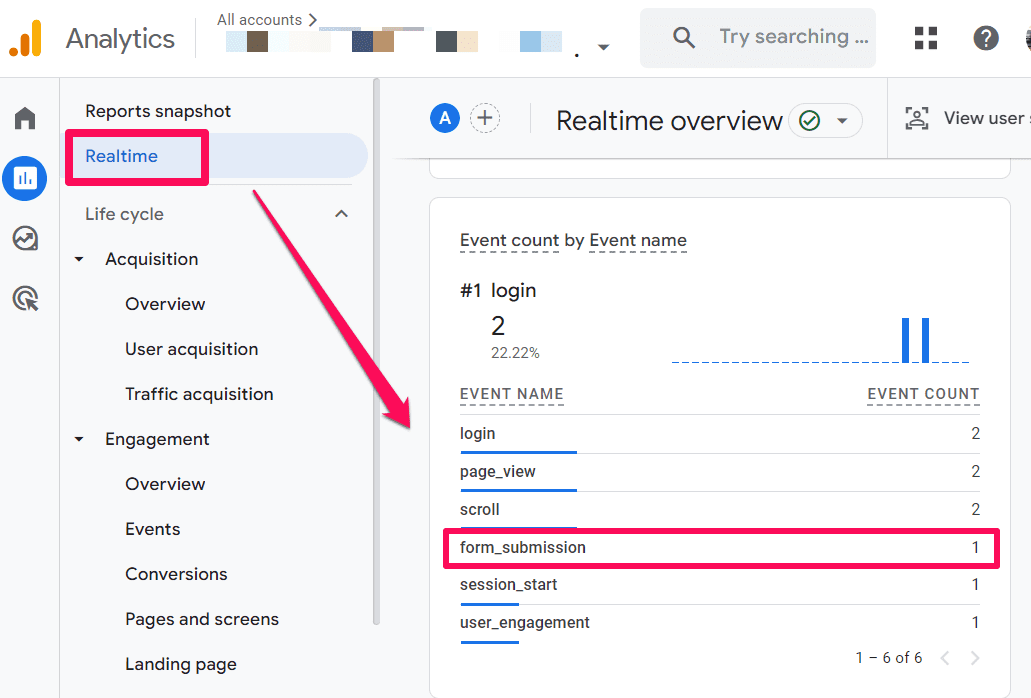
Save all the changes, refresh the GTM preview and debug mode, and submit the form. If you’ve set up the correct tracking, then the Preview and Debug page should show form_submission as one of the events recorded on the page.
Since it’s working here, you can proceed to publishing the container. Just to make sure that the event is being passed to GA4, perform the form submission again and navigate to the GA4 Reports > Realtime
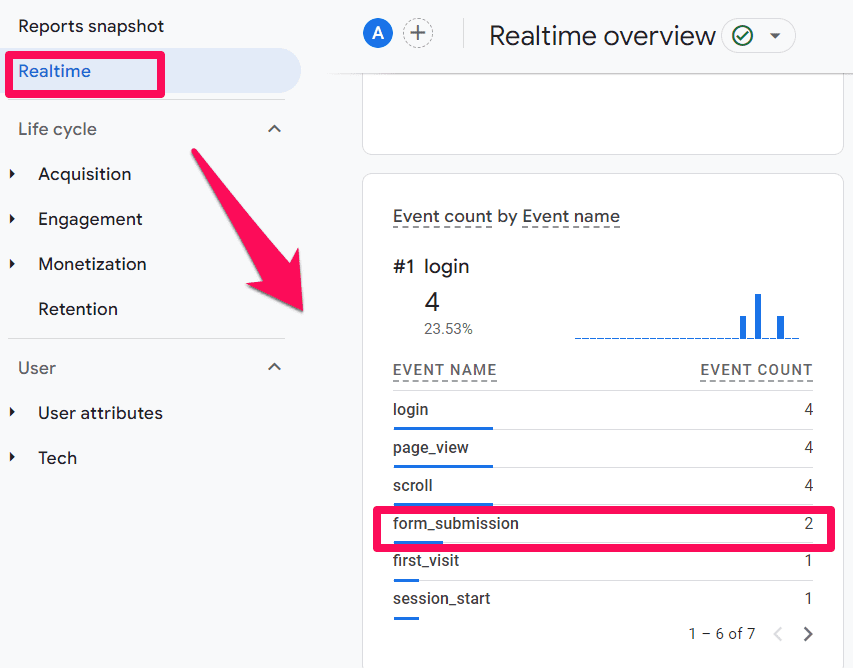
After you check and ensure everything is working correctly, don’t forget to publish the container.
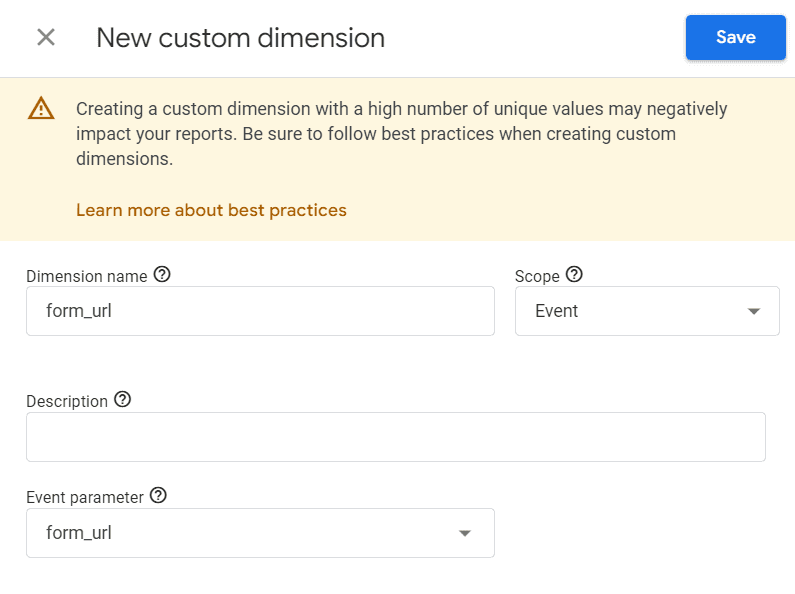
Now since you want to pass back the value contained in the form_url variable to GA4, you must add it as a custom dimension in the GA4 interface. How do you do that? It’s pretty simple; you just need to follow the below steps:
- Navigate to Admin > Data Display
- Select the Custom Definitions option
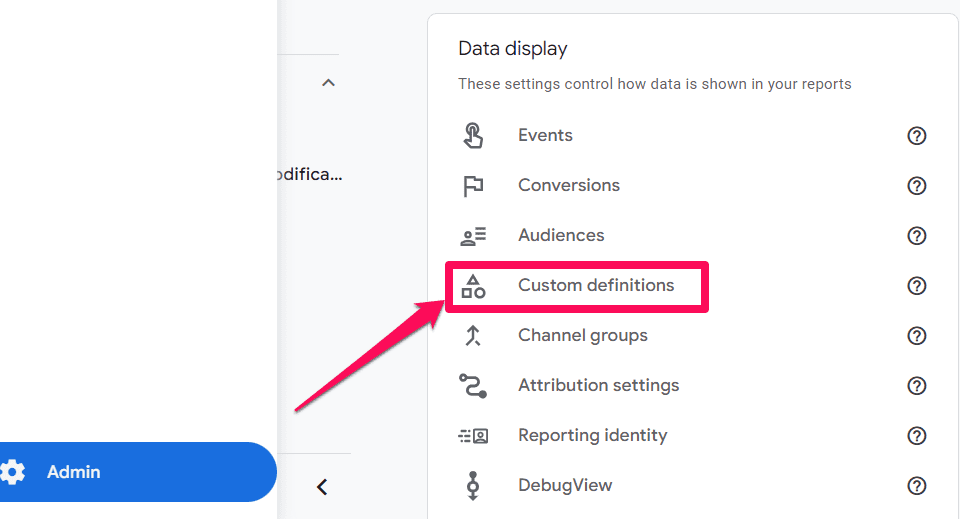

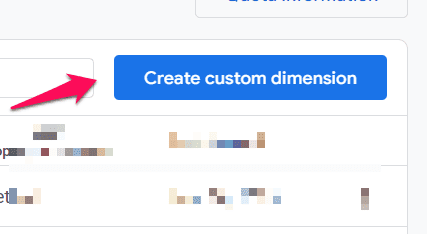
- Click on Create Custom Dimension, enter the details of the form_url variable and hit Save. That’s it!


Option #2. Working with a single-page application? Use Trigger Groups
Note: the solution I’m about to show you is not very scalable (unless you ask a developer to pass some additional info to the Data Layer. More on that – later). If you have just several forms and the number of them is not expected to grow fast, go ahead and use it. Otherwise, move on to another method.
If you are dealing with a Single Page Application, consider using Trigger Groups. This feature allows you to combine several triggers. If they all fire on the same page, the trigger group and all associated tags are activated.
Here’s the main idea:
- A visitor lands on a form “page” of your SPA. Trigger A is activated.
- A visitor lands on a “Thank you” page. Trigger B is activated.
If we include both triggers in a single Trigger group, your GA4 Event Tag could fire.
The reason why I put the word “page” into quotation marks is because Single Page application tracking usually involves Virtual Pageviews. Every time a visitor navigates from one section of your SPA to another, a virtual pageview is sent to Google Analytics.
There are various ways this can be implemented.
Let’s imagine that, in my case, I have asked a developer to push the information on every page to the Data Layer. That information looks like this:
window.dataLayer = window.dataLayer || [];
window.dataLayer.push({
'event' : 'virtualPageview',
'pageTitle' : 'Some page title',
'pagePath' : '/pages/some-page-with-form'
});
Then, I created two Data Layer variables (for the pagePath and pageTitle) and a Custom Event Trigger for the “virtualPageview”.
That custom event triggers a GA4 event tag on every “virtualPageview”. But this is too broad in our case (of tracking multiple forms and a single thank you page). We need to go deeper.
Let’s imagine one more thing in this example. There are two virtual pages with forms:
- /pages/download-an-ebook/
- /pages/download-a-checklist/
- …and one “Thank you” page /pages/thank-you/.
#2.1. Triggers
Now, let’s create triggers (warning: you’ll need to adapt the settings of the triggers to your project because there is a lot of flexibility/uniqueness in the setups of every SPA). One for the “Thank you” page:

And then create one for EACH form. Here’s an example of one trigger. Basically, I just enter the custom event name that represents a virtual pageview and then make it more precise by entering the form’s URL (pagePath or whatever you are using in your setup)
#2.2. Trigger groups
Then, it’s time for trigger groups. Since we have two forms, we’ll need two trigger groups. Go to Triggers > New > Trigger Group. Here’s an example of one trigger group. I included two triggers in it: one for the “Thank you” page and one for pageview related to a specific form.

You must create a separate trigger group for EVERY form you wish to track in your Single Page Application.
#2.3. Tags
Then, finally, create two tags (one for each form). The more forms you have, the more tags you’ll need to create. Assign one tag to one trigger group. Here’s an example of one tag.
Now, since you want to pass back the value contained in the form_name variable to GA4, you must add it as a custom dimension in the GA4 interface. How do you do that? It’s pretty simple; you just need to follow the below steps:
- Navigate to Admin > Data Display
- Select the Custom Definitions option

- Click on Create Custom Dimension, enter the details of the form_name variable and hit Save. That’s it!


#2.4. Test the setup
Save all the changes, refresh the GTM preview and debug mode, and submit the form. If you’ve set up the correct tracking, then the Preview and Debug page should show form_submission as one of the events recorded on the page.
Since it’s working here, you can proceed to publishing the container. Just to make sure that the event is being passed to GA4, perform the form submission again and navigate to the GA4 Reports > Realtime
If you want to see the event parameter passed with the event, click on the event and select the event parameter that you want to observe. If it works properly, it should pass the value of the form recorded in the cookie.
As you can see, this setup is not very scalable and can quickly clutter your container if you have many forms. For example, if you had ten forms, you’d need to create 11 triggers, ten trigger groups, and ten tags. Not an ideal solution
But for small websites, this still might be an option.

Option #3. Store the info of the last submitted form in a cookie
This method works if the Thank You page is on the same domain as the page on which the user submits the form. Subdomains don’t matter. If the form is available on www.example.com and the Thank you page is on app.example.com, that’s fine.
Also, this method is useful if the Referrer, for some reason, is not available or just needs to give us more info.
Here’s what we will do:
- When a form is submitted, we’ll store some information about the submitted form in a cookie. Examples: URL where the form is available, form ID, etc.
- When visitors land on a Thank you page, we’ll read the cookie and use that info in our GA Tag.
The reason why I am not using localStorage is that it is limited just to a single subdomain. And sometimes, thank you pages can be hosted on a different subdomain of the same domain.
#3.1. Set the cookie
There are several ways to set the cookie in Google Tag Manager (Custom HTML tag, Custom Template). In this case, I’ll use the Custom HTML tag
<script>

var cookieName = "gtm_formInfo"; // Name of your cookie
var cookieValue = "REPLACE THIS"; // Value of your cookie, we'll need to replace this
var expirationTime = 86400; // 24 hours in seconds
expirationTime = expirationTime * 1000; // Converts expirationtime to milliseconds
var date = new Date();
var dateTimeNow = date.getTime();

date.setTime(dateTimeNow + expirationTime); // Sets expiration time (Time now + one month)
var date = date.toUTCString(); // Converts milliseconds to UTC time string
document.cookie = cookieName+"="+cookieValue+"; SameSite=None; Secure; expires="+date+"; path=/; domain=." + location.hostname.replace(/^www\./i, ""); // Sets cookie for all subdomains

</script>
We need to insert some value about the form in this code. What kind of info do you have? You can use the Page Path variable if only one form per page exists. If you have another useful variable, feel free to use that.
The final code with the {{Page Path}} info will look like this
<script>

var cookieName = "gtm_formInfo"; // Name of your cookie
var cookieValue = {{Page Path}}; // Value of your cookie
var expirationTime = 86400; // 24 hours in seconds
expirationTime = expirationTime * 1000; // Converts expirationtime to milliseconds
var date = new Date();
var dateTimeNow = date.getTime();

date.setTime(dateTimeNow + expirationTime); // Sets expiration time (Time now + one month)
var date = date.toUTCString(); // Converts milliseconds to UTC time string
document.cookie = cookieName+"="+cookieValue+"; SameSite=None; Secure; expires="+date+"; path=/; domain=." + location.hostname.replace(/^www\./i, ""); // Sets cookie for all subdomains

</script>
This code will set the cookie that will expire in 24 hours (unless the visitor submits another form — then the previous value will be overwritten).
You can fire this code when, say, the submit button is clicked.
I usually advocate that tracking forms with the Click Trigger is a terrible idea, but in this case, we have yet to send any data to GA4. We are just storing the information about the most recent intention to submit a form.
Here is an example of the Click Trigger (if the button’s class is form-submit-button). Learn more about click tracking.
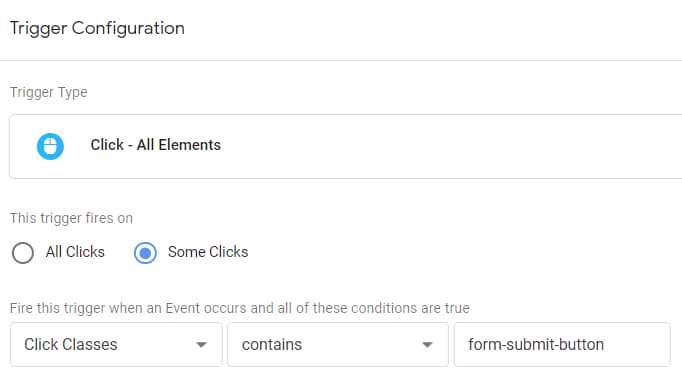
Yes, the example above might be too broad. Having an ID on a button would be a much better option (or some additional data attributes), but look at this more as a proof of concept. Assign this trigger to the Custom HTML tag.
#3.2. Check the cookie
After saving the trigger and the tag, enable/refresh the Preview and Debug mode in GTM and check whether this works. Click on the Form Submit button.
The Custom HTML tag should be activated on a Click Event. If yes, open your browser’s Developer Tools and then go to Application > Storage > Cookies > Select your domain. Then, enter gtm_formInfo in the search bar and check if the cookie is there.

Note: The screenshot above was taken from my Chrome. Other browsers will have a little different interface/naming.
#3.3. Create a 1st party cookie variable in Google Tag Manager
Go to Variables > New > 1st Party Cookie variable and enter the following settings (case-sensitive):
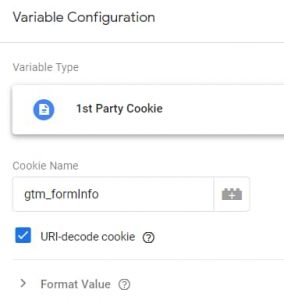
This variable will read the cookie you’ve just set in the previous section of this article.
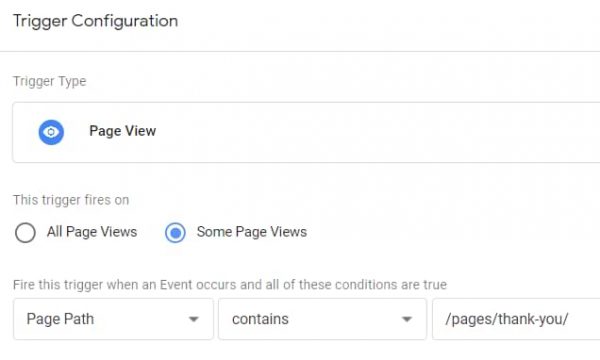
#3.4. Create a trigger
Create a Pageview trigger that activates on a “thank you” page. Say that the URL of your Thank you page is example.com/pages/thank-you/. In that case, the settings of the trigger could look like this:
#3.5. Create a tag
Last but not least, the tag. We need to send the form submission data to Google Analytics. The trigger will activate the tag when a visitor lands on a “Thank you” page. Here are the settings of that tag:
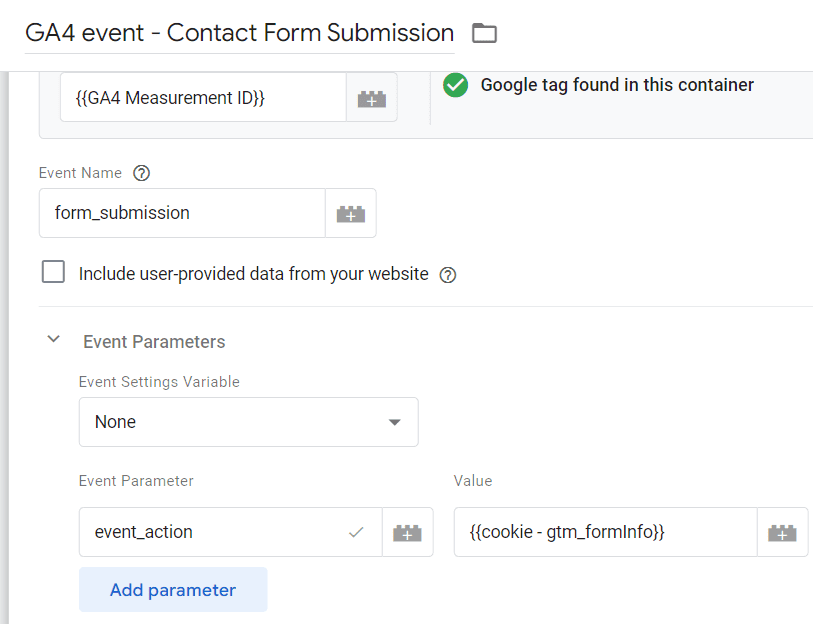
You can use a different naming convention if you wish. Assign the previously created Pageview trigger to this tag.
Now, since you want to pass back the value contained in the form_url variable to GA4, you must add it as a custom dimension in the GA4 interface. How do you do that? It’s pretty simple; you just need to follow the below steps:
- Navigate to Admin > Data Display
- Select the Custom Definitions option
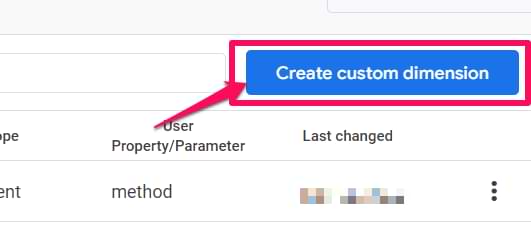

- Click on Create Custom Dimension, enter the details of the form_url variable and hit Save. That’s it!


So, to sum up, when a visitor clicks the Form Submit button, we will store the Page Path in a cookie. When the visitor lands on a “Thank you” page, we’ll take the info of that cookie and use it in the GA Event Tag.
#3.6. Test the setup
Save all the changes, refresh the GTM preview and debug mode, and submit the form once again.
The Preview and Debug page should show form_submission as one of the events recorded on the page.
Since it’s working here, you can proceed to publishing the container. Just to make sure that the event is being passed to GA4, perform the form submission again and navigate to the GA4 Reports > Realtime
Option #4. Can you change the URL of the Thank you page yourself?
The following tracking method is a good option if:
- You are using a flexible form plugin that allows you to change the URL of a “Thank you” page for every single form individually.
- AND the number of new forms isn’t growing very rapidly
- AND if the number of existing forms is not crazy high,
Here’s the deal. You’ll still be using the same “Thank you” page. But instead of a regular /thank-you/ address, you will also add a URL parameter to it, for example, formName. While the “Thank you” page is the same, each form’s URL will differ slightly.
For example, if you have a Thank you page of which the URL is example.com/pages/thank-you/ but you have five forms, the Thank you page URL of each form could look like this:
- example.com/pages/thank-you/?formName=form1
- example.com/pages/thank-you/?formName=form2
- example.com/pages/thank-you/?formName=form3
- example.com/pages/thank-you/?formName=form4
- example.com/pages/thank-you/?formName=form5
You can choose any other (more meaningful value) instead of just “form1”. What we will do next is to create a URL Variable that will return the value of formName, and we will use it in the GA Event Tag.
Now, go through every form on your website and change the URL of the “Thank you” page. I will not provide instructions here because every form plugin or content management system (CMS) will require different steps.
#4.1. Create a URL variable.
In GTM, go to Variables > New > URL variable and enter the following settings:

If you use a different parameter name (instead of formName), enter it in the variable’s settings.
#4.2. Create a Trigger
Once again, we will be using the same Pageview trigger that I mentioned several times in the previous sections. If we follow the URL example I previously mentioned (https://example.com/pages/thank-you/), your trigger settings could look like this:
#4.3. Create a Tag
Go to Tags > New > Google Analytics: GA4 Event and enter the following settings:
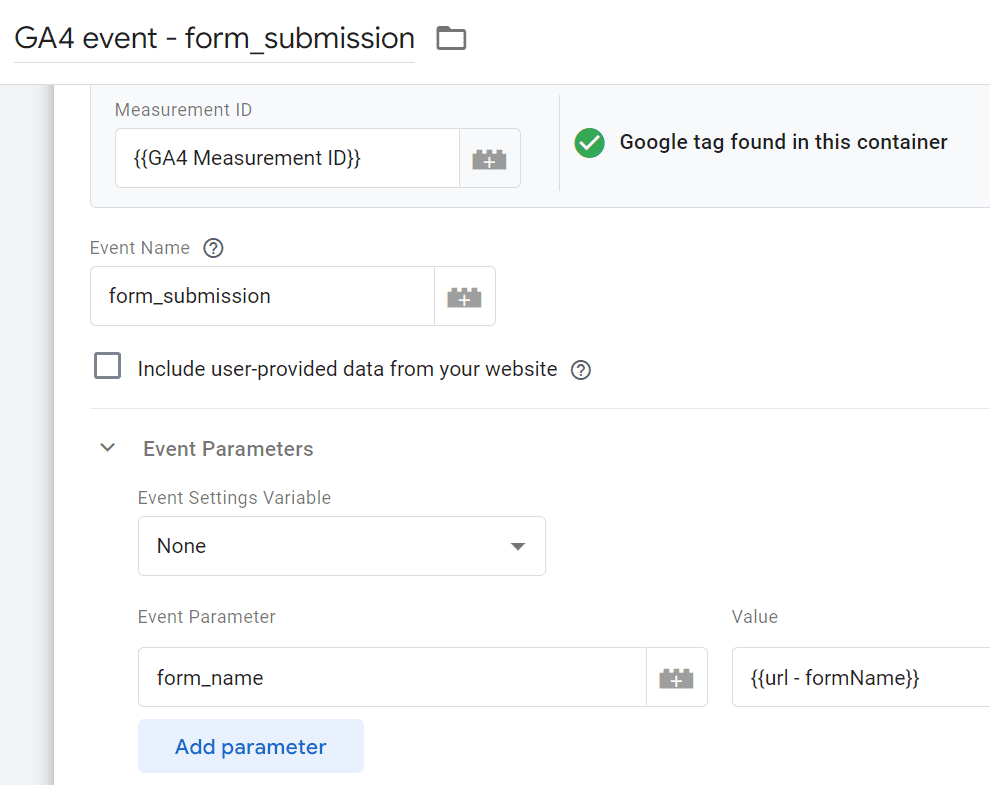
This tag will fire when a visitor lands on a “Thank you” page. In the form_name field, I inserted the previously created URL Variable. It will return the value of the form_name parameter that is visible in the URL of every Thank you page.
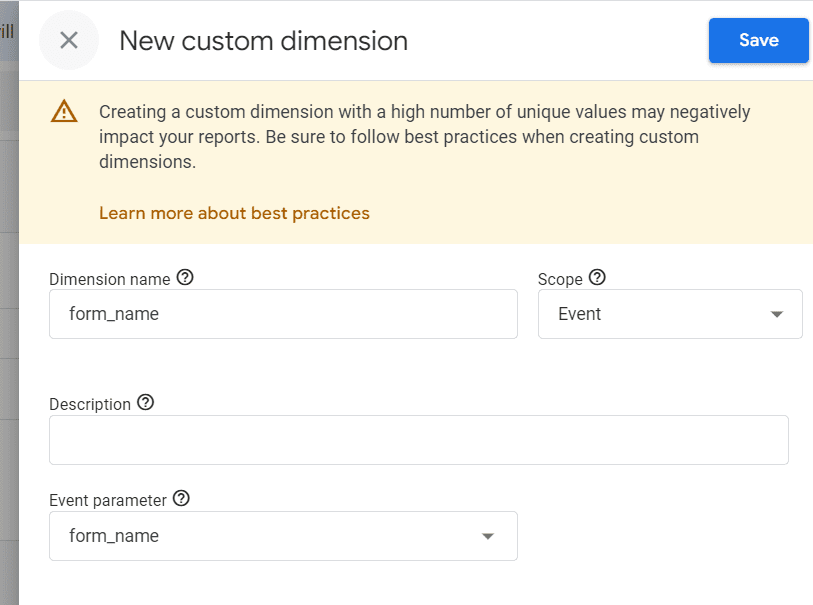
Now since you want to pass back the value contained in the form_name variable to GA4, you must add it as a custom dimension in the GA4 interface. How do you do that? It’s pretty simple; you just need to follow the below steps:
- Navigate to Admin > Data Display
- Select the Custom Definitions option

- Click on Create Custom Dimension, enter the details of the form_name variable and hit Save. That’s it!


#4.4. Test the setup
Save all the changes, refresh the GTM preview and debug mode, and submit the form once again. The Preview and Debug page should show form_submission as one of the events recorded on the page.
Since it’s working here, you can proceed to publishing the container. Just to make sure that the event is being passed to GA4, perform the form submission again and navigate to the GA4 Reports > Realtime
After you check and ensure everything is working properly, don’t forget to publish the container.

Option #5. Cooperate with developers
If none of the previously mentioned options worked for you, you should ask for the developer’s help. Here are several options that come to my mind right now:
- Ask a developer to decorate the URL of every “Thank you” page. Ask them to include a particular parameter indicating which form was submitted. This is pretty much the method #5 from this blog post. The main difference is that maybe you are working on a site where you cannot change the URLs by yourself, thus asking for the developer’s help.
- Ask a developer to push the information about the form submission to the Data Layer of the “Thank you” page. Here is a sample code that your developer could implement:
<script>
window.dataLayer = window.dataLayer || [];
window.dataLayer.push({
'event': 'formSubmission',
'formName': 'some form name' //this should be replace with an actual form name
});
</script>
When this is done, then you should create a custom event trigger, Data Layer Variable and a GA Event tag.
Custom Event Trigger’s settings:
- Trigger title – custom – formSubmission
- Event name – formSubmission
- Fire on all custom events
Data Layer Variable’s settings:
- Title – dlv – formName
- Data Layer Variable name – formName
- Version 2
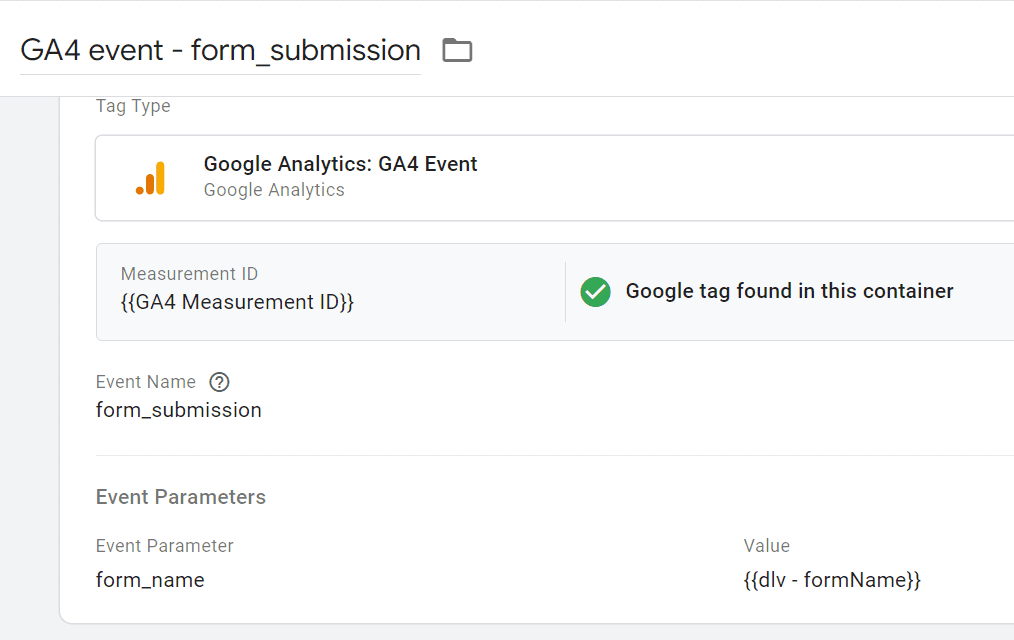
Finally, create the GA Event Tag with the following configuration, assign the previously created Custom Event Trigger, insert the Data Layer Variable (it is surrounded by {{ }})
Remember – to send the details captured by the form_name variable, you must add it as a custom dimension to GA4. The steps to do the same are listed below:
- Navigate to Admin > Data Display
- Select the Custom Definitions option

- Click on Create Custom Dimension, enter the details of the form_name variable and hit Save. That’s it!

#5.1. Test the setup.
Save all the changes, refresh the GTM preview and debug mode, and submit the form. The Preview and Debug page should show form_submission as one of the events recorded on the page.
Since it’s working here, you can proceed to publishing the container. Just to make sure that the event is being passed to GA4, perform the form submission again and navigate to the GA4 Reports > Realtime
After you check and ensure everything is working properly, don’t forget to publish the container.
Where can I find this data in my regular Google Analytics 4 reports?
There are two places where you can see the details of all events tracked on your website.
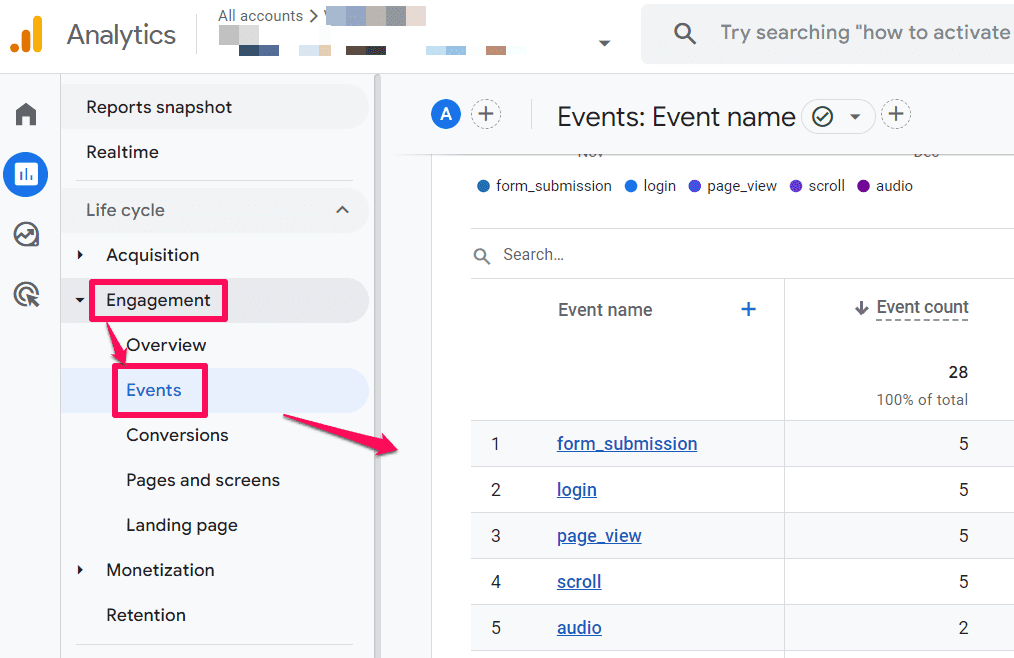
- All of these events will appear in Reports > Engagement > Events. Here, you can play around with the event data as you wish.

- The second option is to create a new exploration report. Navigate to Explore and select Blank Exploration. Exploration reports are also more detailed, and I recommend learning how to use them for all reporting purposes. Here’s a detailed article on how to create exploration reports.
How to track multiple forms with one Thank You page: Final Words
And there you have it. If you are dealing with numerous forms that redirect a visitor to the same “Thank you” page. Hopefully, one of these methods will help.
Personally, I’d try working with the Referrer variable first (because it requires less work compared to other methods).
If that does not work, I will store the info in a cookie or edit the URLs of the Thank you page (by adding some parameters). Or keep looking for the information about the previous page in the Data Layer.
If none of that worked, I would probably cooperate with developers closer.
Other methods should be considered as plan B.
13 COMMENTS
Thanks for this information. I wanted to know is it possible to track if a signup lead (conversion) came from a google ad? Rather then a conversion or signup lead that comes from organic traffic?
Could you point me to a tutorial that you posted explaining this? if not, is there somewhere i can get information on this?
Hi, if this happened during the same GA session, GA will automatically be able to identify that it was from paid ads.
I was also wandering for option 5, won't it overwrite some other parameters such as utm or glcic? Or does it keep both indication (form name + utm for example)?
thx for the article
You wouldn't see gclid and other parameters anyway. They are always visible only on the landing page URL and when a visitor moves to a Thank you page, they are not displayed anymore.
Hi Julius, great post like always!
One thing, what if the referrer link has personal information like the email of the person that submits the form? Wouldn't that be a problem?
What is the best approach you think of to solve it?
Thank you, and greetings!
This is the leak of personal information. Ask a developer to not include the email address.
Hi Julius,
Great info. Would like to know if we can associate the events to Goals, so that we can get the data in conversions. How to do so?
This is a very long and complicated procedure which are not suitable for non-techies. It is needed the help of web developer to put all the codes and then make triggers on GTM. Can you please make a YouTube on that specific topic to simplify the process for non-technical and non-programmers?? Thanks
Hi, welcome to the world of Google Tag Manager. It is not as simple as some people might expect. If options (that do not require developers) are too complex, then ask a developer to push the needed information to the data layer. This is the least technical option (but requires developers). I don't have plans for recording a video on this (at least now).
If you want to work with GTM, you will eventually need to become more technical.
Dude! This is awesome. I came back several time and kept shying away from the 1-st party cookie solution. And my problem was getting Google Ads conversions for one TY page, not data for UA.
I slightly modified your process to fire a Google Ads conversion tag instead of the UA tag. I made the 1st party cookie, stored the page path and used that to trigger the correct one of 3 conversions.
I needed this because the client only has one, single identical thank you page for all 3 pages with forms on them. So without this fix all three conversions would fire simultaneously and show in Google Ads no matter which form/page they filled out.
Now I only get the correct form/page conversion when the fill one out. Not 3 duplicates.
Nice and thank you !!!
Is the "referrer" method still the way to go with GA4?
Thanks!
GA4 changes nothing here
Hello Julius,
First of all, congrats on another wonderful and super useful post! ;) I've been following you for a while, and you're doing an amazing job providing free knowledge to all the marketers out there trying to navigate the ever-changing landscape of digital analytics.
I have a question for you. We've been experiencing some inconsistency in our Google Ads conversions, and our digital agency has identified a potential connection with the load time of our Thank You Page. In other words, when a lead clicks on the "Submit" button, the Thank You message's load time is so long that they leave the page before the "process" is completed. This signals to the algorithm that the ad is not successful and pulls us down in the competition against our rivals, resulting in a drop in conversions for our campaigns.
A possible solution the agency has proposed is to change the Google Tag Manager (GTM) trigger from the OneTrustGroupsUpdate to the form_submit, but that could lead to a lot of "false conversions" and create a mess with our data. What would be your advice on this? Thank you a lot!