November 21, 2025
Track Hubspot booking with Google Analytics 4 and Google Tag Manager
Updated: November 21st, 2025
If you are already tracking other Hubspot lead forms, you may have noticed that, unfortunately, this tracking will not capture meeting bookings; you need to implement a different setup! Luckily, you can do this on your own without any help from a developer.
We will break down this process into two steps (with lots of testing in between):
- Add an event listener in Google Tag Manager to check for messages containing information on a successful meeting booking and send this information to the Data Layer.
- Create a GA4 tag to collect the data from the Data Layer and send it to Google Analytics 4.
Let’s learn how to track Hubspot booking forms with GA4 and GTM!

Table of Contents
Here’s what you will learn in this article
Video tutorial
If you prefer video content, here’s a tutorial from my YouTube channel.
Prerequisites
Before we begin, this tutorial assumes you have already completed the following:
- You have Google Tag Manager installed on a website
- You have installed GA4 on your website using Google Tag Manager
- You are familiar with creating tags, triggers, and variables in GTM. If not, check out the Google Tag Manager Tutorial for Beginners.
Go back and review the mentioned articles if you don’t feel like you are ready yet.
Add custom code to GTM container
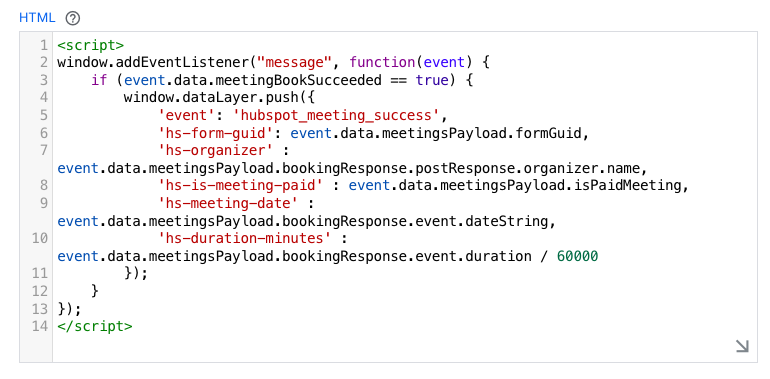
The JavaScript code below adds an event listener to the window object, which listens for messages from your site. When a message is received, it checks if the message contains data indicating a successful meeting booking and, if it is, pushes data related to the booking into the Data Layer.
The code for the Hubspot Meetings Listener is (thanks to Benjamin Juling for the contribution):
<script>
window.addEventListener("message", function(event) {
  if (event.data.meetingBookSucceeded === true) {
    var payload = event.data.meetingsPayload;
    var bookingResponse = payload && payload.bookingResponse;
    var postResponse = bookingResponse && bookingResponse.postResponse;
    var eventData = bookingResponse && bookingResponse.event;
    var organizer = postResponse && postResponse.organizer;
    var contact = postResponse && postResponse.contact;

    window.dataLayer.push({
      'event': 'hubspot_meeting_success',
      'hs-form-guid': (payload && payload.formGuid) || '',
      'hs-organizer': (organizer && organizer.name) || '',
      'hs-is-meeting-paid': (payload && payload.isPaidMeeting) || false,
      'hs-meeting-form-email': (contact && contact.email) || '',
      'hs-meeting-form-firstname': (contact && contact.firstName) || '',
      'hs-meeting-form-lastname': (contact && contact.lastName) || '',
      'hs-meeting-date': (eventData && eventData.dateString) || '',
      'hs-duration-minutes': (eventData && eventData.duration) ? (eventData.duration / 60000) : 0
    });
  }
});
</script>
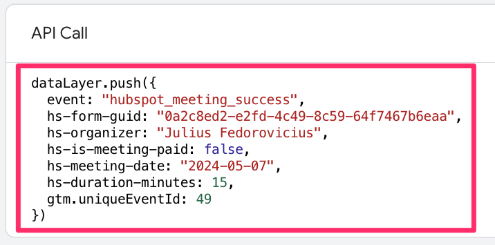
When successful, this code pushes the following data points to the Data Layer, which you can capture:
| Data Layer Variable Name | Example Value |
Description |
| event | hubspot_meeting_success | The custom event name for our trigger. |
| hs-form-guid | a1b2c3d4-…. | The unique ID of the Hubspot meeting form. |
| hs-organizer | Julius Fedorovicius | The name of the meeting host. |
| hs-is-meeting-paid | false | true or false if the meeting required payment. |
| hs-meeting-form-email | [email protected] | The email the user submitted. |
| hs-meeting-form-firstname | John | The first name submitted. |
| hs-meeting-form-lastname | Doe | The last name submitted. |
| hs-meeting-date | 2025-10-20 | The date of the booked meeting. |
| hs-duration-minutes | 30 | The length of the meeting in minutes. |
In the next steps, we will create Data Layer Variables in GTM to capture some of these.
Update: this listener has been later updated to push more data to the data layer (if you need it). However, the subsequent steps and screenshots of this article might still refer to the older version of the listener.
You must add the event listener to your Google Tag Manager container. In GTM, go to Tags in the left-side navigation and click “New”.

Select Tag Configuration, then choose Custom HTML tag.
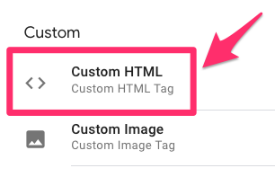
Paste the Hubspot Meetings Listener (the code from above) in the textbox.
Scroll down to the Triggering section. Here, you have two options depending on what suits your needs better: (1) Trigger the event on all pages or (2) Trigger the event on some pages.
If you just want to trigger that event on all pages, select the “All pages” Page View trigger that is automatically in your GTM container.
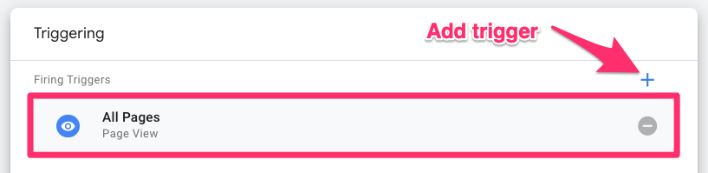
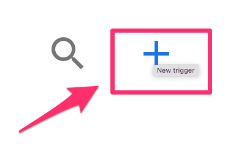
Otherwise, if you want only to trigger the event on certain pages, click the plus sign to add a trigger. Then, on the “Choose a trigger” page, click the plus sign (again) to create a new trigger.
Click “Trigger Configuration” and select the “Page View” trigger type. Fill in the information needed to capture the page(s) you’re interested in. Be sure to select “Some Page Views” under “This trigger fires on” to prompt the filter.
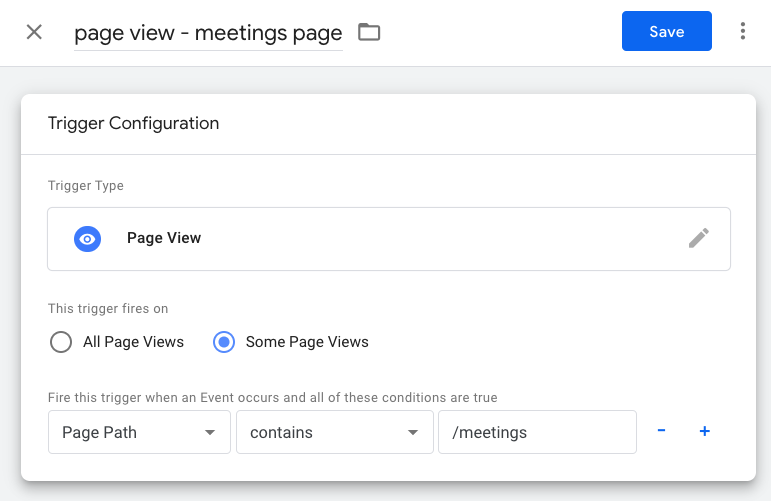
Name your trigger (using proper naming convention) and save.
Now that you have the trigger in the tag, name it “cHTML – Hubspot Meeting listener” (cHTML = custom HTML) and save.

Step 1 is almost done. Let’s test to make sure our code works.
Test custom code
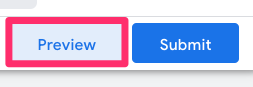
Preview the GTM container by clicking the “Preview” button in the top-left of the interface.
Enter your website’s URL and complete the Hubspot meeting booking. Once you see the success message, go to Preview mode and check for the hubspot_meeting_success event (dataLayer push).
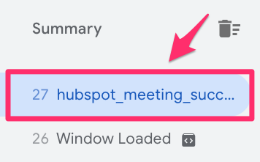
View the information collected with the event and check that it aligns with your submission.

In the next step, we will create the GA4 tag to collect and send information to GA4 so you can decide which (if not all) of this information you want to track and report on.
Do you need help with Preview mode? Check out this article.
Create GA4 event & find data in reports
By adding the custom code to our GTM container, we have made the information we want to track available in the Data Layer. However, we still need to create an event to actually collect and send the data to Google Analytics 4.
Creating an event has three parts: the tag, triggers and parameters. We’ll start by creating the trigger and parameters and then add these to the tag.
Create trigger
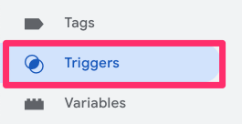
To create a trigger, go to Triggers in the left-side navigation of GTM and click the “New” button.
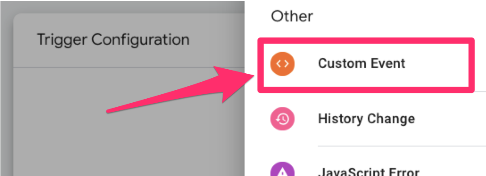
Click “Trigger Configuration” and select “Custom Event” under Other.
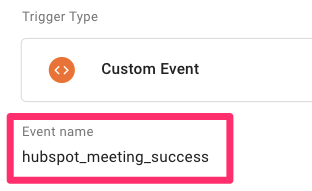
In the Event name textbox, enter the event name as it is in the event listener code from before – “hubspot_meeting_success”. It’s very important that it’s exactly the same, so make sure you double-check this before saving!
Name the trigger “custom – hubspot_meeting_success” and save.
Create Data Layer variables
Depending on what information you have decided to track with the meeting booking success event, you must create Data Layer variables to send this data to GA4. Remember, this is the information collected with the event that you can choose from:
In GTM, go to Variables in the left-side navigation and click “New” under the User-Defined Variables. Sound familiar, yet?

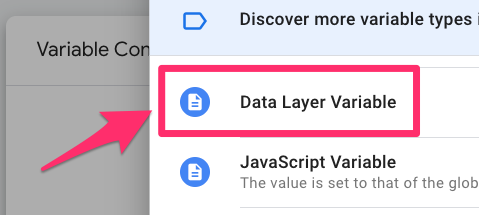
Click the “Variable Configuration” and select “Data Layer Variable”.
Depending on which variables you have chosen to collect, you will (1) input the exact name of the variable from the code above and (2) name the variable “dlv – {variable name}” and save.
For this example, I will create Data Layer variables for hs-organizer and hs-duration-minutes.

Now, let’s put it all together!
Create tag
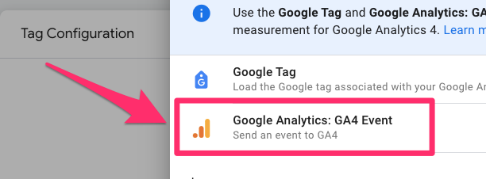
All that’s left to do now is create the tag. The steps will be very similar to when we made the custom HTML tag. Select the Tags item in the left-side navigation and click “New” to create a new tag. For the Tag Configuration, select Google Analytics > GA4 Event.
Measurement ID
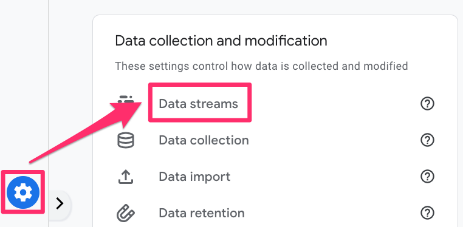
If you don’t have your measurement ID saved as a constant in your container, you need to find it in your Google Analytics 4 data stream. Go to the GA4 interface, then Admin > Data collection and modification > Data streams.
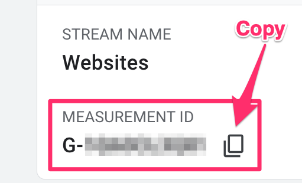
Click the data stream you are interested in and find the measurement ID.
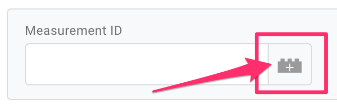
To keep your container more organized, you will want to create a new Constant variable to hold the measurement ID. Click to add a new variable.
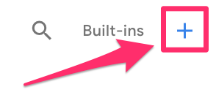
Then, click on the plus in the top right to create a new variable.
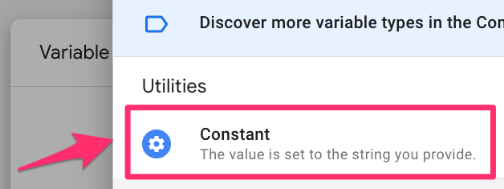
Click on Variable Configuration and select “Constant” as the variable type.
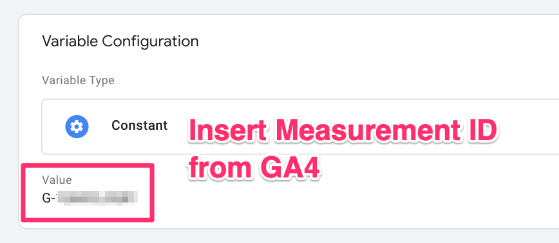
Copy the Measurement ID and paste it into the Value of the constant variable. Save your new variable as “Constant – G-XXXXXXXXXX” (or whatever makes sense to you). Read this blog post to learn more about the constant variable in Google Analytics 4.
Add the other elements
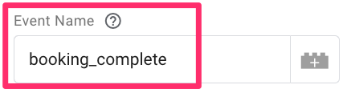
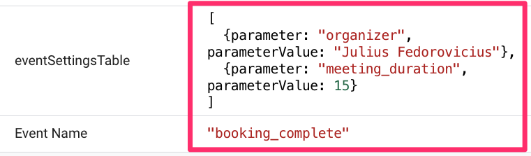
We’ve already done all the hard work, so we just need to put it all together. First, you can add an event name, e.g. “booking_complete”.
Next, you want to add the Event Settings Variable (check out the article if you don’t have this set up yet) and the parameters to the event. You can add the Data Layer variables you created to the event setting variable or just add them directly to the event. For me, these parameters are specific to this event, so I will just add them directly to the tag.
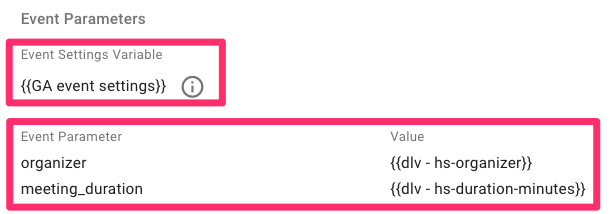
The Event Parameter doesn’t necessarily have to match exactly what’s in the Data Layer. Keep in mind that GA4 will only accept letters, numbers, or underscores for parameter names.
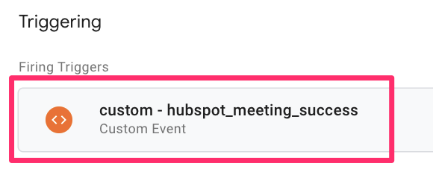
Lastly, add the trigger.
Name the event “GA4 event – booking_complete”, save it, and let’s check to see if it works!
Test new event
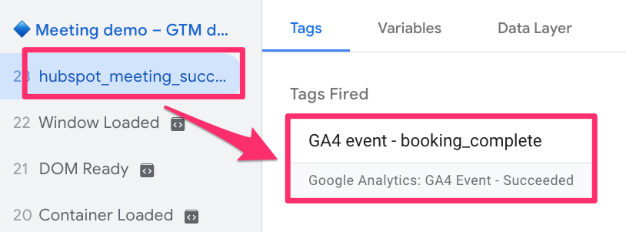
Just like when we tested the custom HTML tag, preview the GTM container > enter your website’s URL > complete the Hubspot meeting booking.
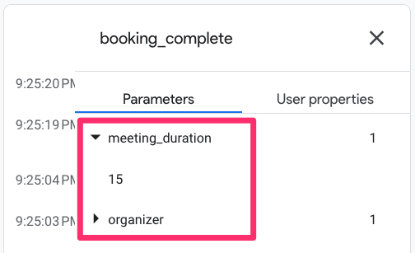
Once you see the success message, go to Preview mode and check for the hubspot_meeting_success event (dataLayer push). You should see your tag under “Tags Fired”.
Select the tag and check that the parameters collect the expected information.
You can also go to DebugView in Google Analytics 4 to confirm that there is incoming data. To get there, go to Admin > Data Display > DebugView and check that you see the event.

You can click on the event to see the collected parameters. Confirm that you see the parameters that you added to the event.
Are you having issues with Debugview? Check out this article.

Create event-scoped custom dimensions
If you want to be able to report on the parameters in the event in GA4, then you need to registerthe parameters as event-scoped custom dimensions.
In GA4, go to Admin > Data Display > Custom Dimensions. Click “Create Custom Dimension”.

There are three elements that you need to consider:
- The Dimension name is the name that will be displayed in GA4 reports
- The Event property needs to be the same name as in Google Tag Manager
- Set the scope to “Event”
You will complete this process for each parameter you include in your event.

Publish Container
You can publish the container now that you have set up and tested your GA4 tag. Be sure to name the container and give it a description so you can quickly find it when you make this update if there are any issues.

Find data in GA4
Once you have published your GTM, you need to wait at least 24 hours for GA4 to process the data for your new event.
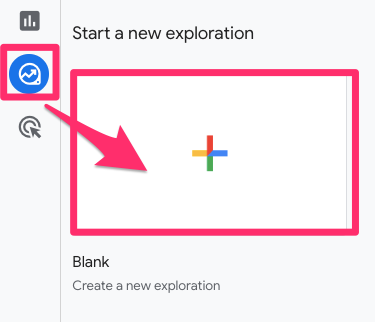
To view the incoming data, create a GA4 Exploration by going to Explore in the left-side navigation. Click “Blank” to start a new report.
To this report, select the following dimensions, metrics, and filters (click the plus sign next to the element):
- Dimensions: Event name, Organizer, Meeting duration
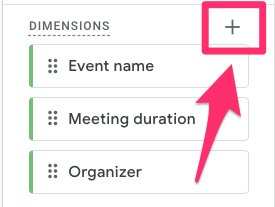

- Metrics: Event count, Total users


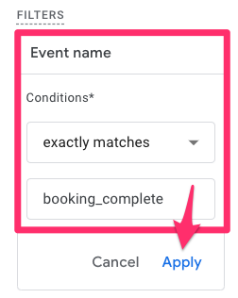
- Filter: Event name “exactly matches” booking_complete

Add each of these elements to the report by dragging the dimensions (you can exclude the Event name since it was included just for the filter) to the Rows and the metrics to the Values (or just double-click on each dimension and metric).

Is the event data not showing up in GA4 reports? Check out this article for some solutions.
Track Hubspot booking with GA4 and GTM: Final Thoughts
And there we have it! If you’ve been wondering how to track Hubspot meeting bookings with GA4, hopefully, this tutorial has answered your questions about how to do it and how to see the data afterward.
Just remember that Hubspot booking forms require a different listener rather than regular Hubspot forms. On my YouTube channel, I have a video talking about regular forms. It’s an older video but the listener there can still be easily adapted to GA4.
If you need a quick recap, here are the key points to remember:
- Different listener required: HubSpot Meeting forms are in an <iframe> and require a special postMessage listener. This is different from the listener used for regular HubSpot contact forms.
- Register custom dimensions: To use your custom parameters (like organizer or meeting_duration) in GA4 reports, you must register them as event-scoped custom dimensions.
- Mark as key event: To measure this booking as a business goal, you must mark your new booking_complete event as a “Key Event” in the GA4 Admin panel.
2 COMMENTS
Hi!
I suppose you took the parameter "meetingBookSucceeded" and value "true" not from the head.
Could you explain how to see and identify which parameters the event "message" sends in the console or using a specific extension?
I've explored the JS HS code where I've found "meetingBookSucceeded" but it's not clear the values of this parameter.
I have the same questions about data.meetingsPayload.bookingResponse.postResponse.organizer.name and so on.
I've got that this represents some kind of hierarchy but how can I see it in readable format before writing some custom code?
Thanks!
Hey there,
Thanks for this great tutorial once again!
1. We use framer and it seems like the way the Hubspot scheduler is embedded in the iFrame, it stops it from communicating with GTM. Any solutions for this?
2. We're interested in sending this data to our Meta Pixel and not GA4, any other tutorials you can reference to help me with that part?