
January 3, 2026
Google Tag Manager Data Layer Explained
Updated: January 3rd, 2026
The Data layer is one of the key concepts in the world of Google Tag Manager. When you fully utilize the Data Layer, it is the fastest way to level up your data collection across web properties (in fact, a broken data layer = severely crippled GTM).
At first, the Google Tag Manager Data Layer might seem like one of those mysterious concepts that no one understands (by saying “no one”, I mean non-developers). But if you stay focused, it’s a concept that’s possible to grasp.
Of course, it takes a while to understand how everything works, but once you get the idea, the puzzle pieces start to resemble the bigger picture. It just requires some time.
The purpose of this blog post is to educate non-developers on how they can master GTM and have extensive control of Google Analytics, Google Ads, or other implementations.
And don’t limit yourself only to those two tools. You can connect GTM with many other online tools (but we’ll talk about that in other blog posts).
Table of Contents
– Hide table of contents –
- #1. How does the Google tag manager Data Layer work?
- #2. How to implement Data Layer
- #3. How GTM uses Data Layer’s information/content?
- #4. Example No.1: using data from the Data Layer in GTM and GA4
- #5. Using Data Layer in triggering
- #6. Example No.2: using Data Layer events as triggering conditions
- Frequently asked questions
- Conclusion
Before we continue: Data Layer is also explained in my GTM courses
If you prefer video material over lengthy blog posts, my Google Tag Manager courses go deeper into the Data Layer:
- Google Tag Manager Masterclass for Beginners explains the essentials of the Data Layer, why it is important in GTM, and how to use it properly. You can also practice and interact with the data layer here.
- The Intermediate Google Tag Manager course goes even deeper into the Data Layer (explaining even some technical aspects behind the DL). Also, the course teaches some nuances not covered in the blog post.
- JavaScript for Google Tag Manager is the most advanced course of these three. It teaches you various techniques for manipulating data from the data layer with JavaScript.
Video tutorial
If you prefer video content, here is a tutorial from my Youtube channel.
#1. How does the Google tag manager Data Layer work?
Before we continue, a quick note: I will interchangeably use dataLayer and Data Layer in this article. FYI – they are the same thing.
Technically speaking, a Google Tag Manager Data Layer is a JavaScript array that temporarily stores the information you need. Google Tag Manager then uses that data in tag/triggers/variables (later, other tools like Google Analytics and Meta Pixel can also use that data).
In plain English, a Data Layer is like a virtual layer of your website, which contains various data points, and GTM uses them (Get it? That’s why it’s called a data layer.). Regular visitors don’t see that because it is not something openly displayed. But if you know how it’s fairly simple to view its contents.
You don’t need any special tools to see the Data Layer. You can view it on any website using your browser’s built-in developer tools. Here’s how:
- Right-click anywhere on the webpage and select “Inspect” to open the developer tools.
- Click on the “Console” tab.
- Type dataLayer into the console and press Enter.
This will display the current state of the dataLayer array. You can click the small triangles to expand the different objects and see exactly what data has been pushed, including GTM’s own events like gtm.js and gtm.dom.
Think of the Data Layer as a bucket. That bucket can contain little ping pong balls, where every ball contains some information, e.g., a user ID, information about the clicked element, purchase ID, page category, etc.
Google Tag Manager heavily relies on what is within that bucket (especially when you have complex user journeys and want to track them accurately).
For example, specific click information can act as a triggering condition for Google Tag Manager. Or you could A/B test which forms on your website drive more lead signups using a unique Form ID variable. You could then send this information to GA4 for reporting purposes.
Anyone/anything can put those “data balls” in the Data Layer. It might be a 3rd party plugin or custom code created by your developer; even Google Tag Manager can push the information from the Data Layer.
Let’s take the example of tracking purchases on your website. One of the possible solutions could be to ask a developer to push the order information to the Data Layer after a successful order/purchase. The information that a developer could push to the Data Layer is (but is not limited to):
- Transaction ID
- Transaction total
- Transaction revenue
- Transaction taxes
- Purchased products, their quantity, product IDs, etc.
In a nutshell, here’s how GTM and Data Layer work:

In many cases (at least from my experience), implementing the Data Layer is not a common activity for developers. Not all websites have or need an active Data layer. Implementing a Data Layer comes into the picture when marketing needs to use Tag Management tools like Google Tag Manager.
Therefore, be prepared for a blank look from your developer when you ask them to “add product information to the Data Layer”.
That’s why my philosophy is that digital marketers/analysts should know/understand what Data Layer is and how it works. Communication between you and the devs becomes much more fluent.
In further chapters of this blog post, we’ll look at what Data Layer is in Google Tag Manager, how to configure it (if you need it), how to use it in your tag management, etc.).
#2. How to implement Data Layer
I often get questions about how to create a data layer. If you don’t plan to use any custom data in your tag manager (e.g., user ID, product ID, etc.), you don’t need to do anything additional on your website.
When the GTM container’s JavaScript Snippet is placed in your website’s source code, a basic Data Layer is initiated automatically every time a visitor lands on your site.
You don’t need to add anything additional. However, if you need to collect custom information, continue reading. I’ll show you how to create/implement a data layer. Just beware that usually, this is the developer’s responsibility.
Here’s an example of GTM’s container snippet.
<head>
<!-- Google Tag Manager -->
<script>(function(w,d,s,l,i){w[l]=w[l]||[];w[l].push({'gtm.start':
new Date().getTime(),event:'gtm.js'});var f=d.getElementsByTagName(s)[0],
j=d.createElement(s),dl=l!='dataLayer'?'&l='+l:'';j.async=true;j.src=
'https://www.googletagmanager.com/gtm.js?id='+i+dl;f.parentNode.insertBefore(j,f);
})(window,document,'script','dataLayer','GTM-XXXXXXX');</script>
<!-- End Google Tag Manager -->
</head>
This code is just one half of the puzzle. There’s also a noscript part. But since our main topic today is Data Layer, let’s focus only on the <script>.
The aforementioned <script> GTM code will create a Data Layer on a page. You can even see the dataLayer mentioned in the code. If the Data Layer exists on a page, this container snippet will adapt and continue using the existing layer.
#2.1. Data Layer declaration vs dataLayer.push
Now, let’s talk about actually putting data into the Data Layer. By default, Data Layer is just an empty bucket once created. The magic starts when someone/something starts putting useful data/info in for Google Tag Manager to use.
There are two ways to add data to the Data Layer:
- By adding a dataLayer snippet above the GTM container snippet. This step is called “Data Layer declaration”.
- Or by pushing data with dataLayer.push method.
What’s the difference, you ask?
The key difference is that dataLayer.push() is a safer and more flexible method that adds information to the existing data layer, while the declaration method (dataLayer = []) overwrites it, which can break your tracking.
| dataLayer Declaration (dataLayer = […]) |
dataLayer.push() |
|
| How it works | Re-creates and overwrites the entire data layer array. | Appends new data to the existing data layer array without deleting previous data. |
| Code Placement | Must be placed above the GTM container snippet. If placed below, it will break GTM’s event tracking. | Can be placed anywhere on the page, above or below the GTM container snippet. |
| Use Case | Primarily for pushing data that needs to be available at the very moment the GTM container loads. | The universally recommended method for all situations, especially for tracking user interactions that happen after the page has loaded (like clicks or form submissions). |
| Recommendation | Not Recommended. GTM specialists advise against using this method due to its high risk of breaking your tracking setup. | Strongly Recommended. This is the safer, more flexible, and industry-standard way to work with the data layer. |
#2.1.1. Data Layer declaration
The first method is limited and works only if you add the Data Layer code snippet ABOVE the Google Tag Manager container code. I never use it. But for curiosity’s sake, let’s take a look.
Let’s say you want to send the page category as a custom dimension to Google Analytics 4. This is the Data Layer code that must be added above the GTM container:
<script>
dataLayer = [{
'pageCategory': 'google-tag-manager-tips'
}];
</script>
<!-- Google Tag Manager -->
...
<!-- End Google Tag Manager -->
If you’re uncomfortable with touching the website’s code, a developer should do that. But this isn’t necessary if you have installed some GTM plugins on your website.
So when the page loads, a Data Layer is created containing one data point, pageCategory. When the Google Tag Manager container code loads, you can use that pageCategory in your tag management. This can be done with the help of the Data Layer Variable.
Another example is transaction or product data. Let’s say you want to implement Google Analytics 4 Purchase Tracking. In this case, your developers should add a dataLayer snippet above the Google Tag Manager container with the following parameters: transaction_id, value, etc.
Once this information is added to the Data Layer, Google Tag Manager can fetch it and transfer it to GA4.
But there are several reasons why I always advise against using this method.
- If dataLayer = [] code snippet is added below the Google Tag Manager container code, then your entire GTM event tracking implementation will break (stop working). And this happens way too often.
- Sometimes Google Tag Manager beginners need clarification about which method to use and when. I mean, should they use the dataLayer = [] or adopt the dataLayer.push (that I will explain next)? It’s much easier to remember and use just one method (see the next chapter).
All in all, GTM specialists don’t recommend using the Data Layer declaration method (dataLayer = [];).

#2.1.2. dataLayer.push
The second method (dataLayer.push) is another way to add data to the Data Layer. Here are a few examples:
- You have a newsletter signup form (which cannot be easily tracked with usual form tracking methods). You should ask your website developer to push a Data Layer event once a new subscriber has entered his/her email on your website. The code of this event could look like this:
window.dataLayer = window.dataLayer || [];
window.dataLayer.push({
  'event': 'new_subscriber'
});
If you wish, you can ask your developer for additional information (for example, form location (because you might have more than one form on the same page)).
window.dataLayer = window.dataLayer || []; window.dataLayer.push({ 'formLocation': ‘footer’, 'event': 'new_subscriber' }); - When a visitor adds a product to his/her cart, a Data Layer event (containing the product’s information) could be fired.
window.dataLayer = window.dataLayer || [];
window.dataLayer.push({
  'event': 'addToCart',
  'products': [{
    'id': '123',
    'name': 'Black T-shirt',
    'brand': 'nike',
    'quantity': 1
}]
});
Why is this method better than the first one?
It can be placed anywhere in the code (above and below the Google Tag Manager container), and it will not break the event tracking within GTM (the Data Layer declaration method needs you to add it above the GTM snippet).
This is made possible by the window.dataLayer = window.dataLayer || []; line that should be included with every push. It checks if a Data Layer array (window.dataLayer) already exists on the page. If it does, it leaves it alone; if it doesn’t (for example, if the script runs before the GTM container has loaded), it creates a new, empty one. This makes sure your dataLayer.push() command always has an array to add data to, preventing errors and making your code safe and reliable.
This is possible thanks to a window.dataLayer = window.dataLayer || []; line.
With this method, you can push events to the Data Layer that can be later used as triggering conditions. For example, if someone submits a form, a developer can activate the following code:
window.dataLayer = window.dataLayer || [];
window.dataLayer.push({
'event': 'formSubmission'
});
Since the code above contains the event key, this dataLayer.push can be used as a triggering condition in Google Tag Manager. Read more about the Custom Event Trigger.
If you want to learn more about dataLayer.push, read this guide.
#3. How GTM uses Data Layer’s information/content?
Google Tag Manager uses the information stored in the data layer in two ways:
- Certain pieces of data are stored in variables. How this is used, I will explain in chapter #3.1.
- To decide when to fire a tag (in the shape of triggers because you can use Data Layer events as triggers). This part will be explained in chapter #5.
We can achieve the first part with the help of the Data Layer Variable and the 2nd one with triggers.
#3.1. Using the Data Layer Variable
Imagine there are several authors in this blog:
- Me (Julius Fedorovicius)
- John Doe
- Jack Torrance
- etc.
I want to find out which authors write the most engaging content and then segment sessions in Google Analytics. I am using a GTM4WP WordPress plugin that stores the post author name in the Data Layer. If you don’t have WP, ask a developer to add additional data points to the Data Layer. The snippet could look like this:
<head>
<script>
window.dataLayer = window.dataLayer || [];
window.dataLayer.push ({
  pagePostAuthor: 'Julius Fedorovicius'
});
</script>
<!-- Google Tag Manager -->
...
<!-- End Google Tag Manager -->
</head>
By default, Google Tag Manager does not recognize custom data in the Data Layer. You cannot use normal variables to store custom data from the Data Layer. Unless you use the Data Layer Variable.
You might wonder why GTM does not just automatically see all the data that is available in the data layer. This is by design and is actually a good thing for keeping your container organized and efficient. GTM only pays attention to the specific pieces of data you tell it to care about. By creating a Data Layer Variable, you are explicitly telling GTM, “This specific piece of information is important to me, so please make it available to use in my tags and triggers.” This prevents your container from being cluttered with unnecessary information.
To create a variable, you’ll need to specify the Data Layer key of which value you want to retrieve. When the Variable is resolved, it will return whatever was most recently pushed into the key. Easy as that!

If I wanted to fetch the pagePostAuthor value, I’d just need to set the pagePostAuthor key in variable settings.
Say you want to send a Google Analytics 4 event when someone leaves a comment. With every event, you also want to push the full name of the article’s author. This way, you’ll see which authors drive the highest reader engagement.
In this example, I will not go into detail on creating a tag, I will only demonstrate how to pull the author data from the Data Layer and turn it into a variable (within Google Tag Manager).
In the GTM account, you should go to Variables and create a new one with the following settings (dlv stands for data layer variable):

It’s important to remember that the “Data Layer Variable Name” field is case-sensitive, meaning that only pagePostAuthor will work (not pagepostauthor or Pagepostauthor, etc.) because that is the parameter named stored in the data layer.
That’s it! Save this variable, refresh Preview and Debug (P&D) mode, and test whether your variable picks custom data from the website you’re working on.
You should then see your newly created variable in the Variables tab of the Preview & Debug console.

Also, it’s completely possible (and quite common) to have a bit more difficult data structures stored in the Data Layer, for example:
{
  attributes: {
    pagePostAuthor: {
      authorName: 'Julius Fedorovicius',
      authorTag: 'Google Tag Manager'
    }
  }
}
So if you wanted to reach the “authorName” key, that would require some additional knowledge of a dot notation. In my other blog post, I shared how to access various data structures in the Data Layer. You should check it out.
As you start working with developers, it is a great idea to agree on a consistent naming convention for your data layer keys. While Google Tag Manager can handle different styles like page_category (known as snake_case) or pageCategory (camelCase), picking one and using it for everything makes your setup much cleaner. This simple habit reduces the chance of case-sensitive typos when you create your variables and makes it easier for anyone on your team to read and understand the data structure at a glance.
A Quick Note on Naming Conventions
As you start working with developers to implement custom data layer pushes, it’s a great idea to agree on a consistent naming convention for your keys. While Google Tag Manager can handle different styles like page_category (known as snake_case) or pageCategory (camelCase), picking one and using it for everything makes your setup cleaner and easier to manage.
This simple habit reduces the chance of case-sensitive typos when you create your variables and makes it easier for anyone on your team to read and understand the data structure at a glance.
#4. Example No.1: using data from the Data Layer in GTM and Google Analytics 4
Let’s imagine that I have a website and all registered users are split into two groups:
- Paying customers.
- Users with a Free plan.
I want to segment these users and all their events/pageviews in Google Analytics 4 by their pricing plan. I have already asked my developers to add static information to the Data Layer when the page loads. The Data Layer snippet looks like this:
<head>
   <script>
     window.dataLayer = window.dataLayer || [];
     window.dataLayer.push ({
   	pricing_plan: 'Premium'
 	});
   </script>
   <!-- Google Tag Manager -->
   ...
   <!-- End Google Tag Manager -->
</head>
The code (between <script> and </script> tags) is static Data Layer information. We’ll use it later.
It’s very important that the Data Layer snippet is placed above Google Tag Manager’s container code in your website’s code. First, you need to send data to Data Layer, then this data is fetched by Google Tag Manager.
If the snippet is placed after the GTM container code, the data won’t be fetched by Google Tag Manager.
#4.1. Create a Data Layer Variable in Google Tag Manager
First, you need to create a Data Layer variable in your GTM container. Tag Manager will accordingly recognize the parameter and store its value. Navigate to Variables, scroll down to User-defined variables, and click New.
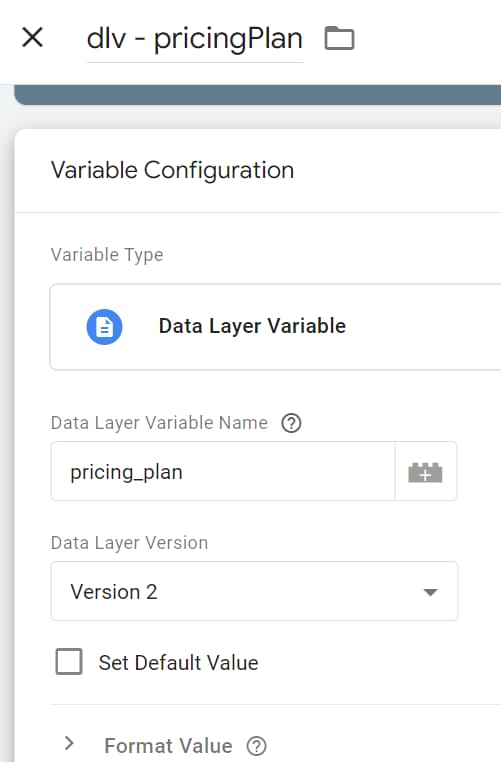
- All my Google Tag Manager Data Layer variables titles start with “dlv” (it’s easier to keep everything in order. Read this useful blog post on how you should name all your tags, triggers, and variables
- Choose a type – Data Layer Variable
- Set pricingPlan as Data Layer variable name because this variable was added to dataLayer’s snippet by your developer.
- Click Save.
#4.2. Enable Preview and Debug mode in Google Tag Manager
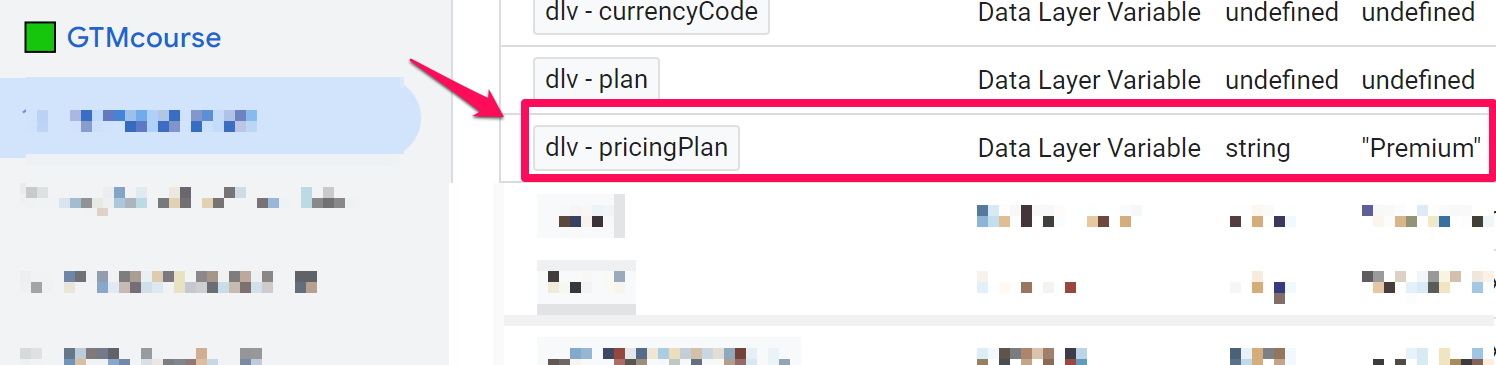
Let’s check if Google Tag Manager catches pricing_plan variable.
In your GTM panel, enter Preview and Debug mode (by clicking Preview button)

When Debug mode is enabled, a new tab should be loaded where you will have to enter the URL of your website

Click Start, and you will be redirected to that page.
Click Variables in the Preview mode’s tab and look for pricingPlan. Check its value. If pricingPlan returns the value undefined, you should double-check whether you have entered a correct Data Layer Variable name in GTM’s admin panel (by the way, it’s case-sensitive). In my case, pricingPlan variable is defined correctly because I get the value Free.
#4.3. Push pricingPlan Data Layer Variable to Google Analytics
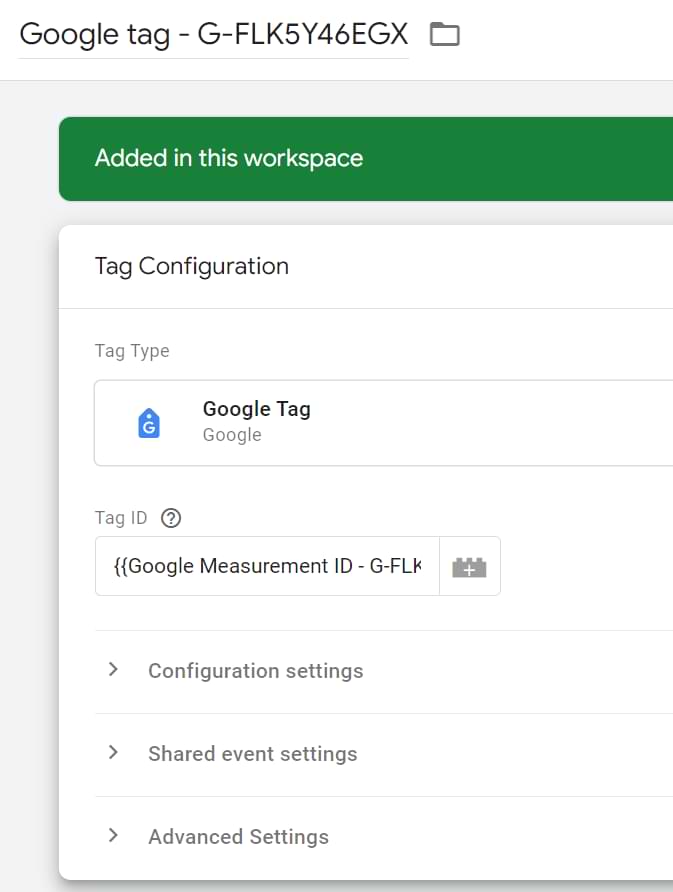
Go back to your Google Tag Manager account. Open the Google tag. If you don’t have one, let’s create it. Go to Tags and click New.

Enter the name for the tag – GA4 config (actually, you can name it whatever you want). Click the Tag Configuration box.

Choose a tag type – Google Analytics > Google tag.
Enter the following settings:
- Enter your GA4 Measurement ID (or a variable that contains it).
- Select the checkbox near the option “Send a page view event when this configuration loads.”
- In the Triggering section, choose Initialization – All Pages.
If you already have a Google tag in your GTM container, there’s no need to create a new one. Use the existing one because the custom dimension will be entered in the Shared Event Settings section.

Note: Doing this should be enough, but the variable’s value can sometimes change on the same page without you reloading it. You should also set the custom dimension for individual event tags if you notice this.
#4.4. Create a custom dimension in GA4
Because pricingPlan is a custom parameter defined by you (or your developer), Google Analytics 4 will not include it in your reports. Unless you register it as a custom dimension.
- Login to your Google Analytics 4 account
- Open your website’s account and then click Admin, then go to Custom definitions


- Click Create custom dimensions
- Enter the dimension name as pricing_plan, event as the scope, and pricing_plan as the Event Parameter. Now, click Create. Alternatively, you could have set this as a user-scoped dimension (learn more here).
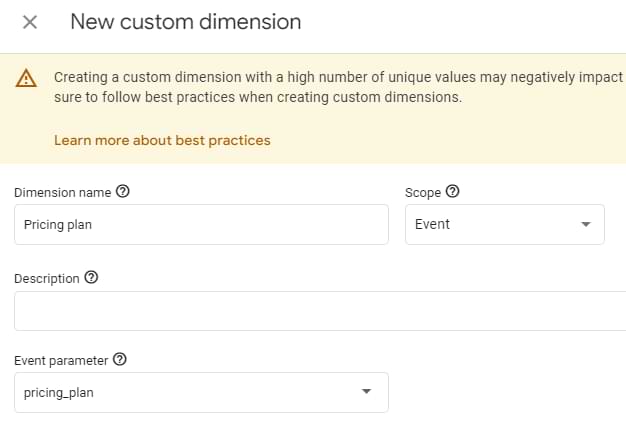

- Now, wait 24 hours for it to reflect back in your GA4 dashboard.
#5. Using Data Layer in triggering
The entire concept of event tracking in Google Tag Manager is based on the Data Layer. If you want to capture an interaction and fire a particular tag (e.g., Google Ads conversion tag), the interaction must first be pushed to the Data Layer.
Only then can Google Tag Manager catch it and use it as a triggering condition. This applies to both standard (e.g., links, forms) and custom event (e.g., purchase, login) tracking.
In this chapter, I will focus on custom event tracking (if you want to learn more about standard event tracking in Google Tag Manager, check these articles for inspiration: click tracking, using history change trigger).
Suppose the event you want to track is a successful registration by a website user. Once the event fires successfully, you want to send it back to Google Analytics. Here is one solution. You can ask a developer to activate the following code every time a user signs up.
window.dataLayer = window.dataLayer || [];
window.dataLayer.push({
  'event': 'registrationComplete'
});
The key part here is the “event” key. It is necessary if you want to fire tags every time a certain interaction occurs on a page.
The key named event has a reserved function in Google Tag Manager. When GTM sees a dataLayer.push that includes an event key, it treats that push as a distinct moment in time and makes its name available in the event stream of the Preview mode. This is what allows you to create a Custom Event Trigger.
Pushing data without an event key simply adds that information to the Data Layer for later use, but it does not create a triggerable event on its own.
Also, let’s say that we also want to track pricing plans of the signup (because users can sign up for free or a premium plan). That’s why we could update the code and add an additional piece of information – plan.
window.dataLayer = window.dataLayer || [];
window.dataLayer.push({
  'event': 'registrationComplete',
  'plan': 'Premium'
});
Once a developer confirms that the above code is implemented, it’s time for you to check whether that’s true.
Enable the Preview and Debug mode in your Google Tag Manager container, complete a normal user registration process and take a look at the debug console.
First, the “registrationComplete” event must appear in the event stream (left side of the console).

So far, so good.
Now, let’s check whether the developer passed the additional key you asked for – plan.
In Preview and Debug mode, click the registrationComplete event and go to the Data Layer tab. As you can see from the screenshot below, the developer did a good job, as I can see the plan key in the Data Layer.

If, unfortunately, registrationComplete is missing, contact the developer and tell him/her to properly follow your instructions. Also, this guide is quite useful for developers to better understand how to work with the Data Layer.
#5.1. Custom Event Trigger
Let’s say the developer successfully pushes the interaction data (together with the event key) to the Data Layer. The next step is to catch that .push and turn it into a triggering condition.
By default, Google Tag Manager does not care about the pushed events in the Data Layer (I mean that no tags will be fired unless you specifically instruct GTM to do so).
Since we are interested in tracking successful registrations, we need to tell GTM that registrationComplete events are important to us, and we wish to use them as triggers.
In Google Tag Manager, go to Triggers and hit the New button. Choose Custom Event as the trigger type and enter the following settings (event name is case-sensitive):
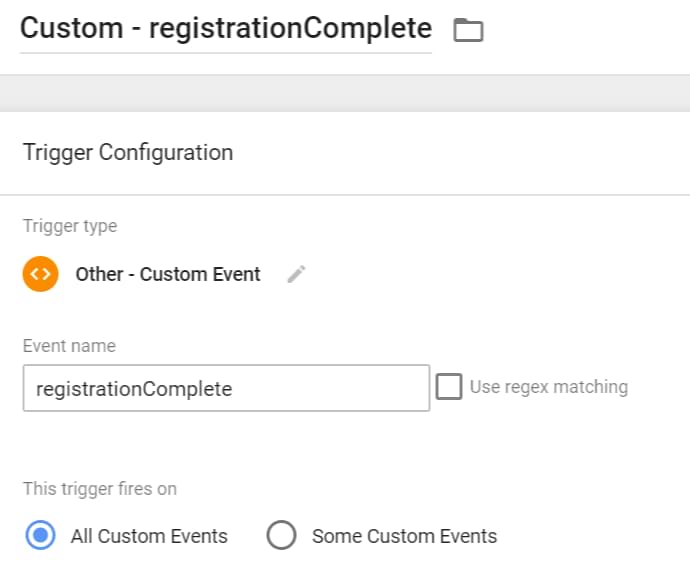
Done. You have just created a Google Tag Manager Custom Event Trigger.
How can you use that in the event tracking? Let’s take a look at the example.
#6. Example No.2: using Data Layer events as triggering conditions in GA
Let’s continue with our example of registration tracking. What we’ve got so far is:
- We asked a developer to implement the dataLayer.push code when a user successfully signs up. The value of the event key is registrationComplete
- A developer has implemented our request, and we checked that in the Preview and Debug mode (Data Layer tab)
- We created an Event trigger registrationComplete.
So what’s next? Let’s send an event to Google Analytics every time a registrationComplete event is pushed to the Data Layer. Additionally, we’ll pass the value stored by the datalayer variable plan.
#6.1. Data Layer Variable
In Google Tag Manager, go to Variables > User Defined Variables > New > Data Layer Variable. Enter the following settings:
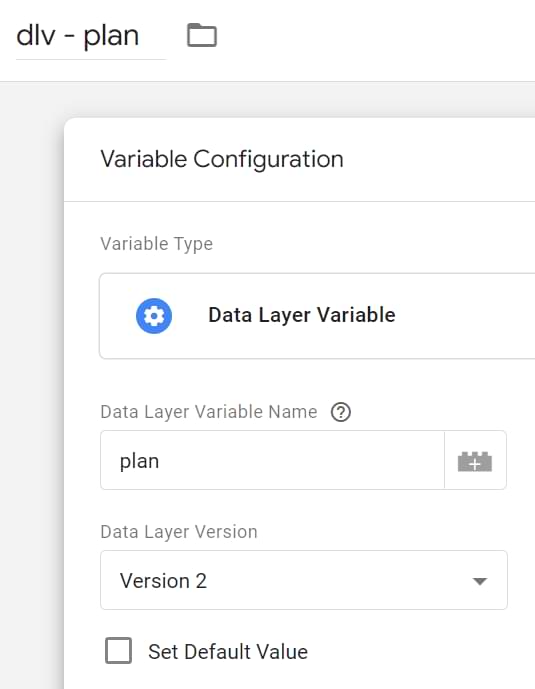
We entered “plan” because that’s the name of the key in the Data Layer (when the registrationComplete event is pushed to the DL).
#6.2. Google Analytics 4 Event Tag
Now, let’s create a GA4 event tag that will send the event data to Google Analytics every time a sign_up is pushed to the Data Layer. In GTM, go to Tags > New > Google Analytics > Google Analytics: GA4 Event. Enter the following settings:
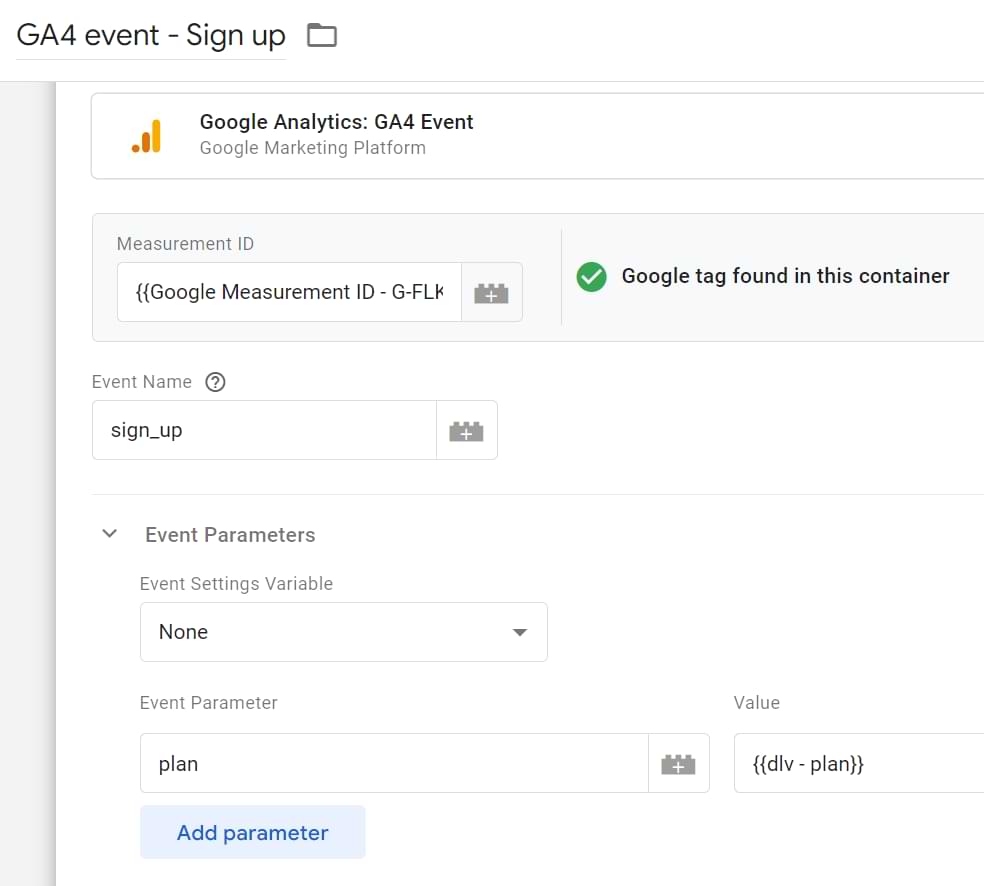
The trigger of this tag should be the Custom event trigger registrationComplete (the one we recently created).
#6.3. Let’s test
Save the GA4 tag, refresh the preview and debug mode, go to your website, and complete the registration again. If you’ve followed the instructions correctly, the sign_up Data Layer event will appear in preview mode.
Click it and check whether your GA4 Event tag is fired.

If the tag has not fired, check whether you have entered the proper event name in the trigger settings. It is super important that you enter the event name precisely as it is displayed in the Data Layer (case sensitive).
Suppose the tag has fired properly. Now let’s see if GA4 has recorded this as well. Head to your Google Analytics 4 dashboard, and navigate to the DebugView screen. If you are still struggling with testing your tags in GTM, read this blog post with 30+ debugging tips.
#6.4. Register ‘plan’ as a custom dimension
As in the previous example, we need to register the custom parameter plan to see it in our Google Analytics 4 reports. Here’s how you should go about registering it:
- Click Admin and then Custom definitions.
- Click Create custom dimensions
- Enter the dimension name as plan, Event as the scope, and plan as the Event parameter name. Now, click Create.
Note: if you want to apply “pricing_plan” just to that event (and not all subsequent events of the user), then you can register the custom dimension as event-scoped.
If you want to learn more about custom dimensions, read this blog post.
#6.5. Register events as key events in GA4
The final step. Let’s turn the GA4 event into a key event (previously known as Conversion).
In your Google Analytics property, click on Admin and head to Key Events.
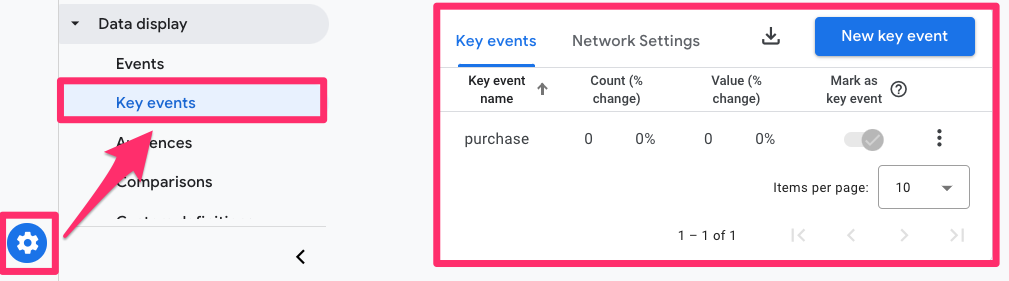
Select New Key Event and add the name of the event when prompted. Ensure that you maintain the same name as that of the event. In my case, that was “sign_up”
I’ve written extensively about recording key events in Google Analytics 4 in this article.
With this kind of setup, a key event will also be counted whenever an event (with event category “sign_up”) is tracked by Google Analytics.
You can also test key events in GA4’s DebugView report. You can find this report by navigating to the Admin screen and clicking on the DebugView tab.
Perform a standard registration on your website and wait for the results to reflect. It will take time, but if you’ve done it correctly, it will look like this.
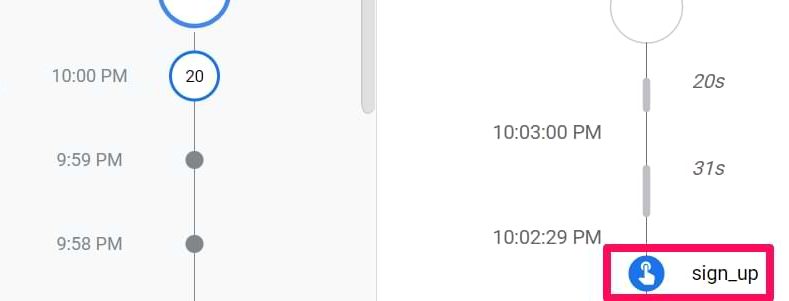
Here, you will notice that a blue icon comes alongside the sign_up event. Blue icons denote events, and green icons represent key events. In this case, my GA4 platform is taking longer than usual to register it as a key event. Just keep this in mind.
Frequently asked questions
Here are some quick answers to common questions about the Google Tag Manager Data Layer.
- Do I need a developer to use the data layer? For basic tracking that relies on built-in GTM triggers (like clicks and pageviews), you do not need a developer. However, to track custom events that GTM cannot see on its own (like a successful user login or an e-commerce purchase), you might need a developer to write the necessary code to push that information to the data layer.
- Can the data layer slow down my website? When implemented correctly, the data layer has a negligible impact on site speed. Performance issues are more likely to arise from having a very large number of tags firing in GTM, rather than from the data layer itself.
- How can I see the data layer on any website? You can view the data layer on any website by opening your browser’s developer console and typing dataLayer. This will print the current state of the data layer array. For a more user-friendly view, you can use a Chrome extension like “Data Layer Checker”.
- What is the difference between an ‘event‘ and other data points in a dataLayer.push? The ‘event’ key is special. When GTM sees a push containing an ‘event‘ key, it logs it as a distinct event on the left side of the Preview mode, which can be used to fire a Custom Event Trigger. All other keys (like ‘pricing_plan‘ or ‘product_id‘) are simply pieces of data that you can access with a Data Layer Variable.
Conclusion
If you read the entire article, well done (and thank you)! If you skipped to the summary without reading the entire thing, I suggest you bookmark this page to return later. This is not a topic that can be covered by a quick 500-word blog post.
Google Tag Manager Data Layer is a fundamental part of GTM. Without it, event tracking would not work. It enables us to capture interactions (+ use them as triggers) and get additional data about the interaction or the context (+ use it with the help of Data Layer Variables).
If you feel this concept is difficult to master, you’re not alone. It’s perfectly fine to be confused at the beginning. I suggest starting with a few events and then scaling up. You’ll become better with time.
Related resources:
- 3 ways to pull data from the Data Layer
- Custom Event Trigger: Fully Explained
- A Guide to Data Layer Variable
Another option for learning the Data Layer can be my Google Tag Manager courses. In both of them, my students and I dive deeper into the concept of Data Layer, and we apply it in practice.
38 COMMENTS
Hi,
I have done these things:
Custom Dimension: User Scope
GTM: Passed a custom dimension along with a page view. Also verified the Index Number
Results: Able to see custom dimension to be populated with event trigger and page-view in GTM Preview Mode.
Able to get custom dimension passed in GA via events but not page view?
What I did: I checked Debug Console Mode. I saw that with Page view, the command is being ignored or undefined.
Any thougths?
Thanks, Arif
Hey,
Maybe that variable you use for the Custom Dimension is not available on Pageview Trigger? Maybe you should use DOM Ready or Window Loaded triggers, instead? Or maybe you could ask a developer to push that variable to the data layer sooner?
If you want, I can take a look at your implementation. Share a Preview link with me (also, I need this info:
- URL of a website you're working one.
- Which variable are you trying to send as a custom variable.
- It would also help if you could share the access to that GTM container (with "read" permissions).
We can keep this private, you are free to send the information to julius[at] analyticsmania.com
Hi Julius,
It worked with DOM Ready. I just changed the trigger to All Pages to DOM Ready and it pulled the information.
Many Thanks, Julius
Hi, thanks for a great article.
Is there any kind of "lag" before your custom dimensions appear in Google Analytics?
I have a site using the GTM tracking code (and some custom dataLayer variables) but the dimensions in GA are always showing as blank/empty.
I am *not* using any GA tracking snippet (just GTM, with a Google Analytics Tag setup, with the custom variables added as indexed dimensions). I created the Custom Dimensions in GA (using the same Index values).
I have checked the GTM Debugger that all of the values are being passed to GA (with the correct dimension indexes) and I can see "activity" in GA (so the GTM > GA passthrough is clearly working).
Should I have to wait (24 hrs?) before the Dimensions are populated / become active? Or does this suggest that for some reason it isn't working?
Hey, even though we figured this out on Twitter, I'll just reply so that other readers could benefit. From my experience, custom dimensions usually appear within several hours but in Martin's case, it took ~24 hours.
I cannot explain a particular reason for such delay, but in the end, the data found its way to the reports. The best way to check if custom dimensions are properly passed is to use GA Debugger Chrome Extension.
Very good article, thank you. Is the dataLayer session-based? If I make changes to tags in my container, what is the affect on users in a current session? Would they not yet propagate? Would the next page load or screen refresh load them?
Hey, Data Layer is pageload-based. So if a developer pushes data layer changes to the website, from the next pageload those changes will be applied to the visitors.
Hello...
I understand "Data Layer" script should be placed before GTM code. However, GTM code is part of template for most of content manager system (such as Drupal or WordPress). How could I implement this data layer script in this type of implementation dynamically?
Discuss this with a developer.
Hi.
First of all, I just discovered your blog. The best for newbies like me.
I don't understand the example "using data from the Data Layer in GTM and GA".
You say that: "It’s very important that dataLayer snippet is placed above Google Tag Manager’s container code in your website’s code. "
However, previously, you have mentioned that dataLayer.push can be placed anywhere in the code (above and below Google Tag Manager container) and it will not break the event tracking within GTM
Can you clarify this?
Regards
If you want to use that custom data on "pageview" trigger, you would still need to place the snippet above gtm container. In other cases, it is fine to place it below.
Hi Julius,
thanks for clarifying Manu's question. If you could have a mention in the article, it would be great.
So is it okay to have If I place code in this order?
1) <script>
window.dataLayer = window.dataLayer || [];
//some data I want to provide on "pageview" trigger
<script>
2) <script><!-- Google Tag Manager Snippet --></script>
3)<script>
window.dataLayer.push({
'event': 'Whatever'
});
</script>
Is it possible to do such a combination? Or you would not recommend it.
Hey, your setup will work fine. I would probably include the "event" in the first code as well. Trigger management would be easier that way.
Hi Julius,
many many thanks for swift reply. And great article as well!
Regards
Hey man,
from what I gather, placing the data layer event above the GTM container is obligatory for data layer declaration, not for dataLayer.push.
Someone correct me if I'm mistaken
Thanks!
Correct
Julius,
Love your stuff! I haven't seen a ton of detail anywhere on the new data layer structure for GA4, other than for e-commerce. Do you know if it can use subobjects? That is, In UA you can set the DL object to, e.g., dataLayer.page.section:marketing, create a DL Variable in GTM based on the object/subobject name, and set it in a Custom Dimension. Based on how GA4 assigns parameters in the DL to Events, it doesn't appear that can be done since Custom Dimensions are created in the admin based on the Event/Parameter pairs, but I wanted to check with an expert.
Thanks!
Hello,
This is very well explained :) I have one question though, using this code snippet
window.dataLayer = window.dataLayer || [];
window.dataLayer.push({
'event': 'registrationComplete',
'plan': 'Premium'
});
what will happen if someone registers for "Free Plan", will this be visible in GA? If not, how do I modify it ?
Many thanks !
Jan
Just copy pasting this code will not work with free plan or any other plan. You must ask a developer to write the code that dynamically outputs the correct plan
Hi Julius, Amazing content. I am a Lil bit confused. I want to measure some of the buttons on my pilar product page. But since it is not an e-commerce I want to do it through the Datalayer, but I don't know how to cause if I inject the dataLayer script into the button code. All the dataLayer scripts will be placed after the google tag manager container. Could you help me clear this question pls . Thank you
Hi, thanks for your useful information. I'm new in GTM, can I use Data Layer in GTM as the schema markup? I search for a guide on how to set up an auto-schema product for all product pages (such as product name, rating,...). But I could only insert schema for a specific product and I had to do it manually. Can you please help me clear that confusion? or which keywords I can search to solve this issue? Many thanks!
Technically it is possible. But I would not recommend it. I always go with Schema implemented directly in the code.
Congratulations and thank you for your very interesting article.
I just need clarification.
"window.dataLayer = window.dataLayer || [];" must always be inserted even when the dataLayer.push comes after the tag manager code? Or is it only mandatory when I have to pass data before uploading the Tag Manager code?
“window.dataLayer = window.dataLayer || [];” is mainly needed when you add the code above the GTM Container
How do I pass user data to the datalayer in a compliant way? I'm trying to setup enhanced conversions on Google Ads which requires user info like email and name but I'm worried about implementing it wrong. Thanks!
You are great Julius! keep going.
Hi,
I want to setup GA4 on a woocommerce shop.
I could do it the "easy way" and install a plugin, but to learn it properly I could do it all manually? What do you think?
In section "#2.1.2. dataLayer.push", you say:
"Why is this method better than the first one?
It can be placed anywhere in the code (above and below the Google Tag Manager container), and it will not break the event tracking within GTM (the Data Layer declaration method needs you to add it above the GTM snippet).
This is possible thanks to a window.dataLayer = window.dataLayer || []; line."
Then in section "#4. Example No.1: using data from the Data Layer in GTM and Google Analytics 4" you say:
"It’s very important that the Data Layer snippet is placed above Google Tag Manager’s container code in your website’s code. First, you need to send data to Data Layer, then this data is fetched by Google Tag Manager.
If the snippet is placed after the GTM container code, the data won’t be fetched by Google Tag Manager."
I'm a little confused by this as it seems contradictory since both code examples use window.dataLayer.push
Hi
thanks for this post
i do not have a developer
and i should send the author data to the datalayer and then ga4.
i want to know how can i do this?
in fact how can i change the name of author dinamically?
document.querySelector("#single-post-meta > span.author-meta.single-author.with-avatars > span > span.meta-author > a")
is sth like this can help?
i have searched alot, but i did not find any blog or video about this. could you please help me about this?
If you don't have the developer but you want to have the custom data layer on the website, you need to know how to code yourself. And that's not an easy feat and it's a lot to learn (+ there is no single resource that teaches all that is needed/possible because there are a lot of nuances).
Hi, very good post! Is it possible to store a value retrieved from an HTTP POST Request generated by GTM SS until next time the tag which makes the HTTP Request is fired again? and it´s a loop: then it retrieves a new value that is stored until next time the tag is fired...
Nice article, thank you :)
I'm looking to install the push-script above my GTM script, and I'm looking to get the transaction ID and the €-value of a successful purchase for my Google Ads campaign conversion... I've been so far unsuccessful to find out how should those two be inserted in the code below:
window.dataLayer = window.dataLayer || [];
window.dataLayer.push({
'event': 'purchase'
'xxx': 'yyy'
});
Hi! Your tech tuts about gtm are the best on the web, congratulations and thank you! I would like to ask you one thing. Does the default form_submit ga4 event really capture the real message sending or just the user's click on the html submit button?
I mean, when a user clicks a submit button, the form is not just sent. Instead, data is sent to the server side script, which usually validates al fields and then builds a message and pass it to a mailer program (phpmailer or the like), which in turn will do some other checks, and then eventually, but not necessarily, will really send the email. Otherwise the entire chain will likely return some kind of error.
Therefore, when ga4 says it detected a form_submit event, does it really check if the email has really been sent (Ifrankly think this is impossible), or, as think, it just simply detect the user's click on the form's submit button?
If this is the case, then more advanced developers should always build a custom form submit event that fires only from the form's landing page or if ajax, only after checking the response.
Thank you, regards
Thank you, regads
Hello Julius,
Thank you for your thorough explanations!
However, one part remains unclear to me.
When setting up 'dlv-plan' we use User Defined Variables. But when we register ‘plan’ as a custom definition in GA4 we make it Event-scoped.
"• Enter the dimension name as plan, Event as the scope, and plan as the Event parameter name. Now, click Create."
Could you please clarify this point?
Thanks!
Hi.
How set up a gtm for event purchase, for track on the GA send a value price
Great content, as always Julius!
For use cases where the developer is not available, what is the best way to utilize the power of dataLayer or how to push dataLayer without a developer. Is there a better way of pulling insights from page using GTM other than scrapping DOM?
Please advise.
Thanks!
I'm working with data layer variables in GA4. I am finding that GA is truncating the data. I am seeing this in GTM:
Data Layer values after this Message:
UserRoles: "authenticated user, lead admin, administrator, " +
"all staff, tfall admin, all role admin, content" +
" reviewer, content lead",
But GA returns: authenticated user, lead admin, admi
I'm getting approximately 35-40 characters returned.
Needless to say, this is junk data. I'm concerned that this partial data is also getting sent to Big Query.
Have you run into this? Do you know a work around other than splitting it into multiple parameters, as I've seen suggested?
Thanks for all your help!
Is this user property? They are limited to 36 characters. A workaround is to send this as event parameter. Then you get 100 characters