October 14, 2025
Install Google Tag Manager and GA4 on Shopify (with Custom Pixel)
Updated: October 14th, 2025
Lately, there has been a lot of confusion about how to properly set up conversion tracking for Shopify, mainly due to the significant changes Shopify has made to its checkout process.
To address this and help the growing number of merchants and conversion tracking specialists facing these challenges, Karol Krajcir and I have put together a comprehensive, ready-to-use solution that you can add to your Shopify store. Once you’ve downloaded and installed the three scripts from our GitHub repository, the only remaining step is to configure the GTM container.
Even though I tried to be helpful here as much as possible, the main brain behind this solution is Karol.
This article will show you how to install Google Tag Manager and GA4 on Shopify (by using Checkout Extensibility/Custom Pixel). There are some limitations, so we highly recommend reading the entire blog post first before diving into the implementation part.
Please note that there still might be some unknown bugs or missing features. But we’ll do our best to keep this updated. Anyway, if you encounter any issues, we’d appreciate your feedback. And if you want to collaborate and add some fixes/improvements, feel free to do so in the Github repository.
Table of Contents
Here’s what you will learn in this article
- Shopify Customer Events
- Adding the codes to Shopify
- Pageviews
- Ecommerce events
- Site search
- Form submissions
- Clicks
- Bonus 1 – content group
- Bonus 2 – GTM container template
- Troubleshooting & FAQ
- Final words
Shopify Customer Events
With checkout.liquid being deprecated, Shopify is moving towards a different approach with checkout extensibility.
Instead of relying on methods like injecting custom JavaScript into theme files or directly modifying Shopify’s checkout scripts, Shopify now encourages merchants to use custom pixels to capture user interactions across their store, such as viewing a product, submitting a form, and more.
These custom pixels can be managed within your store’s Settings under Customer Events. Customer Events are standardized data points representing user actions, accessible for tracking via event listeners from within custom pixels.
They allow you to collect data related to user behavior, which can then be pushed to the browser’s data layer (for use with tag management systems like Google Tag Manager), or sent directly to analytics or marketing platforms like Google Analytics or Meta Ads. In this article, we will focus on integrating Customer Events with the data layer and GTM.

What are the Benefits of Shopify Customer Events?
Shopify’s Customer Events represent a major shift toward streamlined, manageable, and privacy-focused tracking. Here’s what that means in practice:
Accessible to all merchants
Perhaps the biggest improvement is that Customer Events are available to both Shopify Plus and non-Plus merchants alike, and across all pages, including checkout. Previously, granular checkout tracking was limited to Shopify Plus merchants.
Enhanced security
Custom pixels run in a separate child iFrame, making this a sandboxed environment. This setup isolates tracking scripts from the main codebase, increasing security. Merchants must subscribe to specific events provided by Shopify, which restricts arbitrary scripts from running and limits access to the DOM. This added layer of security reduces risks associated with script injections and data leaks, but it also introduces challenges for conversion tracking, which we’ll cover later.
Easier to manage
Because conversion tracking is no longer scattered across multiple locations, it’s now kind of easier to manage. This centralized approach helps reduce the complexity of audits and maintenance, making it simpler for merchants to update and monitor their tracking setups.
Privacy-focused
Custom pixels can be categorized under marketing, analytics, or preferences categories, enabling integration with Shopify’s native consent banner. Even though the native consent banner isn’t fully GDPR-compliant at the time of this writing, it does help ensure that scripts in custom pixels align with user consent preferences.
Note: Currently, the solution that is described in this article does not have out-of-the-box support for Cookie Consent popups (like Cookiebot), because Shopify also affects how that works. It’s not enough to just add CMP’s code snippet to the site.
If this is interesting to you, let us know in the comments.
What are the Limitations of This Method?
While Shopify’s new setup brings benefits, the sandboxed environment introduces a number of challenges for conversion tracking:
#1. Limited DOM access & manipulation
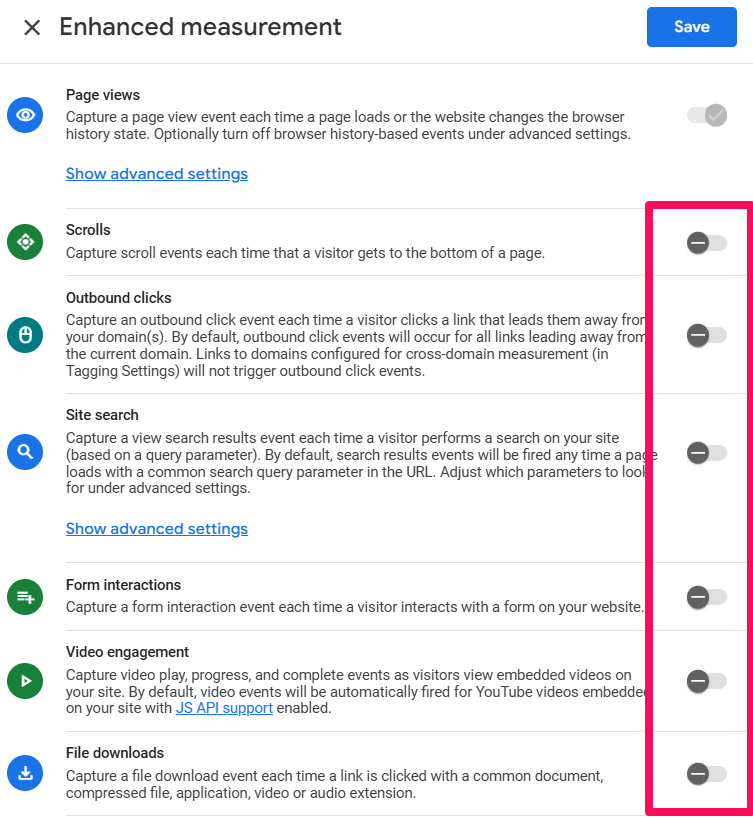
This sandboxed setup limits direct access to the DOM, making things like DOM manipulation and scraping next to impossible. As a result, most standard GTM triggers like element visibility, scroll, history change, click, JavaScript error, and others, won’t work. To avoid unexpected data, we also recommend turning off GA4’s Enhanced Measurement events.
Some of these limitations can be partially addressed by creating custom events, as we’ve done for click events (more on this later in the article).
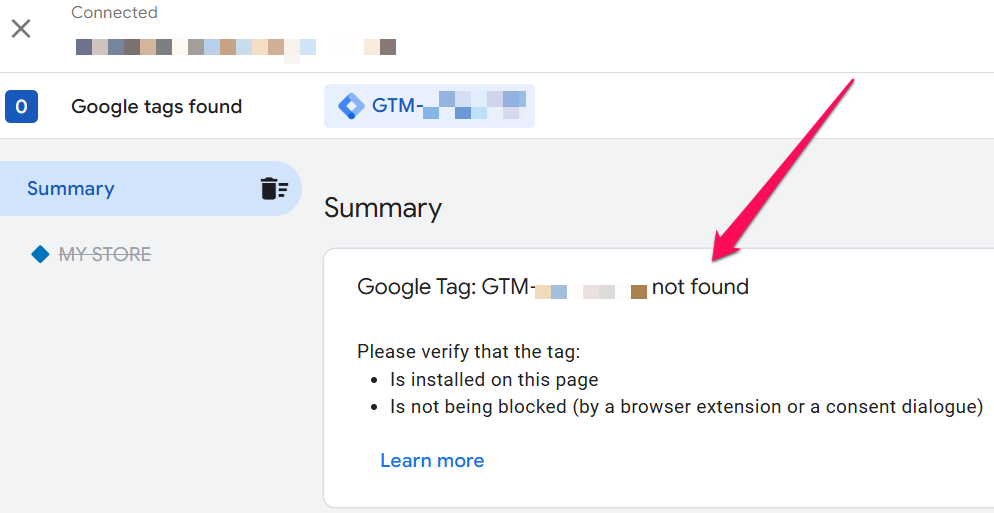
#2. Dysfunctional Preview Mode
The sandboxed environment prevents Google Tag Manager’s Preview Mode from functioning, which complicates testing and debugging. This requires alternative testing approaches (e.g., browser developer tools), which we will also walk you through in this article.
#3. Polluted page URLs
Because custom pixels are embedded within a child iFrame, they lack access to the parent frame’s page information, such as the page URL. This results in polluted page URLs containing unwanted strings and identifiers. We will also explain how to deal with this issue later in the article.
#4. Tracking codes inside custom pixels cannot modify the parent page’s URL
Since GA4 within the pixel’s iFrame can’t access or modify the parent page’s content, URL, or linking parameters, essential for tracking users across domains, things like cross-domain tracking will not work.
Thus, if your website and shop are on separate domains, your GA4 sessions will not be tracked accurately. The lack of cross-domain tracking support, however, does not affect your checkout tracking, as both storefront and checkout are on the same domain.
If this is a dealbreaker for you, try looking for alternative ways of installing GTM and GA4 on Shopify.
#5. User engagement isn’t being tracked properly
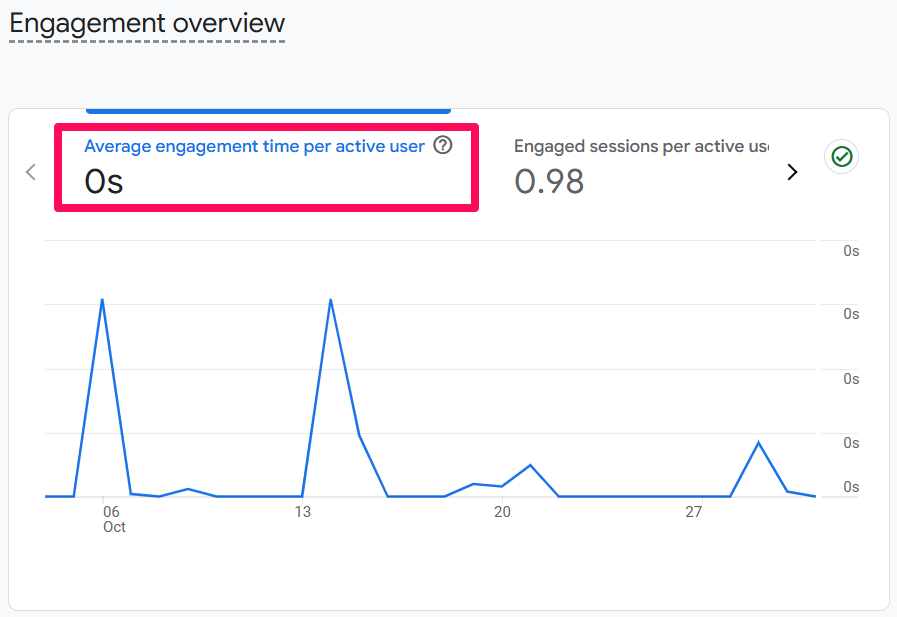
Another significant limitation of custom scripts is that the user_engagement event isn’t being recorded correctly. Our findings indicate that only a minimal number of these events are collected, and when they are, they lack any engagement time data.
As a result, metrics like Average Engagement Time display as 0s, and all related engagement metrics will be inaccurate and should not be relied upon. We’re still investigating the cause of this issue, but for now, be aware of this.
Should You Use This Method? Pros and Cons
This Custom Pixel method is powerful, but due to its limitations, it’s might not be the right fit for everyone. Here’s a quick breakdown to help you decide if this solution is right for your store.
|
Pros |
Cons |
| Available to all merchants. Unlike older methods, this works for both Shopify Plus and non-Plus stores. | GTM Preview Mode does not work. This makes testing and debugging more difficult and requires workarounds. |
| Tracks the entire customer journey. This solution provides tracking across all pages, including the previously locked-down checkout and “thank you” pages. | Cross-domain tracking is not supported. If your store’s user journey spans multiple domains, this method will not work for you. |
| Enhanced security. Scripts run in a sandboxed environment, isolating them from your store’s main codebase. | Standard GTM triggers are limited. Due to the sandboxed setup, most built-in triggers like scroll, element visibility, and history change will not function. |
Adding the codes to Shopify
If the abovementioned limitations do not bother you, let’s see how you can install Google Tag Manager and GA4 on Shopify.
GitHub repository
To get started, you can download the necessary scripts from our GitHub repository here: https://github.com/karolk95/shopify-customer-events-plain
Using these scripts, you’ll be able to track the following events:
- page_view
- view_item_list
- view_item
- add_to_cart
- view_cart
- remove_from_cart
- begin_checkout
- add_shipping_info
- add_payment_info
- purchase
- view_search_results
- form_submit
- clicks (in general)
Before You Begin: A Quick Checklist
This is an advanced technical setup. Before you start copying codes, run through this checklist to make sure this solution is right for you and that you have everything you need.
- Accept the Limitations: Have you read and understood the limitations of this method? Specifically, you must be comfortable with the fact that GTM Preview Mode will not work and cross-domain tracking is not supported.
- Upgrade to Checkout Extensibility: In your Shopify settings, go to Checkout and confirm you have upgraded your Thank you and Order status pages to the new version. This is a mandatory step for Custom Pixels to work.
- Copy the Code Scripts: Go to the public GitHub repository and download the three required scripts: gtm-customer-events-storefront, theme, and custom pixel.
- Have Your GTM Container ID Ready: You will need your Google Tag Manager container ID (e.g., GTM-XXXXXX) to paste into the custom pixel script.
Important notes
#1. Upgrade to Checkout Extensibility
To make use of the Customer Events and custom pixels, you must first upgrade to Checkout Extensibility, if you haven’t done so already. Go to the settings of your store > Checkout and then upgrade.

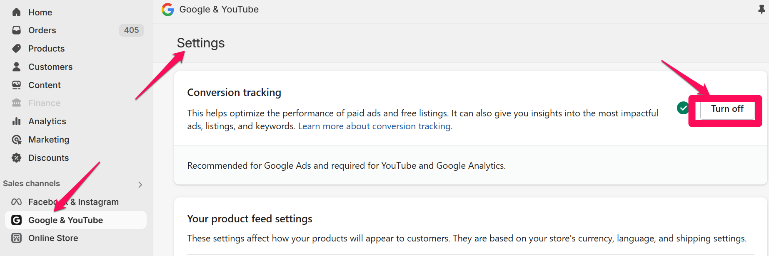
#2. How Can You Avoid Duplicate Data?
After successfully installing our scripts and configuring your Google Tag Manager container (we’ll show you how to do that soon), make sure to disable any other tools or codes that could be sending event data to Google Analytics to prevent any duplicates.
A common way of sending data to Google Analytics is through the Google & YouTube sales channel. To disable it, navigate to Sales channels > Google & YouTube > Settings > Conversion tracking, and turn it off.
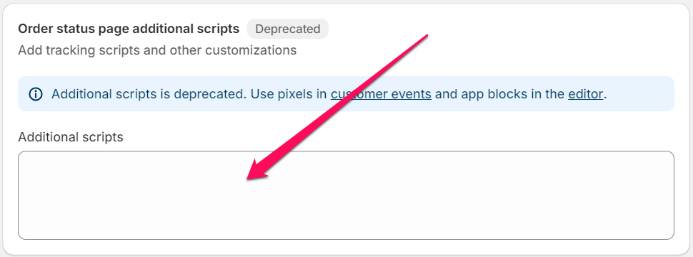
Another popular way of adding tracking scripts was through the Additional scripts. To review and remove these, navigate to Settings > Checkout, and scroll down until you reach Order status page additional scripts.
#3. Are There Any Potential Attribution Issues?
Some claims suggest that using custom pixels may affect attribution accuracy. While this has not been a confirmed issue in our clients’ setups, we recommend monitoring attribution data closely.
Installation instructions
There are three separate scripts in the GitHub repository, each needing to be inserted in specific areas of Shopify. Follow these steps for proper installation:
#1. The ‘gtm-customer-events-storefront’ script
This script listens to click events on the storefront and sends them to the custom pixel, pushing them to the data layer.
Navigate to Online Store > Themes > Edit Code, and locate the ‘snippets’ section:
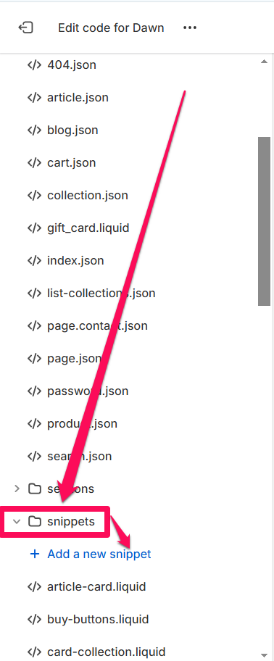
This separate script is necessary because the Custom Pixel itself runs in a sandboxed environment with no direct access to the main page’s content. This storefront script acts as a bridge; it listens for clicks on the main page and then passes that information into the sandbox so the Custom Pixel can process it and push it to the data layer.
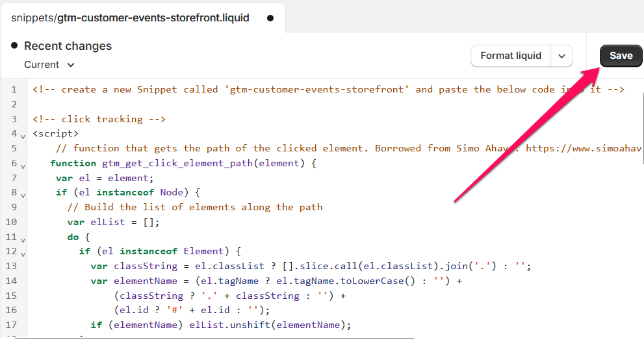
Create a new snippet and name it ‘gtm-customer-events-storefront’ (without quotes). Exactly like that.
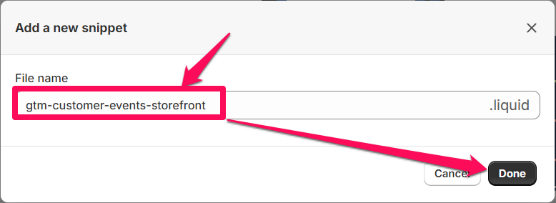
Paste the contents of the ‘gtm-customer-events-storefront’ script into the newly created snippet.
#2. The ‘theme’ script
With the code editor still open, locate the theme.liquid file. Paste the contents of the ‘theme’ script as high in the <head> section as possible:
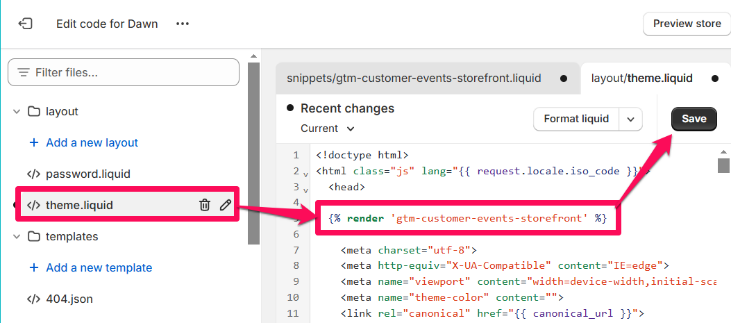
This will add the ‘gtm-customer-events-storefront’ snippet to the theme. Technically, you could just add the ‘gtm-custom-events-storefront’ contents directly to the theme, but separating the two makes the code more readable and cleaner.
#3. The ‘custom pixel’ script
This is the backbone of the solution. It installs GTM via custom pixel, then listens to customer events and pushes their information to the data layer.
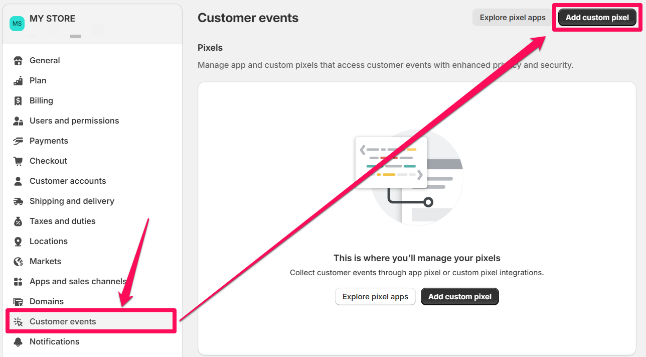
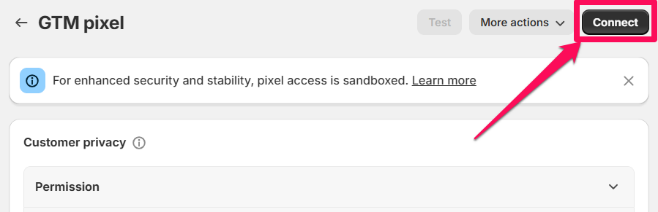
Navigate to your store’s Settings > Customer Events > Add custom pixel.
Name the pixel (e.g., ‘GTM pixel’) and open it.
In the Customer Privacy section, select:
- Not required (in the Permission section)
- Data collection does not qualify as data sale (in the Data sale section)
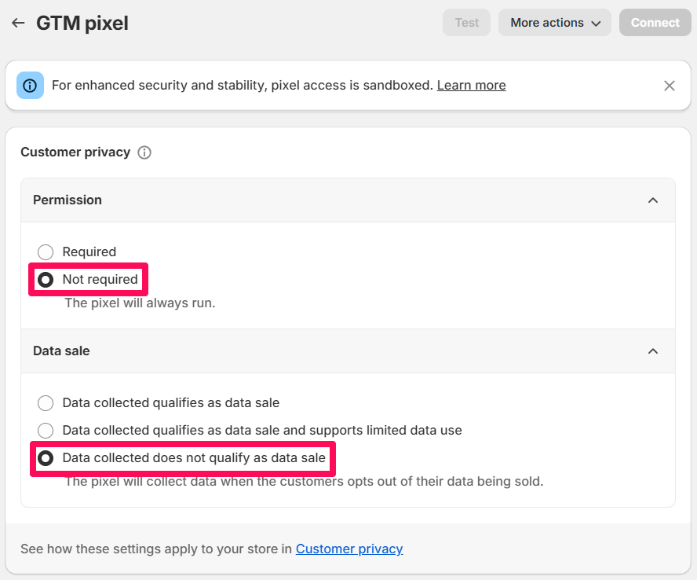
Then, scroll down to the Code section:
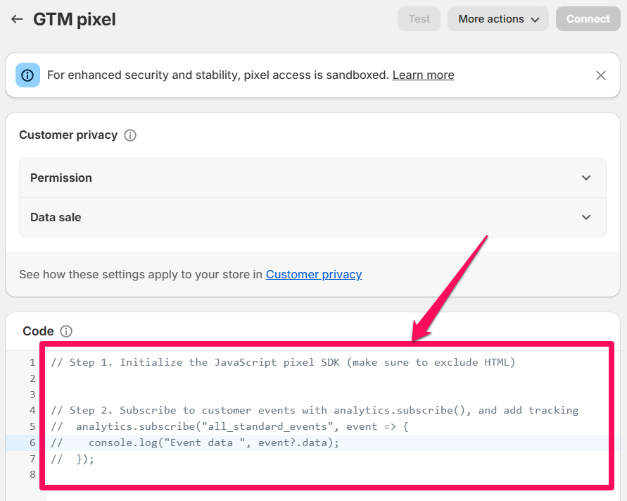
… and replace the placeholder code by Shopify with the contents of the ‘custom pixel’ script:
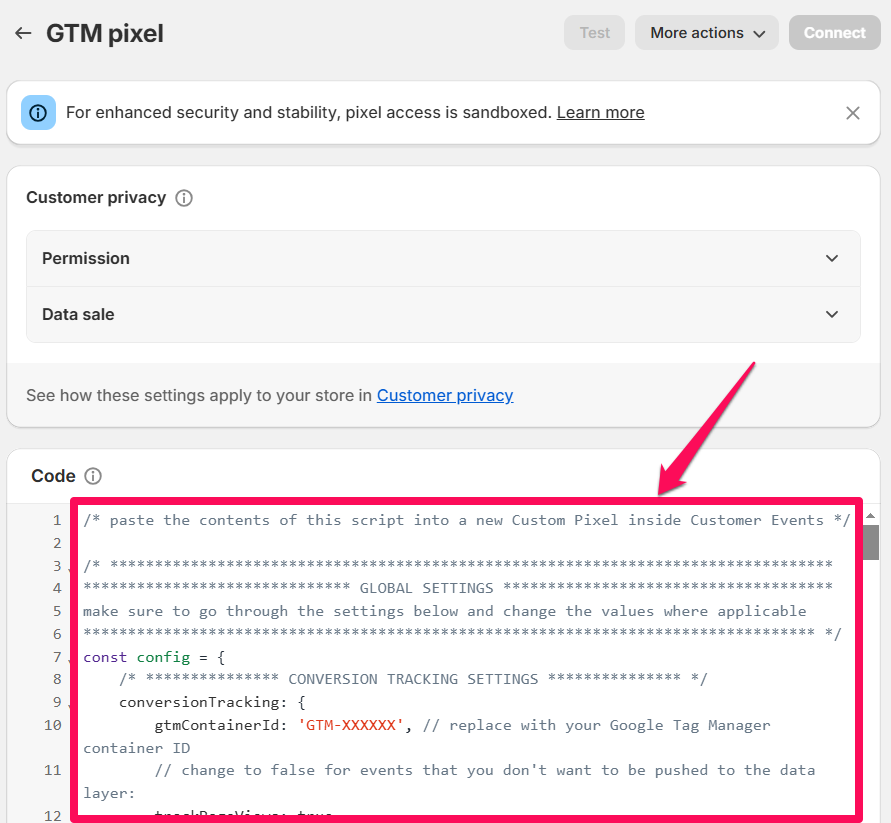
At the top of the custom pixel script, you’ll see a global settings section consisting of three parts – conversion tracking settings and store settings:
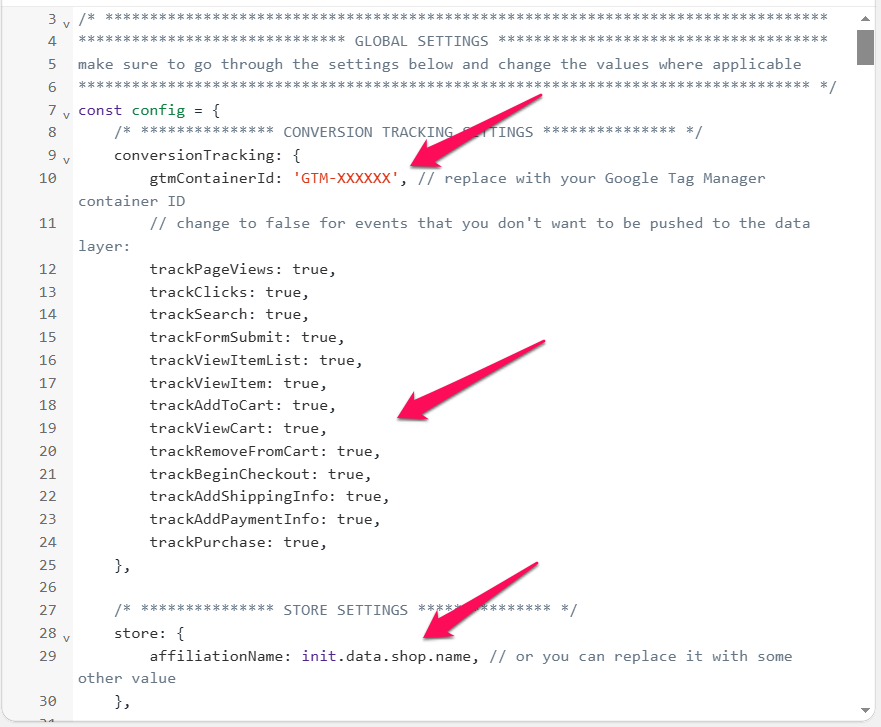
Review these settings – it’s the only place in the script where you need to make changes.
- Firstly, be sure to replace the GTM container ID placeholder with your actual one.
- As for the events, they’re all set to be tracked by default. If you want to disable any of them, you can do so by setting their value to false.
- Lastly, the affiliation. This is a parameter that’s used by the GA4 ecommerce setup. It automatically fetches your store’s name. If you’d prefer to use a custom value, simply replace it with your chosen text, enclosed in single quotes (e.g., ‘My Store Name’).
Finally, make sure to Save and Connect the custom pixel:
Testing
Due to the GTM’s Preview Mode not working with the custom pixels sandboxed environment, testing is done differently. Thus, brace yourself for a not-very-convenient troubleshooting process.
However, for these to work, your GTM container needs to be published. In other words, each time you make a change and want it reflected, you’ll need to publish those changes. Inconvenient, but unfortunately, this is the only way to test within Shopify’s sandboxed environment at the moment.
To verify that your data appears in the expected format – and to define triggers and variables for GTM, you can monitor the data layer, or log data to the console using these two methods:
#1. Observing the data layer
To view the data layer contents, open the browser’s developer tools (usually CTRL + SHIFT + I or F12), and go to the Console. Typing “dataLayer” right away will not work because the console, by default, looks at the global data layer on a page. But we are dealing with the sandbox; thus, we must first switch to it.
You might notice that there are two sandboxes available. Always choose the one that contains the word ‘CUSTOM-’ directly followed by some digits: e.g., web-pixel-sandbox-CUSTOM-120455513.
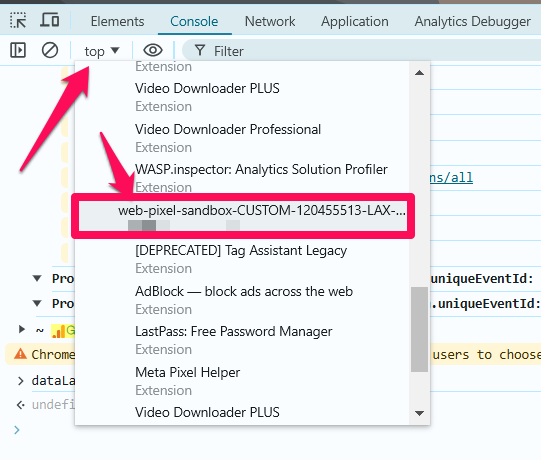
Once you select the correct sandbox, type “dataLayer” (without quotes) in the console and hit enter. You should see populated values there.
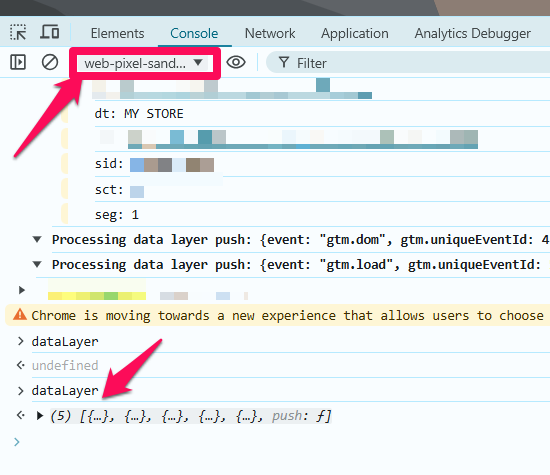
Unfortunately, the JavaScript context defaults to ‘top’ on every page load. Thus, you’ll need to manually switch the context every time.
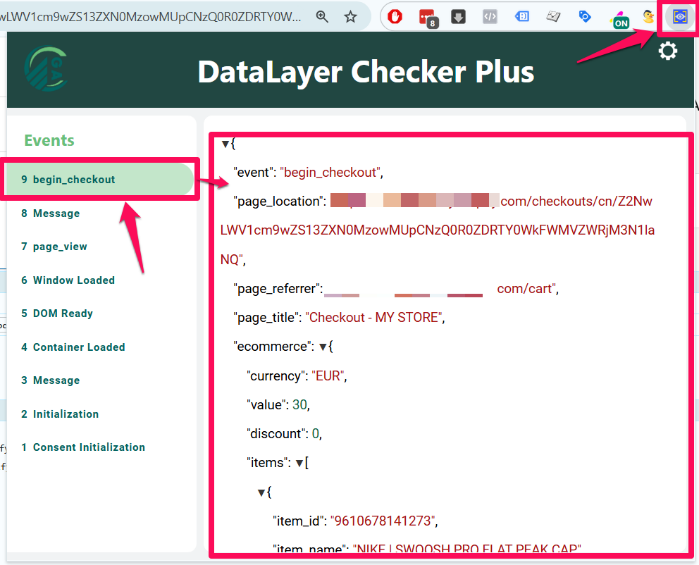
To streamline this, download the free Chrome extension called DataLayer Checker Plus. After installation, open its Settings (click the cog icon) and enable ‘Shopify Custom Pixel DataLayer Checker’. Otherwise, it won’t work on Shopify by default.
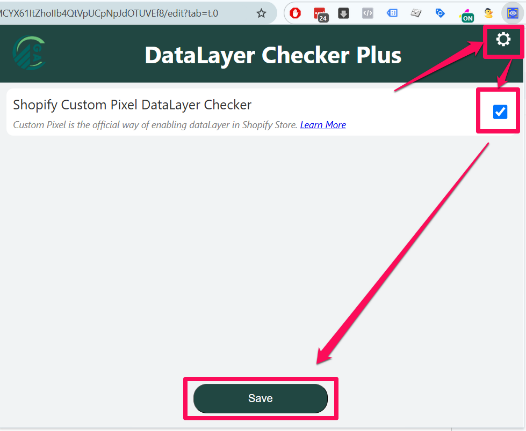
Having enabled this, using the extension is very simple – just click on the extension icon whenever you want to see the current contents of the data layer in a user-friendly format:

#2. Console logging
Another way to observe data before it’s sent to Google Analytics (or other platforms) is by logging it to the console. Add the following line to each event snippet in the custom pixel script:
console.log('Event data for ' + event.name + ': ', event.data, init);
For example, in an add_to_cart event, this line will log the following event data to the console:
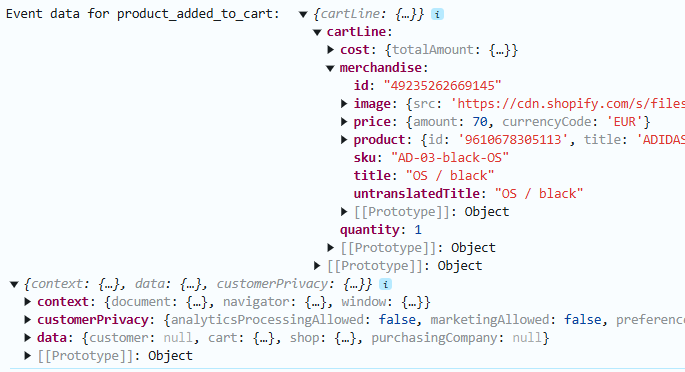
You can browse through this data to confirm accuracy and adjust tags or triggers as needed.
However, we don’t recommend this option unless you really know what you’re doing.
The next two methods allow us to go further by viewing outgoing network requests and received hits.
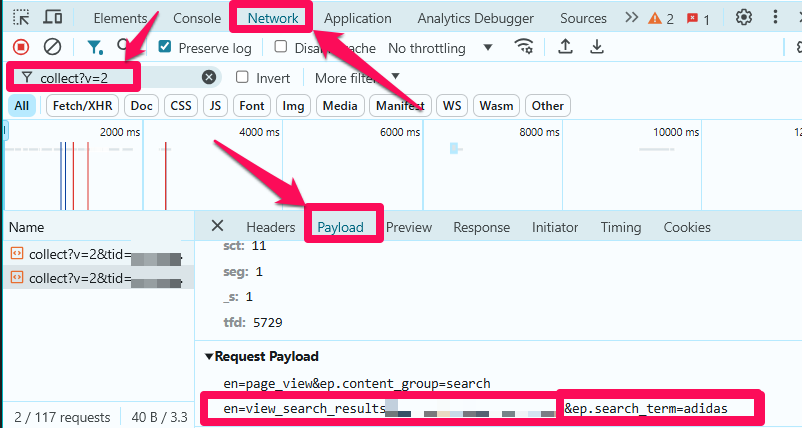
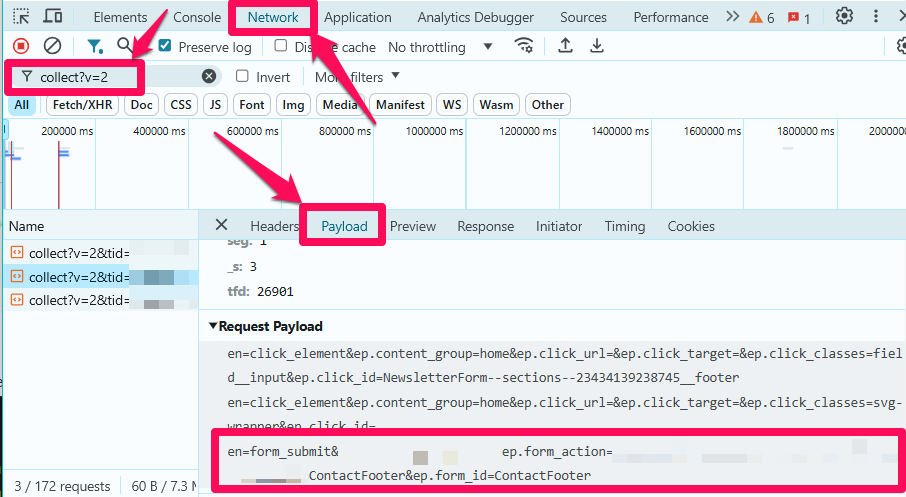
#3. Network requests
When Google Analytics will be installed (we’ll explain that later in this article), you will be able to troubleshoot the setup by using browser’s “Network tab”.
For a closer look at outgoing network requests, open developer tools, navigate to the Network tab, and filter the requests by collect?v=2 to only display requests relevant to Google Analytics 4.
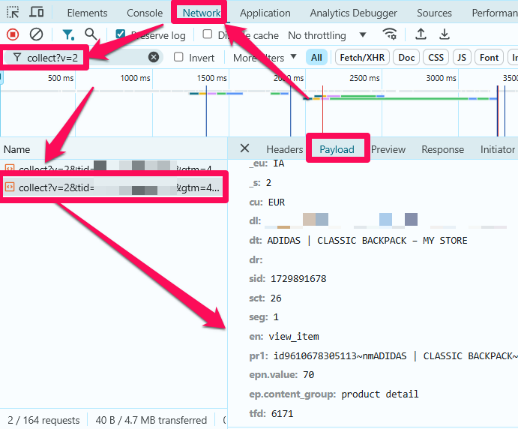
Clicking on a request will open its payload, allowing you to verify the data is being sent correctly for each parameter.
It’s important to note here that without GTM Preview Mode, GA4 batches events. This means that there might be a delay of several seconds between you completing an action and the event being actually sent to GA4.
Also (just a friendly reminder): If you just installed our custom codes on Shopify (but haven’t created a GA4 tag), then you won’t see the requests yet. Refer to this chapter of the blog post once the tags are created.
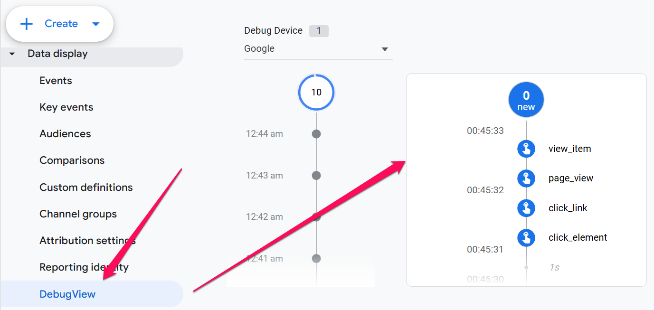
#4. Google Analytics Debugger Chrome extension
Download the Google Analytics Debugger extension, enable it, and visit your store (you’ll need to do this after you configure tags in GTM).
As you perform actions on your store, events will appear in GA4’s DebugView. You can access DebugView by going to GA4’s Admin > Property settings > Data display > DebugView.
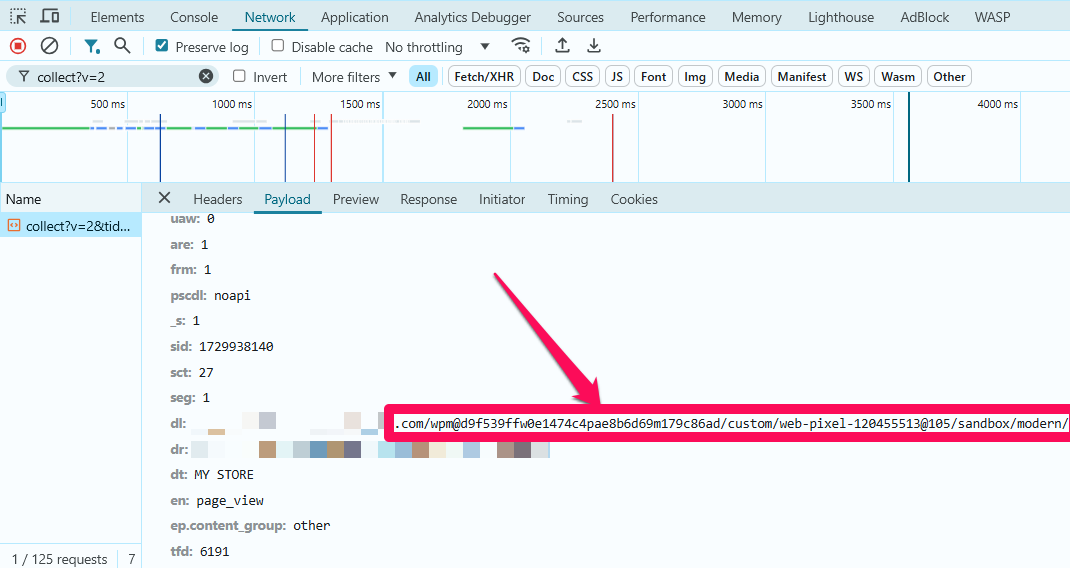
And that’s how you will have to test your setup. Now, let’s get to the fun part and configure your GTM tags to track all the events you’re interested in. We’ll also need to modify the default document location data, which is polluted by default. If you don’t do that, page URLs in your GA4 reports will look like this:
https://www.example.com/wpm@d9f219ffw0e1474c4pae8b6d69m179c86ad/custom/web-pixel-36176064@108/sandbox/modern/
Pageviews
To track page views, we subscribe to the page_viewed Customer Event in Shopify. We then send this event as page_view to the data layer for GTM trigger purposes.
| Customer Event subscribed to | Event pushed to the data layer |
| page_viewed | page_view |
As mentioned earlier, page information, such as the URL, will include unwanted identifiers by default due to limitations within Shopify’s sandboxed setup.
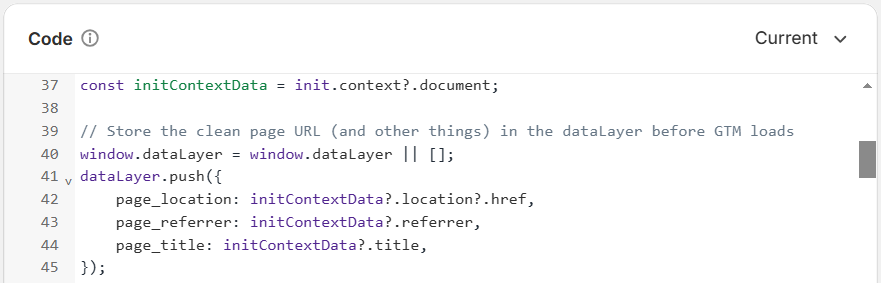
To obtain a clean page URL, we access event.context.document for all events, including page views:
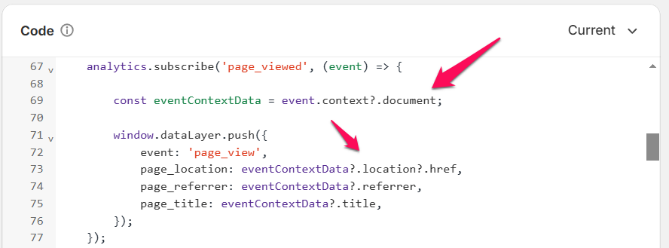
In addition to the page URL, we also retrieve the page referrer and title from the parent frame. This ensures GTM can access the most current data for Single Page Applications (SPA), which update content dynamically without a full page reload.
As a fallback, we retrieve and push the parent frame’s information also upon each page load, even before loading GTM:
Thanks to having this clean page information available in the data layer, we can easily override the default GA4 page parameters using GTM.
Lastly, there’s a limitation with the page referrer parameter – when navigating from checkout back to the storefront, the referrer will display the penultimate storefront page visited before entering checkout.
GTM implementation
#1. Set up a Google Tag
Add a Google Tag for GA4 and enter your GA4 measurement ID in the Tag ID field (or you can use a constant variable, like in the screenshot below).
We will separate page view tracking from the Google Tag by setting the send_page_view parameter to false:
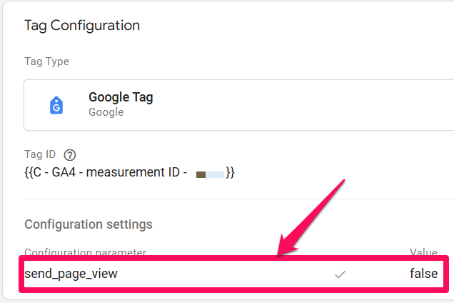
Set this tag to fire on the Initialization – All Pages trigger:
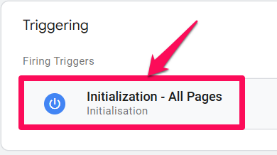
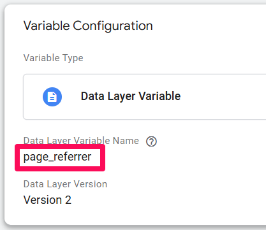
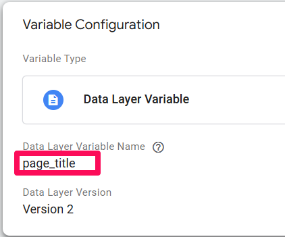
#2. Create Data Layer variables
Create the following three Data Layer variables in GTM for the page location, referrer, and title:
- page_location
- page_referrer
- page_title
These will pull clean page information from the parent frame. You can create data layer variables by going to Variables > New > Variable configuration > Data Layer variable.
#3. Create Event Settings variable
Since we want to reuse these 3 parameters across all events, it is a good idea to set them up within an Event Settings variable.
Navigate to User-Defined Variables > New > Variable configuration > Google Tag: Event settings variable. Add the page_location, page_referrer, and page_title parameters with their corresponding data layer variables that you just created:
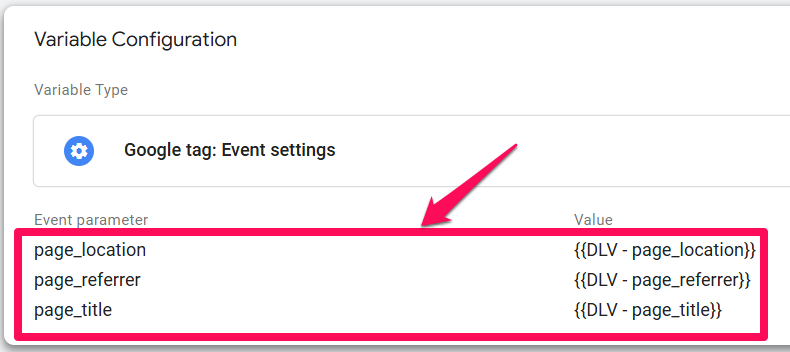
Save the variable.
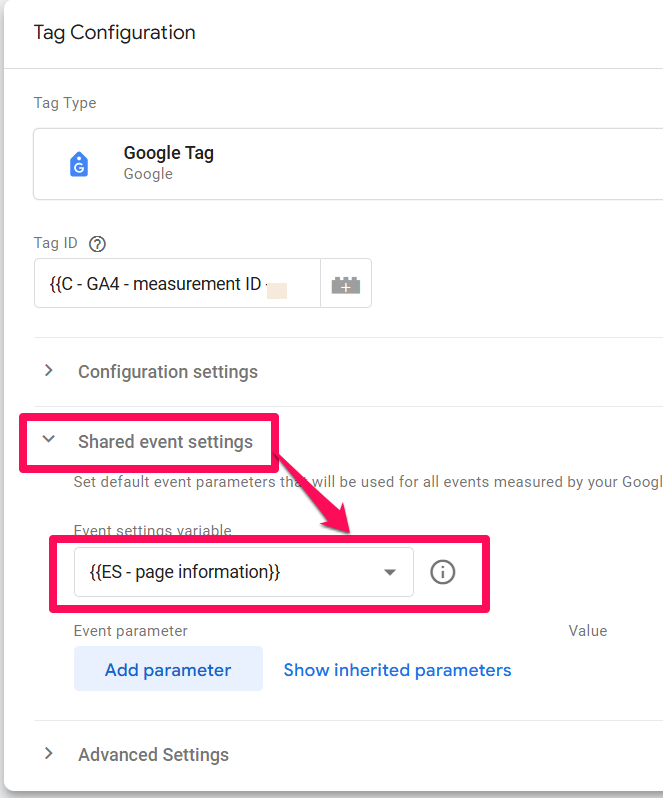
#4. Set up a GA4 Event tag (for page_view)
Create a new GA4 Event tag and add the Event Settings Variable you just created under Event Parameters:
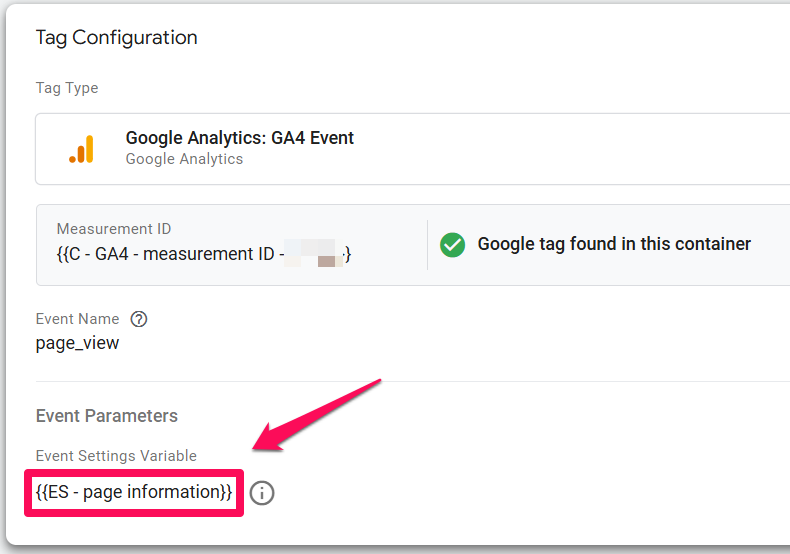
This ensures that the polluted page location is replaced by the clean URL from the parent frame.
#5. Set up the trigger
Create a new Custom Event trigger using the page_view event name that is pushed to the data layer:
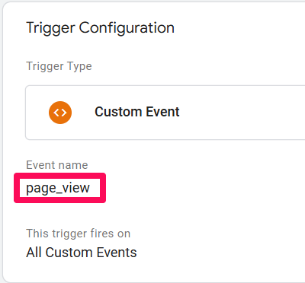
Why page_view? Because that’s the event name that our custom pixel code pushes to the data layer.
#6. Modify your Google Tag
Finally, modify your GA4 Google Tag to also include the Event Settings variable that holds the clean page information:
Testing
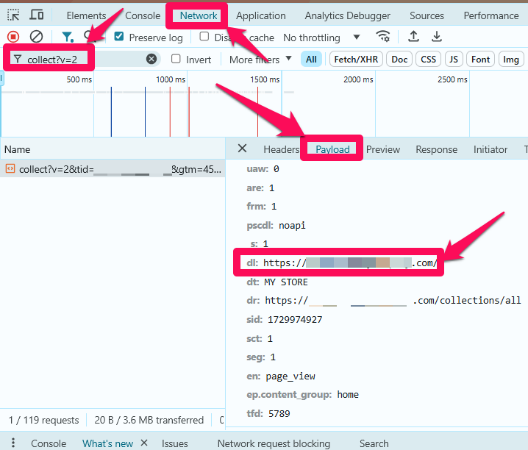
Publish your GTM container, open your store’s website, and test the setup using one or more of the testing methods covered in the previous section.
If everything is configured correctly, you should see a page view network request to GA4 with the ‘dl’ parameter (document location) containing the clean page URL:
Ecommerce events
Our solution tracks the following ecommerce events throughout the customer journey, listed in their typical order:
| Shopify customer event | Event pushed to the data layer |
| collection_viewed | view_item_list |
| product_viewed | view_item |
| product_added_to_cart | add_to_cart |
| cart_viewed | view_cart |
| product_removed_from_cart | remove_from_cart |
| checkout_started | begin_checkout |
| checkout_shipping_info_submitted | add_shipping_info |
| payment_info_submitted | add_payment_info |
| checkout_completed | purchase |
Each event is formatted according to GA4 requirements.
Our solution includes robust handling of discounts, supporting various discount types and their combinations. From the begin_checkout to purchase events, we capture coupon and discount parameters at both the event and item levels:
- Coupon parameter. Stores the coupon code as a string, like ‘BlackFriday2025’. If multiple coupons are used, they will be combined into one string, separated by commas (e.g., ‘BlackFriday2025,CyberMonday2025’).
- Discount parameter. Includes the total discount amount, covering both per-item and per-order discounts. The price (at the item level) and value (at the event level) parameters are then adjusted using this amount in line with GA4’s reaquirements.
- Product ID. This solution uses a simple product ID across all events. If you also need the data in a format required by Google Ads dynamic remarketing (with more tools being supported coming soon), feel free to contact Karol via his website.
For dynamic remarketing in Google Ads, it’s essential that the product ID sent matches the ID in Google Merchant Center (GMC), or other product management tool. Note that GMC product IDs often use a more comprehensive format, depending on your feed setup.
Handling multiple product ID formats falls outside the scope of this article. If your setup requires a different format, contact Karol – he can provide a custom script tailored to support different product ID formats.
GTM implementation
#1. Set up a GA4 Event tag
Go to Tags > New > GA4 Event tag. Enter your GA4’s measurement ID or a constant variable that contains it. Set the Event Name to {{Event}} variable.
As for Event Parameters, the setup is the same as in the page_view tag: include the Event Settings variable you created earlier.
Additionally, navigate to More Settings > Ecommerce, and enable the Send Ecommerce data option, whilst keeping the data source set to Data Layer.
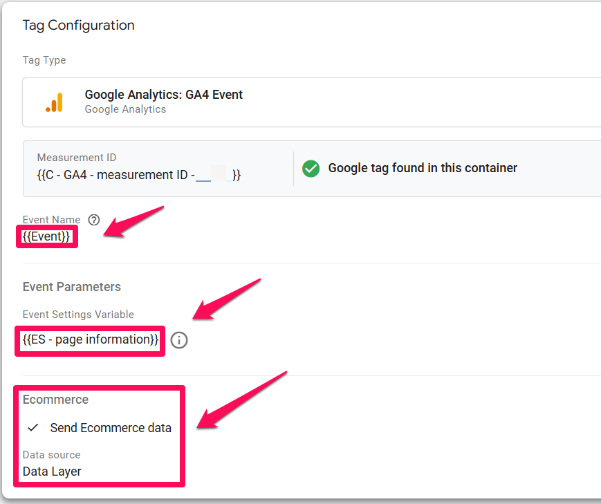
And that’s it for the tag. Thanks to our script generating the data in the format required by GA4, no further configuration is needed – this single tag will handle all e-commerce events.
#2. Set up the trigger
Create a new Custom Event trigger. Enter the following in the Event Name field:
view_item_list|view_item|add_to_cart|view_cart|remove_from_cart|begin_checkout|add_shipping_info|add_payment_info|purchase
… and make sure to enable the Use regex matching option.
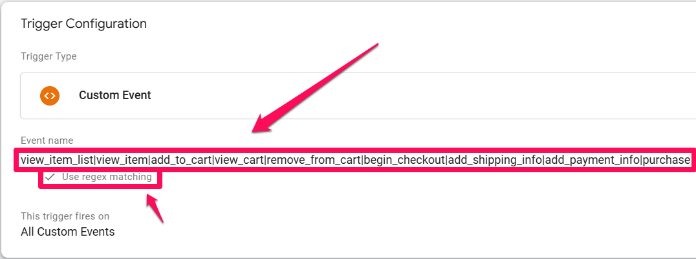
The pipes (|) act as OR operators, ensuring the tag fires for any of these events along with relevant ecommerce and page data.
Testing
Prerequisites:
- download the Data Layer Checker Plus Chrome extension and enable it for Shopify
- create an order or product-level discount with arbitrary amounts for testing purposes, if you want
To test the setup, publish the GTM container. If needed, you can also publish changes of your store’s website. Open the browser’s developer tools, too.
We’ll be using the Data Layer Checker Plus Chrome extension to observe the data layer contents and the network tab in the developer tools to view outgoing requests to GA4.
We’ll focus on testing begin_checkout and add_shipping_info events, but the same principle applies to other e-commerce events.
begin_checkout. Initiate checkout at your store, click the Data Layer Checker Plus extension, and look for the begin_checkout event. Expand the data by clicking the black arrows to inspect the parameters and their values.
If everything looks correct, go to the network tab in the developer tools and filter by collect?v=2 to display only GA4 requests.
Open the begin_checkout request, which should be the latest one at the bottom. To confirm this, scroll to the bottom of the request and look for en: begin_checkout (‘en’ stands for ‘event name’). If it’s not visible, refresh the page with the developer tools open.
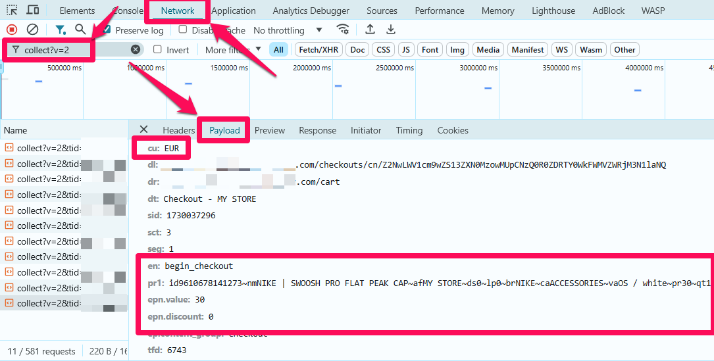
Ensure the following parameters contain the correct data:
- cu (currency)
- epn.value (total event value)
- epn.discount (discount amount)
Inside the pr1 (product 1) parameter, verify the item-level details separated by the tilde symbol (~):
- id (item ID),
- nm (item name),
- af (affiliation),
- ds (discount amount),
- lp (index),
- br (brand),
- ca (category),
- va (variant),
- pr (price),
- qt (quantity)
Next, add the discount code that you created earlier and click Apply.
add_shipping_info. Fill in delivery details and click the Card number field in the Payment section to trigger the add_shipping_info event.
Again, to verify the data layer contents, open the Data Layer Checker Plus extension and click the add_shipping_info event:
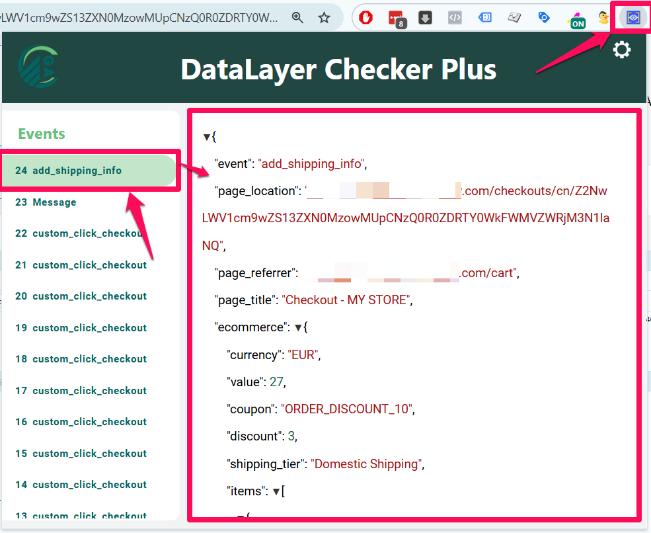
Verify that it also contains the correct coupon, discount amount, and value.
Next, open the latest network request in the developer tools and inspect its data:
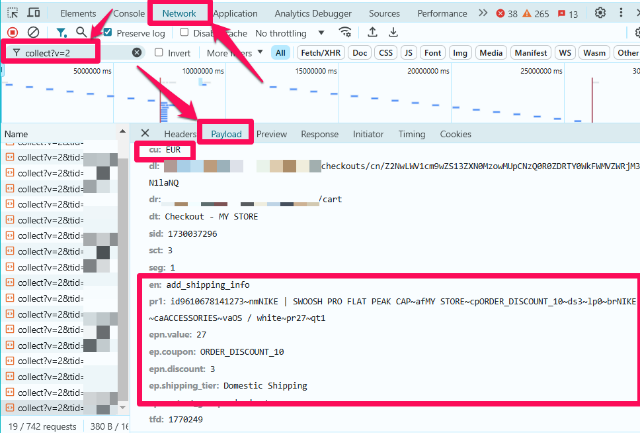
Ensure that the ep.coupon (coupon code) and ep.shipping_tier (chosen shipping method name) contain the expected data. Also, verify cp (coupon code) at the item level.
Make sure to repeat this process for all events throughout the customer journey.
TIP. For testing purchases on Shopify, you can:
- use a 100% discount code, or
- enable test mode for Stripe.
Obviously, the latter is more robust.
To enable Stripe’s test mode, navigate to Settings > Payments > Stripe > Manage. Scroll down to the bottom and toggle Test mode:
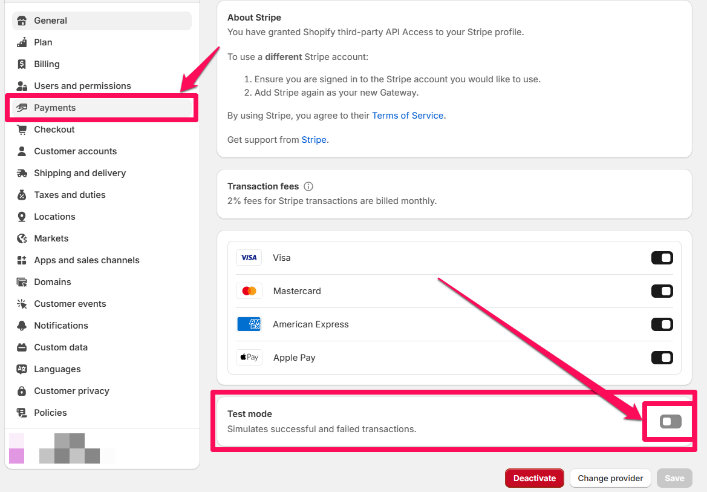
Once test mode is activated, you can enter the following details to simulate a successful transaction from a VISA card:
- card number: 4242424242424242
- CVC: any 3 digits
- expiry date: any future date
Refer to the official Shopify or Stripe documentation to learn more about test payments.
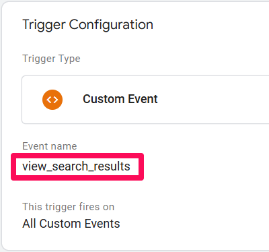
Site search
Site search tracking can be implemented by subscribing to the search_submitted Customer Event in Shopify. For GTM trigger purposes, this event is sent to the data layer as view_search_results.
| Shopify customer event | Event pushed to the data layer |
| search_submitted | view_search_results |
It’s worth mentioning that the search event will only fire when the user explicitly submits the search, either by pressing ‘Enter’ or clicking the search button.
For dynamic search results (where results appear as the user types and clicking on a result redirects directly to a product page), this event will not fire.
GTM implementation
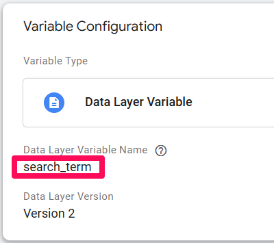
#1. Create a Data Layer variable
Create a new Data Layer Variable to pull the search term data.
Go to User-Defined Variables > New > Variable configuration > Data Layer variable and enter search_term as the name: .
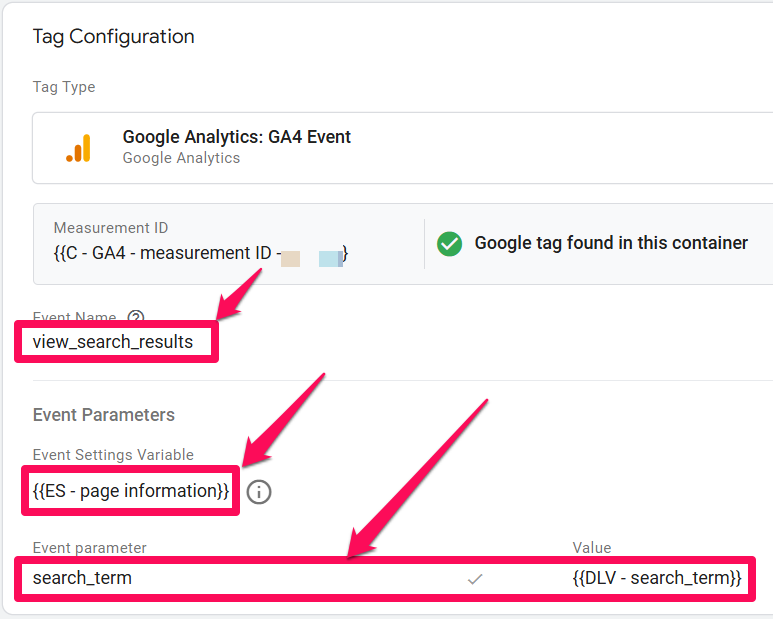
#2. Set up a GA4 Event tag
Create a new GA4 Event tag with your GA4’s measurement ID. Enter the view_search_results as the Event Name.
For Event Parameters, same as for all the other events, add the Event Settings variable created earlier that holds the clean page location, referrer, and title information.
Additionally, add one more event parameter: search_term with its corresponding Data Layer variable created above.
#3. Set up the trigger
Create a new Custom Event trigger with the view_search_results Event name:
Testing
If everything has been configured correctly, you should see a search network request to GA4 upon performing a site search. Verify the the ep.search_term parameter contains the expected data:
Form submissions
We can track form submissions by subscribing to the form_submitted Customer Event in Shopify. For GTM trigger purposes, this event is sent to the data layer as form_submit.
| Shopify customer event | Event pushed to the data layer |
| form_submitted | form_submit |
It’s worth noting that, by default, the form submission event also triggers when a product is added to cart. Since we already track this action using the add_to_cart event, we’ve modified the code so that it won’t fire in this case.
Additionally, there is a limitation with the form submission event that can affect tracking accuracy. The event fires even:
- If you attempt to submit the form and a CAPTCHA appears, the event triggers twice – once upon form submission and once after the CAPTCHA is completed. This can be managed by filtering GA4 reports with form_id = captcha_form.
- Upon unsuccessful submissions (when an error occurs). Unfortunately, this limitation doesn’t currently have a known workaround.
GTM implementation
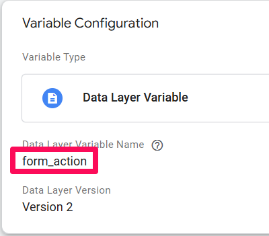
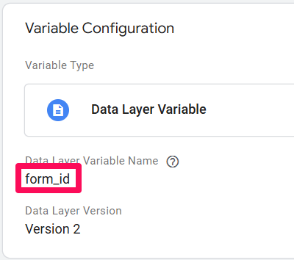
#1. Create Data Layer variables
Create two Data Layer variables – one for the form action and another for form ID:
- form_action (contains the URL to which the user is redirected after form submission)
- form_id (contains the HTML ID of the form)
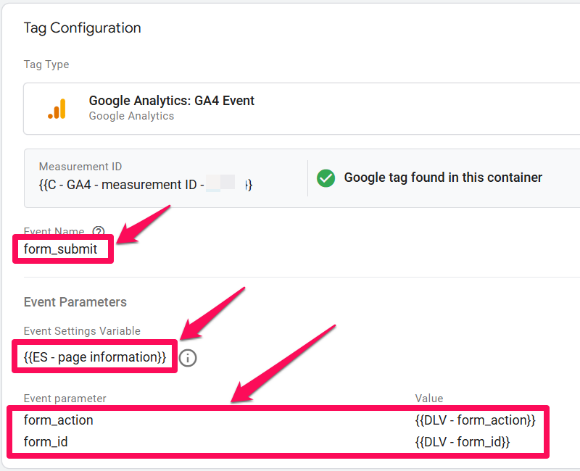
#2. Set up a GA4 Event tag
Create a new GA4 Event tag with your GA4’s measurement ID. Enter the form_submit as the Event Name.
For Event Parameters, same as for all the other events, add the Event Settings variable created earlier that holds the clean page location, referrer, and title information.
Additionally, add two more event parameters – form_action and form_id– and their corresponding Data Layer variables, which were created above.
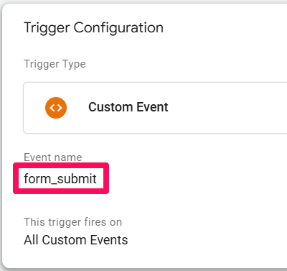
#3. Set up the trigger
Create a Custom Event trigger with Event Name set to form_submit:
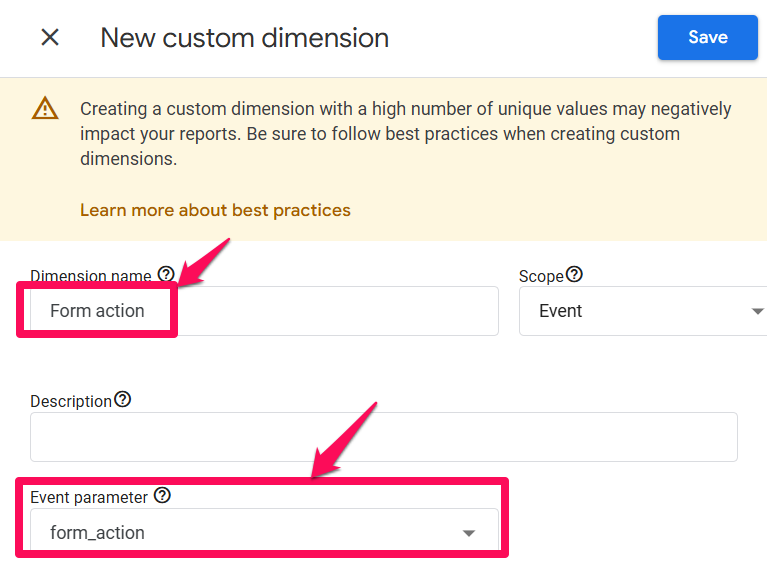
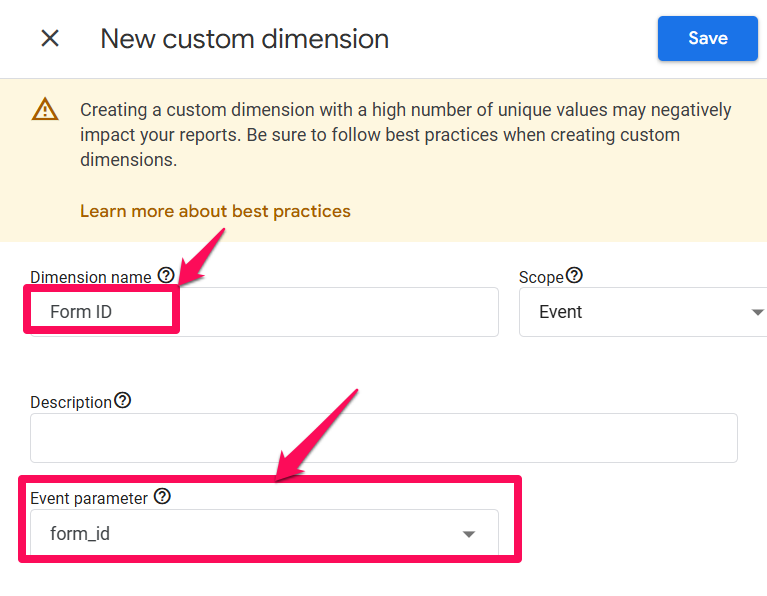
#4. Create a custom dimension in GA4
To make the form_action and form_id parameters also available in your standard GA4 reports, register them as custom dimensions.
Navigate to your GA4’s Admin > Property settings > Data display > Custom definitions and click the ‘Create custom dimension’ button.
Testing
After setting up the tag and trigger, publish your GTM container and test.
Upon submitting a form on your store, you should see the relevant network request to GA4. Verify the ep.form_action and ep.form_id parameters contain the expected data:
Clicks
Tracking clicks in Shopify requires a hybrid approach due to limitations with Shopify’s clicked Customer Event. While Shopify’s clicked Customer Event works on both storefront and checkout pages, it only captures element clicks (not link clicks) and provides limited data. To address this, we’ve implemented custom click events on storefront pages, allowing for tracking of both element and link clicks with richer data.
This hybrid setup allows us to capture click data on both storefront and checkout pages, while gathering more comprehensive click data on storefront pages:
- On storefront pages, we use our custom_click and custom_link_click custom events, which capture both element and link clicks, respectively. These events also utilize code borrowed from Simo Ahava to obtain the full CSS path of the clicked element.
- On checkout pages, we use Shopify’s clicked Customer Event, which tracks only element clicks.
This setup allows for broader tracking than would be possible using only Shopify’s clicked Customer Event.
GTM implementation
Tracking all clicks wouldn’t be a good idea, as it could increase the chances of sampling and overwhelm your GA4 reports in general. Instead, you can use the click data in the data layer made available by our script to focus on tracking specific and meaningful interactions, such as menu clicks.
Available Click Data
The following data is available in the data layer when a click occurs:
| parameter | description |
| click_classes | CSS classes applied to the clicked element (if applicable) |
| click_id | ID of the clicked element (if applicable) |
| click_target | Target attribute of the clicked element (if applicable) |
| click_text | Text content of the clicked element (if applicable) |
| click_url | URL of the clicked link (if applicable) |
| click_element | Full CSS path of the clicked element (helpful for trigger configuration) |
Note: The click_element variable can be helpful for configuring triggers or using RegEx tables. However, because it can be lengthy and include unique values, avoid sending it to GA4 directly.
Moreover, it contains the actual string (of the CSS path), not an object. Thus, the ‘matches CSS selector’ condition can’t be used with it inside a trigger. Instead, opt for the ‘matches RegEx’ condition.
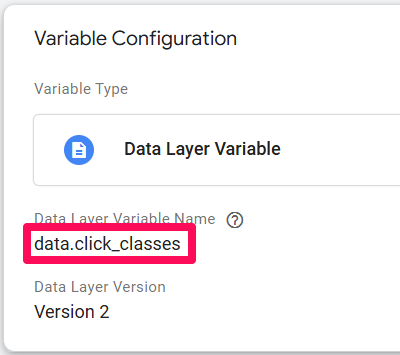
To capture this data, o set up the following Data Layer variables:
- data.click_classes
- data.click_id
- data.click_target
- data.click_text
- data.click_url
- data.click_element
Here’s an example of the data.click_classes:
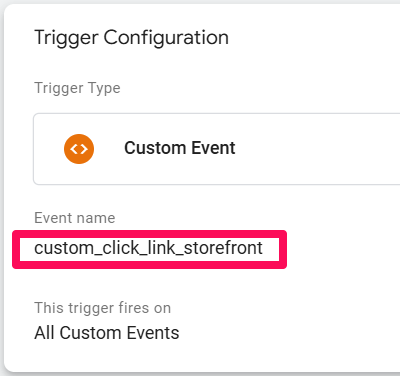
For triggers, you need to use Custom Event triggers. These are the event names available:
| Event name pushed to data layer | Description |
| custom_click_storefront | Click on an element on the storefront. |
| custom_click_link_storefront | Click on a link on the storefront. |
| custom_click_checkout | Click on an element on the checkout. |
As an example for this article, let’s configure menu link click tracking in GTM.
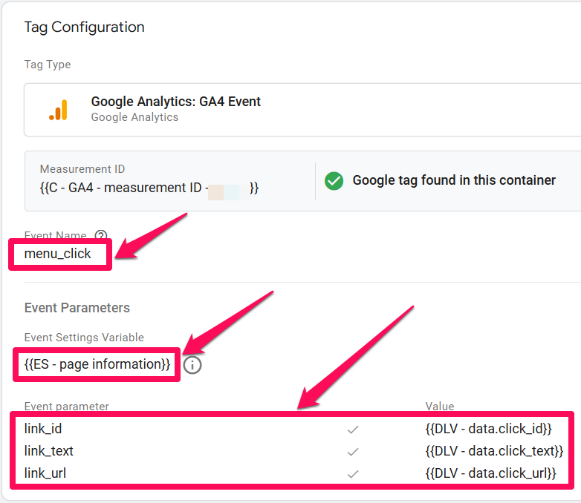
Set up a GA4 Event tag for link clicks
Create a new GA4 Event tag with your GA4’s measurement ID. Enter the event name, e.g., ‘menu_click’.
For Event Parameters, the same as for all the other events, add the Event Settings variable created earlier that holds the clean page location, referrer, and title information.
Additionally, we will want to send the click ID, text, and URL to GA4. You can also send other click data to GA4, but we highly recommend to only send the data that you know will be useful for your specific use case. Do not send any arbitrary data to GA4 just because you can or for ‘just in case’.
Therefore, add the following three Event parameters and their corresponding Data Layer variables:
| Event parameter | Data Layer variable |
| link_id | data.click_id |
| link_text | data.click_text |
| link_url | data.click_url |
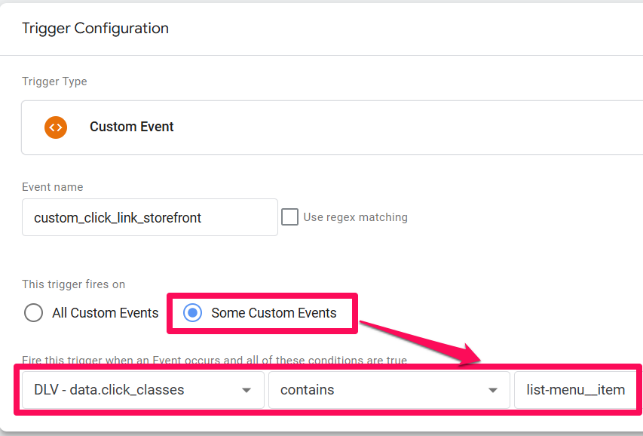
Since link clicks can only be tracked on the storefront (and the menu is only present on the storefront), we will only need one Custom Event trigger with the Event Name set to custom_click_link_storefront:
We still need to narrow this trigger to menu clicks only.
We can do that using the CSS classes. Right-click on one of your menu items, click Inspect, and look for the <a> tag. Inside the tag, you’ll find the class attribute:
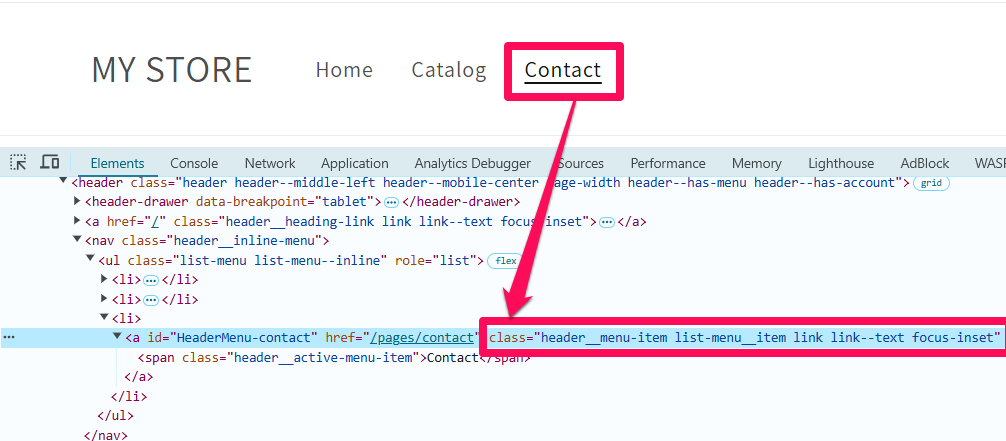
Make sure to inspect the menu items on both PC and mobile versions, as different classes may be applied to different devices.
To inspect on a mobile device, click the device switcher icon in the upper left corner of developer tools and resize until the menu changes to a hamburger menu. Then, refresh the page and right click one of the menu items again, and click inspect:
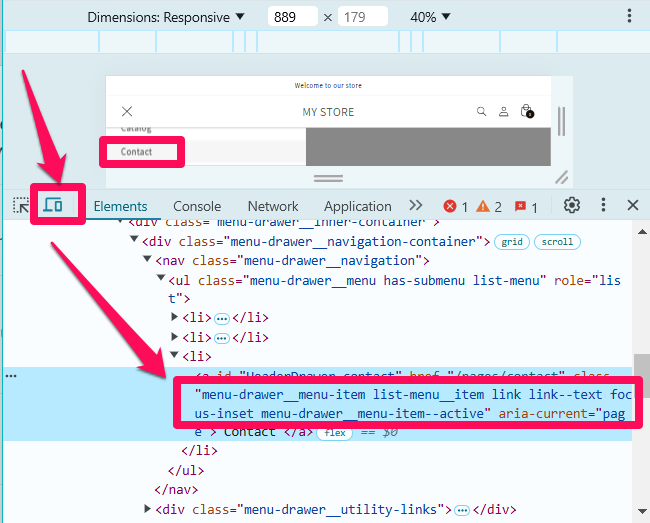
As you can see, the common class is list-menu__item, which we will use for narrowing down the trigger:
Publish the container.
Testing
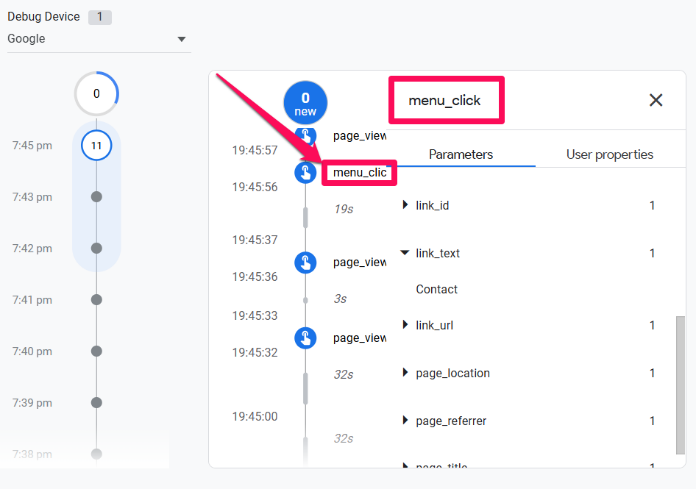
Network requests for link clicks may not appear in the Network tab if the redirect happens too fast. However, thanks to GA4’s beam technology, they will still be collected. You can verify this by turning on the Google Analytics Debugger Chrome extension on your website.
Perform a few clicks on the menu items and check the GA4’s DebugView – the events should appear shortly:
Bonus 1 – content group
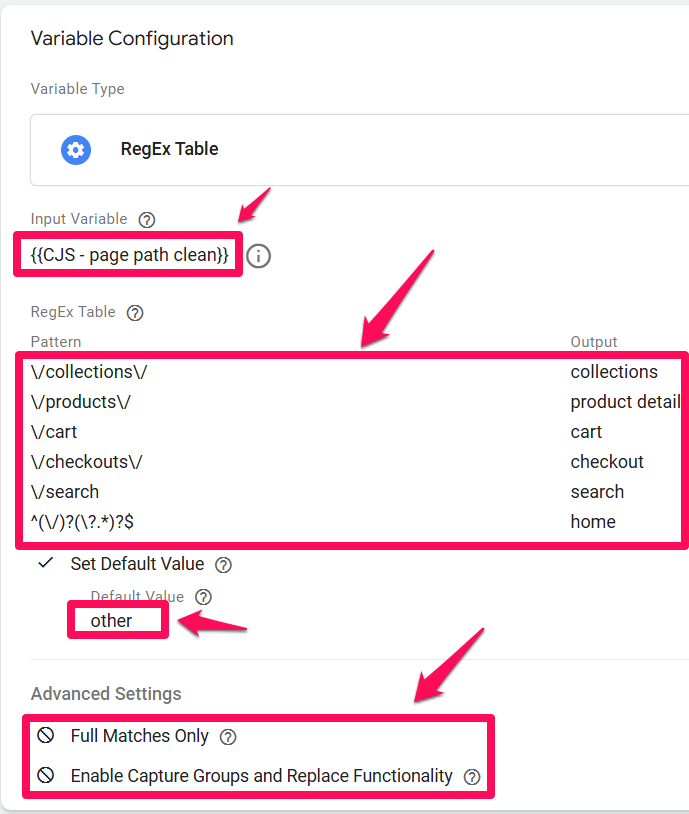
To enhance your analyses, you can also add content group tracking. This will enable you to break down your reports by page types. To accomplish this, we’ll use a RegEx Table variable paired with a clean page path variable.
GTM implementation
#1. Set up a Custom JavaScript variable
Start by creating a Custom JavaScript variable. This variable will extract only the path part of the clean URL:
function() {
  var cleanUrl = {{DLV - page_location}};
  var urlObject = new URL(cleanUrl);
  return urlObject.pathname;
}
This code takes the clean page location and returns only the pathname.
#2. Configure a RegEx table variable
Create a new RegEx Table variable, using the custom path variable you just created as the Input Variable.
For the RegEx table itself, you can use the following examples:
| pattern | output |
| \/collections\/ | collections |
| \/products\/ | product detail |
| \/cart | cart |
| \/checkouts\/ | checkout |
| \/search | search |
| ^(\/)?(\?.*)?$ | home |
This setup lets GTM look for the specified patterns in the URL path and return the corresponding page category specified in the Output column.
TIP. Set a default value like ‘other’ for cases where the URL path doesn’t match any pattern listed.
Finally, uncheck both ‘Full Matches Only’ and ‘Enable Capture Groups and Replace Functionality’ options under the Advanced Settings.
#3. Add the RegEx Table variable to the Event Settings variable
To ensure consistency across all events, add this RegEx Table variable to the Event Settings variable you created earlier:
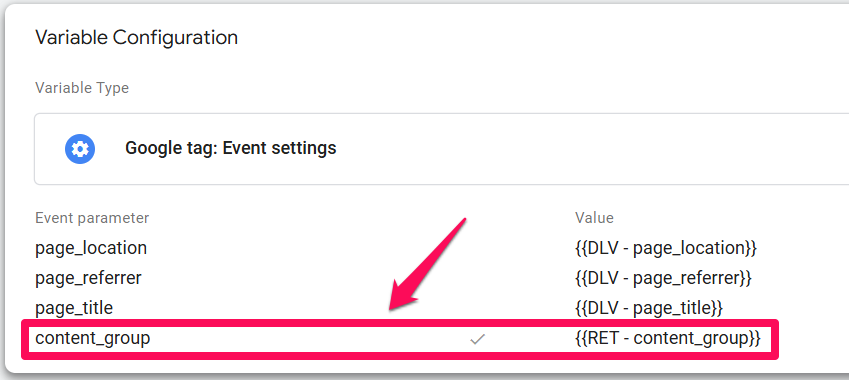
From now on, all events will contain an easy-to-read content group parameter:
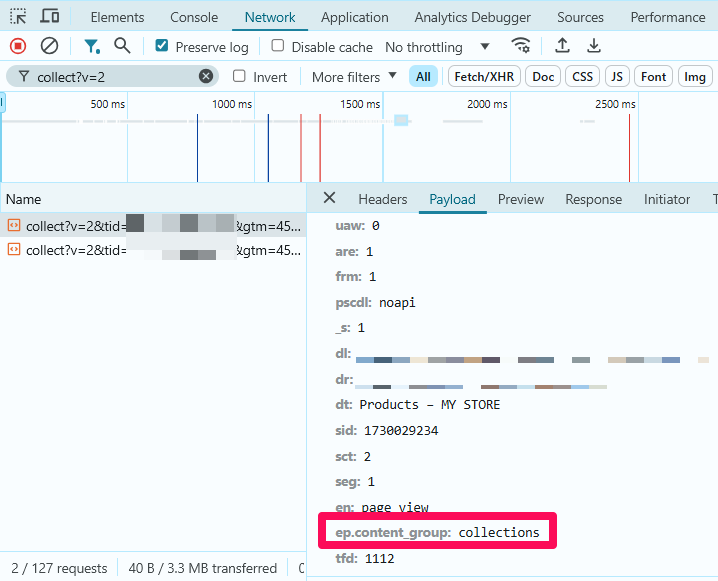
You can read this guide to learn how to find that data in the reports.
Bonus 2 – GTM container template
If you wish to save time on configuring the GTM container, you can download our free GTM container template that works seamlessly with our tracking scripts.
Please note for click tracking, this template includes only the essential triggers and Data Layer variables. You’ll still need to set up specific click tracking configurations tailored to your needs following the steps in Clicks – GTM implementation.
You can download the template here.
Setting Up the Template
After downloading, follow these steps to set it up:
#1. Import the template
Import the template into GTM by going to Admin > Container > Import Container. For more detailed information, you can refer to this article.
#2. Update the GA4 measurement ID variable
Go to User-Defined Variables and find the variable labeled C – GA4 – measurement ID – XXXXXX:
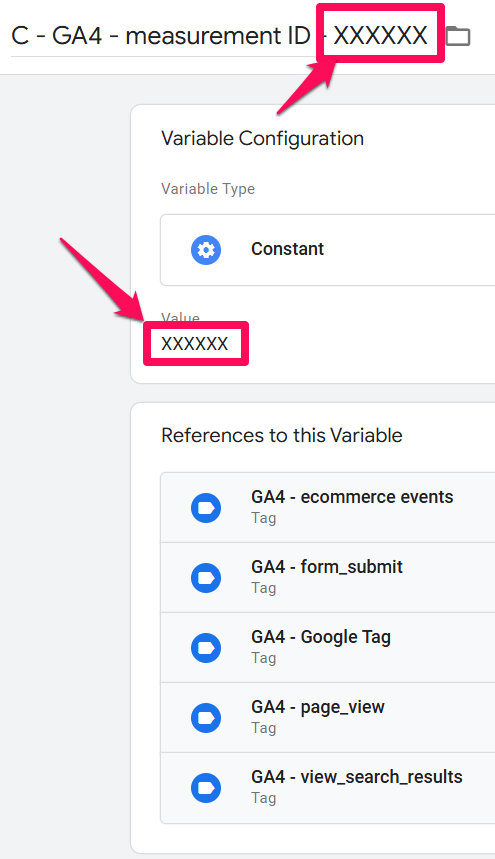
Inside the variable, replace the placeholder XXXXXX value with your actual GA4 measurement ID that you can find in your GA4’s Admin > Property settings > Data streams.
Additionally, also replace the placeholder in the variable name with the actual ID to keep things organized.
And that’s it – publish the container, and you’re all set!
With these simple adjustments, the container is ready to work with our tracking scripts.
Troubleshooting & FAQ
- My GA4 reports show duplicate purchase data. What’s wrong? You likely have another GA4 integration active. The most common cause is the native “Google & YouTube” sales channel in Shopify. Make sure to disable its conversion tracking to avoid sending duplicate data . Also, check for any old tracking scripts in the “Additional scripts” section of your checkout settings.
- Why can’t I see my events in the GTM Preview mode? This is an expected limitation of using Shopify’s Custom Pixel. The sandboxed environment prevents GTM’s Preview mode from connecting. You must use the alternative testing methods described in this guide, such as your browser’s Network tab or the GA4 DebugView.
Install Google Tag Manager and GA4 on Shopify with Custom Pixel: Final words
To wrap things up, setting up Google Tag Manager and GA4 on Shopify, especially within the constraints of Shopify’s new environment, may seem challenging at first, but it’s absolutely manageable with the right approach.
By following these steps and using the scripts provided, you’ll have a streamlined, effective tracking setup across your Shopify store. Here are the key points to remember:
- Understand the limitations first. Before you begin, be aware of the major drawbacks: GTM Preview Mode will not work, and cross-domain tracking is not supported.
- Follow the 3-script setup. Proper installation requires adding three scripts from the GitHub repository: the gtm-customer-events-storefront script, the theme script, and the custom pixel script.
- Avoid duplicate data. After implementing this solution, make sure to disable any other GA4 integrations, like the native “Google & YouTube” sales channel, to prevent your data from being duplicated.
- Verification is manual but necessary. Since Preview Mode is disabled, you must use tools like the GA4 DebugView, the DataLayer Checker Plus extension, or your browser’s Network tab to verify that your tags are firing correctly.
We hope that you found this solution helpful. If you need any further help, feel free to reach out to Karol via his website or LinkedIn.


67 COMMENTS
Hi! Thanks for the article! I just wanted to ask about the solution Shopify offers in their official manual. Everything looks much simpler there and seems to work. They suggest adding GTM code along with commands for Analytics via Shopify Custom Pixel (a code example is also in the manual), and that's it. I've tested on several sites, and everything seems to work without problems, including Enhanced Conversions. Or are there any limitations in the Shopify method?
Thanks!
Hi Alex, the example code that Shopify offers for the custom pixel implementation does indeed work. Think of our code in this blog post as an extension of the Shopify code example to make it more robust and easier to re-use across multiple Shopify stores. For example, Shopify code examples only provide a very basic discount handling, whereas our solution offers a comprehensive one.
The limitations mentioned in this article regarding the sandboxed environment apply to the Shopify code example as well.
Thanks for sharing this resourceful insights generously! Just wonder whether Googles ads conversion tracking will be affected if turning off the Google & YouTube sales channel or related events need to be created for Gads remarketing on GTM?
Thank you for creating this guide. We have struggled with robust tracking since changing to checkout extensibility. The Google and YouTube app is well known to not pass all of the transactions to GA4. Will this tracking metho be more accurate?
I cannot guarantee for all possibles projects/websites,but the accuracy should be better (unless you have recurring payments. Those are not handled).
Thanks for the comprehensive guide. I noticed my GA4 is tracking site searches as form_submit as well. Is there a way to stop that from happening? It tracks normal form submissions as form_submit fine. Thanks! :)
When the search form is submitted, see what form action and form id do you have there. Then make the trigger more precise to exclude that.
It worked, thank you so much!
Hi!
Thank you very much for this detailed "how-to".
I'm just wondering how can we integrate the enhanced conversions for Google Ads with your solution?
I mean, all the user data we can collect (name, mail, adress)?
I would like to access these information in the datalayer to create a new user data variable.
Thank you,
Cédric
All that data is included in the purchase data layer. The blog post explains how to see the data layer
Hi,
This is very helpful, thanks!
I would be very interested in an article about consent mode for shopify as well, I'm really struggling with that part. (using cookiebot).
In terms of the events themselved, does the view_item_list event trigger for product careousels found on PDPs as well or is it just for category pages?
Thanks!
I'd really like the Consent Manager, GTM, and Shopify documentation!
I use Termly, and sometimes I do wonder if it's configured properly with GDPR for my marketing and analytics cookies.
This is really an amazing guide! Thank you so much for this! I got evertyhing to work I would just love for all this to work with Cookiebot so I would love a guide on this!
Thanks for this effort.
I'm facing an issue with reading the cookies on the Checkout Extensibility and wonder if you encountered the same and were able to find a workaround. We enabled the OneTrust app in the Extensibility pixel, and the banner works fine, but if the user changes the consent preference, the GTM reads the previous cookie value instead of the updated one, although the browser cookie seems to be updated fine according to the user's consent preference.
Thanks in advance!
Best setup for Non-plus Shopify users.
Please how do i approach Google Ads Conversion Tracking with this script.
Would love to know too!
For Server Side Tracking when we change custom domain and use custom loder so hwo to we add the custom domain and coustom loder in the script
Thank you for this in-depth tutorial! I just wanted to add that the blog you mentioned about setting up Cookiebot on Shopify would be a fantastic addition as well.
Nice article! I'm trying to manage it on my demo shop.
The key point on which i'm having difficulty, and which is not analyzed in your guide, is the one related to Consent Mode V2.
I tried to set cookies in the custom pixel, and i can read and interpret them from GTM, but i still have to go and reset things continuously.
Also the shopify events are not postponed, so once it has done the datalayer.push of the page_view, when i update the consent this event is not postponed.
Do you have any solution about it?
That's what was mentioned in the article. Consent setup would require different code and setup. And we asked if people would be interested in another guide for the future.
for sure I'm interessed :)
I'm trying to do it by myself. Now i'm triyng to set gtag('consent', 'default') and gtag('consent', 'update') from the shopify pixel.
I will tell you if this help :)
Yes would really be interested in this!!
Hi Julies,
Is there any update or article on the consent mode for this setup?
I think this is mandatory now with the latest changes :(
Yes, this is a must
Great article, thanks so much!
I'm having an issue: when I enter a product discount code, the value changes to an incorrect amount e.g. 0.010000000000000675 when it should be 4.48.
Any idea what could be causing this?
Hi, submit the issue in the github repository with as much info as possible so that we could replicate it. Otherwise, we won't be able to help.
Hello Julius, can we write cookies with cHTML tag using this method?
e.g : Some user coming to the website via a checkout link, we'd like to gather utm parameter values to write it inside a cookie
Thanks!
I found this post very helpful. Thanks Julius
I recently set this up for a client and they changed the theme after I did the setup.
He reached out to complain that they set up a New P.Max campaign and Google were asking them to install a code on their website.
The dataLayer Plus checker plugin still records events happening on the website as I tested as well as the developer tools
However, after checking their Shopify back-end, I noticed that I can no longer see the code in the theme. liquid file or the file I created in the snippet section.
Only the customer event code created and connected in the customer events section in the setting remained.
Does changing from one theme to another break this tracking?
Hi, I’m glad you found the post helpful!
Changing themes in Shopify does indeed remove any custom code added to the theme.liquid file, as each theme has its own set of files. The script you added to theme.liquid is only responsible for click tracking. All other event tracking continues to function because it's handled through the custom pixel, which remains unaffected by theme changes.
To restore click tracking, you’ll need to reinsert the storefront scripts into the new theme's files.
Regarding the missing Google Tag for new P. Max campaigns - I’ve encountered this issue as well. It seems Google is now requiring a separate Google Tag (for Google Ads) to be added, even if you already have a GA4 Google Tag set up. To resolve this, create a new Google Tag for Google Ads and ensure it fires on all pages.
I appreciate the response. It's more clear now.
Another question: Do I need to add the Google Tag (Google Ads) to the theme .liquid file, or can I do it via GTM?
I've run some tests comparing Elevar with this solution, sending data to two separate GA4 properties. The strange thing I've noticed is that with this solution, the user_engagement event never appears. Have you encountered the same issue?
Yes, this is mentioned tin the guide
This is an amazing tutorial.
But, I implemented this and a few hours later Cloudflare included a Suspected Phishing Warning in my website.
Do you know why it happened and how can I solve it?
Did you add anything else to the website/container? Maybe you installed some app, too? I never got this warning after implementing this.
Hi!
I implemented the tracking code on my Shopify site and at first the events were recorded correctly. However, after a few days I noticed that the traffic started to decrease and soon dropped from 500 to 12 users per day.
How can this code affect the site traffic?
Thanks!
It doesn't affect site traffic.
Did the traffic drop in GA4? Or in Shopify, too? If it's in shopify, then maybe it's just a seasonality. Christmas always causes large drops in traffic
Thanks for your reply. The traffic has dropped on the Shopify site, I also think it's seasonality related to the holidays. I'll keep an eye on the site.
Thank you so much for this! I am having one issue... when I look at the page view network request to GA4, the ‘dl’ parameter is still showing the weird URL with the Sandbox in it which is then showing up in GA4's page path.
Carefully follow all steps explained in this article. There is a section addressing this (setting page_location)
Hi Julius,
I love this guide and I've set up my webshop like this. I often check back to see if there's an update in regards to consent mode with Cookiebot? Do you have any idea when you will release a guide for this? Thank so much!
Does this solution affects GA4 live preview? I think I did everything as you wrote, i see page_views and batch events in console and data layer debuggers, data seems to be correct, but I lost live preview.
GA debugger extension should enable the Live Preview for you
I have significant traffic drop. Difference between clicks in Ads and sessions in GA4 are huge. I know it's normal, that clicks number are bigger than sessions, but I have almost 1000 clicks daily, I see page_view event in console, but have only 15 sessions.
Hello Julius,
Thank you for the amazing guide! I’ve followed your instructions and successfully imported and implemented the container you shared on GitHub without any issues—everything works perfectly so far.
I do have a question regarding GDPR/DSGVO compliance. Would it be sufficient to add a trigger condition using Cookiebot for my GTM tags to ensure compliance? Or does the custom pixel you’ve provided collect data in a way that might be problematic from a GDPR perspective, even before the tags are triggered?
Additionally, I’ve checked the "Required" box in the Customer Privacy section of Shopify. Would that help mitigate any potential issues?
Looking forward to your advice, and thank you again for the great resource!
Hello,
I'm having trouble tracking menu_link using the custom_click_link_storefront on this site: https://sonomawoolcompany.com as the menu items do not have a class. Any help would be greatly appreciated
Great guide! The step-by-step breakdown makes setting up Google Tag Manager and GA4 on Shopify much clearer.
I have a question regarding the implementation on different Shopify plans. To what extent can this setup be fully realized for stores on the Basic Shopify plan compared to those on Shopify Plus? Are there any key limitations we should be aware of when configuring GTM and GA4 on a non-Plus store?
Thanks in advance for your insights! 🚀
Hi Georgi, I'm not aware of any limitations for Basic plan - it should work on both plans in the same way.
I followed the procedure and it works like a charm, thanks a lot ! My only concern is that it doesn't seem compatible with a third-party Cookie Consent Banner such as Axeptio.
What is your take on the deadline to migrate everything to the Google and App before august this year ?
Google Tag Manager's documentation: https://support.google.com/tagmanager/answer/15642481?utm_source=swipeinsight.app&utm_medium=referral
Hi!
Thank you so much for your guidance — you’ve done a tremendous job!
I have a quick question regarding the upcoming update of the checkout and thank you pages on Shopify. Not long ago, I received an email from Google stating that the old methods will no longer be supported and that we’ll need to set up integration through the Google & YouTube app to keep tracking purchases on those pages.
My question is — will your current method still work after August 28, or will the direct integration between Google Ads and Shopify through the app become mandatory?
Thanks in advance!
P.S. Here is the link to Google note - https://support.google.com/tagmanager/answer/15642481
Regarding limitation #5 - User engagement isn’t being tracked properly, have you found a solution yet or is this still a problem?
This is the only concerning element of this tutorial that prevents me from using the customer event pixel. I rely heavily on engagement data to measure the success of my Google Ads efforts.
Hello.
How to set up conversions for Microsoft Ads using this method?
As the GTM does not see events, I can not trigger events and send them to MAds. Could you help me what to do?
Hi,
Marvelous this, used it on a few sites, all good.
On my latest one, I am using server side tracking on a custom domain.
So the code snippet is a little different.
If I add the code snippet directly to my theme file after the opening tag, do I then just need to remove lines 64-73 from the pixel code (// GTM script)
Or will that break anything?
Or, would it be better to add my code snippet directly to the pixel, replacing lines 64-73?
make that lines 74-83 in the latest script
one more thing, I currently have the server side tag injected straight into the template code rather than the pixel
and I find then that if I launch client side GTM, I can actually see all the events occuring in the debug tool, as well as on server side tracking
but if I put use the standard GTM tag via the pixel code, I can't see it (which is what I expect)
it's just surprising to see events appear in client side debugger when using the custom pixel
were you aware that this is the case? happy to share screengrabs etc to show what I am seeing
This solution is great but unfortunately incompatible with a Consent Management Plateform. When GTM is installed on Shopify as a Custom Pixel, it runs in a sandboxed environment that is completely isolated from the global browser context (window). That isolation has two critical consequences:
1) No access to global events – Any event fired on window (like axeptio_activate_google_analytics from the Axeptio CMP) is invisible to GTM inside the pixel sandbox.
2) Separate dataLayer – The dataLayer created by the pixel is not the same as the one on the page, so window.dataLayer.push() commands won’t reach GTM.
Because of this, Axeptio and GTM cannot communicate. Axeptio emits consent events globally, but GTM running as a pixel never sees them — so consent-based triggers never fire.
Yes, that was said in the blog post
You're totaly right, sorry I missed that part.
Hello,
If I set tracking for GADS, FB or TikTok, do I need to add page_location, page_referrer, page_title and content group to every tag?
Thanks.
This was such a huge help but I just have one note on the custom_click_link_storefront event setup. In the container download, the DLV's pull variables that start with data.click etc (ie, data.click_text). A few days after implementing, I realized none of my click events were capturing (but could see that when I checked in dataLayer Checker Plus they were firing). I realized it's because the Data Layer Variable Name wasn't recognized and, as dataLayer Checker plus showed, the name should actually be "data.customData.click_text". I updated on all my variable and now they're all properly firing and capturing in GA4. Not sure if that's a fluke on my end but it's functioning now :)
Other than that, this article is such a huge help but just thought I would save someone troubleshooting. Thanks Julius and team!
Hi!
Since I implemented this, I've noticed a significant increase in sessions in (not set) on GA4.
Is this happening to you too?
Are there any solutions?
P.S. I have S2S tracking for GA4.
Great Article,
I have quick question if we have the GTM script in theme.liquid file and we are tracking checkout events via custom pixel then do we need to add the GTM script in custom pixel code as well?
Thank you for this! This guide came just in time since we launched a new webshop for pur client in November.
Is it possible to get the IP address pushed to the data layer?
Is there any benefit of using GTM in this case rather than the Shopify's Google and Youtube App?
I'm seeing a lot of over attribution in conversion values of Google ads through the Google & Youtube App
Just want to confirm: if only ecommerce events need to be collected, can I forgo adding the "gtm-customer-events-storefront.html" snippet to the theme file? Thanks!