
January 2, 2026
How to Setup and Install Google Analytics 4 (3 ways)
Updated: January 2nd, 2026
If you want to measure the performance of your website, you must use some web analytics tool. Google Analytics 4 is one of them. It allows you to see the number of sessions, visitors, most popular traffic sources, etc.
But to get that, first, you need to install GA4 on a website.
In this blog post, I will show you three ways to do that. With the native GA4 tracking code (a.k.a. GTAG, a.k.a. Google Tag), with Google Tag Manager, and with a plugin (native integration).
Table of Contents
Here’s what you will learn in this article
- #1. Create a Google Analytics 4 Property & Data Stream
- #2. Install Google Analytics 4
- #3. Check the DebugView in Google Analytics 4
- #4. Publish your changes in Google Tag Manager
- #5. Google Analytics 4 real-time reports
- #6. What’s next?
- Final words
We have lots to cover, so let’s dive in.
A Video Tutorial on How to install Google Analytics 4
I have recorded a quick tutorial on my YouTube channel if you prefer video content. But if you want to learn additional details, read this blog post as well.
You’ll learn the most if you do both: watch the video and read the tutorial.
#1. Create a Google Analytics 4 Property & Data Stream
It all starts with a new property.
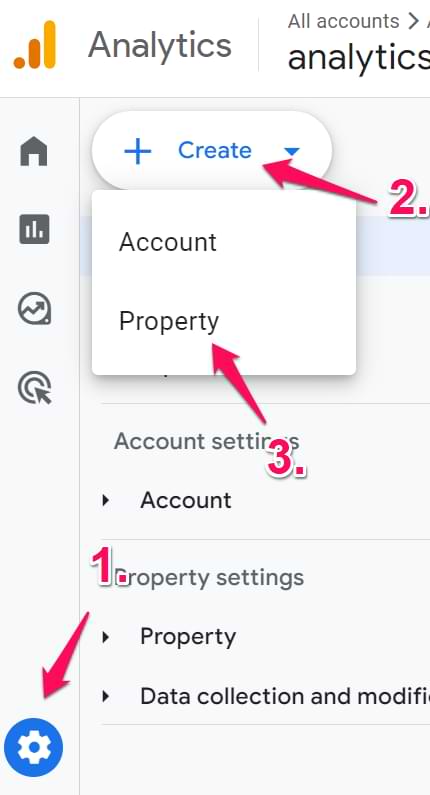
To create a new Google Analytics 4 property, go to the Admin section of your Google Analytics interface (by clicking the Admin at the bottom-left corner) and then (in the Property section) click Create Property.
Note: if you have never worked with GA before, then just go to analytics.google.com and then follow the steps to create your first property.
Then, enter the name of your property. It might be the name of your website, your company, a brand, etc. Choose your company’s country, reporting time zone, and the main currency your business operates.

Then press Next, and answer several questions. Then, you will need to select your business objectives. Based on these choices, the reports that you will have in the interface will change too. To make things simpler right now, select Get baseline reports.

Click Create.
The next step is to configure your first data stream. This is a data source from which events will be sent to your Google Analytics 4 property. You can have multiple data sources in a single property. For example, there are three web properties: one for the web, one for an Android app, and one for an iOS app.
In this blog post, I will focus on a Web stream. Select it.

Then, enter your website’s URL (for example, https://www.mywebsite.com). Note that the protocol (https) is already selected. After that, enter your website’s name.
When you create a web data stream in Google Analytics 4, you can enable/disable Enhanced Measurement. It is designed to help marketers get as many events in the reports as possible without the need to cooperate with developers or configure them in Google Tag Manager.

By default, this feature is enabled and will automatically track the following events:
- Page view (event name: page_view)
- Scroll (event name: scroll)
- Outbound link click (event name: click with the parameter outbound: true)
- Site search (event name: view_search_results)
- Video Engagement (events: video_start, video_progress, video_complete)
- File Download (event name: file_download)
- Form events (form_start, form_submit)
If you want, you can disable/enable events individually. You can do that by clicking the gear icon in the Enhanced Measurement section and then clicking the toggle buttons.

When you’re ready, press the Create stream button.

#2. Install Google Analytics 4
There are three ways to install Google Analytics 4 (which depend on your website and context):
- Install GA4 with a Google Analytics plugin/integration
- Install with GTAG (a.k.a. Google Tag, a.k.a. native GA4 tracking code)
- Install GA4 with Google Tag Manager
You will need to choose one option.
Which Installation Method Should You Choose?
Each of the three installation methods has its own advantages and is suited for different situations. The best choice depends on your technical comfort level and the platform your site is built on. Here’s a quick comparison (we’ll dive into more details later on):
| Installation Method | Best For | Pros |
Cons |
| Using a CMS Plugin | Beginners using popular platforms like WordPress or Shopify. | Easiest and fastest setup, often requiring just your Measurement ID. No code editing needed. | Can have limitations or conflicts with other plugins; you are reliant on the plugin developer for updates. |
| Direct Code Installation (GTAG) | Custom-coded websites where a developer can easily access and edit theme files. | A direct, clean installation with no extra plugins to maintain. | Higher risk of errors if you’re not a developer; code can be overwritten during theme updates if not implemented correctly. |
| Google Tag Manager (GTM) | Anyone who wants maximum flexibility and plans to add other tracking tags in the future. | Centralizes all tracking codes in one place; powerful and scalable for future needs. The recommended method for marketers. | Requires learning a new tool (GTM) and has a slightly steeper learning curve than a simple plugin. |
If you’re new to analytics and use a platform like WordPress, start with a trusted plugin. If you plan on becoming a marketing analytics professional, investing the time to learn Google Tag Manager is the best long-term solution.
#2.1. Install Google Analytics 4 with a plugin
This is a good option for popular content management systems with built-in GA4 support or support GA4 plugins. Popular platforms include WordPress, Squarespace, Shopify, Magento, etc. For example, if you are using Shopify, some alternatives are listed here.
There are many different platforms/systems, and they work differently, so you will need to do your research to find out if they support Google Analytics 4 natively. If not, maybe your system supports 3rd party plugins that can be installed?
This could be done quickly by googling “[your platform name] google analytics 4“, for example, “WordPress google analytics 4“.

Once you find the instructions, follow them, and you should be good.
For example, on WordPress, there are various plugins that offer GA4 integration, like GA4WP. After you install the plugin, it will ask you to enter the Measurement ID.
You can find the ID by going to Google Analytics > Admin > Data Streams > Select your web data stream. Finally, at the top right corner, you will see the ID that starts with G-.

This is the measurement ID. Copy it, paste it into the plugin’s settings, and save the changes. Done! The next step is to test, and you will learn how to do that here.
#2.2. Install Google Analytics 4 with the native tracking code
If you are working with a website that does not have a native GA4 integration or doesn’t support GA4 plugins, then you can ask the developer to install the native GA4 tracking code directly in the source code of the website.
In GA4 Admin > Data Streams, select your Web Data Stream. Then click View tag instructions.
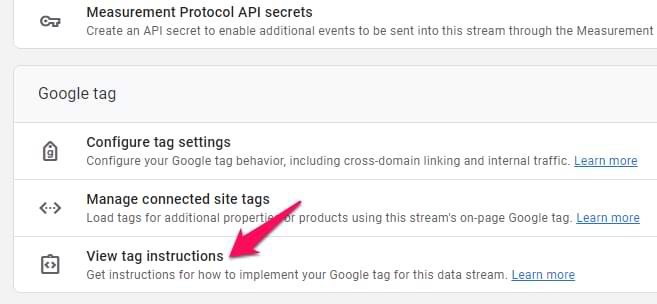
Then select Install manually and copy the code that you’ll get:

You should give that code to a developer and ask him/her to install this code in the <head> section of *all* pages of your website. The developer will know what this means.
Done! The next step is to test, and you will learn how to do that here.
#2.3. Install GA4 with Google Tag Manager
If you want to have more flexibility and power in managing tracking codes, then the third installation option (Google Tag Manager) is what you need. First, you must install GTM on your site (learn how to do that here).
After that, go to GA4 > Admin > Data Streams, select your web data stream, and copy the measurement ID.

Then go to your Google Tag Manager container (if you haven’t worked with it, here’s a tutorial on how to get started) > Tags > New and choose Google Tag.
In the Tag ID field, enter the ID that you copied in the GA4 interface.

In the Triggering section, select Initialization – All Pages and then name the tag, e.g., Google Tag.
Then it’s time to test it. Click Preview in the top right corner of the GTM interface.

Once you enable the preview mode, you should see the new Google tag among the tags that fired.

The next step will be to check if the data is displayed in Google Analytics 4. I will explain this in the next chapter of the blog post. After that, you will need to publish the changes.
#3. Check the DebugView in Google Analytics 4
Once you install Google Analytics 4, it’s time to test. The primary feature built for debugging GA 4 data is the DebugView section.
Head over to your Google Analytics 4 account > Admin > Debugview.

Most likely, you will not see any data there (yet). That’s because that data in the DebugView is visible ONLY when the debug mode in GA4 is enabled. Do not mix this with the GTM Preview and Debug mode. They are two different beasts.
Think of it this way: Google Tag Manager’s Preview mode confirms that your tags are firing correctly on your website. It answers the question, “Did my website tell GTM to send an event?”.
GA4’s DebugView, on the other hand, confirms that Google Analytics received the data from GTM. It answers the question, “Did GA4 hear what GTM sent?”. You must use both tools to confirm the connection is working from end to end.
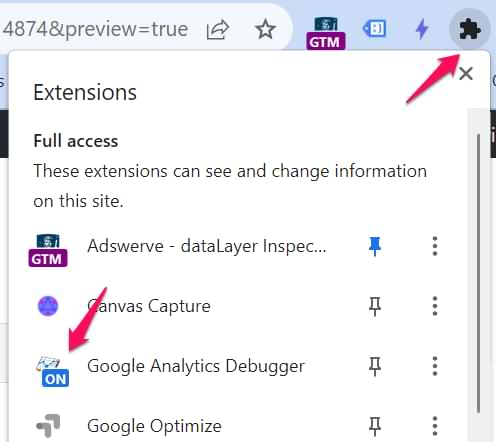
If you installed GA4 by choosing method 1 (plugin) or method 2 (GTAG), install the Google Analytics Debugger extension in your Chrome browser. In the list of installed extensions, click the GA debugger’s icon.
After that, go to your website (where GA4 is installed), browse the site, and visit several pages.
If you installed GA4 with Google Tag Manager, having the GTM Preview mode enabled automatically makes the data visible in the GA4 debug view.
Then, you should start seeing data in the DebugView. Click on every individual event to see the list of parameters.
Click on that parameter to see the value that was received by GA4. Now, that is some granular debugging!

If debugview is not working for you, read this troubleshooting guide. Sometimes, refreshing DebugView’s page helps too.
Also, ensure you have selected the correct Debug device in the top left corner.

If multiple visitors have enabled the debug view (e.g., they all have enabled the Chrome extension), you will see multiple devices there and it might require some time to find yourself. This especially applies to my blog, when many of my readers have enabled the GA Debugger Extension, and I have to guess which device (out of the other 15) is mine 🙂
Anyway, once you start seeing data in DebugView, things will look like this.

If you see your events in the debugview, GA4 was installed properly.
#4. Publish your changes in Google Tag Manager
This step is required only if you are using GTM to install GA4. Once you have made sure that the data is coming in and it is displayed properly, you should submit your GA4 changes in the GTM container and publish it.
You can do that by clicking the SUBMIT button in the top right corner and then completing all the other steps that the user interface asks you to do.

After that, you should soon start seeing the new data coming in your real-time reports as well.
#5. Google Analytics 4 real-time reports
On the left sidebar of the Google Analytics 4 interface, go to Realtime. This is where you will see the data coming into your reports. Unlike in the previous version (Universal Analytics), the new report offers you capabilities to see the data on a much more granular level.
First, you will see a map and a bunch of cards with traffic sources, the most popular events, and the number of users in the last 30 minutes.
You can also take a look at the snapshot of an individual user. You can do that by clicking the View user snapshot button in the top right corner.

Then, you will see a stream of all events of that particular user, you can click on them (just like in the DebugView) to see things on a more granular level. If you wish to look at another user/visitor, you can click the button here:

To exit the snapshot, press the Exit snapshot button in the top right corner.
#6. What’s next?
Installing Google Analytics 4 is just the beginning. To get accurate and useful data, there are a few critical settings you should configure next:
- Exclude your internal traffic: Your own visits to your website can skew your data. Set up an internal traffic filter to exclude your office IP address and any home IPs of remote employees to make sure your reports reflect real customer behavior.
- Increase data retention to 14 months: By default, GA4 only stores granular, user-level data for two months. To extend that period, you must go to Admin > Data Settings > Data Retention and change this setting to 14 months.
- Configure cross-domain tracking: If your user journey spans across multiple domains (like from your main website to a separate checkout portal), you need to set up cross-domain tracking. This tells GA4 to treat a visitor as a single user across both domains, preventing them from being counted as two separate sessions.
- Track events with GA4
- Optional: Review Enhanced Measurement events and disable those that are irrelevant.
- For businesses showing ads in the EU, UK, and Switzerland, configure consent mode. I have an in-depth module in my GTM course for beginners.
Final words on how to install Google Analytics 4
Correctly installing Google Analytics 4 is the first step toward proper data collection. Here are the key points to remember from this guide:
- Always start by creating a GA4 Property and Web Data Stream. This is where you’ll find your essential Measurement ID (which starts with “G-“).
- Choose the right method for you. For most users, a CMS plugin is the easiest option. For marketers who need flexibility, Google Tag Manager is the most powerful and recommended solution. Manual code installation is best left to developers working on custom sites.
- Verification is not optional. After installation, always use GTM Preview Mode (if applicable) and GA4’s DebugView to confirm that events are being sent from your site and received by Google Analytics.
- Complete the essential post-setup steps. Immediately after installation, be sure to exclude internal traffic and increase data retention to 14 months to make sure your data is clean and useful for long-term analysis.
Got more questions? Feel free to ask in the comments below.
24 COMMENTS
Hey,
I wonder if it´s possible to anonymize IP in the configuration tag in GTM?
https://developers.google.com/analytics/devguides/collection/gtagjs/ip-anonymization
Is it done by adding a new field with anonymize_ip: true ?
Ga4 automatically anonymizes IP. Nothing to add.
Hi Julius, great content.
One question, in GA4 if you want send custom data (like old custom dimensions, for example page_section) inside the page_view event, how do you have to add this data in GTM?
Thanks,
Hi, find my blog post about custom event tracking. You will find more information about custom parameters there
Hi Julius.
I set up just GA4 for a new client who had no Analytics. I did not see the option to add the old UA Property as well. The GA4 interface is not what I expected and a real let down as far as drilling down into the data. So I want to add a UA Property for the client as well.
Although I added a new UA Property on it's own after initially creating a GA4 and linked it to the GA4 ID it's not tracking anything. Do I have to add the UA-xxxxxxx-xx tracking code to the website in addition to the GTM tracking code or just add the Universal tracker to GTM?
Thanks in advance
Dave
Just the UA tag in GTM. And if you want to use GA4, have a separate GA4 config tag in GTM as well.
Hi.. I need your help in Ecommerce tracking in GA4.. I am very much confused .. Can you please help me out?
HI, The entire process of GA4 ecommerce setup with very detailed instructions is here https://www.analyticsmania.com/courses/intermediate-google-tag-manager-course/
Hi Julius,
If we already installed Universal Analytics using GTM, then if we want to install GA4 using tag manager, does it mean we have to create a new GTM account ? or can it be the same GTM account that we use to install Universal Analytics? I'm a bit confused there.
Use the same container
sorry Julius, i meant "new container", not account.
"same container" implies that the account will also be same :)
Hi again,
I have followed this steps.
Is it normal not seeing my GA4 measurement ID in the source code of the our website?
Thank you.
Yes, normal
Question about the GA4 Configuration Trigger. I know with UA we would always use the "Page View" trigger, but when looking at 'Google Support Documents' they want you to use an "Initialization" trigger instead. Is there a reason why we still use a Page View trigger instead of what Google suggested?
Here is the link to Tag Manager Help of the information I'm referring to.
https://support.google.com/tagmanager/answer/9442095?hl=en&ref_topic=6333310&sjid=12951177416240877338-NA
Correction: use an "Initialization" trigger for GA4 property instead.
There is no big difference
If I've installed GA4 on my website do I also need to to install it in GTM?
Is it ok to install GTM and GA4 on the same site?
I wanted to express my sincere gratitude for your informative blog post on setting up and installing Google Analytics 4. Your step-by-step guide and clear instructions have been incredibly valuable for someone like me, seeking to harness the power of data analytics for my website.
Your blog provided me with the confidence and knowledge I needed to successfully integrate Google Analytics 4 into my website. The detailed explanations and screenshots you provided made the process seamless and hassle-free.
Looks like Google Analytics migrated over to GA4. Under "Properties & Apps" it shows my old account with an arrow to "Views". That account is no longer getting data. So I created a new "Property & Apps" for the same site but renamed it. How do I delete the original Property?
if we install GA4 code manually on site and create google tag(aka Configuration tag) is there dublicate on data?
Hi Julius,
Very informative post. We are trying to transition from UA to GA4 for our mobile app. We are able to perform the required steps in Google Analytics but when are trying to change the tag type in GTM we do not see the Google Tag option and can see Google Analytics (Firebase) option. Is this the correct one to choose from? As we are not able to get any specific documentation related to this. Please share your thoughts and share any references you have for mobile if any.
If I install 1.st GA4 and then GTM it looks that GA4 does not load acording to Google console? Is that order important or not?