
January 9, 2017
Google Analytics Twitter Tracking: Monitor Tweets On Your Website
If you’re already using Twitter as a marketing tool, you want to measure the results, right? But how can you track interactions such as “Tweet” button clicks? Is Google Analytics Twitter Tracking possible? Sure it is! In this blog post I’ll show you how you can achieve it. This solution requires Google Tag Manager to be implemented on your website.
This blog post assumes you have a working knowledge of Google Tag Manager tags. If you’re a beginner – I highly recommend checking out these free Google Tag Manager courses, first. The minimum requirements:
- You have Google Tag Manager tracking code installed on your website.
- You know what are tags, triggers, variables and dataLayer in Google Tag Manager.
- Optional – if you have ever imported a ready-made GTM container, I’ll show you how to track Twitter buttons in few minutes.
P.S. This blog post is a part of more comprehensive guide – Google Tag Manager + Twitter, so if you’re looking for more in-depth information about how to upgrade your Twitter marketing with Google Tag Manager, give it a try.

Before we continue
Here are several things to keep in mind:
- This tracking method supports only those buttons, which are embedded on your website. It’s impossible to track all tweets, retweets, etc. that happen on other websites. You are able to track only those interactions, that happen within boundaries of your own website which has Google Tag Manager installed.
- This tracking method supports only default Twitter buttons. AddThis, Sumo, or any other social sharing plugins will not be tracked. In case of custom social buttons, you should either try tracking standard button/link clicks or check if social buttons vendor offers built-in Google Analytics integration.
- When a user clicks Tweet button on your website, a small window appears (where a person can add some text to his/her tweet). Unfortunately, it’s impossible to track whether a person eventually published his tweet. Remember,we can track the button which is embedded on your site. We cannot track the button in the small window (because it’s beyond your website). So in this case you can say that we’ll track visitors’ intentions to tweet rather than actual tweets.


- The tracking method I’ve described in this blog post sends the data to Google Analytics as Social Interactions. You won’t see these events in Google Analytics Real-time reports. They will appear in your Social reports (Acquisition > Social > Plugins) after 24-48 hours. If you wish send data as events, I’ll explain that option too.
Custom HTML tag – Twitter Listener
In order to track clicks of Twitter buttons, we’ll need to create a custom HTML tag in GTM – Twitter listener. As you can guess from its title, it will listen to Twitter buttons’ interactions that occur on a website. After listener spot a click it will create a dataLayer event.
That dataLayer event is really important – we’ll use it as a trigger to fire Google Analytics tag.
By the way, I have publish a ready-made Twitter Tracking Recipe for GTM. Feel free to download it and import to your Google Tag Manager container in minutes.
Now, I will explain how Twitter tracking works in detail. Let’s create a Twitter Listener tag in GTM.
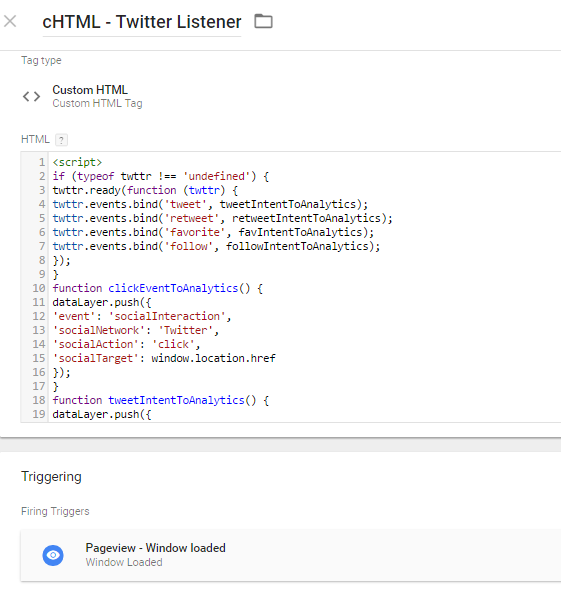
- Tag type – Custom HTML
- Tag title – cHTML – Twitter Listener. cHTML stands for Custom HTML (I like to keep all tags in my order).
- In HTML field paste the following code (it montiros Twitter buttons on a page and fires dataLayer event socialInteraction in case of a click):
<script> if (typeof twttr !== 'undefined') { twttr.ready(function (twttr) { twttr.events.bind('tweet', tweetIntentToAnalytics); twttr.events.bind('retweet', retweetIntentToAnalytics); twttr.events.bind('favorite', favIntentToAnalytics); twttr.events.bind('follow', followIntentToAnalytics); }); } function clickEventToAnalytics() { dataLayer.push({ 'event': 'socialInteraction', 'socialNetwork': 'Twitter', 'socialAction': 'click', 'socialTarget': window.location.href }); } function tweetIntentToAnalytics() { dataLayer.push({ 'event': 'socialInteraction', 'socialNetwork': 'Twitter', 'socialAction': 'tweet', 'socialTarget': window.location.href }); } function retweetIntentToAnalytics() { dataLayer.push({ 'event': 'socialInteraction', 'socialNetwork': 'Twitter', 'socialAction': 'retweet', 'socialTarget': window.location.href }); } function favIntentToAnalytics() { dataLayer.push({ 'event': 'socialInteraction', 'socialNetwork': 'Twitter', 'socialAction': 'favorite', 'socialTarget': window.location.href }); } function followIntentToAnalytics() { dataLayer.push({ 'event': 'socialInteraction', 'socialNetwork': 'Twitter', 'socialAction': 'follow', 'socialTarget': window.location.href }); } </script> - In Triggering section click the entire block:

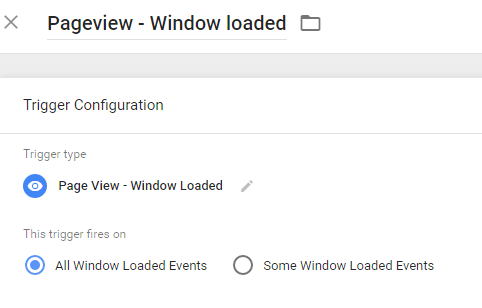
… and choose Window Loaded trigger. If you don’t have one – create it. A trigger’s configuration should look like this:

Assign it to a newly created Twitter Listener’s custom HTML tag.
Why didn’t I choose regular Pageview trigger? I often noticed that listener does not work properly if it’s launched in early stage of page load (when Twitter buttons did not complete loading).
I chose Window Loaded event for a reason. It fires our Twitter listener only when all other scripts on the page (incl. Twitter buttons) are loaded. That way I can be assured that all buttons will be tracked correctly.
However, there’s one but. If you page takes 10 seconds to load all scripts and visitor clicks Tweet button on the 8th second of his/her visit, that interaction will not tracked, because Twitter Listener is not launched yet.
But I chose to live with this drawback, because I don’ expect my visitors to start sharing content like crazy right after he/she landed on a page.
Let’s test our Twitter Listener
Now, let’s use Google Tag Manager’s Preview and Debug mode to find out whether Twitter listener works for us. At the top-right corner of your GTM account, expand Publish button’s options and click “Preview”.

Once the preview mode is enabled, navigate to the site where the form is published and you will see a debug console at the bottom of your browser showing detailed information about your tags, including their firing status and what data is being processed.
This console window will appear only on your computer as you preview the site, and is not visible to your other website visitors. It should look something like this:

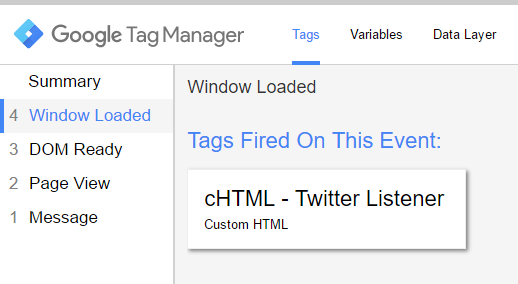
First, check whether Twitter Listener fired on Window Loaded event. On the left side, click Window Loaded. It should look like this:
Then click Tweet button on that very same page and look for socialInteraction event in Preview and debug console. Like in the screenshot below:
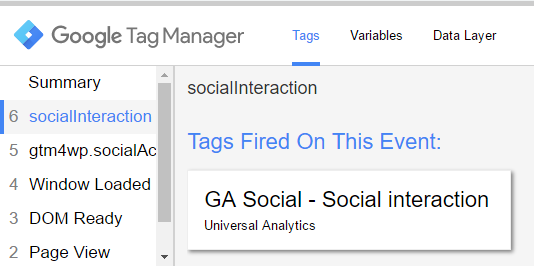
That’s it! Our Twitter listener in Google Tag Manager works perfect! Proceed to the next step.
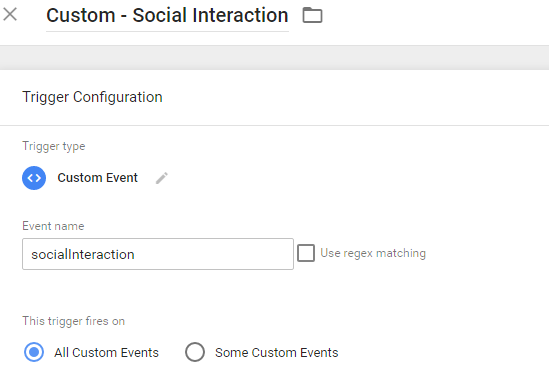
Custom Trigger
Now we should create a GTM trigger which recognizes dataLayer event socialInteraction. It’s crucial for our Google Analytics tag to work.
In Google Tag Manager, go to Triggers and hit New. Create a trigger with the following settings:
Three Variables
As you already know, when Twitter button click occurs, Twitter Listener creates dataLayer event. What you might not know, that it also provides additional data:
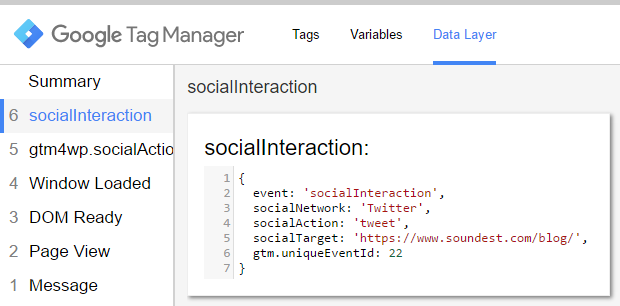
See socialNetwork, socialAction and socialTarget? We can pass that data to Google Analytics. But first we need to create 3 variables in GTM (otherwise Google Tag Manager won’t recognize these data points).
So go to Variables in GTM and create 3 variables with the following settings (you’ll need them in Google Analytics tag):

In case you’re wondering what does dlv mean in the title of every variable – it’s Data Layer Variable. I like to keep my tags, triggers, and variables in order. It makes work with GTM much easier.
Google Analytics Tag
Final step – create Google Analytics tag. It will fire only when the following sequence is complete:
- Window Loaded event occurs.
- Custom HTML Twitter Listener tag fires.
- Visitor clicks Tweet button.
- Twitter Listener spots the click and creates the socialInteraction dataLayer event.
- Trigger socialInteraction fires and launches Google Analytics tag.
All steps are required and must be completed in this exact order.
Go to Tags in GTM and hit New button. Choose Universal Analytics Tag type and add the following settings:

As you can see, all three variables are used as Network, Action and Action Target values in Google Analytics tag. Since I used Social track type, all Twitter buttons’ interactions will appear not in Events reports, but rather in Acquisition > Social > Plugins.
Feel free to change track type to Event, if you wish. In that case you’ll be able to see events in GA Real-time reports.
If you’re wondering why I entered {{Constant – GA UA}} in Tracking ID field, read this post by Google about user-defined constant variables and why you should always use them.
The Final Test
If you chose Social as Google Analytics Track Type, the data will appear within 24-48 hours in Social Plugins report (Acquisition > Social > Plugins).
If you chose Event as Google Analytics Track Type, then use Google Analytics Real-time reports to see whether Twitter button clicks are passed correctly to GA.
Did you know?
I have also prepared read-made Google Tag Manager templates which allow you to track Facebook Likes, Pinterest Pins and Linked In shares on your website. Give them a try as well!
Google Analytics Twitter Tracking – Conclusion
In this blog post I have described how you can use Google Tag Manager in order to implement Google Analytics Twitter tracking. Capture Tweets on your website and automatically send that data to Google Analytics social reports.
But keep bear in mind that this tracking method applies only to official Twitter’s Tweet or Follow buttons. AddThis, Sumo or other custom social sharing buttons are not supported and you’ll need to find another way to track them, for example – try tracking link/button clicks with default Google Tag Manager click triggers.
0 COMMENTS