
November 21, 2025
Guide: How To Use Timer Trigger in Google Tag Manager
Updated: November 21st, 2025.
Are you looking for ways to fire a specific tracking script or pop-up after a 20-second delay? If your answer is Yes, hop on board because I’ll show you how to use the timer trigger in Google Tag Manager.
Table of Contents
- What is a Timer Trigger?
- Create a Timer Trigger within Google Tag Manager
- What Happens in the Data Layer?
- Use Cases
- Start a timer trigger after a click
- Conclusion
What is a Timer Trigger in Google Tag Manager?
Timer Trigger is a type of trigger that fires after a certain duration of time has passed on the web page.

The most common uses for the timer trigger are sending an event to Google Analytics after X seconds or deferring a tag from firing until you can be more confident that an asynchronous request has occurred. But don’t limit yourself!

Create a Timer Trigger within Google Tag Manager
To get started, you must have a Google Tag Manager account and the necessary permissions to edit your website’s GTM container. Go to Triggers > New > Trigger Configuration > Timer and enter the following settings.
- Event Name: This lets you customize the event name that GTM pushes to the dataLayer. It’s most helpful when you want to fire multiple timers on the same page.
- Interval: Here, you can specify how many milliseconds should pass between each activation of this trigger. Enter 10000 if you want the time trigger to activate after 10 seconds.
- Limit: This option lets you choose how many times the trigger fires before it should stop.
- Also, it would be best to delimit the timer to only fire on specific pages using the Enable When option. You’ll need to provide some conditions already present when Google Tag Manager is first loaded, such as Page Path equals /home-page/ or something similar. In my blog, I will use the timer on all pages, thus the Enable When condition is Page Path contains / (because the Page Path variable will always contain at least one slash)
- Last, you can decide whether to fire a tag on all timers or only particular ones. I used All timers.
- Hit save.
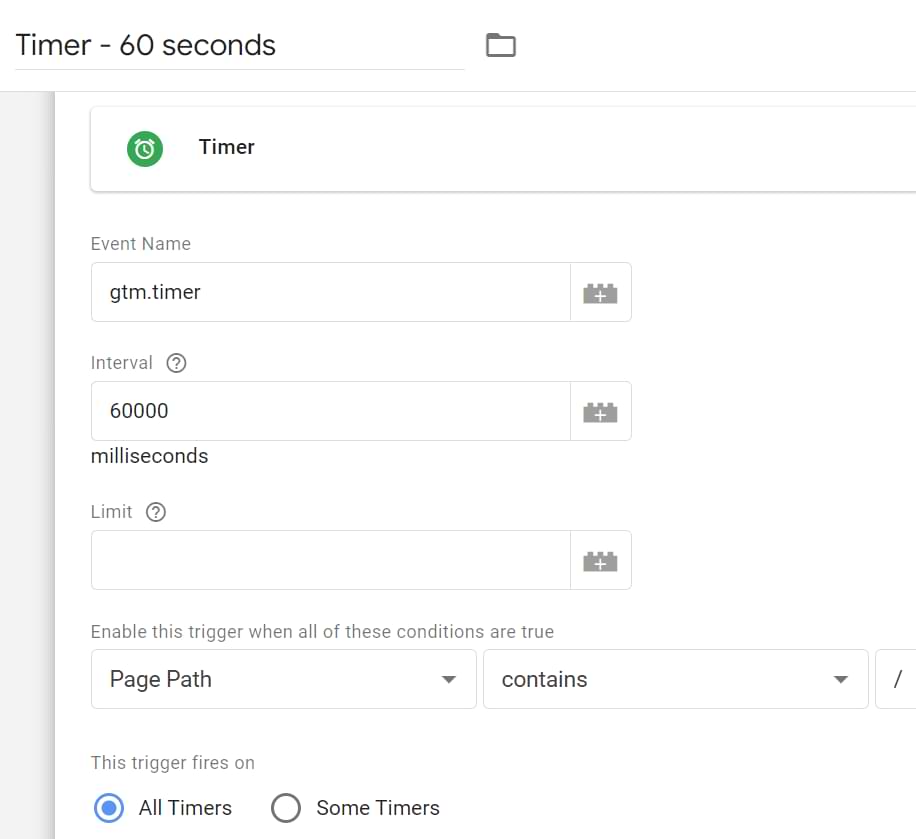
A sample timer trigger could look like this (fires once after 10 seconds on all pages):

What Happens in the Data Layer?
After creating a timer trigger, enable GTM Preview and Debug mode, and navigate to the new window with the site you’re working on. (to test how the trigger works).
After the preview and debug console appears, wait for the timer trigger to activate.
Pro-tip by Captain Obvious: for testing purposes, create a timer trigger that fires after 10 seconds (or even less). If you set it to fire after 60 seconds (or more), you’ll wait too long, and your debugging session will become super boring.
Anyway, let’s go back to our Preview and Debug mode. After waiting 10 seconds, the gtm.timer event appears on the left side of the pane.

Click it and navigate to the Data Layer tab. You should see the array of various parameters.
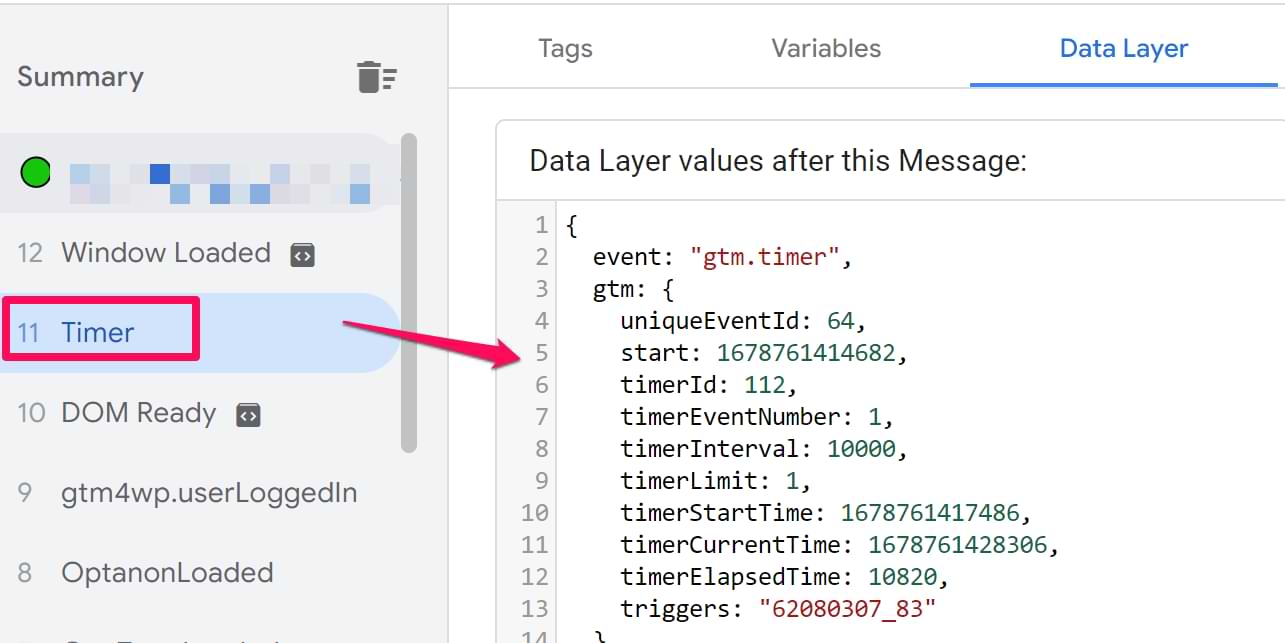
Every time a timer trigger activates, it pushes a particular set of data to the data layer:
- gtm.timerId – A unique identifier number for the timer. Each timer you have on the page has a different ID.
- gtm.timerEventNumber – The number of activated timers on the current page.
- gtm.timerInterval – The value you set in the Interval option when creating the timer.
- gtm.timerStartTime – The timestamp of when the timer first started.
- gtm.timerCurrentTime – The timestamp of the most recent timer activation.
- gtm.timerElapsedTime – The time in milliseconds since the timer started.
The remarkable thing about Google Tag Manager is that you can fetch any parameter from the data layer and turn it into a variable.
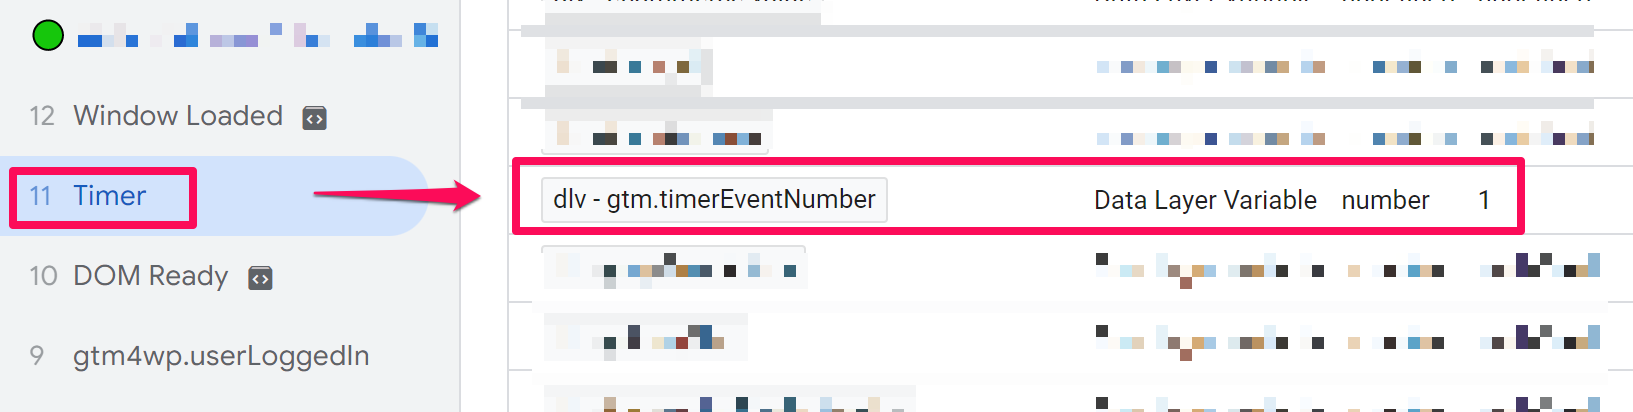
If you wish to know the event number (which iteration of the timer trigger was just completed), you can create a Data Layer variable gtm.timerEventNumber (see the example below). P.S. dlv – stands for Data Layer Variable.

After you create this variable:
- Refresh P&D Mode and navigate to the tab with the website you’re currently working on.
- Wait for the timer trigger to fire.
- Then click the event and head over to the Variables tab of the Preview and Debug pane. What you’ll see it your newly created variable dlv – gtm.timerEventNumber.
What does it mean? Say that you set the timer to fire every minute, dispatching a specific GA4 event tag. That tag sends the information about the number of activated triggers associated with that event with the help of the dlv – gtm.timerEventNumber variable.
Similarly, if you wanted to capture additional details like gtm.timerCurrentTime or gtm.timerElapsedTime, you can follow the same route by creating the datalayer variables for them.
As a result, your GA4 event tag could look like this:
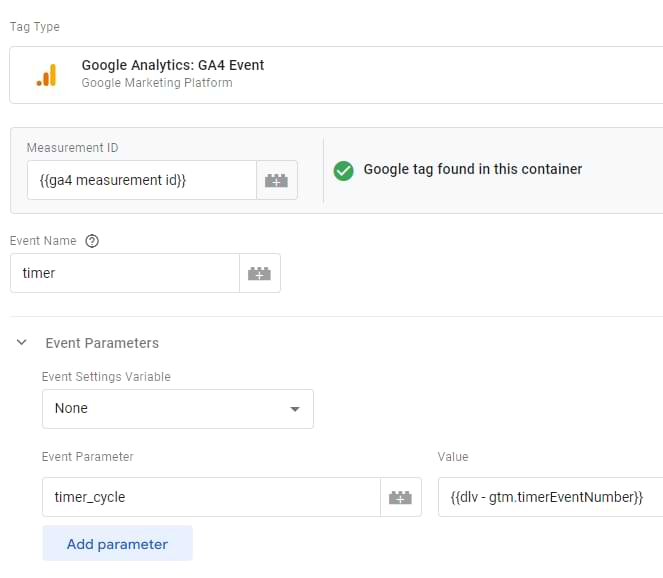
Note: since timer_cycle is a custom parameter, you would need to register it as an event-scoped custom dimension in GA4.
To help you verify everything works correctly, here’s a quick testing checklist:
- Enable GTM Preview Mode
- Wait for the specified time interval (e.g., 10 seconds)
- Look for the Timer event in the left sidebar
- Check the “Variables” tab to ensure gtm.timerEventNumber is populating correctly
Use Cases of the Timer Trigger
If you’re still looking for ideas where a timer trigger might come in handy, here is some food for thought.
Postponing Email Popup
As I have already mentioned, I use this type of trigger myself (in this blog) to delay my email popup AND blue widget, which asks my visitors to subscribe.
Combining with another trigger (via Trigger Group)
Google Tag Manager also lets you combine multiple triggers into a mega-trigger. For example, if ALL triggers’ conditions are met on the same page, the trigger group will be activated, and the associated tags will fire.
For example, it makes sense to fire a tag when a visitor spends at least 60 seconds on your page AND scrolls at least 50% of the page height. If you want to implement the same, here’s how to do it.
Let’s start with creating the triggers for this use case. The timer trigger should fire after 60 seconds, just like in the screenshot below.
Now, to proceed with the scroll depth trigger. Click New and select the Scroll Depth variable from the options. Enter the following settings:
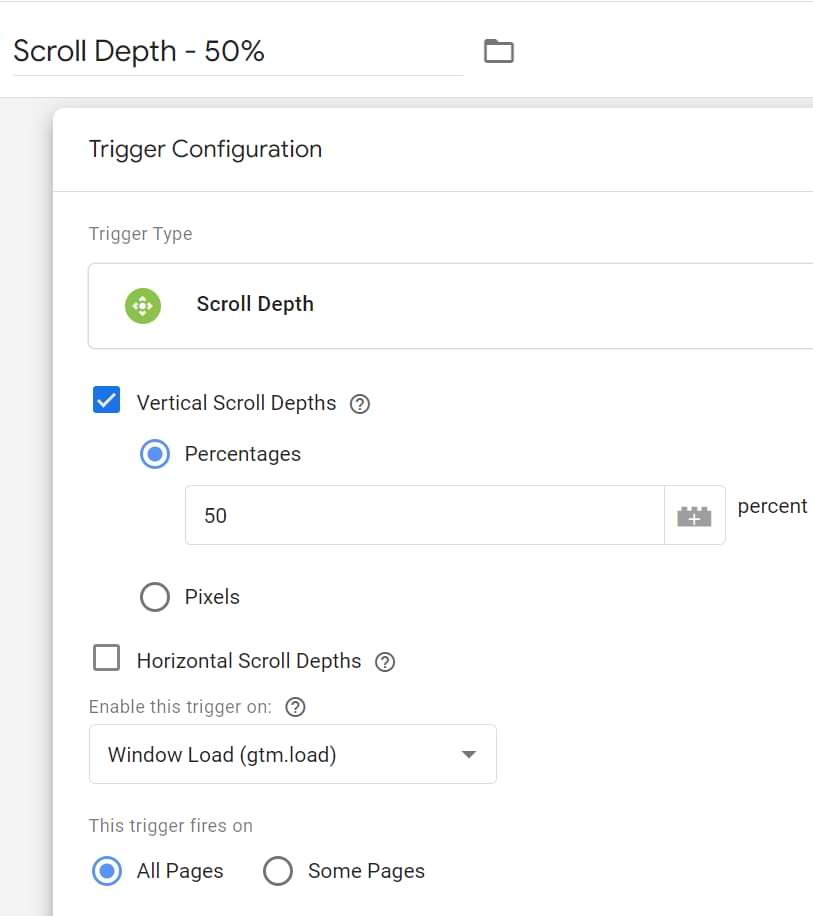
Now, we need to create the trigger group. Click on New and select Trigger Group.

Now select the triggers to be added.

Yes, that’s all you need to do to create a trigger group!
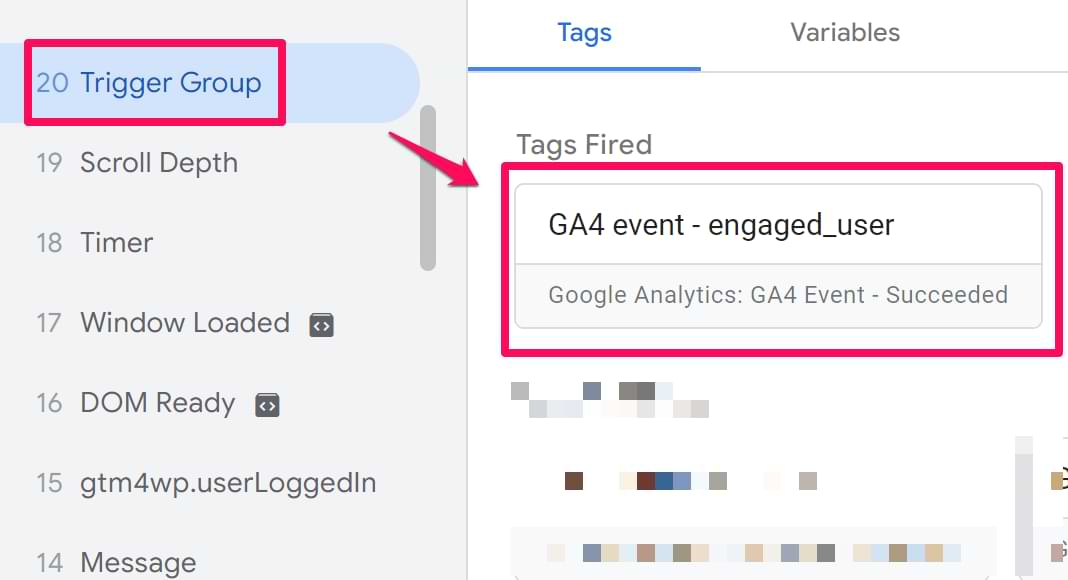
Let’s create a GA4 tag that sends the event engaged_user to Google Analytics when the trigger group is fired, i.e., both conditions are met.

Test it in the Preview and Debug mode. You should see it appear like this.
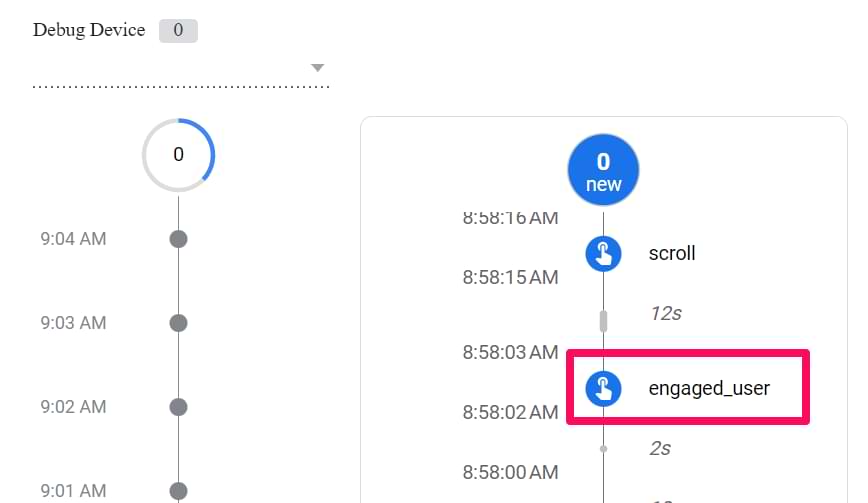
Also, confirm that the event has been passed to GA4 by looking at the DebugView screen.
Remember, you can configure the scroll depth and timer depending on the purpose of your website. This is simply the way to do it.
But wait, there’s more! Start a timer trigger after a click
This idea came from Simo Ahava. If you want a timer to start when the user does something (e.g., click), you’ll need to use a Custom HTML tag with custom code. Here’s the code:
<script>
 (function() {
 // CHANGE THESE THREE:
 var eventName = 'custom.timer'; // The event name that is pushed into dataLayer
 var interval = 5000; // The interval in milliseconds
 var limit = 1; // The number of times the timer fires
 // OTHER SETTINGS:
 var timerNumber = 1;
 var startTime = new Date().getTime();
 var fireTimer = function() {
 var timeNow = new Date().getTime();
 window.dataLayer.push({
 'event' : eventName,
 'custom.timerCurrentTime' : timeNow,
 'custom.timerElapsedTime' : timeNow - startTime,
 'custom.timerStartTime' : startTime,
 'custom.timerEventNumber' : timerNumber,
 'custom.timerId' : timerId,
 'custom.timerInterval' : interval,
 'custom.timerLimit' : limit
 });
 timerNumber += 1;
 if (limit < timerNumber) {
 window.clearInterval(timerId);
 }
 };
 var timerId = window.setInterval(fireTimer, interval);
 })();
</script>
It does pretty much the same thing as the timer trigger. The difference is that you can use any trigger to fire this custom HTML tag, for example, form submission, etc.
Example: Show a popup 10 seconds after a visitor clicks the SHARE under your article.
And don’t forget to edit the timer interval (var interval) and limit (var limit) in the script above to match your needs.
Also, the keys pushed into dataLayer differ in that the prefix is not gtm. but custom.. So gtm.timerId becomes custom.timerId, etc.
Google Tag Manager Timer Trigger: Conclusion
Although the timer trigger is pretty basic, it’s one of those must-have weapons in your Google Tag Manager arsenal. It’s fairly easy to use and allows you to postpone a certain tag for a particular period of time.
I use it to postpone email popups (on this blog), while others might utilize it in order to lower the bounce rate in their Google Analytics report. But don’t limit yourself just to these examples. Be creative!
To get the most out of it, remember these three strategies:
- For simple delays: Use a standard Timer Trigger to delay tags (like heavier scripts) to improve user experience and page load speed.
- For true engagement: Don’t rely on time alone. Combine a Timer Trigger with a Scroll Depth trigger (using a Trigger Group) to measure users who are both present and active.
- For action-based timing: Use the Custom HTML script method if you need to start a timer after a specific user interaction, like a button click.
Got questions? The comments section below is at your service.

31 COMMENTS
I've started using time triggers to get some insights into how long people stay on landing pages that don't need a click.
The situation you mention with tabs opened in the background is however really a problem. Could you track if the user has scrolled at all and only then start the timer somehow?
Yes, you can. To achieve this, you'll need to do several things here:
1. Import Scroll tracking to your GTM container.
2. Create a Custom HTML tag with the script I've mentioned here. Edit the script according to your needs.
3. Fire this Custom HTML tag only when a visitor scrolls more than 25 or 50 percent (you'll need to create a Custom Event Trigger for that).
Hope that makes sense.
Is it possible to retrieve only the last value of the tag v.s. creating an event for every time the event fires.
For example say 10 people visit my website. Instead of getting the following report.
10 people stayed for 10 seconds.
5 people stayed for 20 seconds.
1 person stayed for 30 seconds.
I would get the following report:
5 people stayed for 10 seconds.
4 people stayed for 20 seconds.
1 person stayed for 30 seconds.
Hello, yes, but this requires Advanced JavaScript knowledge. I could not write this listener by myself so I should ask one of my colleagues. This should take at least 2-3 weeks because the developers are now really busy.
Hi again!
Do you know how to do it on AMP site? When I create tag, I choose track type TIMING but then there are some variables to fill out. I have no idea got to fill out the first one (var)
Timer trigger is not related to Universal Analytics Tag's Track Type (it does not matter whether it's AMP, or a regular Web GTM container). If you want to learn more about the GA Timing, check the analytics.js documentation here https://developers.google.com/analytics/devguides/collection/analyticsjs/user-timings
I have created a timer for two events.1 for 3 secs and another for 4 secs.only one timer works.which I kept for higher time limit(4 secs).why ?
Both timers are separate. I suggest you take a look at timer's conditions. Maybe 3s timer is using a particular variable that is undefined at that moment?
Hello,
I have to say, this is cool.
But can you help me with this one ?
I have implemented tab visibility tag, and my pageview is firing when tab state is visible, but i want to measure the time when tab from hidden states transform to visible.
Hey, you can adapt the method used here https://www.analyticsmania.com/post/track-the-timing-of-form-submission-with-google-tag-manager/
Hey! What if I want to track people who stayed on the entire website for more than 30 seconds? Is it possible or I'll always get the data by page.
I see that the same question was recently asked in our Facebook community. Even though it is possible, the solution will not be precise and your data will be inaccurate. So I'd not recommend you do this. At least that's what I think right now :)
Wonderful article Julius, one question though, if I wanted to use the timer trigger but also needed to use a Custom Event trigger (the custom event trigger is linked to a cookie law consent solution I'm using that stops cookies firing until user consent it given), where the Custom Event trigger needs to fire first and then the Timer Trigger, how would I go about it? Any help is greatly appreciate, can't wrap my head around it. Thank you
Hey, this is mentioned in the last chapter of this blog post (before the conclusion). You can create your own custom timer by implementing it via Custom HTML tag. And you can fire that tag after the custom event occurred.
Is it possible to have >120s timer trigger across multiple pages? I mean if user lands on homepage, spends 20s goes to another page and then spends 100s on another page and only then trigger fires. And only once per that session.
Not out of the box. This would require custom JavaScript development and storing time in a cookie.
Thank you for getting back to me. And how much time do you think such development would take?
You should ask a developer who is going to do this.
Hi Julius, thank you for the article.
Do I understand correctly that I can delay third-party loading scripts such as Facebook Pixel, HotJar, etc., on the desired interval with this approach?
Thank you in advance.
You could use timer for that, yet
hi, thanks for this post
you said we should define timer_cycle as a custom dimension
why custom dimension?
why we soould not use custom metric?
Because if the cycle is 5th and you set it as a metric, it will be counted as +5
Hi,
What would be the setting if I just want to fire a 30 sec timer ONCE per user? And use it as an "engaged page_view". Right now I've set everything up, but the timer will fire on EVERY page :/
Cheers
use cookies. When the 30 sec timer fires, set a cookie on the user's browser. and then update your trigger to not fire again if the cookie exists in the visitor's browser
Cheers, thanks so much! Any guide how to approach or do this exactly?
You can start here https://www.analyticsmania.com/post/cookies-with-google-tag-manager/
Hi,
I imported the GTM time saving containers from your GTM course and I checked that Time_spent was added as a custom metric and not custom dimension. And everything seems to be working fine. But, you have added in your commnents above that it should be added as a custom dimension. Why this is so?
because two setups are different. The recipe increments the metric by 1. This guide sends different values as dimensions.
You can implement both options and play around with the reports to understand the difference.
All Timers and Some Timers in timer trigger in gtm
which one should we use?
Hey Julius,
Thanks for the great overview (and all the other ones that came in really useful).
I've bee trying to configure a trigger that fires when people spend 30 sec on the entire website, so 'time on site' instead of 'time on page'.
Any idea how this can be set up?
Anyways, thanks for your time!
Hi Julius, thanks for the article.
I try to use Timer Trigger to activate a tag, for a click-to-call-conversion, if that call lasts at least 30sec. I use Timer Trigger with a click - just links in a Trigger Group. Is that the correct way to set this type of conversion?
Thanks, Davide