
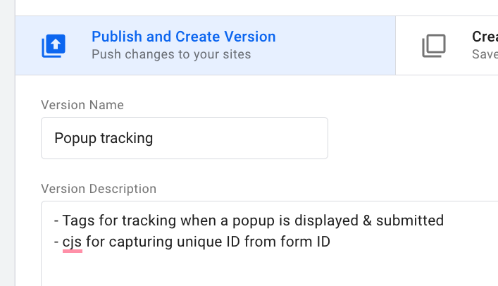
February 27, 2024
Track popups with Google Tag Manager and Google Analytics 4
By strategically implementing popups, businesses can boost not only sales through the promotion of exclusive deals but also increase lead generation. They help attract a visitor’s attention, creating an opportunity to encourage specific actions.
Are you wondering about the effectiveness of the popups on your website? Of all the users that see a popup, how many interact with it? Crafting the right strategy takes time, and, as they say, time is money!
Well, lucky for you, this blog post will help you answer that question because I will show you how to track popups with Google Tag Manager and Google Analytics 4.
At the end of this tutorial, you will be able to create a report that will tell you the number of times a visitor has viewed a popup, the number of popup submissions, and the popup submission rate.


Table of Contents
Here’s what you will learn in this article
- First things first
- How to track a popup
- Track a popup success message
- Track when a popup is displayed
- Get the same Form ID in both events
- Create a report for popup tracking
- Final Words
Video Tutorial
If you prefer video content, here’s a tutorial from my Youtube channel.
First things first
I assume that you already have Google Analytics 4 installed on your site. If not, check out how to install GA4 on your site.
How to track a popup with GTM and GA4
To determine the rate at which visitors submit popups, you must implement two events: one for when a visitor views a popup and one for each successful submission.

Track a popup success message
There are multiple ways that the success message for a popup could appear, e.g., on the same popup or leading the visitor to a new page.
If the popup success message leads a visitor to a new page, you can use the Page View trigger with a condition on the page URL to restrict the trigger to just the popup success page. Use this instead of the trigger we will create in the next section and follow all the same steps to test the tag and add parameters.
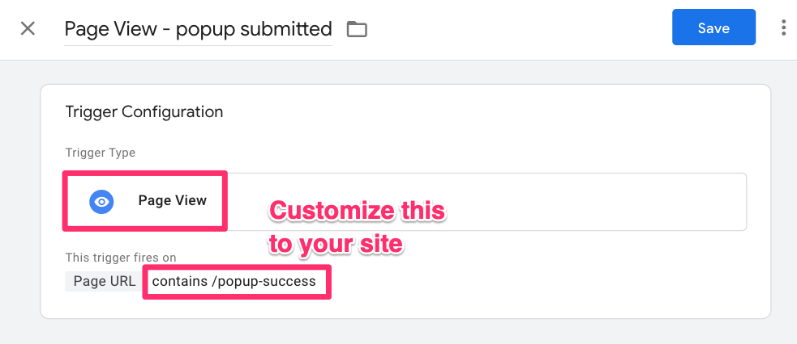
This tutorial will focus on when the success message is in the same popup.

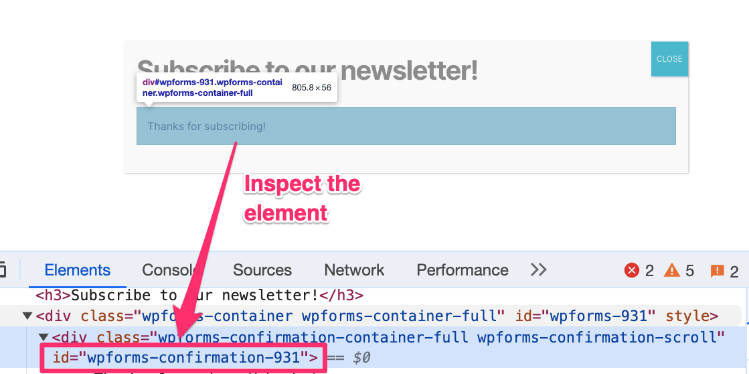
Start by Inspecting your element to find information about the component you want to track, e.g. an id or the class. Right-click on the browser page and select “Inspect” to view the website’s source code.
Selecting the popup element that tells us that a submission has occurred, you can see that there is an id you can reference to identify the success message element uniquely.
However, it’s important to note that forms can be built differently, so there might not even be an id at all. In this case, CSS selectors will come in handy. You can learn more in my intermediate GTM course.
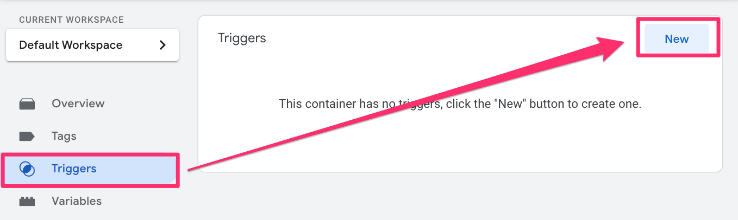
Step 1: Create a trigger
With this id in mind, go to Google Tag Manager. Click Triggers and create a new trigger.
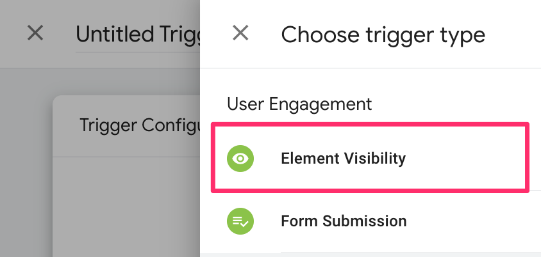
Then, click “Trigger Configuration” and select “Element Visibility”. The Element Visibility trigger fires when a chosen element is within the browser’s viewport.

There are two options you can select under the “Selection Method”. If you just have one popup with a unique ID, use the “ID”.
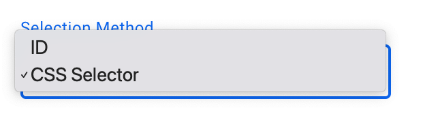
In the scenario where you have multiple popups that you want to track, then you need to select “CSS Selector” to input a more general selector, e.g. “wpforms-confirmation-{id}”. You can find more info on CSS selectors in the Intermediate-Advanced Google Tag Manager Course.
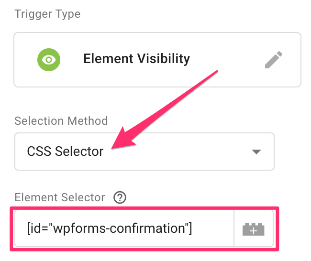
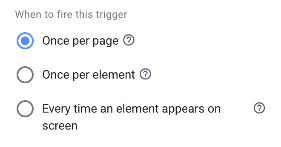
Set the trigger to fire once per page.
Additionally, you will need to configure the Advanced settings. Under Minimum Percent Visible, set the value to “1” so the trigger is fired even if the smallest corner of the popup is on the screen. Also, check “Observe DOM changes”.

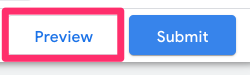
Name and save the trigger. Then, click Preview to check that Element Visibility appears in the left-hand navigation by going to your site and submitting information through the popup(s) that you want to track.
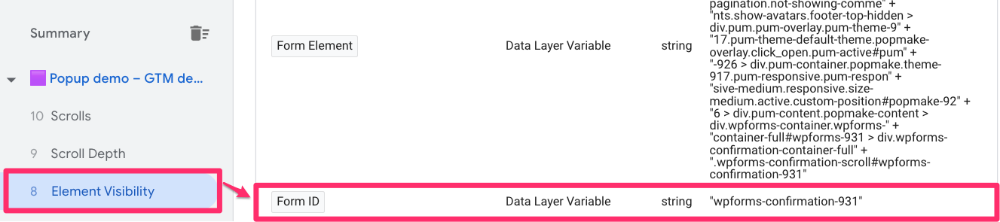
If you expand the Element Visibility section and go to Variables, you can see if a Form ID is available. This will be useful in the next section!
Check out this article if the Element Visibility trigger is not working.

Step 2: Create a tag
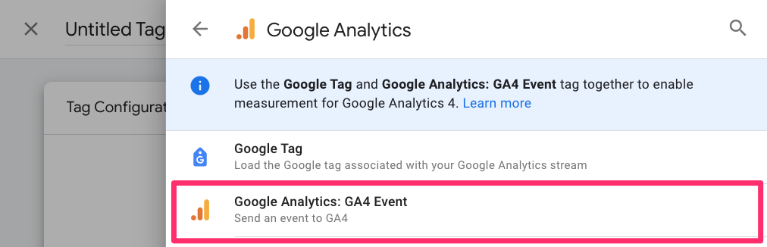
Now, our trigger needs a home, a.k.a. a tag. In the left-side navigation, click “Tag” and then “New”.
Click “Tag Configuration” and then Google Analytics > Google Analytics: GA4 Event.
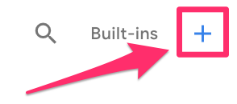
If you haven’t already saved your Measurement ID as constant, you can follow the steps below to create a new Constant variable to reuse in the Tag ID across all events. Click to add a new variable.

Then, click the “+” in the top right to create a new variable.
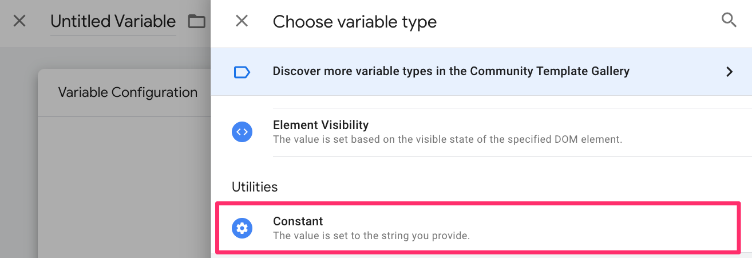
Click “Variable Configuration” and select “Constant” as the variable type.
From the Admin section of Google Analytics 4, go to Data collection and modification > Data streams.
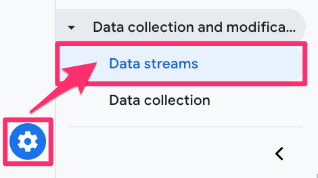
Select the data stream and copy the “Measurement ID”.
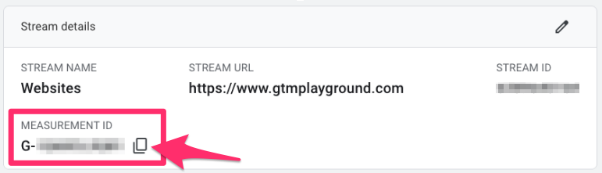
Copy the Measurement ID and paste it into the Value of the constant variable. Save your new variable as “Constant – G-XXXXXXXXXX” (or whatever makes sense to you) to add it to the tag. Read this blog post to learn more about the constant variable in Google Analytics 4.

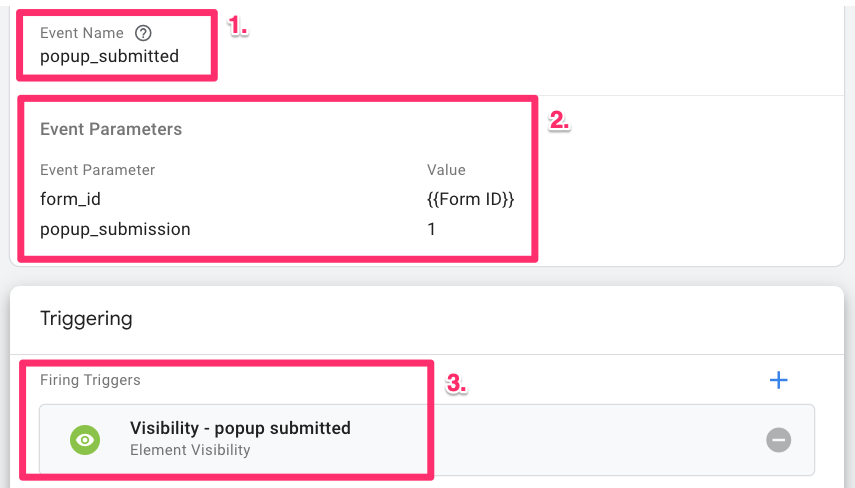
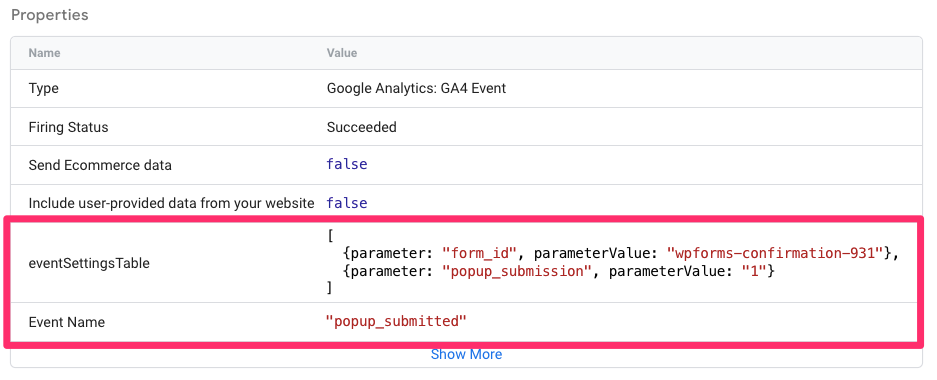
Now, there are three elements you want to add to the tag:
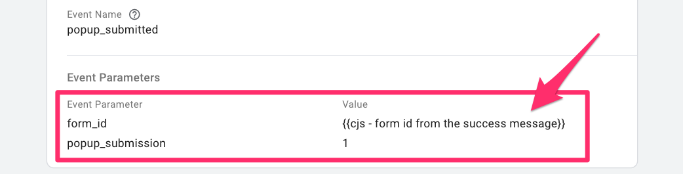
- Event Name: You want the name to be simple and concise, so something like popup_submitted.
- Event Parameters:
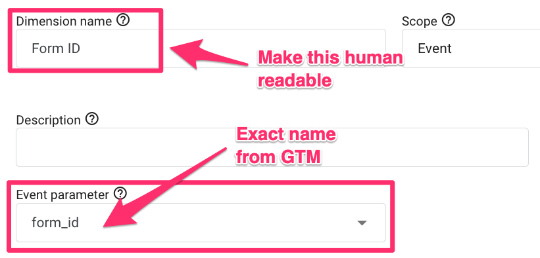
- We saw earlier that the built-in Form ID variable collects information on the submitted form, so we want to collect this as form_id.
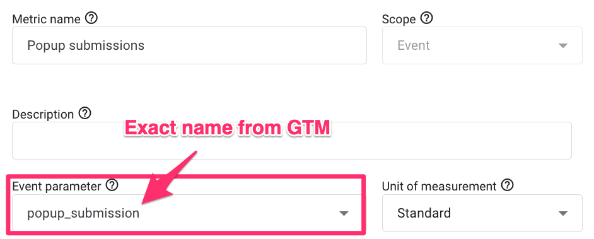
- To calculate the popup submission rate, you need to collect a metric each time the event is fired, which is equal to 1. Here, we are naming it popup_submission.
- Firing Triggers: Select the trigger from the previous step.
Since the parameters added are brand new and we will use them to make reports in GA4, you need to add them as a custom dimension and custom metric.
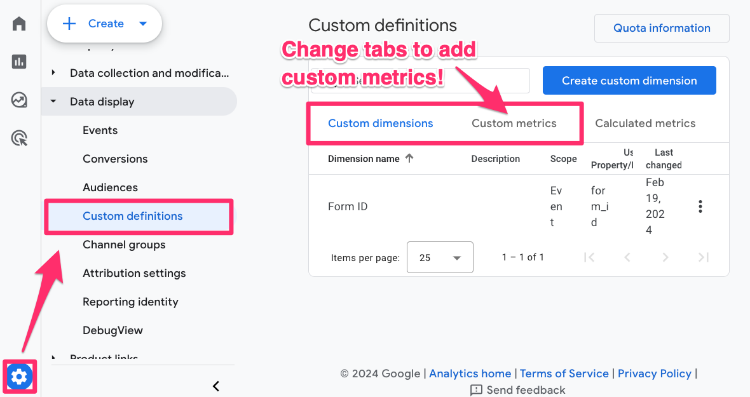
The form_id is a string (read: text), so add this as a custom dimension.
The popup_submission is a numeric value, so add this as a custom metric (switch to the Custom Metrics tab). Keep the Unit of measurement as “Standard”.
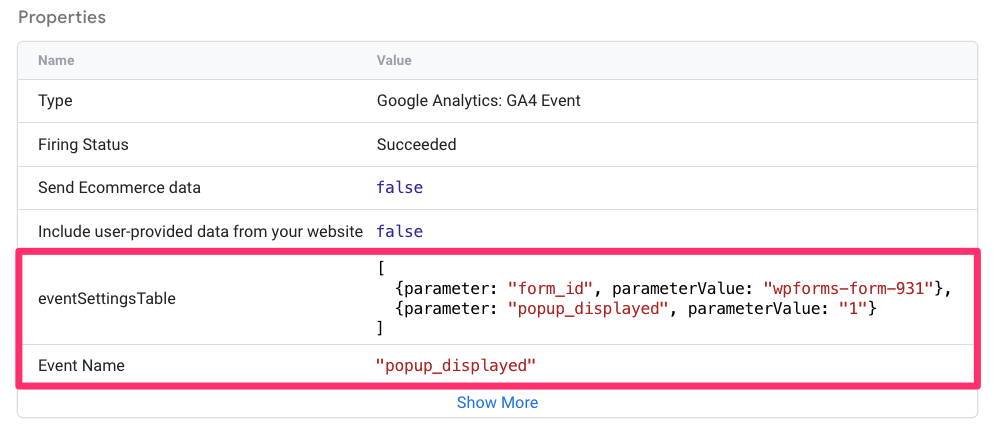
Back in Google Tag Manager, preview and check:
- The tag fires when you submit a popup
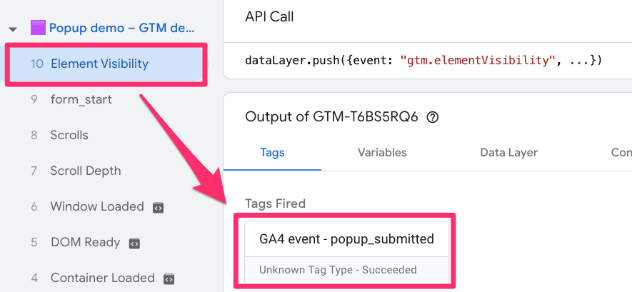

- The parameters captured with the event

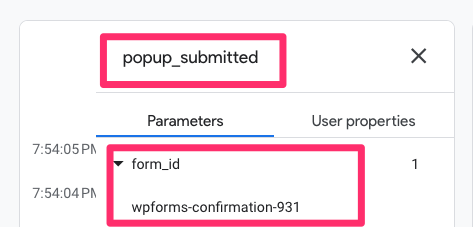
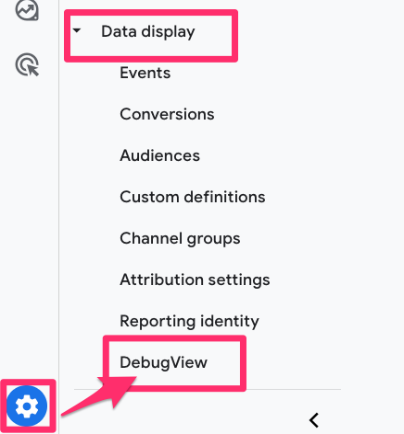
Check DebugView in GA4 by going to Admin > Data display > DebugView.

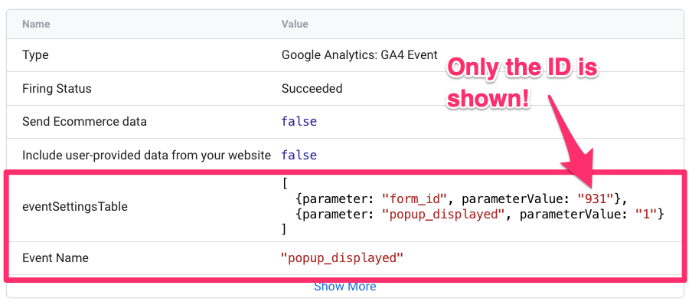
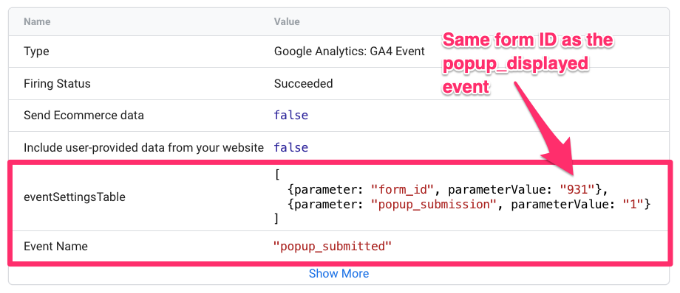
You will see your events coming through, so click on the popup_submitted to view the parameter data that GA4 will collect with each event, like form_id.
You will start to see data from these events (in reports and explorations) within GA4 24 hours after submitting the container.
Track when a popup is displayed
Great, so you have an event to capture a visitor’s submission, but that is half the work. Now, you must set up an event to capture when a visitor simply sees a popup. The process will be very similar to what we just did.
Begin by inspecting the popup to find information to determine the CSS selector you will need to use for the trigger, e.g., an ID or the class.
Note: you must ensure that you use the same form ID in both events. In our example, the entire form ID is not identical, but the unique identifier for the form is the same, e.g., “931”. If the same form ID is not available, you may need to ask a developer to add it.

Step 1: Create a trigger
Head back to Google Tag Manager to create the trigger for the tag. Go to Triggers, then click “New”.

Then, click “Trigger Configuration” and select “Element Visibility”.
There are two options you can select under the “Selection Method”. If you just have one popup with a unique ID, use the “ID”.

In the scenario where you have multiple popups that you want to track, then you need to select “CSS Selector” to input a more general pattern, e.g. “wpforms-{id}”. You can find more info on CSS selectors in the Intermediate-Advanced Google Tag Manager Course.
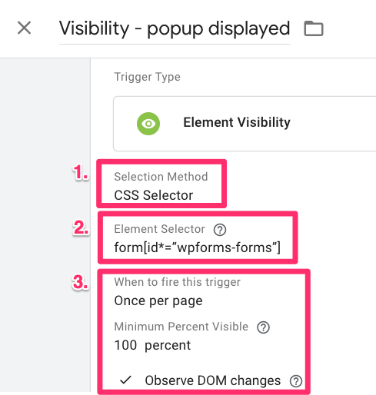
We have a unique ID for each form in this case, so we just want to use the general CSS selector. Same as before, complete these three steps:
- If the id is specific to the popup and you just have one popup, then use the “ID”. If not, you need to use a CSS selector to be more general.
- Add the CSS Selector (or ID), e.g. form[id*=”wpforms-forms”]
- Set the trigger to fire “Once per page“ when the element is “100” percent visible and check to observe DOM changes

Name and save the trigger. Then, preview the container to check that the Element Visibility event appears and the Form ID is available.

Check out this article if the Element Visibility trigger is not working.
Step 2: Create a tag
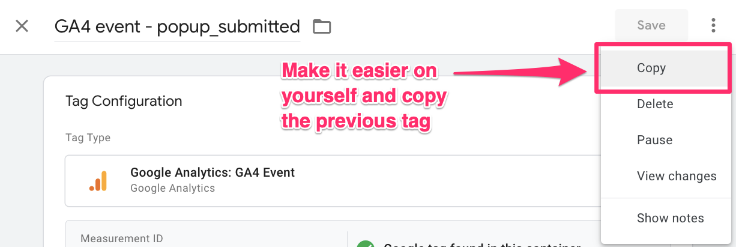
Just having a trigger won’t do us any good, so let’s make a tag for it. To simplify things, you can create a copy of the tag from the previous event.
The things you want to update are:
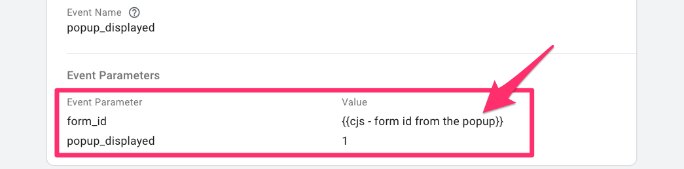
- Event name: Something like popup_displayed will work
- Parameters: Replace popup_submission with popup_displayed (or something else, as long as it’s different) to capture a value for each time the popup is displayed (to be used in the submission rate calculation)
- Firing trigger: Update trigger to the one from the previous step

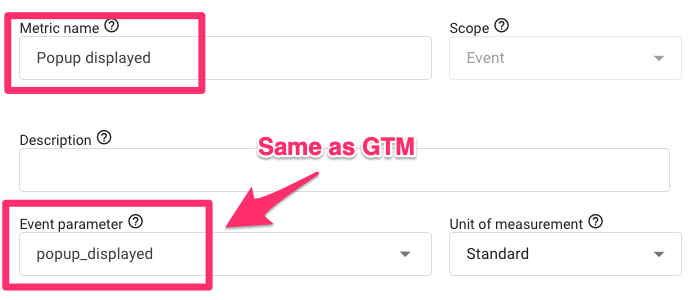
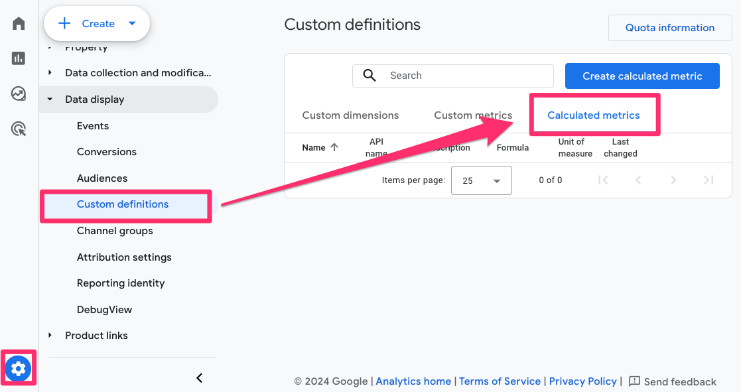
You must add popup_displayed as a custom metric in GA4 by going to Admin > Data display > Custom definitions and clicking “Create custom metric”.

Ensure that the Event parameter is exactly the same as the parameter in GTM. Keep the Unit of measurement as “Standard”.
Head back to Google Tag Manager and preview your container to check that the event is captured when a popup is displayed, along with the parameters.
Confirm that you can also see the event in Debugview in GA4. In GA4, go to Admin > Data display > DebugView.
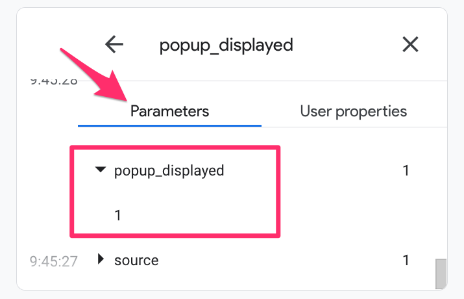
Click on the popup_displayed event and then select the Parameter tab to see the parameter data that GA4 will collect with each event, like popup_displayed.
Now, submit the GTM container and see the data enter GA4 after 24 hours.
Get the same Form ID in both events
In this example, the Form ID differs between the two events. They have the same unique number, but the entire ID is not identical. So, we want to extract just the number from the end of the IDs.
The solution? Custom JavaScript! Check out this code, which shows how to collect just the unique ID of the form for both events in our example.
You will probably have to adjust the code based on the popups on your site, e.g. if the Form ID is “popup-form-123”, then you can change the code to be:
var regex = /popup-form-(\d+)/;
If you need to freshen up your JavaScript skills, check out this article for some tips!
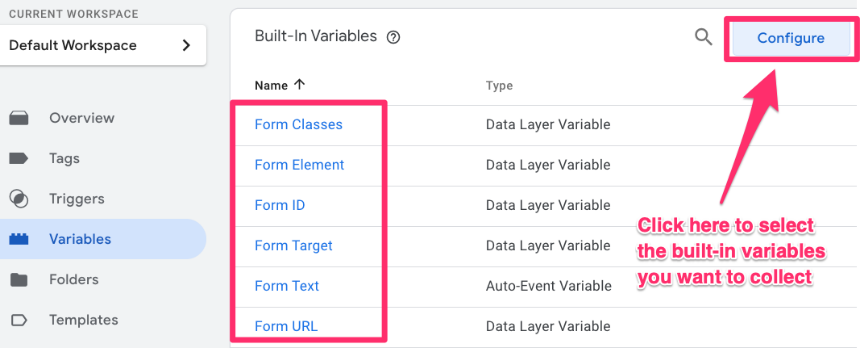
For this to work, you must ensure that you configure the Form ID in Google Tag Manager. Go to Variables > Configure and select all the built-in variables under Form.
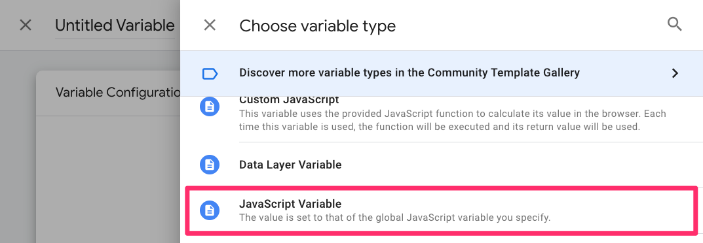
Staying in Variables, go to User-defined variables > New > Variables Configuration > Custom JavaScript.
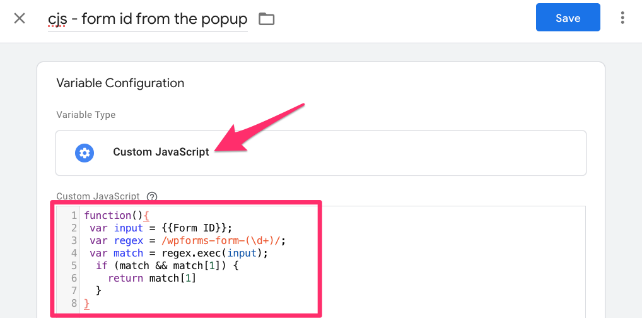
Insert the first code from the link above (or see below) and name the variables “cjs – form id from the popup”.
function(){
  var input = {{Form ID}};
  var regex = /wpforms-form-(\d+)/;
  var match = regex.exec(input);
  if (match && match[1]) {
   return match[1]
  }
}
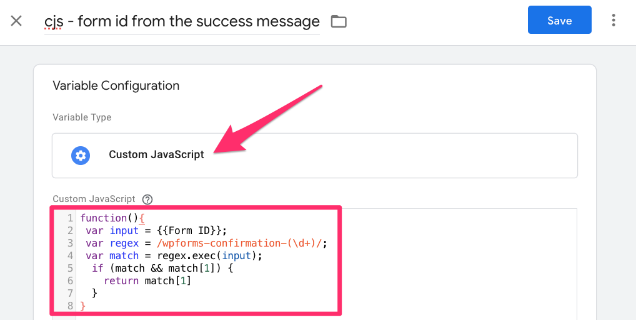
Insert the second code from the link above (or see below) and name the variable “cjs – form id from the success message”. Remember, you code may differ as its based on how the popup is configured on your site.
function(){
  var input = {{Form ID}};
  var regex = /wpforms-confirmation-(\d+)/;
  var match = regex.exec(input);
  if (match && match[1]) {
    return match[1]
  }
}
Now, you also want to go back and update the parameters for the two events to come from these variables rather than the Form ID.
Once you have saved the new tags, preview and check that the variable is in both Element Visibility events.
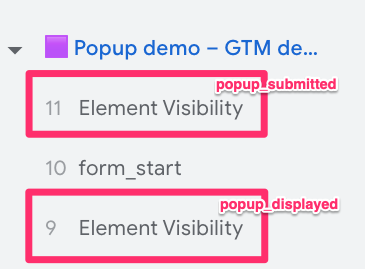
Click each of the tags to confirm that the information collected is correct.
Ok, now that you’ve completed all the nitty gritty stuff, we can move on to the fun things – building a report to actually see the results of our hard work!
Create a report for popup tracking
A cool thing about Google Analytics 4 is that you can create custom calculations. That means we can use the new custom metrics we set up to create a brand new metric called a calculated metric.
Go to Admin > Data display > Custom definitions. Then, change the tab to “Calculated metrics” and click “Create calculated metric”.
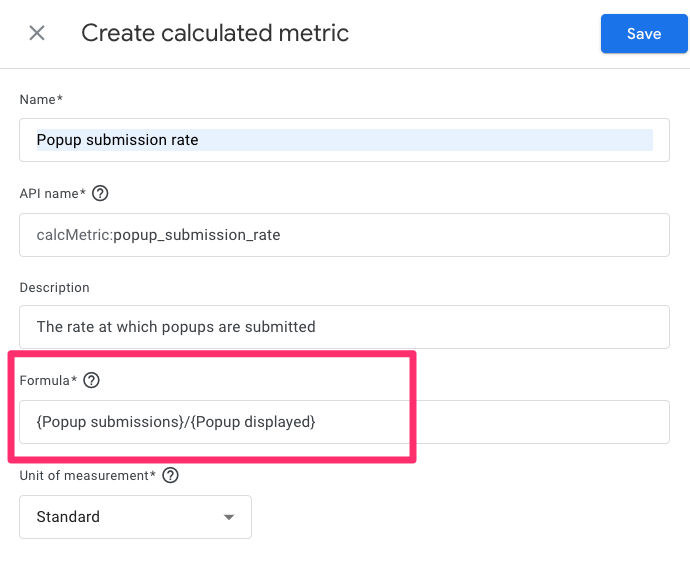
The formula is Popup submission rate = “(Popup submissions) / (Popup displayed)”. The Unit of Measurement can remain “Standard”.
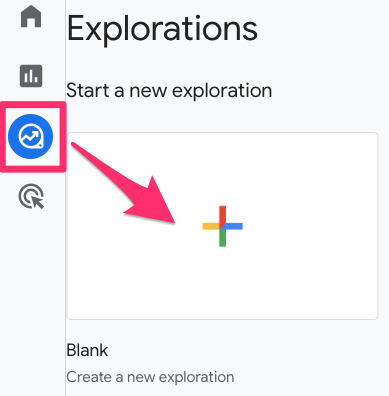
Once you have saved the metric, go to Explore in the left-hand navigation and click “Blank”.
Add to the report:
- Dimensions: Form ID
- Metrics: Popup displayed, Popup submissions and Popup submission rate
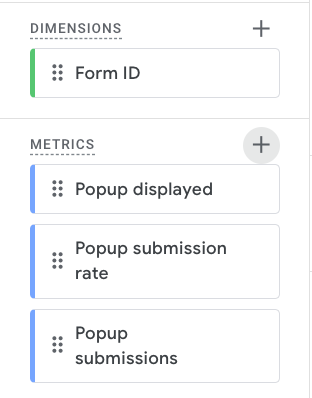
Select the Form ID for the Row dimension and select all the metrics as Values.
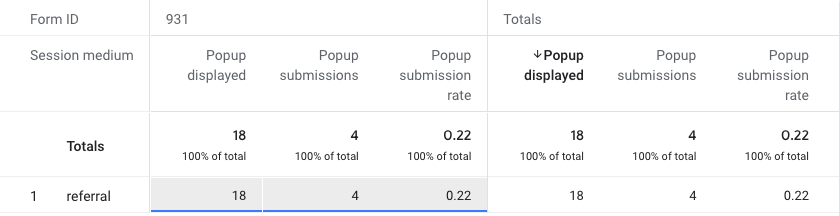
Additionally, you can add Form ID to the column and use another dimension in the row, like Session medium.
Track popups with Google Tag Manager and GA4: Final Words
Hopefully, you now have all the tools to track the success of your popups that ask a visitor for a submission, like an email, using Google Tag Manager and Google Analytics 4.
Comparing multiple popups within the same report will show you which have the highest submission rate so you can further analyze what is unique about them and adjust other popups on your site to be more successful.
This is a good reminder to use custom dimensions, custom metrics, and calculated metrics to enrich the available data for you to use in GA4.
Cheers to uncovering new insights!
1 COMMENT
how can I track when the popup modal (same page) closes? I tried using a click button with Click Class, and it did not work, so I think the best option would be to try and see when a specific modal is not visible. Would this be the correct way, and how to implement this?