
October 21, 2025
How to Set Up Google Tag Manager Server-side Tagging with Cloud Run
Updated: October 21st, 2025.
Note: This tutorial shows how to use Google Cloud Platform as your hosting provider. If you are looking for a tutorial using Stape.io, take a look here.
When Google launched the public beta of server-side Google Tag Manager (SGTM) on August 12, 2020, the audience split into several groups. Some people were cheering and shouting, “THIS IS HUUUUGE” while others were confused and asked “do we really need it?”. This is understandable because server-side tagging is not an easy topic.
That’s why the goal of this blog post is not to give you the “ultimate definitive” guide to how to work with Google Tag Manager server-side tagging. Instead, I wanted to provide an introduction for beginners (on the server side) and those who have no idea why this might be useful.
So if you are looking for something like “GTM server-side tagging for beginners” or “Google Tag Manager server-side tagging tutorial for beginners”, you’ve come to the right place.
However, remember that in this context, the word “beginner” refers to someone who does not know what server-side is. You will still need to have a good understanding of how website tracking with GTM works in general.
If your clients ask whether they need to adopt server-side tagging, you will be better able to answer their questions after reading this guide.

Table of Contents
Here’s what you will learn in this article
- The usual way how GTM is used
- The server-side way
- Why would you need this?
- Benefits of server-side tagging
- Drawbacks
- How to configure server-side tagging in GTM?
- Things to keep in mind
- There’s much more to learn
- Final Words
Want to learn more? Take a look at this course.
This blog post explains just the very first steps of server-side tagging. If you are serious about using this technology, many more things await you ahead.
If you want to learn the topic properly, I have a lot of content about it in my Intermediate/Advanced Google Tag Manager course. You will learn crucial topics like how to send data to Google Analytics and Facebook Conversions API, how to enrich your data, and more.

The usual way how GTM is used
To explain how server-side tagging works, first, let’s look at the setup/process that most of you are already familiar with deploying. If you want to install Google Tag Manager on a site, you need to add the web container’s JavaScript snippet to the source code of your site.
When the page loads, the GTM snippet loads along with the rest of the webpage and fires tags based on your configuration. The Google Analytics 4 tag is one of them. All this activity happens client-side (read: in the user’s browser). JavaScript codes load, collect data, and then send it somewhere else. For example, the GA4 snippet sends the data to google-analytics.com.
In addition to the data you instructed Google Analytics to collect (e.g., the click URL of the button), tracking codes usually gather additional information about the page, device, etc.

The server-side way
With server-side tagging, you are introducing an additional layer to the data collection chain – your own server (or servers) that hosts a server-side GTM container.
In that server, Google Tag Manager receives data from the client-side tracking codes, processes it, manipulates it (if needed), and then sends it to the 3rd party vendors or maybe even in-house analytics tools you are using.

Therefore, we have client-side tracking, but we also have some server-side parts. And if you want to go even further, you can skip the client-side tracking and get data from one server to your GTM server-side setup and send it to some marketing/ analytics end-points. But in this guide, we are focusing on the mix of client-side and server-side tagging.
A good way to think about this is to imagine your data is a package. Traditionally, the browser (the client) sends many small packages directly to various delivery services like Google Analytics, Facebook, etc. With server-side tagging, the browser sends just one large package to your own private post office (your server). There, you can check the contents, repackage them, and then forward the necessary items to each final destination. You get more control over what you send and reduce the traffic leaving your website directly.
To make the distinction clearer, here’s a side-by-side comparison of the two approaches:
|
Client-Side Tagging (Traditional) |
Server-Side Tagging |
|
| Where Code Runs | Directly in the user’s web browser. | In a cloud server that you control. |
| Data Flow | The browser sends many separate requests to each vendor (Google Analytics, Facebook, etc.). | The browser sends a single request to your server, which then distributes the data to vendors. |
| Performance Impact | It can slow down your website due to multiple JavaScript files loading in the browser. | Reduces the load on the user’s browser, potentially speeding up your site. |
| Data Control | Vendors can collect additional browser and device data automatically. | You have full control to clean, validate, or remove sensitive data before it’s sent to vendors. |
| Cost | Free (apart from the GTM tool itself). | Paid, as you must pay for server hosting |
Why would you need this?
You are probably thinking now: why would you want to add an additional step to the data collection process? Why should you bother having a server(s) in the cloud where another GTM container is loaded that sends the data to other vendors?

This is a very legit question. Let’s dive right into the benefits.
Benefits of server-side tagging
There are many benefits you can get from server-side tagging. I will mention only the most important ones (in my opinion):
- Improved Website Performance: By consolidating multiple tracking scripts into a single data stream to your server, you reduce the amount of JavaScript running in the user’s browser, which can lead to faster page load times.
- Greater Data Control and Security: You decide exactly what information gets passed to third-party vendors, allowing you to remove or hash sensitive data before it leaves your server.
- Increased Durability of Tracking: Server-side tagging can help mitigate data loss from certain browser extensions and overcome cookie expiration limits imposed by browsers like Safari (ITP).
- Richer Data through Enrichment: You have the opportunity to enrich the data you collect with information from other sources (like your CRM) before sending it to analytics platforms.
Reduced load on a page
When a web page loads, it has to download and process a lot of resources. As my experiments proved, the JavaScript snippets you add for analytics/marketing purposes can significantly slow down your site, especially if you add new scripts more often than Buckethead releases new albums).
Even if the script is loaded asynchronously (which is pretty much the standard today), it can slow down your site.
Imagine this: instead of loading dozens of different scripts on your website, you could have just one. That script would send data to your server-side GTM container. From there, the container would modify the data according to your configurations and then send it further to more tools/platforms you are using (analytics, marketing, CRM, you name it).
However, configuring a server-side container adds another level of complexity because you will need to configure how to transform the data, etc.
At the moment, that is not an easy task — you will need to learn how to code JavaScript, understand how server-side tagging works from a technical perspective, be familiar with cloud platforms, etc.
But the community keeps creating new plug-and-play templates that will do the hard work for you, and you will need to click some buttons/checkboxes, etc., and launch without too much hassle.
Control what data is sent to vendors
As I mentioned in one of the previous chapters of this blog post, JavaScript libraries loaded on a site will likely track more than what you instruct them to do. These libraries also collect details related to the device (for example, screen size), page details (page URL, page title), etc.
Libraries related to advertising might collect everything they can to identify visitors with higher precision. Data collection involves various techniques, including fingerprinting.
From a privacy standpoint, you would want something other than that, as it increases the risk of leaks of personally identifiable information (PII). With server-side tracking, you control what reaches those vendors.
Here’s an example:
- You have some custom-built JavaScript library that is collecting data about visitor behavior on your site
- That library sends the data to your server-side Google Tag Manager container
- You configure that container to send the received data to:
- Google Analytics
- Facebook Pixel
- Google Ads
In this case, these 3 analytics/advertising platforms can only get additional data about the visitor if you send it to them. If you send the user ID, then that ID is delivered. However, optional data that standard JavaScript libraries could have accessed on a website is now out of reach.
Why? Because Facebook Pixel in this setup is communicating with your cloud server. It cannot capture data from the visitor’s browser.
If your custom JS library on the site collects some PII, you can process the requests in the server-side container and remove/hash them.

Reduce the impact of ad blockers
Here’s a situation: you got consent from a visitor for analytics tracking, but that visitor is using some adblocking extension. The extension blocks all the requests to Google Analytics, as it blocks ads.
Because the request was blocked, the browser will not send any data collected by the various tags on your website to Google Analytics.
With server-side tagging, you could create a custom subdomain to which you can send the data, e.g., analytics.yourdomain.com. A GTM server-side container is waiting for the data at the other end. Once it is received and processed, the container sends the data further to Google Analytics.
Currently, most ad blockers do not block requests sent to domains like analytics.yourdomain.com. Who knows what will happen in the future, but this solution works now.
Extend the cookie expiration on Safari (ITP)
Intelligent Tracking Prevention (ITP) is a collection of privacy-enhancing features in the Apple Safari browser (but it also affects more browsers on iOS). Unfortunately, many things are affected/limited to prevent cross-site tracking, but my concern for this blog post is cookie expiration.
If the 1st party cookie (meaning that it can only be accessed on your site) is stored in a visitor’s browser by JavaScript, that cookie will expire in 7 days (in some cases, the limit is 24 hours).
Even if that JavaScript is entirely custom, built in-house, and is not related to any 3rd party vendor, that cookie will expire in 7 days (unless a visitor keeps revisiting your site and that cookie gets updated).
For the time being, you can avoid this 7-day limit if you store the cookie on the server side. In other words, if a server (accessed via your domain) stores a cookie in a visitor’s browser, its expiry date is whatever you configured it to be (e.g., 2 years).
I explain how to extend cookies with SGTM in my Intermediate/Advanced Google Tag Manager course.
Update: Apple launched an update to limit the duration of cookies set from the server. If the website server’s and your SGTM server’s IP address’s first two numbers don’t match, the cookie extension will not work.
If the website server’s IP address is 1.2.3.4 and SGTM server’s IP address is 44.55.6.7, the first two numbers (1.2 vs 44.55) do not match, thus, cookies set from the server will still expire in 7 days.
A solution for that would using the same load balancer for your website and for your server-side Google Tag Manager. Then, IP addresses will match and the lifetime of cookies (set from the server) will be extended properly.
Drawbacks
However, not everything is perfect here. There are several drawbacks as well. Or maybe they should be called “Things to keep in mind”.

In fact, I already have a separate section for “things to keep in mind,” and it contains more notes. Keep reading.
Paid solution
Don’t get me wrong. GTM server-side container is free, and you will not incur much cost in most cases in the testing configuration.
But if you want to run it on a live website that is getting decent traffic, you will need to open your wallet.
No, that’s not because the GTM container requires some premium GTM subscription. However, you need to host that server-side container somewhere. And that’s where you spend the real $$$ (on Google Cloud Platform, Stape, Azure, AWS, or somewhere else). Even though Stape is cheaper than the other options I mentioned, it will still incur costs.
The price depends on a lot of factors:
- Which hosting provider do you choose
- The number of requests or traffic you send/get
- Number of servers, etc.
I am most familiar with Google Cloud Platform (GCP) and Stape. The minimum recommended configuration on GCP would cost you at least $90/month. On Stape, the pricing starts at $20/month.
But if you get more traffic, your expenses will be higher.
It is important to frame this cost as an investment rather than just an expense. While standard web tracking has often been free, the benefits of server-side tagging, such as improved data quality, better performance, and enhanced privacy controls, offer tangible business value. For many businesses, the monthly fee for a server is a small price to pay for a more robust data collection strategy, especially as privacy regulations and browser limitations continue to evolve.
You can also use your servers (by doing a manual setup). But that will also cost you something.
Not for everyone
To start working with server-side tagging in Google Tag Manager, you will need to become even more technical (or hire someone experienced in analytics development).
If you thought that GTM already requires a lot of technical topics (spoiler alert: it does), then from now on, the rabbit hole goes deeper.

How to configure server-side tagging in Google Tag Manager?
Now, let’s dive into your first setup. I’ll try to keep things as simple as possible (even though, in reality, they are more difficult).
Here’s what the process looks like in a nutshell:
- Create a server-side Google Tag Manager container + server
- Map the default server URL to a custom domain
- Send the data to your GTM server-side container
- Configure tags, triggers, variables (if needed), and clients in the server container
- Test, upgrade your server (if required) and publish
Note: Each hosting provider has a different process for setting up the server. So, if you decide to use, say, Amazon AWS, you’ll need to find separate instructions for that.
Setup SGTM container and server
The first step is to create a server container in Google Tag Manager. Since the container needs to be hosted somewhere, the next step is to provision a tagging server using Google Cloud Run. Once you have set up the server, we will test the randomly generated URL that Google provides to ensure it is working correctly.
Create a server container
Before we begin, I assume you have previously created a Google Analytics 4 property and a GTM container for your website (a.k.a. client-side tracking). If not, read this blog post on setting up GA4 and then return to this article.
Now, we need to create a server container from either the GTM account list or within the container. Using the first method, click the three dots next to the gear icon (in the account where you want the container).
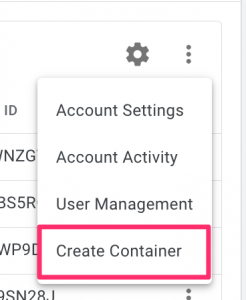
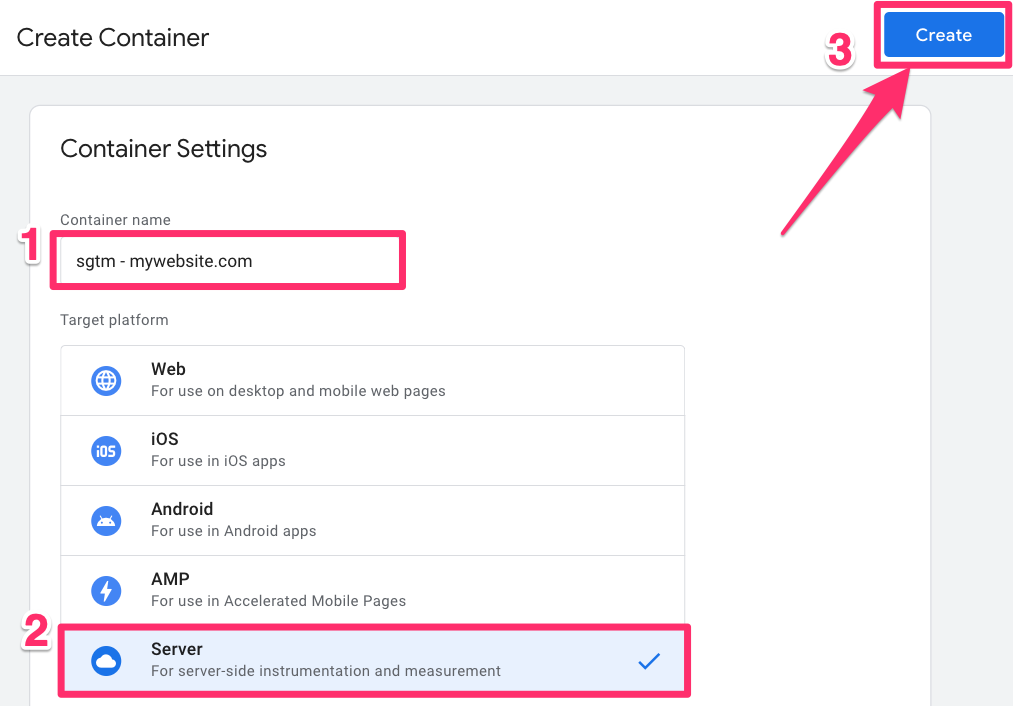
You can name the container something like “sgtm—mywebsite.com” (where you replace mywebsite.com with your website), choose “Server”, and click “Create” at the top right.
Provision a tagging server (Cloud Run)
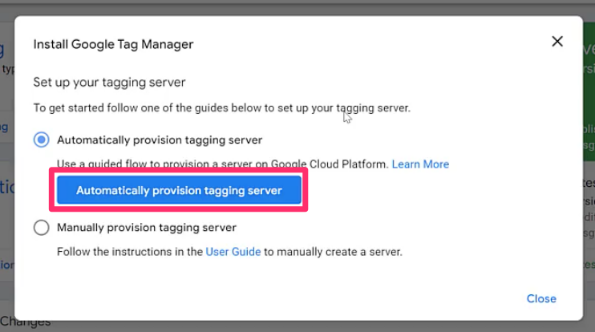
Once you’ve created the container, you need to provision a tagging server, a.k.a. creating a server to store your GTM container.
Since we’re using Google Cloud Platform (GCP), specifically Cloud Run (a serverless platform in GCP), I recommend selecting the “Automatically provision tagging server” option. However, if you’re using a different hosting provider like Stape.io, you’ll need to set up the server manually, which is outside the scope of this tutorial.
If you choose this option, a tagging server will be created in the US region, although you can change the region later. For more information, check out my Intermediate/Advanced GTM course. This approach also creates servers you can (and will) reconfigure later, simplifying your life as your needs evolve.
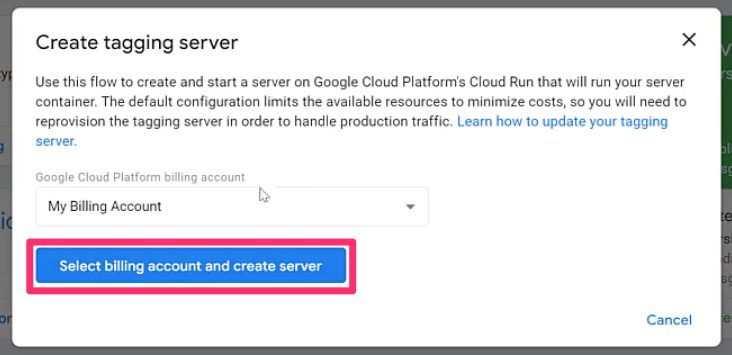
If you don’t already have a billing account, you must create one now. Select “Create a billing account” and follow all the steps. Once you’re done, select the Billing account you just created (or an existing one).
What if you are working with an organization with an existing billing account? You need to use their account to provision the tagging server. You have two options in this case.
Option 1: Ask your coworker or client to provision the server for you and give you access.
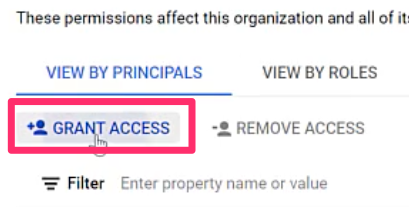
Option 2: If you prefer not to ask your coworker or client to go through the process, request permission or access to the Google Billing Account. Your coworker or client will need to follow these steps:
- Go to console.cloud.google.com.
- In the project selector (ensure the correct organization is selected), select the three dots and choose “IAM/PERMISSIONS”.
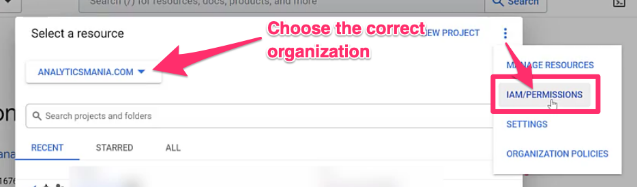

- Select “Grant access” and add your (the analyst’s) email address under New principals.

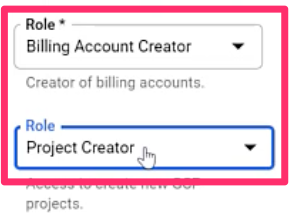
- You will need to be assigned two roles: “Billing Account Creator” (to work with the billing account) and “Project Creator” (to create a new project in GCP).

Once everything is set up with the billing, you will get a pop-up in your GTM container with important information about your tagging server. You can view this information later by clicking the container ID.

Make a test request to .run.app
To test the Default URL, which is how you send data from your website to the tagging server, click “Preview” in the top right corner of the GTM container.

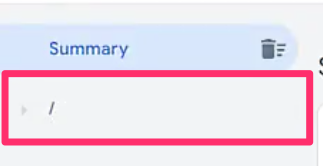
Start by copying the Default URL, which should look something like https://server-side-tagging-acbcde123f-uc.a.run.app. Next, open a new browser tab and paste the Default URL into the address bar. When you do this, you’ll encounter an error since we haven’t configured much yet. However, in Preview mode, you will notice a “/” in the URL. This means that when trying to load the site, a request was sent to the tagging server, and the server registered the request.
To continue testing, add “/testing” to the URL and refresh the page. In Preview mode, you should now see “testing” displayed in the URL.

Finally, click on the “testing” request, go to the Requests tab and view the incoming request to see the information that the server captured from the browser. This will show you the data that was sent from the website to the tagging server during the test.

Mapping a custom domain
When you enable Preview mode in GTM container, you will notice that the Preview mode URL is actually the server URL (you can check this by clicking the container ID in SGTM).
![]()
![]()
Why is this a problem? Since you’re still using Google’s domain–a third-party domain that doesn’t belong to us–it will limit the benefits of server-side tagging (if you try to do anything from the URL, it’s still considered third-party tracking).
What is the solution? Mapping a custom domain, e.g., using something like data.mydomain.com (replacing “mydomain” with your domain). Then, when the visitor lands on your website, your tracking uses the same domain, just with a different subdomain.
Step 1: Reserve an IP address
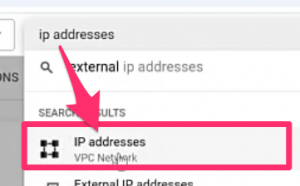
Start in your SGTM, click the container ID, and select the link next to the Google Cloud Platform Project ID. In the search bar, type “IP addresses” and when you see the pop-up, click “Continue” (you will see some errors on the page, but this is normal).
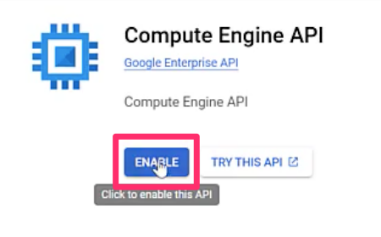
If prompted, enable the “Compute Engine API” (and if you’re asked to enable anything else during the process, make sure to do so).
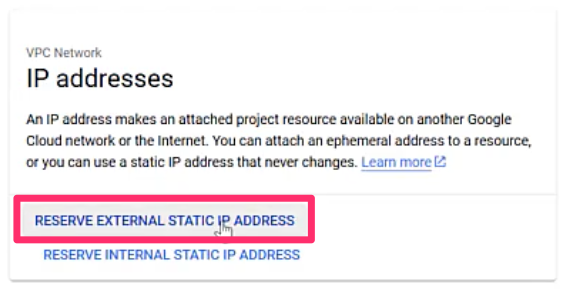
Once the API is loaded, click “Reserve External Static IP Address” on the new screen,
Name the IP address “sgtm-ip”, update the Type to “Global” and click “Reserve”.
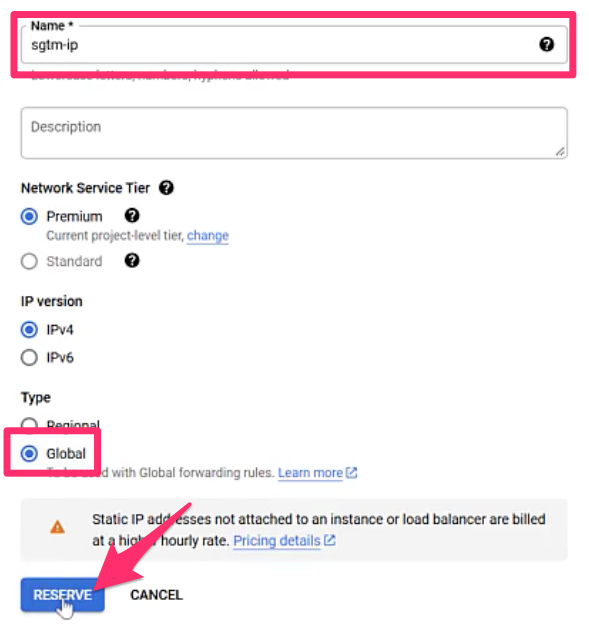
At this point, there are two essential things you need to note:
- When the IP is not connected to anything, it will start to incur costs (~ a couple of cents a day), but once it’s linked to and used by the server, the IP will become free.
- You must include this newly reserved IP address in your domain’s DNS records. If you’re unsure how to do this, contact someone in your company, e.g. IT.
Step 2: Provision SSL certificate
The SSL certificate ensures that the connection between the user and the server is secure, allowing the server-side endpoint to use HTTPS instead of just HTTP.
In GCP, search “Certificate Manager” and you will be prompted to enable the “Certificate Manager API”.
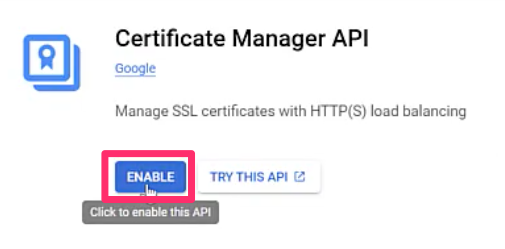
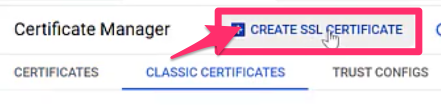
Once that’s done, select Class Certificates > Create a certificate.
There are a few steps you will need to take to complete this form:
- Name: “sgtm-ssl”
- Select “Create Google-managed certificate”
- Domain 1: Enter your domain of the server-side endpoint (You must ensure that the subdomain you’ve chosen is not being used anywhere else)
- Click “Create”
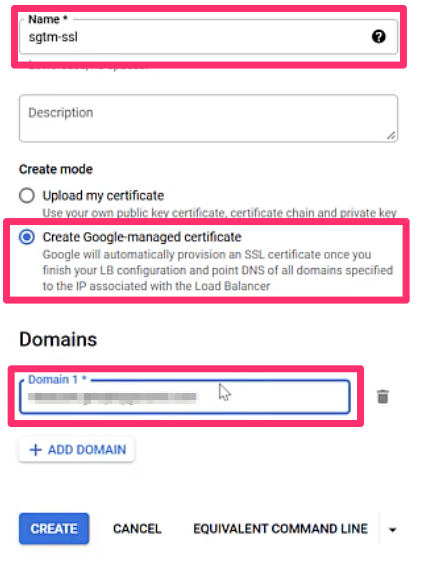
You don’t need to wait until the status changes from Provisioning to Active. We will move on to linking the SSL to the load balancer immediately (this could take anywhere from a couple of hours to a couple of days).
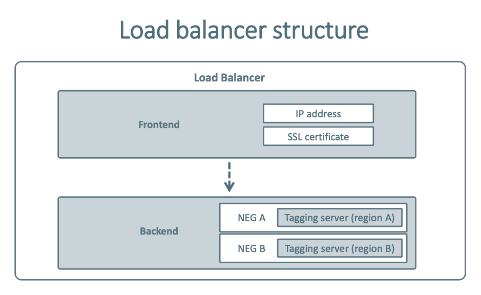
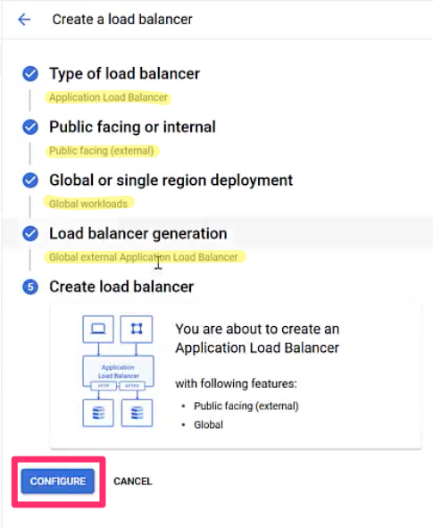
Step 3: Create a load balancer
A load balancer is a tool for managing and directing incoming traffic to different servers. When visitors land on your site, the load balancer determines which server should handle the request. For example, if you have both a US- and an EU-based server, the load balancer will direct users from the US to the US server and from the EU to the EU server.
The load balancer has two main parts:
- Frontend: Links the IP address and the SSL certificate
- Backend: Where you set up Network Endpoint Grounds (NEG), one for each tagging server region.
Search “Load balancing” in GCP and click “Create load balancer”. Since we keep all the default options, you can select “Configure” immediately. Name this “sgtm-loadbalancer” (you’ll notice a pattern with the naming convention).
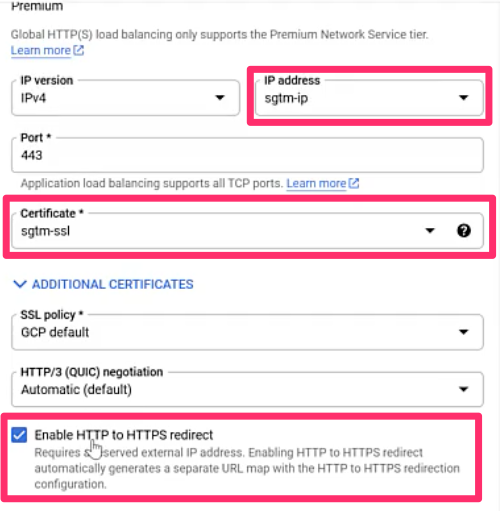
Frontend
For the frontend, there are a few things you need to do:
- Name: “sgtm-front”
- Switch the Protocol to “HTTPS”
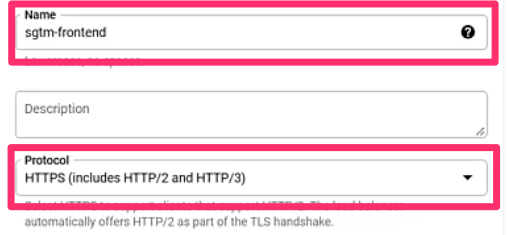

- Updated the IP address field to the IP address you previously reserved, e.g. “sgtm-ip”
- Under Certificate, select “sgtm-ssl” (which you created earlier in this chapter)
- Check “Enable HTTP to HTTPS redirect”

Backend
Next, move to the Backend configuration section. Here, you need to select “Create a backend service” and fill out the form in the window pop-up:
- Name: “sgtm-backend”
- Switch the Backend type to “Serverless network endpoint group”
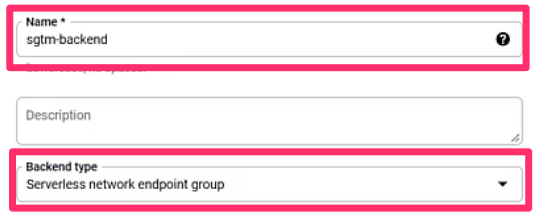

- Under New Backend, select “Create serverless network endpoint group”


- In the new form, you will need to fill in the following information:
- Since we used the automatic provisioning, it set the region as us-central1, so that you can set the name to “sgtm-neg-usc1”
- Select “us-central1” under Region.
- Check “Cloud Run” and for the Service, use “server-side-tagging”
- Click “Create”


- In the new form, you will need to fill in the following information:
- Uncheck “Enable Cloud CDN”
- [Optional] You can add additional geolocation headers so that, with each incoming request to the SGTM container, you will also get information on the visitor’s country, region, and city. If you are doing consent mode stuff related to regions or using Google Signals, you should definitely include this information. To do this, go to Advanced configurations > Custom request headers and click “Add header” (three times). Add the three header names and values from below:
- X-Gclb-Country – {client_region}
- X-Gclb-Region – {client_region_subdivision}
- X-Gclb-City – {client_city}


- Click “Create” to save all these changes.
Routing rules
While all traffic will be sent to sgtm-backend since that’s where the tagging server is, entering your own subdomain is also good practice.
Click “Add host and path rule” and fill in the following information:
- Host 2: Add your subdomain, e.g. data.mydomain.com
- Path 2: Enter “/*” (aka all paths that are related to the subdomain)
- Backend 2: Enter “sgtm-backend” (same as what is in the row above)

Finally, select Preview and finalize, and click “Create” to complete this step.
Now, you will see two load balancers: the sgtm-frontend-redirect is the main load balancer and sgtm-loadbalancer is just for the HTTP/HTTPS redirect. The statuses for both should contain green checkmarks.
The Load balancer will only start working when the SSL certificate is finally provisioned. Search “Certificate Manager” and go to Classic Certificates. The status will change to “Active” in a couple of hours (this depends on the DNS provider).
Step 4: Update the domain in the SGTM container
Once the status updates to “Active”, copy your new domain and navigate to SGTM. In the Admin section, select Container Settings.

Remove the existing Server container URL and paste your own (ensure that you include “https” and remove any trailing slashes “/”).

Let’s test once again. Enter Preview mode. Now, in the URL, you should see your own domain. Open a new tab, paste “data.mydomain.com/test” (replacing it with your actual domain), and you should see “test” in preview mode.

Click on the incoming request and review the fetched data. Confirm that you can see the city, country, and region.

If all of this checks out, the custom domain tracking was completed successfully.
Send data from a web container to the server-side container
There are several ways to send data to the GTM server-side container:
- A developer can edit the gtag.js code snippets added to your site’s source code.
- A developer can write custom code or a library that prepares and sends the data to the server container itself.
- You can configure a Google Analytics 4 tag in Google Tag Manager’s web container.
To no one’s surprise, I’ll use the third option for this example.
Let’s say you have a website with a regular GTM web container (a prerequisite for this blog post). With the out-of-the-box solution, you are already firing a GA4 tag on every pageview, and you’ve probably created some additional event tags.
These tags send data (by default) to google-analytics.com/g/collect (or /r/collect, analytics.google.com/collect, etc.). What we need to do now is change that destination URL and forward all requests to your new server-side container.

How do you do this?
First, we need to edit the Google Tag (which you used to install GA4 with GTM). In your web container, open the Google Tag responsible for activating Google Analytics 4. Then click Configuration settings > Add parameter and enter “server_container_url” as the parameter and your server-side endpoint subdomain as the value.

As a safeguard, you should also go through each GA4 event tag in your container and add the same server_container_url parameter and value to each of them.
For more convenient management, you could include it in the event settings variable, and then just include the variable in all GA4 tags.
Test
Let’s test to ensure that this is working as we hope. To do so, refresh the preview mode in your server-side container (by clicking the “Preview” button in the GTM interface once again) and enable it in the web GTM container.
You can check the Network tab of your browser developer tools (right-click on your webpage and select “Inspect”). Enter “/collect” (without quotation marks) to find the request. You should see that the request is no longer sent to the Google Analytics domain but rather to your own server.

Then, you need to go to the preview mode of the server GTM container and see if the requests were received. If yes, they will display on the left side of the preview mode. Click on one of them to see what data was collected with the incoming request.

We will configure server-side tags, triggers, and variables to send data to Google Analytics 4 in the next section.
Configure tags, triggers, variables and clients in the server container
If you’ve worked in Google Tag Manager before, you know of tags, triggers, and variables, but clients will be a new term for you. Let’s briefly go over what each of these mean:
- Tags send HTTP requests from SGTM
- Triggers fire tags (only one trigger type is available)
- Variables can be used to remove some parameters of the request, add some additional parameters to the request and make triggers more precise (I won’t talk about variables too much, so if you want to learn more, check out my Intermediate/Advanced GTM Course)
- Clients are responsible for receiving and processing/adapting the data received by the GTM server-side container. Then, they make the data available to that container’s tags, triggers, and variables.

What are clients?
Since they’re unique to SGTM, let’s chat more about clients.
Data is usually available in the regular web container because some code pushes it to the data layer. In this case, the server-side container receives the data from *somewhere*. The client then catches, adapts, and makes it available in the container.
Think of a Client as a specialized gatekeeper. When a request arrives at your server-side container, it needs to be identified. Is this a request from Google Analytics 4? Is it from a different tool? The Client is the first component to inspect the incoming data, claim it if it recognizes the format, and then translate it into a standard structure that tags, triggers, and variables inside the server container can easily understand and work with.
When you create a new server container, it automatically adds a client for GA4.

You can add additional clients if needed, but the number of client templates available is limited at this time (however, in the future, we can expect more as the community builds them). Also, you can create your own clients, but this requires good JavaScript knowledge + becoming familiar with the APIs available for the Client Templates.
For the initial setup, we don’t need to create or code clients. Instead, we will use the existing Google Analytics 4 client.
Tags, trigger, and variables
Every time GA4 sends data to the GTM server container, this client will catch it and make it available in tags, variables, etc. When that happens, we must activate a Google Analytics 4 server tag to send the data further to Google Analytics servers.
In the regular web GTM Container, you are accustomed to creating different tags for different interactions:
- One tag for pageviews
- One for purchases
- One for outbound link clicks, etc.
In the server-side case, having one GA4 tag is enough (at least in the early stages of your SGTM setup). This tag will receive data about GA4 events, pageviews, purchases (from your website), and other related data and forward it to Google Analytics servers.
When does creating multiple GA4 tags in the server container make sense? Sometimes, certain Google Analytics 4 events may require you to override settings. Then, it makes sense to create a separate tag for X events.
To create the one GA4 tag, go to Tags > New > Google Analytics: GA4. This tag will forward all the data from a Google Analytics 4 client. We will not update anything under Event Parameters or User Properties at this time.

In the “Triggering” section, you will find three pre-built triggers, similar to the client-side setup: Custom, Custom Event, and Page View.
In our specific case, we need to create a trigger when GA4 appears as the Client name for the associated event. Here, you should select the “Custom” trigger. Custom means “a request was sent to the GTM server container”.

If you’re not concerned about which requests are sent to Google Analytics, you can keep using “All events”.
If this is your case, you could limit this trigger to activate only when the default Google Analytics 4 client catches the request. That’s why you should enter the following condition: Client Name contains (or exactly matches) GA4.

P.S. Client Name is a built-in variable you must enable in the server container’s Variables section (Variables > Configure).
Name the tag “GA4” and save all these changes. It’s time to enable Preview mode. The preview mode will open in a new tab and looks quite similar to the one you use for the Web container. However, there are several new things/differences. I’ll mention them a little later.
Once your site is loaded, complete an action (e.g., refresh the web page or click on something), and you will see the incoming requests in the SGTM preview mode. Click one of the requests and go to the Requests tab. Here, you will see the client, the outgoing request, and the incoming request. If you click on the outgoing request, you will see what tag sent the request, which, in this case, is the GA4 client, and information about the request.

How to check everything
While we have tested along the way, this chapter will give an overview of four ways to ensure your setup is working, especially after setting up a new event.
- Preview mode of Web GTM: Complete the action on your site and confirm that you can see the event in preview mode. Check that the tag appears under “Tags fired” and contains all the parameters.
- Network tab (right-click on your webpage > Inspect > Network): Type in “collect” in the search bar and confirm the data is going to your server-side endpoint.
- Preview mode of SGTM: Complete the action on your site and confirm that you can see the event in preview mode. Confirm that the request appears in the left-hand navigation. Click on the request and go to the Requests tab to see information on the client and the incoming and outgoing requests.
- To check the final destination (e.g., GA4 DebugView), go to Admin > DebugView and check that the event and parameters appear in the timeline.
Again, I discuss this in much more detail in the server-side chapters of my Intermediate/Advanced GTM course.
Upgrading the server and publishing your GTM changes
One of the final steps in this guide is to upgrade the servers (so that your SGTM can support the website’s traffic and have enough power to process incoming requests).
Go to your server Google Tag Manager container, click the container ID, and then click the Google Cloud Platform project ID. You will be redirected to the Google Cloud Platform. Use the search bar at the top of the interface to find Cloud Run.

Select the tagging server (not the preview server).

Then select “Edit & Deploy” for the new revision.

In the Autoscaling section, set the minimum number of instances to 2 and the maximum to 10. Then, click “Deploy” to complete the process.

Costs
As with many things, this will all come at a cost. Running one instance costs ~$45/month, so the setup in this tutorial will cost you at least $90/month. If your website has a high traffic volume, Google Cloud Run will increase the number of instances, so it’s possible that your setup might cost even more, e.g., 4 x $45 = $180/month.
Other factors will also affect the final price (e.g., the volume of outgoing server requests and logging), so you might expect to pay a bit more. However, estimating the monthly GCP costs of server-side tagging is very difficult until you start using it.
Once your setup is ready, publish changes in both GTM containers (web and server). The web container will start to send your GA4 data to the server-side container, and the server container will then begin to accept the incoming data and forward it to GA servers.
Warning: If you upgrade for testing purposes, remember to downgrade (or ideally, delete the Cloud Run servers, load balancer, IP address, and SSL certificate after you’ve played around). Otherwise, Google will charge you once the free credits expire.
Things to keep in mind
Next to all the benefits and drawbacks mentioned in the previous chapters, here are more things/concerns to keep in mind.
This DOES NOT make your knowledge of web tracking with GTM obsolete
GTM server-side does not completely replace the usual website tracking that you have been doing to this day. You still need to understand how the data layer works and how to configure tags, triggers, and variables in your web container.
Server-side tagging is an additional level of features that you *can* use in your stack. Of course, you can move entirely to the server side, but I still see many cases where the server container works hand in hand with the web container.
As the entire industry is shifting towards pure(-ish) 1st party tracking, the need for server-side will definitely increase. But you will still need to send that data from your website (and the web container in GTM is one of the options).
So, if you have doubts about reading/ watching current GTM tutorials, don’t worry; feel free to dive in. If you are in a hurry and want to get up and running FAST, you can check my premium GTM courses.
Bad/shady actors
With great power comes great responsibility. And since many things are about to move to the server side, bad actors can also do that. This talk is about businesses that might/will utilize this new suite of features to avoid ad blockers, etc., and track more information without consent.
But I guess that’s the price of progress. Plus, I think that the industry (and privacy guards) will continue to find ways to circumvent/limit this. Somehow.
Server-side does NOT make you automatically GDPR/CCPA/etc. compliant
Modern privacy regulations are not about technology. They are about consent. If a visitor did not give you consent for tracking, it does not matter how you collect data — client-side, server-side, whatever.
More difficult debugging
Debugging will become more complex. It will not be as simple as checking browser extensions or network requests in your browser (especially if you are debugging someone else’s setup without having proper access to the GTM container).
You WILL need access to the server-side container to debug what is happening inside.
This step is the most painful for those who want to pitch new clients and showcase their expertise beforehand. Regular website tracking allows you to check what data is sent, identify issues + impress the lead. Server-side, however, is a black box that can be opened only with the proper access to the container.
Just starting with GTM? Don’t jump into server-side just yet
First, get familiar with the regular (website) GTM container and how it works. When you get confident in that, start learning more about server-side tagging.
Otherwise, you might feel overwhelmed by a knowledge gap that’s too large.
If you want to start with GTM website tracking, grab this free ebook.
There’s much more to learn
This guide was just an introduction to the world of server-side tagging. If you want to adapt it to various use cases, you must continue learning. A few topics to start:
- How to optimize the costs of server-side tagging
- Sending data from the server to multiple vendors (e.g., to Google and Meta at the same time)
- Transformations
- Changing the region of your server to EU
All of this (and much more) is explained in my intermediate/advanced Google Tag Manager course.
GTM server-side tagging: Final Words
Should you start implementing server-side tagging right now in your projects?
The answer is classic “it depends”. If you want to be in control of what data is collected by marketing/analytics vendors, invest in server-side tagging.
If you want to reduce the impact on page loading speed (while doing the heavy lifting in your server), choose server-side tagging.
If any other benefit (mentioned in this article) resonated with you. SGTM is for you.
But if your analytics/marketing needs are very basic and you mainly check your data to see what are the most popular pages or where are you getting most of your traffic from, server-side GTM might be too much of an investment because it will induce additional costs.
Google Analytics and GTM have been free for years, thus many businesses got used to the fact that their tracking should be free. Spending at least 3-4 digits per year on server-side tagging might be too expensive for many of them.
To sum things up, here are the key takeaways from this article:
- Server-Side Tagging Adds a Control Layer: It routes your website’s data through your own server before sending it to third-party vendors, giving you more control.
- It’s a Paid Solution: Unlike client-side GTM, you must pay for server hosting, with costs often starting at $20-$90/month for production traffic. For Google Cloud Run, the cost start at $90/month.
- Requires a Custom Domain: To get the full benefits, you must map the server to a subdomain of your own site (e.g., data.yourwebsite.com).
- It Complements, Not Replaces, Web GTM: You will still need your client-side GTM skills to send data from the website to your server container.
- Start with Fundamentals: If you are new to GTM, master the standard web container before diving into the added complexity of server-side tagging.
54 COMMENTS
Another great blog and video! Thanks a lot ;)
Great article!
How to move cookie with another domain to 1st party cookie? Like a google.com or something else.
Now I can set up "Transport URL" only for Google Analytics variable.
Sorry, I don't understand the question. You cannot move cookies between domains. You can set new cookies on domains.
If you want a cookie to be set on your domain, it must be set by a script (or http request) on your own domain.
Hmm, sorry Julius - It's confusing.
I found this article: https://www.simoahava.com/gtm-tips/build-custom-universal-analytics-client-server-side-tagging/
Simo made _ga the 1st party cookie.
Maybe this is the right way, but I have many cookies...
So I would like to protect my cookies from Apple which reduces expire time etc.
You would then need to write custom code/clients to handle other cookies too. There is no ready-made solution for that at the moment.
Posting this in case someone faces a similar issue. I have an existing GCP account and in trying to create the container, I got "Billing quota exceeded".
Solution:
Head over to GCP > Manage Resources > You'll find your newly created GTM container there > Click on the three dots and associate Billing with your CC .
Head back to GTM > Retry > Your container should now be created.
Thanks for the heads up!
Hi, Julius. At the moment, it's just for Google Analytics tracking right? (We don't have client for Facebook Pixel, for example)
There is no ready-made facebook pixel client yet. But in the futurex there will definitely be one. I have heard that Simo has created one (it is not public yet).
I am pretty sure the community will build more in the future.
Thank you so much Julius!
Great article! Incredibly well written. I really appreciate the level of detail in the step by step guide. It makes it really hard to mess up the test run... ;)
One question: Have you tried building a client that is not based on GA? I.e. a client that captures incoming tracking hits that are not GA measurement protocol and passes them on to other 3rd party tools (such as Adobe Analytics or other analytics vendors)? It looks like everything is pretty much Google exclusive so far, but I could be missing something?
I haven't, but you can definitely build custom clients working with other tools, for example Faceebook pixel.
Cool, I'll give it a shot! Thanks.
Can I set up GTM server side without GCP. I use Nginx or Apachie.
Yes, you can use custom servers https://developers.google.com/tag-manager/serverside/manual-setup-guide
Hey Julius!
Great article as always, however I'm a bit confused on sending data to server-side container. I'd like to use the existing client-side container and the server-side container at the same time, when previewing on GTM I can see that there are calls both on server-side and client-side and they're are sent as "succeeded", however when I publish the changes to Production somehow the # of events collected are diminished tragically. I've checked the network with "collect?" and saw that "...appspot.com" calls are giving out 500 status error, while google analytics calls are giving 200.
However, I'd have expected the event counts to stay the same as the previous implementation was based on client-side anyways, so nothing is changed ideally. I'm trying to use server-side GTM for deduplicationg on Facebook Conversion API.
Any ideas on this?
If you hosted your website on google cloud, do you still need to pay separately for the GTM server side?
GTM server container requires a separate Google Cloud project thus SGTM would increase your overall costs. As far as I know.
Thank you, for my understanding, the GA tag has to be active and data will send through the server-side.
That means if users don't allow the cookie consent, the tag will not be active, and the server-side will not active as well. my understanding is correct?
Correct
Is it still necessary to pay individually for the GTM server side ?
yes
Hi Julius, I came back to this article because I have set up GA4 via a GTM server container. To compare, I have also set up GA4 with a web GTM container. My GA4 reports show that the number of users is significantly higher in my server side setup compared to my web setup. 125.000 in my server side report VS 108.000 in my web setup report. Is this normal? I am trying to figure out if I should check my server set up. I realize that it's impossible to tell for my specific situation, but what are your experiences in general when comparing server versus web setup, in terms of number of users? Thanks!
fun fact: you cannot share GA4 auds from a server-side container back to Google Ads.
"Please note that currently google signals is not supported on GA4 server-side tags: Advertisers can use server-side GTM and Google signals in tandem (requires full GA4 implementation client-side), but the server-side GA4 tag does not yet support Google signals."
Depends on how you have implemented GA4 in SGTM. My guess is that if you continue using client-side cookies, it will still work. That's what I have in my own setup. GA4 is server-side by user identification is JavaScript-based (read: client-side cookies). In that case, GA4 audiences work fine in Google Ads.
Thank you for this comment, Julius. How do you implement client side cookies with SGTM/GA4? Are you implementing GA4 in a web-based, client-side installation to accomplish this?
I do similarly as I have explained in this guide. Client side gtm + server side gtm
Can I set up GTM server side without GCP.
Yes
Hi! Tested the server container via preview mode, sent a test event manually using a test curl query that suggested preview mode, but the event did not come to google analytics. Can you please tell me if it is possible to send such queries directly to further send events to google analytics?
I have setup the GTM in my VPS!! With /healthz works fine!! I am doing Apache Proxy Passing to target docker container!! But I am unable to see any page view? How can i check my Custom GTM Server ?
If the gtm script can be skipped when using server-side container? As we have a website which is written using C#.net that all pages are real-time rendered by some dll code and there is no way to put the gtm script on the page header.
It's no longer possible to choose the GA4 Config tag in GTM and i have to choose the Google Tag-tag. There's no option to "Send to server container". How do i do this with the Google-Tag?
Add a server_container_url parameter in your Google tag
Hi Julius,
Thank you for your detailed introduction. I am still seeing a 90kb+ data layer loading on my site which is my ga4 code from the web gtm container. I thought that having server side GTM was meant to stop this. Should it stop this? Do you know what I am doing wrong?
It means that you are loading just GA4. But other tracking codes (like FB or Google Ads) are handled on yhe server. So they are not loaded on a the website, hence page performance is improved.
Thanks Julius,
So, should GA4 be loading through the GTM web container or not? Is it possible to remove this?
The setup that I explain here is a hybrid setup where you use client side + server-side.
You could get rid of GA4 tracking code completely, but then you would need to build your own library that captures events and sends them to your server. This makes the setup much more complicated.
Thanks Julius,
We are trying to send data from a server to GTM Server, and from there, with measurement protocol to GA4. We are getting the hits but we are not recording Users or Sessions. I guess we need to add de session_id, we did add client_id. But we are not sure if to add those to event_parms or user_properties, as they are more like session parameters.
Do you know any documentation where they explain de full process. Normally is just to send data from client to GTM server and the to GA4.
Thanks in advanced,
Borja
What is the difference of this custom subdomain setup (on Cloud run) compared to one via App engine? One in App engine seemed a little easier, no? Maybe I'm missing something here or Google Cloud has made some changes in server side tagging setup.
I have install uBlock and the tag manager script is not loaded because it block the requests to google tag and google map
and i defined a custom domain.
is it means that i need to load the script by myself? im using angular tag manager library
Do you know how can i using firebase analytics with web app together with google tag manader server container ?
is it possible to load both ? or make the configuration on the google analytics to send data to the serverv?
i created another new web container and set the measurement id of analytics and load both
is there any other way?
how can i prevent ad blocker to load the tag?
i put the script in the head but its block it
and i have firs proxy domain
thanks for this guide. I got an active status now in Cloud Run. But before I deploy, what's the difference of this setup vs the adding the subdomain in App Engine? Do we need to just choose between Cloud Run and App Engine?
Thanks Julius, in the process now of setting up Meta Pixel with Google Tag Manager. Step two in the process appears to REQUIRE us to create a server container and we cannot proceed with only a web container. Do you have any experience in this situation? We only need/want the web container...
Hi Julius! Thank you for the awesome content!
I have a question regarding key events. When sending data for key events from serverside, Im getting 302 but the still the request shows as succeeded and I can see the.event in the debugview.
Do you know why that happens? Been trying to figure out, but not sure at all.
Same here. I think it is just a false positive.
Hi Julius, i have a question about serverside GA4. Im facing trouble, the data for session on GA4 report is lower than other metrics that not make sense. When i check with omnibug there is no (session_start) event firing. how to check the session event in case using serverside to make sure the session_start is detected properly? thanks
Hi,
Thanks for the article, very helpful!
I'm wondering what would be the advantages or same origin?
I understand it would take more work from developers but what would we get more in return for the extra effort?
Thanks,
Catalina
Hi Julius, great article! I do have a question though. You start the process creating a project from the container creation, but what if you need to setup the container on an existing project? We tried with the manual provisioning but somehow is failing and we are not sure why. Ip address is in place, load balancer in place, SSL provisioned but it does not get connected to the container and returns or 404 or errors and we are not sure why.
Hi Julius,
We set up server-side tracking from the scratch about a month ago, following your article and youtube video.
On Google Cloud's APP Engine> setting > Custom Domains, our custom domain is certified, so i expected it to be work when debugging with the custom domain. However, the custom domain we set always return as 404 when i debug the domain from server-side GTM container. I researched and tried out cache issue but this approach did not fix this page 404 problem. Do you have any other potential factors in mind that might be causing this problem??
Thank you for your help!
I'm trying to follow the step "Provision SSL certificate". But I always get the status "FAILED_NOT_VISIBLE". So after I Select “Create Google-managed certificate” and Enter your domain of the server-side endpoint, do I need to add some record to my domain register ?
great guide, thanks Julius! One thing worth mentioning is that when you create GA4 tag in sGTM using condition Client Name = 'GA4', make sure to name client the same way 'GA4', or it will not work.
I named my client 'ga4' (in lowercase ), and used triggering condition Client Name = 'GA4' (in uppercase), nothing worked as the result for hours :D
Hi Julius,
Thank you for the great information. I already use tag manager to send data from multiple environments to Analytics, Google Ads, and MS Ads. Recently I've started to receive complaints from the PCI scan company regarding unsecure client side cookies. And after some research, I've decided the future is lies Server Side Tags. So far it looks like Analytics is provisioned, but not Google Ads and MS Ads. Also, I use event tags extensively (view_item, view_item_list, add_to_cart, begin_checkout, purchase, menu_click, email_click, phone_click, file_download, scroll, page_view). Currently this all flows to Analytics and the Ad providers. Right now I'm doing baby steps, but I'm a little overwhelmed by the scope of the project. Do you see more server side clients being made available in the near future.