
May 6, 2025
Auto-Event Variable In GTM: 2 Simple But Powerful Examples
Updated: May 6th, 2025
Google Tag Manager offers a lot of excellent features when it comes to website tracking. If you have already tried using GTM for more than basic Google Analytics pageview tracking, you have probably seen the list of 15+ variable types. That’s a pretty decent list, huh? I bet it raises more questions than answers – e.g., what is the DOM element? What is the Auto-Event Variable? etc.
In this blog post, I will show how you can add an auto-event variable to your web analytics arsenal + two examples of use from my experience.
Table of Contents
Here’s what you will learn in this article
- What is an Auto-Event variable?
- What problem does it solve?
- What do all those settings mean?
- Example No.1 – Auto-Event Variable in GA4 Tag
- Example No.2 – Auto-event Variable in Trigger
- The result
- Conclusion
Before we continue: this topic is also explained in my Intermediate GTM course
The auto-event variable is often overlooked amongst the other Google Tag Manager features. In fact, many more underutilized functionalities can take your GTM implementation skills to another level. That’s why I created an Intermediate Google Tag Manager course that can help you with this.

What is an Auto-Event variable?
Auto-Event Variables are used to access the target element of an auto-event action (e.g., Click, Error, Form Submit). For example:
- When you click an image, you can access the image’s URL or target link.
- When you submit a form, you can access the form’s ID, etc.
Sounds familiar? Google Tag Manager already offers a lot of predefined (built-in) variables, for example, Click ID, Form Text, etc. All of them are auto-event variables (note: most built-in variables are stored as Data Layer variables; Simo has described it in detail.)
The auto-event variable checks the website’s element that a user interacts with and adds some particular data to the Variables tab of GTM Preview and Debug mode.
What problem does it solve?
I’ll illustrate it with an example – imagine your website’s homepage contains three clickable images. Each one opens a different YouTube video (in a pop-up). You want to track which image your visitors are clicking the most.

What will you do? Your answer is to use Google Tag Manager Click Trigger. Good choice. However, there’s one “but”. All images contain the same CSS class and have no IDs. So, the default GTM Click variables are not useful in this situation – you cannot simply identify the most clicked image.
What do you do? Research. Use the “Inspect element” feature of your browser to find other possible solutions. Usually, it works by clicking the mouse right button on the website element (e.g., an image) and then Inspect element (see more thorough instructions for Chrome, Firefox, Internet Explorer, Edge).
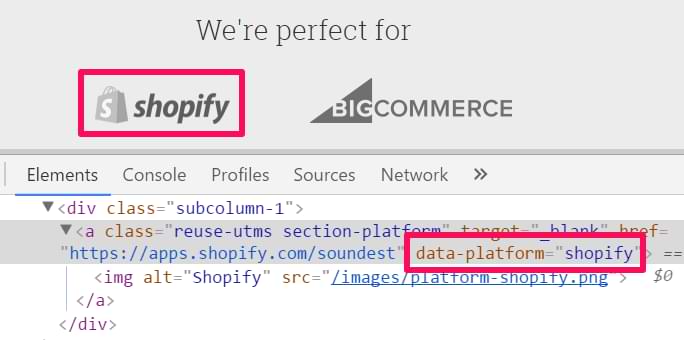
Once you open Developer Tools (by inspecting elements), you’ll see an HTML code. A sample could look like this:

As mentioned before, no click class or click ID is available for this element. But there are other attributes that I could make use of – alt and data-video-id. That’s where the Auto-Event variable comes in handy – I can turn alt or data-video-id into variables in Google Tag Manager and use their values in triggers or tags.

What do all those settings mean?
Disclaimer: This chapter is a bit more technical, so in case you feel a bit confused, feel free to skip to the next chapter – a practical example. If you are still willing to find out more technical details, let’s dive in.
To create an Auto-Event Variable, complete the following actions:
- Go to Variables
- Under User-Defined Variables, click New
- Click Variable Configuration and then Auto-Event Variable
Expand the Variable Type dropdown, and you’ll see 13 options.
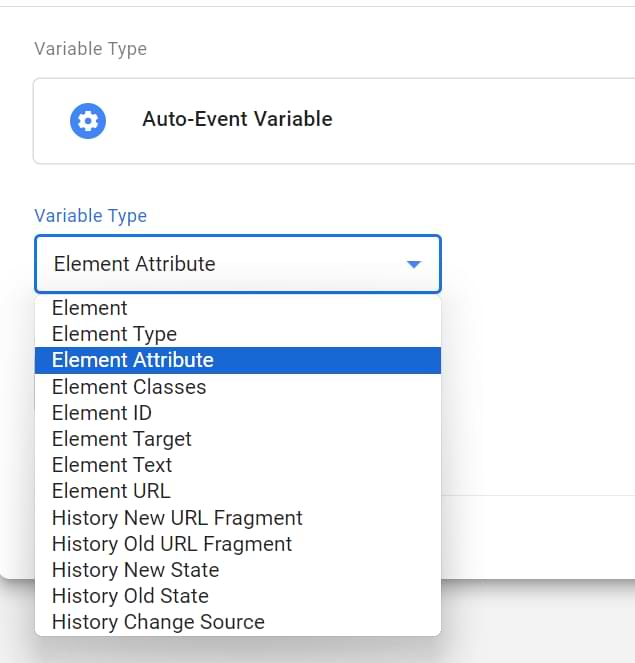
#1. Element – Accesses the website element (a.k.a. DOM Element) itself that was the target of the auto-event action, i.e., if you click an image, the auto-event variable will return value [object HTMLImageElement] (I have to admit I have never used such type of auto-event variable in practice). This is stored in the Data Layer under gtm.element name. Note: There are Built-In Variables for this – Click Element and Form Element.
#2. Element Type – captures the type of the element that triggered the auto-event. This could be anything from a button to an image or form element. The Element Type option is useful for tracking user interactions with specific elements on a page.
#3 Element Attribute – Returns the value of a particular attribute of the auto-event element. You need to define the name of the attribute you are interested in. All examples in this blog post are dedicated to this type of auto-event variable.
#4. Element Classes – Returns the value of the class attribute of the auto-event element. Stored in the Data Layer under the key gtm.elementClasses. Note: There are Built-In Variables for this – Click Class and Form Class.
#5. Element ID – Returns the value of the id attribute of the auto-event element. Stored in the Data Layer under the key gtm.elementId. Note: There are Built-In Variables for this – Click ID and Form ID.
#6. Element Target – Returns the value of the target attribute of the auto-event element. Stored in the Data Layer under the key gtm.elementTarget. Note: There are Built-In Variables for this (Click Target and Form Target).
#7. Element Text – Returns the value of either the text (textContent or innerText property) of the auto-event element. Note: There are Built-In Variables for this – Click Text and Form Text.
#8. Element URL – Returns the value of either the href or the action attribute of the auto-event element. Stored in the Data Layer under the key gtm.elementUrl. Note: There are Built-In Variables for this – Click URL and Form URL.
#9. History New URL Fragment – Returns the new URL fragment set with a browser history event. Stored in Data Layer under the key gtm.newUrlFragment. URL fragment is the part of a web address after the # symbol (e.g., www.example.com/#contact-us). This is especially popular among one-page sites where URL fragment changes when you scroll). Note: There is a Built-In Variable for this – New History Fragment. If you’re interested in URL fragments and tracking in GTM, check Simo Ahava’s blog post.
#10. History Old URL Fragment – Returns the old URL fragment replaced in the browser history event. Stored in Data Layer under the key gtm.oldUrlFragment. Note: There is a Built-In Variable for this – Old History Fragment.
#11. History New State – Returns the new state object set with a browser history event. Stored in Data Layer under the key gtm.newHistoryState. Note: There is a Built-In Variable for this – New History State.
#12. History Old State – Returns the old state object replaced in the browser history event. Stored in Data Layer under the key gtm.oldHistoryState. Note: There is a Built-In Variable for this – Old History State.
#13. History Change Source – Returns a string denoting the event that triggered the history change event (popstate, pushState, replaceState, or polling). Stored in Data Layer under the key gtm.historyChangeSource. Note: There is a Built-In Variable for this – History Source. P.S.
Example No.1 – Auto-Event Variable in GA4 Tag
I used to work at a startup called Omnisend (previously Soundest). We offer an email marketing solution that could easily integrate with popular e-commerce platforms (Shopify, Bigcommerce, etc.). On our website (the older version of it), we had various places where logos of e-commerce vendors are displayed (we call them platforms internally). Some logos redirected to app stores (where visitors can install Omnisend), while others redirected users to a signup form, etc.
I was interested in which vendors are the most popular among our website visitors. Luckily, each logo contained an attribute with the vendor’s title – data-platform (I could by using the Inspect element feature).
My idea was to catch all link clicks of vendor logos and push that data to Google Analytics as events where the event label is a platform (vendor) name. To achieve this, I completed the following steps:
- Create an Auto-Event Variable in GTM
- Set up a Click trigger (Just links), which fires only when any of the logos is clicked
- Created a Google Analytics Event tag that pushes the data to Google Analytics.
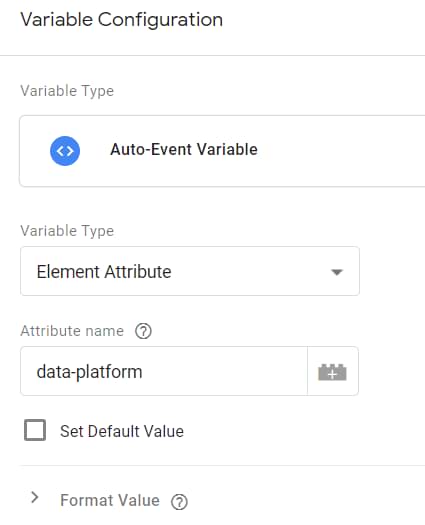
Step 1: Create an Auto-Event Variable
Variable’s settings:
- Type: Auto-Event Variable
- Title: aev – data-platform
- Variable Type: Element Attribute
- Attribute name: data-platform
Step 2: Create a Click Trigger
Set up a Click trigger (Just links) with the following settings:
- Title: Click – Clicked Platform Logo
- This trigger fires on some link clicks
- Click classes contain section-platform (because all vendor logos in that particular website section have CSS class reuse-utms section-platform).
![]()
![]()
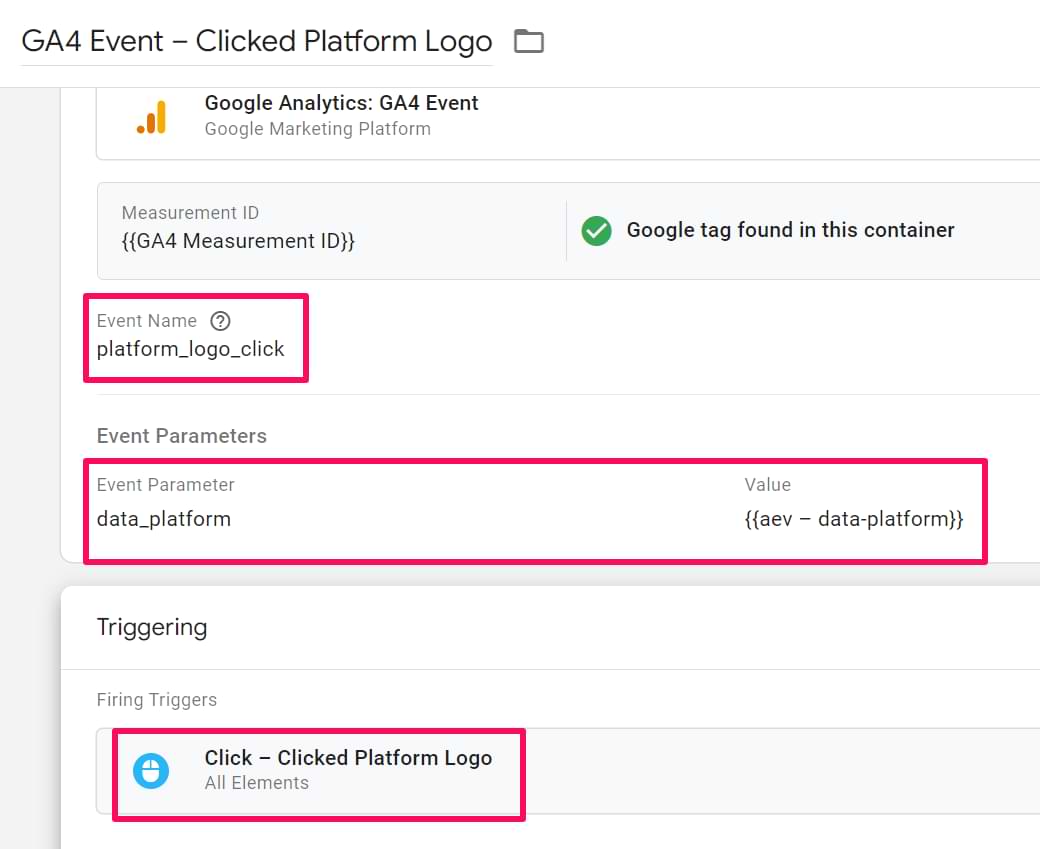
Step 3: Create a GA4 Event Tag
Now, let’s create a GA4 Event tag that fires an event when someone clicks a vendor logo. But first, you must create a Google Tag (the new replacement for the GA4 Configuration tag). You can follow this extensive article about the Google Tag and proceed to the following steps:
- Go to Tags
- Click New and choose a predefined template – Google Analytics: GA4 Event.
- Title: GA4 Event – Clicked Platform Logo
- Event name: platform_logo_click
- Add the created Auto Event Variable as an Event Parameter
- Add the click trigger you have previously created
Example No.2 – Auto-event Variable in Trigger
In this example, I’ll show you how to use an auto-event variable in triggers. When I was working at Omnisend, I was talking with my colleague Karolina, and she complained that the bounce rate of our blog was a bit too high. Karolina raised some doubts that due to the lack of interactions being tracked with Google Analytics, the bounce rate is actually higher than it should be.
First, let’s remember how the bounce rate is calculated. According to Google, Bounce Rate is the percentage of single-page sessions (i.e., sessions in which the person leaves your site from the entrance page without interacting with the page). Pageviews are not the only way to interact. Other events (such as form submissions or certain clicks) are also considered interactions.
Karolina’s hypothesis was although visitors do not read more than one blog post per session, they still interact with it. So, we needed to track more relevant interactions. Her blog posts contained many images, charts, etc., that can be viewed in greater detail when clicked upon. So, I decided to start tracking clicks of images in blog posts.
I was interested only in those images that are part of blog posts, not all images displayed on the entire page. After inspecting, I noticed that all content images contained links with attribute rel=”lightbox-5″ or rel=”lightbox-6″, etc. Each number represents the ID of the image.
The best way to track those images was to create an auto-event variable rel and use it in the Link Click trigger.
Step 1: Create a variable
Auto-event variable’s settings:
- Title: aev – rel
- Variable type: Auto-Event Variable
- Type: Element Attribute
- Attribute name: rel
Step 2: Create a trigger
Trigger’s settings:
- Title: Click – Image In Blog Post
- Trigger type: Just links
- This trigger fires on Some Link Clicks
- Condition: rel contains “lightbox” (without quotation marks)
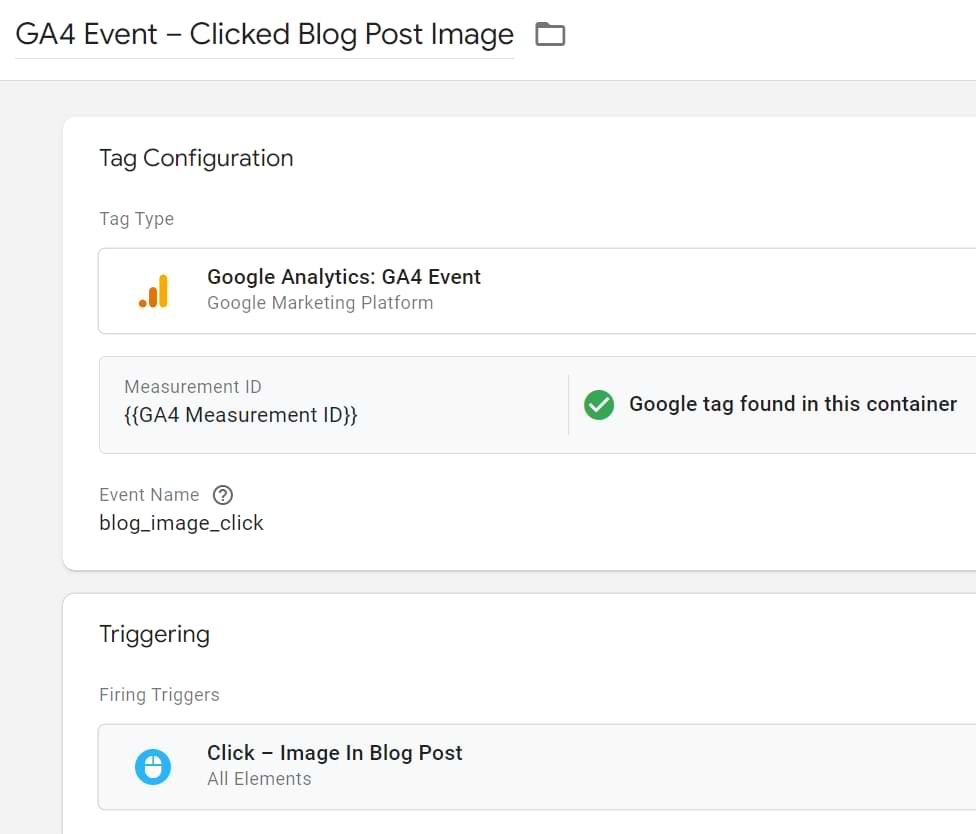
Step 3: Create a GA4 Tag
Google Analytics Tag’s settings:
- Go to Tags
- Click New and choose a predefined template – Google Analytics: GA4 Event.
- Title: GA4 Event – Clicked Blog Post Image
- Event name: blog_image_click
- Add the created Auto Event Variable as an Event Parameter
- Add the click trigger you have previously created
The result
Karolina’s guess was correct: some visitors interacted with her content by clicking images. Some opened a blog post, read it, clicked at least one chart or image (if there’s one), and only left the page.
The bounce rate decreased by almost 5 percent, and the average time per session increased by 15 seconds. Of course, Karolina’s long-term objective is to increase the number of pages per session, but more accurate metrics were a good start.
Auto-Event Variable: Conclusion
The auto-event variable is a pretty easy way to get more data from a website and utilize it in your tags or triggers. In this blog post, I described how you can easily fetch custom data from your website and push it to Google Analytics. In another example, I demonstrated how you can track clicks of only certain website elements with the help of AEV. This technique is ideal when the Click Classes variable is not unique (and no Click ID is available).
Here is another idea where you can use Auto-Event variables:
- You can track outbound link clicks as Google Analytics events and see which links are nofollow. All you need to do is create an Auto-Event Variable (Type: Element Attribute, Attribute name: rel) and push it as an Event Label to GA.
If you have questions about Auto-Event variables or Google Tag Manager, feel free to comment, and maybe we’ll devise a solution.
9 COMMENTS
Hi Julius - I just wanted to let you know how immensely helpful your articles have been to me this past month as I was forced to take my GTM knowledge to a new level. Your articles are so clearly written that I can actually follow them. Thank you and all the best with your aspirations!
Hi Julius,
Your article is super helpful! A question to ask:
1. For the aev in trigger,
using the same example above, could I achieve the same effect by
click - just links - some link clicks
click element - matches CSS selector - img[rel*="lightbox"]
?
And - if both methods can achieve the same result, which one would you suggest to use and why?
Thanks!
It depends on the situation. If you use Link clicks trigger, then the < a > element of the HTML (link) must contain that "rel" attribute.
Txs!!!
Hey bud,
If you don't fill a field on our signup form error text shows within the variable: data-testid. So if it fires the code looks something like:
.
I'm adding a form completion trigger and looking to validate only if the variable data-testid > does not contain > error-text.
Will an auto event variable work here? Since the user isn't actually clicking on it? Or am I doomed to use the DOM variable.
Either DOM element variable or write custom code that crawls the DOM and finds the correct object. Auto-event variable requires a visitor to interact with the actual element (e.g. click the error message)
Hi Julius, Thank you for the insightful post. I would love to use the auto-event variable but it's very dependent on exactly where users click on a feature. So for example, I have a button that is coded this way:
Add
If the user clicks right on the button label, the span element is captured and thus no data-gtm attribute is found. But if the user clicks anywhere else within the button, the data-gtm value is captured. Do you have any ideas as to how to deal with this? By the way, I can't change the code.
This would require advanced knowledge and you would need to get familiar with topics such as JavaScript fundamentals and DOM traversal.
Hi Julius, do you know if it's possible to push a value to GTM which would set an Auto-Event Variables value? For example, I am requried to implement a native gtm.click event via JavaScript. I am able to override all click elements besides the Click Text because it's an Auto-Event and not a dataLayer variable. Any tips appreciated!