
May 9, 2020
Setup GDPR Cookie Consent Notification with Google Tag Manager
Last update: May 9th, 2020
On May 25th, 2018, General Data Protection Regulation (GDPR) came in effect, meaning that online businesses that get visitors from the European Union, must track visitor/user behavior and collect data more carefully, responsibly, and with consent.
I will not go into detail what GDPR is (there are other great blog posts out there like this one, this one or this one). Long story short, a standard This website uses cookies blah blah blah cookie consent becomes irrelevant. From now on, if you are using some tools/scripts on your website that are used to identify individuals and their data is processed by you or 3rd parties), that can be done only when a person gives consent. This also affects tracking codes that are managed in Google Tag Manager.
So before you get the actual consent, all the tracking should be put on hold. In this guide, I’ll show you what solution did I choose and how I implemented GDPR cookie consent notification on analyticsmania.com + you’ll get a Google Tag Manager Recipe.
This Google Tag Manager GDPR setup will give you more control when it comes to activating marketing/analytics tracking codes.

Table of Contents
- First things first, GDPR is NO cookie legislation
- Action plan
- What will the consent banner look like?
- Onetrust Cookie Consent Notification: Pros and Cons
- Create an account
- Scan the website
- Cookie Banner Setup
- Publishing changes + script integration
- GTM Recipe
- Import The GTM Recipe
- Update Your Current Tags with New Triggers
- To sum up
- But wait, there’s more
- Useful Resources
- Final words
First things first, GDPR is NO cookie legislation
Before we continue with the GDPR cookie consent notification, I’d like to point out a common misconception. The General Data Protection Regulation only involves personal data. It does not talk about cookies in any way. If a cookie contains personal data, then GDPR applies to it (because of data), in all other cases, a “cookie law” should be applied.
In fact, the European Commission is currently working on a new ePrivacy Legislation (expected probably(?) in 2020, even though it was supposed to arrive at 2018) which will be built upon the ePrivacy directive and the GDPR. This legislation is expected to bring more clarity on how companies should handle tracking and advertising online.
Also, keep in mind that I am not a lawyer. So you should not use this guide as legal advice.
GDPR Cookie Consent Notification: Action plan
OK, now let’s go back to our main topic, cookie notification. I’ve checked several solutions and the one that I’ve chosen is offered by OneTrust. My website is using an older version of it (implemented in 2018). The newest version (explained in this guide) will work a bit differently. I’ll explain that in a moment.
Here’s the flow:
- A new visitor lands on a page and sees the cookie notification banner at the bottom of the screen.
- Banner offers to accept cookies or decline them by going into cookie settings. Until this moment no tracking tags are fired yet. In other words, a visitor still has the opportunity to act before cookies are stored in his/her browser.
- If a visitor clicks Accept Cookies button, this is a consent.
- The consent banner will block the visitor from using the website content until tracking is accepted or rejected.
What will the consent banner look like?
A visitor lands on your website and this popup will appear (design might look different based on your settings). It cannot be closed or hidden unless a visitor accepts or rejects tracking.

If a visitor gives consent, all tags will continue working as usual. If a user clicks No, let me choose, a preference center will open where all the tracking categories (e.g. targeting group, functional group, etc.) will be opt-out by default. A visitor will have to choose which ones he/she wants to give consent to.
Here’s an example:

Onetrust Cookie Consent Notification: Pros and Cons
I have to admit, I struggled a lot when I was trying to implement OneTrust’s consent for the first time. For the second one, I already had a Google Tag Manager recipe which made things much faster and easier.
If you’re not sure whether this tool is right for you, here are the advantages and disadvantages:
Pros:
- Free for one website (not limited by pageviews/number of pages, etc.)
- The design is pretty good and clear
- A Preference Center and the ability to opt-out/in to separate categories of tracking cookies
- Pushes consent data and events to the Data Layer
- Scans the website for cookies, automatically assigns them to different cookie categories in the preference center.
- Offers various opt-in/opt-out settings, is pretty customizable.
Cons:
- On workdays, the cookie scan takes a pretty long time (if not carefully configured, even several hours). But I’ll show you a workaround.
- Several bugs
- Requires a lot of configuration on the Google Tag Manager side (but this step is required by pretty much all cookie consent tools, as far as I know).
- Setup flow was annoying sometimes, especially for new users who don’t know all ins and outs, yet.
I have to admit, it took me way too much time during the first implementation (a day or two) because I had problems almost in every step (and the support was pretty meh with their help).

But when I did succeed, all the other attempts took me about 1-2 hours. Once I knew all the possible obstacles, I avoided them immediately, therefore saved a lot of time.
In this guide, I’ll also give you tips on how to avoid possible blunders in order to implement the GDRP cookie consent notification asap.
Create an account
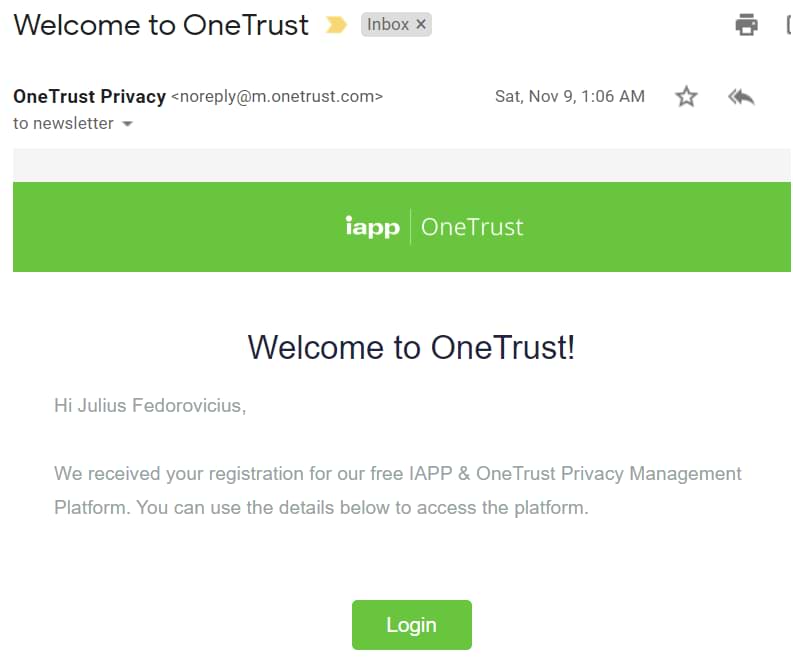
This is a very important part. It’s not that simple to create a free OneTrust account. You will need to fill in this form, submit and wait for up to 48 hours because someone will manually create an account for you and then send an email with the confirmation link.
So if there is a slight chance that you will want to try OneTrust, immediately go to this page and submit the form. Go, do it now. I’ll wait.
I had different experiences waiting for the email with a link. Once it took maybe 2-4 hours of waiting, while the other time it was 48 hours. So you should be patient.
After you get an email with a link, finish registration and come back to this blog post and we’ll continue. In my case, the email looked like this (but in the future, its design might look different):
OneTrust has published a long but informative and useful guide, you can find it here. Cookie-consent-related stuff starts on page 148.
If you don’t receive an email with the account details after 48 hours, try to contact their support or submit the form again with a different email address.
Scan the website
After you get an email with a signup link and finish the registration, you should be redirected to this page.

Click Cookie Consent > Go to Product. On the next page, click Add Website (in the top right corner).
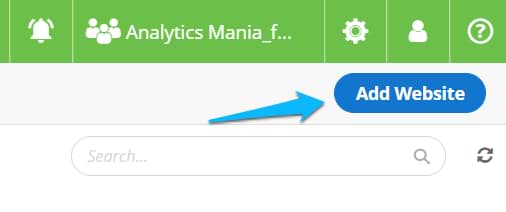
Then click Add Website (in the top right corner of the screen) and enter website’s information. Free OneTrust plan allows you to have one domain.
Important! DO NOT ENTER a subdomain (e.g. www.analyticsmania.com). ALWAYS enter just the main domain, e.g. analyticsmania.com. By entering just the main domain you enable this GDPR cookie notification consent to work on all subdomains.

If I entered just www.analyticsmania.com, then consent cookie settings will be saved only on www.analyticsmania.com. If I also had support.analyticsmania.com, that subdomain wouldn’t be able to access cookie settings stored on www.
It is crucial to enter only the main domain on the first step because you won’t be able to edit it later and OneTrust’s support will also be useless here. The only way to change it is to delete all the content and settings in OneTrust and start from scratch (which is annoying and time-consuming).
Another tip. If your scan’s status changes to Error, this means that your website’s protection is too strict against bots (or there is a redirect).
In my case, I’m using Cloudflare and it did not let OneTrust’s scanning bots through. A solution? Temporary disable Cloudflare’s firewall or make its settings a bit lighter. Consult a developer/sysadmin, who has set Cloudflare in the first place.
Once the scan is initiated, you can start working on your GDPR consent mechanism.
One more thing: this GDPR cookie consent solution will not work if you want to implement it across multiple domains (e.g. example1.com and domain15.com).
Cookie Banner Setup
Customizing style
We can start with branding. In the list of your websites, click the domain you have added.

Then in the top bar, click Branding. On the left side of the screen, you will have to override template styling.
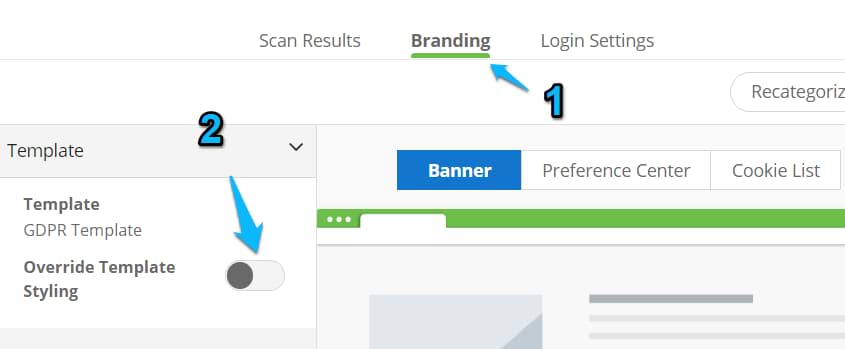
Once you click the switch, you will see a bunch of options that you can implement (2). Also, don’t forget to switch to the Preference Center and see how your branding/styling looks there.
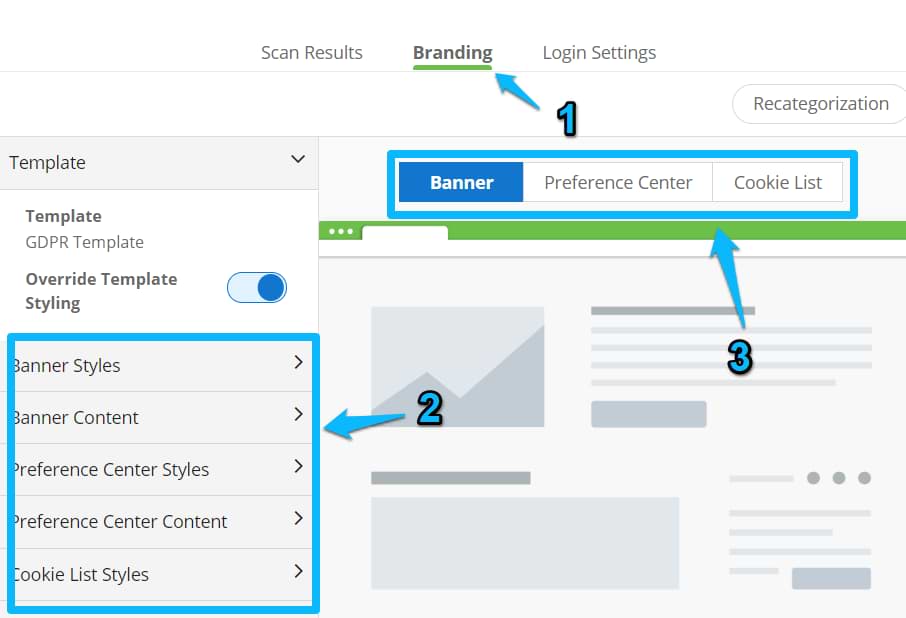
You will be able to change its layout, colors, content, and behavior. I won’t go into details of all options, just want to mention several:
- Layout and colors for GDPR don’t matter. Choose whatever is beautiful for you.
- Don’t forget to include the link to your Cookie Policy.
Tip: Don’t forget to save your changes (by clicking the Save button in the top right corner (next to the Publish button).
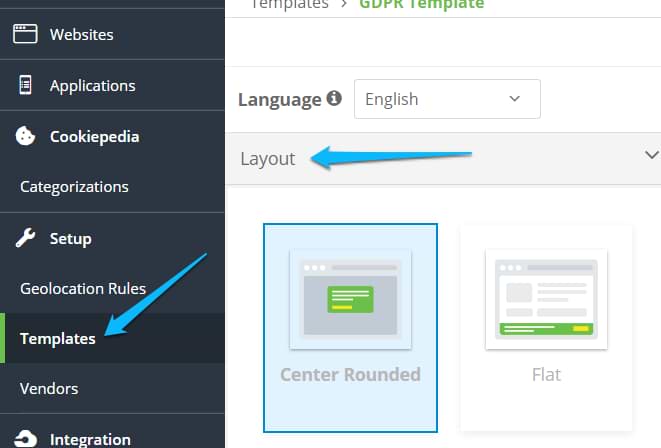
If you want your consent banner to use a different layout (e.g. a popup instead of a notification bar), go to Templates > GDPR Template > Layout and choose what you like the most. I’d personally go with the Center Rounded (a.k.a. popup), because it is the most visible for visitors.
Customizing behavior
Now, let’s move to the section where we’ll configure how the consent banner and preference center will actually work.
On the left sidebar, choose Geolocation Rules and then choose Default Consent Policy.

If you want to edit the default consent policy, you can click the pencil icon in its top-right corner.
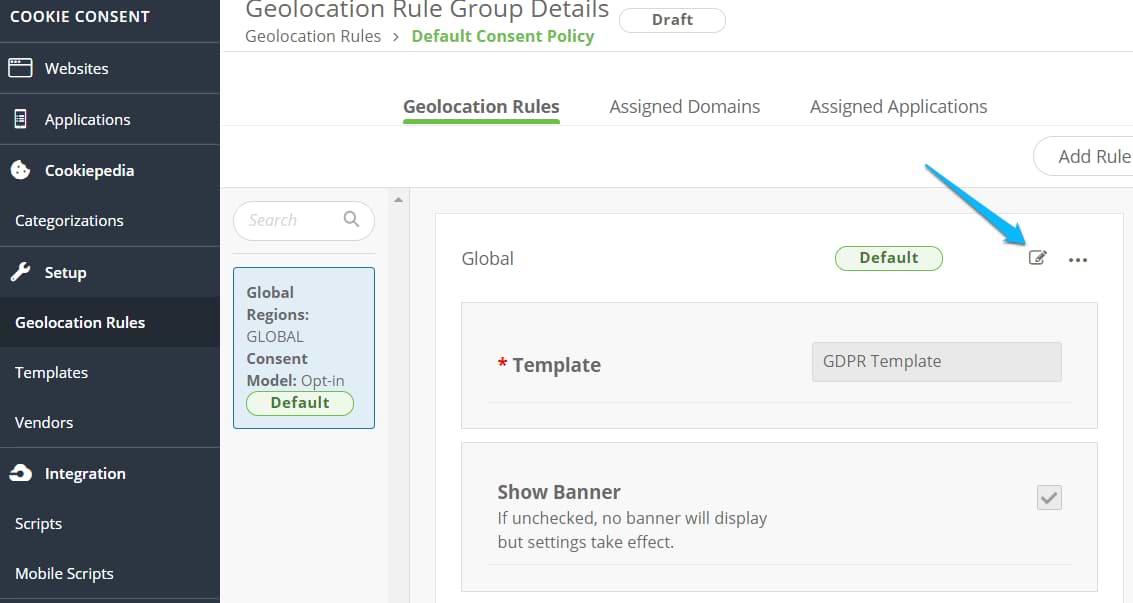
One thing to mention – Consent Model. In the case of GDPR, you must choose the Opt-in. This means that you cannot start tracking people before the consent was given.
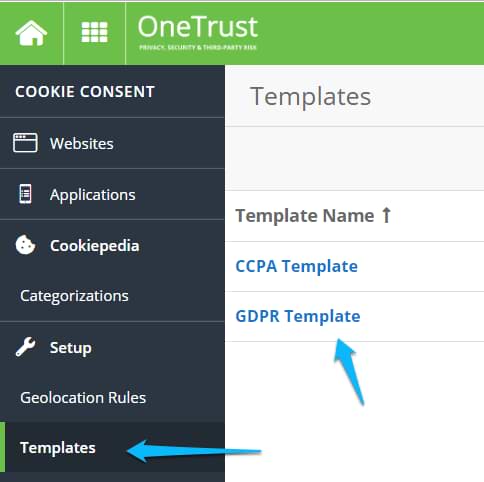
Let’s go back to templates. Go there and click the GDPR template.
Then, expand the Content section and click Button Set. Of course, don’t forget to check the options there but I want to put a spotlight on the Button Set now. Click on the pencil icon.

Here are the settings that I would implement (but, once again, I am not a lawyer and this is not a piece of legal advice).
Here are the settings that I would implement:
- Rename the button to Accept All Cookies
- Keep Show Cookie Settings button option enabled and rename it to No, let me choose
- When using the button in a web page to access the Cookie’s Preference Center option would be changed to Show other text and I would enter Cookie Preferences
- Then I would set Cookie Settings Button Style to Button.
- Also, it’s important that you disable the Show Close Button. The solution explained in this blog post was tested only with this option disabled.
Here is what would happen: when a visitor lands on a page, he/she sees a notification (I’d display a popup). Then the visitor has two options:
- Accept all cookies
- Specify what he/she wants to accept. If a visitor clicks the button No, let me choose, all the cookie groups (e.g. marketing cookies) selections will be disabled by default and a visitor will have to choose which groups does he want to give consent to. If none of them, he/she would need to click Save my choices.

P.S. To be fully GDPR compliant, you would also need to enable Show Reject All Button setting.
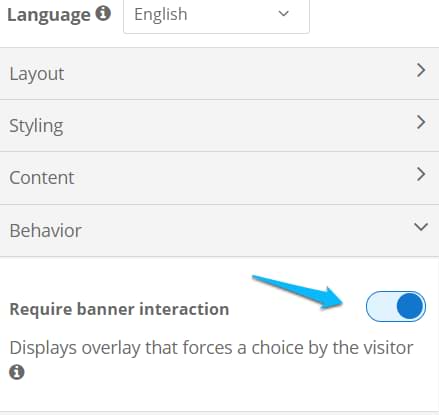
Also, if you are using popup as your consent notification, I’d recommend going to Behavior and enable Require banner interaction (in order to make sure that the visitor would definitely interact with the notification).
Let’s categorize cookies
By this time, your cookie scan should be over. Let’s see what we should do with those cookies.
I’m writing this guide for the 2nd time. The first time was in 2018, and I hated my experience — a lot of usability bugs in OneTrust. At the very end of 2019, I decided to revisit this topic (because Onetrust implemented many breaking changes that did not allow new users to use my Google Tag Manager recipe (the old ones work fine, though).
The good news is that a lot of those 2018 bugs were resolved (they even have contacted me and thanked by identifying those bugs). However, there is no happy ending. By fixing X bugs, they introduced a bunch of new bugs.
I had to spend many hours trying to identify why this or that was just not working. My tip here is to strictly follow my steps in this guide, otherwise, you’ll waste too much time.
In general, I like OneTrust’s cookie consent mechanism and design. But the configuration might be pure hell. As long as you stick with my instructions, you should be good.
Anyway, back to the topic. Cookie categorization. Cookie consent notification should be able to allow visitors to pick purpose groups to which they give consent. For example, some visitors might want to give you consent for analytics tracking but not to targeting/remarketing.
By default, only one consent group is enabled – Strictly necessary cookies. They are necessary for the website to work and do not require consent. Now, what I’ve noticed while working with OneTrust, is that after the scan, they automatically categorize cookies they’ve found. And that’s good, right? 
Yes, if it actually worked.
This is the reality. Even though cookies are identified and categorized, it looks like this process does not work properly.
Here’s what happened to me. I had a bunch of already categorized cookies. But after I tried to see the category list in my actual preference center, there was only one category. But I had 3 categories!

After playing around, I’ve finally found out that (for some reason) I still have to add at least one cookie to each cookie category (manually!) in order to start seeing it in the cookie consent banner.
WTF…
Anyway, let’s do that. By default, Onetrust offers these groups/categories of cookies:
- Targeting
- Functional
- Strictly necessary (default. cannot be removed)
- Performance (a.k.a. analytics)
- Social media
- Unknown
Think which ones apply to you and which ones would you like to see in your cookie preference center.
I’d go with “targeting”, “Functional” and “performance”. Or maybe just “targeting” and “performance”. Analytics and A/B test cookies would be added to the “Performance” bucket. After you decide which categories to use, create one cookie for each category.
On the left sidebar, go to Cookiepedia > Categorizations and click Add Cookie.

And enter the following information (say, we’re creating a cookie for the Targeting category)
- Cookie name – add any random name, e.g. “targeting” without quotation marks
- Host – add your website’s domain
- Category – Targeting cookies
- Lifespan – Persistent
- Party – First party
Then create a cookie for Performance category:
- Cookie name – add any random name, e.g. “performance” without quotation marks
- Host – add your website’s domain
- Category – Performance cookies
- Lifespan – Persistent
- Party – First party
You get the idea. Repeat the same action for each cookie category you want to use.
Publishing changes + script integration
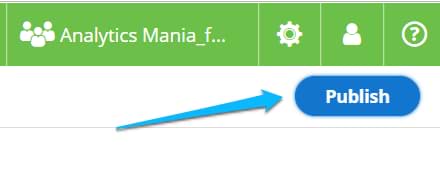
After you’ve done all the changes above, it’s time to see how the consent banner looks on your website. In order to do that, you need to add the script to your website. To do that, go to Websites > Choose your website and in the upper right corner press Publish.
A window will slide from the right with a two-step process:
- Testing CDN (you should use this code for your testing website)
- Production CDN (you should use this code for your live website)
IMPORTANT: don’t copy the script and paste to Google Tag Manager right away. It will not work. You should use my GTM recipe, that you can download from here and enter the settings there.
I’ll explain how to use it in a minute.
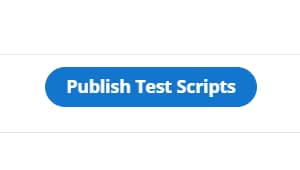
IMPORTANT #2: once you make some changes in OneTrust and want to preview them on your website, publish those changes in the OneTrust interface. If you want to test X change in the testing environment, the just press Publish Test Scripts.
GDPR Cookie Consent Notification: GTM Recipe
Configuring OneTrust’s cookie consent solution is just half of the task. Your tracking scripts (like Google Analytics, Google Adwords, etc.) will still continue working as they always did unless you import my Google Tag Manager recipe and then reconfigure all of your tracking tags. Yup, there’s a lot of manual work waiting ahead.
Important: After you follow my instructions and configure everything properly, OneTrust’s Cookie Consent will affect only those tracking codes which are implemented via Google Tag Manager. So if you have Google Analytics hardcoded directly in the website’s code, it’s right about time to migrate to GA + Google Tag Manager.
I will not go into detail how everything is set up in the recipe and why did I choose one solution over another but here’s a brief recap of what useful settings will you get. Important: If you are using an older version of Onetrust (from early 2019, 2018, or even older, use this recipe instead)
After you import the container, it will automatically create a dedicated Folder called GDPR Cookie Consent Notification containing 11 assets. Here they are:
Tags
- cHTML – Cookie Consent. This is the tag where you should paste your OneTrust consent script. Without it, GDPR cookie consent notification will not work.
Triggers
- Custom – OneTrustLoaded (this one activates every time a consent banner script is loaded or consent preferences are updated)
- 4 blocking triggers:
- Blocking – functional cookies not allowed
- Blocking – performance cookies not allowed (analytics tags should be used with this trigger)
- Blocking – social media cookies not allowed
- Blocking – targeting cookies not allowed (a.k.a. – marketing cookies)
Variables
- dlv – OnetrustActiveGroups – this is a Data Layer variable that returns all the cookie/consent groups to which a visitor has agreed,
- Regex – functional cookies allowed. Returns true if a visitor has agreed to functional cookies (e.g. personalization). Otherwise, returns false.
- Regex – performance cookies allowed. Returns true if a visitor has agreed to performance/analytics cookies. Otherwise, returns false.
- Regex – social media cookies allowed.
- Regex – targeting cookies allowed. Returns true if a visitor has agreed to targeting/marketing cookies. Otherwise, returns false.
Personally, for me, Social Media cookies were not needed but I added them anyway. If you don’t need assets related to them, feel free to delete them.
Import The GTM Recipe
After you download the GDPR cookie consent notification Google Tag Manager recipe, follow this guide on how to import it. Just make sure you choose to Merge as an Import Option, NOT Overwrite. However, within the Merge option, choose to Overwrite conflicting tag, trigger and variables.

Update Your Current Tags with New Triggers
There are several things you need to do (in this exact order!):
#1. Go to cHTML – Cookie Consent tag and replace some parts of its code with stuff that can be found in OneTrust’s script (Cookie Consent > Integration > Scripts). In Onetrust interface, click the name of your website.
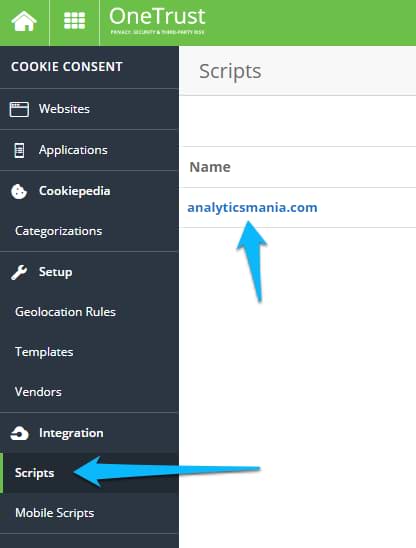
And then the Publish button in the top-right corner. Click Next and you will see a Production CDN script. You will need two things from it:
- link of the script
- value of the data-domain-script

Add them in the Cookie Consent Custom HTML tag you have in the container.

Save the tag in Google Tag Manager, publish changes in your OneTrust account.
If you first want to play around just for testing purposes, then use the Testing CDN script instead (it was displayed to you when you initially clicked the Publish button in the top-right corner). However, in the end, your final setup should be using the Production CDN script.
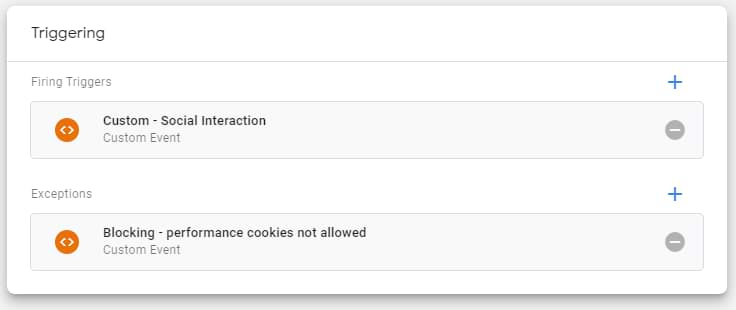
#2. Update all your tracking tags (which deal with personal data) in Google Tag Manager by adding one of 4 blocking triggers to them as an exception. This needs to be done with every single tracking tag (that deals with personal information), including Google Analytics Pageview, Google Ads Conversion Tag, etc. ).

If a tag is related to analytics (e.g. Google Analytics Event tag) then assign Blocking – performance cookies not allowed trigger as an exception. In the case of Google Ads tag, use Blocking – targeting cookies not allowed trigger. You get the idea, right?
Here’s how an updated tag triggering could look like of a Universal Analytics tag:
#3. Additionally, update all those tags which fire upon Pageview, DOM ready, or Window Loaded Events. The important part of this new cookie consent is to hold tracking tags until a visitor gives consent to be tracked. Therefore, GA, FB pixel, and other pageview-based tags must be “on hold” as well. Consequently, standard All Pages, DOM Ready, and Window Loaded trigger becomes irrelevant here.
Firstly, you need to remove all Pageview, DOM Ready, and Window Loaded triggers from your current tags as they do not respect visitor’s consent. Instead, you need to add the Custom – OneTrustLoaded. This means that your pageview-based tags will usually fire between the DOM Ready and Window Loaded.
If you had a certain tag that fired on Pageview (but on a specific page), you will need to create a new Custom – OneTrustLoaded trigger with an additional condition, for example:

The expected result: Universal Analytics pageview, Facebook Pixel main code, and others that fire upon page load must not fire until a visitor gives the consent.
Once the consent is given, on every subsequent page, the OneTrust consent banner will continue pushing the “OneTrustLoaded” Data Layer event with consent groups (e.g. performance, targeting, etc.).
To sum up
- Go to cHTML – Cookie Consent tag and replace its content with the script that OneTrust provides you at Cookie Consent > Script Integration.
- Every tag (regardless of whether they are event-based or pageview-based) should get a blocking trigger of a particular consent group. If a tag is for analytics, assign a Blocking – performance cookies not allowed trigger, etc.


- Remove Pageview, DOM Ready, and Window Loaded triggers from your current tags. Instead, choose a trigger that directly relates to the consent. You must not fire tracking tags before the consent is given. So choose Custom – OneTrustLoaded trigger. Do that to all tags that used to fire when the page loads.


- If you have some tags that fire when the page loads (but not on the homepage), create a copy of the Custom – OneTrustLoaded and add an additional condition in order to specify on which page do you wish your tag to fire, for example:


But wait, there’s more

Even though you’ve just installed and configured GDPR cookie consent notification with Google Tag Manager, there are other things to do if you’re a user of Google Analytics. I will not go into detail and will only give a brief list.
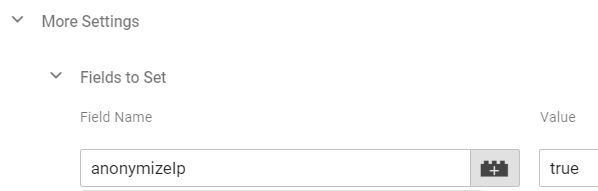
- Anonymize IP. In Google Analytics tags or GA Settings variable go to More Settings > Fields to set and enter the following settings:

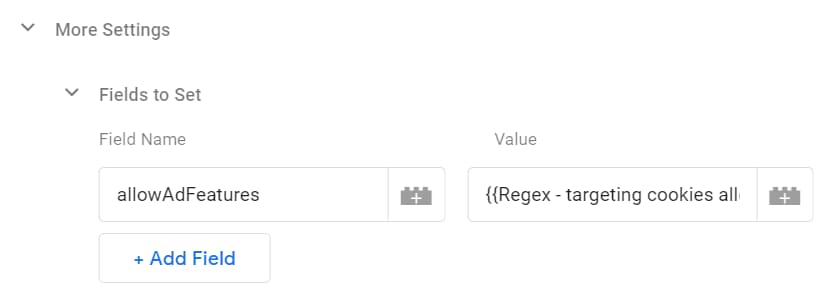
- Disable Display Advertising features or configure it to respect consent settings with allowAdFeatures. In GA Settings Variable, go to More Settings > Fields to set and enter the following settings:

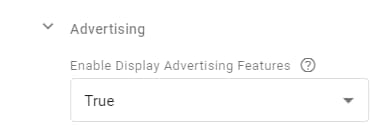
Also, have the display advertising features enabled in the tag. Under More settings > Fields to set enable the following setting:

Useful Resources
In addition to all of this, here’s a list of other useful resources related to cookie consent and GDPR in general:
- The Definitive GDPR guide for ecommerce by my colleagues at Omnisend
- Configure Google Analytics to be GDPR compliant by Humix
- Did not like OneTrust as a cookie consent solution? Not a problem! Here are other GDPR cookie consent notification solutions:
GDPR Cookie Consent Notification in Google Tag Manager: Final Words
In a nutshell: According to GDPR, firing all tracking codes right after a visitor landed on your page is not permitted anymore (since May 25th, 2018). You should first ask for permission to track and only then fire your tags.
In this blog post, I’ve explained how to implement a GDRP cookie notification consent with Google Tag Manager and how to update your current marketing tags accordingly.
This cookie consent notification is just a tool for getting consent, it’s not capable of managing your tracking tags because every website and every Google Tag Manager container is unique, therefore there is no universal solution. As a result, you will have to manually update all your tracking tags with additional firing rules.
OneTrust GDPR cookie consent notification solution was a tool of my choice in this guide, I’ve explained how to configure it.
It has its pros and cons but with some experience, you can do pretty flexible implementations. Obviously, new users will have no previous knowledge, that’s why my guide should be useful to them as I share my blunders and ways to avoid them. Plus, my GDPR Cookie Consent Google Tag Manager Recipe should save you lots of time.

64 COMMENTS
Hi Julius, Great post as always. Since this only applies to people in the EU, have you come across any solutions that only trigger the cookie consent popup based on location of the visitor? Cheers.
Hey Clayton,
OneTrust cookie notification that I've used in this blog post has this setting, "Show only in the EU". I haven't tried it so you should check it on your own.
While IP-address-based option greatly decreases the issue with GDPR, EU citizens might be using VPN services (which are pretty popular here) and imitate being logged in from outside the EU.
Such visitors will avoid the cookie consent and will be tracked. The problem is that they are still eligible to GDPR protection. So I'm not sure whether this solution is ok, but after all, I'm not sure about many things GDPR :)
Thanks Julius. Good point. Keep up the good work!
Hi there, did you solve that point ?
I encountered the same "not set"
Hey, those two codes should be added directly in the website's code, not via GTM. People usually place them in the privacy policy page. Most often they just add a single code - cookie settings button.
Hey,
1. First, you add all the triggers to Google Analytics tags (like blocking statistics triggers and when the consent to statistics is given). Then you refresh the GTM Preview and debug mode and you'll see the Onetrust cookie notification. Your GA Pageview tag must fire only after you give a consent to be tracked. And if you track clicks, their tags must fire only after the consent is given. If you click links before the consent, no related tags must fire.
2. Those consents are stored as events in GA reports. Behavior > Events
Hey,
Thank you so much for the reply. So I can't seem to see those consents does that mean I have done something wrong? I can' figure out what I am doing wrong!
Thanks,
I am of the understanding that the cookie notifications are the result of a European Union law?
Whilst I didn't vote in favour of Brexit, I presume that once we leave these notifications will cease?
I hope so, I am bored of being told something repeatedly, day in, day out and having to respond by clicking
No, these notifications will remain as usually business will continue to display them regardless of your location.
Yes, choose Universal Tag Type
And track type should be event.
Hi, all
After the integration of these GTM Recipe have you noticed a decrease in the bounce rates of your site?
And a decrease in the traffic recorded by Google Analytics?
Bounce rate shouldn't be affected a lot but the decrease in traffic is very much expected. Various websites which have implemented Cookie consent mechanism (any, not only OneTrust) noticed a 20-30% decrease in the traffic. This means that either people decline to be tracked or just open a page, do nothing and close it.
Thanks Julius for the info.
I'm not surprised by the decrease in the traffic
For the bounce rate, could it be a "bad" integration of the recipe ?
Everything is possible. But I did not notice that on my blog (I'm using that very same recipe).
Hi Julias,
If I only use Google Analytics do I need one of those pop up window things? I have done the anonymize ip setting. I turned off name/email for comments. My site also uses Amazon affiliate links and has an opt in box (which should be clear they're giving consent...right?) If I have this in my privacy policy is this sufficient?
Sorry if this has been covered but it's like an information overload and I can't handle it. lol
Don't take my word for a legal advice :) Some people say that Google Analytics ga_id is also considered as PII but I'd say that you what you did is enough to not ask for a consent.
That's great, I appreciate the quick response Julias. Have a great day bud :)
Hi Julius,
Thanks for the article it's very helpful. I have got some of this working in a dev environment. Rookie question but how do I handle a pageview trigger on a marketing tag that is set only to fire on 1 specific page? Should I copy the Pageview - All Pages - Marketing Cookies Allowed and add a second condition when url path = ... then apply this new trigger to the tag?
Thanks,
Brendan
Correct
Hi Julius,
If I were to implement this for my client, would only a free onetrust account be sufficient? If not, what product should we buy from their website? Their product list is extensive and quite confusing.
Kind regards,
Hi, I am not their representative. Such questions should be forwarded to their support or sales people.
Our categorised cookies aren't showing in the Preference center at all, not a single category. I have tried to create a cookie and add it to each category manually, but "Manage Consent Preferences" are still empty. Any ideas for a workaround?
I would recommend then contacting OneTrust's support.
Thanks for this useful info.
OneTrust also offer auto-blocking which is supposed to relieve us of the requirement to configure all these triggers in GTM - cookies are blocked via their scripts. Have you tried it, and if so how do you find it? I've had trouble - I can still see cookies being set with auto-blocking enabled
I haven't tried it. I don't trust such functionalities.
Hi Julius,
Our cookie consent widget seems to appear every time the site is refreshed. Do you have any ideas why?
Thanks for such a thorough info, btw!
The wrong domain (or subdomain) is entered in your OneTrust settings.
Example:
Your live website is mywebsite.com
Your development website is mydevsite.com
If you entered "mywebsite.com" in Onetrust, the popup will be jumping on every page on mydevsite.com. You can do nothing about it.
If that is not the case, I suggest contacting OneTrust's support.
Hi Julius, can I customize your solution to include only the "accept" button as I only have a wordpress site with Google Analytics? Or OneTrust doesn't allow this?
Not sure but most likely yes. You should sign up to find out.
Hi Julius,
This is my 1st comment and first of all, I would like to say thank you, your blog is awesome and I do my best to promote it among my friends and colleagues :)
Really cool articles and valuable knowledge!
Now, re this article:
It's June 2020 and I faced the following problem:
I tried to create an account on OneTrsut by the link provided in the article twice, have been waiting even longer (at least week between attempts) and in both cases didn't get an email.
Before repeating my attempts, just decided to clarify, is it still possible to get OneTrust for free for 1 domain in 2020 summer?
Thank you in advance
I don't know. Haven't created an account in quite a long time.
Hi Platon, if you find out, please update us here if you can...
Hi Jimena, finally I got a reply, but strange things happened. After my comment, I applied one more time using 2 different email addresses. One is the same that I used in the first two attempts the second one from my other business.
The thing is, I got a response on the second email address and still nothing for the 1st one. I do check all possible folders including SPAM - and there is nothing..
As if, for some reason, OneTrust cannot deliver an email to my inbox.. (but I receive letters from other senders)
In both cases inboxes created with G-Suit, the difference is just the second email is [email protected] and the first one was: [email protected] & [email protected], "tools" is an alias for [email protected].
So if you are facing the same problems as I, simply try to request access from other domains.
Hope that helped
Thanks for the feedback!
Hi Platon, if you find out, please update us here if you can...
Hi Julius,
Great work on the post, thanks.
We've recently implemented OneTrust via GTM. It works, but it's impacting the performance of some tools we have to conduct AB tests, like Google Optimize. Optimize is waiting for the 'green light' from OneTrust on each page load before it can fire and make whatever change is required on the page for those customers in the variant experience. However, there appears to be quite a long delay for that green light to arrive, so customers in the variant will see a flicker (they first see the default version of the page and then it will flip to the variant).
Have you encountered any problems like this?
Thanks,
Lee
I replied to this earlier today, but I do not see that the comment went through. Flicker is a common problem with A/B testing tools. Searching "Google Optimize flicker" in your favorite search engine should give you some great resources on solutions. The gist behind most is to hide the page or section of the page that has the varying experience until the chosen experience is known. This will delay display of content, but it will solve the flicker issue. There is a good article from Google on an anti-flicker snippet as well as ways to install Google Optimize that may prevent the need for using the snippet in the first place: https://support.google.com/optimize/answer/7100284
Since Google Optimize falls under the category of performance cookies, and you want to mitigate delay of page display, you would likely want to prioritize their script and fire as soon as you know performance cookies are accepted. GTM is async by nature, but it is possible to force a script to fire synchronously using the async=false property. This of course has to be thoroughly considered as to whether this helps or hinders the page load times or the user experience of visitors.
Unfortunately tag managers solve a ton of issues, but they also can be tricky to wield when we are basically loading tools within tools along with a bunch of other tools. GTM adds lots of convenience while also adding the potential for implementation difficulty. I still think it is a great tool though coming from the Adobe DTM world!
Hi Julius,
thanks for the article!
How would you approach setting up Onetrust on an SPA? Pageviews are triggered programmatically by means of custom GTM events. As it's an SPA and there are no page reloads, I can't just replace my custom pageview event with OneTrustLoaded. At the same time, I do need the OneTrustLoaded event, as the first pageview event will be wasted (no consent given yet).
Thanks for sharing your thoughts!
Hi
Your are missing a detail here: #3. Additionally, update all those tags which fire upon Pageview, DOM ready, or Window Loaded Events
There needs to be an exception with a blocking trigger, but this is not mentioned. It is visible in the last summary, but should be mentioned explicitly
You don't need to add a blocking trigger if your firing trigger is already using a consent. That is what I am referring to in my guide.
The screenshot you are referring to is not for the pageview-based tag. It belongs to an event-based tag, therefore it has a blocking trigger.
Hi Julius,
Great post and this has been a lifesaver. I wanted some clarification on tag/trigger configuration. If i'm understanding correctly for each eCommerce event that fires (ATC, Checkout, Purchase..ect) I need to create a trigger group for each specific event and include the performanceFiring category event) and then attribute that trigger group to the relevant tag and then add an expectation (performanceBlocking trigger) to ensure my EEC event tags don't fire if they don't accept performance cookies.
I added some screenshots to imgur to provide an example.
https://imgur.com/a/sKQ2Kf0
I would just have the custom trigger as a firing trigger and add the blocking trigger as an exception. No need to use trigger groups.
Thanks for the response. For the pageview tags, I tried using OneTrustLoaded as an event trigger. The issue i'm having is that it fires right away before the user clicks accept.
https://imgur.com/VgDI4dF
Is the blocking trigger actually needed in this case? I agree that the whole process of implementing OneTrust in GTM is a pretty big headache, but works well once you have it setup. And yes, I am still iterating on our solution to make it more maintainable and understandable for future devs that work on it.
My understanding is that the different OneTrust cookie consent category firing triggers are based off of the dataLayer variable OnetrustActiveGroups that captures consent, and that the event that determines those values is OneTrustGroupsUpdated. If there is a tag with a OneTrust targeting cookie consent firing trigger, the tag will fire on the OneTrustGroupsUpdated event if that cookie category is accepted and it will not fire on that event if the cookie category is not accepted because that firing trigger will not get triggered. Is an exception trigger needed in this case? It seems the firing trigger satisfies both the firing and exception in one. I tested this in my GTM container and my assumption is correct.
One gotcha that I found though is that the OneTrustGroupsUpdated event can fire multiple times on a page. Any time preferences are changed. Any firing triggers linked to cookie consent preferences would also re-trigger depending on the conditions.
Needless to say, this is one intricate implementation that hopefully will get simplified down the road. Thanks for writing on this topic and many more!
Hi Julius,
thank you so much for this tutorial! I used this implementation on several website and always worked like a charm.
Unfortunately I've recently tried it with OneTrust 6.8 and it does not seem to work anymore. The cookie banner is correctly displayed, but upon clicking on "Accept all cookies" Google Analytics is not triggered.
Do you know if anything changed with the new version of Onetrust?
Hi Julius, I wanted to set this up yesterday as I got my onetrust account approved, but the cookie notification isn't showing at all when I insert the code into GTM (it works though if I add it directly into my website). Any ideas what's happening?
Thanks for this amazing article!
We're currently using Universal Analytics with anonymized IPs. In the comments above, it looks like you replied to someone else with a similar setup that they didn't need a cookie notification on their website as long as this is disclosed in the privacy policy, which it is for us as well.
My question: if/when we upgrade to GA4, will we then need to consider adding a cookie consent notification popup in order to remain GDPR compliant?
Thanks so much!
Hi,
I have one question.i have default GTM event trigger for scroll and video tracking to my tags by default and i used the trigger "block-performance cookies" as exception.
However, my scroll and video tracking are firing even without accepting the cookies. do you have any any guidelines on it?
You see the "video" and "scroll depth" events in the preview mode. They will continue to appear. What matters is whether your TAGS fire on those events. If the tags fire, then revisit your triggering setup because you have misconfigured something.
I found it's possible to continue to use the standard Page View, DOM Ready and Window Loaded events and not be forced to wait for the Cookie Consent solution to load. It's a slightly more involved implementation, but I think being able to continue using those standard events, the tags firing quicker and not necessarily having to create consent event + pageview triggers outweigh this complexity.
I actually have this setup working using another consent solution (Civic) but the principal is the same.
The consent solution needs to send an event to GTM each time a category is consented and update a DLV with the current consent state for said category. For example, a ccAnalyticsAccepted event and a push of analytics: true against a DLV to store consent status in an object.
Configure your tags to fire on Page view as before, and also in response to an "X Accepted" GTM event so you don't miss out on your tracking for the initial page. Make sure that the tag is configured to fire once per page, otherwise the tag will fire twice (once for page view and once when the acceptance event is triggered by the consent solution). Most importantly, include a blocking trigger for "X not accepted".
The blocking trigger utilises a custom JS function which ultimately returns true or false depending on the consent category requested. The function must be able to read the DLV and if this is undefined, fall back to the first party cookie set by the consent solution and read the consent information from there.
Hi Julius,
Thank you for your great article here.
My question: If our data privacy officer requests a specific behavior: "don't show cookie banner on 1) imprint and 2) data privacy page and thus make a user visit these pages without any cookies/scripts load before consenting", how would you approach this?
Looking forward to your answer.
Best,
André
Depends on your current setup. There is no quick answer here.
Hi julius,
I wonder why everyone uses services like Cookiebot and Onetrust. Wouldn't it be better to create a javascript popup in GTM that defines cookies. So you don't need an extra service and you can easily duplicate it. Or am I missing something?
Because those services provide not only just the popup. They also have their backend systems where you can manage the content (without the need to edit the code), usage statistics, cookie scans, etc. It's not just a popup.
If you need just a popup, sure, use your own custom solution.
OneTrust has now phased out the free option
This was made very clear to us by a sales person earlier today
https://www.cookiepro.com/pricing/ by OneTrust looks fairly reasonable
I implemented this OneTrust CDN Script using GTM Custom HTML tag. I can see sometimes the OnetrustActiveGroups datalayer variable is getting delayed & its available their in website after pageviews & window load triggers are executed.
Do you think that can be the issue because I have used GTM for executing OneTrust CDN Script? By implementing this OneTrust CDN Script in website head tag will resolve this issue?
Hello Julius,
Thank you for this blog!
Hello Julius, have you written an article on how to set up GTM triggers that respect user consent for non-essential cookies and prevent data from being sent to GA4 in such cases? I'm particularly interested in how the new consent settings and trigger types in GTM can be used for this purpose.
I explain that in my GTM course for beginners. The course was recently updated. https://www.analyticsmania.com/courses/google-tag-manager-course-for-beginners/
Julius, hope this message finds you alright! I'm writing from Argentina, and I would like to know how I can apply this, following the regulations and policies that govern here. Thank you
A heartfelt thank you for your amazing share! Your unique perspectives and detailed explanations have enlightened me a great deal. This is such a precious experience, and I’m really grateful for your generous contribution to all of us.
This GDPR Cookie Consent Notification setup is impressively well-structured. It clearly organizes tags, triggers, and variables for seamless OneTrust integration, making it easy to manage consent preferences and ensure compliance. The blocking triggers and regex variables are particularly helpful for controlling cookie usage, streamlining the implementation process.
One Trust is not free! In fact it is 10K$ per year. The article needs an update. The tool OneTrust seems like an awesome tool but with a heavy price tag.