October 20, 2025
Track HubSpot Forms with Google Tag Manager and Google Analytics 4
Updated: October 20th, 2025
If you’re using HubSpot forms on your site to generate leads, you’ll find that the built-in form submission trigger in Google Tag Manager won’t work. Luckily, there is a solution! In this article, I will show you how you can track HubSpot forms with Google Tag Manager and Google Analytics 4.
We will break down this process into two steps (with some testing in between):
- Add an event listener in Google Tag Manager to check for messages containing information on successful HubSpot form completions and send this information to the Data Layer.
- Create a GA4 tag to collect the data from the Data Layer and send it to Google Analytics 4.
Here’s an example of the data that you will eventually see:

This solution is compatible with HubSpot form versions 3 and 4. Let’s get into it!
Table of Contents
Here’s what you will learn in this article
- Assumptions
- Add a custom event listener to your GTM container
- Create a GA4 event and find data
- Final Thoughts

Video tutorial
If you prefer video content, here’s a tutorial from our YouTube channel.
Assumptions
Before we begin, I have two assumptions:
- You have installed GA4 on your website using Google Tag Manager
- You are familiar with creating tags, triggers, and variables in GTM. If not, check out the Google Tag Manager Tutorial for Beginners.
Go back and review the mentioned articles if you don’t feel like you are ready yet.
Add a custom event listener to your GTM container
You might be wondering why we can’t just use Google Tag Manager’s built-in “Form Submission” trigger. The reason is that HubSpot forms don’t use a standard web form structure. They are loaded within an <iframe>.
This means that GTM’s standard form listener cannot “see” the submission event. To solve this, we need to use a custom piece of JavaScript that specifically listens for the unique signals (or “messages”) that the HubSpot form sends out when a submission is successful. This listener acts as a bridge, capturing the HubSpot event and translating it into a Data Layer event that GTM can understand.
We will use custom code that listens for form submissions from HubSpot. When someone fills out and submits a form, this code picks up that event and makes it visible to Google Tag Manager by pushing data into the Data Layer.
The code for the HubSpot Forms Listener is:
<script>
window.dataLayer = window.dataLayer || [];

//listener for older version (v3) of HS forms
window.addEventListener('message', function(event) {
  if (event.data.type === 'hsFormCallback' && event.data.eventName === 'onFormSubmitted') {
    window.dataLayer.push({
      event: 'form_submission',
      form_id: event.data.id,
      conversion_id: event.data.data.conversionId,
      form_data: event.data.data.submissionValues,
    });
  }
});

//listener for v4 HS forms
window.addEventListener("hs-form-event:on-submission:success", function(event) {
    var hsform = HubspotFormsV4.getFormFromEvent(event);
    if (hsform) {
      hsform.getFormFieldValues().then(function(fieldValues) {
        var transformedData = fieldValues.reduce(function(obj, item) {
          var key = item.name.split('/')[1];
          if (key) {
            obj[key] = item.value;
          }
          return obj;
        }, {});

        window.dataLayer.push({
          event: "form_submission",
          form_id: hsform.getFormId(),
          conversion_id: hsform.getConversionId(),
          form_data: transformedData
        });
      });
    }
  });
</script>
You must add the event listener to your Google Tag Manager container. In GTM, go to Tags in the left-side navigation and click “New”.

Select Tag Configuration, then choose Custom HTML tag.

Paste the HubSpot Forms Listener (the code from above) in the textbox. This listener supports both version 3 and version 4 forms.
Scroll down to the Triggering section. Here, you have two options depending on what suits your needs better: (1) Trigger the event on some pages or (2) Trigger the event on all pages.
It’s best to trigger this event only on pages that actually contain a HubSpot form. This makes your site’s loading speed a bit better because the code doesn’t have to run on every single page, just the ones where it’s needed.
To trigger the event on pages that contain the HubSpot form, click the plus sign to add a trigger. Then, on the “Choose a trigger” page, click the plus sign (again) to create a new trigger.

Click “Trigger Configuration” and select the “Page View” trigger type. Fill in the information needed to capture the page(s) you’re interested in. Be sure to select “Some Page Views” under “This trigger fires on” to prompt the filter.

Name your trigger (using proper naming convention) and save.
Otherwise, if you just want to trigger that event on all pages, select the “All pages” Page View trigger, which is automatically included in your GTM container.

Now that you have the trigger in the tag, name it “cHTML – HubSpot Forms listener” (cHTML stands for custom HTML) and save.

Before we close out Step 1, we’ll test to make sure the listener is working.
How the Code Works (v3 vs. v4)
You’ll notice the code has two main parts. This is to make sure it works with both old and new versions of HubSpot forms.
- The window.addEventListener(‘message’, …) part: This is the listener for older (v3) HubSpot forms. These forms send a generic “message” to the browser when they are submitted, and this code filters through those messages to find the one that signals a successful submission.
- The window.addEventListener(“hs-form-event:on-submission:success”, …) part: This is the listener for modern (v4) HubSpot forms. HubSpot introduced a dedicated event for successful submissions, which makes tracking much more direct and reliable.
By including both listeners in the same tag, you make sure that your tracking will work correctly regardless of which version of the HubSpot form is embedded on your page.
Test custom code
Preview the GTM container by clicking the “Preview” button in the top-right of the GTM interface.

Enter your website’s URL and complete the HubSpot form. Once you see the success message, go to Preview mode and check for the form_submission event (dataLayer push).

Click on the event to see the information it has collected. You should see the form_id, conversion_id, and form_data (which contains data of form fields). You may have more parameters if you’re tracking version 3 of Hubspot forms.

In the next step, we will create the GA4 tag to collect and send information to GA4, allowing you to decide which of this information you want to track and report on.
Issues with Preview? Check out this article.
Create a GA4 event and find data
By adding the custom code to our GTM container, we have made the information we want to track available in the Data Layer. However, we still need to create an event to actually collect and send the data to Google Analytics 4.
Creating an event consists of three parts: the tag, trigger, and parameters. We’ll start by creating the trigger and parameters, and then add these to the tag.
Create trigger
To create a trigger, go to Triggers in the left-side navigation of GTM and click the “New” button.

Click “Trigger Configuration” and select “Custom Event” under Other.

In the Event name field, enter the event name as it is in the event listener code from before – “form_submission”. It’s very important that it’s exactly the same, so make sure you double-check this before saving!

Name the trigger “custom – form_submission” (or something similar) and save.
Create Data Layer variables
Important: The listener script makes all submitted form data available in the Data Layer, including names, emails, and phone numbers. It is a direct violation of Google Analytics’ Terms of Service to send PII to GA4.
The only safe way to use this data is with the special “User-Provided Data” variable for enhanced conversions, which we cover later. Do not create standard Data Layer Variables for PII fields (like form_data.firstname) and send them as regular event parameters to GA4. Doing so can result in your GA4 property being suspended.
Depending on what information you have decided to capture with the form completion event, you must create Data Layer variables to send this data to GA4. Remember, this is the information collected from the event that you can choose from:

Since we want to use these events for enhanced conversions, you must include an identifier for the user who submitted the form, such as their email address, along with the form ID.
In GTM, go to Variables in the left-side navigation and click “New” under the User-Defined Variables.

Click the “Variable Configuration” and select “Data Layer Variable”.

Depending on which variables you have chosen to collect, you will (1) input the exact name of the variable from the code above and (2) name the variable “dlv – {variable name}” and save.
For this example, I will create two Data Layer variables: form_id and form_data.email (we need to specify that the email is contained within the form_data key). I talk more in-depth about the data layer and working with different data structures in my Google Tag Manager courses.

Create User-Provided Data variable
This part is necessary if you import key events from GA4 to Google Ads as conversions and want to send the user’s email address with it. I assume you have linked your Google Analytics property to your Google Ads account.
The first step is to turn on user-provided data collection by navigating to Admin > Data Collection and Modification> Data Collection. Click “Turn on” under the User-provided data collection section.

In the pop-up, you want to make sure the toggle is off for collecting automatically-detected user-provided data and click “Turn on” again.

Then, go to Data collection and modification > Data streams. Click on your site and scroll down to Configure tag settings.

Find Allow user-provided data capabilities and turn off “Automatically detect user-provided data”.

Back in GTM, go to Variables in the left-side navigation and create another variable under User-Defined Variables.
This time, for the Variable configuration, select “User-Provided Data”.

Select the Manual configuration option and, under Email, find the email data layer variable that you created earlier.

Name the variable ”user-provided data” (or something similar) and save. Now that we have all our pieces, the next step is to put them all together!

Create tag
All that’s left to do now is create the GA4 tag. The steps will be very similar to those we took when creating the custom HTML tag. Select the Tags item in the left-side navigation and click “New” to create a new tag. For the Tag Configuration, select Google Analytics > GA4 Event.

Measurement ID
If your measurement ID isn’t saved as a constant in your container, you need to get it from the GA4 config tag in your GTM container. Copy this value.

Paste the measurement ID from the config tag into the Measurement ID section of the new GA4 tag.

To organize your container and make things easier in the future, you should create a new Constant variable to hold the measurement ID. Read this blog post to learn more about the constant variable in Google Analytics 4.
Combine all the elements
You’ve already done all the heavy lifting, so all that’s left to do is put the tag together.
First, you can add an event name, e.g., “form_submission” or “generate_lead”.

Next, add the parameters: form_id & user_data.

Note: The parameter user_data is a special, reserved name in GA4. You must use this exact name when you are sending a “User-Provided Data” variable. Using any other name (like user_provided_data or user_info) will cause the enhanced conversion data to be ignored by Google.
Lastly, add the custom event trigger.

Name tag “GA4 event – form_submission” and save.

Test the event
As with testing the custom HTML tag, preview the GTM container, enter your website’s URL, and complete the HubSpot form.
Once you see the success message, go to Preview mode and check for the from_submission event (dataLayer.push). You should see your tag under “Tags Fired”.

Select the tag and check that the parameters collect the expected information.

You can also go to DebugView in Google Analytics 4 to confirm that there is incoming data. To get there, go to Admin > Data Display > DebugView and check that you see the event.

You can click on the event to see the collected parameters (under the Parameters tab). Confirm that you see the parameters that you added to the event. DebugView won’t show the user-provided data, so don’t worry if you don’t see this.

You can see what’s sent to GA4 by looking at the tags under the Google Analytics 4 Measurement ID section of Tag Assistant. This is where you can check that GA4 is collecting the email.

Click the form_submission tag and look for the em parameter (you will see a hashed value for the email).
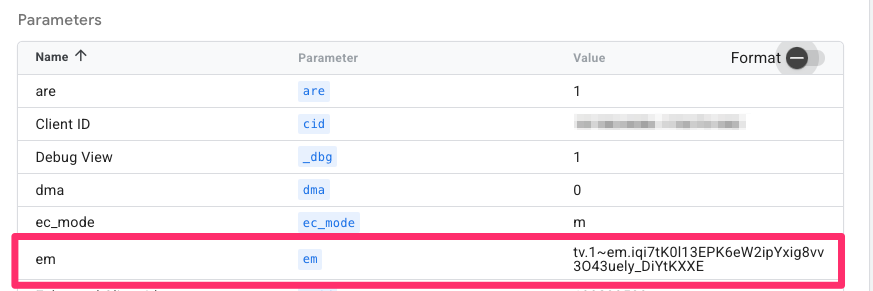
If you don’t see the em parameter, make sure that you have enabled user-provided data collection in Google Analytics property settings.
Create an event-scoped custom dimension
To build a report using the form ID in GA4, you need to add it as an event-scoped custom dimension. If you have already done this before, skip this step.
In Google Analytics, go to Admin > Data Display > Custom Dimensions. Click “Create Custom Dimension”.

There are three things that you need to consider:
- The Dimension name is the name that will be displayed in GA4 reports
- The Event parameter needs to be the same name as in Google Tag Manager
- Set the scope to “Event”

Save the custom dimension.
Publish Container
Now that you have created and tested your GA4 tag, you can publish the container. Be sure to name the container and give it a description so you can easily find it after you make this update (in case there are any issues).

Find data in GA4
Once you have published your GTM container, you need to wait at least 24 hours for GA4 to process the data for your new event.
To view the incoming data, create a GA4 Exploration by going to Explore in the left-side navigation. Click “Blank” to start a new report.

For this report, select the following dimensions, metrics, and filters (click the plus sign next to the element):
- Dimensions: Event name, Form ID


- Metrics: Event count, Total users


- Filter: Event name “exactly matches” form_submission


Add each of these elements to the report by dragging the dimensions (you can exclude the Event name, since it was included just for the filter) to the Rows and the metrics to the Values (or just double-click on each dimension and metric).
Is the event data not showing up in GA4 reports? Check out this article for solutions.
Track HubSpot Forms with Google Tag Manager and Google Analytics 4: Final Thoughts
And just like that, you’re set! If you’ve been wondering how to track HubSpot forms with GA4, this tutorial should have cleared things up on both how to do it and how to see the data afterward.
If you use HubSpot for meeting bookings, unfortunately, this tracking will not work for that. But, don’t worry, I already have an article on how to track HubSpot bookings, so you can check that out!

15 COMMENTS
Hi Julius, have you happened to find any solution for HubSpot's new beta forms?
Hey, I thought V4 is the "new" forms :) Is there a newer version? If yes, can you share a URL of a page where that "new" form is embedded? I will like to test it
Hi Julius,
Is there code to track form loaded and form started?
What additional steps do we take if we want to track different hubspot forms. Let's say a contact form submission event and a whitepaper download form submission event?
Read the form id with the data layer variable, then send form id as a parameter to ga4. Or you could create a lookup table that takes the form id as an input and returns form name as an output. Then you could send the form name to GA4.
Hello Julius, could you please tell me what additional steps I need to take in order to measure the form submissions coming from Google Ads? I’d really appreciate your input!
Hey, Julius. Can you help me?
So, when I test custom code in the previw, the tag is fired, but there is no form submission event.
Maybe the form is not a hubspot form
Hey Julius! I'm bit of confused in some places. I'm tracking for both GA4 & FB.
1. You said to turn off AUTO detected user data from GA4, Will there be any issues regarding user data? since I'm not tracking just for Hubspot, in other events I need user data too. Ex. Purchase Event
2. What if I wanna send user data to Facebook? what should I use on GA4 Tag parameters section?
Normally we do this way on GA4 Tag's parameters : user_data.email_address
Should i continue this for facebook? and exclude these user data from GTM Server Container? and simultaneously send user_data variable specifically for GA4?
Hey Julius, what if i have a pop-up form? I have a Hubspot Landing Page with a Hubspot pop-up form and this solution didn`t work. The submit never shows in GTM`s preview mode.
I am looking for this answer too.
I love the update to the script! I appreciate all your work :)
I added the new custom HTML tag and triggered it the correct page, but when previewing whether the tag fired or not it didnt.
It says that form_submission or (_event) didn't meet filter requirement of gtm.js.
Any idea what that means?
Hello Julius,
I find that the v4 tracking code, specially the part to collect the input fields values does not work. Do you have any tips on how to correctly fetch this values?
Hi, difficult to say without seeing the form