
June 24, 2019
Zopim + Google Tag Manager: How To Install Widget, Control It, and Track Events
It’s quite evident that users sometimes face difficulties while navigating through a website. As users, we hate that part when we have no solution even after a few attempts. Many websites have a help-desk, but it’s quite a long and tedious process to pick up the phone and make a call, or send an email and wait hours for a response.
That’s where online chats come in handy. They are a great way to engage visitors and possibly turn them into customers. That’s why I decided to write a Zopim Google Tag Manager guide that describes how to install the widget and, more importantly, track events in Google Analytics. In fact, that’s not all! Continue reading and you’ll see what I mean.
Zopim is a real-time chat solution for websites, which enables you to easily add a chat widget to your website or SaaS interface. In 2014, the startup was acquired by Zendesk and is now called Zendesk Chat.
Note: this blog post teaches how to track events with Universal Analytics. If you want to get familiar with event tracking in Google Analytics 4, you can also refer to this blog post.
How to install Zopim with Google Tag Manager?
As you already might know, Google Tag Manager empowers us to add various tracking codes to a website and control them all in one place – a GTM account.
Zopim, as well as the majority of online tools, requires you to place a Javascript code snippet on all pages of the website. After you created an account, Zopim will give you a code which looks like this:
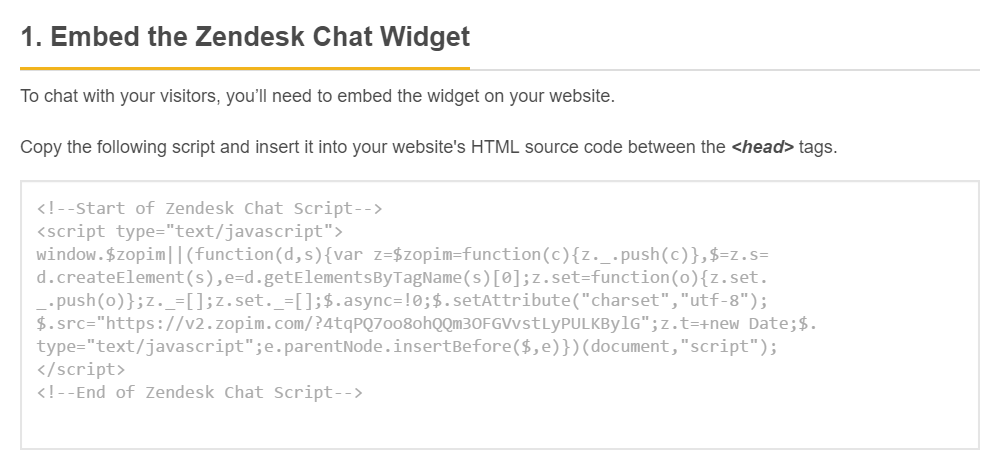
Although instructions require you to paste the code between <head> tags, it should work fine even if it is placed between <body> tags. Copy that code and open your Google Tag Manager account.
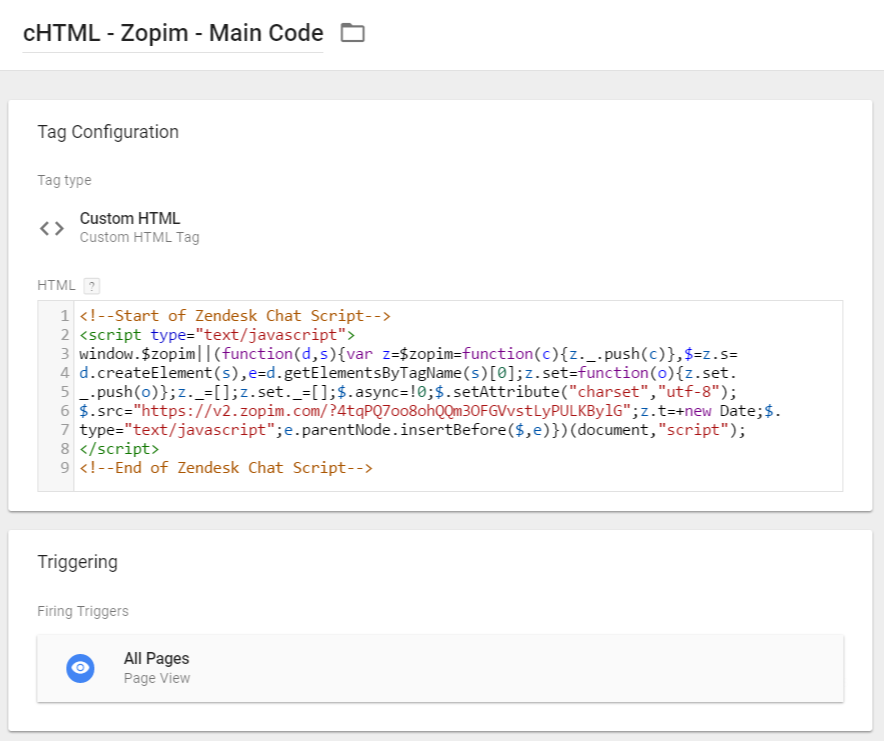
Click Tags, choose Custom HTML type and paste the code. Set it to fire on All pages.
Done! Now, enable Preview and Debug mode, and test whether the chat widget appears on all pages. By default, it should be located in the bottom right corner of browser window.
The basic part is over. Your visitors can now contact the support team with ease.
Next step – control of the widget.
How to control Zopim Chat Widget with Google Tag Manager?
While the first chapter of Zopim Google Tag Manager guide was pretty quick and easy, this one will require more attention and thoroughness.
Disclaimer: features (described below) are available for Paid Zopim plans only. If you’re using the Free plan, consider upgrading.
Another awesome feature of Zopim chat is Javascript API. It enables you to control widget and chat window with small snippets of code.
After you open Zopim Javascript API documentation, on the left side, you’ll see a list of sections. Each one of them contains different elements that you can control, e.g. Chat Badge, Chat Button, etc.

Choose the one you’re interested in.
Expand Zopim Chat Badge
Let’s say, you want to “play” with Chat Badge. Click $zopim.livechat.badge and you’ll see the following list of actions:
![]()
![]()
- Set color
- Show chat badge
- Hide chat badge, etc.
Click any of these actions and you’ll be automatically scrolled down to the exact part of the documentation. I decided to choose Show function.
What you’ll see there is a name of the function and a sample code that can be easily used in practice. You can also click Run script link to see how it works in action.
![]()
![]()
By default, the Zopim chat widget looks like this:

But with a small piece of code, you can expand it and turn into this (looks more like Call-to-action, right?):
![]()
![]()
Let’s try this together. Copy the sample code:
<script>
 $zopim(function() {
 $zopim.livechat.badge.show();
 });
</script>
Head over to your Google Tag Manager account and create a new Custom HTML tag. Paste the code there.
Now, the most important part – triggering. Thanks to Google Tag Manager, you are free to decide when you want that chat widget to be expanded.
My rule of thumb would be to expand the chat widget when the user is looking for help/guidance. Easy to say, hard to do, right?
“When do my visitors need the help?” – you might ask. Well, there is no universal answer. My suggestion would be to experiment and see which works best for your business. Ask your customers/visitors for honest feedback, that should give some ideas. Ask friends and family to look at your website from a neutral perspective and ask their opinion.
Here are a couple of ideas for triggers of this custom HTML tag (which expands the chat badge):
- When a visitor navigates to Contact Us page. Trigger type: Pageview, URL contains /contact-us.
- After spending 90 seconds on a page. Use timer trigger here.
Another important thing to mention – all these scripts must be fired after the main Zopim Widget code has loaded.
Show a Chat Badge With Custom Message
If you wish, you can customize the text, visible in the chat badge. By default, it is “We’re online”, but with the additional line of code, you can easily customize it. Let’s take a Javascript code snippet from the previous example:
<script>
 $zopim(function() {
 $zopim.livechat.badge.show();
 });
</script>
And add one more line:
$zopim.livechat.badge.setText('Wanna talk?');
The final code should look like this:
<script>
 $zopim(function() {
 $zopim.livechat.badge.show();
 $zopim.livechat.badge.setText('Wanna talk?');
 });
</script>
This snippet of code will do two operations:
- Expand the badge.
- Change the text to “Wanna talk?”.
The final result should look like this:
![]()
![]()
Don’t expand the badge too soon
I often see websites which popup chat windows or expand badges too soon. As a visitor, don’t you hate when you’ve just landed on a website and after 2 seconds you get bombarded with various messages asking for something? What’s your most genuine reaction can be here?

Right. So what makes you think this very same solution won’t annoy your visitors? Try to find that perfect time/moment, when the appearance of chat window is appropriate. Let’s remember previously mentioned two examples of decent timing:
- When a visitor navigates to Contact Us page. Trigger type: Pageview, URL contains /contact-us.
- After spending 90 seconds on a page. Timer trigger is awesome for this purpose.
But don’t take this for granted, and experiment. See what’s best for your business.
Explore Zopim Javascript API
Don’t limit yourself to only two examples I’ve described. There is a bunch of other options you can make use of. You can also control the chat window, pre-chat form, send custom user-related data, etc. Not sure what a particular function does? Click the Run script and see it yourself.
Just keep in mind that Zopim Javascript API requires you to have a paid Zopim subscription.
How to track Zopim with Google Tag Manager?
Zopim Javascript API lets you not only send the data to Zopim but also catch particular events, which is very convenient for those who are interested in seeing that data in Google Analytics.
In my opinion, the most important interactions are when the chat starts and when it ends. That’s where the Zopim Listener jumps in.
Zopim Custom Auto-event Listener for GTM
I have written a little piece of code that listens to Zopim Chat’s interactions (Chat started and Chat ended, in particular).
My most loyal readers know that I’m no developer. And that did not change, actually. But I am always looking for ways to learn some new things, and Javascript is one of them. Although I am still a total JS beginner and learning in baby steps, I hope to have some decent skills in the future.
But that does not change the essence of this blog – to help non-developers track what they want with little or no help from developers.
Anyway, let’s get back to Zopim Listener. I wrote a little piece of code which was later reviewed by one of my colleagues/developers. So you can be sure that this code won’t break anything on your site.
<script>
  $zopim(function() {
      $zopim.livechat.setOnChatStart(function() {
        // trigger when chat starts
        window.dataLayer.push({
          "event": "zopimChat",
          "zopimChatAction": "zopimChatStarted"
        });
    });
    $zopim.livechat.setOnChatEnd(function() {
        // trigger when chat closes
        window.dataLayer.push({
          "event": "zopimChat",
          "zopimChatAction": "zopimChatClosed"
        });
    });
  });
</script>
Once the chat conversation is started or closed, this listener fires zopimChat event with attribute zopimChatAction. Attribute’s possible values are zopimChatStarted or zopimChatClosed.

Copy listener’s code and head over to Google Tag Manager. Go to Tags and create a custom HTML tag, paste the code there.
As for triggering, create a new trigger with the following settings:
- Type: Pageview – DOM Ready.
- This trigger fires on – All DOM Ready events.
Important: This listener must fire after the main Zopim widget script was initiated. So if you’ve set the main script to fire on DOM Ready event, then you can:
- Either set the Zopim Listener to fire on Window Loaded event (Trigger type: Page view – Window Loaded).
- Or fire listener and main script on DOM Ready event, but set the main script’s priority to 1 (while listener remains at 0). The tag with higher priority will fire first. You can set Tag Firing Priority under Advanced Settings of the Tag.
In my case, the main Zopim script fires with All Pages trigger, while Listener fires with DOM Ready trigger.

Let’s Create Variables and a Trigger
After the tag is created, save it. Refresh Preview and Debug mode, and then refresh the website you’re currently working on.
Start a conversation in the Zopim chat widget.
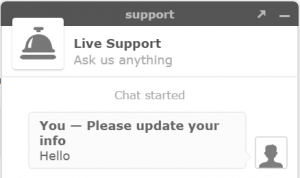
After Chat started message appears in the chat window, you should see zopimChat event in GTM Preview and Debug console. That event will be our trigger. Click it and then navigate to Data Layer tab.

What you see if all information which is available with the event:
- Event name. It always will be zopimChat.
- zopimChatAction. In this case, it’s zopimChatStarted.
If the visitor ends the chat, you’ll get an event of which zopimChatAction attribute equals to zopimChatClosed.
What we should do next is to “teach” Google Tag Manager how to catch zopimChat events and to read zopimChatAction values. That’s where triggers and variables come in.
In Google Tag Manager, create a trigger with the following settings:
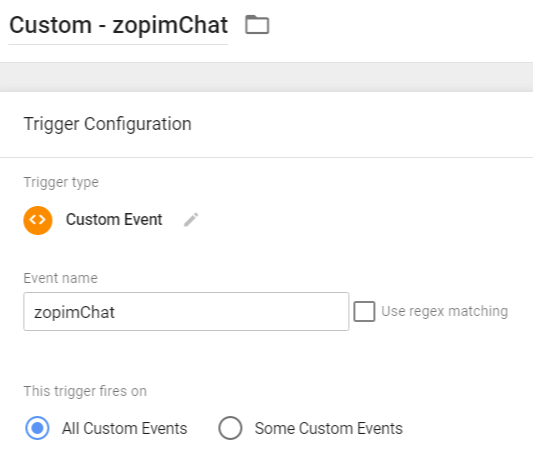
Then, create a variable:
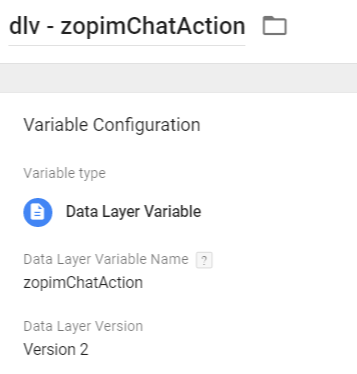
While you can’t test the trigger without having it assigned to a tag, you can easily check whether Data Layer variable was created properly. Refresh Preview and Debug (P&D) mode, then refresh the website you’re currently working on.
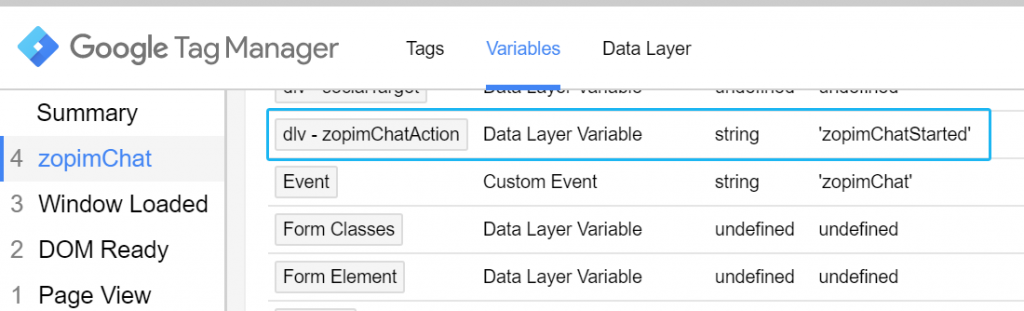
Start or end a chat conversation. After the zopimChat event appears in the P&D console, click it and go to the Variables tab. If your newly created variable dlv – zopimChatAction contains either zopimChatStarted or zopimChatClosed, you’re good to go. This variable will be important for us in the Google Analytics tag, that we’ll create in the next chapter.
Google Analytics Event
We’ve come to the last part of the Zopim Google Tag Manager guide – let’s create a tag that sends interaction data to Google Analytics.
In Google Tag Manager, go to Tags and create a new Universal Analytics tag with the following settings:
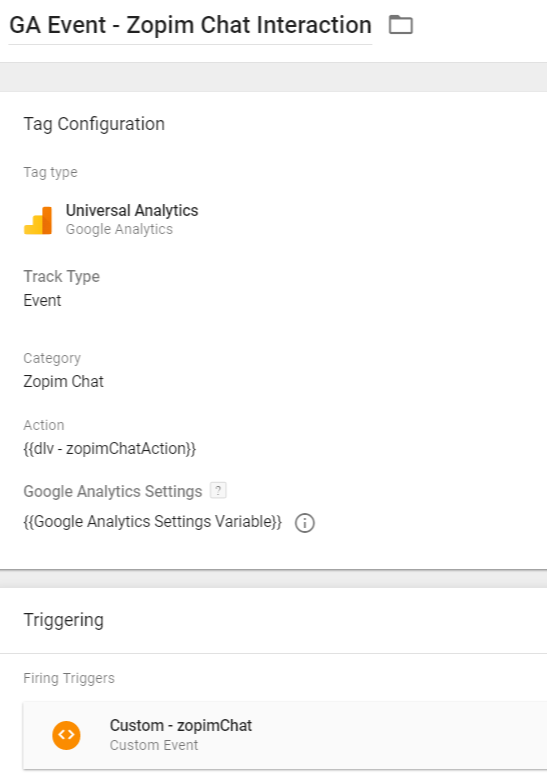
This tag fires only when zopimChat event is pushed to the data layer and passes the following data:
- Event Category – Zopim Chat
- Event Action – either zopimChatStarted or zopimChatClosed (depends on the context).
Don’t forget to test this event with Google Analytics Real-time event reports. After the Universal Analytics tag is fired, you should see it in GA Real-time reports as well.
Zopim Google Tag Manager Guide: Conclusion
Google Tag Manager strikes again! It’s an irreplaceable tool when it comes to installing various scripts, tracking certain activity and pushing data/interactions to other 3rd party tools/platforms.
In this Zopim Google Tag Manager guide, I’ve explained three ways how you combine Google Tag Manager and Zopim chat (current name: Zendesk Chat):
- How to Install Zopim Chat with Google Tag Manager.
- How to control Zopim Chat with Google Tag Manager.
- How to track Zopim Chat interactions with Google Tag Manager, and send that data to Google Analytics.
The latter two topics/functionalities are available only for paying users of Zopim chat because their Javascript API is not available for Free users.
26 COMMENTS
Thank you so much for sharing this piece of knowledge - it really helped me with tracking the chat events.
You're welcome!
Hi! I just wanted to let you know that I implemented the tracking at the beginning of February but I saw that it doesn´t work now. I am not sure what my mistake is. Maybe you can help me with this? I am trying to figure out by now what went wrong.
Do I get this right that the Chat Listener should load after the Zopim Chat is loaded?
If it loads simultaneously the tracking doesn´t work I suppose?
So how do I set this up?
We do not implement the chat with the help of the tagmanager.
There is a setting in the Advanced settings for every tag called Tag Sequencing. You can use that to instruct GTM to load another tag before or after the tag.
Hey, first the Zopim chat must be loaded and after that, the listener should be dispatched.
Therefore make sure that Zopim chat script fires on All Pages trigger, and the listener - on all DOM Ready events. If you still face some issues, try firing Zopim Listener tag on "Window Loaded" trigger.
Hello Julius,
Thank you for sharing this.
Is there a way to track leads when users leave their name and email in Zopim when the chat is offline? Currently when this happens, Zendesk sends an event with Action name "Offline Message Sent" to Google Analytics. Wondering if we can also use this as trigger in GTM to fire other conversion codes.
Samar
Hello, Unfortunately, Zopim JavaScript API does not provide a solution for such event. Therefore there is no robust way to fire other conversion codes when the offline message is sent.
Thank you for your response Julius.
I am trying another way, which is to use Zapier to connect Google Analytics to Facebook. A new event in Analytics would trigger a Facebook Offline conversion and Facebook would use the user's details to attribute the conversion. I have no idea if it will work. :)
And I need to be able to capture the user's details in the event.
How would one do this? Can this also be one by the chat API?
Samar
Hey, honestly, I also have not idea if your method will work :) Zopim chat loads in the iframe, so you won't be able to scrape user's information from the chat so easily. I recommend digging into Zopim's JavaScript API and try to find out what user data can be accessed https://api.zopim.com/files/meshim/widget/controllers/LiveChatAPI-js.html
Hi Julius, thanks for the response.
I see a "getEmail" API call. Would you know if I can use this call to "get" the email address already entered by the user and the push it to the datalayer? OR does this call make the chat box "get" or "ask" for the email address form the user? This is confusing and I am not able to find any explanation on the LiveChatAPI page. :)
Thanks in advance,
Samar
Don't know. I haven't used Zopim's API that much. I'd guess that you could get that email and push it to the dataLayer but the best way to find out is to try :)
Cool thanks Julius. :)
Keep up the blogging. Its super helpful! :)
Hi, I just wanted to add that I think there is a way to track offline conversion because zopim gives out an Action and category when you send a message offline.
To find out you can use the Google Tag Assistant and Record the Actions.
For any questions, ask me. I can provide instructions if you want to.
Yes please Josephine! :)
Hey guys,
we are currently working on tracking the Zendesk Chat on a wordpress based Website.
We implemented this instruction as written here and then we found out that the Google Tag Assistant gives out different values than written here.
F.e. as a category it gives us "Zopim Livechat" instead of "Zopim Chat"
And the Action "zopimChatstarted" does not even appear when we test it.
Do you have any suggestions or answers to why this particular Action doesn´t fire?
Hey,
"Zopim Livechat" is the value that you or your colleague entered in the GA Event Tag's "Event Category" field. You can set any Event Category value you want.
Zopim Listener (mentioned in this blog post) does not impact GA Event Category unless you specifically set it in Tag's settings. The listener just fires the Data Layer event which you need to process (by creating a custom trigger). Event Category, Action, and Label can contain any values you set.
As for zopimChatStarted event, are you sure that the listener is fired later, after the Zopim Chat's main script is loaded? I've just tested the listener on the official Zopim Chat's Demo page (https://www.zopim.com/demo) and it's working fine.
Maybe you're using some Wordpress plugin which modifies the chat widget in a certain way? The Zopim Listener supports only the native Zopim Chat.
Hi Julius:
The listener works all fine - I implemented the listener and the Zopim Chat Widget via Tag Manager and the Listener fires after the Tag that implements the chat.
Whats happening here is that Analytics gives out only 2 actions, the third action "zopimChatstarted" is not seen. Maybe I can explain it detailed with images to you when I write you an email?
It´s not easy to explain without images.
The listener is not the code which implements the chat. The listener is a code which listens to chat's interactions. There are two actions which are supported by the listener:
- Both events are called "zopimChat".
- Every event is passing different "zopimChatAction" value which equals to either "zopimChatStarted" or "zopimChatClosed"
So in total, there are two possible actions. What third action do you have in mind?
Hi Julius,
I know that the listener is not the Chat. Nevertheless I implement the Chat and the listener with Google Tag Manager.
if you use the Google Tag Assistant to track the data that is given out when you use the chat then you see:
Button clicked - when someone clicks on the Chat to open up the Chat window
Chat request form submitted -> when someone clicks on "begin Chat"
and then the third Action can be tracked which is given by the listener and can be either "zopimChatStarted" or "zopimChatClosed". -> When someone starts the Chat and "Chat started" appears in the Chat window.
and in my case this third step is not recorded/displayed by Google Tag Assistant on my wordpress based Website.
On the other two Websites where I track the Chat it works all fine and it displays this Action - but not on my wordpress site.
Is there any known Problem with wordpress and Zopim?
What does GTM Preview and Debug mode show? Does the "zopimChat" event appear there after you start a chat? If yes, then you need to create a Custom Trigger "zopimChat" in GTM and then assign it to Google Analytics Event Tag.
The listener does not send the event directly to Google Analytics, therefore Google Tag Assistant will not catch it.
To sum up:
- You install the listener (this is already done)
- Then you create a Custom "zopimChat" trigger (that's a capital C letter).
- Then you assign that trigger to your Google Analytics Event tag.
Hi Julius,
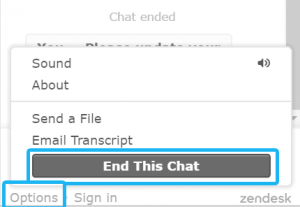
Would you be able to tell me what a Chat End is? Would someone just closing the chat box qualify as a Chat End? Or do they have to specifically "END CHAT"
Samar
Hi, unfortunately, just closing a chat box is not enough. They have to specifically "End chat". I know that does not sound very accurate, but that's how Zopim's JavaScript API works and were are limited to this functionality.
Well, I am using it to track leads so specifically Ending Chat is way better to measure than people just closing the chat box out of irritation! :)
Thanks Julius! :)
Samar
Hi Julius,
For some reason, the listener does not recognize any activity within the chat. I've set it to fire on Window Loaded event. I do not see zopimChat event in GTM Preview and Debug console. Any idea what I could be missing?
This is on a Magento site
Hi, this article was written 4 years ago. Maybe Zopim/Zendesk changed something since then.