
February 8, 2025
Track TypeForm with Google Tag Manager and Google Analytics 4
If you love the customization that Typeform provides but are worried about implementing it if you can’t track their usage, then there’s no need to worry; it’s actually pretty simple.
This article will go through the steps to track Typeform with Google Tag Manager and Google Analytics 4 each time a user starts and submits a form.
Table of Contents
Here’s what you will learn in this article
- Assumptions
- Create an event listener
- Create two tags
- Measurement ID
- Form ID variable
- Typeform page trigger
- Copy the tag to make life easier
- Create a trigger for the form submission
- Test the tags
- View data in GA4
- Final words
Video tutorial
If you prefer video content, here’s a tutorial on my YouTube channel. It’s important to note that the video explains a slightly different configuration approach. Both options work fine; thus, it’s your choice.

Assumptions
- You have installed GA4 on your website using Google Tag Manager
- You are familiar with creating tags, triggers, and variables in GTM. If not, check out the Google Tag Manager Tutorial for Beginners.
- You have built a form in Typeform & embedded it into your site (assuming this has already been done if you are reading this article, but maybe you want to make sure you can track it first)
Create an event listener
We first want to create an event listener using a custom HTML tag in Google Tag Manager. This will “listen” to events and push this information to the Data Layer. Once the information is in the Data Layer, we can create a GA4 event tag to capture this information.
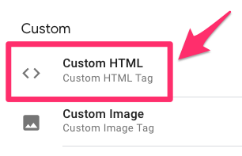
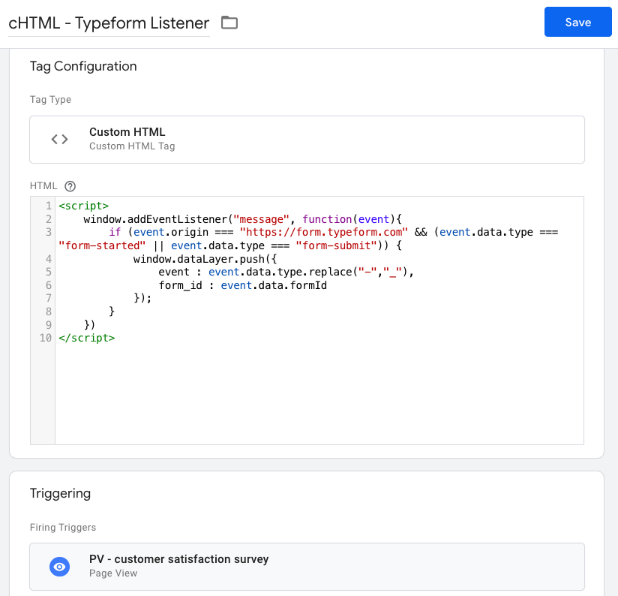
To create the custom HTML tag, go to Tags and select “New”.

Select Tag Configuration, then choose Custom HTML tag.
In the textbox, paste the Typeform listener code below:
<script>
window.addEventListener("message", function(event){
  if (event.origin === "https://form.typeform.com" && (event.data.type === "form-started" || event.data.type === "form-submit")) {
    window.dataLayer.push({
      event : event.data.type.replace("-","_"),
      form_id : event.data.formId
    });
  }
});
</script>
This code will send an event to the Data Layer when a user starts the form and when they complete the form.
Scroll down to the Triggering section. Here, you have two options depending on what suits your needs better: (1) Trigger the event on all pages or (2) Trigger the event on some pages.
If you want to trigger that event on all pages, select the “All pages” Page View trigger, which comes default in your GTM container.
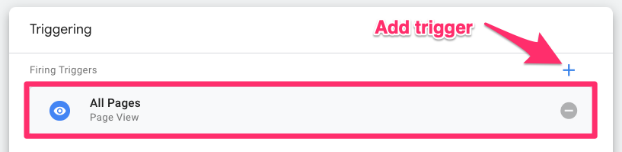
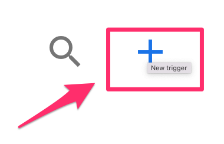
Otherwise, if you want only to trigger the event on certain pages, click the plus sign to add a trigger. Then, on the “Choose a trigger” page, click the plus sign (in the top-right corner) to create a new trigger.
Click “Trigger Configuration” and select the “Page View” trigger type. Fill in the information needed to capture the page(s) you’re interested in. Be sure to select “Some Page Views” under “This trigger fires on” to prompt the filter.
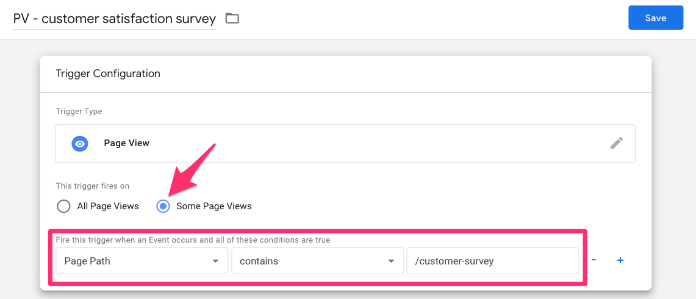
Name your trigger (using proper naming convention) and save.
Now that you have the trigger in the tag, name it “cHTML – Typeform Listener” (cHTML = custom HTML) and save.
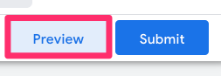
Preview the GTM container by clicking the “Preview” button in the top-left of the interface.
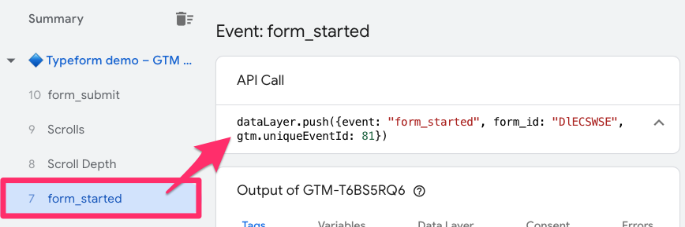
Enter your website’s URL and begin the Typeform survey. Once you answer the first question, return to Preview mode and check for the form_started event (dataLayer push). You will notice that there is also a form_id that you can collect.
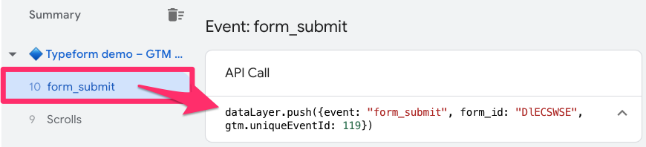
Return to your site, complete the survey, and check Preview mode again to find the form_submit event. This should only appear if you have successfully submitted the form and there are no errors. Again, there is a form_id that you can collect.
Let’s get this data over to Google Analytics 4 now!
Create two tags
By adding the custom code (aka the custom HTML) to our GTM container, we have made the information we want to track available in the Data Layer. However, we still need to create an event to actually collect and send the data to Google Analytics 4.
In this article, we will create two GA4 custom event tags. Alternatively, there is a method to achieve this with just one GA4 event tag and one trigger, which you can learn about in this video.
However, we will focus on the first method with two tags in this article. One tag will be for the form_started event and the other for the form_submit event. The steps outlined below will be exactly the same for both events, so go through this process twice. I will show you a trick to make this a bit easier.
For each event, go to Google Tag Manager > Tags (in the left-side navigation) > New.
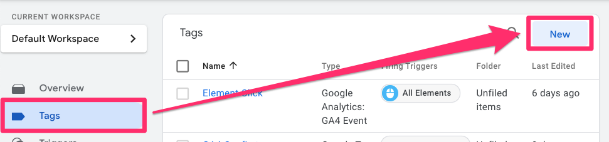
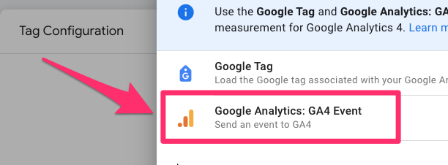
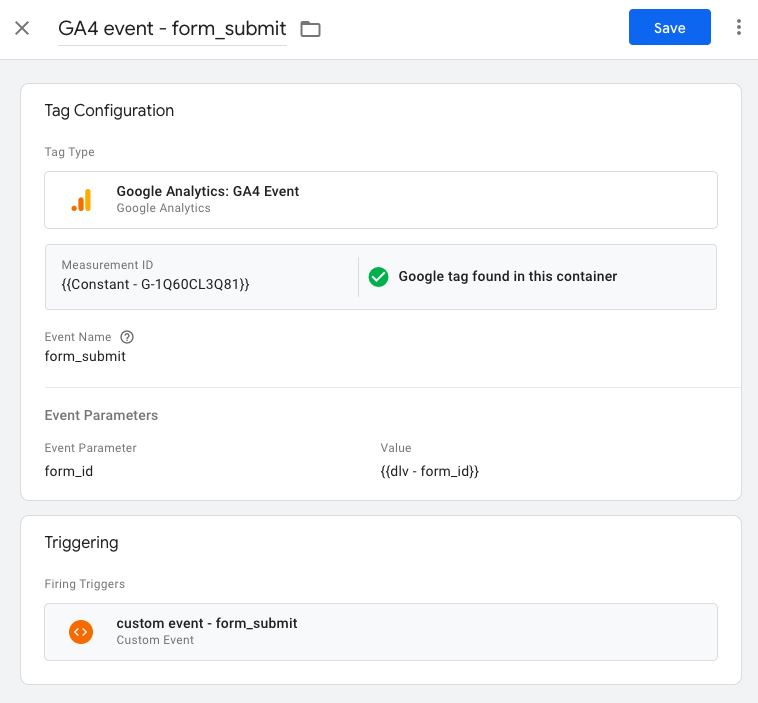
For the Tag Configuration, select Google Analytics > GA4 Event.
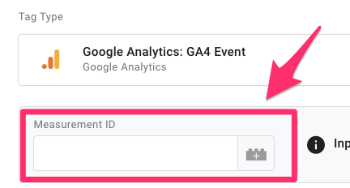
The first thing you will need to input is the Measurement ID. The next sub-chapter goes into detail about the measurement ID if this is new to you. If not, you can just enter your ID and move on to the next part.
Measurement ID
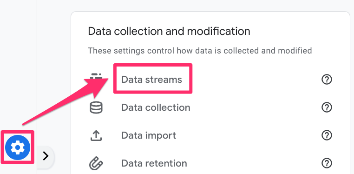
If you don’t have your measurement ID saved as a constant in your container, you need to find it in your Google Analytics 4 data stream. Go to the GA4 interface, then Admin > Data collection and modification > Data streams.
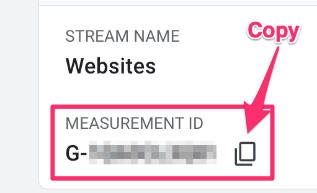
Click the data stream you are interested in and find the measurement ID.
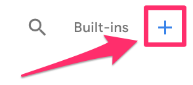
To keep your container more organized, you will want to create a new Constant variable to hold the measurement ID. Click to add a new variable.
Then, click on the plus in the top right to create a new variable.
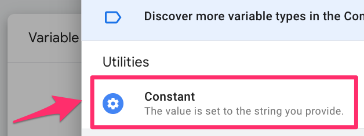
Click on Variable Configuration and select “Constant” as the variable type.
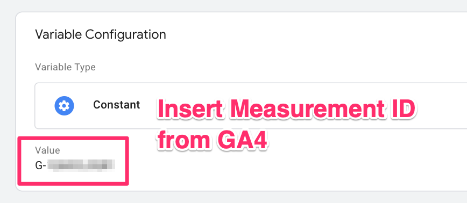
Copy the Measurement ID and paste it into the Value of the constant variable. Save your new variable as “Constant – G-XXXXXXXXXX” (or whatever makes sense to you). Read this blog post to learn more about the constant variable in Google Analytics 4.
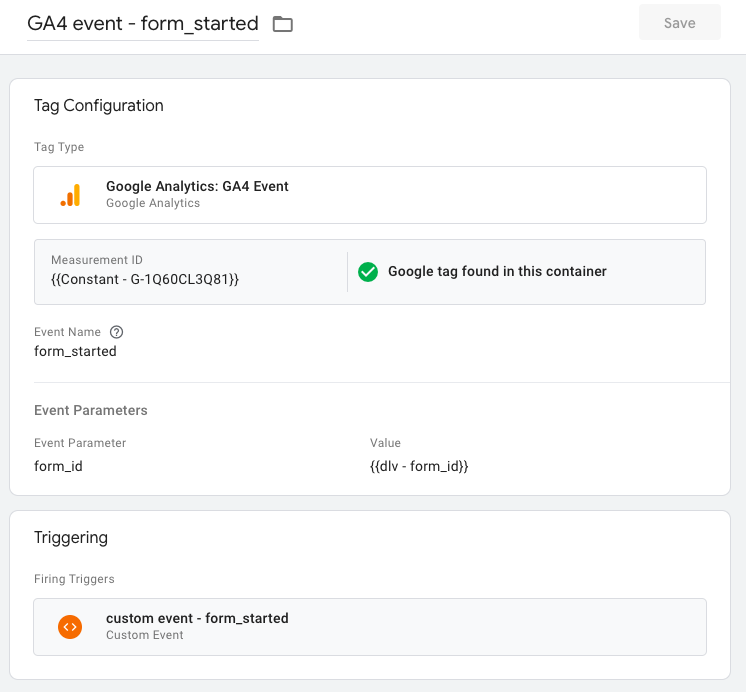
Under the Measurement ID, you will need to enter an event name. In this case, we can use the same name the custom HTML sends: form_started and form_submit. For this example, I will start with form_started but don’t forget that you need to create another tag for form_submit.
Form ID variable
You may have noticed that a form ID appears in the data coming through from the Typeform events. By collecting this form ID, you could slice and dice your event data based on the form. Sounds useful? Follow the steps below!
Under Event Parameters, click “Add parameter”. For the Event Parameter, you can just enter “form_id” and for the value, click the icon.
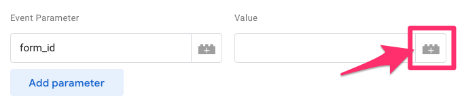
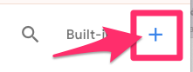
Then, click the “+” in the top-right corner.
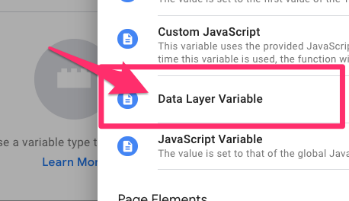
For the Variable Configuration, choose “Data Layer Variable”.
For the Data Layer Variable Name, enter the name exactly as it comes through in the form_started event in Preview mode: form_id. Name the variable “dlv – form_id” and save.
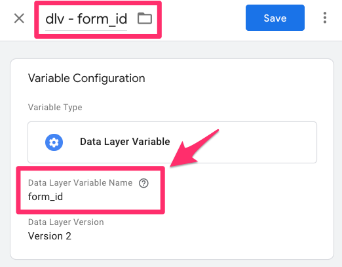
Once you save, you will be sent back to the tag, and the variable you just created will auto-populate under Value.

Typeform page trigger
At the bottom of the tag, there will be a section for Triggering. Here, we need to create a new custom event trigger. Click on the box below the Triggering title.
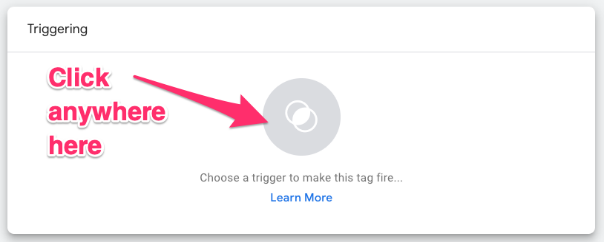
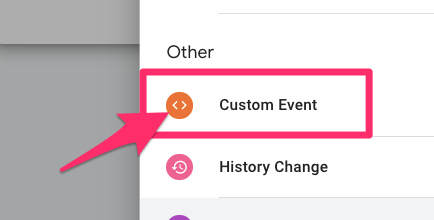
Click the “+” icon in the top-right corner to make a new trigger.

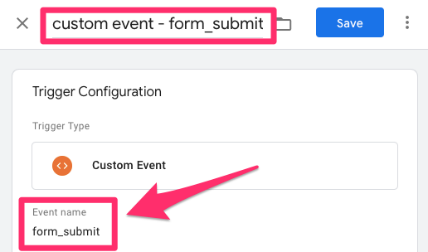
For the Trigger Configuration, select “Custom Event”
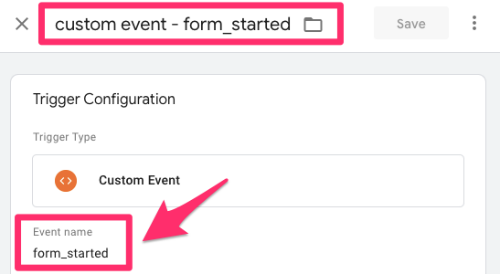
Enter the custom event exactly as shown in Preview mode: form_started. Name the trigger as “custom event – form_started” and save.
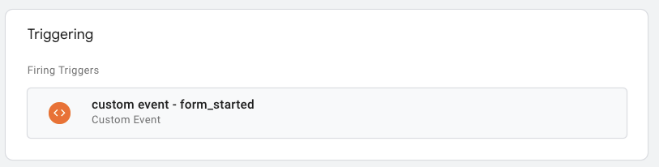
Back in the tag, the new trigger will be auto-populated.
This is now one tag complete! This is how it should all look together:
Copy the tag to make life easier
Not only do we want to track when a user starts a Typeform, but we also want to capture when they have successfully completed the form. Instead of creating a tag from scratch, we can copy the tag we made above since some elements will be the same for both tags.
Go to the menu items in the top-right corner of the tag (next to the “Save” button) and select “Copy”.
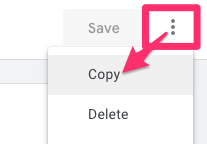
A new tag will be in front of you now. There are three things we need to change:
- The tag name
- The event name
- The trigger
As for the tag name, you can just change it to “GA4 event – form_submit”.

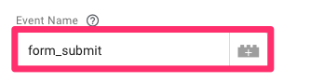
You can update the event name to “form_submit”.
Create a trigger for the form submission
Unfortunately, it’s not as simple to update the trigger. We need to create a new custom event trigger so that the tag will fire when the form_submit event occurs. These steps will be the same as above.
Under the Triggering section, select the “+” sign to create a new trigger, but be sure to remove the existing trigger either now or after you make the new trigger.
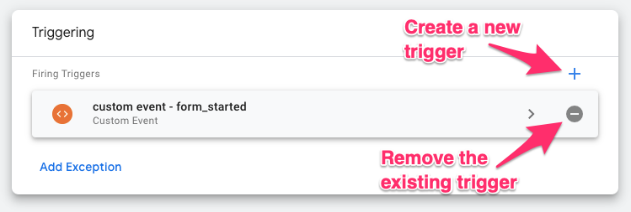
Click the “+” icon in the top-right corner to make a new trigger.

For the Trigger Configuration, select “Custom Event”
Enter the custom event exactly as shown in Preview mode: form_submit. Name the trigger as “custom event – form_submit” and save.
Once you have made all the necessary updates, your tag should look like this:
Test the tags
Phew! We are almost done. Let’s now make sure that everything is working. Enter Preview mode and go to the URL where the Typeform is on your site. Answer the first question and return to preview mode. Under the form_started event, you should see that your first tag has fired.
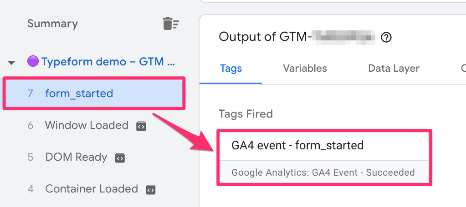
Tip: Select the tag and double-check the event name to ensure you haven’t mixed up the form started and form submission events. Also, check the form ID to ensure the value has come through.

Once you have completed the form, return to the preview mode to ensure you see the second tag under the form_submit event.
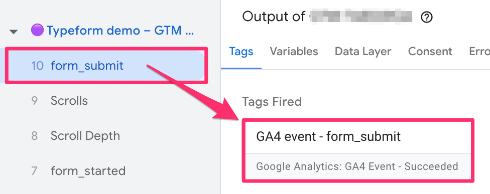
Click the tag to confirm the information is correct.

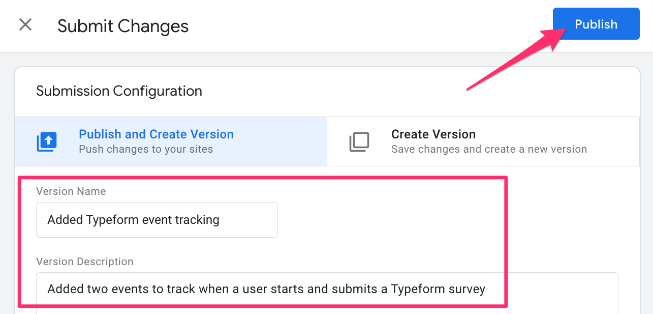
When you are satisfied that the tags are firing correctly and the proper information is collected, publish your GTM container.
View data in GA4
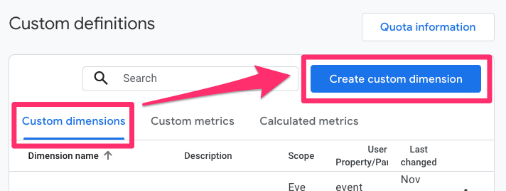
You must wait at least 24 hours from publishing your GTM container to viewing the Typeform tracking data in the Google Analytics 4 interface. However, one thing you should do immediately in GA4 is create a custom dimension for the form_id variable.

Create custom dimension for form_id
You may already have a form_id custom dimension set up in GA4, in which case, you will not need to do this step.
If you haven’t, go to Admin > Data Display > Custom Dimensions. Click “Create Custom Dimension”.
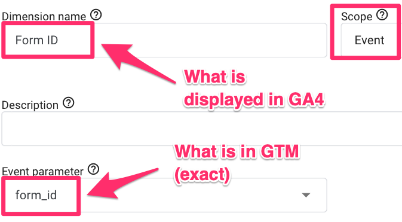
There are three elements that you need to consider:
- The Dimension name is the name that will be displayed in GA4 reports
- The Event parameter needs to be the same name as in Google Tag Manager
- Set the scope to “Event”
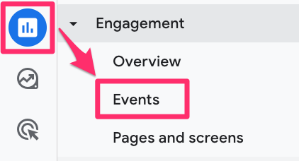
Built-in standard reports
The quickest method is to head to the Events report in Google Analytics 4. Since GA4 is customizable, your property may not look the same as mine, so the location of this report may be elsewhere.
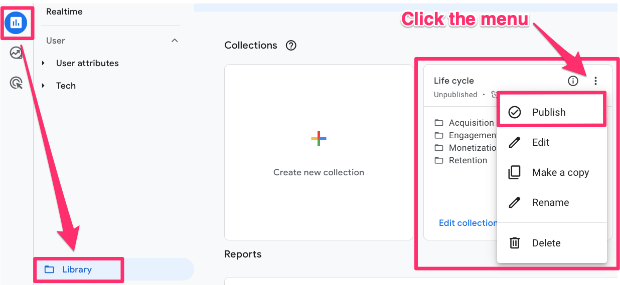
You can also add this report collection to your reports tab if you don’t have it by going to the Library and publishing the “Life cycle” collection.
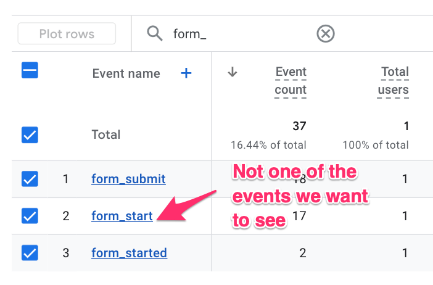
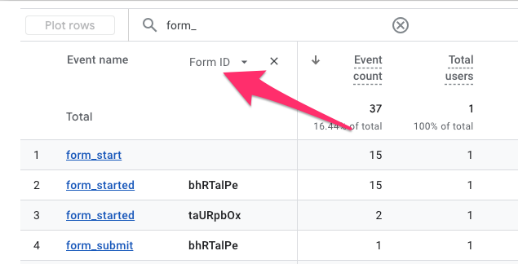
All you need to do is enter the name of one of the events – either form_started or form_submit – into the search bar to filter the report. The search field acts like a “contains” so if you just enter “form_”, you will get both events and any other events starting with form_.
For example, when I search “form_”, I also get the form_start event, which I don’t want to see when I’m looking for events related to Typeform tracking. This may be a bit confusing, but form_start is related to Enhanced measurement (it’s picking up events from other forms on the site). We can’t use this here since Enhanced measurement cannot track Typeform.
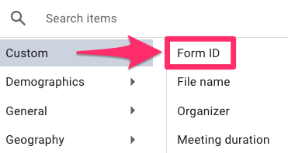
Search for “Form ID” under the Custom dimensions.
You will also see the form ID for the events where it’s available.
Since there are two events, it’s not the most practical to look at them separately (or with other events in the way). A better solution would be to build a report to see data using GA4 Explorations.
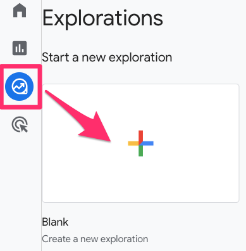
GA4 Explorations
Go to Explore in the left-hand navigation and click “Blank”.
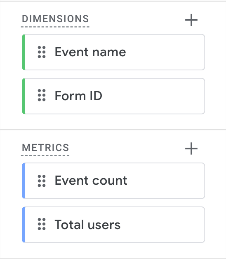
Add to the report:
- Dimensions: Event name and Form ID
- Metrics: Event count and Total users

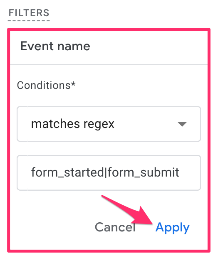
- Filter: Event name matches regex “form_started|form_submit” (make sure to click “Apply” to activate the filter)

Double-click on each dimension and metric to add them to the report. You can also name the tab if you will be adding more tabs to the report.
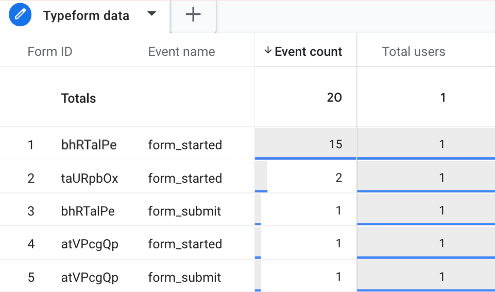
Now, with this report, you can see both the number of users who have started a form and the number of users who have submitted the same form. This will help you better understand the completion rate for each form. If a form isn’t performing well, then maybe there is something you need to update!
To further explore this data, you could look into creating a funnel exploration. Check out this article on funnel explorations in GA4 to learn more!
Track Typeform with Google Tag Manager and Google Analytics 4: Final words
While the length of this article may be deceptive, tracking Typeform with Google Tag Manager and Google Analytics 4 is actually not very difficult! There are three tags that you can create, but hopefully, this article has simplified things, so it’s not as daunting. Alternatively, you could go with a leaner approach (and have just one GA4 event tag), but in this blog post, I wanted to show the option with more tags.
One thing to note is that this tracking will not capture the information the user has inputted into the form. You will need to go to your Typeform account to gather this data. This tracking will only captured when a user has started a form and when a user has completed a form (and the form ID).
3 COMMENTS
Hello
Thank you for this tutorial. I built this and it seems to be working but its firing for forms that are not typeforms, but all forms. Have I gone wrong somewhere? I thought the event listener would only push to the data later if it was an embedded typeform?
Thanks
Just to update on my earlier comment, in case this happens to anyone else, I solved it.
I edited the custom HTML tag in GTM, so that it now pushes a different value to the data layer when an embedded typeform is submitted: embedded_typeform_started or embedded_typeform_submit, depending on the action taken, and that has solved the issue.
Before, my HTML tag was using data layer values (form_started and form_submit) that other elements on our website were already sending to the data layer, though these weren't linked to any events I'd looked at in GA4. That's why the tracking for embedded typeforms was being fired on seemly random actions.
How can we send enhanced data to GA4 using this listener code?