
August 17, 2025
Facebook Conversion Tracking With Google Tag Manager
Updated: August 17th, 2025
If you already use Facebook as a marketing tool, you want to measure results. You have multiple options, including remarketing, Facebook conversion tracking, etc. Everything requires time to implement.
Let’s say you email the developer; completing the task takes weeks. With the help of Google Tag Manager, you can speed up the process.
Table of Contents
Here’s what you will learn in this article
- Before you continue
- So what’s the plan?
- #1. Get the Facebook Pixel ID
- #2. Add the Facebook Pixel Custom Tag Template to your GTM container
- #3. Facebook Pixel Pageview Tag
- #4. Facebook Conversion Tracking with Google Tag Manager
- #5. Where can I see/use conversions in Facebook’s Interface?
- #6. Send additional parameters to Facebook Pixel with Google Tag Manager
- Troubleshooting common pixel issues
- Facebook Conversion Tracking: Final Words
Before you continue
While writing this blog, I assumed that you have a working knowledge of Google Tag Manager tags. If you’re a beginner, I highly recommend downloading my free e-book Google Tag Manager for Beginners

So what’s the plan?
To make this work, you will need to:
- Add a Facebook Pixel Custom Template to your Google Tag Manager container
- Get a Facebook Pixel ID from Facebook Business Manager.
- If you haven’t yet, create a Facebook Pixel tag and use the Pixel ID in your Google Tag Manager container
- Create additional event tags that send interaction data to Facebook (that’s what I’ll explain in this blog post). That data will be used to create more precise remarketing audiences and measure the success of your campaigns.
Please note that in this guide, we will be working only with a pure client-side setup. Server-side tagging is not included. If you also want to implement conversion tracking with server-side GTM and Conversions API, take a look at my intermediate/advanced Google Tag Manager course.
#1. Get the Facebook Pixel ID
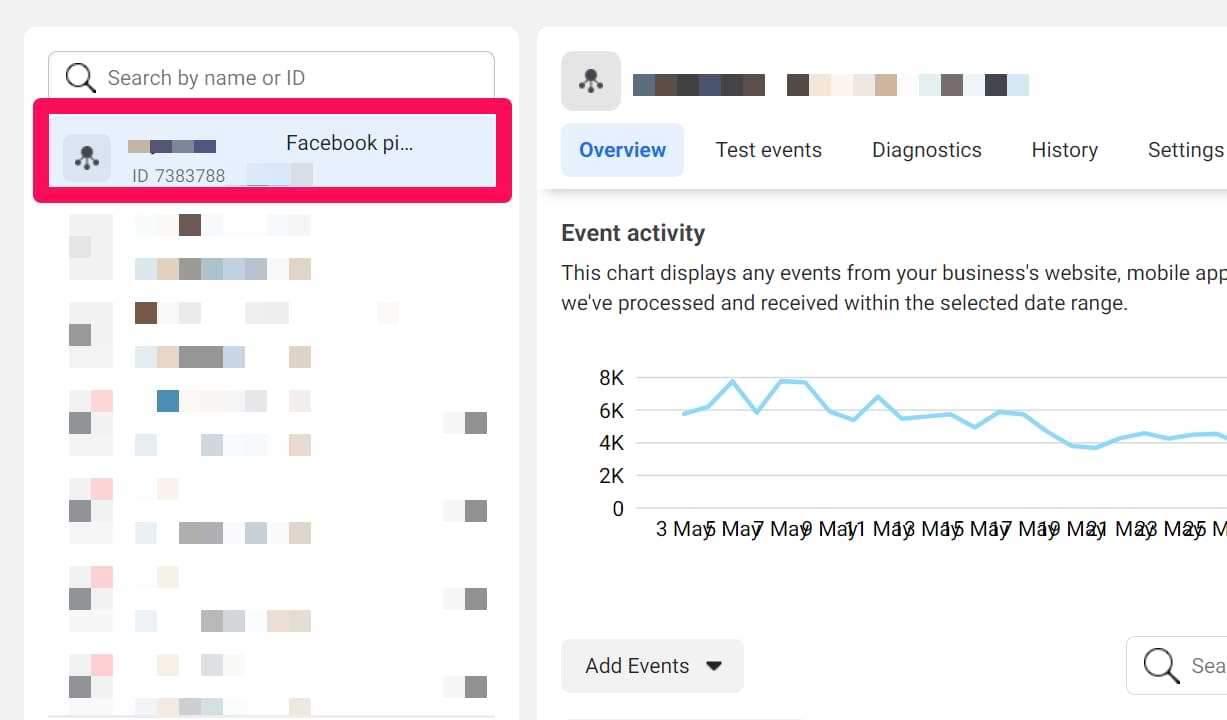
First, let’s go to the Facebook Pixel Business Manager and get the Pixel ID (that will be needed in the following chapters of this blog post.)
Disclaimer: Facebook is constantly changing the user interface here; therefore, there is a high chance that my screenshots will not match what you see. In fact, once, I had a case where four people in my Google Tag Manager workshop saw different versions of the interface simultaneously. So, if you don’t find a particular option, just keep looking.
Click the Menu icon in the top right corner and go to Events Manager.

Then go to Data Sources and choose the Pixel you’re interested in.

If you don’t have any Pixels yet, click the Set Up Pixel option and follow all the necessary steps.
In one of the steps, Facebook will offer several ways to add the pixel. We won’t be exploring these options, so close this window for now.
![]()
![]()
Your main goal, for now, is to get the Pixel ID that looks like this (of course, the value will be different):
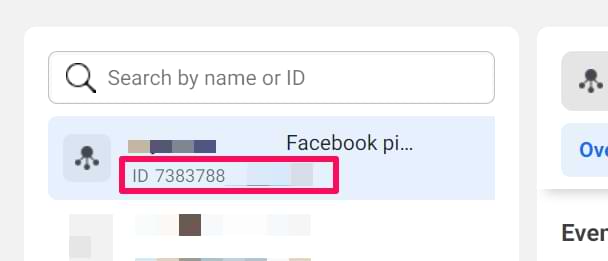
Once you get it, copy it (because we’ll need it in the next chapter of this blog post).
#2. Add the Facebook Pixel Custom Tag Template to your GTM container
If you go to Tags > New (in Google Tag Manager) and search for “Facebook”, you will not find any tag template. That’s because, by default, no such tag exists in the GTM container.
Instead, you have to add it manually. In the older days, you had to use the Custom HTML tag to install FB pixel, but now, luckily, there is a very convenient feature called Community Template Gallery.
A community gallery is where anyone in the community (who can code) can create custom templates of Variables or Tags.
In Google Tag Manager, go to Templates > Tag Templates > Search Gallery, and in the search field, enter Facebook.
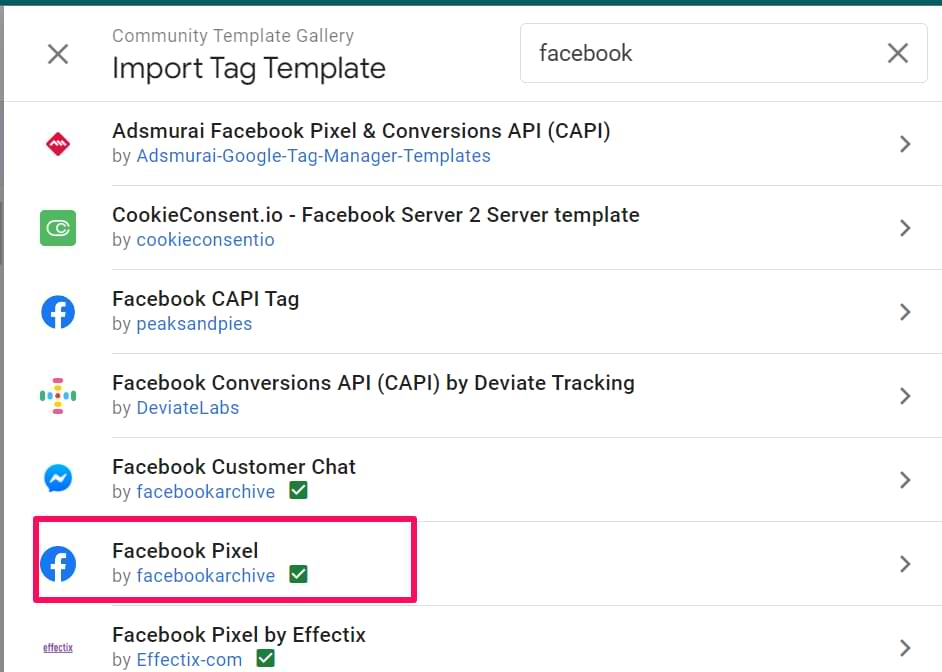
You will see this template. Click it and add it to your Workspace. Once you do that, a new template will appear in the Tags > New > Custom section, and you can reuse it multiple times in multiple tags in the same container.

Why use a tag template instead of a custom HTML tag?
In older guides, you might see instructions to copy the entire Facebook Pixel code and paste it into a Custom HTML tag. Personally, I tried to avoid this. Using the official community tag template is the best practice for a couple of reasons:
- Simplicity and readability: The template provides a clean user interface with clear fields for your Pixel ID and event parameters. This is easier to manage than digging through a large block of code.
- Reduced errors: By using predefined fields, you reduce the risk of introducing typos or syntax errors that could break your tracking.
#3. Facebook Pixel Pageview Tag
Everything starts with the basic implementation of the Facebook pixel. In other guides (especially the older ones) found online, you might see a term called Facebook Pixel Base Code (or something similar). The following steps I will demonstrate explain exactly that (but without using the term Base Code).
In Google Tag Manager, go to Tags > New > Facebook Pixel and enter the following settings (if some fields are not visible in the screenshot, I did not change anything there):

In the Facebook Pixel ID(s) field, enter the Pixel ID you copied in the How to get Facebook Pixel ID? chapter. This field lets Google Tag Manager know which FB ad account to send this data to.
Wondering what {{Constant – Meta Pixel}} means? I will explain this in the next chapter.
For now, leave all the other settings as they are (for now).
Set the tag to fire on All Pages.
#3.1. Constant Variable for the Pixel ID
Spoiler alert: We must create a separate FB Pixel tag for each interaction you want to track with the Facebook Pixel. In every tag, you will need to define a Facebook Pixel ID.
Eventually, you end up with 50 (or even more) tags that send data to Facebook. This means you must manually insert the Pixel ID 50+ times. But what if, one day, you have to switch to another Pixel ID? You will need to change the ID 50+ times manually.
To make things more optimal, you could create a Google Tag Manager variable containing your FB Pixel ID and reuse the same variable whenever you need it. If you need to change the Pixel ID, you must do that once in the Variable.
In Google Tag Manager, go to Variables > User-defined Variables > New > Constant and paste your Facebook Pixel’s ID.

Save the variable. Then open the previously created Facebook Pixel pageview tag, and insert the Constant Variable instead of plain Pixel ID.

#3.2. Test the Facebook Pixel Tag
Now, it’s time to ensure you have implemented everything correctly.
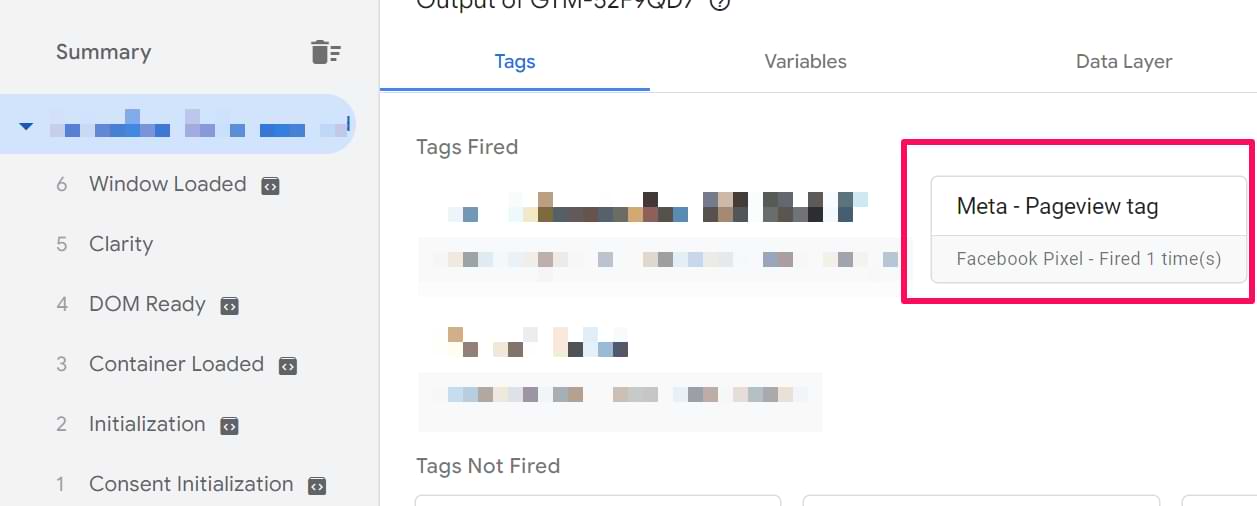
Google Tag Manager Preview and Debug mode. In GTM, enable the Preview and Debug mode, then refresh the page where you want to install Facebook Pixel with Google Tag Manager.
At the bottom of the screen, a debug console will appear. Click the Summary, and you should see that your Facebook Pixel tag has fired.
Facebook Pixel Helper. The previous tip does not mean everything was properly sent to Facebook Pixel! There are other places we need to check.
One of them is the Facebook Pixel helper. Install it, and this icon appears in the top right corner of your Chrome browser. Once you refresh the page AND if Facebook Pixel is implemented on a page, its color will change to blue, and you will see a number within that icon.
Click that icon, and let’s check. We see that a PageView was tracked with a green check mark icon next to it. That’s good! If there were a loader or yellow icon, that’d mean a possible problem. But a green icon is exactly what we are looking for.

Facebook Pixel Reports
In Facebook Business Manager, go to Events Manager > Data Sources > Select your Pixel and then Test Events.

Enter the URL of your website (if I were working with my site, I would enter https://www.analyticsmania.com) and click Open Website. After you are redirected to your website, go back to the Test Events of your Pixel and check whether you see Pageviews coming from your device. If nothing appears, return to your site and refresh the page.
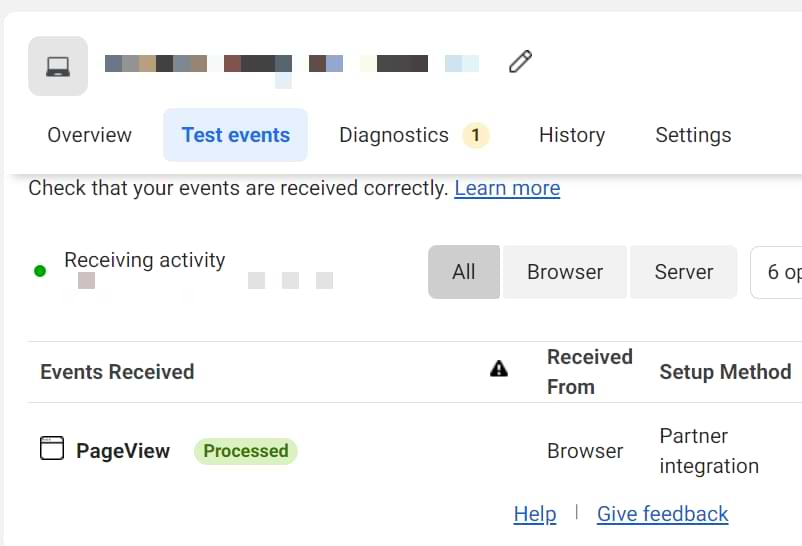
If everything is fine, you have correctly implemented Facebook Pixel with Google Tag Manager.
#4. Facebook Conversion Tracking with Google Tag Manager
To optimize and measure Facebook ad campaigns, you need to track important events on your website and send that data to Facebook. According to the official FB Pixel documentation, there are three ways how to track conversions with Facebook Pixel:
- Custom Conversions
- Standard Events
- Custom Events
#4.1. Custom Conversions
Each time a Facebook Pixel Pageview tag is fired, a pageview (together with the Page URL) is sent to Facebook. You can create a Custom Conversion based on the URL that a visitor landed on.
You can create custom conversions based on events, too (with even more specific conditions), but I’ll talk about that later.
Let’s go back to the pageview. For example, after a visitor makes a purchase, they may be redirected to a “Thank you” page whose URL contains /thank-you-for-purchasing.
You could instruct Facebook Pixel that visiting this page is very important to your business and should be considered a goal.
This option does not depend on Google Tag Manager almost in any way (except that we use it to send the pageviews). The entire setup is done in the FB Business Manager’s interface.
In FB Business Manager, go to Events Manager and then choose Custom Conversions.

And, then, enter the conditions that you consider an essential interaction to your business. In the case of our example, we are interested in all Pageviews where the URL contains /thank-you-for-purchasing.
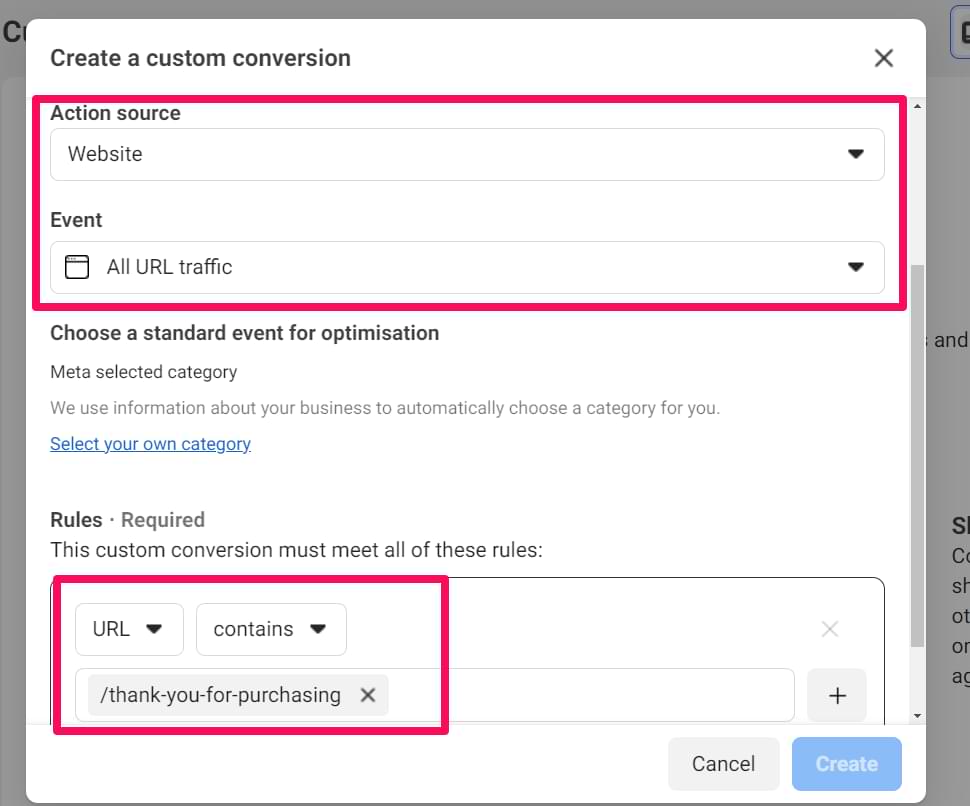
Save the conversion, and you will start seeing it in your interface. I’ll show that a bit later.
URL-based vs. Event-based Custom Conversions
You can create Custom Conversions based on either URL traffic (as shown above) or on specific events.
- Use URL traffic when: The conversion is defined simply by a user visiting a specific page (e.g., a “thank you” page). This is the simplest method.
- Use events when: The conversion is based on an interaction that doesn’t have a unique URL. For example, if a user clicks a button that opens a popup, you would send a lead event via GTM and then create your Custom Conversion based on that lead event. This is a more robust and flexible method.
In modern tracking, it is almost always better to create Custom Conversions based on events rather than URLs.
#4.2 Standard vs Custom Facebook Pixel events
When it comes to event tracking with Facebook Pixel, there are two types of events:
- Standard
- Custom
According to the official Facebook documentation, standard events are the most common actions a visitor/user can do on a site. Facebook recognizes and supports those events across all ad products. These events can be used to build audiences and optimize conversions.
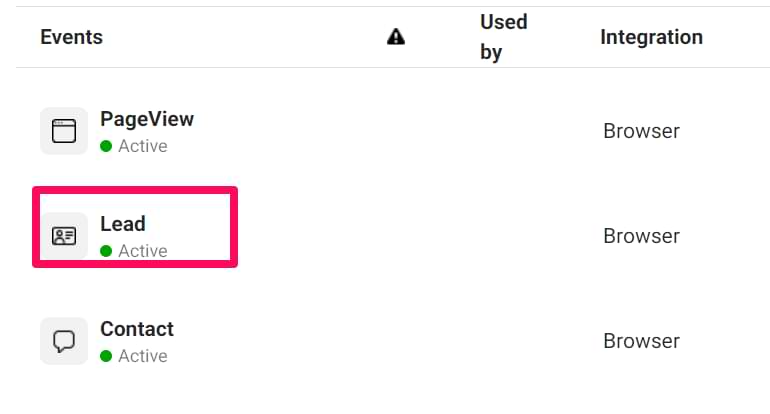
Here are the standard events that FB pixel supports:
- PageView
- AddPaymentInfo
- AddToCart
- AddToWishlist
- CompleteRegistration
- Contact
- CustomizeProduct
- Donate
- FindLocation
- InitiateCheckout
- Lead
- Purchase
- Schedule
- Search
- StartTrial
- SubmitApplication
- Subscribe
- ViewContent
P.S. The list might be updated in the future (because that has already happened several times in the past).
The titles are pretty much self-explanatory. So if you want to track an interaction mentioned in that list, using the Standard Event is the way to go.
Custom events are the interactions that do not fall under the category of standard events. For example:
- Scroll
- Time on page (e.g., when you fire an event after a visitor spends 5 minutes on a page)
- Viewed a certain element
- Outbound link click
- Video play, etc.
#4.3 A Tag + a trigger for a Standard Event
Suppose you want to track when someone enters their email on your landing page. Looking at the list of possible standard events, this one should be considered as a Lead.
So, let’s create a tag to send the “Lead” event to Facebook.
In Google Tag Manager, go to Tags > New > Facebook Pixel and enter the following settings:
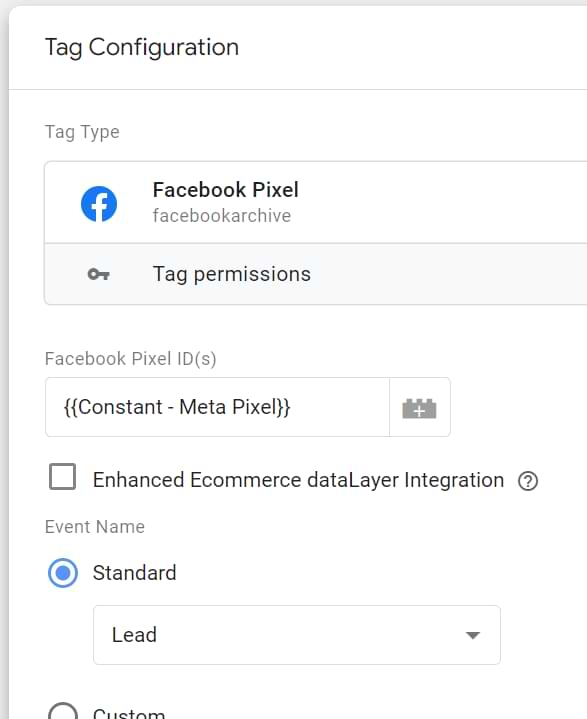
As you can see, we chose Lead in the Event Name field. For now, keep all the other fields empty. You must also define a trigger (a condition when this tag must fire).
This depends on the kind of interaction you want to track. Triggers are a totally different story that requires you to learn a lot.
If we are interested in tracking leads, we will deal with forms. So, while I will not dive deeper into how to do that, here’s a very extensive guide on how to track forms with Google Tag Manager.
If you are struggling with tracking interactions independently, ask a developer for help. They will have to push data to the Data Layer, and you will need to use the Custom Event trigger to catch that data.
As for the lead, imagine that a visitor (after entering email) is redirected to a “Thank you” page www.example.com/thank-you. This can be used as a trigger condition, where the tag will fire if the Page URL contains /thank-you.

But remember that form tracking is SO MUCH full of nuances, and your trigger might look very much different.
#4.4 Test the Standard Facebook Pixel Event
After you have created a tag and a trigger, save everything. Then refresh the Google Tag Manager preview and debug mode and head to the page where you want to track that event with Facebook Pixel. Complete that interaction. In my example, that interaction is entering an email on a landing page and then being redirected to a “Thank you” page.
Since my trigger is based on a Page View, I click that in my preview and debug console…
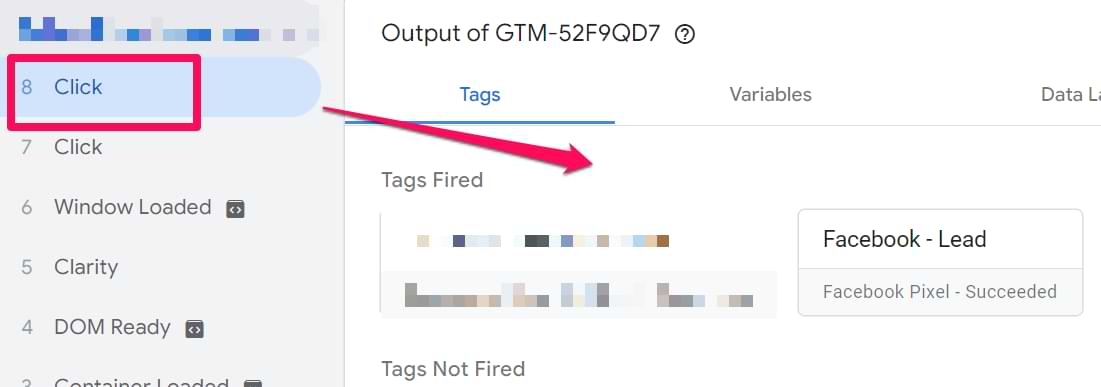
… then, check whether my Facebook Pixel tag (related to a lead) has been fired. If yes, that’s a good start! Read this guide if you are struggling with debugging Google Tag Manager setups.
The next step (just like it was with the FB Pageview tag) is to check the Facebook Pixel Helper. After the Lead tag has fired, click the Pixel Helper’s icon and check whether you see a green icon next to a Lead event.
![]()
![]()
The final step is to test the reports in Facebook Business Manager. Go to Events Manager > Data Sources > Choose your Pixel and click Test Events. Check whether you see the Lead event there.
#4.5 A Tag + a trigger for a Custom Event
In this example, let’s say we want to track whenever someone presses the Play button in an embedded Youtube video player on our landing page. First, let’s create a tag. To do this, go to Tags > New > Facebook Pixel and enter the following settings.
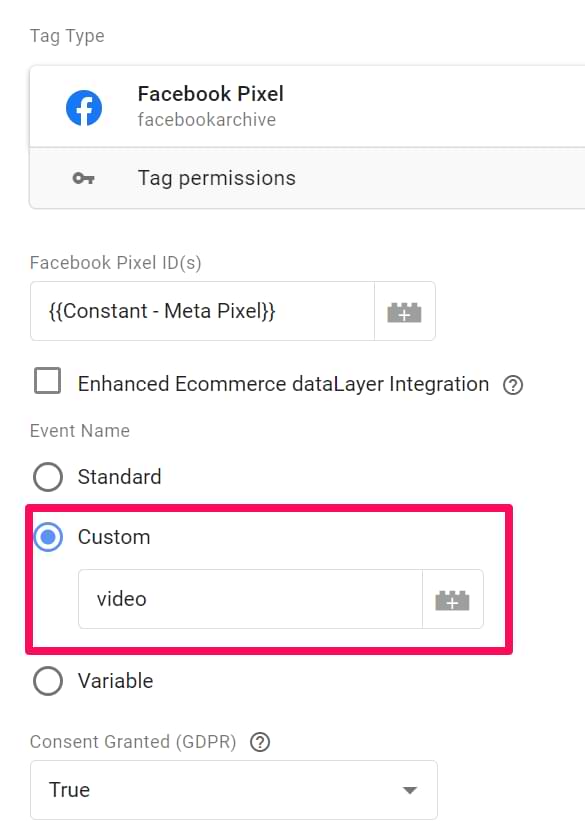
We want this tag to fire only when someone clicks the Play button; therefore, we must create a Youtube video trigger. Click the Triggering section in your Facebook Pixel tag, then click the Plus icon in the top right corner. Then click Trigger Configuration > Youtube video and enter the following settings (you can add more if you want, like Progress)):
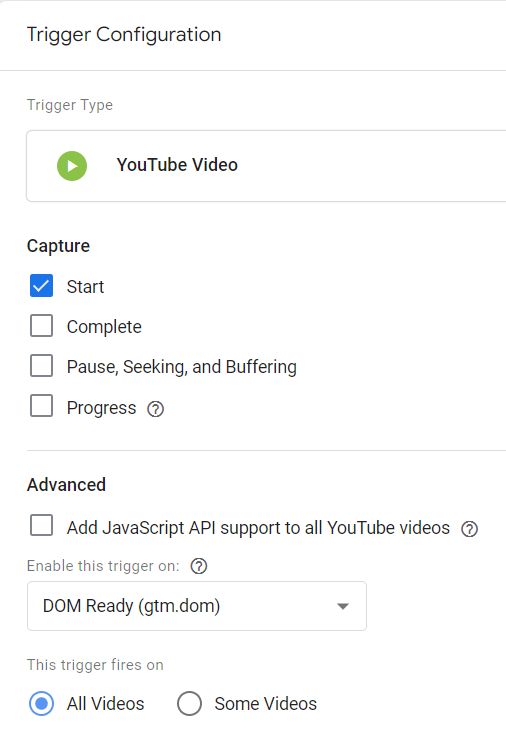
Save the trigger, and it will be automatically added to your Facebook Pixel tag.
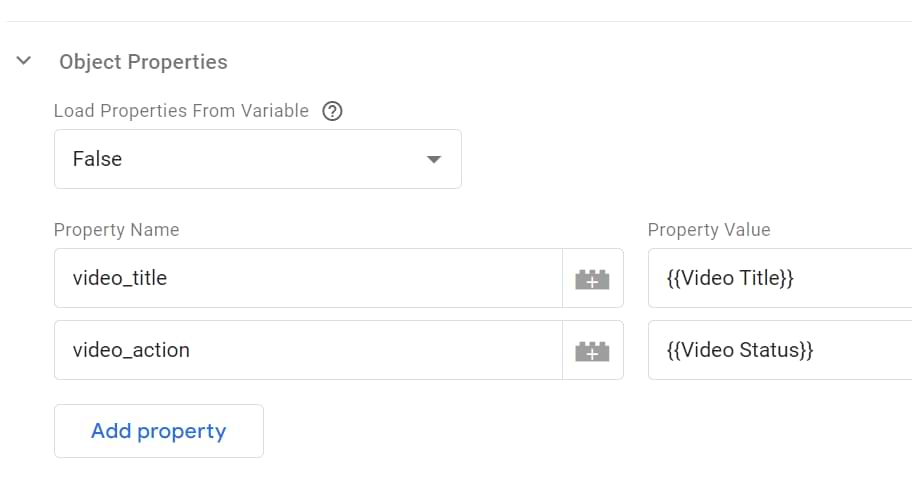
By the way, if you want to add some additional data to the custom event, you can do that by going to Object Properties and adding any custom parameters you need, for example (the variables I’ve used are both built-in in Google Tag Manager. You just need to enable them in Variables > Built-in Variables > Configure.):
#4.6 Test the Custom Event
The testing principle is the same as it was described in #3.2. chapter of this blog post (related to testing the Standard Events). Your goal here is to make sure that:
- The Facebook Pixel tag fires
- Facebook Pixel helper shows the green icon next to that event
- Test Events section in Facebook Events Manager shows the event that you’ve just sent
#5. Where can I see/use conversions in Facebook’s Interface?
By now, we have learned three things:
- How to send standard events to Facebook
- How to send custom events to Facebook
- How to create custom conversions in Facebook Business Manager (so far, we have done this only based on page views)
Let’s see where we can use those conversions in the FB interface.
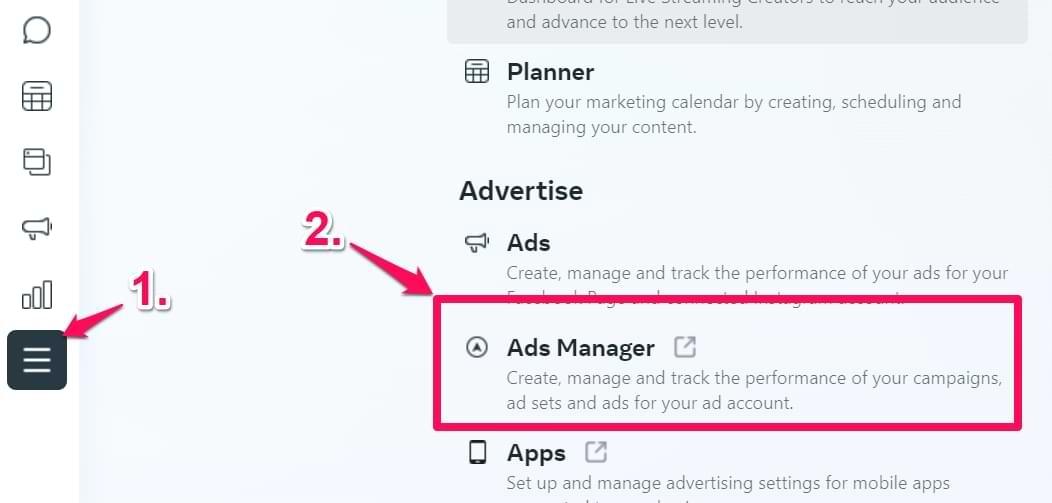
Go to Facebook Ads Manager:
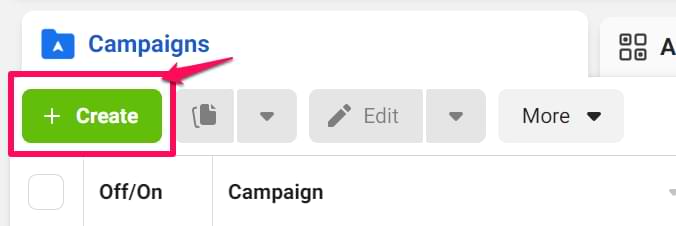
Once you click “Create” in the Campaigns section…
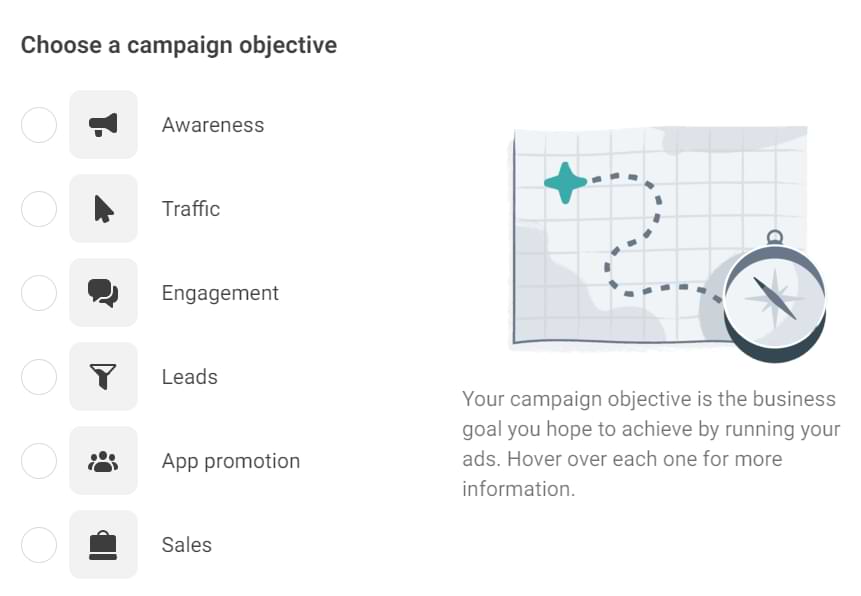
…, and choose your campaign’s main objective (and continue)
You will be asked to define the conversion you want to optimize against.
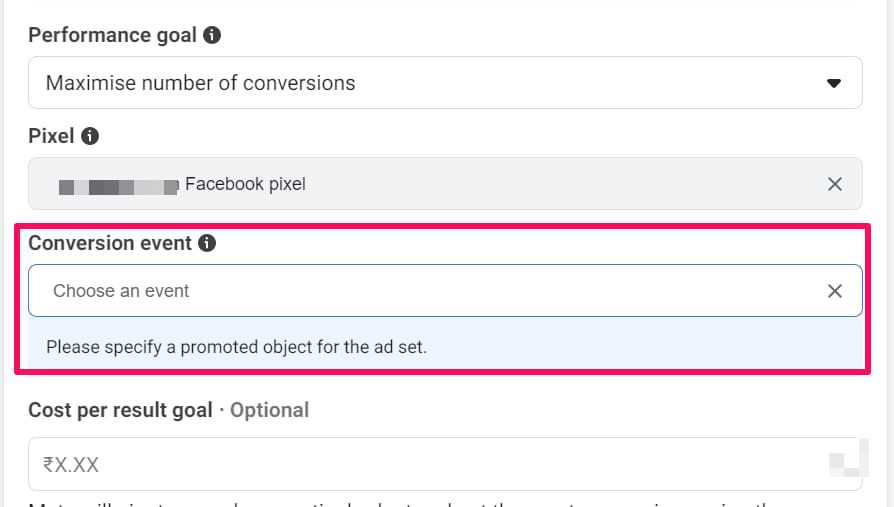
It might be already prefilled (e.g., with a Purchase), but you can click X and choose any conversion you want. All the events (Standard and Custom) that you sent to Facebook Pixel will be visible there (except the pageview):

If you have created any Custom Conversions, they will also be visible here.
Suppose you are interested in seeing a particular event (like Purchase) as a conversion but want it to be more specific (like Purchased a particular product). In that case, you can create a Custom Conversion based on that specific event. Here’s an example.
Go back to Events Manager > Custom Conversions > Create Custom Conversion and use similar settings (of course, enter something meaningful to your business).
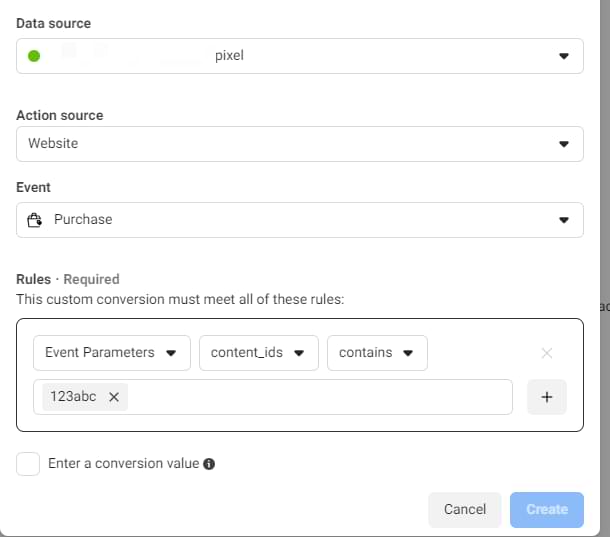
Once you save this conversion and go back to create a new ad campaign, this conversion will be available in the Ad Set to choose from.
Where do those Event Parameters come from? Continue reading.
#6. Send additional parameters to Facebook Pixel with Google Tag Manager
With Facebook Pixel, you can send additional values along with the events (e.g., order total, video title, etc.). In fact, in the previous example of the custom video event, we have already done that.
You can find a complete list of supported standard parameters here. The majority of them are optional. If you are working with a custom event, feel free to develop any custom parameter you want.
Speaking of Standard Events, only the Purchase event requires currency and value.

Also, by looking at the documentation, you can see which fields Facebook expects. For example, if you send the AddToCart event and want to send custom data (like product price, etc.), the Facebook pixel will expect content_ids, content_name, content_type, contents, currency, value. None of these are required when it comes to AddToCart.
So, when you plan to pass some parameters, refer to this page and check the table of standard events + their parameters.
Let’s, for example, track a Purchase and see how a Google Tag Manager tag should be configured.
#6.1. Example – Purchase Tracking with Additional Parameters
Imagine that visitors are redirected to a “Thank you” page after making a purchase. On that page, I’ve asked a developer to push the transaction data to the Data Layer.
Here’s that code snippet that a developer activated (that contains the transaction info).
<script>
window.dataLayer = window.dataLayer || [];
window.dataLayer.push({
  event: "purchase",
  ecommerce: {
     transaction_id: "T_12345",
     affiliation: "Google Merchandise Store",
     value: 25.42,
     tax: 4.90,
     shipping: 5.99,
     currency: "USD",
     coupon: "SUMMER_SALE",
     items: [
       {
        item_id: "SKU_12345",
        item_name: "Stan and Friends Tee",
        item_category: "Apparel",
        price: 9.99,
        quantity: 1
       }
       {
        item_id: "SKU_12346",
        item_name: "Google Grey Women's Tee",
        item_category: "Apparel",
        price: 20.99,
        quantity: 1
       }]
     }
});
Keep in mind that this code contains dummy values. So, a developer should write some functions and custom logic in their code that replace dummy values with actual purchase data.
Looking at the official FB Pixel documentation, two fields are required:
- Revenue
- Currency
Looking at my Data Layer code, there are two keys we’re interested in – currency and value. We could reuse them and send their values to Facebook Pixel. Creating two Data Layer Variables with the following settings:

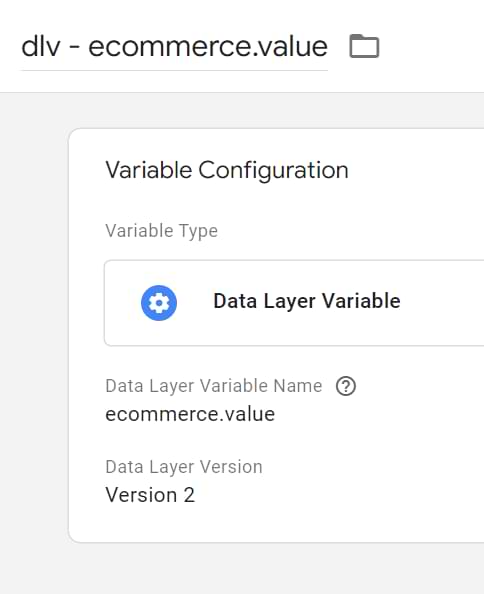
Then, create a Facebook Pixel Tag with the following configuration:
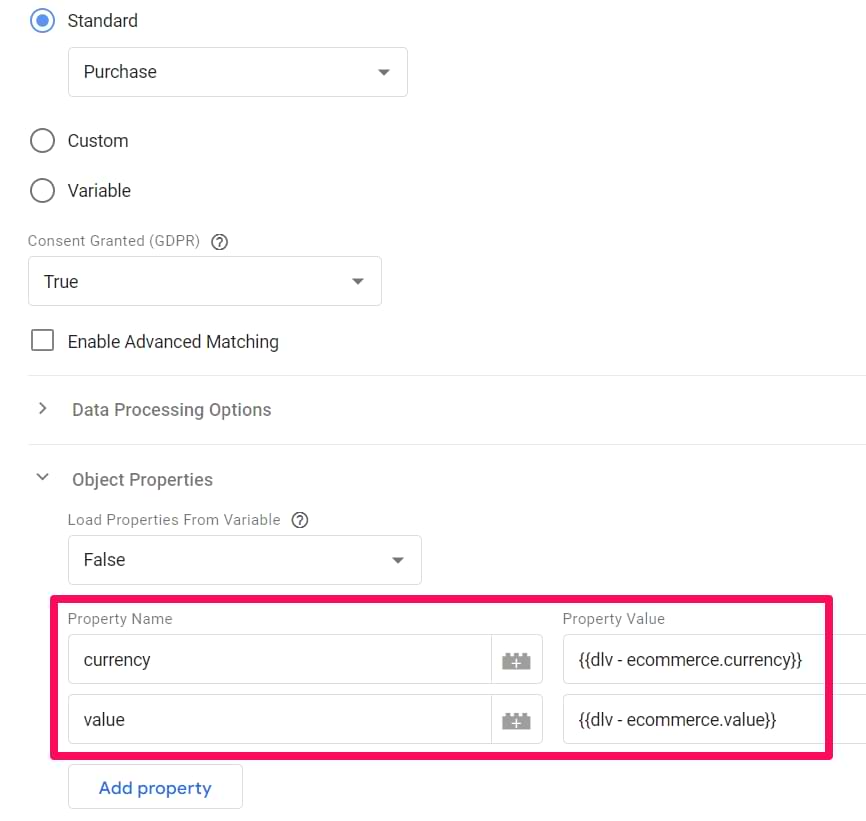
As you can see, I’ve inserted both variables in the Object Properties section. On the left side, you can see the name of the parameter that Facebook is expecting (currency and value), and we set our Data Layer Variables as values of those two parameters.
In order words, we will send “EUR” as a currency (because “EUR” is the value of the currency in the Data Layer) and 38.26 because that’s the value of the value in the Data Layer).
Next, click the Triggering section in your Facebook Pixel tag and then click the Plus icon in the top right corner (we will create a new trigger). Then click Trigger Configuration > Custom. We want that dataLayer.push (that contains the transaction data) to use as a trigger.
In the Custom Event Trigger, enter purchase event name (because that is the value of the ‘event’ key in that dataLayer.push).

Save the trigger and then save the tag.
#6.2. Test the event with additional parameters
Now, it’s time to test the setup. Refresh your Preview and Debug mode, go to your website, refresh it and complete a purchase. By now, you should already know the drill:
- Check whether the Facebook Pixel tag has fired upon the purchase (in my case, I should click the purchase event in the debug console and then check whether the tag has indeed fired).
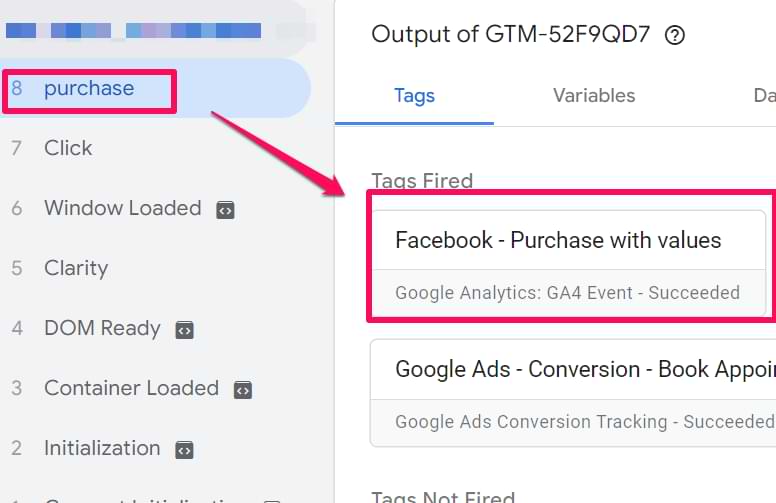
- Check whether the Purchase event has a green icon next to it. Also, expand the event to see if all the parameters were sent as intended.

- Check whether the event with custom parameters is displayed in the Test Events section of your FB Events Manager interface. Check Chapter #3.2. to learn more.
Troubleshooting common pixel issues
- Why does the Facebook Pixel Helper show a yellow warning icon? A yellow icon is a minor warning and usually not a cause for panic. It often means the pixel took too long to load or that some optional data wasn’t sent. As long as your events are marked with a green checkmark and appear in the Test Events tool, your core tracking is likely working correctly.
- Why don’t I see my events in the Test Events tool? There can be a delay of several minutes for events to appear. Also, make sure you have clicked the “Open Website” button from the Test Events tab itself to initiate the test session. If you’re still having issues, privacy-focused browser extensions or ad blockers are a common culprit. Try testing in an incognito window with extensions disabled.
- My Purchase event fired in GTM, but Pixel Helper shows an error. For the purchase event, the value and currency parameters are required. If these are missing or have an invalid format (e.g., the value includes a currency symbol like ‘$’), the event will fail. Check your GTM variables to make sure they are correctly capturing this data from your data layer.
Facebook Conversion Tracking: Final Words
And that’s the end of this blog post! Facebook Conversion Tracking offers you much flexibility when measuring your ad campaigns’ success. You can track standard (Facebook-supported) events. If those are not enough, go with Custom Events.
And to add even more flexibility, consider using Custom conversions (where you can create pageview-based conversions or more specific event-based conversions).
Ensure you properly test your setup with the Google Tag Manager debug mode, Facebook Pixel helper, and Test Events section of the FB Events Manager.
35 COMMENTS
Thank you, I spent hours looking for this solution before finding it here. A bookmark page for sure.
Hello! Thanks for the article. I am just wondering, what kind of difference is in this case between these 9 types of standard events? I mean, basically you could use AddToCart event for your leads (triggering the AddToCart events to fire upon pressing the button "Become a lead" on your website), etc., couldn't you? Technically, for Facebook there is no difference in how you name the event, it just uses the same naming to appear in reports but what are you tracking with it is up to you, am I right?
Hello Tania, yes, you are right. You can assign any interaction to "Lead" event. It's up to you, although doing this would make your data more hard to read/understand, especially for another person. So keep that in mind.
Great article! Just one question. When the tag and trigger are ready in GTM and the Facebook ads are running. Where can I best analyze them? In Google Analytics? But how do I get the Facebook Ads tracking results in Google Analytics through my GTM?
Hi. If you want to see how many people are coming from your Facebook ads to a website, you can check Google Analytics Acquisition reports. If you want to see how many times Pixel has fired and on which pages, then you should go to business.facebook.com.
Hi Julius,
We're looking to get Standard Events set up on our clients websites. Would you suggest installing these through Google Tag manager or just placing code on the back end of the site. Does this provide the same result? Essentially I'm looking to easily be able to see how many "registration conversions" are coming from each of my individual ads.
I would definitely use GTM, otherwise, this guide would not exist. You'll have more control and won't be tied to developers that much.
Hi Julius,
Great article on implementation.
Could you tell where to see "content_name" in Facebook data when the pixel fires? For example, I have 4 different "content_name" under Lead: Email, Quote, Directions, Phone. I can see that I have had 4 events under Website Leads, but I do not know what content_name it is.
Hey, sorry for late reply. You should use Facebook Analytics for that https://www.facebook.com/analytics/. Login with the same account that has access to that trackign pixel, then go to Activity > Events > Choose "Lead" event. In the top right corner (of the chart) you'll see a dropdown "Show by", click it and find "Content". This way you'll be able to see statistics of "Lead" event split by content parameter.
Hey, works the same way as with the Google Ads tag. Just in the Custom HTML tag's code enter the ordeTotal variable surrounded by double curly braces, for example {{variable}}.
https://www.analyticsmania.com/post/insert-variables-in-google-tag-manager/
Sorry. Haven't tried that, thus I don't know.
Hello Julius,
I already have a lot of events set up for my website through Google Tag Manager, is there a way to synchronize these events with facebook events, or to be exact use these events for facebook remarketing. Or do i need to re create these events specially for facebook ads manager, and therefore have double of the same events just one set for facebook, and one for google analytics?
Thank you in advance!
As far as I know, you need to recreate all those events specifically for Facebook ads.
Ah well, not the worst that could have happened. Thank you very much for the swift reply!
Hello Julius,
Thank you for this post. I was wondering, i followed every step of your instruction to set up the Facebook tag with Google Tag Manager. They only problem is that the Facebook pixel says that the tag is fired 2 times. I also see 2 pageviews when I check in Facebook Pixel Reports. In Google Tag Manager Preview and Debug mode i see that the tag is fired 1 time... Do you know what the problem can be?
Another FB pixel fired directly from the website's code (no Google Tag Manager)?
There was another FB pixel (also via Google Tag Manager) but it had another pixel code so i didn't think that was the problem, till i paused that one and the other worked perfect.
Thanks
Hello Julius,
Just another question. I've followed your steps to set up the Facebook pixel (Purchase Tracking with Additional Parameters). It works perfectly but my problem is that we have multiple domains under one advertising account. Can i also set this up for the other domains and if so, how can i distinguish the Transaction pixels in our account?
I am wondering how the iOS update with stricter privacy restrictions is going to affect the strategy outlined in your article. For example, if I want to track Page Views can I still effectively do this via GTM? Someone mentioned GTM doesn't use Cookies so I thought this might still work. Would we need to use the Conversions API along with GTM to track Page Views? Thanks in advance for your reply!!!
Hi Julius,
I have set a tag where when the buttons call on the site are fired there is an event.
Now.. the conversioni in Facebook ads is visible only when utm_source=facebook ??
The conversion in FB ads is visible only then, when there was at least one prior ad click in the FB network recently
Hi Julius,
Thanks for the good insights. I just cannot find the FB tag template from Simo Ahava anymore. Many templates from that person, but no FB one.
Any alternative suggestions?
Simo's template now belongs to Facebookincubator (or something like that). There is still only one FB Pixel template. Use the one that is in the gallery.
Great, thanks!
Hi Julius,
I actually wonder the same thing than Brian Schweitzer up there, would this work even with the iOS update ?
Hi, I followed your guide on how to install a FB pixel (great and easy to understand!) using the method with the GTM container etc. I completed each step carefully (didn't do or change anything else) and double-checked everything, but when using GTM's preview mode it says under "Container Loaded" that "Facebook Pixel - failed", but it still fired. What could possibly have gone wrong?
You might have some browser extension that blocks fb pixel
Oh my god that was it! I tried it in Edge instead of Chrome and it fired successfully. Thanks so much for your quick reply Julius!! And thanks again for the awesome guide.
Have a great weekend :)
Hi Julius,
I can't really find an answer on how to separate conversions by medium(google/Facebook). I use GTM to trigger conversions on url path level.
How does one properly decide when it is a facebook conversion or a google ads conversion? I thought about using utm parameters to seperate.
Hi Julius, Awesome information. What are your thoughts on the following and how you would have proceed? Facebook Total Purchase event and also Facebook Category Purchase Event? I would like to track total purchase and also would like to create custom purchase conversion calculating based on product category. For an eg.; I've have A and B product category. Already have implemented custom variable which calculates the correct product category purchase value.
What are your recommendation? Should we be creating one making purchase trigger and other again purchase trigger using following code?
{
fbq('track', 'Purchase', {
content_name: 'Product A',
value: '{{Product_Value_A_product}}',
currency: 'CAD'
});
}
Similarly for 2 code?
2) If I implement the above, I thing it will be double counting my purchase value. That is main purchase trigger + Category product trigger?
What are your thoughts? Looking forward to hearing from you.
Again, thank you for your insights.
Hi Julius,
Really great article! Do you have any idea if the url-based custom conversions can be changed/edited to fire with GTM triggers? As far as I see in BM, Fb doesn't allow you to edit the rules of the existing custom conversions, plus, I don't know if it's even possible to set custom conversions with GTM but still wanted to double-check :)
Thanks very much in advance!
Meggy
Hi Julius,
Thanks a lot for the detailed guide. I was planning on adding everything with custom HTML tags. However, this is much more convenient and way faster.
Still, I am wondering why with custom HTML people use tag sequencing making sure the FB base pixel tag is fired before the conversion tag. I don't see you mentioning this in your guide. Why not? Should we still add this or is this taken care of by using the template?
Looking forward to your answer!
Kind regards,
Sebas
I don't mention it in this guide because that is already handled by the FB custom template I use. No need to add anything else with tag sequencing.
I find that Facebook conversions are difficult to measure. How can I most accurately measure conversions?
Hello there Julius,
Thank you so much for all the effort creating and publishing these extremely detailed and thoroughly explained step by step tutorials.
I am trying to install the Facebook pixel using Tag manager by creating a new tag to fire on all pages. I have tried all methods available including template use and custom html code without any success on sending data to Facebook.
The issue i am facing is that the only way to get the meta pixel helper to identify the Facebook pixel is when i create a custom html tag containing the pixel script.
But even then, the pageview event is not sent to meta, thus i get a yellow notification from meta pixel helper, any thoughts on what is at fault here?
"Meta Pixel
Troubleshoot Pixel
Set Up Events
New!
Pixel ID: 579505873087415 click to copy
PageView
WARNINGS
Pixel Helper found your Meta Pixel, but the pixel has not been activated for this event and no information has been sent to Meta. This may be due to an error in the code or if the pixel fires on a dynamic event, such as a button click. Follow the steps below to troubleshoot this issue:
Try sending the desired event using the test events tool.
If the test events tool does not detect the event, there may be an issue with the Pixel Helper implementation. Please review Meta Pixel implementation with your developer.Learn more
EVENT INFO
Setup Method: Manual
Pixel Code: Hide
<noscript><img height="1" width="1" style="display:none" src="https://www.facebook.com/tr?id=************&ev=PageView&noscript=1"></noscript>"