
March 5, 2024
Twitter Conversion Tracking with Google Tag Manager
Updated: March 5th, 2024
If you’re already using Twitter (X) as a marketing tool, you want to measure the results, right? You have multiple options here – remarketing, X conversion tracking, etc. However, everything takes time to implement – you send an email with the requirements to the developer on what should be tracked, and it takes him weeks to complete the task. But not anymore! With the help of Google Tag Manager, you can speed up the process.
Note: I will be using Twitter and X interchangeably in this article.
Before you continue
This blog post assumes you have a working knowledge of Google Tag Manager tags. If you’re a beginner, I recommend starting here. Want to be up and running much faster? Take a look at my GTM masterclass for beginners. The minimum requirements are:
- You have a Google Tag Manager tracking code installed on your website.
- You know what tags, triggers, variables, and dataLayer are and how they work in Google Tag Manager.
So What’s the Plan?
If you’re familiar with the Google Ads tracking setup process via Google Tag Manager, it is essentially the same for X (formerly Twitter). All you need to do is to:
- Get your X Pixel from the X Ads Manager. You can find this by navigating to ads.twitter.com and navigating to Tools > Events Manager.
- Create a Twitter Base Pixel template in the Google Tag Manager container. (It was previously called the Twitter Universal Pixel Tag, but the company depreciates the tag template).
- Create a tag and paste your Pixel ID in the required field.
- Identify the events you want to track on your website and create those interactions inside the X Ads platform. You can choose from the predefined set of events or create a Custom event.
- Make the tag (or tags) fire after specific interactions you want to track as conversions.
I have described the first three steps in this blog post, so before you continue, make sure you have also read Twitter Tracking Pixel + Google Tag Manager.
Twitter conversion tracking is closely related to remarketing. You’ll use the same Twitter Tag Template in Google Tag Manager (available in the Community Template Gallery), but events will differ. In the blog post about Twitter Pixel, I have created a Twitter Pageview tag; in this blog post, we’ll track more precise interactions, like signups or purchases.

Different types of events:
For every interaction you want to track with Twitter, you’ll need to create a separate GTM Twitter event tag. It will use the same Tracking ID pixel from your Twitter Base tag but different tag events:
For each event, you’ll need to create the Event ID inside the ads platform first. From there, the unique event ID must enter the required field in the Twitter Event Tag.
Also, triggers in Google Tag Manager will be different for each event. Want to learn various event-tracking techniques? Take a look at my Google Tag Manager courses.
Purchase tracking with Twitter Pixel and Google Tag Manager
In this blog post, I will focus on purchase tracking (because I believe it is the most important conversion for most businesses). However, the same implementation principle applies to other events.
The most robust option to track purchases is to ask a developer to push the purchase data to the Data Layer. Once the developer implements this, enable the GTM preview mode and make a test purchase. You should see a purchase on the left side of the preview mode. Click it and then expand the API call. An example of that data could look something like this:
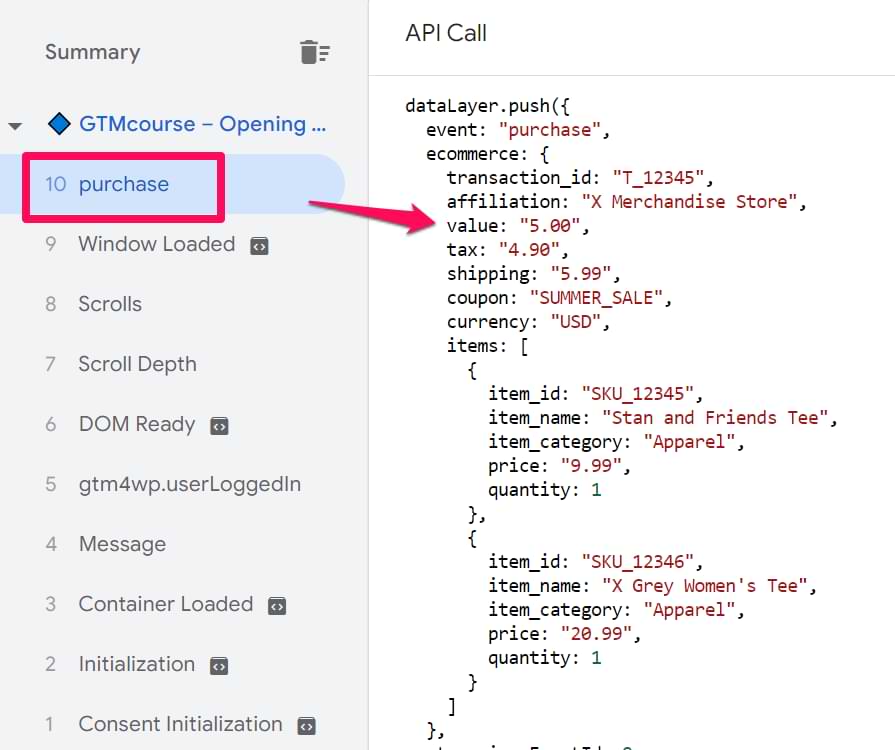
By the way, if you want to learn more about data layer and purchase tracking, take a look at this course.
Even though there are many data points (related to the purchase) in the data layer, it is completely fine to send at least the revenue and the currency. Since we want to use those two data points and send their values to Twitter Pixel, we must create two separate Data Layer Variables.
In GTM, go to Variables > New > Data Layer Variable. Create the first variable, which is ecommerce.currency. Read this to learn more about why I entered the name like this.
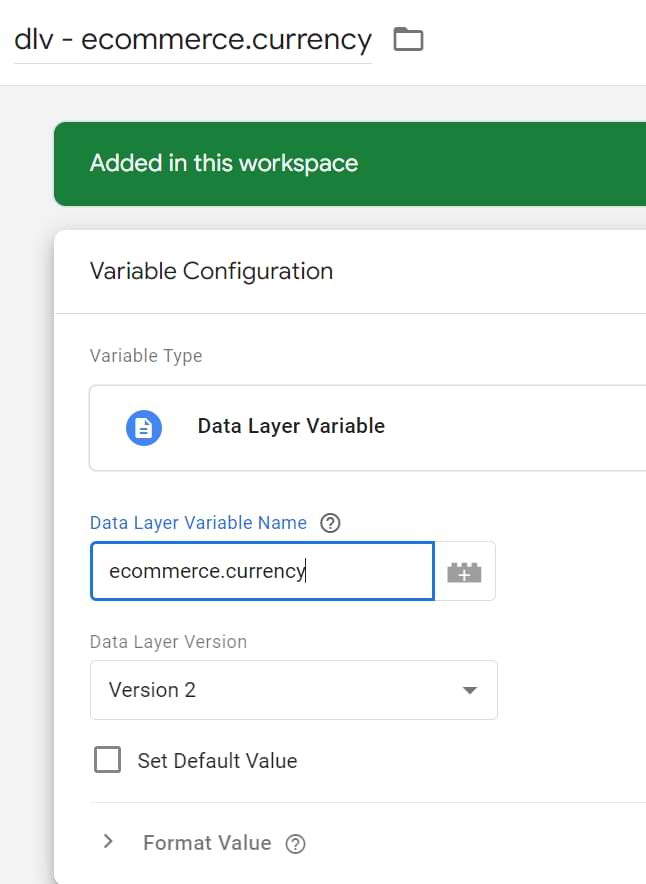
Then do the same thing for ecommerce.value.
Then, in GTM, go to Tags > New > Community Template Gallery >Twitter Event Tag and enter the following settings:
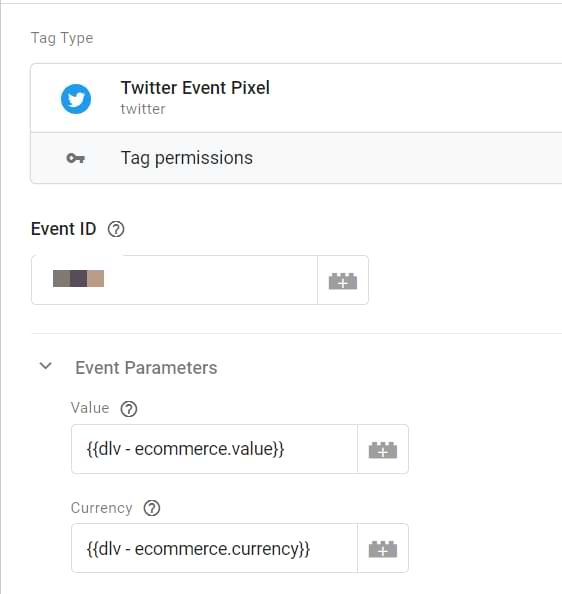
I inserted the Twitter Pixel ID constant variable (created in the 1st chapter of this blog post). Also, I have selected the Purchase event. But we are not done yet. We could also send order value and currency together with the Purchase event.
Below the list of possible events, click Add (in the Event Parameters section).
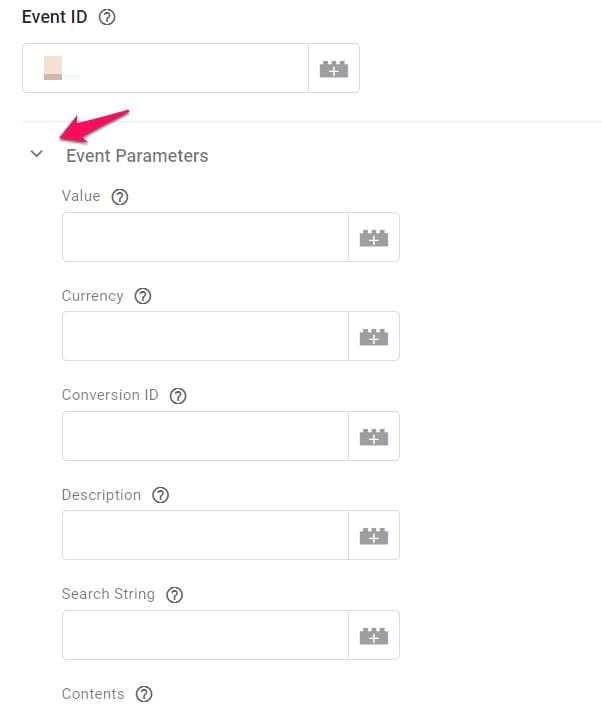
Then, you will have to add two parameters (one by one). It is easier to add them now since the boxes for value and currency are already pre-defined. Insert the Data Layer variable (that returns currency) that you have recently created. Then do the same thing for value. Select the value in the first dropdown field and insert the Data Layer variable that returns the order total in the second field. Eventually, the tag configuration will look like this:
In the Twitter Pixel purchase tag, click anywhere on the Triggering section and click the Plus icon in the top-right corner.

Select the trigger type: Custom Event. If the value of the “event” parameter in the dataLayer.push was “purchase”, enter “purchase” in the trigger’s settings.

Again, I want to emphasize this. I entered “purchase” (all lowercase) because the “event” in the dataLayer.push was “purchase”. Save the trigger, and it will be automatically added to the Twitter Event tag.
Test the setup
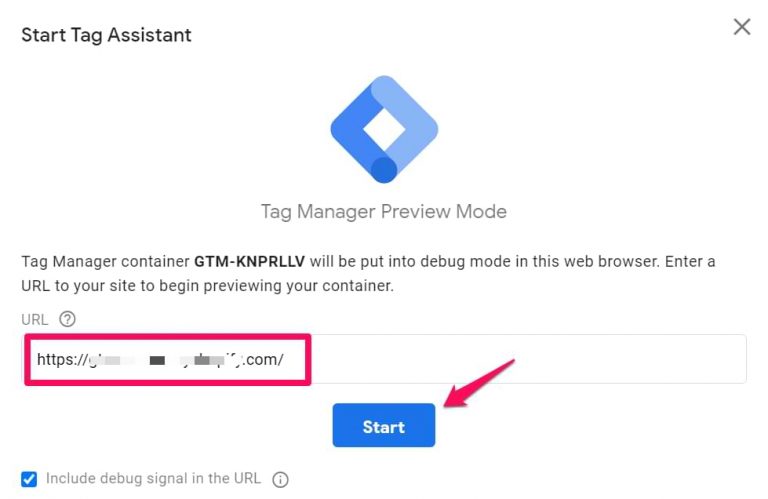
Now, the time has come to test everything. In the top right corner of the GTM interface, click Preview.

A popup there will ask you to enter the URL which you want to test and debug. It might be the address of a homepage or it might be a specific page’s URL and then press Start.
A new browser tab (or window) should appear where you will see the URL that you entered in the previous popup. At the bottom of that page/tab, you must see the following badge:

If you go back to the tagassistant.google.com tab, you must see this success message. Click Continue.
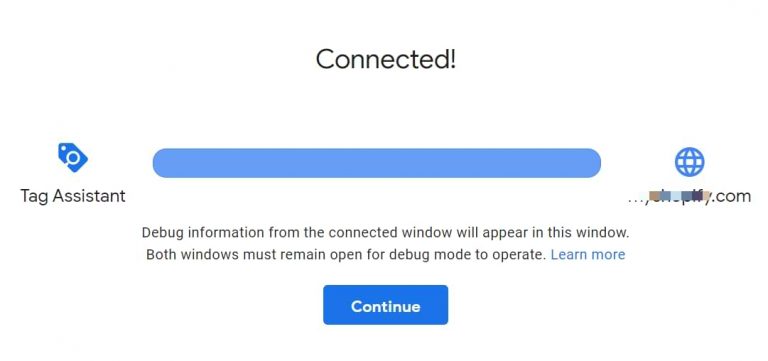
If you don’t see the success message or if the preview badge shows that the debugger is not connected, read this.
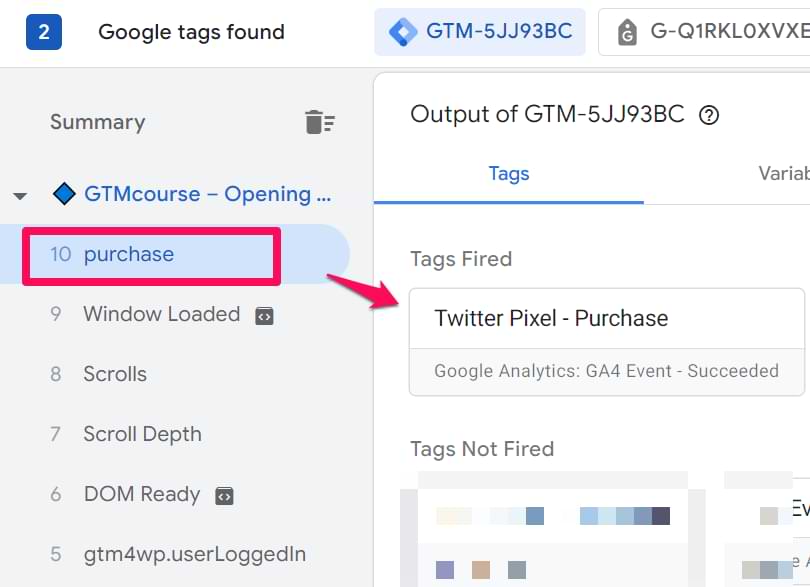
Make a test purchase on your website. A purchase event should appear on the left side of Preview mode. Click it, and you should see that your Twitter Purchase tag has fired.
Additionally, use the Twitter Pixel Helper Chrome extension. Refresh the page of your website where the preview mode is enabled, and Twitter Pixel is activated. Click the Twitter Pixel Helper icon in your Chrome browser. You should see something like this:
![]()
![]()
Click the “Twitter website tag fired successfully” and then click Advanced Debug Info and you will see more details about the request that was sent to Twitter Pixel.

Great! Now, it’s time to publish your changes in GTM. Click SUBMIT in the top right corner, select PUBLISH and CREATE VERSION, and then complete the flow that you will see there.
Things To Keep In Mind
- It may take up to 24 hours for data to appear in the Twitter Ads account (but usually, it’s processed much faster).
- Before you enter tagging “rampage mode”, prepare a measurement plan – a list of what you need to track. It will bring more transparency, help you plan ahead, and avoid inconsistency problems.
- Test, test, test before publishing – the devil is in the detail. One tiny mistake can lead to huge problems.
I will not go into details on how to set up the actual ad campaign on Twitter. You can watch this video instead.
Where can you find the sales/conversion data in the Twitter Ads interface?
You can find them by going to Campaigns > Ads Manager. Then in the list of all campaigns, switch metrics to Website Conversions. This is the place where you will find purchase data.

If you want to see other conversions, then switch back to Summary.

And click Customize metrics.
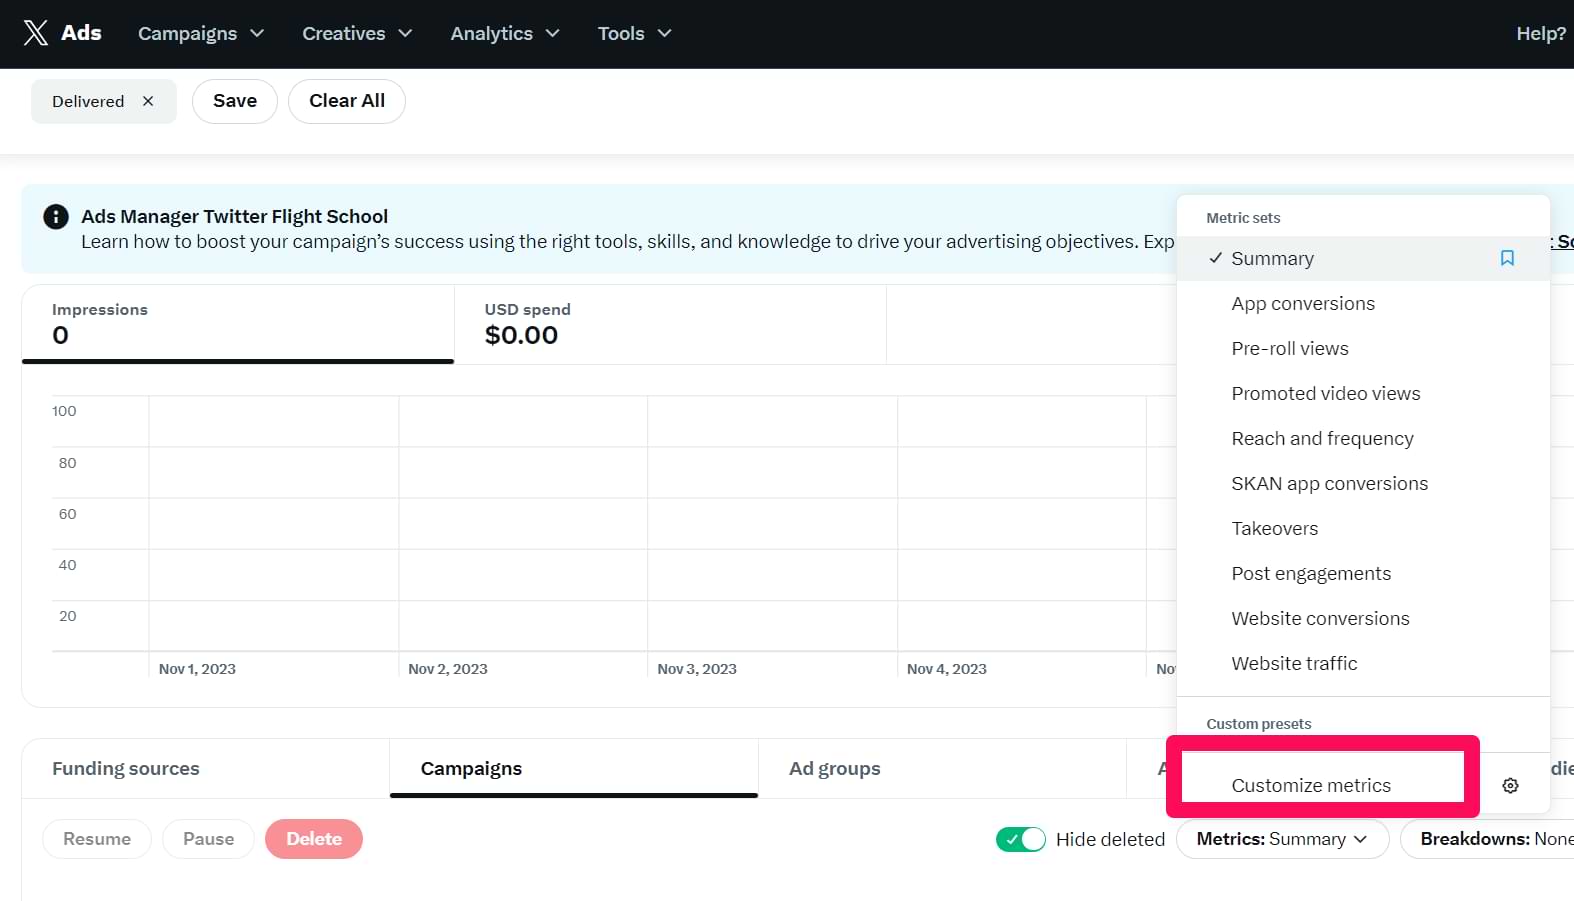
Then, keep looking for Key Conversions. They are the ones that you select as your main conversions in ad campaigns.
Twitter Conversion Tracking: Final Words
Twitter conversion tracking is similar to Google Ads conversion tracking in Google Tag Manager. First, you need to decide which website interactions are important to you. Then, set those events within GTM as triggers (e.g., “Visited Thank You Page”) and link them to Twitter Base Tag.
Remember: for every important interaction, you must create a distinct Twitter tag in Google Tag Manager.
Twitter conversion tracking lets you measure your ad campaigns and see which ones drive more signups or sales.
Also, remember that the data will not appear in real-time. Be patient.
15 COMMENTS
Thanks for this tutorial! How do you pick up on those events in the Twitter campaign reporting? Will they show up automatically as conversion events?
Thanks!
Hey,
yes, they should appear in your Twitter ads reports (unless Twitter has changed something in the last few months (that's how long I haven't worked with Twitter ads)).
Cheers
Hi Julius,
thanks for the quick reply. It's a very detailed question so you probably are not able to answer it ;)
The workflow you suggest is:
1. Create ONE Universal tag in Twitter
2. Create all tags in GTM, say for example PageView and Signup
The question is: Do you need to create a seperate conversion event in Twitter Ads manager for EACH event (PageView and Signup) or is one universal tracking conversion event enough, that captures all different events?
Cheers
Hey, for every different event you should create a separate Twitter Universal Tag (just like you do with Universal Analytics tag).
Twitter Ads manager has conversion event creation , will i need to create separate event for each created Universal GTM Tag.
Hey Julius,
is it possible to use custom events in Twitter, like in FB as the (pseudo) example shows below:
fbq('trackCustom', 'url-part-to-track', {
conference_id: conf_id,
conference_title: conf_title
});
Or if not, what do you suggest to send custom data for conversion tracking?
I use GTM btw.
Thanks
More info: in the conversion tracking help, I read the following:
Conversion types explained:
...
"Custom: This is a catch-all category for a custom action that does not fall into one of the categories above"
But didn't find any examples searching on google, only for the standard methods like PageView, AddToCart etc..
Hey,
Honestly, I haven't tried tracking custom events with Twitter so I'm not sure whether it works at all.
I guess I'll need to do some tests in the future and maybe it will become another blog post :) In the meantime, I have no other suggestions how to track custom event with Twitter Pixel.
Cheers
I have Implemented MACT through API in both IOS and Android. I have Implemented API's like App Install, checkout and purchase.I'm getting alert in Twitter (Conversion tracking isn't set up for this app. Without it you won't be able to see ROI metrics or track custom events. Set up conversion tracking) conversion not yet Implemented. Is it possible to do Twitter Analytics using Api without using third party tools.
I don't know as this is not related to Google Tag Manager.
Does OG tags can be integrated in GTM?
Very Interesting And Informative Article.
I have bookmarked your blog.
Thanks for share such type of precious information.
Hey Julius, my question is probably more specifically related to the Twitter side of things so I understand if you're not sure.
I've followed this guide and everything seems to be tracking well, the purchase event is being triggered and appears in Twitter's Event Manager. However, when I'm looking at my Ads Manager it says there's been 0 purchases against my campaign. Do you know why this may be?
Maybe Twitter needs more time to process the data. Or maybe something is configured incorrectly.
I have a problem that the event parameters are shown in twitter pixel helper
But in ads.x dashboard the event shown with zero parameters
This problem only with purchase event