
August 9, 2025
The Ultimate Google Tag Manager Glossary (150+ terms)
To make your life a little easier, I’ve assembled a huge list of Google Tag Manager (GTM) terms to help you avoid confusion in the future. Whether you’re looking to understand the language of GTM or help train someone else, this Google Tag Manager glossary should be your best companion.
It should not only make you smarter, but it should also help you be more eloquent when speaking about GTM.
This is your Google Tag Manager dictionary, your go-to guide for all things GTM, and all the important elements you’ll find in your account.
By the way, you can also download the Google Tag Manager glossary (PDF) straight to your inbox. Just enter your email address below and I’ll send it to you.
1st party cookie
A variable that returns the value for the first-party browser cookie with the name you specify in the Cookie Name field. For example, if you have a cookie called “name”, you can use the 1st Party Cookie Variable to retrieve the value for this particular cookie. Learn more about how to set and read cookies with Google Tag Manager.
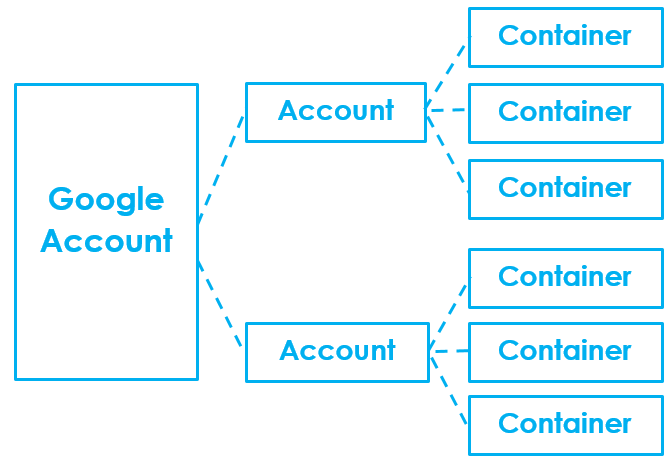
Account
First, let’s not confuse a Google Tag Manager account with a Google account. Google account lets you access all Google products: Gmail, Drive, Adwords, GTM, etc.
By concept, the Google Tag Manager account is similar to the Google Analytics account. Google Analytics accounts contain Properties (which contain Views), while Google Tag Manager accounts contain Containers.
It’s recommended to use one account per client/company and have separate containers for company’s/client’s Mobile Apps, Websites, etc.
Activity history
Account activity displays information about the actions that have been done in the account. It is useful to determine which user has performed a certain action and when it was done.
You can find account activity by opening any container of the account you’re interested in > Admin > Account Activity.
It does not contain the activity of containers that belong to the account. If you’re looking to container history, go to Container Activity.

Advanced tag settings
Additional tag settings, which let you control:
- Tag Firing Priority
- Tag Firing Schedule
- Tag Firing Options
- Tag Sequencing
- Ability to fire a tag only in published containers
AJAX
It stands for Asynchronous JavaScript and XML. AJAX is a set of techniques for creating highly interactive websites and web applications. It enables your browser to send and receive data without refreshing the window.
A lot of web forms are created using AJAX, and the standard GTM Form submission trigger cannot track them.
That’s where the AJAX listener (created by Bounteous) comes in handy. Learn more about how to track AJAX forms with Google Tag Manager.
AMP
It’s an abbreviation of Accelerated Mobile Page. Simply put, Accelerated Mobile Pages is a stripped-down version of the mobile web that runs on a reinvented version of the language used to create web pages: HTML.
This reimagined version of HTML, known as AMP HTML, removes most of the elements that cause web pages to load more slowly on mobile, like JavaScript and third-party scripts.
Google Tag Manager and Google Analytics are also heavily reliant on Javascript, thus it’s not possible to implement them in a standard way. When it comes to AMP and Google Tag Manager, you need to choose a different container type – AMP.
API
API stands for Application Programming Interface, but basically, describes one way to plug your website/web application into another. Google Tag Manager has an API as well. This means that other developers can integrate their websites/systems with GTM.
GTM API enables developers to control accounts, containers, folders, tags, triggers, etc. via other interfaces.
App ID
The value is set to the package name (Android) or bundle ID (iOS). A built-in variable of this type is provided in mobile app containers. It’s not available in containers for websites.
App Name
A variable that is available only in mobile app containers. The value is set to the name of the currently running application. A built-in variable of this type is provided in mobile app containers; you don’t need to define a new variable of this type.
App Version Code
A variable that is available only in mobile app containers. The value is set to the version of the currently running application.
Approval queue
Due to its title, this term is surrounded by confusion. Unfortunately, GTM currently does not have a proper approval workflow, and the approval queue is not for accepting/declining changes in the Google Tag Manager container.
Approval queue is a feature reserved for the DoubleClick Floodlight setup only and is used exclusively as part of the DCF implementation process.
You can learn more about approval queues here.
Asynchronous loading
Unlike synchronous scripts, asynchronous scripts can load simultaneously. They do not block page render and allow the browser to continue loading elements while the JavaScript is being downloaded in the background. This significantly speeds things up, especially when the JS file is loaded from a remote server.
Google Tag Manager, Google Analytics and the majority of other tracking scripts are loaded asynchronously.
Auto-event listener
A listener is a function that operates in the background. When creating the listener, you tell it what operations it should wait for, and once these operations take place, the listener activates and fires any code within.
In Google Tag Manager Web containers, default auto-event listeners listen to the following interactions, for example:
- Clicks.
- Link clicks.
- Form submissions.
- Javascript errors.
- Timer.
- History changes.
In order to enable these auto-event listeners in Google Tag Manager, you need to toggle the corresponding triggers (e.g., All Clicks trigger, etc.).
Auto-event variable
Auto-Event Variables are used to access the target element of an auto-event action (e.g., Click, Error, Form Submission). For example:
- When you submit a form, you can access form’s ID.
- When you click an image, you can access image’s alt attribute (like in the image below).

Learn more about the Auto-event variable in GTM and how/where to use it.
Browser limits
Although there are no limits of how many tags can be fired in Google Tag Manager, you should keep in mind browser limits.
For web containers, Tag Manager can only fire tags within the capabilities of the browser. Most browsers handle a maximum of 6 to 8 simultaneous HTTP requests for a single domain. If you have a high number of tags on the same domain firing under the same conditions, tags will only fire within this browser limitation.
Cleanup Tag
In a tag, under Advanced Settings, you’ll find a tag sequencing section that contains two options:
- Fire a tag before XXXX fires option, which is called a setup tag.
- Fire a tag after XXXX fires option, which is called a cleanup tag.
A cleanup tag fires immediately after the primary tag has fired. To specify a cleanup tag, check the “Fire a cleanup tag when tag XXXXX is finished” checkbox and select the tag you wish to use from the menu. Check the “Don’t fire Tag YYYYYY if Tag XXXXXX fails” checkbox if you wish to have the cleanup tag only fire when the main payload tag fires successfully.
Click classes
A built-in variable that fetches element’s CSS classes upon click. The same result can be achieved by using a user-defined variable with the following settings:
- Type – Auto-event variable.
- Variable type – Element classes.
Click Element
A built-in variable that returns an HTML element that was the target of a click. You can achieve the same result by using a user-defined variable with the following settings:
- Type – Auto-event variable.
- Variable type – Element.
Click ID
A built-in variable that returns id value of the clicked element. You can achieve the same result by using a user-defined variable with the following settings:
- Type – Auto-event variable.
- Variable type – Element ID.
Click Target
A built-in variable that returns a string contained in the target attribute value of the clicked element. The same result can be achieved by using a user-defined variable with the following settings:
- Type – Auto-event variable.
- Variable type – Element Target.

Click Text
A built-in variable that returns the visible text inside the clicked element. You can achieve the same result by using a user-defined variable with the following settings:
- Type – Auto-event variable.
- Variable type – Element Text.
Click – All Elements
A trigger that fires when a visitor clicks anything on the page (image, link, etc.). In the Preview and Debug console, this event is displayed as gtm.click.
Click – Just Links
A trigger that fires when a visitor clicks any link on the page. It listens only for clicks which propagate up to a link (<a/>) node. This means that you can click on a SPAN in a BUTTON in a DIV, but as long as there’s a link somewhere up there, GTM will register the event as a link click.
In the Preview and Debug console, this event is displayed as gtm.linkClick.
Click URL
A built-in variable that returns the value of the href (or action) attribute of the clicked element. You can achieve the same result by using a user-defined variable with the following settings:
- Type – Auto-event variable
- Variable type – Element URL
Consent mode
A feature that allows you to adjust how your Google tags behave based on a user’s consent choices for cookies. When a user does not consent, Google Analytics/Ads may use machine learning to model the behavior of non-consenting users based on the behavior of similar consenting users. This helps to recover some of the lost data from non-consenting users while respecting their privacy choices. This is called Advanced consent mode.
Alternatively, you can implement Basic consent mode, which fires tags only if consent is given.
Constant
A user-defined variable that returns the string you choose to type in the Value field. Its value never changes. Learn more about its use cases.
Container
Every Google Tag Manager account contains one or more containers. Currently, there are 4 types available: Web, iOS app, Android app, or AMP. Each container has one container snippet.
Container Activity
Container activity displays information about the actions that have been done in the container. It is useful to determine which user has performed a certain action and when it was done.
You can find container activity by opening any container of the account you’re interested in > Admin > Container Activity.
Container ID
Container ID is a part of Google Tag Manager Container snippet. Pretty much like Google Analytics ID (UA-XXXXXX-XX), container ID allows GTM to distinguish one website from another. Its structure is GTM, dash, and a string of 7 random letters/numbers, e.g. GTM-11122AA
Container Snippet
The Google Tag Manager container snippet is a small piece of JavaScript and non-JavaScript code that you need to paste into your pages. It enables Tag Manager to fire tags by inserting gtm.js into the page (or through the use of an iframe when JavaScript isn’t available).
Without this code, Google Tag Manager would not work on your (client’s) website.
Container snippet placement
Container snippet consists of two parts: <script> and <noscript>. It’s highly recommended to copy and paste the <script> as close to the opening <head> part as possible on every page of your website.
<noscript> should be placed immediately after the opening <body> tag of the page.
While you can place both these codes in <body> only, you must not add them both in <head>. The <noscript> part renders an iframe, which is not allowed in <head>, otherwise you’re website’s HTML will be invalid.
Container type – AMP
Since AMP (Accelerated Mobile Pages) removes most of the elements that cause web pages to load more slowly on mobile (like JavaScript and third-party scripts), regular Website containers will not work.
Consequently, Google Tag Manager offers AMP containers which have a different set of tags, triggers, and variables.
Container type – Android
A type of Google Tag Manager container dedicated to Android apps. It has a different set of tags, triggers, and variables.
Container type – iOS
A type of Google Tag Manager container dedicated to iOS apps. It has a different set of tags, triggers, and variables.
Container type – Server
A container type that allows you to manage and route data from a server-side environment. This container type enables a more controlled and secure way of sending data to marketing and analytics platforms. Unlike web containers, which send data directly from the user’s browser, server containers receive data and then forward it to various endpoints. This helps improve website performance and offers more control over the data being shared with third parties.
Container type – web
The most common type of Google Tag Manager containers is designed for websites or web applications.
Container version
A built-in variable that returns the version number of the container that is implemented on the site, or QUICK_PREVIEW if the version is in preview mode. You can achieve the same result by utilizing a user-defined variable – Container Version Number (no configuration is required).
Cookie
#1. A delicious dessert baked by your grandma.
#2. A cookie is a tiny little file that’s stored on your computer. It is designed to hold a modest amount of data about a visitor. Marketing heavily relies on cookies, when it comes to remarketing, tracking behavior on a page (Google Analytics), etc.
With the help of Google Tag Manager, you can easily set and read cookies.
CSP (Content Security Policy)
A security standard that helps prevent various types of attacks, including Cross-Site Scripting (XSS) and data injection. A CSP allows web developers to control the sources of content that can be loaded on a webpage, such as scripts, styles, and images. When a GTM container is served from a different domain or uses a custom domain, you might need to update your website’s CSP to allow GTM to function correctly.
CSS
CSS (Cascading Style Sheets) allows you to create great-looking web pages. It’s like a central place where all styles are defined. For example, all buttons must be red, font size 30px, font Arial.
When there are multiple buttons (which look identical), you’ll need to edit their style only once, because they all have the same CSS Class .red-button.
Otherwise, you’d have to edit buttons’ style individually. This is what makes CSS a very scalable solution.
When it comes to Google Tag Manager, you can distinguish interactions of elements with particular CSS classes/ID or other CSS selectors.
CSS class
CSS Classes are reusable styles that can be added to HTML elements. Two buttons may have the same class .red-button and look the same.
Say that sometimes you want the font of the page element to be large and white, while other times you would prefer the font to be small and black. CSS would not be very useful if it did not allow you to have many different types of formats for a single element.
For this purpose, one HTML element can have multiple CSS classes.
Custom Auto-event Listener
A custom auto-event listener is a function which operates in the background which is waiting for the particular actions occur on the website. When the listener activates it pushes certain data to the Data Layer.
In addition to the default auto-event listeners, you can easily add custom listeners to track interactions you need, for example, Facebook LIKE button clicks, Vimeo player, AJAX form submissions, and much more.
Overwhelmed by too much information? No worries! Bookmark this page or download the entire Google Tag Manager glossary as PDF (by entering an email address in the form below).
Custom event
Custom events are used for tracking interactions that might take place on your website or mobile app that aren’t handled by standard auto-event listeners.
When a certain event is pushed to the Data Layer (by using dataLayer.push), Google Tag Manager does not catch it by default; you need to create a Custom Event trigger in GTM first.
After the Custom Event trigger is created, you can use it as a condition to fire a tag.

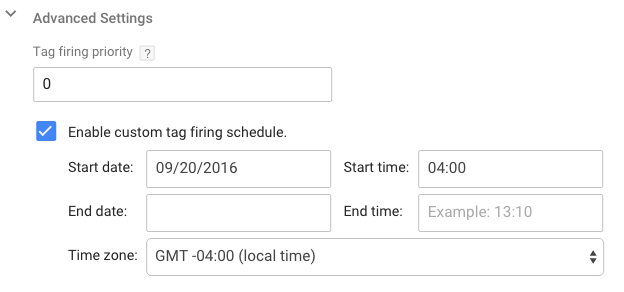
Custom tag firing schedule
Tag firing schedule allows you to indicate that the tag should fire only during your specified time window. To enable this, go to Tag’s Advanced Settings, select Enable custom tag firing schedule.
Custom HTML Tag
The Custom HTML Tag type allows you to manage a tag that isn’t explicitly supported via Google Tag Manager, such as 3rd party tags, and have not yet been integrated into Tag Manager as a tag template.
When creating a Custom HTML tag, you will be presented with a text box. Copy and paste your custom HTML and/or Javascript code where indicated.
Custom Image tag
The Custom Image Tag type allows you to manage your own image tag with its own custom triggers and parameters. For example, if you use a pixel image for tracking, enter the image URL in the Image URL field.
Select the Cache Buster checkbox and provide a cache-busting parameter to ensure that hits are registered from browsers that have cached versions of the image.
Here’s a guide that explains how it works.
Custom JavaScript variable
Custom Javascript variable can be used to run arbitrary JavaScript on the page. Most popular use cases are:
- Name of the downloaded file.
- Is a visitor using a mobile device?
- Screen width, etc.
All three aforementioned examples are explained in this blog post.
Custom Templates
A feature that allows you to create and manage your own tag and variable templates in Google Tag Manager. Instead of using the built-in templates (that might be missing certain features) or a Custom HTML tag, you can create a reusable template with predefined fields, which makes it easier for other users in your organization to deploy tags consistently and without errors.
Data Layer
Technically speaking, a data layer is a JavaScript object or variable that stores and sends information from your site to Google Tag Manager (later, that data is transferred to other tools, like Google Analytics).
In other words, it’s like a virtual layer of your website which contains various data points (Get it? That’s why it’s called Data Layer.).
Data Layer can contain various information, such as the page category or transaction value. Then, with help of Google Tag Manager, this data can be transferred to other tools, like Google Analytics or Mixpanel.
dataLayer.push
dataLayer.push lets you send additional data to the Data Layer when certain events occur on the website. For example, you have a newsletter signup form (which cannot be easily tracked with automatic GTM form listeners).
In that case, you should ask your website developer to push the dataLayer event once a new subscriber has submitted his/her email address. The code of the event should look like this:
dataLayer.push({'event': 'new_subscriber'});
If you wish, you can ask the developer for additional information (for example, form position).
dataLayer.push({
 'formPosition': ‘footer’,
 'event': new_subscriber
 });
Data Layer variable
When you create a Data Layer Variable, you specify the Data Layer key whose value you want to retrieve. By default, Google Tag Manager does not fetch all keys and values from the Data Layer, so you need to “teach it” by creating Data Layer variables.

After you’ve done it, the variable will become accessible in the Variables tab of the GTM Preview and Debug mode, and you’ll be able to reuse it in any GTM tag.
Learn more about how to access data in the Data Layer.
Data Layer version 1
While creating a Data Layer variable, you need to choose between version 1 and version 2 (default) of the Data Layer.
Version 1 of the Data Layer Variable has a very limited reach. Basically, it doesn’t let you access nested keys, like here:
 attributes: {
    pagePostAuthor: 'Julius Fedorovicius': {
       someOtherKey: 'example'
    }
 }
}
That’s all Version 1 does. There’s no merging, no special data model functions, or anything else that you can use to further manipulate the retrieved data. Simo Ahava has explained it in greater detail.
Data Layer Version 2
While creating a Data Layer variable, you need to choose between version 1 and version 2 (default) of the Data Layer.
Instead of completely overwriting existing keys (like in Version 1), Version 2 first checks whether a key with that name already exists in the data model. If it does, it recursively merges information in the new push with information in the existing object. It’s easier to explain with an example.
Here’s the first Data Layer push:
window.dataLayer.push({
 'product' : {
   'price' : '89.99',
   'category' : 'Shoes'
 }
});
And here’s the second (there’s a new key name):
window.dataLayer.push({
 'product' : {
   'price' : '89.99',
   'name' : 'Nike'
 }
});
If it was Version 1, the final result would be, because the second data push completely removed previous data and wrote a new one.
window.dataLayer.push({
 'product' : {
   'price' : '89.99',
   'name' : 'Nike'
 }
});
But with Version 2, the final result is like this (all three keys (category, price, and name) are intact):
window.dataLayer.push({
 'product' : {
   'category' : 'Shoes'
   'price' : '89.99',
   'name' : 'Nike'
 }
});
Data Stream
The flow of data from a single source to a GA4 property. There are three types of data streams: Web, iOS app, and Android app. Each data stream has its own unique measurement ID, and a single GA4 property can have multiple data streams.
Debug mode
A built-in variable. Its value is set to true if the container is being viewed in debug mode. There’s also a user-defined variable under the same name.
Device ID
A built-in variable in mobile app containers. For Android, the value is set to the device ID. For legacy iOS containers, the value is set to ” (the empty string). This variable is not available in Firebase (iOS) containers.
Device Name
A built-in variable in mobile apps containers. The value is set to the device name of the currently running application (e.g., “Samsung Android”, “Android SDK built for x86”). A built-in variable of this type is provided in mobile app containers; you don’t need to define a new variable of this type.
DOM (Document Object Model)
The Document Object Model (DOM) is a programming interface for HTML and XML documents. It represents the web page so that programs can change the document structure, style, and content. The DOM represents the document as nodes and objects. That way, programming languages can connect to the page.
The Document object model provides a way for JavaScript to interact with every single node (in other words, website element).
In Google Tag Manager, you can access any element on the page and read its value. All thanks for the DOM Element variable.
If you still feel like WTF is DOM?, then I highly recommend watching the video below. It’s targeted towards designers (who are also non-developers, like me).
DOM element
You can use the DOM Element Variable to retrieve the text content of any given DOM Element. You can also use it to retrieve the value of any attribute of the DOM Element.
If the value you’re looking for was not set up in the data layer (see Data Layer Variable type, above), it’s possible that the value can be retrieved from the DOM. Use this variable type if you can find the value you’re looking for in the DOM by entering the value of the element’s ID attribute.
A pretty common use case is to scrape DOM in order to track form submissions or to get product price.
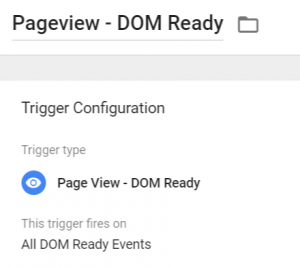
DOM ready
DOM ready is a Pageview-type trigger which occurs when the browser DOM is fully constructed (and gtm.dom Data Layer event is fired). You can see the DOM ready event in the GTM Preview and Debug console (event list).
DOM scraping
DOM scraping is the process of fetching values by crawling the DOM. In the context of Google Tag Manager, with help of DOM variable, you can transfer any text from your website to other marketing tools, as long as it is selectable in the DOM.
But keep in mind that this technique is risky because the developer can accidentally edit some nodes in the DOM which will break your “scraping implementation”. If possible, ask developers to push the needed data to the data layer, instead.
Enhanced Conversions
A feature in Google Ads that improves the accuracy of your conversion measurement by supplementing your existing conversion tags with hashed first-party data from your website, such as email addresses. This helps to more accurately attribute conversions that might not have been captured otherwise due to cookie restrictions or other factors.
Environment
Environments are browser cookies, which you use to link a Google Tag Manager container state with the browser of the user who needs to or wants to view that particular state.
In other words, if you have a QA (quality assurance) process, or if you do most of your testing on a staging server you can create an Environment in GTM, after which you can publish container versions (even the draft) into that particular Environment alone.
You can manage environments by going to Admin > Container > Environments.
Environment name
A built-in variable which returns the name of the current environment (Live, Latest, Staging, etc.). There’s also a user-defined variable under the same name.
Error line
A built-in variable that returns a string containing the line number where the error was thrown. It is related to the Javascript Error trigger.
Error Message
A built-in variable that returns a string containing the error message dispatched by a JavaScript Error Trigger.
Error URL
A built-in variable that returns a string containing the URL of the script where the error was thrown. This variable is related to the Javascript Error trigger.
Event
A Google Tag Manager event is an interaction that occurred on the web page and was then pushed to the Data Layer. If you enable GTM Preview and Debug mode, a special console will appear at the bottom of the screen.
On the left side of that console is the list of Google Tag Manager events.

They actually play a very important role within the GTM – you can fire your Tags (scripts from various marketing tools) based on these Google Tag Manager events. A few examples to mention:
- A “Pageview” Google Tag Manager Event can be used as a trigger to fire the Google Analytics Pageview Tag.
- A “gtm.linkClick” GTM event (which happens when a visitor clicks any link on your website) can trigger a Google Analytics Event Tag (which sends a particular event to GA).
Event (2)
A built-in variable that returns a string containing the value stored in the ‘event’ dataLayer key. There also a user-defined variable under the same name.
Event Name
A built-in variable in GTM containers for Mobile Apps. The value is set to eventNameXYZ when the following code in your app is executed:
Android:
FirebaseAnalytics.getInstance(mContext).logEvent("eventNameXYZ", null);
iOS:
[FIRAnalytics logEventWithName:@"eventNameXYZ" parameters:parameters];
Event Parameter
A built-in variable in GTM containers for Mobile Apps. The value is set to the value of a logged Firebase Analytics event parameter for the given key.
Export Container
Exported containers can be compared, modified, shared, and imported back into Google Tag Manager. Containers are exported as JSON text files.
You can replicate a container setup by exporting the container and then importing the file into a different container. Or, you can modify the exported file to include only a subset of the triggers, tags, and variables before importing it. By exporting and importing containers, you can create and reuse container templates and share them with others.
You can export the container by navigating to Admin > Container > Export Container. A whole bunch of exported containers is available for free at our Google Tag Manager Recipes section.
Facebook Pixel Helper (a.k.a. Meta Pixel Helper)
The Facebook Pixel Helper is a troubleshooting tool that helps you validate your Facebook (Meta) Pixel. Using the tool you can verify whether the pixel is working properly, what events were fired and spot errors in no time.
A small number will appear on the Facebook Pixel Helper icon to indicate the number of pixel events. When clicked, a panel will expand to show a detailed overview of the page’s pixels, including warnings, errors, and successes.
For more information, check these two blog posts: installing Facebook pixel and tracking FB conversions with Google Tag Manager.
Firebase User Property
A built-in variable in GTM containers for Mobile Apps. The value is set to the Firebase Analytics user property value for the given key.
Folder
As your containers grow over time, it can become difficult to keep track of all of your tags, triggers, and variables. With folders, you can organize these items into logical groupings, making them easier to work with for yourself and your team members.
To see all folders within a container, click Folders in the left menu. Click a folder name to expand or collapse it in the list.
To file one or more items into a folder, select their checkboxes in the list and select a folder from the Move menu to place the items in an existing folder, or select Folder from Selected to add the items to a new folder.
Form Classes
A built-in variable that fetches an element’s CSS classes upon form submission.
Form Element
A built-in variable that returns an HTML element that was the target of a form submission.
Form ID
A built-in variable that returns the ID value of the submitted form.
From Target
A built-in variable that returns a string contained in the target attribute value of the submitted form.
Form Text
A built-in variable that returns the visible text inside the submitted form.
Form Trigger
The Form Submit trigger waits for a submit() event to be dispatched. This means that if some script on your site hijacks the form event and proceeds with some proprietary AJAX function, for example, GTM’s listener will not be able to pick it up.
The trigger has two additional options: Check Validation and Wait For Tags. Once you check either, you’ll see an extra step, Enable When, in the Trigger settings:
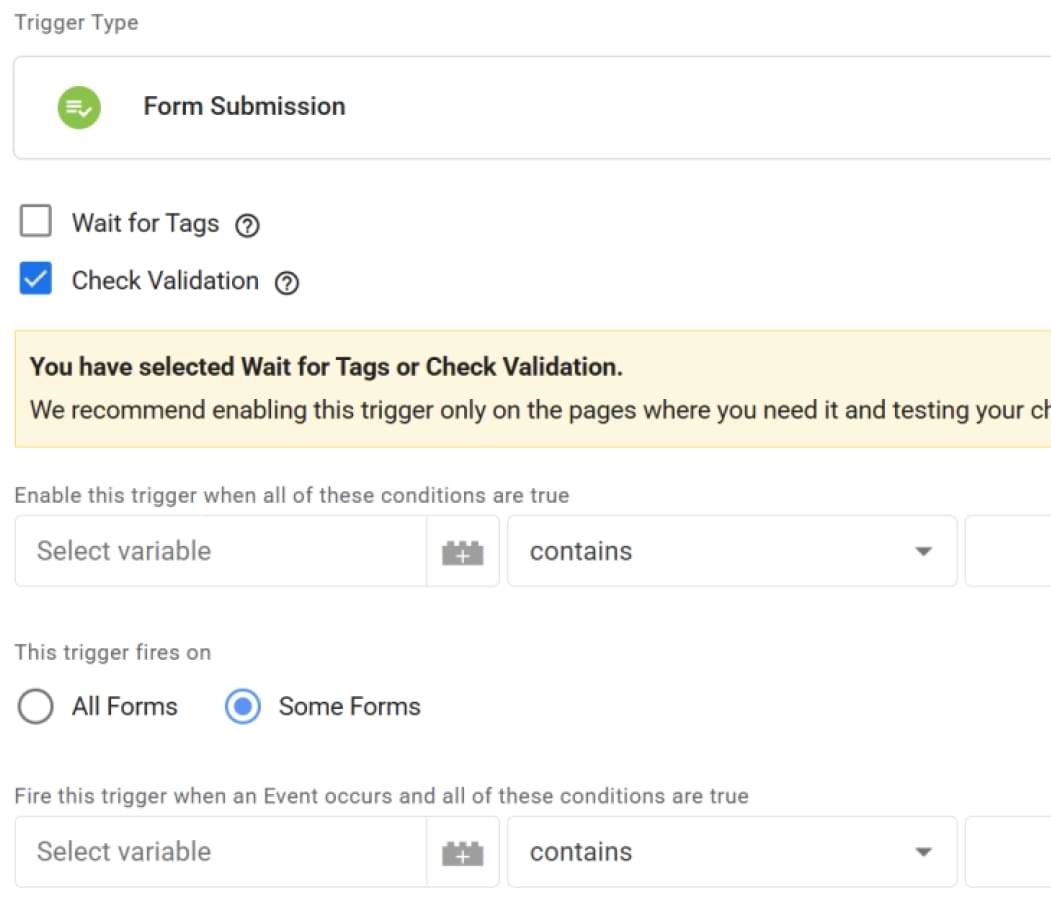
The point with Enable When is that you’ll be able to specify a condition for when the trigger is actively listening for the specified event. The most common condition types you’ll use here are page conditions since you might want to specify that the Form Submit trigger only listens for submit events on pages with forms.
Check Validation, when checked, will require that a valid action is propagated to GTM’s listeners. With the Form Submit, it also checks for a prevented default action. For example, if validation fails, it’s normal to prevent the default action of the submit event.
Wait For Tags ensures that all tags that fire on the trigger execute first before proceeding with the action of the event. So if it’s a Form trigger, the action is halted long enough for all dependent tags to complete execution, after which the action is resumed.
Due to the diversity of forms and how they work, in many cases, GTM form trigger will not work properly. But that shouldn’t be the problem because there are other ways to track form submissions with Google Tag Manager.
Form URL
A built-in variable which returns the value of the href attribute of the submitted form, if any.
Overwhelmed by too much information? No worries! Bookmark this page or download the entire Google Tag Manager glossary as PDF (by entering an email address in the form below).
Google Analytics Settings Variable
This variable acts as a central location to configure sets of Google Analytics settings for use across multiple tags.
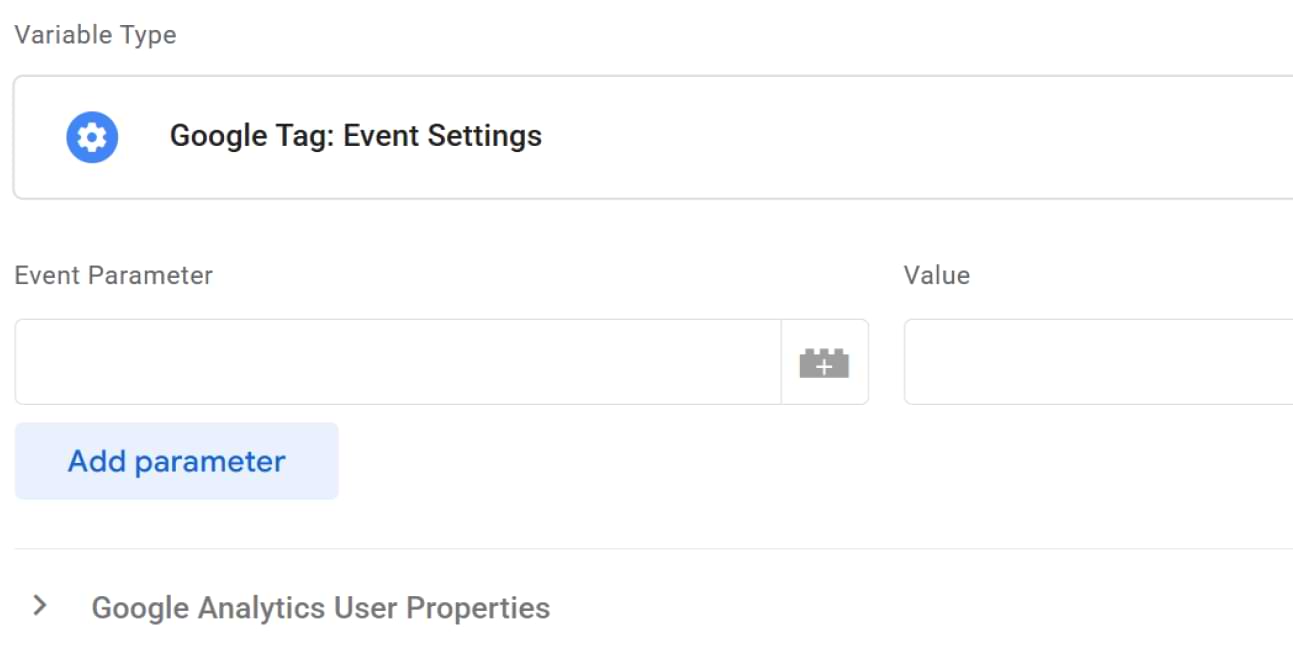
Instead of having to enter your Google Analytics settings over and over again in each new Google Analytics tag, you’ll simply be able to select (or create) a Google Analytics Settings Variable to apply to multiple tags.
Learn more about Google Analytics Settings Variable in GTM.
Google Tag Manager
Google Tag Manager is a free tool that makes it easy for marketers to add and update website tags/scripts (including conversion tracking, site analytics, remarketing, and more) with just a few clicks, and without needing to edit your website code every time.
Google Tag Manager 360
Google Tag Manager 360 is a premium solution for Enterprise-level businesses. It is fully integrated with the Google Analytics 360 Suite and will be a platform to provide enterprise-focused features.
Main differences between free and the 360 version are:
- 360 offers an unlimited number of workspaces
- An enterprise-level support (with dedicated specialists) for 360 users.
- 360 offers a service-level agreement
Google Tag Manager extension
There are useful Google Tag Manager Extensions for Google Chrome will make your life/work much easier. Their main purpose is to help test GTM implementation and spot issues much faster. To name a few: Stape GTM helper, DataLayer Inspector, GTMFixer, etc.
The full list can be found in my other blog post: Google Tag Manager Extensions for Chrome.
gtm.dom
A Data Layer event that is fired when the browser DOM is fully constructed. In Google Tag Manager Preview and Debug console, this event is displayed under the DOM Ready event name.
It can be used as a trigger (Page view > DOM Ready).
gtm.js
A Data Layer event that is fired when the Google Tag Manager Container snippet is loaded.
In the Google Tag Manager Preview and Debug console, this event is displayed under the Container Loaded event name.
That event can be used as a trigger and it’s the earliest moment (after the page starts loading) when you can fire tags via Google Tag Manager.
gtm.load
A Data Layer event that is fired when the Google Tag Manager Container snippet is loaded.
In the Google Tag Manager Preview and Debug console, this event is displayed as Window Loaded.
It fires when everything else (including JavaScript) finishes loading on the page.
Hard-coded scripts
Hard-coded scripts are little code snippets that the developer added directly to the source code of the website/web application. Every time a change is required, a marketer needs to ask the developer to edit it.
This process is really frustrating and time-consuming, that’s where Google Tag Manager comes in handy. Instead of having all tracking codes/script hard-coded, you can control them from one place, Google Tag Manager interface.
Hard refresh
Browser cache is useful for web browsing, but a real pain point for developers or sometimes those, who are working with web tracking.
A hard refresh is a way of clearing the browser’s cache for a specific page, to force it to load the most recent version of a page. Why is this important for Google Tag Manager users? Because sometimes Preview and Debug mode does not appear when it should.
For Chrome users, click CTRL + F5 (for Windows users) or CMD + Shift + R (for Mac users). Here are the instructions for other browsers.
If your Preview and Debug mode still does not appear, check out this blog post how to fix it.
History change
Triggers based on the History Change event will fire a tag when the URL fragment (hash) changes or when a site is using the HTML5 pushstate APIs.
URL Fragment is a part of URL which comes after the hash (#) symbol, for example, https://www.analyticsmania.com/#example_fragment. So when the fragment changes, a History Change event can be fired to the Data Layer.
This trigger is useful to fire tags tracking virtual page view in an AJAX application, for instance.
History Source
A built-in variable which returns a string denoting the event that triggered the history change event (popstate, pushState, replaceState, or polling). Stored in Data Layer under the key gtm.historyChangeSource.
The same variable can be created by the user with the following settings:
- Auto-event variable
- Type: History Change Source
HTTP Referrer
A built-in variable that provides the full referrer URL for the current page (the previously visited page that later redirected the user to the current page). With it, you can create triggers based on where the visitor is coming from.
GTM users can also create the same variable by themselves by choosing HTTP Referrer variable type.
Import container
This is a feature in Google Tag Manager that lets you import a JSON file that contains tags, triggers, and variables. This may be an entire container or just items. Reasons to start using the Import feature:
- You have a lot of sites and want to set up a default container for each of them. I have prepared a vast (and free) library of ready-made Google Tag Manager Container templates that you can easily import.
- Importing new tags, variables, and triggers that have been shared with you.
- Making bulk changes to your container.
- You’re maintaining separate GTM containers in different environments, like a dev or staging site, and you want to export out of one environment and into another.
Import container – merge
When you start importing a GTM container, two options will be displayed: Overwrite or Merge.
Merging containers will let you keep your existing tags, triggers, and variables, and just add in the new ones. If you choose to Merge the new container with your existing container, you’ll have to then decide whether you want to overwrite conflicting tags or rename conflicting tags.
- Overwrite – If a variable, tag, or trigger in the new container has the same name, overwrite the old one with the new one.
- Rename – If a variable, tag, or trigger in the new container has the same name, keep the old one and rename the new one.
Import container – overwrite
When you start importing a GTM container, two options will be displayed: Overwrite or Merge.
Overwriting the existing container will remove all your existing tags, triggers, and variables, and will replace them with those in the imported container. A new container version will be created before the import. Use this option if you want to start fresh with the imported container.
Javascript error
A default Google Tag Manager trigger which fires when the Javascript Error occurs on the page. There are 3 built-in variables that are useful while working with Javascript errors:
- Error message
- Error URL
- Error line
In Google Tag Manager Preview and Debug mode, these events are displayed as gtm.pageError.
Javascript variable
The JavaScript Variable returns the value stored in the global JavaScript variable you specify. Note, this is NOT the same as the Custom JavaScript Variable, which is a function declaration.
Most common use case: Page Title variable. By default, Google Tag Manager does not offer Page Title as a built-in variable. If this information is important to you, create a JavaScript variable with document.title as its value.
JSON
JSON is short for JavaScript Object Notation and is a way to store information in an organized, easy-to-access manner. In a nutshell, it gives us a human-readable collection of data that we can access in a really logical manner.
As a simple example, information about a person might be written in JSON as follows:
var person = {
 "age" : "24"
 "gender" : "male"
};
Google Tag Manager exports and imports containers in JSON.
Konami code
The Konami Code is a cheat code that appears in many Konami video games, although the code also appears in some non-Konami games as well. Years later, it became an internet meme and was adopted by multiple website creators.
Various web developers have hidden an Easter egg in their projects that can be accessed by entering the following sequence of key presses on the keyboard:

In this blog post, I have demonstrated 4 examples how to implement Konami code on your website with the help of Google Tag Manager.
Language
A built-in variable in containers for mobile apps. The value is set to the two letter language code representing the user-set device language.
Listener
In JavaScript, a listener is a function that listens to specific interactions on the web page, and, when one occurs, runs a particular code (e.g., sends data to the Data Layer).
Related to Auto-Event Listener.
Lookup Table
Lookup table is a variable that has the value of another variable as the input. It works like this: When [input variable] equals to _______, set [this output variable] to_______.

It can drastically reduce the number of tags required and turn your messy GTM into a neat environment.
The most popular use case from my experience: Different Google Analytics Tracking IDs – one for production (live) website, the other one for the development version. With Lookup Table all page views from “development” website will be sent to my GA test account and will not mess my Live tracking data:
- If Page Hostname equals to https://www.analyticsmania.com, set Lookup Table’s value to UA-11111111.
- If Page Hostname equals to https://www.analyticsmania.com, set Lookup Table’s value to UA-22222222.
Malware detection
The term malware, short for “malicious software,” refers to any software specifically designed to harm a computer or the software it’s running. Malware can steal sensitive information (like credit card numbers or passwords) or even send fake emails from a user’s email account, often without the user’s knowledge.
To protect the safety and security of our users, Google Tag Manager will stop firing tags pointing to sites where we find malware. You can learn more about Malware detection here.
Matches CSS selector
CSS Selectors are patterns used to select the element(s) you want to style. In Google Tag Manager, Matches CSS Selector option empowers you to target website elements by their features.
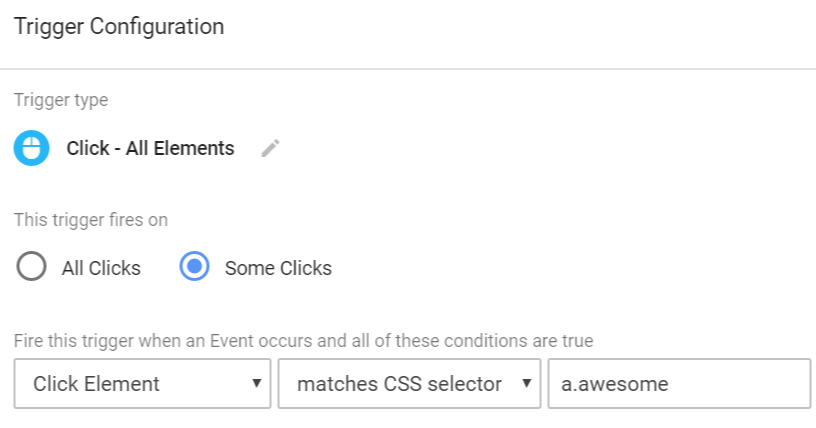
For example, you can track clicks of only those buttons that have a CSS class .button and are descendants of a block with class .main-div.
This is especially useful when a single page has multiple buttons with the same style, links, and text, and you need to track them separately.
Naming conventions
In computer programming, a naming convention is a set of rules for choosing the character sequence to be used for identifiers that denote variables, types, functions, and other entities in source code and documentation.
In other words, it’s a logical way of naming items (e.g., files and folders) to keep everything in order.
In Google Tag Manager, naming conventions are important when naming tags, triggers, and variables. Instead of naming a tag as “Button click”, try giving it a more descriptive name GA Event – Click – Contact Support Button.
New history fragment
A built-in variable that returns the new URL fragment set with a browser history event. Stored in Data Layer under the key gtm.newUrlFragment.
URL fragment is the part of web address after the # symbol (e.g. www.example.com/#contact-us). This is especially popular among one-page sites where URL fragment changes when you scroll.
Old history fragment
A built-in variable that returns the old URL fragment replaced in the browser history event. Stored in Data Layer under the key gtm.oldUrlFragment.
Old history state
A built-in variable that returns the old state object replaced in the browser history event. Stored in Data Layer under the key gtm.oldHistoryState.
Only fire this tag in published containers
It’s an option located in Advanced settings of the tag. If firing certain tag results in a fee being charged, you can avoid firing it in testing environments (e.g., during previewing and debugging).
After you enable this option, Google Tag Manager will not fire the tag in Preview and Debug mode. For the most accurate testing, leave this option unchecked.
Operating System Version
A built-in variable in containers for mobile apps. The value is set to the version of the operating system in which the application is installed.
Overwhelmed by too much information? No worries! Bookmark this page or download the entire Google Tag Manager glossary as PDF (by entering an email address in the form below).
Overview
A section of the Google Tag Manager User Interface which displays the container version number, a list of workspace changes, version description, and activity history.
Page hostname
A built-in variable which returns a string containing the hostname of the current page (e.g. www.analyticsmania.com). The same result can be achieved by creating a user-defined variable with the following settings:
- Variable type – URL.
- Component type – Host name.
Page Path
A built-in variable which returns a string containing the relative path of the current page. If the page’s address is https://www.analyticsmania.com/post/example?gclid=4482923423492342324, Page Path’s value will be equal to /post/example.
The same result can be achieved by creating a user-defined variable with the following settings:
- Variable type – URL.
- Component type – Page Path.
Page URL
A built-in variable which returns a string containing the full URL of the current page, e.g. https://www.analyticsmania.com/post/example?gclid=4482923423492342324.
The same result can be achieved by creating a user-defined variable with the following settings:
- Variable type – URL.
- Component type – Full URL.
Page view
This event corresponds to the rendering of a page in the user’s web browser. It is the earliest moment when your tags can be fired via Google Tag Manager. Page view is also known as gtm.js Data Layer event.
Permissions
Google Tag Manager allows you to delegate access to other users at the Account and Container level. Users can be granted the ability to view or administer other users at the Account
As for permissions, users can be granted the ability to view or administer other users at the Account level and can be granted read, edit, approve, or publish rights at the Container level.
Platform
A built-in variable available in containers for mobile apps. The value is set to the platform of the currently running application (e.g., “Android”).
Preview and debug mode
Google Tag Manager Preview and Debug (P&D) mode enables you to browse a site on which your GTM container code is implemented. Sites with preview mode enabled will display a debugger pane (a.k.a. console) at the bottom of your browser screen so that you can inspect which tags fired and in what order. And the best part: Preview and Debug console is visible only to you, not your website visitors.

Random Number
A built-in variable which returns a number, randomized between 0 and 2147483647.
Use case: sample your visitors. If you want to fire a tag for every 10th visitor, you can set the rule {{Random Number}} ends with 1.
Recipe
A ready-made Google Tag Manager container template that can be imported to GTM container. Go to the library of Google Tag Manager recipes, download any recipe you need, and follow the instructions.
Regular expression
Regular expressions (also known as regex) are used to find specific patterns in a list/text. Instead of having multiple “contains” conditions, you can match different data with just one Regular Expression. Here are few examples:
- A|B means A or B.
- a$|^b means ends with A or starts with B
In Google Tag Manager, Regular Expressions are useful when it comes to triggers.

Release notes
Release notes is a page, where Google Tag Manager team announces new features. Although these notes have some delay (compared to Google Analytics blog), this is still a pretty reliable source of news.
Revoke authorization code
This term is related to the Share Preview feature of GTM. If you have preview links sent out and you’d like to invalidate that preview, you can do so from the Actions menu:
- In the Environments listing (Admin > Container > Environments), find the entry for the environment you would like to install.
- Click the Actions menu.
- Select Reset Link.
- A confirmation box will appear. Click Reset link to cancel the old code and create a new one.
Server-Side Tagging
A method of sending data from a user’s browser to a server container, which then forwards the data to third-party tools (or sending directly from your server to ad/analytics vendors). This approach can improve website performance by reducing the number of requests made by the browser and can also increase data accuracy.
Screen Resolution
A built-in variable available in containers for mobile apps. The value is set to the screen resolution of the device of the currently running application. The format is ‘<width>x<height>’, e.g. ‘1024×768’.
Setup tag
Opposite to the Cleanup tag. In a tag, under Advanced Settings, you’ll find a tag sequencing section that contains two options:
- Fire a tag before XXXX fires option is called a setup tag.
- Fire a tag after XXXX fires option is called a cleanup tag.
The Setup Tag, which is a tag that must fire before the main Tag fires.
Synchronous loading
Unlike asynchronous, synchronous scripts must load one after another. They might block page to render and do not allow the browser to continue loading elements until X or Y script is loaded.
Google Tag Manager, Google Analytics and the majority of other tracking scripts are loaded asynchronously. So if you have a synchronous script to put, add it directly to the website’s source code. Currently, GTM does not support synchronous scripts.
Tag
A tag is a piece of code that sends information to a third party, such as Google Analytics. Tags are often provided by analytics, marketing, and support providers to help you integrate their products into your website or mobile app.
With Google Tag Manager, you no longer need to maintain each of these JavaScript snippets in your source code. Instead, you specify the tags that you want to fire, and when you want them to fire, from within the Google Tag Manager user interface.
Tag firing options
You can control how tag fires using Tag Firing Options, which is found in the Advanced Settings of any tag definition in a web container. You may select from the following settings:
- Unlimited: Tags will fire whenever triggers tell it to. (Used only with tag sequencing)
- Once per event: The tag will fire only once when the specified event occurs. This might be used when adding information to the data layer. There is no need to add multiple pieces of the same data to the data layer, so the tag is only fired once.
- Once per page: The tag will fire only once per page load. This might be used if you were loading an external JavaScript library, which would only need to happen once when the page loads (e.g. Facebook Pixel).
Tag firing priority
Tag Firing Priority determines the order in which tags will be fired. Tag Firing Priority can be a positive or negative integer, and tags with higher priorities will be fired first. (For example, a priority 3 tag will fire before priority 1 or 2 tags).
Priority defaults to 0 if none is specified. Tags with higher numbers for priority will be fired first. Priority defaults to 0 if none is specified. Tags will still be fired asynchronously (tags will fire whether or not the previous tag has finished).
Tag sequencing
A cleanup tag is a part of the process, which comprises three phases:
- The setup is a Tag that must be successfully completed before the main Tag fires. You can set it under Advanced Settings of the tag.
- The main tag, which is the Tag with the dependencies. It’s either dependent on the setup, or it establishes a dependency with the cleanup.
- The cleanup is a Tag that fires after the main tag has completed successfully.
Simo Ahava has a detailed explanation of how the tag sequencing works.
Tag template
Google Tag Manager features a powerful tag template system to help simplify publishing of tracking codes and eliminate errors. Instead of writing your own code, you can use tag templates in Google Tag Manager which offer a bunch of predefined fields with settings. This approach is much more user-friendly.
Several examples: Universal Analytics Tag Template, Google Optimize, CrazyEgg, etc.
Timer
Timer Trigger is a type of trigger which fires after a certain duration of time has passed on the web page.

The most common uses for the timer trigger seem to be either to send an event to Google Analytics after X seconds (to lower the Bounce rate) or to defer a tag from firing until some asynchronous request has completed with certainty. But don’t limit yourself!
Overwhelmed by too much information? No worries! Bookmark this page or download the entire Google Tag Manager glossary as PDF (by entering an email address in the form below).
Trash can
The Trash Can is a temporary holding area for accounts and containers before they are permanently deleted. Accounts and Containers are moved to the Trash Can and held for 30 days before they are permanently deleted.
Trigger
A trigger is a condition that evaluates to either true or false at runtime. Triggers attached to a tag govern when the tag should fire or not.
All tag firing in Tag Manager is event-driven. Anytime an event is registered by Tag Manager, triggers from the container are evaluated and tags are fired accordingly. No tag can be fired unless an event occurs.
An event can be a page view, a click on a button, a form submission, or any custom event that you define. Tag Manager has 6 built-in event types plus a custom event option:
- Page view
- Click
- Form submission
- Javascript Error
- History Change
- Timer
- Custom event (which is created with dataLayer.push)
Trigger Exception
Trigger Exceptions are special Triggers that you can use to block Tags from firing in certain instances. If you want some Tags to only fire on a Live site, then you can create a Trigger Exception, or a blocking Trigger, that says – “Do NOT fire if you are NOT on the Live site.”
Trigger Group
A trigger type that allows you to combine multiple triggers into one. The tag associated with a Trigger Group will only fire when all of the triggers in the group have been met. This is useful for complex conditions, such as firing a tag only when a user has scrolled to a certain point and has spent a specific amount of time on the page.
URL variable
The URL Variable lets you access components of the current page URL. This is a very versatile Variable type and is especially useful for traversing query parameters and hash fragments in your URLs. Learn more about it.
Let’s say the address of the web page that I am currently on is https://www.example.com/welcome:8080?gclid=aabbcc123#home. With the help of URL Variable, you can turn a particular fraction of the URL into a variable. Here’s a list of available component types that can be extracted:
- Full URL, e.g., https://www.example.com/welcome?gclid=aabbcc123.
- Protocol, e.g., https.
- Host Name, e.g., www.example.com.
- Port, e.g., 8080.
- Path, e.g., /welcome/.
- Query.
- Fragment.
URL Variable Component – Fragment
URL Variable’s Component type, which returns the value of the URL’s fragment without the leading ‘#’.
Let’s say the address of the web page that I am currently on is https://www.example.com/welcome:8080?gclid=aabbcc123#home. In this case, a variable’s value would be home.
URL Variable Component – Full URL
URL Variable Component type, which returns the full URL without the hash fragment.
Let’s say the address of the web page that I am currently on is https://www.example.com/welcome:8080?gclid=aabbcc123#home. In this case, a variable’s value would be https://www.example.com/welcome:8080?gclid=aabbcc123.
URL Variable Component- Hostname
URL Variable’s Component type, which returns the hostname of the URL without the port number.
Let’s say the address of the web page that I am currently on is https://www.example.com/welcome:8080?gclid=aabbcc123#home. In this case, a variable’s value would be www.example.com. You can choose to strip ‘www.’
URL Variable Component – Path
URL Variable’s Component type, which returns only the path name in the URL (in other words, everything after the hostname, except port, fragment, and query parameters).
Let’s say the address of the web page that I am currently on is https://www.example.com/welcome:8080?gclid=aabbcc123#home. In this case, a variable’s value would be /welcome/.
URL variable Component – Port
URL Variable’s Component type, which returns the port number used in the URL.
Let’s say the address ofthe web page that I am currently on is https://www.example.com/welcome:8080?gclid=aabbcc123#home. In this case, a variable’s value would be 8080. Or 80 for HTTP / 443 for HTTPS, if the URL had no port number.
URL Variable Component – Query
URL Variable’s Component type, which returns the entire query parameter string (without ‘?’), if you don’t specify a query key.
Let’s say the address of the web page that I am currently on is https://www.example.com/welcome:8080?gclid=aabbcc123#home. In this case, I could specify the query key to gclid, thus the URL variable’s value would be aabbcc123.
If you do specify a query key, but that key is absent, the variable’s value would be undefined.
Variable
Variables are name-value pairs for which the value is populated during runtime. For example, the predefined variable named url has been defined such that its value is the current page URL.
Variables are used in triggers and in tags. In triggers, they are used to define filters that specify when a particular should be executed (e.g. to execute a pageview trigger when the url variable is example.com/index.html).
In tags, variables are used to capture dynamic values (e.g. passing the transaction value and products purchased to a conversion tracking tag).
Version
A container version can be thought of as an immutable copy (snapshot) of a container’s configuration at a particular point in time.
You can save the current state of a workspace as a version at any time. This allows you to save and preserve your work and go back to a previous version if you need to.Every time a container is published, a version of that container is recorded.
Versioning can make it easier to recover from mistakes. For example, if someone accidentally publishes a container version before it’s ready for production, you can simply publish another version that has been debugged and is known to work.
Window loaded
Window Loaded is a Pageview-type trigger which occurs when everything else (including Javascript) finishes loading on the page (and gtm.load Data Layer event is fired).
You can see Window Loaded event in the GTM Preview and Debug console (event list).
Workspace
In Google Tag Manager, workspaces enable you to create multiple and differing sets of changes to your container. Different users and teams can work on these sets of changes in separate workspaces to independently develop and test tag configurations.
Google Tag Manager Glossary
I hope you found this Google Tag Manager Glossary useful. I will keep updating it once GTM team releases something new or I find something noteworthy.
The best way to keep this glossary in mind is to bookmark this link or download the Google Tag Manager Glossary as PDF file. Just enter your email address in the form below. If you are already a subscriber of my blog, you’ll find the link to PDF in every newsletter I send.
0 COMMENTS