
December 4, 2025
Google Tag Manager Best Practices: 24 Tips
Updated on December 4th, 2025
Google Tag Manager (GTM) is a powerful tool that lets you add and edit tracking codes (tags) without much intervention from the IT department (although there are some nuances, and the classic “it depends” plays a significant role here). It is also much more convenient to control all your tags in one dashboard rather than having them scattered across your website’s source code.
But creating and managing tags, triggers, and variables within the GTM still require specific skills. For example, suppose you need help with how to best use Google Tag Manager; you may end up with a real mess in your account or, in the worst case, may end up breaking the website functionality and causing significant financial loss to your client/company.
To show you the right direction, here are a bunch of Google Tag Manager best practices you should start following immediately.
Obviously, this is not a definitive list (or whatever), and it never will be. But I hope some list items will give you ideas/inspiration for your next task/project with GTM.
Google Tag Manager best practices:
– Here are the GTM best practices –
- Plan before the implementation
- Account/container structure and ownership
- Use Proper Naming Conventions
- Give GTM control only to the right people
- Leverage Workspaces
- Consider using constant variables
- Use Lookup/Regex Tables
- If possible, use Custom Templates
- Server-side tagging
- Consult with developers before using unknown Javascript codes
- Utilize the Data Layer
- If developers/CTO oppose Google Tag Manager
- Ask a Developer to Add “data-” Prefix to Important Website Elements
- Ask a Developer to add ID’s to Important Website Elements
- Keep an eye on the page speed performance
- Always Test Before Publishing
- Use Debugging Tools
- Check real-time reports, debug views, etc.
- Write clear descriptions and names of version releases
- Publish/Create versions in smaller chunks
- Collect Data And Verify First
- Avoid Double Tagging
- Follow Industry News
- Check online courses to get you up and running
- Final words

Video tutorial
If you prefer video content, here’s a tutorial from my Youtube channel.
#1. Plan before the implementation
Don’t rush to implement various tracking techniques blindly when you start working on a new project. Instead, prepare a measurement plan and a tag implementation plan.
First, start with identifying the business objectives. What are the main goals of the business? If you are working on tracking the website, determine which of those business objectives a website will help achieve.
For example, one of the central business objectives will be to (obviously) increase revenue. If the website is an e-commerce site, the main thing to track is purchases.
Then identify the events/interactions that lead your users towards that main goal (purchase). For example, for an e-commerce website, it could be “add to cart”, “start checkout”, “subscribe to newsletter”, etc.
When you prepare the list of events, your measurement plan will start to materialize. And that’s where you can begin preparing a list of tags you will implement in Google Tag Manager. Then, prepare a spreadsheet of all tags and the settings you will implement.
When you maintain this kind of spreadsheet, you will start seeing what you need from your developers, the names of the events, etc. The spreadsheet will also help you create a solid naming convention (more on that later).
I have ~1 hour of content on planning and preparing the measurement/tag implementation plans in my GTM course for beginners. I talk even more about this in my Google Analytics 4 course.
#2. Account/container structure and ownership
Google Tag Manager consists of accounts and containers. The idea here is similar to the Google Analytics account structure – one account holds many containers (in GA4, it’s called properties). Each container has its own Javascript code that should be placed in a website’s source code.
Google recommends using only one account per company and one container tag per website. Yet I still sometimes see installations where several GTM accounts have been created just for one company or several container tags just for one website. Multiple GTM accounts/containers can cause tracking and diagnosing issues sooner or later.
Moreover, managing tags, triggers, and variables spread across several accounts/containers can become a nightmare as your account grows. Use only one GTM account per company and one container tag per website.
Of course, there might be some exceptions, e.g., two websites (due to their significant similarity) may use the same GTM container code. But in this case, you must be very careful when setting up triggers only on one website.
As for containers, you might be wondering how many containers you need. The answer is “it depends”, and this article explains everything you need to know.
Another important thing: Digital agencies should NEVER create GTM containers for all their clients under a single agency GTM account. The client should ALWAYS own the container. The agency should do one of two things:
- Either ask the client to create the account & container
- The agency makes a separate account + container and gives admin permissions to the client.
I have seen some nasty cases where agencies just block the client from the GTM container when the client wants to end the relationship.
#3. Use Proper Naming Conventions
I just can’t emphasize enough how important this Google Tag Manager best practice is to me.
If you’ve used GTM before, you will notice that the number of tags, triggers, and variables can quickly grow into a hard-to-manage mess. Therefore, use clear naming guidelines to help make managing your GTM implementation far easier for you and your teammates. Easier = less risk, time, and money wasted on tagging. Otherwise, this will happen:

The author of this image is unknown to me (couldn’t find it). I remember seeing it in the GTM Google+ (yup, G+) community and then recreated it from my memory.
Best tips for naming tags, triggers, and variables:
- Include track type if you are creating Google Analytics Tags. For example, you can have “Event” or “Config” in the tag name. For Google Ads Tags, you can have the Tag Type, such as Conversion or Remarketing, in the name.
- Include specific pages. If a tag should fire on a particular page or a set of pages (like a subdirectory), include the page/subdirectory in the tag name. Examples:
- GA4 event – generate_lead – contact form.
- Google Ads Remarketing – Thank You page.
- Click the link to learn more naming convention tips.
#4. Give GTM control only to the right people
Google tag manager is a very powerful tool, and if used irresponsibly or without proper thought, planning, and testing, it can break your website functionality. Ensure you limit access to this tool only to users involved in tag deployment.
GTM allows you to delegate access to other users at the Account and Container levels. For example, users can be granted the ability to view or administer other users at the Account level. They can also be given read, edit, approve, or publish rights at the Container level.
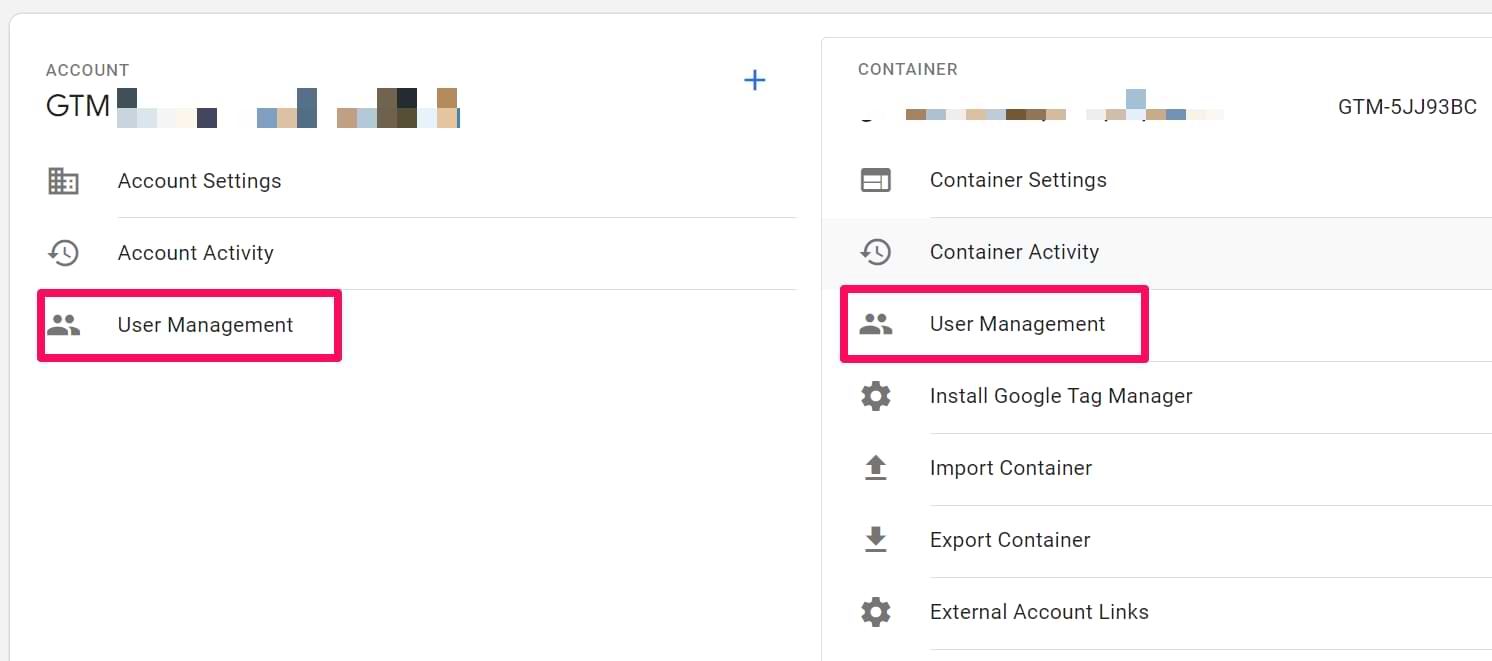
To add or modify users, click Admin in the Tag Manager menu bar, choose an account or container you need and click “User Management”. Create a new user or edit an existing user. There are four possible permissions levels each user can have access to:
- Read: The user will see the container listed and may browse the tags, triggers, and variables in the container but will not have the ability to make any changes.
- Edit: The user can create workspaces and edit them but not create versions or publish them.
- Approve: The user can create versions, workspaces and make edits but not publish.
- Publish: The user has full rights to create versions, workspaces, make edits, and publish.
| Permission Level | View Container | Create/Edit Workspaces | Create Versions |
Publish |
|
Read |
Yes | No | No | No |
| Edit | Yes | Yes | No |
No |
|
Approve |
Yes | Yes | Yes |
No |
|
Publish |
Yes | Yes | Yes |
Yes |
Tip – give “Publish” permission only to those team members who know GTM the best in your team.
#5. Leverage Workspaces
This Google Tag Manager best practice is especially useful for larger teams. In GTM, workspaces enable you to create multiple and differing sets of changes to your container. Different users and teams can simultaneously work on these changes in separate workspaces to independently develop and test tag configurations.

With Workspaces, you’ll be working with multiple Container Drafts. When you create a Workspace, a new Container Draft is separated from the latest GTM container version, and this becomes your new Workspace.
Each container has one stream of versions. When a new version is created, each workspace will display a notification that the workspace is out of date, with a prompt to update the workspace.
When another Workspace turns into a Version, all other Workspaces will be notified that the Latest Container Version has changed. In addition, GTM users should ensure that any changes implemented in this new Container Version be synchronized with all other Workspaces before being turned into new Versions.
You don’t have to do it immediately. Still, you will see the notification in the Container Overview reminding you to update the current Workspace with changes in the Latest Container Version.
Make sure to update the workspace before creating a version and publishing it. If there are any conflicts between the changes synced to your workspace while updating and any of the changes already in your workspace, you will see a “Conflict found” indication on the Workspace Overview page. Selecting to resolve the conflicts will bring you to a conflict resolution tool.
I will not get into details of conflict resolution. You can learn more about it in Simo’s blog post.

#6. Consider using constant variables
Most tags in GTM will need individual configuration settings, done with their unique tracking codes and such. For example, if you use the official Facebook Pixel tag template (previously known as facebookincubator, created by Simo Ahava) in GTM, you must enter the same tracking ID in every FB pixel tag. Imagine what would happen if you have 30 FB pixel tags and you have to change the Pixel ID from X to Y one day.
You would need to go through every FB pixel tag and manually replace that, not very optimal, and fertile ground for human errors.
Luckily, you can use a thing called Constant Variables in Google Tag Manager. Go to Variables > New > Constant.
Here you will see only one field. So let’s continue with our Facebook Pixel ID example. Here I could paste my Pixel’s ID and save the variable.

Now, I can use this variable in every FB Pixel tag.
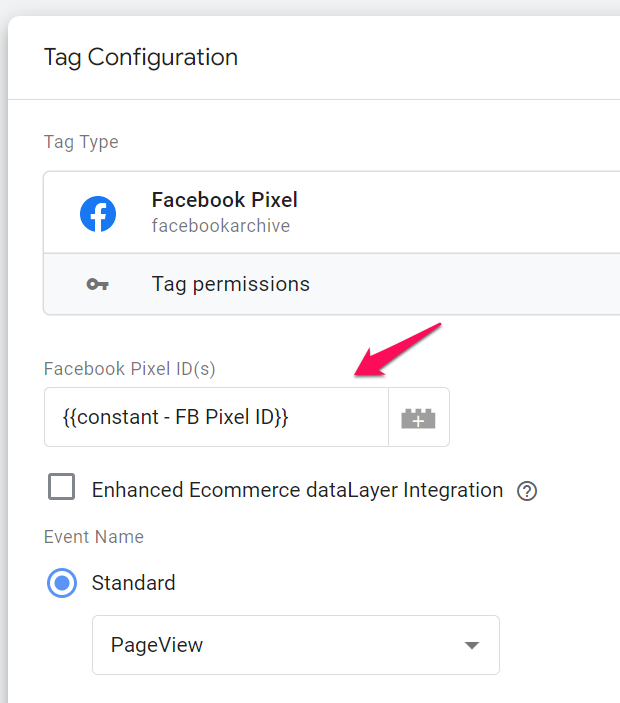
And if I need to change the ID in the future, I will have to change it only once in the constant variable. Then, all FB Pixel tags that use this variable will automatically inherit the change.
#7. Use Lookup/Regex Tables
A lookup table in Google Tag Manager simplifies managing many values in your tracking setup. For example, it can drastically reduce the number of required tags and turn your messy GTM into a neat environment.
A lookup table in Google Tag Manager is a variable with another variable’s value as input. It works like this: When [input variable] equals to _______, set [this output variable] to_______.
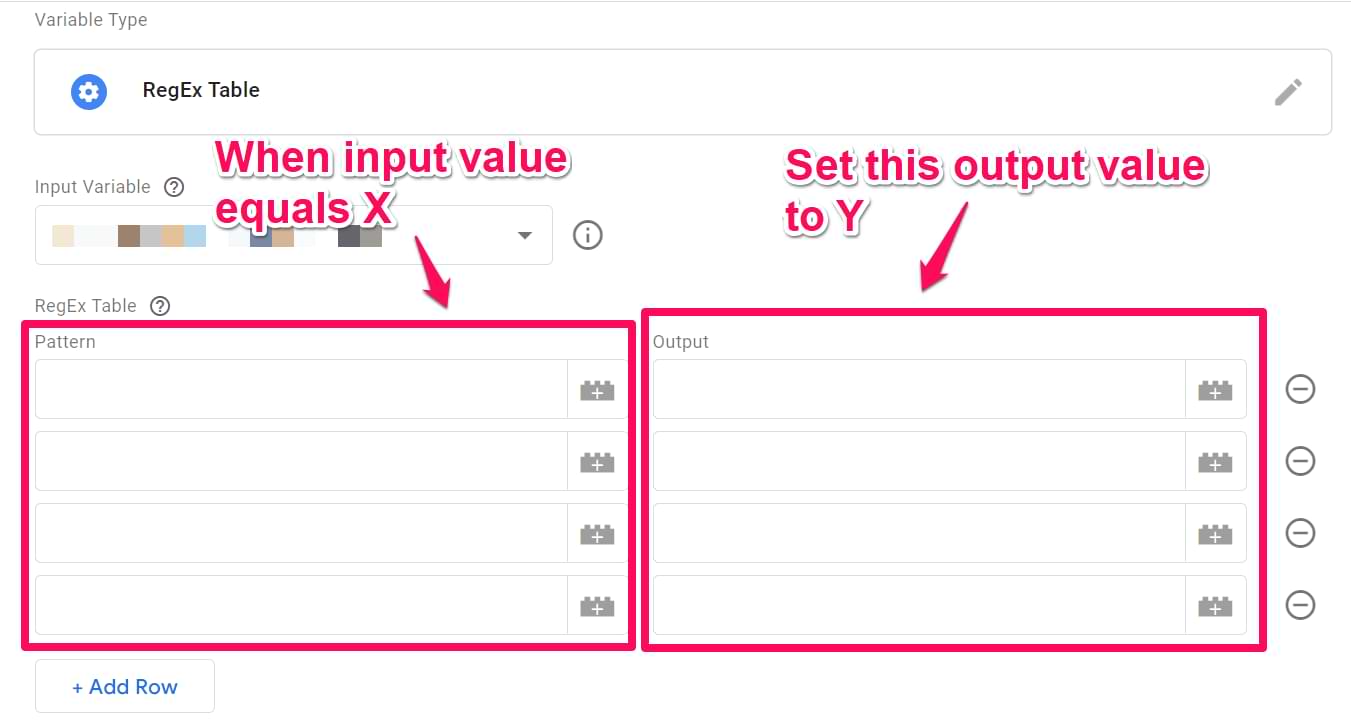
The most popular use case from my experience: Different Google Analytics Measurement IDs – one for the production (live) website and the other for the development version. In this method, my GA test account will receive all page views from the “development” website and none from my actual tracking data:
- If Page Hostname equals https://www.analyticsmania.com, set Lookup Table’s value to G-1234567890.
- If Page Hostname equals https://dev.analyticsmania.com, set Lookup Table’s value to G-9876543210.
You can read this Lookup Table tutorial to learn more.
GTM also offers Regex Tables. They work as Lookup tables + every field supports regular expressions (more complex conditions, but more powerful).
#8. If possible, use Custom Templates
With the rise of custom templates in Google Tag Manager and the community gallery, more and more people are building and sharing ready-made templates. These templates are popular because they are easier to use than just editing plain JavaScript codes and are not as harmful as Custom HTML tags or Custom JS variables.
Using templates is almost a no-brainer since many GTM users are not proficient with JavaScript. Also, these templates are designed to play better with your website’s Content Security Policy (CSP).
In a nutshell, CSP is a way for website developers to limit some harmful things that JavaScript can do on a website. However, with Custom Templates, website developers can still keep some limitations intact while you can use Custom Templates in GTM. Simo Ahava has a detailed article about using custom templates in Google Tag Manager, which is a good read.
#9. Server-side tagging
With the ever-changing landscape of digital analytics, more and more businesses are moving towards server-side solutions that offer more control over what data is shared with 3rd party vendors and increase the accuracy of the data collected by your business.
In 2020, Google Tag Manager joined this movement and introduced server-side tagging, and you can learn more about it here.
| Client-side (Standard) |
Server-side (Advanced) |
|
| Execution | Runs in the user’s browser | Runs in a server |
| Data Control | Low (Vendors see user IP/Headers) | High (You choose what to send) |
| Performance | Can slow down the website | Can move most of the processing off the device |
| Cost | Free | Monthly server costs |
However, server-side tagging is only for some businesses (because it incurs additional monthly costs that can be too large for small businesses), but the benefits significantly outweigh the drawbacks.
And if you want to dive deeper and implement not only GA4 but also Facebook Conversions API, enroll in my intermediate/advanced GTM course.
#10. Consult with developers before using unknown Javascript codes
If you find useful custom code that can add value to some websites, I recommend consulting with a developer before using it.
Even if a well-known and respected source provides the code.
Why? Because custom codes that you implement via a Custom HTML tag (or something similar) can break the website. I have seen cases where the marketing team adds some codes (without adequately testing them) and temporarily breaks the site resulting in thousands of dollars of lost revenue.
As a result, the marketing team lost permission to publish the GTM container changes. With great power/flexibility comes great responsibility. And fewer people than you think are aware of it.
#11. Utilize the Data Layer
Google Tag Manager Data Layer is incredibly useful for passing custom data and triggers. Although it’s a pretty tricky concept to master for beginners, it is one of the key parts of tag management. So whether you like it or not, you must understand it.
What is the Data Layer? The Data Layer is a virtual layer of your website where developers can store information (like transaction totals, form IDs, or user attributes) so that Google Tag Manager can easily read it. It acts as a bridge between your website’s code and your tracking tags.
If you want to track certain parts/features of your website and default GTM auto-event listeners do not catch any interactions, I recommend utilizing the Data Layer.
Just ask your developers to put the data you want into Data Layer, and then Google Tag Manager will easily access it and use it in triggers, tags, or variables. So how do you ask developers for data in the data layer? I explain that here.
Most common examples of where using the Data Layer is highly recommended:
- Form Tracking. If GTM form triggers do not capture your form’s submissions, ask a developer to fire dataLayer.push event with data you’re interested in. I have posted a detailed step-by-step guide on how to track form submissions with Data Layer. If you’re into form tracking with GTM, consider reading my comprehensive guide of form tracking methods with Google Tag Manager.
- Send Ecommerce data from an online store. For example, suppose you plan to track Google Analytics E-commerce transactions with Google Tag Manager. Your developers will need to push transaction data into DataLayer.push method.
I have also written a comprehensive post on what Data Layer in Google Tag Manager is and how it works.
Also, if possible, prioritize Data Layer over DOM scraping (because it’s more robust). In some cases, DOM scraping can still be a viable option (e.g., when there is no developer available). However, the problem with DOM scraping is that it can break if the structure of the website’s code changes.
#12. If developers/CTO are against Tag Managers
It is not new that in some companies, the IT department is strictly against Tag Managers. After all, an external party could use them to inject scripts and affect the websites’ performance and security.
As a result, the IT department will decline anything related to the topic of implementing GTM.
However, they usually don’t know that Google Tag Manager offers features that allow the IT department much control and limit what the marketing/analytics team can do. But at the same time, the marketing/analytics team can still do much of their usual work without compromising security.
For example, the IT department can automatically prevent marketers from implementing Custom HTML tags and can allow only to use Google Analytics, Google Ads, and some other tags. The allowlist/blocklist helps achieve this.
Want to implement a server-side tagging setup? Your developers can configure policies to allow only specific actions.
And these are just some of the things that the IT department can have control of.
Yes, this introduces more limitations for the marketing/analytics people, but it’s still much better than having no GTM.
Additional resources:
#13. Ask a Developer to Add “data-” Prefix to Important Website Elements
If possible, ask developers to add helpful information to your website’s source code – e.g., id or “data-id=xyz” to elements you need to identify for tracking. Let me show you an example:
I used to work at a startup called Omnisend. We offered an email marketing solution that easily integrated with popular e-commerce platforms such as Shopify, Bigcommerce, etc. In the older version of our website, we displayed various logos of e-commerce vendors (we call them platforms). Some logos redirected our visitors to app stores (where they can install Omnisend).
So I was interested in which vendors are the most popular among our website visitors. So I asked a developer to add data-platform attribute to each logo, and then with the help of an auto-event variable, I could pass that data to Google Analytics.
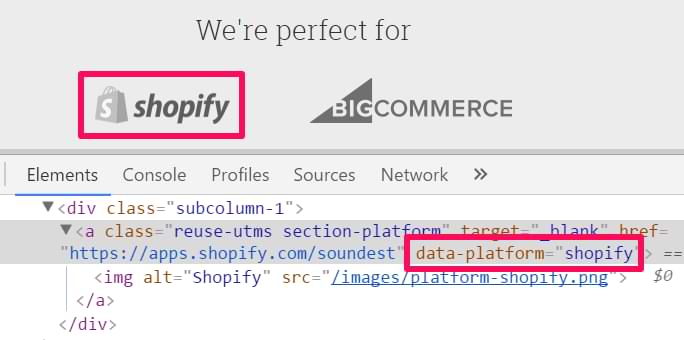
I have written a detailed step-by-step guide on how I passed the “data-platform” to GA with the help of Auto-Event Variable.
#14. Ask a Developer to add IDs to Important Website Elements
This tip is helpful when several call-to-action buttons are on the same page but in different locations. They all have the same CSS class and target URL. You want to track them separately in Google Analytics. What should you do here?
Ask a developer to add IDs to each button, for example:
// ID of the first button is "menu-button"
<a class="button" id="menu-button">https://www.example.com</a>

// ID of the second button is "footer-button"
<a class="button" id="footer-button">https://www.example.com</a>
Then in Google Tag Manager, enable the built-in variable “Click ID”. After a click, in Preview and Debug console’s Variables tab, you’ll see that the Click ID equals either “menu-button” or “footer-button” ID.
You can name the ID whatever you want; just make sure every ID is unique per webpage.
#15. Keep an eye on the page speed performance
When you started using Google Tag Manager, you probably saw statements like “Google Tag Manager optimizes page loading speed”.
The reality is — “it depends”. I have done many tests and saw some improvement when you compare hardcoded tracking snippets (added directly to the website) vs tags added to GTM.
Nevertheless, every added code piece to a website negatively impacts page loading speed. So if you add a bunch of different pixels, like Facebook Pixel GA4, Reddit Pixel, Quora Pixel, Linkedin insight tag, and a bunch of other stuff, your page loading time will increase by A LOT.
So after you add some new tags, looking at your page speed is an excellent practice. You should run several tests before adding the codes and compare them to what happens after publishing your changes.
I have published an article about GTM vs Pagespeed, so look there.
#16. Always Test Before Publishing
This seems like a no-brainer, but sometimes we are still doing this (when the change is minor and we’re in a hurry). So there just shouldn’t be an excuse not to do this!
Regardless of the GTM container changes, it must always be tested. GTM offers a great Preview and Debug mode; other debugging tools can also help you test and rapidly spot bugs. Use them!
Speaking of debugging tools, let’s move to the next tip.
#17. Use Debugging Tools
GA debugger and Data Layer Inspector are among the most popular debugging tools you should know. Both are free Google Chrome extensions that will make your life much easier.
Data Layer Inspector is like a Swiss army knife that adds additional information to the browser’s console, also allows you to inject the GTM container on any site temporarily, debug other analytics tools (including server-side setup), etc. Learn more here.
As for the GA debugger, when it comes to Enhanced E-commerce tracking, GA debugger is irreplaceable for me (together with the GTM/GA debug). When enabled, it displays all data passed to Google Analytics; thus, I can troubleshoot much faster.
I have prepared a comprehensive list of Chrome extensions and tools for GTM. Take a look at this list here.
Also, a bunch of debugging tips are explained here.
#18. Check real-time reports, debug views, etc.
I’ve seen many beginners not check their GA real-time reports or GA4 DebugView once they have implemented Google Analytics tracking via GTM. Instead, they falsely perceived their task was complete once the GA tag fired (according to the Preview and Debug console).
But that was very far from the truth because, in some cases, they were accidentally sending data to the wrong Google Analytics property. Constantly checking real-time reports prevents this issue. And in other cases, they did not see data at all (because of filter misconfiguration in GA).
In Google Analytics 4, the DebugView is your friend; if you want to learn more, look here.

Lastly, other tools you want to implement (e.g., Facebook Pixel) can also offer real-time debugging features. Always use them.
#19. Write clear descriptions and names of version releases
You can name the container version and add notes whenever a new container version is published. You should take advantage of this option to leave full notes for someone who may be auditing your site’s tagging or troubleshooting your changes at a later date.
Even if you don’t care about the auditor, you should care about yourself. Six months after you publish a new version of the GTM container, you won’t remember what you did or why you did it. Detailed descriptions and version names will remember for you.
The ideal version description should contain the following:
- A meaningful name that reflects the additions and changes made to it.
- Detailed notes include:
- Who requested the changes
- Who published the changes
- What are the new tags, triggers, and variables in this container
- What changes were made to existing tags, rules, and variables
- Why those changes were made.
#20. Publish/Create versions in smaller chunks
The beauty of container versions in Google Tag Manager is the ability to restore the previous version in case some parts of your new implementation go wrong. Imagine what would happen if you implement FB Pixel, GA tracking, Google Ads tracking, etc., in a single version. All of these configurations would end up in a single container version.
What if Facebook Pixel was implemented incorrectly? You have to roll back, therefore, disable Google Analytics, Google Ads, and other tags (which were in that version).
It would be much better if you first implemented Google Analytics tracking and published it. Then Google Ads, then Facebook. Then during the roll-back, you would just have to temporarily remove Facebook’s tags, keeping GA and G ads tags up and running.
Also, deploying extensive tracking functionalities at once means the testing process will be more complex, and you’ll have to check EVERYTHING at once.
#21. Collect Data and then Verify
If you are migrating from hard-coded Google Analytics (where all tracking codes are scattered across the entire website) to Google Analytics via GTM, you should first let them both work at the same time:
- Hard-coded tracking keeps working as usual.
- GA via GTM sends data to another Google Analytics account/property (temporarily).
After a week, you must check Google Analytics reports in both accounts. These numbers should be within 1-2% of each other (they will not match exactly). If data in both GA accounts appears to be out of sync, investigate your implementation, and see if you can spot where things are different.
My GTM ebook for beginners describes this with additional details.
#22. Avoid Double Tagging
After verifying the new Google Tag Manager implementation (see Tip #19), remove the old GA code. This is one of the most common issues I see with tag deployment.
If you have deployed tags via Google Tag Manager, you should remove the corresponding hard-coded tags from your website as soon as possible. Not doing so may inflate your analytics data and duplicate pageviews/events.
#23. Follow Industry News
Join the communities if you want to be the first to hear the GTM news, solve your problems, or get new ideas.
- GTM Facebook Community (recommended, but I am biased here)
- GTM community on Reddit
- Official Google Tag Manager Forum
- MeasureSlack
- Also, subscribe to the Analytics Mania newsletter for comprehensive GTM guides like this one.
#24. Check online courses to get you up and running
You can also call me biased here (and I am). But I also believe in this and apply this same principle to myself. I now try to take some courses if I need to learn the topic. Yes, it can cost more money, but in the end, it saves me a lot of time; hence the price is usually worth it (of course, you need to research the course before taking it, read reviews, etc.).
I struggled with almost everything when I started using Google Tag Manager in 2013-2014. There needed to be more information about how to get started and achieve something meaningful, and the user interface needed to be clearer and easier to understand.
But everything changed in 2015 when Google introduced the Google Tag Manager V2. The platform came with the following:
- A totally redefined user interface and more precise workflow
- Auto-event listeners, and most importantly
- A rapidly growing number of Google Tag Manager online courses and tutorials.
Here are several options you can choose from:
- Free Google Tag Manager mini-course (with 90+ minutes of video content)
- Premium Google Tag Manager Course for Beginners. I’ve been crafting this one for quite some time. It explains basic and intermediate topics related to GTM, e.g., form tracking, conversion and sales tracking, etc.
- Premium Intermediate Google Tag Manager course (+ advanced topics). This is the next level course after you become comfortable with GTM (and exit the beginner zone). You will learn how to unlock GTM’s potential, properly test your implementation, implement GA Ecommerce tracking, server-side tagging, etc.
Google Tag Manager Best Practices: Conclusion
So there you have it – a long list of Google Tag Manager best practices – from account structure to testing and deployment.
My suggestion – don’t start using them all at once. Instead, try them individually and see which ones fit your needs the best (and give the maximum outcome).
I’d like to emphasize the importance of account structure (+ naming conventions), the data layer, and testing.
- Working in a mess of randomly titled tags, triggers, and variables will be nearly impossible in the long run. That’s why you need to have a strict order in your container.
- If you end up at a dead-end and cannot track a particular interaction on your website – ask for the developer’s help. They can push the data via dataLayer.push.
- And I guarantee that most of your tracking setup will only work with proper testing. I have made a whole bunch of mistakes, and all of them were spotted while testing the Google Tag Manager implementation.
Do you have anything to add to this blog post? Are the any essential Google Tag Manager best practices I missed? I’d be happy to hear your thoughts in the comments below.
15 COMMENTS
Great article. Thank you Julius.
You are welcome, Dave!
Our agency manages well over a hundred websites for our clients and we're trying to figure out the best way to manage tracking pixels and triggers for our marketing campaigns. Our biggest question at the moment is whether it makes more sense to give our vendors direct access to each sites GTM to place pixels/triggers or if that's a function we should be providing instead.
Would love to know your thoughts on what makes sense and why, thanks!
It's up to you. If your clients are paying you to manage their GTM containers, then do it yourself.
If your customers are willing to manage everything by themselves, then you can give them direct access. Although there's a higher risk of breaking the implementation (if your client is not experienced with GTM). But in that case you will be able to revert to older (working) container version (in case something goes wrong).
So you should decide it individually with every client. Maybe some clients want control, while others don't.
Thanks for the response Julius!
Something I wanted to clarify, the question isn't about the customer running GTM, it's about giving 3rd Party vendors access to place pixels and set triggers. Our primary 3rd party vendor is very hesitant about having that level of access, though several other smaller vendors are doing so without issue.
What we're trying to determine is what makes sense from a policy perspective both short-term and long-term and what's reasonable to expect from our digital marketing vendors.
If you have thoughts on best practice, we'd love to know and thanks again for your swift reply!
If some vendors are hesitant and are afraid of responsibility (If I understood it correctly), you can give them only "Read and Edit" permissions and your internal GTM expert could approve and publish their changes. Of course, this kind of workflow won't be very flexible and quick.
Really nice article Julius, thank you.
We're looking to get some processes in place for GTM at my company. One thing to improve on straight away is #15.
I didn't know any better, so I've just set all my recently added tags to fire on every event. This'll be one of the first things we will look at fixing :-)
Within gtm would the client would be placing the tags within containers. However what level of ux work would be need on the front end of the site.
Could you possible share information on the ux work?
Thanks,
Prem
Depends on what you wamt to achieve. There many different situations and things.
You can download my GTM checklist (in the sidebar), it mentions some things
Thank you Soo much, Juli
Great & helpful article Julius! Thank you. but why all article is about GTM for websites? I'm in an ambiguous situation, is GTM helpful for android apps and implement firebase events like websites? I can't find any article about this question in Analytics mania.
I just specialize in website tracking. That's all :)
Thanks for the extensive article.
I have another question - should the dataLayer be used as "common storage" to pass tracking data to the frontend, even when used by non-GTM frontend code?
Assuming frontend JS code needs access to some user properties that exist in the dataLayer - is it good practice to extract those properties from the DL, or should the backend make it available separately to non-GTM code segments?
Thank you!
Depends on what those non-GTM tools are. But usually, dataLayer is a tag-management-related
Great article! I have a question. Can a marketing agency with publisher access delete tag container?
My reason for asking is because I'm now going through an agency contract that says "upon deletion of contract the Agency will delete all accounts and containers created". That line is what made me do some research and I stumbled across your article.
After, reading your article I decided to open my own Tag Manager Account and give publisher access to agency. However, I don't know if they would still be able to delete container if things don't work out between agency and I.
Appreciate you response.